

LangGraph & MCP - Graph(五)
Graph 是 LangGraph 的核心,它以有向无环图的方式来整合多个 Agent,构建更复杂的 Agent 大模型应用,形成更复杂的工作流。并且提供了很多产品级的特性,保证这些应用可以更稳定高效的执行。
Graph 主要包含三个基本元素:
- State:在整个应用中共享的一种数据结构
- Node:一个处理数据的节点。LangGraph 中通常是一个 python 函数,以 State 为输入,经过一些操作后,返回更新后的 State
- Edge:表示 Node 之前的依赖关系。 LangGraph 中通常也是一个 Python 函数,根据当前 State 来决定接下来执行那个 Node
以下代码均在: https://pan.baidu.com/s/1IQv97pLKbn-a9rXFHvWoZQ?pwd=w2sq 提取码: w2sq
一、最基本的 Graph 用法
代码在 basic_graph.py 文件中,内容如下:
# -*- coding: utf-8 -*-
import os
from dotenv import load_dotenv
from typing import TypedDict
from IPython.display import Image, display

from langgraph.constants import END, START
from langgraph.graph import StateGraph


class InputState(TypedDict):
    user_input: str

class OutputState(TypedDict):
    graph_output: str

class OverllState(TypedDict):
    foo: str
    user_input: str
    graph_output: str

class PrivateState(TypedDict):
    bar: str

def node_1(state: InputState) -> OverllState:
    # Write to OverllState
    return {"foo": state["user_input"] + ">学院"}

def node_2(state: OverllState) -> PrivateState:
    # Read from OverllState, write to PrivateState
    return {"bar": state["foo"] + ">非常"}

def node_3(state: PrivateState) -> OutputState:
    # Read from PrivateState, write to OutputState
    return {"graph_output": state["bar"] + ">靠谱"}

# 构建图
builder = StateGraph(OverllState, input_schema=InputState, output_schema=OutputState)

# 添加 node
builder.add_node("node_1", node_1)
builder.add_node("node_2", node_2)
builder.add_node("node_3", node_3)

# 添加 edge
builder.add_edge(START, "node_1")
builder.add_edge("node_1", "node_2")
builder.add_edge("node_2", "node_3")
builder.add_edge("node_3", END)

# 编译图
graph = builder.compile()

# 调用图
response = graph.invoke({"user_input": "图灵"})
print(response)

image_data = graph.get_graph().draw_mermaid_png()
with open("graph.png", "wb") as f:
    f.write(image_data)
display(Image(image_data))
运行后如下:
{'graph_output': '图灵>学院>非常>靠谱'}
能够看出 node_1 添加了 ->学院,node_2 添加了 ->非常,node_3 添加了 ->靠谱
其中这部分代码可以将以上 graph 保存成 png 图片。
image_data = graph.get_graph().draw_mermaid_png()
with open("graph.png", "wb") as f:
    f.write(image_data)
display(Image(image_data))
图片如下:
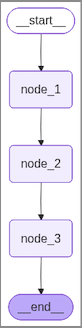
当然也可以参考 LangGraph & MCP - LangSmith(二) 这篇文章集成 LangSmith,然后在 LangSmith 网站查看着张图。
二、State(状态)
State 是所有节点共享的状态,它是一个字典,包含了所有节点的状态。有几个需要注意的地方:
- State 形式上,可以是 TypeDict 字典,也可以是 Pydantic 中的一个 BaseModel。例如:
from pydantic import BaseModel
# The overall state of the graph (this is the public state shared across nodes)
class OverallState(BaseModel):
    a: str
这两种实现,本质上没有太多的区别。
- State 中定义的属性,通常不需要指定默认值。如果需要默认值,可以通过在 START 节点后,定义一个 node 来指定默认值。
def node(state: OverallState):
    return {"a": "goodbye"}
- State 中的属性,除了可以修改值以外,也可以定义一些操作。来指定如何更新 State 中的值。例如:
from langgraph.graph.message import add_messages

class State(TypedDict):
    messages: Annotated[list[AnyMessage], add_messages]
    list_field: Annotated[list[int], add]
    extra_field: int
此时,如果有一个 node,返回了 State 中更新的值,那么 messages 和 list_field 的值就会添加到原有的旧集合中,而 extra_field 的值则会被替换。
代码在 state.py 文件中,内容如下:
# -*- coding: utf-8 -*-
from langchain_core.messages import AnyMessage, AIMessage
from langgraph.graph import StateGraph
from langgraph.graph.message import add_messages
from typing import Annotated, TypedDict
from operator import add

class State(TypedDict):
    messages: Annotated[list[AnyMessage], add_messages]
    list_field: Annotated[list[int], add]
    extra_field: int

def node_1(state: State):
    new_messages = AIMessage(content="Hello!")
    return {"messages": [new_messages], "list_field": [10], "extra_field": 10}

def node_2(state: State):
    new_messages = AIMessage(content="LangGraph!")
    return {"messages": [new_messages], "list_field": [20], "extra_field": 20}

graph = (
    StateGraph(State)
    .add_node("node_1", node_1)
    .add_node("node_2", node_2)
    .set_entry_point("node_1")
    .add_edge("node_1", "node_2")
    .compile()
)

input_message = {"role": "user", "content": "Hi"}


result = graph.invoke({"messages": [input_message], "list_field": [1,2,3]} )
print(result)
运行后如下图:

可以看到代码中添加的两个 AIMessage,还有 list_field 和 extra_field
{'messages': [HumanMessage(content='Hi', additional_kwargs={}, response_metadata={}, id='d5f577c6-83b5-41ff-a0fb-708674ce9b0a'),
AIMessage(content='Hello!', additional_kwargs={}, response_metadata={}, id='175f3fd4-0bab-41fa-be60-c0a9a591c1f1'),
AIMessage(content='LangGraph!', additional_kwargs={}, response_metadata={}, id='1af84770-b4f2-42d6-ad1c-20ae9e12bf86')],
'list_field': [1, 2, 3, 10, 20],
'extra_field': 20}
三、Node(节点)
Node 是图中的一个处理数据的节点。也有以下几个需要注意的地方:
- 在 LangGraph 中,Node 通常是一个 Python 的函数,它接受一个 State 对象作为输入,返回一个 State 对象作为输出。
- 每个 Node 都有一个唯一的名称,通常是一个字符串。如果没有提供名称,LangGraph 会自动生成一个和函数名一样的名称。
- 在具体实现时,通常包含两个具体的参数,第一个是 State,这个是必选的。第二个是一个可选的配置项 config。这里包含了一些节点配置参数。
- LangGraph 对每个 Node 提供了缓存机制。只要 Node 的传入参数相同,LangGraph 就会优先从缓存当中获取 Node 的执行结果。从而提升 Node 的运行速度。
代码在 node.py 文件中,内容如下:
# -*- coding: utf-8 -*-
import time
from typing import TypedDict

from langchain_core.runnables import RunnableConfig
from langgraph.constants import END, START
from langgraph.graph import StateGraph
from langgraph.types import CachePolicy
from langgraph.cache.memory import InMemoryCache # 是 langgraph 中的,而不是 langchain 中的

# 配置状态
class State(TypedDict):
    number: int
    user_id: str

class ConfigSchema(TypedDict):
    user_id: str

def node_1(state: State, config: RunnableConfig):
    time.sleep(3)
    user_id = config["configurable"]["user_id"]
    return {"number": state["number"] + 1, "user_id": user_id}

builder = StateGraph(State, config_schema=ConfigSchema)
builder.add_node("node_1", node_1, cache_policy=CachePolicy(ttl=5)) # node 缓存 5秒

builder.add_edge(START, "node_1")
builder.add_edge("node_1", END)

graph = builder.compile(cache=InMemoryCache())
print(graph.invoke({"number": 5}, config={"configurable": {"user_id": "123"}}, stream_mode='updates'))
# [{'node1': {'number': 6, 'user_id': '123'}}]
# node 入参相同,就会走缓存
print(graph.invoke({"number": 5}, config={"configurable": {"user_id": "456"}}, stream_mode='updates'))
# [{'node1': {'number': 6, 'user_id': '123'}, '__metadata__': {'cached': True}}]
运行后如下图:

对于 Node,LangGraph 除了提供缓存机制,还提供重试机制。针对单个节点指定,例如:
from langgraph.types import RetryPolicy
builder.add_node("node1", node_1, retry=RetryPolicy(max_attempts=4))
另外,也可以针对某一次任务调用指定,例如:
print(graph.invoke(xxx, config={"recursion_limit": 25}))
三、Edge(边)
在Graph(图)中,通过 Edge(边)把Node(节点)连接起来,从而决定 State 应该如何在 Graph 中传递。LangGraph 中也提供了非常灵活的构建方式。
- 普通 Edge 和 EntryPoint
Edge 通常是用来把两个 Node 连接起来,形成逻辑处理路线。例如,graph.add_edge("node_1", "node_2")。
LangGraph 中提供了两个默认的 Node,START 和 END,用来作为 Graph 的入口和出口。
同时,也可以自行指定 EntryPoint。例如:
builder = StateGraph(State)
builder.set_entry_point("node1")
builder.set_finish_point("node2")
- 条件 Edge 和 EntryPoint
我们也可以添加带有条件判断的 Edge 和 EntryPoint,用来动态构建更复杂的工作流程。
具体实现时,可以指定一个函数,函数的返回值就可以是下一个 Node 的名称。
代码在 routing_edge.py 文件中,内容如下:
# -*- coding: utf-8 -*-
from typing import TypedDict
from IPython.display import Image, display
from langchain_core.runnables import RunnableConfig
from langgraph.constants import END, START
from langgraph.graph import StateGraph
# 配置状态
class State(TypedDict):
number: int
class ConfigSchema(TypedDict):
user_id: str
def node_1(state: State, config: RunnableConfig):
return {"number": state["number"] + 1}
builder = StateGraph(State)
builder.add_node("node1", node_1)
def routing_func(state: State) -> str:
if state["number"] > 5:
return "node1"
else:
return END
builder.add_edge("node1", END)
builder.add_conditional_edges(START, routing_func)
# number 小于 5,所以 {'number': 4}
graph = builder.compile()
print(graph.invoke({"number": 4}))
# number 大于 5,所以 {'number': 7}
graph = builder.compile()
print(graph.invoke({"number": 6}))
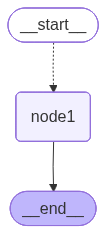
image_data = graph.get_graph().draw_mermaid_png()
with open("graph.png", "wb") as f:
f.write(image_data)
display(Image(image_data))
运行成功,如下图:

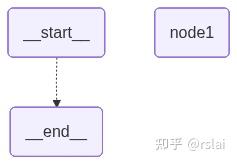
这样有一个问题,就是跳转逻辑写死在代码中,不是很灵活,后续这个逻辑在其他 graph 中也没法使用。
如果不想在路由函数中写死节点名称,也可以在函数中返回一个自定义结果,然后将这个结果解析到某个具体的 Node 上。例如:
-
Send (动态路由)
def routing_func(state: State) -> bool:
    if state["number"] > 5:
        return True
    else:
        return False

builder.add_conditional_edges(START, routing_func, {True: "node_a", False: "node_b"})
在条件边中,如果希望一个 Node 后同时路由到多个 Node,就可以返回 Send 动态路由的方式实现。
Send 对象可传入两个参数,第一个是下一个 Node 的名称,第二个是 Node 的输入。
代码在 send_edge.py 文件中,内容如下:
# -*- coding: utf-8 -*-
from operator import add
from typing import TypedDict, Annotated
from IPython.display import Image, display

from langgraph.constants import END, START
from langgraph.graph import StateGraph
from langgraph.types import Send

# 配置状态
class State(TypedDict):
    messages: Annotated[list[str], add]

class PrivateState(TypedDict):
    msg: str

def node_1(state: PrivateState) -> State:
    res = state["msg"] + "!"
    return {"messages": [res]}

builder = StateGraph(State)
builder.add_node("node1", node_1)

def routing_func(state: State):
    result = []
    for message in state["messages"]:
        result.append(Send("node1", {"msg": message}))
    return result

# 通过路由函数,将消息中每个字符串分别传入 node1 处理
builder.add_conditional_edges(START, routing_func, ["node1"])
builder.add_edge("node1", END)

graph = builder.compile()
print(graph.invoke({"messages": ["hello", "world", "hello", "graph"]}))
# {'messages': ['hello', 'world', 'hello', 'graph', 'hello!', 'world!', 'hello!', 'graph!']}

image_data = graph.get_graph().draw_mermaid_png()
with open("graph.png", "wb") as f:
    f.write(image_data)
display(Image(image_data))
运行结果如下图:

其中也会有一些限制,其中 ["node1"] 就是限制跳转到 node1中。
builder.add_conditional_edges(START, routing_func, ["node1"])
在看生成的graph.png,这样能看到 start 后连接的是 node1,但由于是动态的所以是个虚线。
- Command 命令
通常,Graph 中一个典型的业务步骤是 State 进入一个 Node 处理。在 Node 中先更新 State 状态,然后再通过 Edges 传递给下一个 Node。如果希望将这两个步骤合并为一个命令,那么就可以使用 Command 命令。
代码在 command_edge.py 文件中,内容如下:
# -*- coding: utf-8 -*-
from operator import add
from typing import TypedDict, Annotated

from langgraph.constants import END, START
from langgraph.graph import StateGraph
from langgraph.types import Command

# 配置状态
class State(TypedDict):
    messages: Annotated[list[str], add]

class PrivateState(TypedDict):
    msg: str

def node_1(state: State):
    new_message = []
    for message in state["messages"]:
        new_message.append(message + "!")
    return Command(
        goto=END,
        update={"messages": new_message}
    )

builder = StateGraph(State)
builder.add_node("node1", node_1)

# node1 中通过 Commang 同时集成了更新 State 和指定下个 Node
builder.add_edge(START, "node1")

graph = builder.compile()
print(graph.invoke({"messages": ["hello", "world", "hello", "graph"]}))
# {'messages': ['hello', 'world', 'hello', 'graph', 'hello!', 'world!', 'hello!', 'graph!']}
运行后如下图:

四、子图
在 LangGraph 中,一个 Graph 除了可以单独使用,还可以作为一个 Node ,嵌入到另一个 Graph 中。这种用法就称为子图。通过子图,我们可以更好的重用 Graph,构建更复杂的工作流。尤其在构建多 Agent 时,非常有用。在大模型项目中,通常都是由一个团队专门开发 Agent,在通过其他团队来完成 Agent 整合。
使用子图时,基本和使用 Node 没有太多区别。
唯一需要注意的是,当触发了 SubGraph 代表的 Node 后,实际上相当于重新调用了一次 SubGraph.invoke(state) 方法。
代码在 subgraph.py 文件中,内容如下:
# -*- coding: utf-8 -*-
from operator import add
from typing import TypedDict, Annotated

from langgraph.constants import END
from langgraph.graph import StateGraph, MessagesState, START

# 配置状态
class State(TypedDict):
    messages: Annotated[list[str], add]

# SubGraph
def sub_node_1(state: State) -> MessagesState:
    return {"messages": ["response from subgraph"]}

subgraph_builder = StateGraph(State)
subgraph_builder.add_node("sub_node_1", sub_node_1)
subgraph_builder.add_edge(START, "sub_node_1")
subgraph_builder.add_edge("sub_node_1", END)

subgraph = subgraph_builder.compile()

# Parend graph
builder = StateGraph(State)
builder.add_node("subgraph_node", subgraph)
builder.add_edge(START, "subgraph_node")
builder.add_edge("subgraph_node", END)
graph = builder.compile()

print(graph.invoke({"messages": ["hello subgraph"]}))
# 结果 hello subgraph 会出现两次。这是因为在 subgraph_node 中默认调用了一次 subgraph.invoke(state) 方法。主图里也调用了一次 invoke。这就会往 state 中添加两次语句
# {'messages': ['hello subgraph', 'hello subgraph', 'response from subgraph']}
运行后如下图:

所以,为了避免两个 hello subgraph 子图跟主图最好使用不同的 state。
五、图的流式输出
和调用大模型相似,Graph 除了可以通过 invoke 方法进行直接调用外,也支持 stream() 方法进行流式调用。不过大模型的流式调用是依次返回大模型响应的 Token。而 Graph 的流式输出则是依次返回 State 的数据处理步骤。
Graph 提供了 Stream() 方法进行同步的流式调用,也提供了asstream() 方法进行异步的流式调用。
代码在 graph_stream.py 文件中,内容如下:
# -*- coding: utf-8 -*-
from operator import add
from typing import TypedDict, Annotated

from langgraph.constants import END
from langgraph.graph import StateGraph, MessagesState, START

# 配置状态
class State(TypedDict):
    messages: Annotated[list[str], add]

# SubGraph
def sub_node_1(state: State) -> MessagesState:
    return {"messages": ["response from subgraph"]}

subgraph_builder = StateGraph(State)
subgraph_builder.add_node("sub_node_1", sub_node_1)
subgraph_builder.add_edge(START, "sub_node_1")
subgraph_builder.add_edge("sub_node_1", END)

subgraph = subgraph_builder.compile()

# Parend graph
builder = StateGraph(State)
builder.add_node("subgraph_node", subgraph)
builder.add_edge(START, "subgraph_node")
builder.add_edge("subgraph_node", END)
graph = builder.compile()


for chunk in graph.stream({"messages": ["hello subgraph"]}, stream_mode="updates"):
    print(chunk)
# 可以看出在 subgraph_node 中更新了一次 state
# {'subgraph_node': {'messages': ['hello subgraph', 'response from subgraph']}}

for chunk in graph.stream({"messages": ["hello subgraph"]}, stream_mode="values"):
    print(chunk)
# 每一个 node 处理的结果
# {'messages': ['hello subgraph']}
# {'messages': ['hello subgraph', 'hello subgraph', 'response from subgraph']}


for chunk in graph.stream({"messages": ["hello subgraph"]}, stream_mode="messages"):
    print(chunk)
# messages 没有返回,因为这是在调用大模型时才会返回。这里没有调用大模型,所以没有返回。
运行结果如下图:

LangGraph 支持几种不同的 stream mode:
- values: 在图的每一步之后,流式传输状态的完整值。
- updates: 在图的每一步之后,将更新内容流式传输到状态。如果在同一步骤中进行了多次更新(例如,运行了多个节点),这些更新将分别进行流式传输。
- custom:从图节点内部流式传输自定义数据。通常用于调试。
- messages:从任何调用大语言模型(LLM)的图节点中,流式传输二元组(LLM的Token,元数据)。
- debug: 在图的执行过程中尽可能多地传输信息。用得比较少。
六、图的custom(自定义)流式输出
代码在 graph_custom_stream.py 文件中,内容如下:
# -*- coding: utf-8 -*-
from typing import TypedDict, Annotated

from langgraph.config import get_stream_writer
from langgraph.graph import StateGraph, START

# 配置状态
class State(TypedDict):
    query: str
    answer: str

def node(state: State):
    writer = get_stream_writer()
    writer({"自定义key": "在节点内返回自定义信息"})
    return {"answer": "some data"}

graph = (
    StateGraph(State)
    .add_node("node", node)
    .add_edge(START, "node")
    .compile()
)

inputs = {"query": "example"}

for chunk in graph.stream(inputs, stream_mode="custom"):
    print(chunk)
# 直接输出自定义信息
# {'自定义key': '在节点内返回自定义信息'}
运行后如下图:

最后,在 LangChain 中,构建 LLM 对象时,大都支持 disable_streaming 属性,禁止流式输出。例如:
llm = ChatOpenAI(model="", disable_streaming=True)
七、总结
在这一章节,我们详细演练了LangGraph中的Graph构建以及工作方式。可以看到,Graph图的构建非常灵活,我们可以自由地构建各种复杂的图结构。即使是没有与大模型交互的图,也可以通过LangGraph来构建。这对于处理传统任务也是非常有用的。
当然,LangGraph中的图,还是要有大模型的加持,才能更好的体现他的强大之处。下一章节我们就着重去演练大模型加持下的LangGraph。

 浙公网安备 33010602011771号