

MCP - AI智能体调用 MCP Serverr - Stdio(六)
之前展示的都是手写一个 client,然后手工调用 MCP tools。没有使用到任何大模型,下文将展示如何通过大模型调用 MCP tools。
同样调用 MCP Server 有两种方式:第一,stdio。第二,Streamable HTTP。后文展示的是通过 stdio 模式。
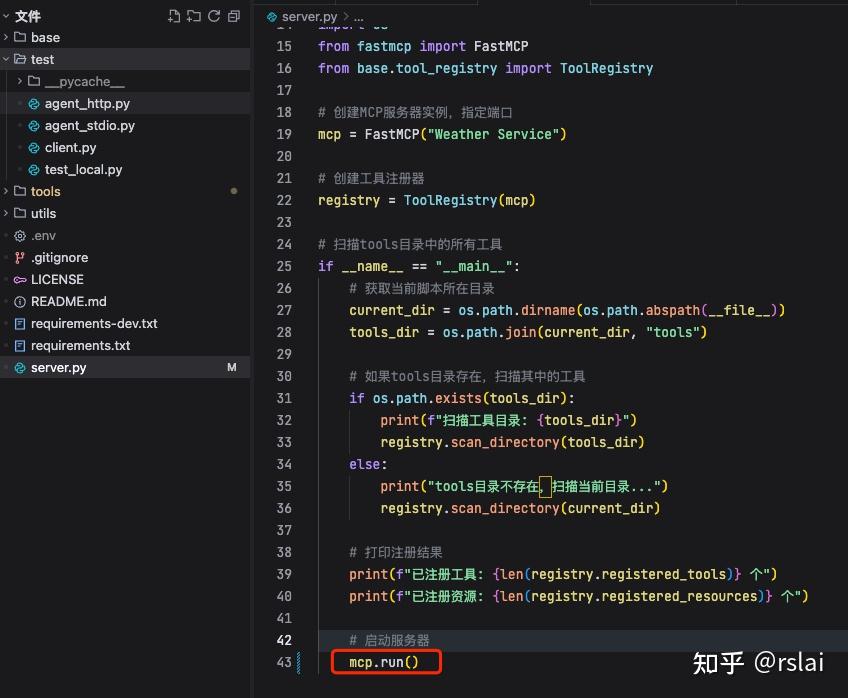
一、同样需要将 server.py 代码改为 stdio 模式
将 mcp.run(transport="http", port=3002, host="0.0.0.0", path="/mcp_atlas") 改为 mcp.run()
修改后如下图
二、在 test 目录中添加 agent_stdio.py 文件
并添加如下代码:
import asyncio
import os
from openai import OpenAI
from dotenv import load_dotenv
from contextlib import AsyncExitStack
from mcp import ClientSession, StdioServerParameters
from mcp.client.stdio import stdio_client
import json
# 加载 .env 文件
load_dotenv()
class MCPClient:
def __init__(self):
"""初始化 MCP 客户端"""
self.exit_stack = AsyncExitStack()
self.api_key = os.getenv("API_KEY") # 读取 OpenAI API Key
self.base_url = os.getenv("BASE_URL") # 读取 BASE URL
self.model = os.getenv("MODEL") # 读取 model
if not self.api_key:
raise ValueError("未找到 API KEY. 请在 .env 文件中配置 API_KEY")
self.client = OpenAI(api_key=self.api_key, base_url=self.base_url)
async def process_query(self, query: str) -> str:
"""
调用大模型处理用户查询并根据返回的 tools 列表调用对应工具
"""
messages = [{"role": "user", "content": query}]
# 获取工具列表
response = await self.session.list_tools()
available_tools = [{
"type": "function",
"function": {
"name": tool.name,
"description": tool.description,
"input_schema": tool.inputSchema
}
} for tool in response.tools]
print('服务端工具列表', available_tools)
# 请求 OpenAI 模型处理
response = self.client.chat.completions.create(
model=self.model,
messages=messages,
tools=available_tools
)
# 处理返回的内容
content = response.choices[0]
if content.finish_reason == "tool_calls":
# 执行工具调用
tool_call = content.message.tool_calls[0]
tool_name = tool_call.function.name
tool_args = json.loads(tool_call.function.arguments)
# 执行工具
result = await self.session.call_tool(tool_name, tool_args)
print(f"\n\n[Calling tool {tool_name} with args {tool_args}]\n\n")
# 将模型返回的原始消息和工具执行的结果都添加到 messages 中
messages.append(content.message.model_dump())
messages.append({
"role": "tool",
"content": result.content[0].text,
"tool_call_id": tool_call.id,
})
# 将上面的结果再返回给大模型生产最终的结果
response = self.client.chat.completions.create(
model=self.model,
messages=messages,
)
return response.choices[0].message.content
return content.message.content
async def chat_loop(self):
"""运行交互式聊天循环"""
print("MCP 客户端已启动!输入 'exit' 退出")
while True:
try:
query = input("问: ").strip()
if query.lower() == 'exit':
break
response = await self.process_query(query)
print(f"AI回复: {response}")
except Exception as e:
print(f"发生错误: {str(e)}")
async def clean(self):
"""清理资源"""
await self.exit_stack.aclose()
async def connect_to_server(self, server_script_path: str):
"""
连接到 MCP 服务器
"""
is_python = server_script_path.endswith('.py')
is_js = server_script_path.endswith('.js')
if not (is_python or is_js):
raise ValueError("不支持的文件类型")
command = "python" if is_python else "node"
server_params = StdioServerParameters(command=command,
args=[server_script_path],
env=None)
# 启动 MCP 服务器并建立通信
stdio_transport = await self.exit_stack.enter_async_context(
stdio_client(server_params))
self.stdio, self.write = stdio_transport
self.session = await self.exit_stack.enter_async_context(
ClientSession(self.stdio, self.write))
await self.session.initialize()
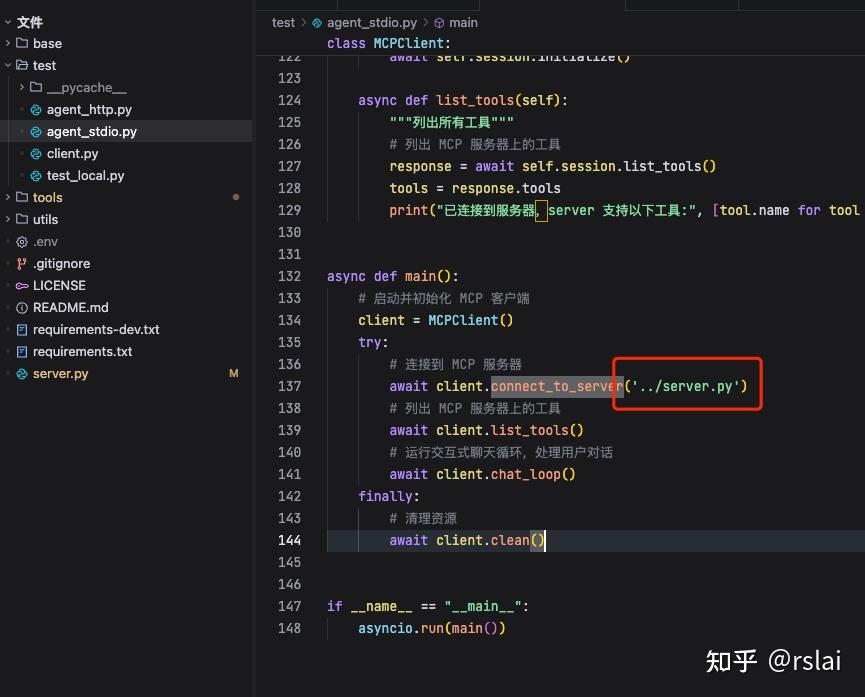
async def list_tools(self):
"""列出所有工具"""
# 列出 MCP 服务器上的工具
response = await self.session.list_tools()
tools = response.tools
print("已连接到服务器,server 支持以下工具:", [tool.name for tool in tools])
async def main():
# 启动并初始化 MCP 客户端
client = MCPClient()
try:
# 连接到 MCP 服务器
await client.connect_to_server('../server.py')
# 列出 MCP 服务器上的工具
await client.list_tools()
# 运行交互式聊天循环,处理用户对话
await client.chat_loop()
finally:
# 清理资源
await client.clean()
if __name__ == "__main__":
asyncio.run(main())
注意如果你的 MCP server 文件位置不同,需要修改。
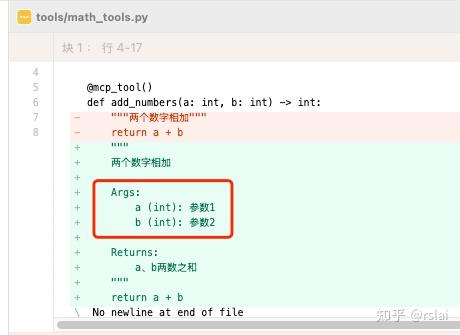
三、tools 修改
找到 math_tools.py 文件,增加参数说明,修改后代码如下:
# -*- coding: utf-8 -*-
import random
from base.tool_registry import mcp_tool

@mcp_tool()
def add_numbers(a: int, b: int) -> int:
    """
    两个数字相加

    Args:
        a (int): 参数1
        b (int): 参数2

    Returns:
        a、b两数之和
    """
    return a + b
由于之前代码没写参数说明,所以有些模型返回 tools 调用时没带 参数
四、添加 .env
在根目录添加 .env 文件(注意文件名 env 前要有 .),内容如下:
API_KEY= xxx # 根据你的配置修改
BASE_URL=xxx # 根据你的配置修改
MODEL=xxx # 根据你的配置修改
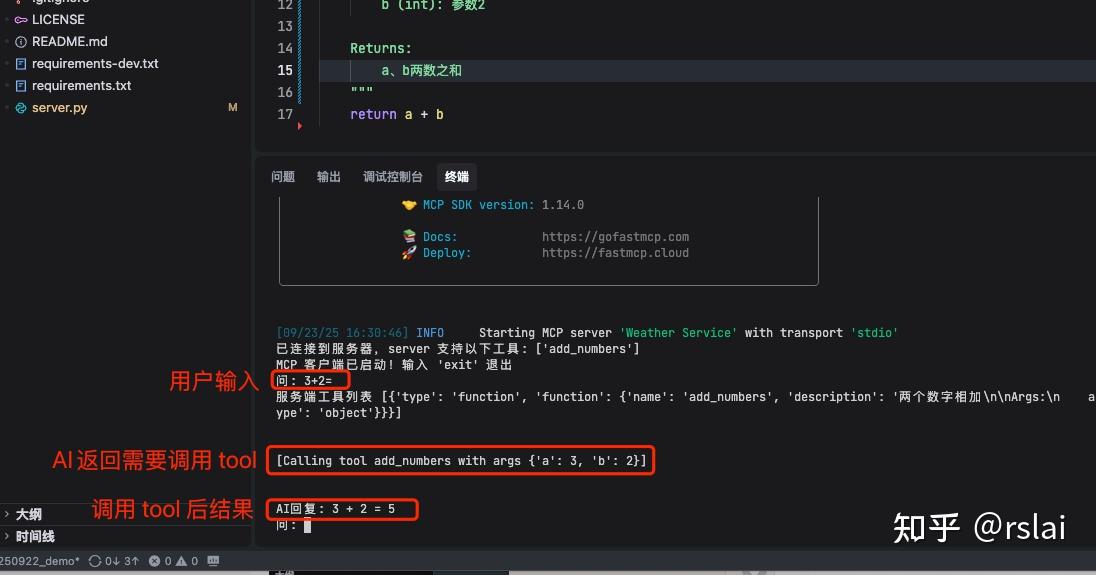
五、效果展示
执行如下命令启动 Agent(同样需要先运行 pytho3.1 的虚拟环境,运行方法参见之前文章)
python agent_stdio.py
运行后如下图
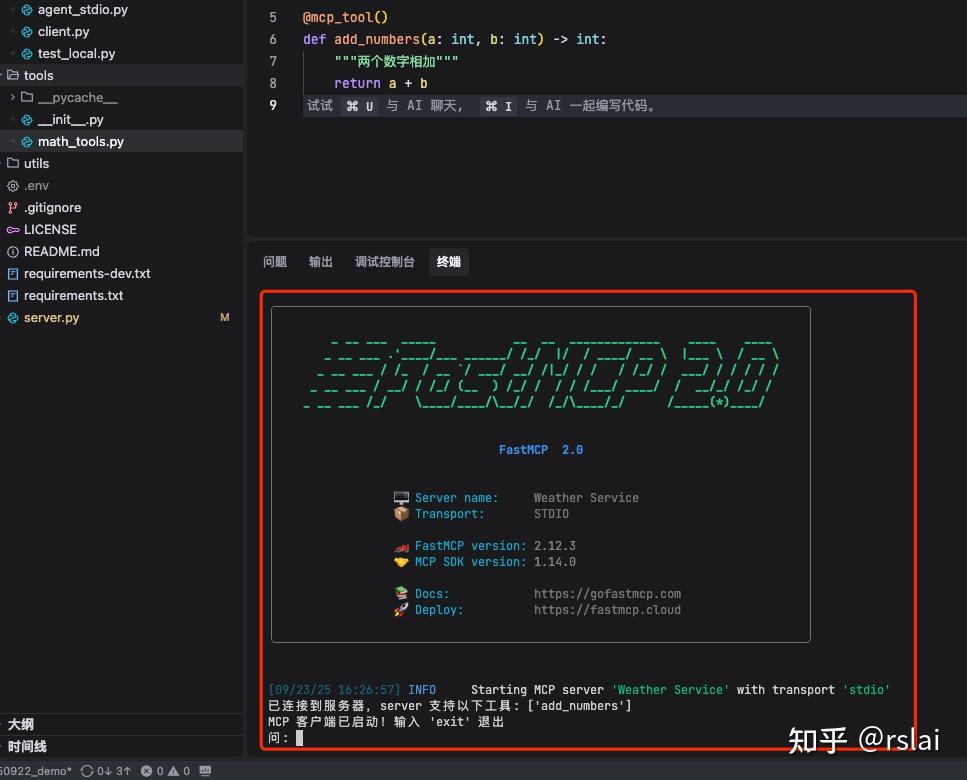
用户输入 3+2= 后可以看到如下图结果:
源代码: https://pan.baidu.com/s/1dMJ1zxxztxdbhu95q7CLWw?pwd=rsak 提取码: rsak

 浙公网安备 33010602011771号