MCP - 使用 fastmcp 编写 Client 调用 MCP Serverr - Streamable HTTP (三)
同样,MCP Server,可以运行在:
- 本地进程间管道(stdin/stdout)通信:Stdio
- 通过 HTTP 长链接通信:SSE 、 Streamable HTTP
本文讲解如果使用 fastmcp 如何跟 MCP Server(Streamable HTTP) 创建链接并调用 tools。这里都是手动调用 tools 没有使用任何大模型。
1、创建 client.py 并粘贴如下代码:
# -*- coding: utf-8 -*-
# @Time : 2025/7/28 17:09
# @Author : yangwenjie
# @Email : 邮箱
# @File : server-sse.py
# @Project : fastmcp
# weather_sse.py
from fastmcp import FastMCP
import random

# 创建MCP服务器实例,指定端口
mcp = FastMCP("Weather Service", port=3002)

# 模拟的天气数据
weather_data = {
    "New York": {"temp": range(10, 25), "conditions": ["sunny", "cloudy", "rainy"]},
    "London": {"temp": range(5, 20), "conditions": ["cloudy", "rainy", "foggy"]},
    "Tokyo": {"temp": range(15, 30), "conditions": ["sunny", "cloudy", "humid"]},
    "Sydney": {"temp": range(20, 35), "conditions": ["sunny", "clear", "hot"]},
}

@mcp.tool()
def add_numbers(a: int, b: int) -> int:
    """两个数字相加"""
    return a + b

@mcp.tool()
def get_weather(city: str) -> dict:
    """获取指定城市的当前天气"""
    if city not in weather_data:
        return {"error": f"无法找到城市 {city} 的天气数据"}

    data = weather_data[city]
    temp = random.choice(list(data["temp"]))
    condition = random.choice(data["conditions"])

    return {
        "city": city,
        "temperature": temp,
        "condition": condition,
        "unit": "celsius"
    }

@mcp.resource("weather://cities")
def get_available_cities() -> list:
    """获取所有可用的城市列表"""
    return list(weather_data.keys())

@mcp.resource("weather://forecast/{city}")
def get_forecast(city: str) -> dict:
    """获取指定城市的天气预报资源"""
    if city not in weather_data:
        return {"error": f"无法找到城市 {city} 的天气预报"}

    forecast = []
    for i in range(5):  # 5天预报
        data = weather_data[city]
        temp = random.choice(list(data["temp"]))
        condition = random.choice(data["conditions"])
        forecast.append({
            "day": i + 1,
            "temperature": temp,
            "condition": condition
        })

    return {
        "city": city,
        "forecast": forecast,
        "unit": "celsius"
    }

@mcp.prompt()
def weather(city: str = "北京") -> list:
    """提供天气查询的对话模板"""
    return [
        {
            "role": "user",
            "content": f"请帮我查询{city}的天气情况,并提供详细的天气信息。"
        }
    ]

if __name__ == "__main__":
    # 使用 Streamable HTTP 传输方式启动服务器
    mcp.run(transport="http", path="/weather")
二、创建 client.py 并粘贴如下代码:
import asyncio
from fastmcp import Client

# 使用 config 配置方式
config = {
    "mcpServers": {
        "server": {
            "url": "http://127.0.0.1:3002/weather",
            "transport": "streamable-http"
        }
    }
}

# 初始化客户端
client = Client(config)

async def main():
    async with client:
        print("===== 调用 tools 列表查询 =====")
        tools = await client.list_tools()
        print(tools)

        print("===== 调用 resources 列表查询 =====")
        resources = await client.list_resources()
        print(resources)

        print("===== 调用 resource_templates 列表查询 =====")
        templates = await client.list_resource_templates()
        print(templates)

        print("===== 调用 prompts 列表查询 =====")
        prompts = await client.list_prompts()
        print(prompts)

        print("===== 调用工具 add_numbers =====")
        output = await client.call_tool("add_numbers", {"a": 1, "b": 3})
        extracted_text = output.content[0].text
        print(extracted_text)

        print("===== 读取指定URI对应的资源内容 =====")
        output = await client.read_resource("weather://cities")
        print(output)

        print("===== 读取指定URI对应的资源模版内容 =====")
        output = await client.read_resource("weather://forecast/London")
        print(output)

        print("===== 获取填充数据后的提示词模板 =====")
        output = await client.get_prompt("weather", {'city': '北京'})
        print(output)

if __name__ == "__main__":
    asyncio.run(main())
代码中的 await client.call_tool("get_weather", {"city": "Tokyo"}) 需要根据 list_tools 后的结果修改,如下图

三、运行
3.1、启动 server
根据文章 https://www.cnblogs.com/rslai/p/19092832 介绍启动 server 端,运行成功如下图:

3.2、运行 client
重新启动一个终端,执行如下命令:
python client.py
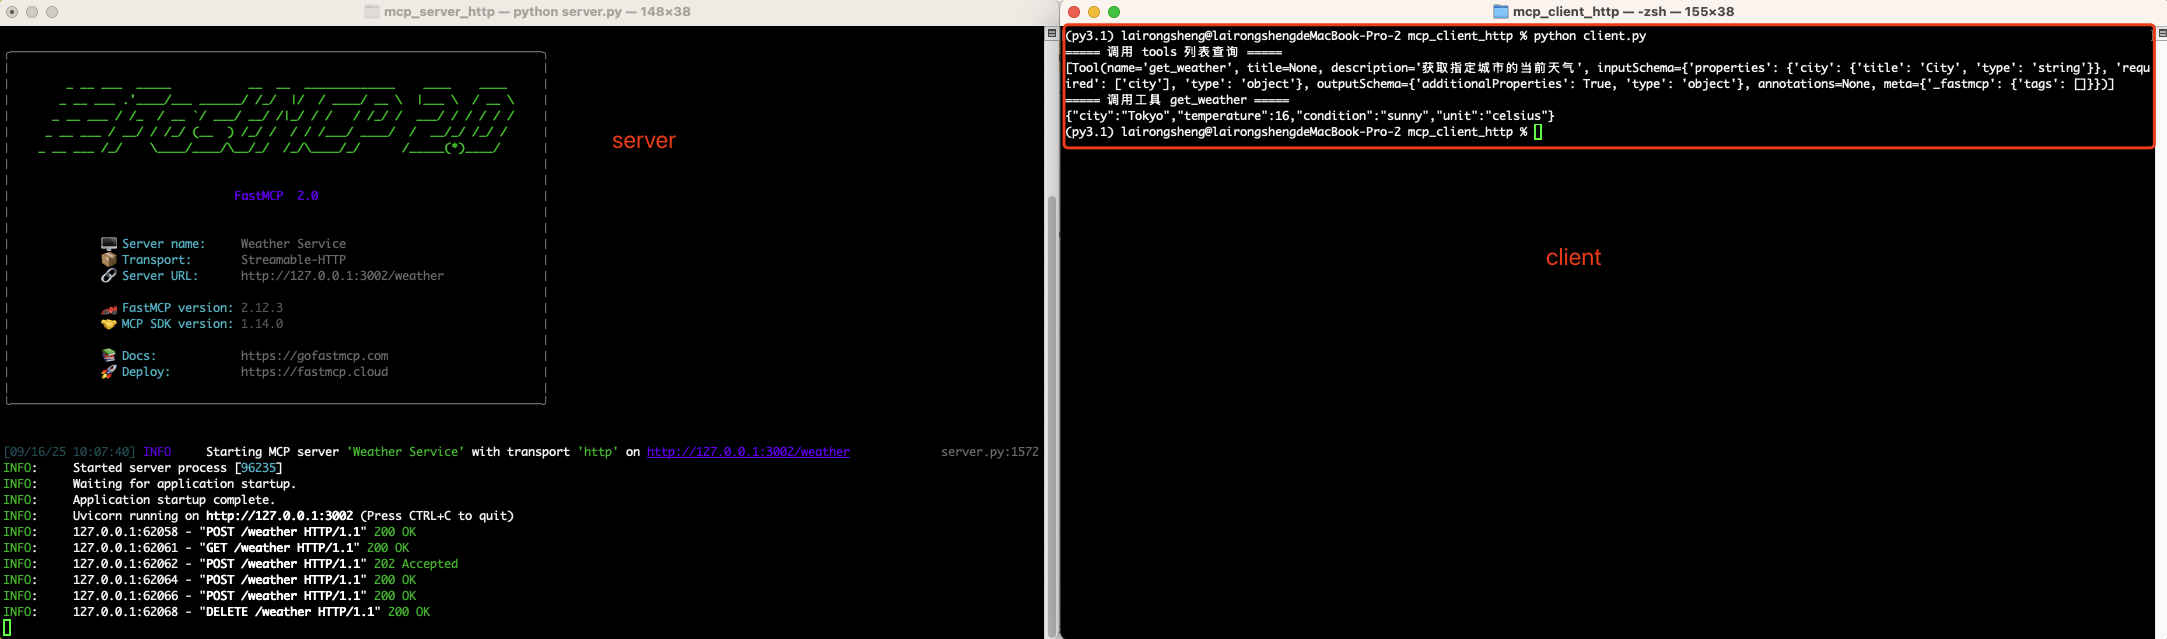
运行后如下图:
- 右侧运行后可以看到,执行了两条命令。一个,查询所有 tools 列表。二,执行工具 get_weather
- 左侧可以看到 client 调用后服务器请求
源代码: https://pan.baidu.com/s/1syizMytkDTz1un0n87-5tg?pwd=rr8d 提取码: rr8d

 浙公网安备 33010602011771号