


上一篇文章大概搭建了一下ssm的框架,其实还是不完整,我们往项目中添加了spring和mybatis的配置文件,还差一个spring mvc的配置文件,在resource中在新建一个ApplicationContext-mvc.xml文件,代码如下。
<?xml version="1.0" encoding="UTF-8"?>
<beans xmlns="http://www.springframework.org/schema/beans"
    xmlns:xsi="http://www.w3.org/2001/XMLSchema-instance"
    xmlns:mvc="http://www.springframework.org/schema/mvc"
    xmlns:context="http://www.springframework.org/schema/context"
    xsi:schemaLocation="http://www.springframework.org/schema/beans http://www.springframework.org/schema/beans/spring-beans.xsd
        http://www.springframework.org/schema/mvc http://www.springframework.org/schema/mvc/spring-mvc.xsd
        http://www.springframework.org/schema/context http://www.springframework.org/schema/context/spring-context.xsd">

    <mvc:annotation-driven/>
    <mvc:default-servlet-handler/>

    <context:component-scan base-package="com.m_gecko.controller" />

    <!-- 对静态资源文件的访问,跳过spring mvc的dispatch,防止被springmvc错误拦截 -->
    <mvc:resources mapping="/admin/**" location="/,/admin/" />
    <mvc:resources mapping="/static/**" location="/,/static/" />
    <mvc:resources mapping="/plugins/**" location="/,/plugins/" />
    <mvc:resources mapping="/uploadFiles/**" location="/,/uploadFiles/" />

    <!-- 访问拦截  -->
      <mvc:interceptors>
        <mvc:interceptor>
            <mvc:mapping path="/**/**"/>
            <bean class="com.m_gecko.interceptor.SpringInterceptor"/>
        </mvc:interceptor>
    </mvc:interceptors>

    <!-- 配置SpringMVC的视图解析器 -->
    <bean class="org.springframework.web.servlet.view.InternalResourceViewResolver">
        <property name="prefix" value="/WEB-INF/jsp/"/>
        <property name="suffix" value=".jsp"/>
    </bean>
    <!-- 异常处理 -->
    <bean id="exceptionResolver" class="com.m_gecko.resolver.MyExceptionResolver"></bean>

    <!-- 上传拦截,如最大上传值及最小上传值 -->
      <bean id="multipartResolver"   class="org.springframework.web.multipart.commons.CommonsMultipartResolver" >
          <property name="maxUploadSize">
              <value>104857600</value>
           </property>
            <property name="maxInMemorySize">
                <value>4096</value>
            </property>
             <property name="defaultEncoding">
                <value>utf-8</value>
            </property>
    </bean>

</beans>
里面有些配置暂时可能还不会用到,如果项目运行不起来,注释掉就好了。或者添加相应缺少的jar包。本文章主要在于记录和思考,在项目运行过程中有遇到很多bug,无法运行的情况,都是摸石头过河解决的,所以无法一一记录。
至此ssm三大框架的配置文件都已编写好了,但是如何将他们串起来呢。我们知道,web项目在启动的时候,首先会启动web.xml,所以我们就是在web.xml文件中进行这些框架启动顺序的配置。
web.xml文件如下。
<?xml version="1.0" encoding="UTF-8"?>
<web-app xmlns:xsi="http://www.w3.org/2001/XMLSchema-instance"
    xmlns="http://java.sun.com/xml/ns/javaee"
    xsi:schemaLocation="http://java.sun.com/xml/ns/javaee http://java.sun.com/xml/ns/javaee/web-app_2_5.xsd"
    version="2.5">
    <!-- 加载spring配置文件 -->
    <context-param>
        <param-name>contextConfigLocation</param-name>
        <param-value>
            classpath:ApplicationContext.xml,
        </param-value>
    </context-param>
    <!-- 加载log4j配置文件 -->
    <context-param>
        <param-name>log4jConfigLocation</param-name>
        <param-value>classpath:log4j.properties</param-value>
    </context-param>
    <!-- 字符编码过滤器 -->
    <filter>
        <filter-name>encodingFilter</filter-name>
        <filter-class>org.springframework.web.filter.CharacterEncodingFilter</filter-class>
        <init-param>
            <param-name>encoding</param-name>
            <param-value>utf-8</param-value>
        </init-param>
    </filter>
    <filter-mapping>
        <filter-name>encodingFilter</filter-name>
        <url-pattern>/*</url-pattern>
    </filter-mapping>
    <context-param>
        <param-name>webAppRootKey</param-name>
        <param-value>www.m_gecko.com</param-value>
    </context-param>
    <filter>
        <filter-name>DruidWebStatFilter</filter-name>
        <filter-class>com.alibaba.druid.support.http.WebStatFilter</filter-class>
        <init-param>
            <param-name>exclusions</param-name>
            <param-value>*.js,*.gif,*.jpg,*.png,*.css,*.ico,/druid/*</param-value>
        </init-param>
    </filter>
    <filter-mapping>
        <filter-name>DruidWebStatFilter</filter-name>
        <url-pattern>/*</url-pattern>
    </filter-mapping>
    <servlet>
        <servlet-name>DruidStatView</servlet-name>
        <servlet-class>com.alibaba.druid.support.http.StatViewServlet</servlet-class>
    </servlet>
    <servlet-mapping>
        <servlet-name>DruidStatView</servlet-name>
        <url-pattern>/druid/*</url-pattern>
    </servlet-mapping>
    <!-- 监听器 -->
    <listener>
        <listener-class>org.springframework.web.util.Log4jConfigListener</listener-class>
    </listener>
    <listener>
        <listener-class>org.springframework.web.context.ContextLoaderListener</listener-class>
    </listener>
    <!-- 以下配置是spring mvc -->
    <servlet>
        <servlet-name>springMvc</servlet-name>
        <servlet-class>org.springframework.web.servlet.DispatcherServlet</servlet-class>
        <init-param>
            <param-name>contextConfigLocation</param-name>
            <param-value>classpath:ApplicationContext-mvc.xml</param-value>
        </init-param>
        <load-on-startup>1</load-on-startup>
    </servlet>
    <servlet-mapping>
        <servlet-name>springMvc</servlet-name>
        <url-pattern>/</url-pattern>
    </servlet-mapping>
    <error-page>
        <error-code>404</error-code>
        <location>/404.jsp</location>
    </error-page>
    <session-config>
        <session-timeout>600</session-timeout>
    </session-config>
</web-app>
这样以后就可启动了,启动可能会报错,说:java.lang.ClassNotFoundException: org.springframework.web.context.ContextLoaderListener
如果你是maven项目,tomcat在发布项目的时候没有同时发布maven依赖所添加的jar包,
你需要设置一下eclipse:
项目 —> 属性 -> Deployment Assembly -> Add -> Java Build Path Entries -> 选择Maven Dependencies -> Finish -> OK
把对应的Maven依赖包也发布到tomcat,调试时会自动把那些jar发布到指定目录下,tomcat也能找到那些jar了。
我们查看控制台,启动的日志如下。

终于将ssm框架配置完成,但目前看来,程序现在还做不了任何事情,我们只是配置了一些基础的信息,并没有写任何类。
目前我们的项目的框架如下图所示。

 其中SpringInterceptor和MyExceptionResolver可以就建立一个文件,什么都不用写,到时候我们需要用到的时候再来写。
-----------------------------------------------------------------------------分割线-----------------------------------------------------------
下面我们要来写一个简单的demo,实现数据的增删改查,在这个demo里,我们将spring和mybatis集成起来用。
1.首先在com.m_gecko.dao中创建所有dao的基类BaseDao,定义一些最常用的方法,我暂时写了几个,该基类利用了反射和泛型。代码如下。
package com.m_gecko.dao;

import java.io.Serializable;
import java.lang.reflect.ParameterizedType;
import java.lang.reflect.Type;
import java.util.List;

import javax.annotation.Resource;

import org.mybatis.spring.SqlSessionTemplate;
import org.springframework.stereotype.Repository;

/**
 * 所有dao基类
 *
 * @author xdx
 *
 * @param <T>
 * @param <PK>
 */
@Repository("baseDao")
public class BaseDao<T, PK extends Serializable> {
    private Class<T> enetityClass;
    @Resource(name = "sqlSessionTemplate")
    private SqlSessionTemplate sqlSessionTemplate;

    // 构造方法,根据实例类自动获取实体类型,这边利用java的反射
    public BaseDao() {
        this.enetityClass = null;
        Class c = getClass();
        Type t = c.getGenericSuperclass();
        if (t instanceof ParameterizedType) {
            ParameterizedType p = (ParameterizedType) t;
            Type[] type = p.getActualTypeArguments();
            this.enetityClass = (Class<T>) type[0];
        }
    }

    /**
     * 获取实体
     *
     * @param id
     * @return
     */
    public T getT(String sql, Object param) {
        return sqlSessionTemplate.selectOne(sql, param);
    }
    /**
     * 不带查询参数的列表
     * @param str
     * @return
     * @throws Exception
     */
    public List<T> findTList(String sql) throws Exception {
        return sqlSessionTemplate.selectList(sql);
    }

    /**
     * 带有参数的列表
     *
     * @param str
     * @param param
     * @return
     * @throws Exception
     */
    public List<T> findTListByParam(String sql, Object param) throws Exception {
        return sqlSessionTemplate.selectList(sql, param);
    }

    /**
     * 插入一条数据,参数是t
     *
     * @param sql
     * @param t
     * @return
     */
    public int addT(String sql, T t) {
        return sqlSessionTemplate.insert(sql, t);
    }
    /**
     * 修改一条数据,参数是t
     * @param sql
     * @param t
     * @return
     */
    public int updateT(String sql,T t){
        return sqlSessionTemplate.update(sql, t);
    }
    /**
     * 删除t
     * @param sql
     * @param t
     * @return
     */
   public int deleteT(String sql,PK pk){
        return sqlSessionTemplate.delete(sql, pk);
    }
}
2.然后我们建立一个Service类,起名为GeckoService,并将BaseDao依赖注入。同时写了一个main方法备用,如下。
package com.m_gecko.service;

import java.util.List;

import javax.annotation.Resource;

import org.springframework.context.ApplicationContext;
import org.springframework.context.support.ClassPathXmlApplicationContext;
import org.springframework.stereotype.Service;

import com.m_gecko.dao.BaseDao;
import com.m_gecko.entity.TGecko;
import com.m_gecko.util.ParamModel;

@Service("geckoService")
public class GeckoService {
    @Resource(name="baseDao")
    private BaseDao<TGecko,Integer> baseDao;public static void main(String args[]) throws Exception{

    }

}
3.接下来我们一步一步来进行增删改查的操作
1)增。
在service类中,写一个增加数据的方法,如下。
public int addGecko(TGecko gecko){
        return baseDao.addT("TGeckoMapper.insertSelective", gecko);
    }
该方法的第一个参数,TGeckoMapper.insertSelective指的是我们在TGeckoMapper.xml里定义的方法,TGeckoMapper对应<mapper namespace="TGeckoMapper">这里的namespace,insertSelective对应具体的方法,代码如下。
<insert id="insertSelective" parameterType="Gecko">
        insert into t_gecko
        <trim prefix="(" suffix=")" suffixOverrides=",">
            <if test="geckoId != null">
                gecko_id,
            </if>
            <if test="geckoType != null">
                gecko_type,
            </if>
            <if test="geckoName != null">
                gecko_name,
            </if>
            <if test="picUrl != null">
                pic_url,
            </if>
            <if test="createTime != null">
                create_time,
            </if>
            <if test="updateTime != null">
                update_time,
            </if>
            <if test="isDel != null">
                is_del,
            </if>
        </trim>
        <trim prefix="values (" suffix=")" suffixOverrides=",">
            <if test="geckoId != null">
                #{geckoId,jdbcType=INTEGER},
            </if>
            <if test="geckoType != null">
                #{geckoType,jdbcType=INTEGER},
            </if>
            <if test="geckoName != null">
                #{geckoName,jdbcType=VARCHAR},
            </if>
            <if test="picUrl != null">
                #{picUrl,jdbcType=VARCHAR},
            </if>
            <if test="createTime != null">
                #{createTime,jdbcType=TIMESTAMP},
            </if>
            <if test="updateTime != null">
                #{updateTime,jdbcType=TIMESTAMP},
            </if>
            <if test="isDel != null">
                #{isDel,jdbcType=INTEGER},
            </if>
        </trim>
    </insert>
在该方法中,我们传入的parameterType为Gecko的参数,对应于addT方法中的第二个参数T,#{geckoId,jdbcType=INTEGER}所代表的的即是传进来的实参gecko的一个属性geckoId。
现在我们来调用方法。
在main方法中,写入如下代码。
    ApplicationContext context=new ClassPathXmlApplicationContext("ApplicationContext.xml");
        GeckoService geckoService=(GeckoService) context.getBean("geckoService");

        TGecko gecko=new TGecko();
        gecko.setGeckoType(1);
        gecko.setGeckoName("原种守宫");
        int result=geckoService.addGecko(gecko);
        System.out.println("插入结果:"+(result>0?"成功":"失败"));
然后,run as java application程序,这样我们就剥离spring mvc,把程序当成一个普通的应用程序来跑,需要注意的是ApplicationContext context=new ClassPathXmlApplicationContext("ApplicationContext.xml");这句话的作用是载入spring容器,并且初始化其中的bean。

运行以后,控制台打出消息。

我们从数据库中查看,确实能看到刚才插入的一条数据。
![]()

2)删
现在我们删除gecko_id为4的一条数据,先写一个deleteGecko方法。
    public int deleteGecko(TGecko gecko){
        return baseDao.deleteT("TGeckoMapper.deleteByPrimaryKey",gecko.getGeckoId());
    }
该方法对应于TGeckoMapper.xml中的deleteByPrimaryKey方法,如下所示。
<delete id="deleteByPrimaryKey" parameterType="java.lang.Integer">
        delete from
        t_gecko
        where gecko_id = #{geckoId,jdbcType=INTEGER}
    </delete>
同样的,我们在main方法中对该方法进行调用。
    ApplicationContext context=new ClassPathXmlApplicationContext("ApplicationContext.xml");
        GeckoService geckoService=(GeckoService) context.getBean("geckoService");
        TGecko gecko=new TGecko();
        gecko.setGeckoId(4);
        int result=geckoService.deleteGecko(gecko);
        System.out.println("删除结果:"+(result>0?"成功":"失败"));
运行结果:

我们去查看数据库,可以看到gekcoId=4的记录已经被成功删除。

3)改
接下我们修改一条数据,将gecko_id=6的原种守宫,改为原色守宫。
public int updateGecko(TGecko gecko){
        return baseDao.updateT("TGeckoMapper.updateByPrimaryKeySelective", gecko);
    }
    ApplicationContext context=new ClassPathXmlApplicationContext("ApplicationContext.xml");
        GeckoService geckoService=(GeckoService) context.getBean("geckoService");
        TGecko gecko=new TGecko();
        gecko.setGeckoId(6);
        gecko.setGeckoName("原色守宫");
        int result=geckoService.updateGecko(gecko);
        System.out.println("修改结果:"+(result>0?"成功":"失败"));


4)查
最后我们来做一下查询,我们先来查询geckoId=1的这条记录,并把它打印出来。
    public TGecko getGeckoById(int geckoId){
        return baseDao.getT("TGeckoMapper.selectByPrimaryKey", geckoId);
    }
        ApplicationContext context=new ClassPathXmlApplicationContext("ApplicationContext.xml");
        GeckoService geckoService=(GeckoService) context.getBean("geckoService");
        TGecko gecko=geckoService.getGeckoById(1);
        System.out.println("查询结果,geckoId:"+gecko.getGeckoId()+",geckoName:"+gecko.getGeckoName()+",geckoType:"+gecko.getGeckoType());

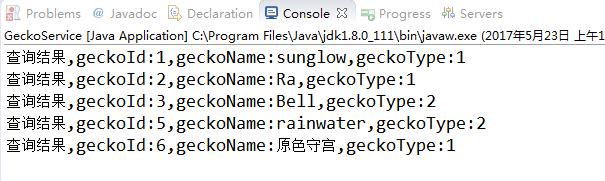
再来查询一个列表,查询出所有的gecko的list.
    <select id="listGecko" resultMap="BaseResultMap">
        select
        <include refid="Base_Column_List"></include>
        from t_gecko
        where
        is_del =0
        ORDER BY gecko_id
    </select>
    public List<TGecko>getGeckoList() throws Exception{
        return baseDao.findTList("TGeckoMapper.listGecko");
    }
    ApplicationContext context=new ClassPathXmlApplicationContext("ApplicationContext.xml");
        GeckoService geckoService=(GeckoService) context.getBean("geckoService");
        List<TGecko> geckoList=geckoService.getGeckoList();
        for(TGecko gecko:geckoList){
            System.out.println("查询结果,geckoId:"+gecko.getGeckoId()+",geckoName:"+gecko.getGeckoName()+",geckoType:"+gecko.getGeckoType());
        }
以上便是利用spring+mybatis实现数据的增删改查的初级操作,下一篇文章我们结合spring mvc来做一个小的demo.

 浙公网安备 33010602011771号