[源码解析] 机器学习参数服务器ps-lite 之(3) ----- 代理人Customer
[源码解析] 机器学习参数服务器ps-lite 之(3) ----- 代理人Customer
0x00 摘要
本文是参数服务器第三篇,介绍ps-lite的Customer模块。
目前有了邮局 (PostOffice)和通信模块小推车(Van),接下来就要看看邮局的客户Customer。
Customer 就是 SimpleApp 在邮局的代理人。因为 worker,server 需要集中精力在算法上,所以把 worker,server 逻辑上与网络相关的收发消息功能 都总结/转移到 Customer 之中。
本系列其他文章是:
[源码解析] 机器学习参数服务器ps-lite 之(1) ----- PostOffice
[源码解析] 机器学习参数服务器ps-lite(2) ----- 通信模块Van
0x01 来源
1.1 目前总体
我们总结一下目前的总体状态:
- PostOffice:一个单例模式的全局管理类,一个 node 在生命期内具有一个PostOffice,依赖它的类成员对Node进行管理;
- Van:通信模块,负责与其他节点的网络通信和Message的实际收发工作。PostOffice持有一个Van成员;
- SimpleApp:KVServer和KVWorker的父类,它提供了简单的Request, Wait, Response,Process功能;KVServer和KVWorker分别根据自己的使命重写了这些功能;
- Node :信息类,存储了本节点的对应信息,每个 Node 可以使用 hostname + port 来唯一标识。
- Customer:每个SimpleApp对象持有一个Customer类的成员,且Customer需要在PostOffice进行注册,该类主要负责:
- 作为一个发送方,跟踪由SimpleApp发送出去的消息的回复情况;
- 作为接收方,维护一个Node的消息队列,为Node接收消息;
了解一个类的上下文环境可以让我们更好的理解这个类,所以我们首先需要看看 Customer 在哪里使用到,我们目前已经分析了两个类,我们就看看这两个类中如何使用Customer。
1.2 Postoffice
在 PostOffice 之中,有如下成员变量:
// app_id -> (customer_id -> customer pointer)
std::unordered_map<int, std::unordered_map<int, Customer*>> customers_;
以及如下成员函数,就是把Customer注册到customers_:
void Postoffice::AddCustomer(Customer* customer) {
  std::lock_guard<std::mutex> lk(mu_);
  int app_id = CHECK_NOTNULL(customer)->app_id();
  // check if the customer id has existed
  int customer_id = CHECK_NOTNULL(customer)->customer_id();
  customers_[app_id].insert(std::make_pair(customer_id, customer));
  std::unique_lock<std::mutex> ulk(barrier_mu_);
  barrier_done_[app_id].insert(std::make_pair(customer_id, false));
}

Customer* Postoffice::GetCustomer(int app_id, int customer_id, int timeout) const {
  Customer* obj = nullptr;
  for (int i = 0; i < timeout * 1000 + 1; ++i) {
    {
      std::lock_guard<std::mutex> lk(mu_);
      const auto it = customers_.find(app_id);
      if (it != customers_.end()) {
        std::unordered_map<int, Customer*> customers_in_app = it->second;
        obj = customers_in_app[customer_id];
        break;
      }
    }
    std::this_thread::sleep_for(std::chrono::milliseconds(1));
  }
  return obj;
}
因此,我们可以看出来几点:
- 一个 app 实例可以对应多个 Customer;
- Customer 需要注册到 Postoffice 之中;
1.3 Van
在 Van 中,我们可以看到,当处理数据消息时候,会:
- 依据消息中的 app_id 从Postoffice 之中得到 customer_id;
- 依据 customer_id 从 Postoffice 之中得到 Customer;
- 调用 Customer 的 Accept 方法来处理消息;
void Van::ProcessDataMsg(Message* msg) {
  // data msg
  int app_id = msg->meta.app_id;
  int customer_id =
      Postoffice::Get()->is_worker() ? msg->meta.customer_id : app_id;
  auto* obj = Postoffice::Get()->GetCustomer(app_id, customer_id, 5);
  obj->Accept(*msg);
}
因此我们知道:
- 一个 app 实例可以对应多个 Customer;
- Customer 需要注册到 Postoffice 之中;
- 接受消息时候会依据消息中的app id找到 Customer,从而调用 Customer 的 Accept 方法来处理具体数据消息;
1.4 Customer
在 Customer 之中我们可以看到,Accept 的作用就是往 Customer 的 queue 之中插入消息。
ThreadsafePQueue recv_queue_;

inline void Accept(const Message& recved) {
   recv_queue_.Push(recved);
}
Customer对象本身也会启动一个接受线程 recv_thread_,使用 Customer::Receiving(),其中调用注册的recv_handle_函数对消息进行处理。
std::unique_ptr<std::thread> recv_thread_;

recv_thread_ = std::unique_ptr<std::thread>(new std::thread(&Customer::Receiving, this));

void Customer::Receiving() {
  while (true) {
    Message recv;
    recv_queue_.WaitAndPop(&recv);
    if (!recv.meta.control.empty() &&
        recv.meta.control.cmd == Control::TERMINATE) {
      break;
    }
    recv_handle_(recv);
    if (!recv.meta.request) {
      std::lock_guard<std::mutex> lk(tracker_mu_);
      tracker_[recv.meta.timestamp].second++;
      tracker_cond_.notify_all();
    }
  }
}
1.5 目前逻辑
因此我们可以得出目前逻辑(接受消息逻辑)如下:
- worker节点 或者 server节点 在程序的最开始会执行
Postoffice::start()。 Postoffice::start()会初始化节点信息,并且调用Van::start()。Van::start()启动一个本地线程,使用Van::Receiving()来持续监听收到的message。Van::Receiving()接收后消息之后,根据不同命令执行不同动作。针对数据消息,如果需要下一步处理,会调用ProcessDataMsg:- 依据消息中的app id找到
Customer。 - 将消息传递给
Customer::Accept函数。
- 依据消息中的app id找到
Customer::Accept()函数将消息添加到一个队列recv_queue_;Customer对象本身也会启动一个接受线程recv_thread_,使用 Customer::Receiving()- 从
recv_queue_队列取消息。 - 调用注册的
recv_handle_函数对消息进行处理。
- 从
简要版逻辑如下,数据流按照图上数字顺序进行,我们也可以看到, Van,Postoffice,Customer 这三个类彼此之间有些过耦合,可能做一下梳理会更好:
                +--------------------------+
                | Van                      |
                |                          |
DataMessage +----------->  Receiving       |
                |  1           +           |             +---------------------------+
                |              |           |             | Postoffice                |
                |              | 2         |             |                           |
                |              v           | GetCustomer |                           |
                |        ProcessDataMsg <------------------> unordered_map customers_|
                |              +           |      3      |                           |
                |              |           |             +---------------------------+
                +--------------------------+
                               |
                               |
                               | 4
                               |
                +-------------------------+
                | Customer     |          |
                |              |          |
                |              v          |
                |           Accept        |
                |              +          |
                |              |          |
                |              | 5        |
                |              v          |
                |         recv_queue_     |
                |              +          |
                |              | 6        |
                |              |          |
                |              v          |
                |          Receiving      |
                |              +          |
                |              | 7        |
                |              |          |
                |              v          |
                |         recv_handle_    |
                |                         |
                +-------------------------+
下面我们就详细剖析下具体逻辑。
0x02 基础类
我们首先要介绍一些基础类。
2.1 SArray
SArray 有如下特点:
- SArray 是共享数据的智能数组,提供类似 std::vector 的功能。
- SArray 可以从 std::vector 构建出来。
- SArray 可以像 C 指针一样拷贝赋值,当对某个SArray的引用为0时,就自动回收该SArray的内存。
- 可以理解为一个零拷贝的vector,能兼容vector的数据结构。
2.2 KVPairs
在ps-lite中,每个server 拥有一段连续的key,以及这些key对应的value。key和value是分开存储的,每个key可能对应多个value,因此需要记录每个key的长度,所以就有了 KVPairs。
KVPairs 特点如下:
- KVPairs封装了Key-Value结构,还包含了一个长度选项,拥有keys,values,lens等3个数组。
- KVPairs 包含SArray
keys,SArray vals,SArray lens的模板类。Key其实是int64的别名,Val是模板变量。 - lens和keys 等长,表示每个key对应的value的个数。
- lens可为空,此时values被平分。
举例而言:
- 若keys=[1,5],lens=[2,3],那么keys[0] 对应的数据就是 :values[0] 和 values[1],而keys[1] 对应的数据就是 values[2],values[3],values[5]。
- 而如果len为空,则values.size()必须是keys.size()(此处为2)的倍数,key[0]和key[1]各对应一半的values。
定义如下:
struct KVPairs {
  // /** \brief empty constructor */
  // KVPairs() {}
  /** \brief the list of keys */
  SArray<Key> keys;
  /** \brief the according values */
  SArray<Val> vals;
  /** \brief the according value lengths (could be empty) */
  SArray<int> lens; // key对应value的长度vector
  /** \brief priority */
  int priority = 0;
};
2.3 Node
Node封装了节点信息,例如角色,ip,端口,是否是恢复节点。
struct Node {
  /** \brief the empty value */
  static const int kEmpty;
  /** \brief default constructor */
  Node() : id(kEmpty), port(kEmpty), is_recovery(false) {}
  /** \brief node roles */
  enum Role { SERVER, WORKER, SCHEDULER };

  /** \brief the role of this node */
  Role role;
  /** \brief node id */
  int id;
  /** \brief customer id */
  int customer_id;
  /** \brief hostname or ip */
  std::string hostname;
  /** \brief the port this node is binding */
  int port;
  /** \brief whether this node is created by failover */
  bool is_recovery;
};
2.4 Control
Control :封装了控制消息的meta信息,barrier_group(用于标识哪些节点需要同步,当command=BARRIER时使用),node(Node类,用于标识控制命令对哪些节点使用)等,方法签名。
可以看到,Control 就包含了上面介绍的 Node 类型。
struct Control {
  /** \brief empty constructor */
  Control() : cmd(EMPTY) { }
  /** \brief return true is empty */
  inline bool empty() const { return cmd == EMPTY; }

  /** \brief all commands */
  enum Command { EMPTY, TERMINATE, ADD_NODE, BARRIER, ACK, HEARTBEAT };
  /** \brief the command */
  Command cmd;
  /** \brief node infos */
  std::vector<Node> node;
  /** \brief the node group for a barrier, such as kWorkerGroup */
  int barrier_group;
  /** message signature */
  uint64_t msg_sig;
};
2.5 Meta
Meta :是消息的元数据部分,包括时间戳,发送者id,接受者id,控制信息Control,消息类型等;
struct Meta {
  /** \brief the empty value */
  static const int kEmpty;
  /** \brief default constructor */
  Meta() : head(kEmpty), app_id(kEmpty), customer_id(kEmpty),
           timestamp(kEmpty), sender(kEmpty), recver(kEmpty),
           request(false), push(false), pull(false), simple_app(false) {}
  /** \brief an int head */
  int head;
  /** \brief the unique id of the application of messsage is for*/
  int app_id;
  /** \brief customer id*/
  int customer_id;
  /** \brief the timestamp of this message */
  int timestamp;
  /** \brief the node id of the sender of this message */
  int sender;
  /** \brief the node id of the receiver of this message */
  int recver;
  /** \brief whether or not this is a request message*/
  bool request;
  /** \brief whether or not a push message */
  bool push;
  /** \brief whether or not a pull message */
  bool pull;
  /** \brief whether or not it's for SimpleApp */
  bool simple_app;
  /** \brief an string body */
  std::string body;
  /** \brief data type of message.data[i] */
  std::vector<DataType> data_type;
  /** \brief system control message */
  Control control;
  /** \brief the byte size */
  int data_size = 0;
  /** \brief message priority */
  int priority = 0;
};
2.6 Message
2.6.1 结构
Message 是要发送的信息,具体如下:
-
消息头 meta:就是元数据(使用了Protobuf 进行数据压缩),包括:
- 控制信息(Control)表示这个消息表示的意义(例如终止,确认ACK,同步等),具体包括:
- 命令类型;
- 节点列表(vector
),节点包括: - 节点的角色
- ip, port
- id
- 是否是恢复节点
- group id表示这个控制命令对谁执行;
- 方法签名;
- 发送者;
- 接受者;
- 时间戳;
- ...
- 控制信息(Control)表示这个消息表示的意义(例如终止,确认ACK,同步等),具体包括:
-
消息体 body:就是发送的数据,使用了自定义的 SArray 共享数据,减少数据拷贝;
2.6.2 逻辑关系
几个类之间的逻辑关系如下:

Message中的某些功能需要依赖Meta来完成,以此类推。
2.6.3 message类型
message 包括如下类型:
- ADD_NODE:worker和server向shceduler进行节点添加
- BARRIER:节点间的同步阻塞消息
- HEARTBEAT:节点间的心跳信号,check alive
- TERMINATE:节点退出信号
- EMPTY:普通消息,比如 push or pull
2.6.4 定义
具体定义如下:
struct Message {
  /** \brief the meta info of this message */
  Meta meta;
  /** \brief the large chunk of data of this message */
  std::vector<SArray<char> > data;
  /**
   * \brief push array into data, and add the data type
   */
  template <typename V>
  void AddData(const SArray<V>& val) {
    CHECK_EQ(data.size(), meta.data_type.size());
    meta.data_type.push_back(GetDataType<V>());
    SArray<char> bytes(val);
    meta.data_size += bytes.size();
    data.push_back(bytes);
  }
};
每次发送消息时,消息就按这个格式封装好,负责发送消息的类成员(Customer类)就会按照Meta之中的信息将消息送货上门。
0x03 Customer
3.1 概述
Customer 其实有两个功能:
- 作为一个发送方,用于追踪SimpleApp发送出去每个Request对应的Response情况;
- 作为接收方,因为有自己的接受线程和接受消息队列,所以Customer实际上是作为一个接受消息处理引擎(或者说是引擎的一部分)存在;
具体特点如下:
-
每个SimpleApp对象持有一个Customer类的成员,且Customer需要在PostOffice进行注册。
-
因为 Customer 同时又要处理Message 但是其本身并没有接管网络,因此实际的Response和Message需要外部调用者告诉它,所以功能和职责上有点分裂。
-
每一个连接对应一个Customer实例,每个Customer都与某个node id相绑定,代表当前节点发送到对应node id节点。连接对方的id和Customer实例的id相同。
-
新建一次request,会返回一个timestamp,这个timestamp会作为这次request的id,每次请求会自增1,相应的res也会自增1,调用wait时会保证 后续比如做Wait以此为ID识别。
3.2 定义
3.2.1 成员变量
我们首先看看Customer的成员变量。
需要注意,这里对于变量功能的理解,我们可以从消息流程来看,即如果有一个接受消息,则这个流程数据流如下,所以我们把 Customer 的成员变量也按照这个顺序梳理 :
Van::ProcessDataMsg ---> Customer::Accept ---> Customer::recv_queue_ ---> Customer::recv_thread_ ---> Customer::recv_handle_
主要成员变量如下:
-
ThreadsafePQueue recv_queue_ :线程安全的消息队列;
-
std::unique_ptr< std::thread> recv_thread_ : 不断从 recv_queue 读取message并调用 recv_handle_;
-
RecvHandle recv_handle_ :worker 或者 server 的消息处理函数。
- 绑定Customer接收到request后的处理函数(SimpleApp::Process);
- Customer会新拉起一个线程,用于在customer生命周期内,使用recv_handle_来处理接受的请求,这里是使用了一个线程安全队列,Accept()用于往队列中一直发送消息,
- 接受到的消息来自于Van的receiving thread,即每个节点的Van对象收到message后,根据message的不同,推送到不同的customer对象中。
- 对于Worker,比如KVWorker,recv_handle_保存拉取的msg中的数据,
- 对于Server,需要使用set_request_handle来设置对应的处理函数,如KVServerDefaultHandle,
-
std::vector<std::pair<int, int>> tracker_ :request & response 的同步变量。
- tracker_是Customer内用来记录request和response的状态的map。记录了每个 request(使用request id)可能发送了多少节点 以及 从多少个节点返回的 response的次数,
- tracker_下标为每个request 的timestamp,即Request编号。
- tracker_[i] . first 表示该请求发送给了多少节点,即本节点应收到的Response数量。
- tracker_[i] . second 表示目前为止实际收到的Response数量。
3.2.2 具体定义
具体定义如下:
class Customer {
 public:
  /**
   * \brief the handle for a received message
   * \param recved the received message
   */
  using RecvHandle = std::function<void(const Message& recved)>;

  /**
   * \brief constructor
   * \param app_id the globally unique id indicating the application the postoffice
   *               serving for
   * \param customer_id the locally unique id indicating the customer of a postoffice
   * \param recv_handle the functino for processing a received message
   */
  Customer(int app_id, int customer_id, const RecvHandle& recv_handle);

  /**
   * \brief desconstructor
   */
  ~Customer();

  /**
   * \brief return the globally unique application id
   */
  inline int app_id() { return app_id_; }

  /**
   * \brief return the locally unique customer id
   */
  inline int customer_id() { return customer_id_; }

  /**
   * \brief get a timestamp for a new request. threadsafe
   * \param recver the receive node id of this request
   * \return the timestamp of this request
   */
  int NewRequest(int recver);

  /**
   * \brief wait until the request is finished. threadsafe
   * \param timestamp the timestamp of the request
   */
  void WaitRequest(int timestamp);

  /**
   * \brief return the number of responses received for the request. threadsafe
   * \param timestamp the timestamp of the request
   */
  int NumResponse(int timestamp);

  /**
   * \brief add a number of responses to timestamp
   */
  void AddResponse(int timestamp, int num = 1);

  /**
   * \brief accept a received message from \ref Van. threadsafe
   * \param recved the received the message
   */
  inline void Accept(const Message& recved) {
    recv_queue_.Push(recved);
  }

 private:
  /**
   * \brief the thread function
   */
  void Receiving();

  int app_id_;
  int customer_id_;
  RecvHandle recv_handle_;
  ThreadsafePQueue recv_queue_;
  std::unique_ptr<std::thread> recv_thread_;
  std::mutex tracker_mu_;
  std::condition_variable tracker_cond_;
  std::vector<std::pair<int, int>> tracker_;
  DISALLOW_COPY_AND_ASSIGN(Customer);
};
3.3 接受线程
在构建函数中,会建立接受线程。
recv_thread_ = std::unique_ptr<std::thread>(new std::thread(&Customer::Receiving, this));
线程处理函数如下,具体逻辑就是:
- 在消息队列上等待,如果有消息就取出;
- 使用 recv_handle_ 处理消息;
- 如果 meta.request 为 false,说明是 response,则增加 tracker 之中对应计数。
void Customer::Receiving() {
  while (true) {
    Message recv;
    recv_queue_.WaitAndPop(&recv);
    if (!recv.meta.control.empty() &&
        recv.meta.control.cmd == Control::TERMINATE) {
      break;
    }
    recv_handle_(recv);
    if (!recv.meta.request) {
      std::lock_guard<std::mutex> lk(tracker_mu_);
      tracker_[recv.meta.timestamp].second++;
      tracker_cond_.notify_all();
    }
  }
}
因为是使用 recv_handle_ 来进行具体的业务逻辑,所以我们下面就看看 recv_handle_ 如何设置,其实也就是 Customer 如何构建,使用。
3.4 如何构建
我们需要提前使用下文将要分析的一些类,因为他们是 Customer 的使用者,耦合的太紧密了。
3.4.1 In SimpleApp
首先我们看看SimpleApp,这是具体逻辑功能节点的基类。
每个SimpleApp对象持有一个Customer类的成员,且Customer需要在PostOffice进行注册,
这里就是 新建一个Custom对象初始化obj_成员。
inline SimpleApp::SimpleApp(int app_id, int customer_id) : SimpleApp() {
  using namespace std::placeholders;
  obj_ = new Customer(app_id, customer_id, std::bind(&SimpleApp::Process, this, _1));
}
我们再看看SimpleApp的两个子类。
3.4.2 KVServer(app_id)
KVServer类主要用来保存key-values数据,进行一些业务操作,比如梯度更新。主要方法为:Process() 和Response()。
在其构造函数中会:
- 新建一个Customer对象来初始化 obj_ 成员;
- 把 KVServer::Process 传入Customer构造函数,其实就是把 Process 方法赋予了
Customer:: recv_handle_; - 对于Server来说,app_id = custom_id = server's id;
构造函数如下:
  /**
   * \brief constructor
   * \param app_id the app id, should match with \ref KVWorker's id
   */
  explicit KVServer(int app_id) : SimpleApp() {
    using namespace std::placeholders;
    obj_ = new Customer(app_id, app_id, std::bind(&KVServer<Val>::Process, this, _1));
  }
3.4.3 KVWorker(app_id, custom_id)
KVWorker类 主要用来向Server Push/Pull 自己的 key-value 数据。包括如下方法: Push(),Pull(),Wait()。
在其构造函数中会:
- 用默认的KVWorker::DefaultSlicer绑定slicer_成员;
- 新建一个Customer对象初始化obj_ 成员,用KVWorker::Process传入Customer构造函数,其实就是把 Process 方法赋予了 Customer:: recv_handle_;
  /**
   * \brief constructor
   *
   * \param app_id the app id, should match with \ref KVServer's id
   * \param customer_id the customer id which is unique locally
   */
  explicit KVWorker(int app_id, int customer_id) : SimpleApp() {
    using namespace std::placeholders;
    slicer_ = std::bind(&KVWorker<Val>::DefaultSlicer, this, _1, _2, _3);
    obj_ = new Customer(app_id, customer_id, std::bind(&KVWorker<Val>::Process, this, _1));
  }
3.4.4 Customer
构建函数逻辑如下:
- 分别用传入构造函数的参数初始化
app_id_, custom_id_ , recv_handle成员 - 调用PostOffice::AddCustomer将当前Customer注册到PostOffice;
- PostOffice的customers_成员: 在对应的app_id的元素上添加custom_id;
- PostOffice的barrier_done_成员将该custom_id的同步状态设为false
- 新起一个Receiving线程recv_thread_;
具体构建函数如下:
Customer::Customer(int app_id, int customer_id, const Customer::RecvHandle& recv_handle)
    : app_id_(app_id), customer_id_(customer_id), recv_handle_(recv_handle) {
  Postoffice::Get()->AddCustomer(this);
  recv_thread_ = std::unique_ptr<std::thread>(new std::thread(&Customer::Receiving, this));
}
3.4.5 梳理
3.4.5.1 示例代码
大家可能对 app_id 和 customer_id 有些疑问,比如:
在 KVWorker 构建函数中有:
- app_id the app id, should match with KVServer's id
- customer_id the customer id which is unique locally
在 KVServer 构建函数中有:
- app_id the app id, should match with KVWorker's id
我们使用源码自带的 tests/test_kv_app_multi_workers.cc 来梳理一下 app_id 与 customer_id 的逻辑关系。
我们提前剧透:worker是用 customer_id 来确定自己的身份。customer id 在 worker 代码中被用来确定 本worker 对应的 key 的范围。
从脚本中可以看出来,使用如下做测试:
find test_* -type f -executable -exec ./repeat.sh 4 ./local.sh 2 2 ./{} \;
文件中启动了一个 server 和 两个 worker。
- server 的 app_id, customer_id 都是 0;
- worker 的 app_id 是 0,customer_id 分别是 0,1;
- 使用 std::thread 来执行 worker,这就是说,在同一个进程内运行两个 worker 节点。这就可以解释 KVWorker 构建函数中 注释中的 “the customer id which is unique locally”。
- 这样,在 Postoffice 的 std::unordered_map<int, std::unordered_map<int, Customer*>> customers_ 成员变量中有如下:
- [0, [ 0, Customer_0] ],第一个 0 是 app id, 第二个 0 是customer id
- [0, [ 1, Customer_1] ],第一个 0 是 app id, 第二个 1 是customer id
因此,我们可以理出来:
- app id 用来确定一个应用。
- customer id 用来在本应用(app id)内确定一个 local worker,或者一个 server。
- 所以 KVServer 构建函数中说,app id 需要和 KVWorker's id 一致,其实就是说,大家的 app id 需要一致。
- customer id 在下面的 worker 代码中被用来确定 本worker 对应的 key 的范围。
具体代码如下:
#include <cmath>
#include "ps/ps.h"
using namespace ps;

void StartServer() { // 启动服务
  if (!IsServer()) return;
  auto server = new KVServer<float>(0);
  server->set_request_handle(KVServerDefaultHandle<float>());
  RegisterExitCallback([server](){ delete server; });
}

void RunWorker(int customer_id) { // 启动worker
  Start(customer_id);
  if (!IsWorker()) {
    return;
  }
  KVWorker<float> kv(0, customer_id);
  // init
  int num = 10000;
  std::vector<Key> keys(num);
  std::vector<float> vals(num);

  int rank = MyRank();
  srand(rank + 7);
  for (int i = 0; i < num; ++i) {
    keys[i] = kMaxKey / num * i + customer_id;
    vals[i] = (rand() % 1000);
  }
  // push
  int repeat = 50;
  std::vector<int> ts;
  for (int i = 0; i < repeat; ++i) {
    ts.push_back(kv.Push(keys, vals));

    // to avoid too frequency push, which leads huge memory usage
    if (i > 10) kv.Wait(ts[ts.size()-10]);
  }
  for (int t : ts) kv.Wait(t);

  // pull
  std::vector<float> rets;
  kv.Wait(kv.Pull(keys, &rets));

  // pushpull
  std::vector<float> outs;
  for (int i = 0; i < repeat; ++i) {
    kv.Wait(kv.PushPull(keys, vals, &outs));
  }

  float res = 0;
  float res2 = 0;
  for (int i = 0; i < num; ++i) {
    res += fabs(rets[i] - vals[i] * repeat);
    res += fabs(outs[i] - vals[i] * 2 * repeat);
  }
  CHECK_LT(res / repeat, 1e-5);
  CHECK_LT(res2 / (2 * repeat), 1e-5);
  LL << "error: " << res / repeat << ", " << res2 / (2 * repeat);
  // stop system
  Finalize(customer_id, true);
}

int main(int argc, char *argv[]) {
  // start system
  bool isWorker = (strcmp(argv[1], "worker") == 0);
  if (!isWorker) {
    Start(0);
    // setup server nodes,启动server节点
    StartServer();
    Finalize(0, true);
    return 0;
  }
  // run worker nodes,启动两个worker节点
  std::thread t0(RunWorker, 0);
  std::thread t1(RunWorker, 1);

  t0.join();
  t1.join();
  return 0;
}
3.4.5.2 确定身份
我们再回忆下 Postoffice 的初始化,可以看到,启动时候,worker是用 customer_id 来确定自己的身份。于是,customer id 在 worker 代码中被用来确定 本worker 对应的 key 的范围。
void Postoffice::Start(int customer_id, const char* argv0, const bool do_barrier) {

    // init node info.
    // 对于所有的worker,进行node设置
    for (int i = 0; i < num_workers_; ++i) {
      int id = WorkerRankToID(i);
      for (int g : {id, kWorkerGroup, kWorkerGroup + kServerGroup,
                    kWorkerGroup + kScheduler,
                    kWorkerGroup + kServerGroup + kScheduler}) {
        node_ids_[g].push_back(id);
      }
    }
	// 对于所有的server,进行node设置
    for (int i = 0; i < num_servers_; ++i) {
      int id = ServerRankToID(i);
      for (int g : {id, kServerGroup, kWorkerGroup + kServerGroup,
                    kServerGroup + kScheduler,
                    kWorkerGroup + kServerGroup + kScheduler}) {
        node_ids_[g].push_back(id);
      }
    }
	// 设置scheduler的node
    for (int g : {kScheduler, kScheduler + kServerGroup + kWorkerGroup,
                  kScheduler + kWorkerGroup, kScheduler + kServerGroup}) {
      node_ids_[g].push_back(kScheduler);
    }
    init_stage_++;
  }

  // start van
  van_->Start(customer_id); // 这里有 customer_id

  ......

  // do a barrier here,这里有 customer_id
  if (do_barrier) Barrier(customer_id, kWorkerGroup + kServerGroup + kScheduler);
}
再看看 Van 的初始化,也是用 customer_id 来确定自己的身份。
void Van::Start(int customer_id) {
  if (init_stage == 0) {
    // get my node info
    if (is_scheduler_) {
      my_node_ = scheduler_;
    } else {
      my_node_.hostname = ip;
      my_node_.role = role;
      my_node_.port = port;
      my_node_.id = Node::kEmpty;
      my_node_.customer_id = customer_id; // 这里有 customer_id
    }
  }

  if (!is_scheduler_) {
    // let the scheduler know myself
    Message msg;
    Node customer_specific_node = my_node_;
    customer_specific_node.customer_id = customer_id; // 这里有 customer_id
    msg.meta.recver = kScheduler;
    msg.meta.control.cmd = Control::ADD_NODE;
    msg.meta.control.node.push_back(customer_specific_node);
    msg.meta.timestamp = timestamp_++;
    Send(msg);
  }

  ......
}
所以,也能够解释了为什么在 KVWorker 发送消息时候使用 app_id 和 customer_id。
template <typename Val>
void KVWorker<Val>::Send(int timestamp, bool push, bool pull, int cmd, const KVPairs<Val>& kvs) {
  .....
  for (size_t i = 0; i < sliced.size(); ++i) {
    Message msg;
    msg.meta.app_id = obj_->app_id(); // 注意这里
    msg.meta.customer_id = obj_->customer_id();// 注意这里
    msg.meta.request     = true;
    ......
    Postoffice::Get()->van()->Send(msg);
  }
}
在 KVServer 之中,也需要在回应消息时候,使用 app_id 和 customer_id。
template <typename Val>
void KVServer<Val>::Response(const KVMeta& req, const KVPairs<Val>& res) {
  Message msg;
  msg.meta.app_id = obj_->app_id();// 注意这里
  msg.meta.customer_id = req.customer_id;// 注意这里
  msg.meta.request     = false;
  msg.meta.push        = req.push;
  msg.meta.pull        = req.pull;
  msg.meta.head        = req.cmd;
  msg.meta.timestamp   = req.timestamp;
  msg.meta.recver      = req.sender;
  ......
  Postoffice::Get()->van()->Send(msg);
}
3.4.5.3 问题
那么问题来了,为什么 Server 端,app_id 与 customer_id 相等?
因为目前没有 ps 的最初代码,所以猜测是:
在 ps 代码中,Server 端也是有多个 cusomer,但是出于精简目的,在 ps-lite 之中删除了这部分功能,因此在 ps-lite 之中,app_id 与 customer_id 相等。
3.5 目前逻辑
因此我们再次梳理流程(接受消息逻辑)如下:
-
worker节点 或者 server节点 在程序的最开始会执行
Postoffice::start()。 -
Postoffice::start()会初始化节点信息,并且调用Van::start()。 -
Van::start()启动一个本地线程,使用Van::Receiving()来持续监听收到的message。 -
Van::Receiving()接收后消息之后,根据不同命令执行不同动作。针对数据消息,如果需要下一步处理,会调用 ProcessDataMsg:- 依据消息中的app id找到 Customer,即会根据customer id的不同将message发给不同的customer的recv thread。
- 将消息传递给
Customer::Accept函数。
-
Customer::Accept() 函数将消息添加到一个队列
recv_queue_; -
Customer 对象本身也会启动一个接受线程
recv_thread_,使用 Customer::Receiving()- 从
recv_queue_队列取消息。 - 如果 (!recv.meta.request) ,就说明是 response,则
tracker_[req.timestamp].second++ - 调用注册的
recv_handle_函数对消息进行处理。
- 从
-
对于worker来说,其注册的
recv_handle_是KVWorker::Process()函数。因为worker的recv thread接受到的消息主要是从server处pull下来的KV对,因此该Process()主要是接收message中的KV对; -
而对于Server来说,其注册的
recv_handle_是KVServer::Process()函数。因为server接受的是worker们push上来的KV对,需要对其进行处理,因此该Process()函数中调用的用户通过KVServer::set_request_handle()传入的函数对象。
目前逻辑如下图,在 第 8 步,recv_handle_ 指向 KVServer
                +--------------------------+
                | Van                      |
                |                          |
DataMessage +----------->  Receiving       |
                |  1           +           |             +---------------------------+
                |              |           |             | Postoffice                |
                |              | 2         |             |                           |
                |              v           | GetCustomer |                           |
                |        ProcessDataMsg <------------------> unordered_map customers_|
                |              +           |      3      |                           |
                |              |           |             +---------------------------+
                +--------------------------+
                               |
                               |
                               | 4
                               |
                +-------------------------+
                | Customer     |          |
                |              |          |
                |              v          |
                |           Accept        |
                |              +          |
                |              |          |
                |              | 5        |
                |              v          |
                |         recv_queue_     |                +-----------------+
                |              +          |                |KVWorker         |
                |              | 6        |     +--------> |                 |
                |              |          |     |    8     |         Process |
                |              v          |     |          +-----------------+
                |          Receiving      |     |
                |              +          |     |
                |              | 7        |     |
                |              |          |     |          +-----------------+
                |              v          |     |          |KVServer         |
                |         recv_handle_+---------+--------> |                 |
                |                         |          8     |         Process |
                +-------------------------+                +-----------------+
0x04 功能函数
以下这些 Customer 函数都是被其他模块调用。
4.1 Customer::NewRequest
4.1.1 实现
此函数的作用是:当发送一个 request 时候,新增对此 request 的计数。所以,当我们需要给一个Resquest计数的时候,使用此函数。
特点如下:
-
每次发送消息前,先修改此条消息 应收到的 Response数量。
-
recver表示接收者的node_id,因为ps-lite中一个整数可能对应于多个node_id,所以使用Postoffice解码获得所有的真实node_id 的数目。
-
比如给 kServerGroup 发消息,kServerGroup 里面有3 个 server,则 num 为 3,就是应该收到 3 个response。tracker_ 对应的item 就是 [3,0],表示应该收到 3个,目前收到 0 个。
-
函数的返回值可以认为是一个时间戳,这个时间戳 会作为这次request的id,调用wait时会保证后续Wait以此为ID识别。
int Customer::NewRequest(int recver) {
  std::lock_guard<std::mutex> lk(tracker_mu_);
  int num = Postoffice::Get()->GetNodeIDs(recver).size();  // recver 可能会代表一个group。
  tracker_.push_back(std::make_pair(num, 0));
  return tracker_.size() - 1;  // 代表此次请求的时间戳timestamp,后续customer使用这个值代表这个request
}
4.1.2 调用
具体调用举例就是在 worker 向 server 推送时候。
  int ZPush(const SArray<Key>& keys,
            const SArray<Val>& vals,
            const SArray<int>& lens = {},
            int cmd = 0,
            const Callback& cb = nullptr,
            int priority = 0) {
    int ts = obj_->NewRequest(kServerGroup); // 这里会调用
    AddCallback(ts, cb);
    KVPairs<Val> kvs;
    kvs.keys = keys;
    kvs.vals = vals;
    kvs.lens = lens;
    kvs.priority = priority;
    Send(ts, true, false, cmd, kvs);
    return ts;
  }
4.2 Customer::AddResponse
4.2.1 实现
作用是:针对request已经返回response进行计数。
特点如下:
-
当外部调用者收到Response时,调用AddResponse告诉Customer对象。
-
主动增加某次请求实际收到的Response数,主要用于客户端发送请求时,有时可跳过与某些server的通信(此次通信的keys没有分布在这些server上),在客户端就可直接认为已接收到Response。
-
另外,在
Customer::Receiving中,当处理了一条非request请求后,也会增加对应的请求的Response数。tracker_[recv.meta.timestamp].second++; -
这个类有个缺陷,对于过期的以后不会再用到的Request信息,没有删除操作。而这个类的单个对象的生存周期又近乎等于进程的生存周期。因此,基于ps-lite程序跑的时间久了基本都会OOM。
void Customer::AddResponse(int timestamp, int num) {
  std::lock_guard<std::mutex> lk(tracker_mu_);
  tracker_[timestamp].second += num;
}
4.2.2 调用
在 KVWorker 的 Send 方法会调用,因为某些情况下,(此次通信的keys没有分布在这些server上),在客户端就可直接认为已接收到Response,所以要跳过。
template <typename Val>
void KVWorker<Val>::Send(int timestamp, bool push, bool pull, int cmd, const KVPairs<Val>& kvs) {
  // slice the message
  SlicedKVs sliced;
  slicer_(kvs, Postoffice::Get()->GetServerKeyRanges(), &sliced);

  // need to add response first, since it will not always trigger the callback
  int skipped = 0;
  for (size_t i = 0; i < sliced.size(); ++i) {
    if (!sliced[i].first) ++skipped;
  }

  obj_->AddResponse(timestamp, skipped); // 这里调用

  if ((size_t)skipped == sliced.size()) {
    RunCallback(timestamp);
  }

  for (size_t i = 0; i < sliced.size(); ++i) {
    const auto& s = sliced[i];
    if (!s.first) continue;
    Message msg;
    msg.meta.app_id = obj_->app_id();
    msg.meta.customer_id = obj_->customer_id();
    msg.meta.request     = true;
    msg.meta.push        = push;
    msg.meta.pull        = pull;
    msg.meta.head        = cmd;
    msg.meta.timestamp   = timestamp;
    msg.meta.recver      = Postoffice::Get()->ServerRankToID(i);
    msg.meta.priority    = kvs.priority;
    const auto& kvs = s.second;
    if (kvs.keys.size()) {
      msg.AddData(kvs.keys);
      msg.AddData(kvs.vals);
      if (kvs.lens.size()) {
        msg.AddData(kvs.lens);
      }
    }
    Postoffice::Get()->van()->Send(msg);
  }
}
4.3 Customer::WaitRequest
4.3.1 实现
功能是:当我们需要等待某个发出去的Request对应的Response全部收到时,使用此函数会阻塞等待,直到 应收到Response数 等于 实际收到的Response数。
wait操作的过程就是tracker_cond_一直阻塞等待,直到发送出去的数量和已经返回的数量相等。
void Customer::WaitRequest(int timestamp) {
  std::unique_lock<std::mutex> lk(tracker_mu_);
  tracker_cond_.wait(lk, [this, timestamp]{
      return tracker_[timestamp].first == tracker_[timestamp].second;
    });
}
4.3.2 调用
Wait 函数就是使用 WaitRequest 来确保操作完成。
  /**
   * \brief Waits until a push or pull has been finished
   *
   * Sample usage:
   * \code
   *   int ts = w.Pull(keys, &vals);
   *   Wait(ts);
   *   // now vals is ready for use
   * \endcode
   *
   * \param timestamp the timestamp returned by the push or pull
   */
  void Wait(int timestamp) { obj_->WaitRequest(timestamp); }
但是具体如何调用,则是用户自行决定,比如:
  for (int i = 0; i < repeat; ++i) {
    kv.Wait(kv.Push(keys, vals));
  }
于是这就来到了同步策略的问题。
0x05 同步策略
不同的worker同时并行运算的时候,可能因为网络、机器配置等外界原因,导致不同的worker的进度是不一样的,如何控制worker的同步机制是一个比较重要的课题。
5.1 同步协议
一般来说,有三个级别的异步控制协议:BSP(Bulk Synchronous Parallel),SSP(Stalness Synchronous Parallel)和ASP(Asynchronous Parallel),它们的同步限制依次放宽。为了追求更快的计算速度,算法可以选择更宽松的同步协议。
为了解决性能的问题,业界开始探索这里的一致性模型,最先出来的版本是ASP模式,在ASP之后提出了另一种相对极端的同步协议BSP,后来有人提出将ASP和BSP做一下折中,就是SSP。
这三个协议具体如下:
-
ASP:task之间完全不用相互等待,完全不顾worker之间的顺序,每个worker按照自己的节奏走,跑完一个迭代就update,先完成的task,继续下一轮的训练。
-
优点:消除了等待慢task的时间,减少了GPU的空闲时间,因此与BSP相比提高了硬件效率。计算速度快,最大限度利用了集群的计算能力,所有的worker所在的机器都不用等待
-
缺点:
- 这个过程可能会导致梯度被计算过时的权重,从而降低统计效率。
- 适用性差,在一些情况下并不能保证收敛性
![]()
-
-
BSP:是一般分布式计算采用的同步协议,每一轮迭代中都需要等待所有的task计算完成。每个worker都必须在同一个迭代运行,只有一个迭代任务所有的worker都完成了,才会进行一次worker和server之间的同步和分片更新。
-
BSP的模式和单机串行因为仅仅是batch size的区别,所以在模型收敛性上是完全一样的。同时,因为每个worker在一个周期内是可以并行计算的,所以有了一定的并行能力。spark用的就是这种方式。
-
优点:适用范围广;每一轮迭代收敛质量高
-
缺点:每一轮迭代中,,BSP要求每个worker等待或暂停来自其他worker的梯度,这样就需要等待最慢的task,从而显著降低了硬件效率,导致整体任务计算时间长。整个worker group的性能由其中最慢的worker决定;这个worker一般称为straggler。
![]()
-
-
SSP:允许一定程度的task进度不一致,但这个不一致有一个上限,称为staleness值,即最快的task最多领先最慢的task staleness轮迭代。
-
就是把将ASP和BSP做一下折中。既然ASP是允许不同worker之间的迭代次数间隔任意大,而BSP则只允许为0,那我就取一个常数s。有了SSP,BSP就可以通过指定s=0而得到。而ASP同样可以通过制定s=∞来达到。
-
优点:一定程度减少了task之间的等待时间,计算速度较快。
-
缺点:每一轮迭代的收敛质量不如BSP,达到同样的收敛效果可能需要更多轮的迭代,适用性也不如BSP,部分算法不适用。
![]()
-


5.2 论文
沐神在论文中提到,parameter server 为用户提供了多种任务依赖方式:
-
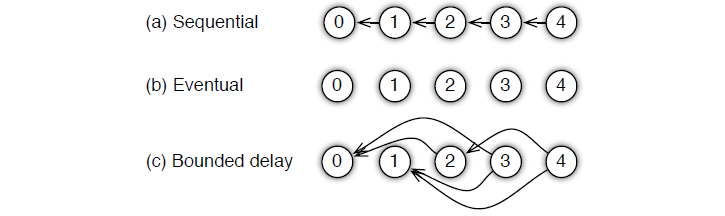
Sequential: 这里其实是 synchronous task,任务之间是有顺序的,只有上一个任务完成,才能开始下一个任务;
-
Eventual: 跟 sequential 相反,所有任务之间没有顺序,各自独立完成自己的任务,
-
Bounded Delay:这是sequential 跟 eventual 之间的trade-off,可以设置一个 \(\tau\) 作为最大的延时时间。也就是说,只有 \(>\tau\) 之前的任务都被完成了,才能开始一个新的任务;极端的情况:
- \(\tau\) = 0,情况就是 Sequential;
- \(\tau\) = ∞,情况就是 Eventual;
5.3 ps-lite
ps-lite里面有几个涉及到等待同步的地方:
- Worker pull 是异步操作,如果需要等待 pull 完成,则可以调用Wait来保证customer里面的request和response两者相等,即保证Pull完成后再做其他操作;
- 在一个worker内,可以存在多个Customer,当第一个发送barrier后,scheduler接收到request请求,然后根据msg判断是request,然后,向barrier_group里的所有node,node接到后, Postoffice::Get()->Manage(*msg)将barrier_done_中的customer_id对应的bool置true,完成同步操作。
- 当构建节点连接时,也可以进行一个barrier;
更复杂的比如Asp,bsp,ssp可以通过增加相应的Command来完成。
0x06 分布式优化
6.1 问题定义
假设我们要解决以下问题
其中 (yi, xi) 是一个样本对,w是模型权重。
我们考虑使用批量大小为b的小批量随机梯度下降(SGD)来解决上述问题。 在步骤 t,该算法首先随机选取b个样本,然后通过下面公式更新权重w
我们使用两个例子来展示在ps-lite之中如何实现一个分布式优化算法。
6.2 Asynchronous SGD
第一个示例中,我们将SGD扩展为异步SGD。 服务器会维护模型权重w,其中server k 将获得权重w的第k个阶段,由 wk 表示。 一旦Server从worker收到梯度,server k将更新它所维护的权重。
t = 0;
while (Received(&grad)) {
  w_k -= eta(t) * grad;
  t++;
}
对于一个worker来说,每一个步骤会做四件事情
Read(&X, &Y);  // 读取一个 minibatch 数据
Pull(&w);      // 从服务器拉去最新的权重
ComputeGrad(X, Y, w, &grad);  // 计算梯度
Push(grad);    // 把权重推送给服务器
ps-lite将提供push和pull函数,worker 将与具有正确部分数据的server通信。
请注意:异步SGD在算法模式上与单机版本不同。 由于worker之间没有通信,因此有可能在一个worker计算梯度的时候,其他worker就更新了服务器上的权重。 即,每个worker可能会用到延迟的权重。
6.3 Synchronized SGD
与异步版本不同,同步版本在语义上与单机算法相同。 就是每一次迭代都要所有的worker计算好梯度,并且同步到server中。
我们使用scheduler 来管理数据同步。
for (t = 0, t < num_iteration; ++t) {
  for (i = 0; i < num_worker; ++i) {
     IssueComputeGrad(i, t);
  }
  for (i = 0; i < num_server; ++i) {
     IssueUpdateWeight(i, t);
  }
  WaitAllFinished();
}
IssueComputeGrad 和 IssueUpdateWeight 会发送命令给 worker 和 servers,然后 scheduler 会调用 WaitAllFinished 等待所有发送的命令结束。
对于一个worker接受到一个命令,它会做如下:
ExecComputeGrad(i, t) {
   Read(&X, &Y);  // 读取数据 minibatch = batch / num_workers 个样本
   Pull(&w);      // 从服务器拉取最新权重
   ComputeGrad(X, Y, w, &grad);  // 计算梯度
   Push(grad);    // 把权重推送给服务器
}
这个算法和ASGD几乎相同,只是每次步骤中,只有 b/num_workers个样本被处理。
在 server 节点,与ASGD相比,多了一个聚合步骤。是把所有worker的梯度累计起来之后,再配合 学习速率进行迭代。
ExecUpdateWeight(i, t) {
   for (j = 0; j < num_workers; ++j) {
      Receive(&grad);
      aggregated_grad += grad;
   }
   w_i -= eta(t) * aggregated_grad;
}
0x07 总结
-
PostOffice:一个单例模式的全局管理类,每一个 node (每个 Node 可以使用 hostname + port 来唯一标识)在生命期内具有一个PostOffice,直接从字面意义可以知道,PostOffice就是邮局;
-
Van:通信模块,负责与其他节点的网络通信和Message的实际收发工作。PostOffice持有一个Van成员,直接从字面意义可以知道,Van就是小推车,用来提供送信的功能;
-
SimpleApp:KVServer和KVWorker的父类,它提供了简单的Request, Wait, Response,Process功能;KVServer和KVWorker分别根据自己的使命重写了这些功能;
-
Customer:每个SimpleApp对象持有一个Customer类的成员,且Customer需要在PostOffice进行注册,该类主要负责:
- 作为一个发送方,跟踪由SimpleApp发送出去的消息的回复情况;
- 作为接收方,维护一个Node的消息队列,为本Node接收消息;
Customer 由名字就可以知道,是邮局的客户,就是 SimpleApp 在邮局的代理人。因为需要 worker,server 需要集中精力为算法上,所以把 worker,server 逻辑上与网络相关的收发消息功能都总结/转移到 Customer 之中。
下面给出了逻辑图。
                +--------------------------+
                | Van                      |
                |                          |
DataMessage +----------->  Receiving       |
                |  1           +           |             +---------------------------+
                |              |           |             | Postoffice                |
                |              | 2         |             |                           |
                |              v           | GetCustomer |                           |
                |        ProcessDataMsg <------------------> unordered_map customers_|
                |              +           |      3      |                           |
                |              |           |             +---------------------------+
                +--------------------------+
                               |
                               |
                               | 4
                               |
                +-------------------------+
                | Customer     |          |
                |              |          |
                |              v          |
                |           Accept        |
                |              +          |
                |              |          |
                |              | 5        |
                |              v          |
                |         recv_queue_     |                +-----------------+
                |              +          |                |KVWorker         |
                |              | 6        |     +--------> |                 |
                |              |          |     |    8     |         Process |
                |              v          |     |          +-----------------+
                |          Receiving      |     |
                |              +          |     |
                |              | 7        |     |
                |              |          |     |          +-----------------+
                |              v          |     |          |KVServer         |
                |         recv_handle_+---------+--------> |                 |
                |                         |          8     |         Process |
                +-------------------------+                +-----------------+
0xEE 个人信息
★★★★★★关于生活和技术的思考★★★★★★
微信公众账号:罗西的思考
如果您想及时得到个人撰写文章的消息推送,或者想看看个人推荐的技术资料,敬请关注。
 ****
****
0xFF 参考
https://www.cs.cmu.edu/~muli/file/parameter_server_osdi14.pdf
sona:Spark on Angel大规模分布式机器学习平台介绍
基于Parameter Server的可扩展分布式机器学习架构
Mu Li. Scaling Distributed Machine Learning with the Parameter Server.
CMU. http://parameterserver.org/
Joseph E.Gonzalez. Emerging Systems For Large-scale Machine Learning.
【分布式计算】MapReduce的替代者-Parameter Server
Parameter Server for Distributed Machine Learning
PS-Lite Documents
ps-lite源码剖析
http://blog.csdn.net/stdcoutzyx/article/details/51241868
http://blog.csdn.net/cyh_24/article/details/50545780
https://www.zybuluo.com/Dounm/note/529299
http://blog.csdn.net/KangRoger/article/details/73307685
http://www.cnblogs.com/heguanyou/p/7868596.html
MXNet之ps-lite及parameter server原理
ps-lite学些系列之一 ----- mac安装ps-lite
https://www.zhihu.com/topic/20175752/top-answers
Large Scale Machine Learning--An Engineering Perspective--目录
ps-lite学些系列之3 --- ps-lite的简介(1. Overview)
https://www.zhihu.com/topic/20175752/top-answers
https://blog.csdn.net/zkwdn/article/details/53840091

 浙公网安备 33010602011771号