Apifox前置、后置登录RSA加密与token获取
系统登录优化,原本的登录接口加上了RSA加密,导致直接传入登录账号和密码无法正常登录获取token
但是测试的过程中需要获取不同账号的token
所以对原有的接口进行了优化
步骤一:
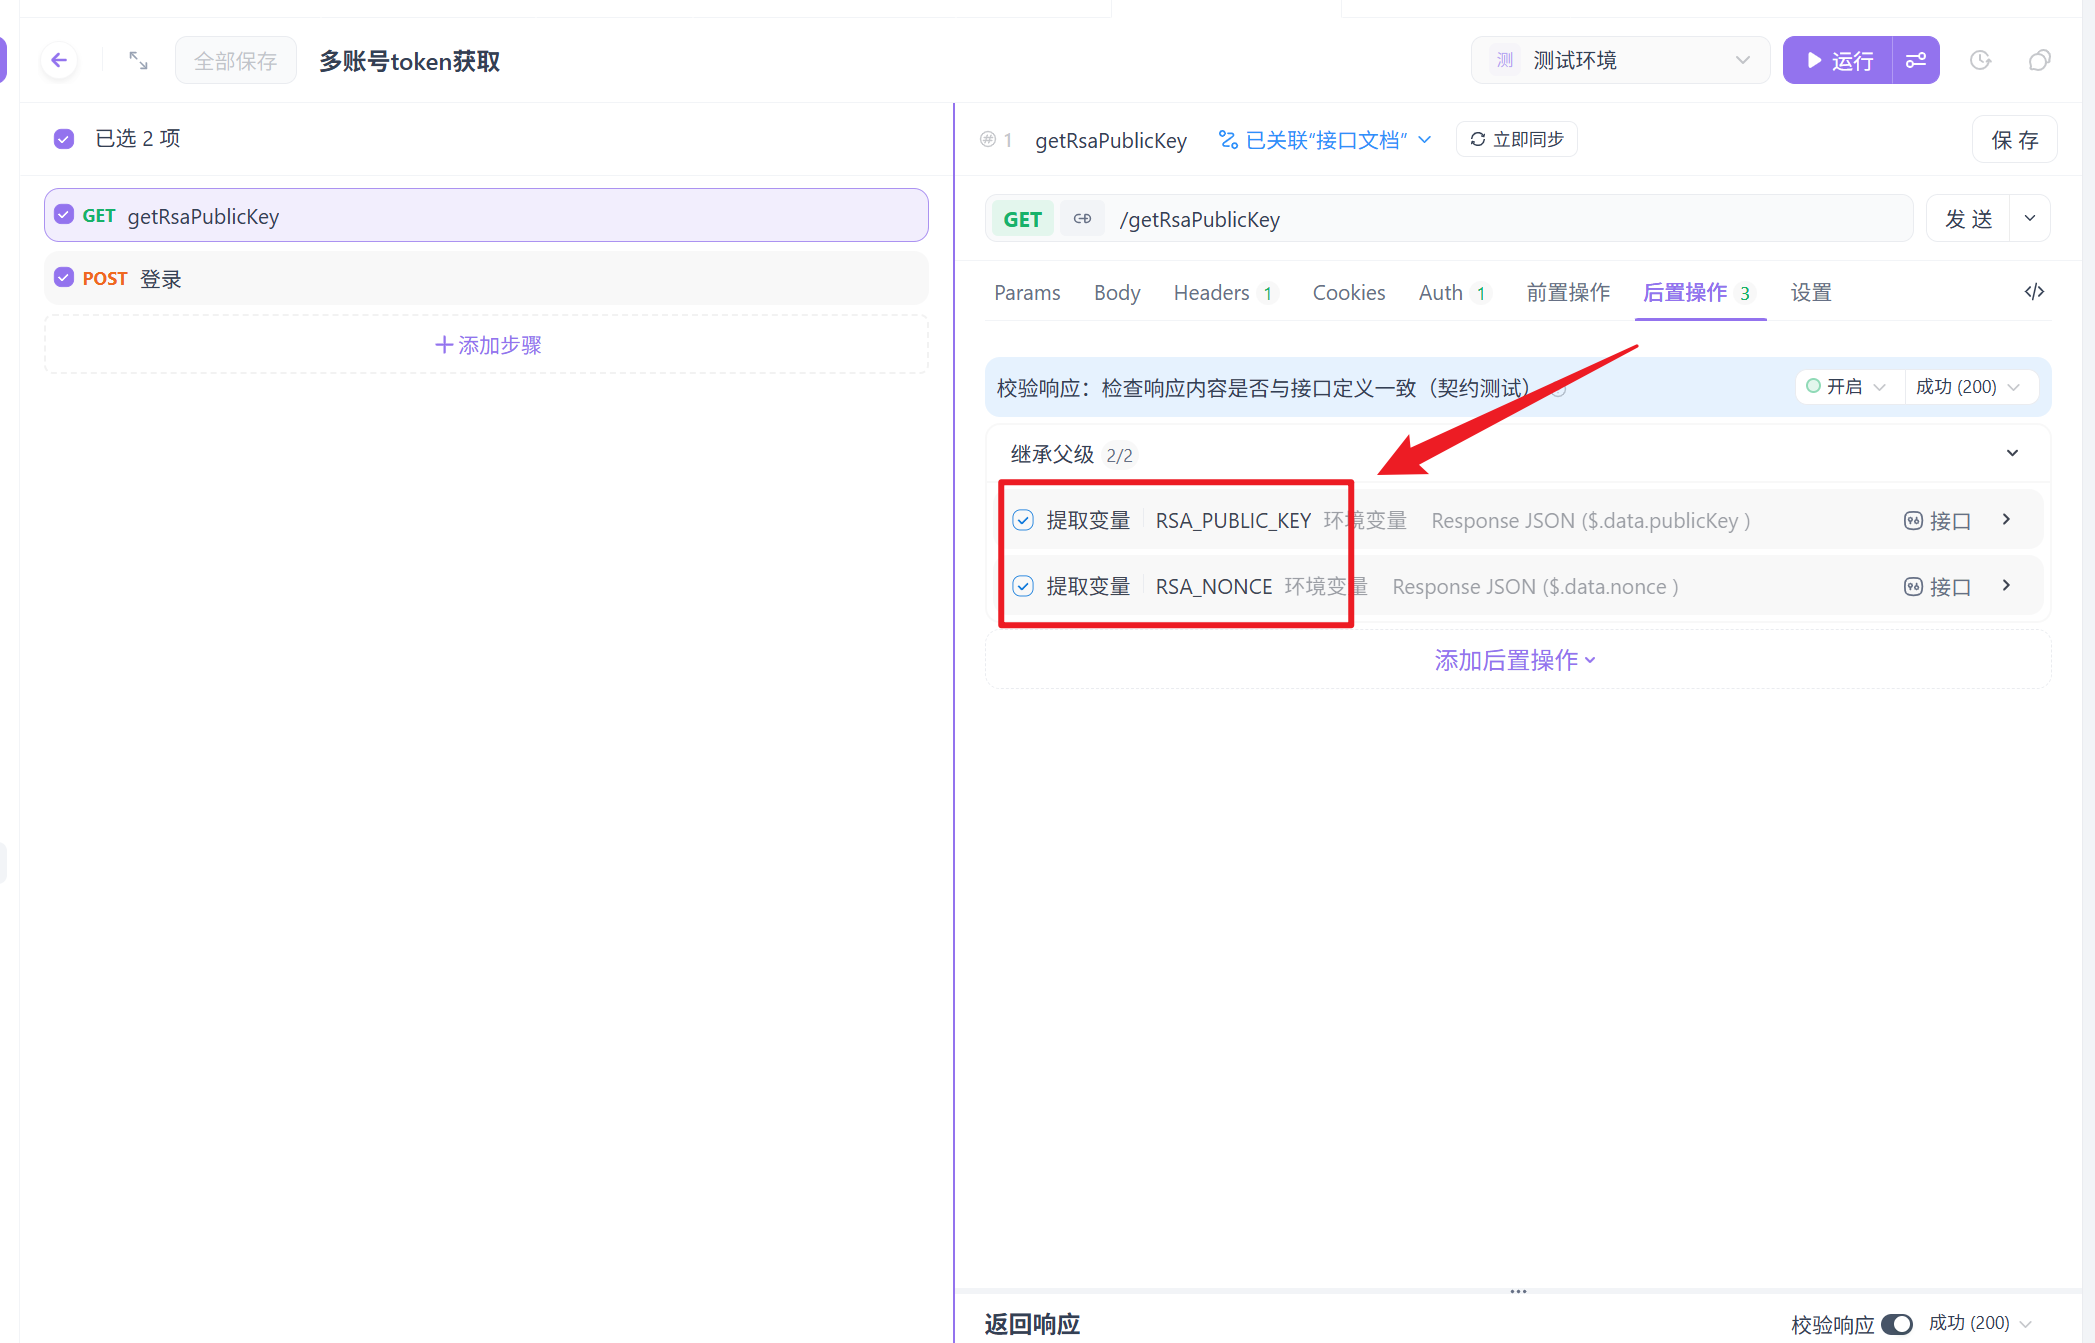
获取publickey和nonce
有的publickey和nonce是静态的,那么可以直接添加到环境变量里
不过测试项目中的publickey和nonce是动态的,所以在login接口前增加一个get获取publickey和nonce
在原本的login接口增加前置操作
// 登录接口前置脚本 - 多账号循环版
console.log('🔄 多账号RSA加密登录流程');

// ========== 1. 定义账号列表(三种方式选其一) ==========

// 方式A:直接内嵌在脚本中(最简单,修改需编辑脚本)
const accounts = [
    {username: "111111", password: "111111"},
    {username: "222222", password: "123456"},
    {username: "333333", password: "123456"}
];


// ========== 2. 获取当前要测试的账号索引 ==========
// 使用一个计数器记录当前测试到第几个账号
let currentIndex = parseInt(pm.environment.get('ACCOUNT_INDEX') || '0');
const totalAccounts = accounts.length;

if (currentIndex >= totalAccounts) {
    console.log('✅ 所有账号已完成测试');
    // 重置索引,开始新一轮
    currentIndex = 0;
}

const currentAccount = accounts[currentIndex];
console.log(`📊 账号进度: ${currentIndex + 1}/${totalAccounts}`);
console.log(`👤 当前测试用户: ${currentAccount.username}`);

// ========== 3. 执行RSA加密(复用之前的逻辑) ==========
try {
    const publicKey = pm.environment.get('RSA_PUBLIC_KEY');
    const nonce = pm.environment.get('RSA_NONCE');

    if (!publicKey || !nonce) {
        throw new Error('请先运行"获取RSA公钥"接口');
    }

    const dataToEncrypt = {
        password: currentAccount.password,
        nonce: nonce
    };

    const jsrsasign = require('jsrsasign');
    const publicKeyPEM = `-----BEGIN PUBLIC KEY-----\n${publicKey}\n-----END PUBLIC KEY-----`;
    const pubKeyObj = jsrsasign.KEYUTIL.getKey(publicKeyPEM);

    const encryptedHex = jsrsasign.KJUR.crypto.Cipher.encrypt(
        JSON.stringify(dataToEncrypt),
        pubKeyObj
    );
    const encryptedPassword = jsrsasign.hextob64(encryptedHex);

    // ========== 4. 准备请求并更新索引 ==========
    // 更新请求体
    pm.request.body.raw = JSON.stringify({
        username: currentAccount.username,
        password: encryptedPassword
    });

    // 为这个账号记录一个标识(用于后置脚本存储token)
    pm.environment.set('CURRENT_TESTING_USER', currentAccount.username);

    // 递增索引,为下一个账号准备
    pm.environment.set('ACCOUNT_INDEX', (currentIndex + 1).toString());

    console.log(`✅ 第 ${currentIndex + 1} 个账号加密完成`);
    console.log(`📤 准备发送请求...`);

} catch (error) {
    console.error(`❌ 账号 ${currentAccount.username} 加密失败:`, error.message);
    // 跳过这个账号,继续下一个
    pm.environment.set('ACCOUNT_INDEX', (currentIndex + 1).toString());
}
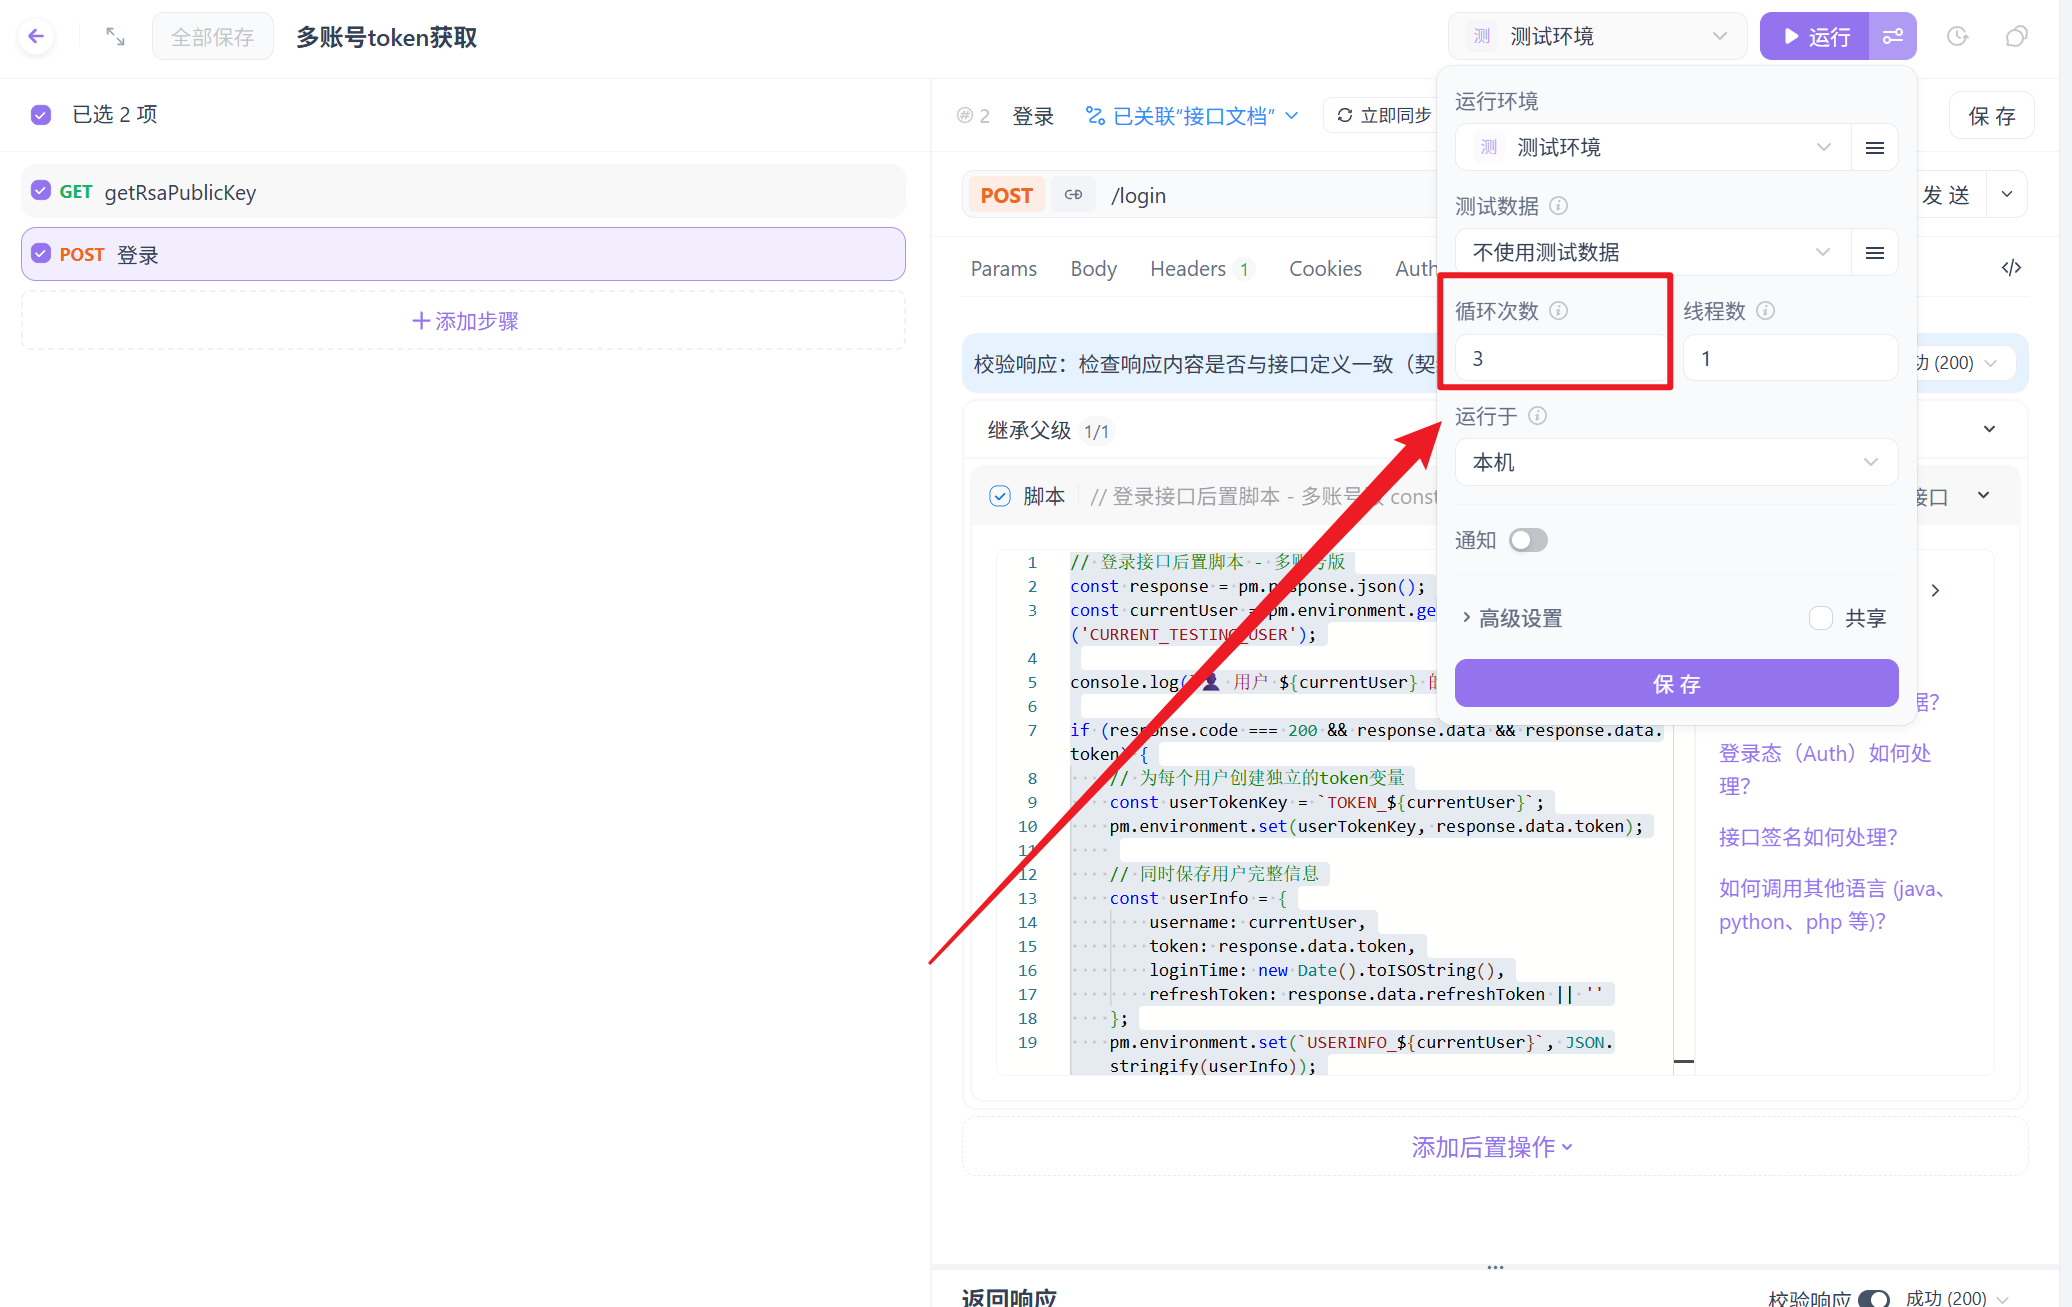
login添加后置操作实现存储不同账号的token
// 登录接口后置脚本 - 多账号版
const response = pm.response.json();
const currentUser = pm.environment.get('CURRENT_TESTING_USER');

console.log(`👤 用户 ${currentUser} 的登录响应:`);

if (response.code === 200 && response.data && response.data.token) {
    // 为每个用户创建独立的token变量
    const userTokenKey = `TOKEN_${currentUser}`;
    pm.environment.set(userTokenKey, response.data.token);

    // 同时保存用户完整信息
    const userInfo = {
        username: currentUser,
        token: response.data.token,
        loginTime: new Date().toISOString(),
        refreshToken: response.data.refreshToken || ''
    };
    pm.environment.set(`USERINFO_${currentUser}`, JSON.stringify(userInfo));

    console.log(`✅ ${currentUser} 登录成功!`);
    console.log(`   Token存储键: ${userTokenKey}`);
    console.log(`   Token预览: ${response.data.token.substring(0, 40)}...`);

} else {
    console.error(`❌ ${currentUser} 登录失败:`, response.message);
    // 记录失败信息
    const failInfo = {
        username: currentUser,
        error: response.message,
        time: new Date().toISOString()
    };
    pm.environment.set(`FAIL_${currentUser}`, JSON.stringify(failInfo));
}
想要实现获取n个账号的token,就运行n次

 浙公网安备 33010602011771号