

orange pi 5b wifi ap 创建以及systemd 服务配置简单说明
orange pi 5b 支持wifi ,同时可以创建ap 热点,以下是一个简单的使用说明
创建ap 热点命令
- 命令参数
比较全了解可以方便使用
Usage: create_ap [options] <wifi-interface> [<interface-with-internet>] [<access-point-name> [<passphrase>]]

Options:
  -h, --help              Show this help
  --version               Print version number
  -c <channel>            Channel number (default: 1)
  -w <WPA version>        Use 1 for WPA, use 2 for WPA2, use 1+2 for both (default: 1+2)
  -n                      Disable Internet sharing (if you use this, don't pass
                          the <interface-with-internet> argument)
  -m <method>             Method for Internet sharing.
                          Use: 'nat' for NAT (default)
                               'bridge' for bridging
                               'none' for no Internet sharing (equivalent to -n)
  --psk                   Use 64 hex digits pre-shared-key instead of passphrase
  --hidden                Make the Access Point hidden (do not broadcast the SSID)
  --mac-filter            Enable MAC address filtering
  --mac-filter-accept     Location of MAC address filter list (defaults to /etc/hostapd/hostapd.accept)
  --redirect-to-localhost If -n is set, redirect every web request to localhost (useful for public information networks)
  --hostapd-debug <level> With level between 1 and 2, passes arguments -d or -dd to hostapd for debugging.
  --isolate-clients       Disable communication between clients
  --ieee80211n            Enable IEEE 802.11n (HT)
  --ieee80211ac           Enable IEEE 802.11ac (VHT)
  --ht_capab <HT>         HT capabilities (default: [HT40+])
  --vht_capab <VHT>       VHT capabilities
  --country <code>        Set two-letter country code for regularity (example: US)
  --freq-band <GHz>       Set frequency band. Valid inputs: 2.4, 5 (default: 2.4)
  --driver                Choose your WiFi adapter driver (default: nl80211)
  --no-virt               Do not create virtual interface
  --no-haveged            Do not run 'haveged' automatically when needed
  --fix-unmanaged         If NetworkManager shows your interface as unmanaged after you
                          close create_ap, then use this option to switch your interface
                          back to managed
  --mac <MAC>             Set MAC address
  --dhcp-dns <IP1[,IP2]>  Set DNS returned by DHCP
  --daemon                Run create_ap in the background
  --pidfile <pidfile>     Save daemon PID to file
  --logfile <logfile>     Save daemon messages to file
  --stop <id>             Send stop command to an already running create_ap. For an <id>
                          you can put the PID of create_ap or the WiFi interface. You can
                          get them with --list-running
  --list-running          Show the create_ap processes that are already running
  --list-clients <id>     List the clients connected to create_ap instance associated with <id>.
                          For an <id> you can put the PID of create_ap or the WiFi interface.
                          If virtual WiFi interface was created, then use that one.
                          You can get them with --list-running
  --mkconfig <conf_file>  Store configs in conf_file
  --config <conf_file>    Load configs from conf_file

Non-Bridging Options:
  --no-dns                Disable dnsmasq DNS server
  --no-dnsmasq            Disable dnsmasq server completely
  -g <gateway>            IPv4 Gateway for the Access Point (default: 192.168.12.1)
  -d                      DNS server will take into account /etc/hosts
  -e <hosts_file>         DNS server will take into account additional hosts file

Useful informations:
  * If you're not using the --no-virt option, then you can create an AP with the same
    interface you are getting your Internet connection.
  * You can pass your SSID and password through pipe or through arguments (see examples).
  * On bridge method if the <interface-with-internet> is not a bridge interface, then
    a bridge interface is created automatically.

Examples:
  create_ap wlan0 eth0 MyAccessPoint MyPassPhrase
  echo -e 'MyAccessPoint\nMyPassPhrase' | create_ap wlan0 eth0
  create_ap wlan0 eth0 MyAccessPoint
  echo 'MyAccessPoint' | create_ap wlan0 eth0
  create_ap wlan0 wlan0 MyAccessPoint MyPassPhrase
  create_ap -n wlan0 MyAccessPoint MyPassPhrase
  create_ap -m bridge wlan0 eth0 MyAccessPoint MyPassPhrase
  create_ap -m bridge wlan0 br0 MyAccessPoint MyPassPhrase
  create_ap --driver rtl871xdrv wlan0 eth0 MyAccessPoint MyPassPhrase
  create_ap --daemon wlan0 eth0 MyAccessPoint MyPassPhrase
  create_ap --stop wlan0
- 基本模式
sudo create_ap -m nat wlan0 eth0 orangepi orangepi
- 保存配置模式
此命令可以保存启动命令到配置文件中,之后可以方便复用
sudo create_ap --daemon --mkconfig ap.conf --dhcp-dns 192.168.12.1 -m nat wlan0 eth0 orangepi orangepi -e /opt/ap/app
- 启动加载配置
sudo create_ap --daemon --config ap.conf -e /opt/ap/app
systemd 模式
- 配置
可以通过上边--mkconfig 参数指定
CHANNEL=default
GATEWAY=192.168.12.1
WPA_VERSION=1+2
ETC_HOSTS=0
DHCP_DNS=192.168.12.1
NO_DNS=0
NO_DNSMASQ=0
HIDDEN=0
MAC_FILTER=0
MAC_FILTER_ACCEPT=/etc/hostapd/hostapd.accept
ISOLATE_CLIENTS=0
SHARE_METHOD=nat
IEEE80211N=0
IEEE80211AC=0
HT_CAPAB=[HT40+]
VHT_CAPAB=
DRIVER=nl80211
NO_VIRT=0
COUNTRY=
FREQ_BAND=2.4
NEW_MACADDR=
DAEMONIZE=0
DAEMON_PIDFILE=
DAEMON_LOGFILE=/dev/null
NO_HAVEGED=0
WIFI_IFACE=wlan0
INTERNET_IFACE=eth0
SSID=orangepi
PASSPHRASE=orangepi
USE_PSK=0
- sytemd 服务
create_ap.service , 注意如果使用了systemd 上边的--daemon 不能配置,如果配置了,可以通过手工修改生成的文件,设置为0
[Unit]
Description=Create AP Service
After=network.target

[Service]
Type=simple
ExecStart=/usr/local/bin/create_ap --config /opt/ap/ap.conf -e /opt/ap/app
KillSignal=SIGINT
Restart=on-failure
RestartSec=5

[Install]
WantedBy=multi-user.target
- 自定义host
上边运行的时候配置了一个-e 参数可以指定自己的hosts 文件,比较有用,比如我们自己配置服务域名,这样连接进入wifi 之后就可以直接通过dns 访问服务了
192.168.12.1 dalongrongdemoapp.com
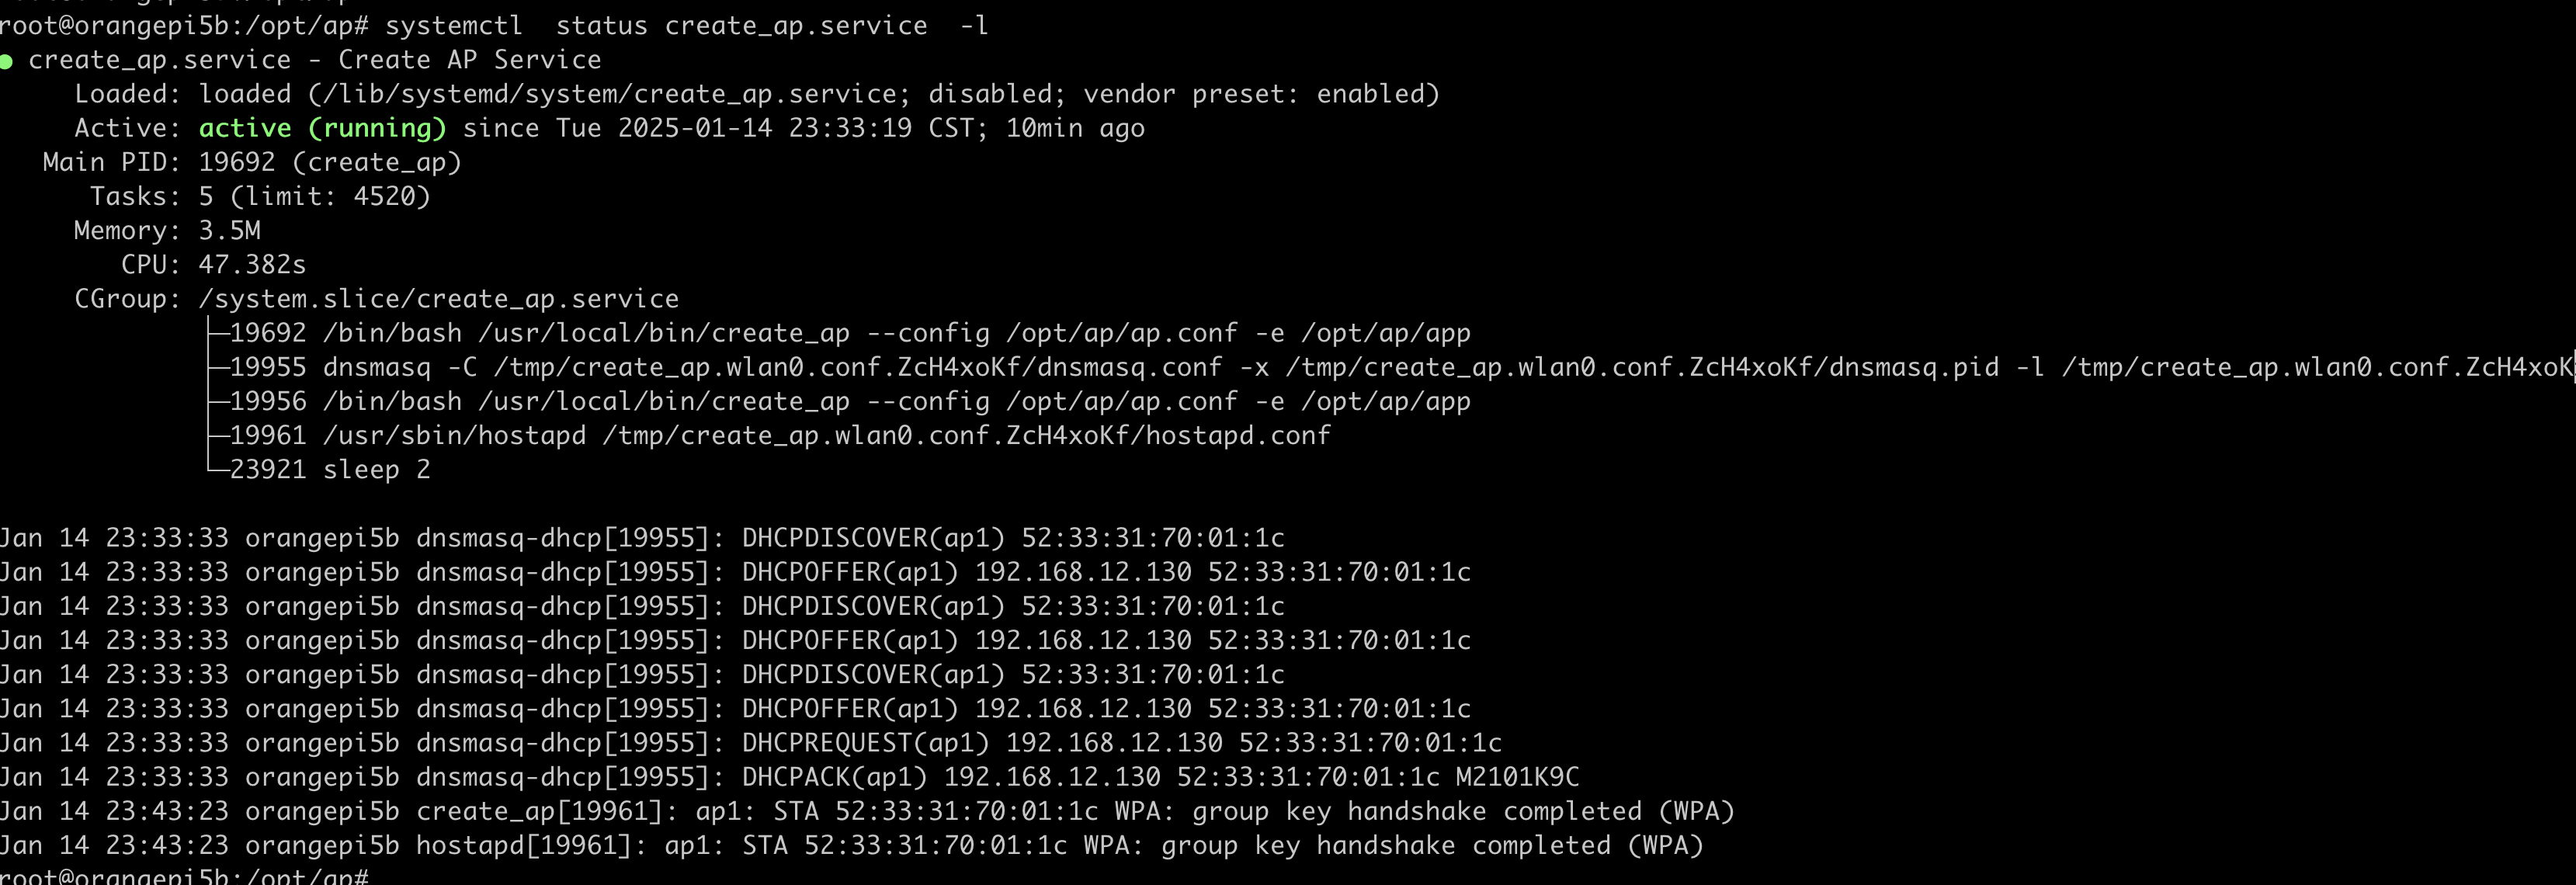
运行效果
- systemd 服务
可以看到包含了hostapd,dnsmasq
说明
目前create_ap已经不在维护了,因为使用的orange pi 5b 内部直接内置了create_ap 命令使用起来比较方便,对于其他系统推荐还是使用creat_ap github 上推荐的ap 创建工具
参考资料
https://github.com/oblique/create_ap
http://www.orangepi.org/orangepiwiki/index.php/AP6275P_PCIe_NIC_creates_WIFI_hotspot_via_create_ap


 浙公网安备 33010602011771号