ElasticSearch 简单入门
目录
1 ElasticSearch 简单介绍
1.1 数据格式
ElasticSearch 是面向文档型的数据库,一条数据在这里就是一个文档。为了方便理解可以将ElasticSearch 里存储文档数据和关系型数据库Mysql存储数据做一个对比。
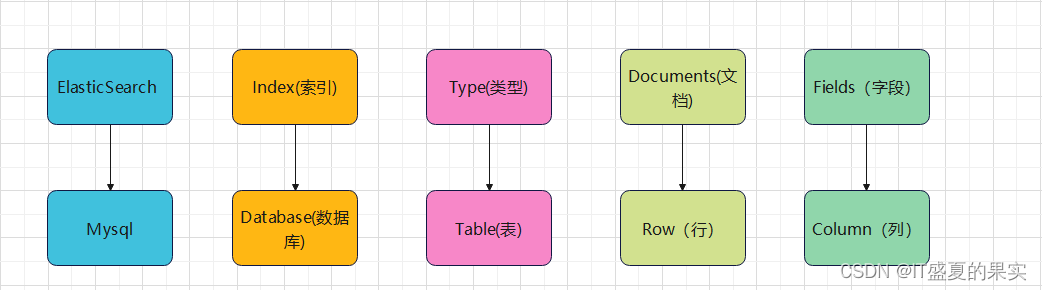
Es中的Index可以看做一个库,Types相当于表,Documents相当于表的行。但是Types的概念已经被逐渐弱化,在 ElasticSearch6.X中,一个index下已经只能包含一个type,ElasticSearch7.x中,Type的概念已经被移除了
ElasticSearch的windows环境下安装及遇到问题可参考博客:Windows下安装ElasticSearch_IT盛夏的果实的博客-CSDN博客
1.2 倒排索引
倒排索引的英文原名Inverted index,是一种索引方法,被用来存储全文搜索下某个单词在一个文档或者一组文档中的存储位置的映射。它是文档检索系统中最常用的数据结构。
可能因为Invert有颠倒的意思,所以被翻译成倒排。但其实倒排索引的真正含义并非是其字面上的意思,举个例子来说,在mysql中,通常会由记录来确定属性值,而倒排索引会由属性值来确定记录。这称之为倒排索引。

2 IK分词器
下载地址:Releases · medcl/elasticsearch-analysis-ik · GitHub
分词:就是将一段中文划分成一个个的关键字,在搜索时会将自己的信息进行分词,会把数据库中或者索引库中的数据进行分词,然后进行一个匹配操作,默认的中文分词器是将每一个字看成一个词。比如:“我爱中华”会被分为“我”、“爱”、“中”、“华”,这显然是没有必要的,所以需要安装中文分词器ik来解决这个问题。
IK分词器提供了两个分词算法
ik_smart:最少切分
ik_max_word:最细粒度划分
将ik分词器从gitLab上下载完毕之后,将其解压到elaticsearch中的plugins目录下:

重启es,可以根据elasticsearch-plugin list命令看是否插件是否加载成功
elasticsearch-plugin list
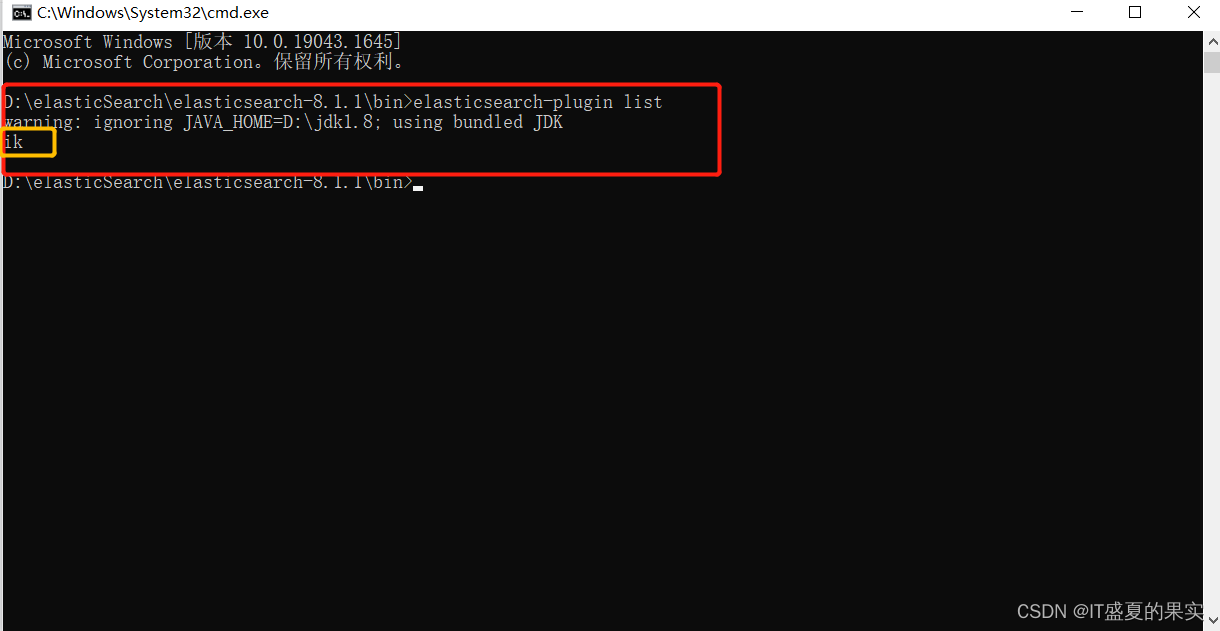
如此可见,插件已经加载成功。之后用kibana来测试我们刚刚安装的分词器的效果。
1)最少切分效果(ik_smart):

2)最细粒度切分效果(ik_max_word)

注意: 此时可以看出一个问题,当我们对一组词去进行拆分的时候,它并不知道拿一组词是关键词,就拿“刘畊宏的女孩”这组来说,首先“刘畊宏”肯定是个关键字,但是它却将它拆开了。显然这样人们去搜索的时候,它就不能成为一个关键字了。那么如何去避免这种情况呢?一般像这种自己需要的词,加到自己的分词器的字典中。
那么如何去加呢?打开自己刚刚配置的ik分词器目录,里面有一个config文件,打开发现里面有一个配置文件和众多字典。

其实ik分词的分词就是按照这些默认字典中的词去分的。我们可以加上一个自己的字典。然后在xml文件中指向自己配置的字典名称。
如:我加了一个字典名称为“me”,里面内容为“刘畊宏”的字典

字典内容:

IKAnalyzer.cfg.xml文件中配置:

之后重启es和kibana后继续测试。


之后发现,两种分词方式都已经将做“刘畊宏”作为一个关键词了
3 ElasticSearch的CRUD
2.1 索引相关操作
对比关系型数据库mysql,如果想要对数据进行操作,那么就需要知道是哪个数据库,是数据库中的哪张表,是表的哪条数据。那么在es中对比的就是Index和Document的概念了(Table的概念已经移除)
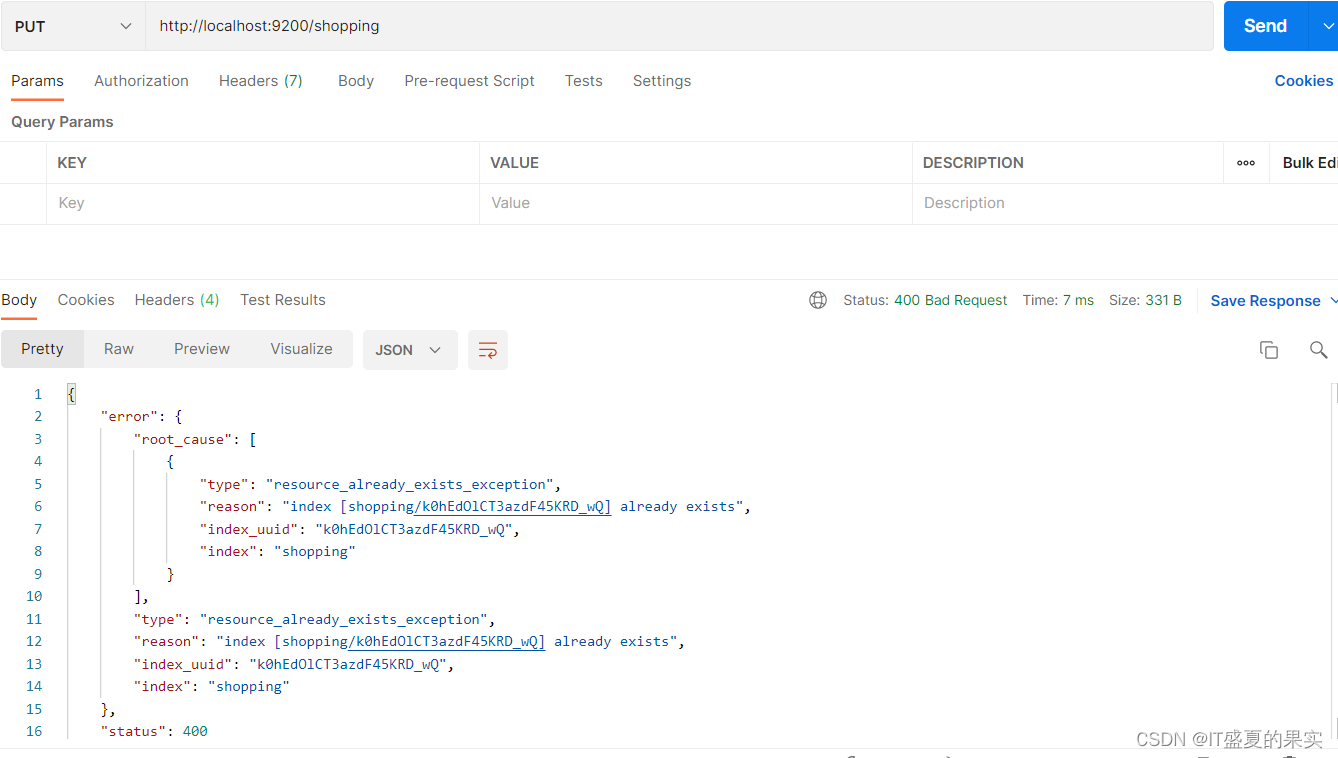
1)创建索引
向Es服务器发送PUT请求(创建一个index为shopping的索引):

注意:
1这里的请求方式只支持DELETE, PUT, HEAD, GET,不支持Post。因为Post没有幂等性。

2 当索引已经存在时,再创建会出错 (如继续创建index为shopping的索引)
2)查看指定索引(只需要将请求方式换为Get即可)

3)查看所有索引(http://localhost:9200/_cat/indices?v)

4)删除索引(将请求方式换为delete)

2.2 文档相关操作
我们在上面已经创建好了一个索引,接下来就应该创建文档了,并且添加数据。这里的数据可以类比为关系型数据库中的表数据,添加的数据格式为JSON格式
1)创建文档

注意:文档创建成功之后会返回一个id标识,这个id标识是随机生成的,当我们再次创建同样一个文档时,它依然会创建成功。只不过随机生成的id不一样,所以说创建文档的操作不需要保持幂等性,可以使用Post请求,但不能使用PUT请求。


刚刚我们说了创建文档的操作可以使用Post请求,但不能使用PUT请求的原因是因为返回的id是随机的,不用保持幂等性。但如果我们自己指定id呢?是否可以使用PUT请求呢?可以试一下:


可以发现,当指定了id之后,POST请求和PUT请求都是支持的。
2.3 查询
1)条件查询
方式一:Get请求

方式二:请求体查询

2)全量查询
{"query" : {
"match_all" : {
}}
}

3)分页查询
{"query" : {
"match_all" : {
}},
"from":0,
"size":2
}
from:(页码-1)* 每页数据条数

除此之外也可以对想要的数据进行指定查询

4)排序

5)多条件查询
should:或相当于or
查询手机品牌为小米或价格在1999.00的数据

must:且相当于and
查询手机品牌为小米并且价格在1999.00的数据

6)范围查询
{
"query" : {
"bool" : {
"must" : [
{
"match" : {
"category" : "小米"
}
},{
"match" : {
"price" : "1999.00"
}
}
],
"filter" : {
"range" : {
"price" : {
"gt" : 50000
}
}
}
}
}
}

7)全文检索
这种查询方式会将所有文章中所有带小或燕的全部查询出来,因为小燕会经过分词,分成小和燕

8)完全匹配
如果不想要全文匹配,想要根据查询字段完全匹配的话,可以将match换成match_phrase

9)高亮显示
对查询出的字段category进行高亮显示
"highlight" : {
"fields" : {
"category" : {}
}
}

10)聚合查询
对价格进行分组
{
"aggs" : { //聚合操作
"price_group" : { //随意起的分组名称
"terms" : { //分组
"field" : "price" //分组字段
}
}
}
}

要是想对价格求平均值呢?
{
"aggs" : { //聚合操作
"price_avg" : { //随意起的分组名称
"avg" : { //分组
"field" : "price" //分组字段
}
}
},
"size" : 0 //不要原始数据
}

2.4 映射关系
大家都知道,我们在用es进行搜索的时候,是可以全文搜索,和完全匹配的,那么怎么确定哪些字段可以全文搜索,哪些可以完全匹配呢?
{
"properties" : {
"name" : {
"type" : "text",
"index" : true
},
"sex" : {
"type" : "keyword",
"index" : true
},
"tel" : {
"type" : "keyword",
"index" : false
}
}
}
如上所示:
type类型为text时,表示可以全文搜索,为keyword时,表示只能完全匹配,index为false表示不能够被索引
4 SpringBoot集成Es
pom文件:
<?xml version="1.0" encoding="UTF-8"?>
<project xmlns="http://maven.apache.org/POM/4.0.0" xmlns:xsi="http://www.w3.org/2001/XMLSchema-instance"
         xsi:schemaLocation="http://maven.apache.org/POM/4.0.0 https://maven.apache.org/xsd/maven-4.0.0.xsd">
    <modelVersion>4.0.0</modelVersion>
    <parent>
        <groupId>org.springframework.boot</groupId>
        <artifactId>spring-boot-starter-parent</artifactId>
        <version>2.6.0</version>
        <relativePath/> <!-- lookup parent from repository -->
    </parent>
    <groupId>com.liubujun</groupId>
    <artifactId>springboot_es</artifactId>
    <version>0.0.1-SNAPSHOT</version>
    <name>springboot_es</name>
    <description>Demo project for Spring Boot</description>
    <properties>
        <java.version>1.8</java.version>
        <!--自己定义es版本依赖   保证和本地一致-->
        <elasticsearch.version>7.7.0</elasticsearch.version>
    </properties>
    <dependencies>
        <dependency>
            <groupId>com.alibaba</groupId>
            <artifactId>fastjson</artifactId>
            <version>1.2.74</version>
        </dependency>
        <dependency>
            <groupId>org.springframework.boot</groupId>
            <artifactId>spring-boot-starter-data-elasticsearch</artifactId>
        </dependency>

        <dependency>
            <groupId>org.springframework.boot</groupId>
            <artifactId>spring-boot-devtools</artifactId>
            <scope>runtime</scope>
            <optional>true</optional>
        </dependency>
        <dependency>
            <groupId>org.springframework.boot</groupId>
            <artifactId>spring-boot-configuration-processor</artifactId>
            <optional>true</optional>
        </dependency>
        <dependency>
            <groupId>org.projectlombok</groupId>
            <artifactId>lombok</artifactId>
            <optional>true</optional>
        </dependency>
        <dependency>
            <groupId>org.springframework.boot</groupId>
            <artifactId>spring-boot-starter-test</artifactId>
            <scope>test</scope>
        </dependency>
    </dependencies>

    <build>
        <plugins>
            <plugin>
                <groupId>org.springframework.boot</groupId>
                <artifactId>spring-boot-maven-plugin</artifactId>
                <configuration>
                    <excludes>
                        <exclude>
                            <groupId>org.projectlombok</groupId>
                            <artifactId>lombok</artifactId>
                        </exclude>
                    </excludes>
                </configuration>
            </plugin>
        </plugins>
    </build>

</project>
注意:es的版本一定要和springBoot的版本一致,否则后续会出问题。

如图:我们springBoot中默认的是有一个es的客户端的。但是我下载的es版本是7.7.0的。所以需要额外的配置。

配置完成后,在刷新依赖看

客户端配置:
import org.apache.http.HttpHost;
import org.elasticsearch.client.RestClient;
import org.elasticsearch.client.RestHighLevelClient;
import org.springframework.context.annotation.Bean;
import org.springframework.context.annotation.Configuration;

/**
 * @Author: liubujun
 * @Date: 2022/4/23 20:23
 */

@Configuration
public class ElasticSearchClientConfig {

    @Bean
    public RestHighLevelClient restHighLevelClient() {
        RestHighLevelClient client = new RestHighLevelClient(
                RestClient.builder(
                        new HttpHost("127.0.0.1", 9200, "http"))
        );
        return client;
    }


}
4.1 索引的操作
1)创建索引
@SpringBootTest
class SpringbootEsApplicationTests {

    @Resource
    private RestHighLevelClient client;

    /**
     * 测试索引的创建
     */
    @Test
    void testCreateIndex() throws IOException {

        // 1 创建索引请求
        CreateIndexRequest request = new CreateIndexRequest("liu2_index");
        // 2 客户端执行请求
        CreateIndexResponse createIndexResponse
                = client.indices().create(request, RequestOptions.DEFAULT);

        System.out.println(createIndexResponse);

    }

}
2)测试索引是否存在
    /**
     * 测试索引获取存在
     */
    @Test
    void testExistIndex() throws IOException {
        GetIndexRequest request = new GetIndexRequest("liu2_index");
        boolean exists = client.indices().exists(request, RequestOptions.DEFAULT);
        System.out.println(exists); //true
    }
3)删除索引
    /**
     * 删除索引
     */
    @Test
    void testDelIndex() throws IOException {
        DeleteIndexRequest request = new DeleteIndexRequest("liu2_index");
        AcknowledgedResponse delete = client.indices().delete(request, RequestOptions.DEFAULT);
        System.out.println(delete.isAcknowledged()); //true
    }
4.2 文档相关操作
测试文档相关操作时,可以先创建一个实体类方便操作
import lombok.AllArgsConstructor;
import lombok.Data;
import lombok.NoArgsConstructor;
import org.springframework.stereotype.Component;

/**
 * @Author: liubujun
 * @Date: 2022/4/24 16:35
 */

@Component
@AllArgsConstructor
@NoArgsConstructor
@Data
public class User {

    private String name;

    private Integer age;
}
1)添加文档
    /**
     * 添加文档
     */
    @Test
    void testAddDocument() throws IOException {
        //创建对象
        User user = new User("zhangsan", 18);

        //创建请求
        IndexRequest request = new IndexRequest("liu2_index");

        // 设计规则
        request.id("1");
        request.timeout(TimeValue.timeValueSeconds(1));
        request.timeout("1s");

        //将数据放入请求
         request.source(JSON.toJSONString(user), XContentType.JSON);

        //客户端发送请求
        IndexResponse indexResponse = client.index(request, RequestOptions.DEFAULT);
        System.out.println(indexResponse.toString());
        //对应我们命令返回的状态
        System.out.println(indexResponse.status());

    }
2)看文档是否存在
    /**
     * 文档是否存在
     */
    @Test
    void testExistDocument() throws IOException {

        GetRequest getRequest = new GetRequest("liu2_index","1");
        //不获取返回source的上下文
        getRequest.fetchSourceContext(new FetchSourceContext(false));
        boolean exists = client.exists(getRequest, RequestOptions.DEFAULT);
        System.out.println(exists); //true
    }
3)获取文档内容
    /**
     * 获取文档信息
     */
    @Test
    void testGetDocument() throws IOException {

        GetRequest getRequest = new GetRequest("liu2_index","1");
        GetResponse getResponse = client.get(getRequest, RequestOptions.DEFAULT);
        //打印文档内容map格式
        System.out.println(getResponse.getSourceAsString());
        //返回全部信息和命令是一样的
        System.out.println(getResponse);
    }
4)更新文档
/**
     * 更新文档
     */
    @Test
    void testUpdateDocument() throws IOException {

        UpdateRequest updateRequest = new UpdateRequest("liu2_index", "1");
        // 设计规则
        updateRequest.timeout("1s");

        User user = new User("lisi",19);

        //将数据放入请求
        updateRequest.doc(JSON.toJSONString(user), XContentType.JSON);

        //客户端发送请求
        UpdateResponse updateResponse = client.update(updateRequest, RequestOptions.DEFAULT);
        System.out.println(updateResponse.status());  //OK

    }
5)删除文档内容
    /**
     * 删除文档记录
     */
    @Test
    void testDelDocument() throws IOException {
        DeleteRequest request = new DeleteRequest("liu2_index", "1");
        request.timeout("1s");

        DeleteResponse deleteResponse = client.delete(request, RequestOptions.DEFAULT);
        System.out.println(deleteResponse.status()); //OK

    }
6)批量插入数据
/**
     * 批量插入数据
     */
    @Test
    void testBulkDocument() throws IOException {
        BulkRequest bulkRequest = new BulkRequest();

        bulkRequest.timeout("10s");
        ArrayList<User> userList = new ArrayList<>();

        userList.add(new User("lisi1",19));
        userList.add(new User("lisi2",19));
        userList.add(new User("lisi3",19));
        userList.add(new User("lisi4",19));
        userList.add(new User("lisi5",19));

        //批量插入数据
        for (int i = 0; i < userList.size(); i++) {
            bulkRequest.add(
                    new IndexRequest("liu2_index")
                    .id(""+(i+1)) //不写id就会默认插入随机id
                    .source(JSON.toJSONString(userList.get(i)),XContentType.JSON)
            );
        }
        BulkResponse bulkResponse = client.bulk(bulkRequest, RequestOptions.DEFAULT);
        System.out.println(bulkResponse.hasFailures());  //false 因为是否失败所以false代表成功
    }
7)查询
    /**
     * 查询
     */
    @Test
    void testSearchDocument() throws IOException {
        SearchRequest searchRequest = new SearchRequest("liu2_index");

        SearchSourceBuilder sourceBuilder = new SearchSourceBuilder();

        //QueryBuilders.termQuery() 精确匹配
        //QueryBuilders.matchAllQuery() 匹配所有
        TermQueryBuilder termQueryBuilder = QueryBuilders.termQuery("name", "lisi1");


        sourceBuilder.query(termQueryBuilder);
        sourceBuilder.timeout(new TimeValue(60, TimeUnit.SECONDS));

        searchRequest.source(sourceBuilder);

        SearchResponse searchResponse = client.search(searchRequest, RequestOptions.DEFAULT);

        System.out.println(JSON.toJSONString(searchResponse.getHits()));
        System.out.println("=====================================================");
        for (SearchHit documentFields : searchResponse.getHits().getHits()) {
            System.out.println(documentFields.getSourceAsMap());
        }


    }
结果:
{"fragment":true,"hits":[{"fields":{},"fragment":false,"highlightFields":{},"id":"1","matchedQueries":[],"primaryTerm":0,"rawSortValues":[],"score":1.3862942,"seqNo":-2,"sortValues":[],"sourceAsMap":{"name":"lisi1","age":19},"sourceAsString":"{\"age\":19,\"name\":\"lisi1\"}","sourceRef":{"fragment":true},"type":"_doc","version":-1}],"maxScore":1.3862942,"totalHits":{"relation":"EQUAL_TO","value":1}}
=====================================================
{name=lisi1, age=19}
 浙公网安备 33010602011771号