
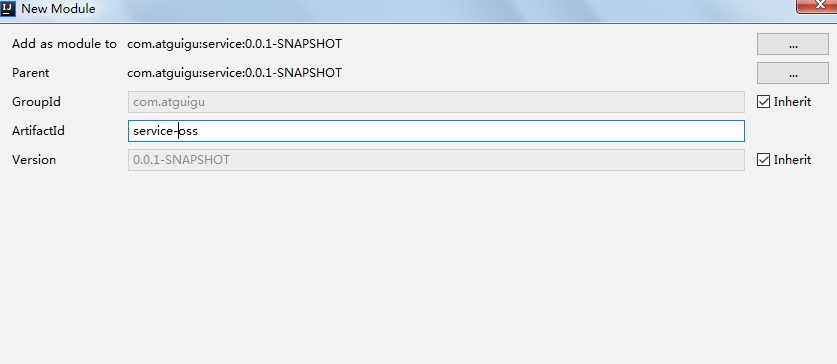
一、新建云存储微服务
1、在service模块下创建子模块service-oss
2、配置pom.xml
service-oss上级模块service已经引入service的公共依赖,所以service-oss模块只需引入阿里云oss相关依赖即可,
service父模块已经引入了service-base模块,所以Swagger相关默认已经引入
<dependencies>
        <dependency>
            <groupId>com.aliyun.oss</groupId>
            <artifactId>aliyun-sdk-oss</artifactId>
        </dependency>
        <dependency>
            <groupId>joda-time</groupId>
            <artifactId>joda-time</artifactId>
        </dependency>
    </dependencies>
3、配置application.properties
# 服务端口
server.port=8002
# 服务名
spring.application.name=service-oss
# 环境设置:dev、test、prod
spring.profiles.active=dev

# 阿里云 OSS
# 不同的服务器,地址不同
aliyun.oss.file.endpoint=oss-cn-beijing.aliyuncs.com
aliyun.oss.file.keyid=LTAI4FyreS5c9zrkGTxF8T6U
aliyun.oss.file.keysecret=IwPay0vpADfubAtmHsURVFfiES5Dag
# bucket可以在控制台创建,也可以使用java代码创建
aliyun.oss.file.bucketname=ws-1010
# nacos服务地址,实际中改成服务器ip
spring.cloud.nacos.discovery.server-addr=127.0.0.1:8848
4、logback-spring.xml
5、创建启动类
创建OssApplication.java
package com.atguigu.oss;

import org.springframework.boot.SpringApplication;
import org.springframework.boot.autoconfigure.SpringBootApplication;
import org.springframework.boot.autoconfigure.jdbc.DataSourceAutoConfiguration;
import org.springframework.cloud.client.discovery.EnableDiscoveryClient;
import org.springframework.context.annotation.ComponentScan;

@SpringBootApplication(exclude = DataSourceAutoConfiguration.class)
@EnableDiscoveryClient
@ComponentScan(basePackages = {"com.atguigu"})
public class OssApplication {

    public static void main(String[] args) {
        SpringApplication.run(OssApplication.class,args);
    }

}
6、启动项目
报错
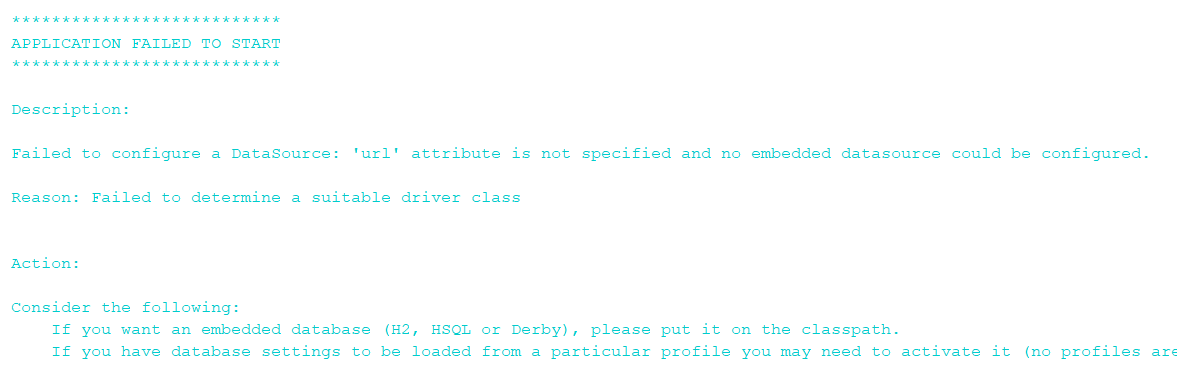
spring boot 会默认加载org.springframework.boot.autoconfigure.jdbc.DataSourceAutoConfiguration这个类,
而DataSourceAutoConfiguration类使用了@Configuration注解向spring注入了dataSource bean,又因为项目(oss模块)中并没有关于dataSource相关的配置信息,所以当spring创建dataSource bean时因缺少相关的信息就会报错。
解决办法:
方法1、在@SpringBootApplication注解上加上exclude,解除自动加载DataSourceAutoConfiguration
@SpringBootApplication(exclude = DataSourceAutoConfiguration.class)
二、实现文件上传
1、从配置文件读取常量
创建常量读取工具类:ConstantPropertiesUtil.java
使用@Value读取application.properties里的配置内容
用spring的 InitializingBean 的 afterPropertiesSet 来初始化配置信息,这个方法将在所有的属性被初始化后调用。
package com.atguigu.oss.utils;

import org.springframework.beans.factory.InitializingBean;
import org.springframework.beans.factory.annotation.Value;
import org.springframework.context.annotation.PropertySource;
import org.springframework.stereotype.Component;

@Component
public class ConstandPropertiesUtils implements InitializingBean {

    //读取配置文件内容
    @Value("${aliyun.oss.file.endpoint}")
    private String endpoint;

    @Value("${aliyun.oss.file.keyid}")
    private String keyid;

    @Value("${aliyun.oss.file.keysecret}")
    private String keysecret;

    @Value("${aliyun.oss.file.bucketname}")
    private String bucketname;

    public static String END_POINT;
    public static String ACCESS_KEY_ID;
    public static String ACCESS_KEY_SECRET;
    public static String BUCKET_NAME;

    @Override
    public void afterPropertiesSet() throws Exception {
        END_POINT = endpoint;
        ACCESS_KEY_ID = keyid;
        ACCESS_KEY_SECRET = keysecret;
        BUCKET_NAME = bucketname;
    }
}
2、文件上传
创建Service接口:FileService.java
package com.atguigu.oss.service;

import org.springframework.web.multipart.MultipartFile;

public interface OssService {
    String uploadFileAvatar(MultipartFile file);
}
实现类
package com.atguigu.oss.service.impl;

import com.aliyun.oss.ClientBuilderConfiguration;
import com.aliyun.oss.OSS;
import com.aliyun.oss.OSSClientBuilder;
import com.atguigu.oss.service.OssService;
import com.atguigu.oss.utils.ConstandPropertiesUtils;
import org.joda.time.DateTime;
import org.springframework.stereotype.Service;
import org.springframework.web.multipart.MultipartFile;

import java.io.ByteArrayInputStream;
import java.io.InputStream;
import java.util.UUID;

@Service
public class OssServiceImpl implements OssService {

    @Override
    public String uploadFileAvatar(MultipartFile file) {

        // Endpoint以杭州为例,其它Region请按实际情况填写。
        String endpoint = ConstandPropertiesUtils.END_POINT;
        // 云账号AccessKey有所有API访问权限,建议遵循阿里云安全最佳实践,创建并使用RAM子账号进行API访问或日常运维,请登录 https://ram.console.aliyun.com 创建。
        String accessKeyId = ConstandPropertiesUtils.ACCESS_KEY_ID;
        String accessKeySecret = ConstandPropertiesUtils.ACCESS_KEY_SECRET;
        String bucketName = ConstandPropertiesUtils.BUCKET_NAME;

        try {
            //oss设置代理
            ClientBuilderConfiguration conf = new ClientBuilderConfiguration();
            conf.setConnectionTimeout(5000);
            conf.setMaxErrorRetry(3);
            conf.setProxyHost("proxy3.bj.petrochina");
            conf.setProxyPort(8080);

            // 创建OSSClient实例。
            OSS ossClient = new OSSClientBuilder().build(endpoint, accessKeyId, accessKeySecret, conf);

            // 上传文件流。
            InputStream inputStream = file.getInputStream();

            //生成随机数
            String uuid = UUID.randomUUID().toString().replaceAll("-","");

            //创建文件存储再oss的路径,按日期存储
            String filePath = new DateTime().toString("yyyy/MM/dd");

            //获取文件流的文件名
            String filename = file.getOriginalFilename();

            //拼接路径和文件名
            filename = filePath+"/"+uuid+filename;

            //上传oss
            ossClient.putObject(bucketName,filename,inputStream );

            // 关闭OSSClient。
            ossClient.shutdown();

            //手动拼接一个返回路径
            //https://ws-1010.oss-cn-beijing.aliyuncs.com/eva-no1%282%29.jpg
            String url = "https://"+bucketName+"."+endpoint+"/"+filename;

            return url;

        } catch (Exception e) {
            e.printStackTrace();
            return null;
        }
    }
}
3、控制层
创建controller:FileUploadController.java
package com.atguigu.oss.controller;

import com.atguigu.commonutils.R;
import com.atguigu.oss.service.OssService;
import org.springframework.beans.factory.annotation.Autowired;
import org.springframework.web.bind.annotation.CrossOrigin;
import org.springframework.web.bind.annotation.PostMapping;
import org.springframework.web.bind.annotation.RequestMapping;
import org.springframework.web.bind.annotation.RestController;
import org.springframework.web.multipart.MultipartFile;

@RestController
@RequestMapping("/eduoss/fileoss")
@CrossOrigin
public class OssController {

    @Autowired
    private OssService ossService;

    //上传头像方法
    @PostMapping("upload")
    public R uploadOss(MultipartFile file) {
        //获取上传文件
        String url = ossService.uploadFileAvatar(file);

        return R.ok().data("url",url);
    }
}

 浙公网安备 33010602011771号