
Nuxt.js打造旅游网站第3篇_登录页面的编写
主要知识点:
1.使用vuex/store管理数据
2.登录注册逻辑
3.Nuxt的本地存储
1.登录页面
1.1登录页面布局


<template>
    <div class="container">
        <!-- 主要内容 -->
        <el-row
        type="flex"
        justify="center"
        align="middle"
        class="main">

            <div class="form-wrapper">
                <!-- 表单头部tab -->
                <el-row type="flex" justify="center" class="tabs">
                    <span :class="{active: currentTab === index}"
                    v-for="(item, index) in [`登录`, `注册`]"
                    :key="index"
                    @click="handleChangeTab(index)">
                        {{item}}
                    </span>
                </el-row>

                <!-- 登录功能组件 -->
                <LoginForm v-if="currentTab == 0"/>

                <!-- 注册功能组件 -->
                <!-- <RegisterForm v-if="currentTab == 1"/> -->
            </div>
        </el-row>
    </div>
</template>

<script>
import LoginForm from '@/components/user/loginForm'
export default {
    components: {
      LoginForm
    },
    data(){
        return {
            currentTab: 0
        }
    },
    methods: {
        handleChangeTab(index){
            this.currentTab = index;
        },
    }
}
</script>

<style scoped lang="less">
.container{
    background:url(http://157.122.54.189:9095/assets/images/th03.jfif) center 0;
    height: 700px;
    min-width:1000px;

    .main{
        width:1000px;
        height: 100%;
        margin:0 auto;
        position: relative;

        .form-wrapper{
            width:400px;
            margin:0 auto;
            background:#fff;
            box-shadow: 2px 2px 0 rgba(0,0,0,0.1);
            overflow:hidden;

            .tabs{
                span{
                    display: block;
                    width:50%;
                    height: 50px;
                    box-sizing: border-box;
                    border-top:2px #eee solid;
                    background:#eee;
                    line-height: 48px;
                    text-align: center;
                    cursor: pointer;
                    color:#666;

                    &.active{
                        color:orange;
                        border-top-color: orange;
                        background:#fff;
                        font-weight: bold;
                    }
                }
            }
        }
    }
}
</style>
1.2 登录功能

思路:
1.在components/user中新建loginForm.vue表单组件
2.使用Element-ui的表单组件
3.表单数据绑定
4.表单验证
5.登录接口
实现步骤:
1.新建loginForm.vue表单组建
<template>
    <el-form
        :model="form"
        ref="form"
        :rules="rules"
        class="form">

        <el-form-item class="form-item">
            <el-input
            placeholder="用户名/手机">
            </el-input>
        </el-form-item>

        <el-form-item class="form-item">
            <el-input
            placeholder="密码"
            type="password">
            </el-input>
        </el-form-item>

        <p class="form-text">
            <nuxt-link to="#">忘记密码</nuxt-link>
        </p>

        <el-button
        class="submit"
        type="primary"
        @click="handleLoginSubmit">
            登录
        </el-button>
    </el-form>

</template>

<script>
export default {
    data(){
        return {
            // 表单数据
            form: {},
            // 表单规则
            rules: {},
        }
    },
    methods: {
        // 提交登录
        handleLoginSubmit(){
           console.log(this.form)
        }
    }
}
</script>

<style scoped lang="less">
    .form{
        padding:25px;
    }

    .form-item{
        margin-bottom:20px;
    }

    .form-text{
        font-size:12px;
        color:#409EFF;
        text-align: right;
        line-height: 1;
    }

    .submit{
        width:100%;
        margin-top:10px;
    }
</style>
<!-- 登录功能组件 -->
<!-- <LoginForm v-if="currentTab == 0"/> -->
2.表单数据绑定
// 其他代码...

data(){
    return {
        // 表单数据
        form: {
            username: "",   // 登录用户名/手机
            password: ""    // 登录密码
        },
        // 其他代码...
    }
},

// 其他代码...
<!-- 其他代码... -->

<el-form-item class="form-item">
    <!-- 新增了v-model -->
    <el-input
              placeholder="用户名/手机"
              v-model="form.username">
    </el-input>
</el-form-item>

<el-form-item class="form-item">
    <!-- 新增了v-model -->
    <el-input
              placeholder="密码"
              type="password"
              v-model="form.password">
    </el-input>
</el-form-item>

<!-- 其他代码... -->
3.表单验证
// 其他代码...

data(){
    return {
        // 其他代码...

        // 表单规则
        rules: {
            username: [
                {
                    required: true,
                    message: '请输入用户名',
                    trigger: 'blur'
                },
            ],
            password: [
                {
                    required: true,
                    message: '请输入密码',
                    trigger: 'blur'
                },
            ],
        },
    }
},

// 其他代码...
<!-- 其他代码... -->

<!-- 新增了prop属性 -->
<el-form-item class="form-item" prop="username">
    <el-input
              placeholder="用户名/手机"
              v-model="form.username">
    </el-input>
</el-form-item>

<!-- 新增了prop属性 -->
<el-form-item class="form-item" prop="password">
    <el-input
              placeholder="密码"
              type="password"
              v-model="form.password">
    </el-input>
</el-form-item>

<!-- 其他代码... -->
4.登录接口
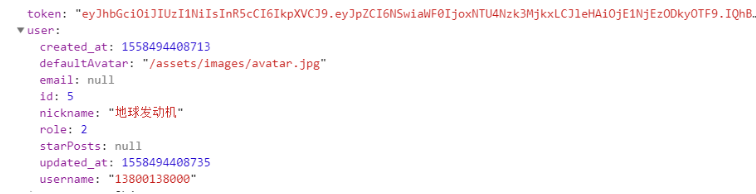
接下来要调用登录的接口进行登录了,如果一切正常的话,我们可以看到后台返回的用户信息,如果登录失败,我们需要对统一对错误的返回进行处理,这个我们在最后再统一实现。
// 其他代码...

// 提交登录
methods: {
    handleLoginSubmit(){
        // 验证表单
        this.$refs['form'].validate((valid) => {
            // 为true表示没有错误
            if (valid) {
                this.$axios({
                    url: "/accounts/login",
                    method: "POST",
                    data: this.form
                }).then(res => {
                    console.log(res.data);
                })
            }
        })
    }
}

// 其他代码...
账号:13800138000
密码:123456
如果正常登录应该可以在控制看到打印出来的用户信息,则表示登录成功了。
5.总结
-
-
使用
Element-ui的表单组件绑定数据和验证表单 -
调用登录接口
2.使用store管理数据
思路:
实现步骤:
// 每个小仓库都必须暴露出 state, mutations
export const state = {
userInfo: {
// 用户验证的token
token: "",
// 用户信息
user: {
}
}
}
export const mutations = {
// 设置用户信息
setUserInfo(state, data){
state.userInfo = data;
}
}
在登录请求发送成功后存储用户输入的数据到vuex的store仓库中。
        // 提交登录
        handleLoginSubmit(){
          // 验证表单
          this.$refs['form'].validate((valid)=>{
            // 为true表示没有错误
            if(valid){
              this.$axios({
                url: '/accounts/login',
                method: 'POST',
                data: this.form
              }).then(res=>{
                // 1.保存到vuex, 注意调用方法时加上命名空间,也就是方法所在的模块user
                this.$store.commit('user/setUserInfo', res.data)
              })
            }
          })
        }
在页面中显示用户登录的手机号,在header.vue组件中替换下面代码。
<span class="el-dropdown-link">
              <img src="http://157.122.54.189:9095/assets/images/avatar.jpg" alt="">
              {{this.$store.state.user.userInfo.user.username}}
              <i class="el-icon-arrow-down el-icon--right"></i>
</span>
nuxt下的store的使用
1.先新建数据的模块,一个模块就是一个文件,文件名字就是模块的名字,比如新建一个user模块,每个模块里面可以暴露出3个常用的属性
- state
- mutations
- actions
// 每个小仓库都必须暴露出 state, mutations

export const state = {
  userInfo: {
    // 用户验证的token
    token: "",
    // 用户信息
    user: {

    }

  }
}

export const mutations = {
  // 设置用户信息
  setUserInfo(state, data){
    state.userInfo = data;
  }
}
2.读取user下面的用户
{{ $store.state.user.userInfo.user.username }}
3.调用mutations下的方法时候必须要带有模块名称
// 1.保存到vuex
this.$store.commit("user/setUserInfo", res.data);
把store数据保存到本地

因为这个项目是Node.js项目,所以不能使用使用localStorage方法来存储,这里需要安装一个插件解决这个本地存储问题。
安装:yarn add vuex-persistedstate
配置nuxt.config.js,在plugins中添加下面配置。
{ src: '~/plugins/localStorage.js', ssr: false }
在plugins目录中新建localStorage.js并添加如下代码。
// ~/plugins/localStorage.js

import createPersistedState from 'vuex-persistedstate'

export default ({store}) => {
  window.onNuxtReady(() => {
    createPersistedState({
        key: 'store'
    })(store)
  })
}
使用一个第三方的插件vuex-persistedstate, 通过这个插件会自动把store的数据保存到本地,并且在应用加载完后会自动把本地的数据重新赋值给store。
3.判断显示页面信息
当本地保存的数据被清除后,页面中仍会显示头像,应该显示的是"登录/注册"按钮,修改成下面的代码即可。
<div>
        <div v-if="!$store.state.user.userInfo.token">
          <nuxt-link to="/user/login">登录 / 注册</nuxt-link>
        </div>
        <div v-else>
          <el-dropdown>
            <span class="el-dropdown-link">
              <img
                :src="$axios.defaults.baseURL + $store.state.user.userInfo.user.defaultAvatar"
                alt
              />
              {{this.$store.state.user.userInfo.user.username}}
              <i
                class="el-icon-arrow-down el-icon--right"
              ></i>
            </span>
            <el-dropdown-menu slot="dropdown">
              <el-dropdown-item>个人中心</el-dropdown-item>
              <el-dropdown-item>退出</el-dropdown-item>
            </el-dropdown-menu>
          </el-dropdown>
        </div>
      </div>
4.退出登录
给header.vue组件中的退出按钮添加一个退出事件
<!-- 给通过native给elementUI组件绑定原生事件 -->
<el-dropdown-item @click.native="handleLogout">退出</el-dropdown-item>
  methods: {
    // 退出登录,清空本地用户数据
    handleLogout(){
      this.$store.commit('user/clearUserInfo');
    }
  }
在store/user.js模块的mutations中添加一个清空数据的方法。
  // 设置用户数据为空
  clearUserInfo(state){
    state.userInfo = {};
  }
登录成功之后跳转到首页,在loginForm.vue中添加下面代码。
// 跳转到首页
this.$router.push("/");
5.actions的使用
actions是异步的修改仓库的数据,并且依赖mutations。
mutations:用于同步修改仓库的数据。
actions:用于异步修改仓库的数据,例如登录。
将发送登录请求的代码写到actions的方法里面,方便以后维护和调用。
在store/user.js中新增actions。
// 异步修改仓库的数据
export const actions = {
  // login(store, data){
  login({commit}, data){
    return this.$axios({
      url: "/accounts/login",
      method: "POST",
      data:data
    }).then(res => {
      // store.commit("setUserInfo", res.data)
      commit("setUserInfo", res.data)
      // 1.保存到vuex, 注意调用方法时加上命名空间,也就是方法所在的模块user

      // 登录后的行为应该由调用的页面去执行,不能写死,因为每个页面登录成功执行的操作可能不一样
      // this.$router.push("/");

    });
  }
}
loginForm.vue组件中的发送登录请求方法的代码改为:
  methods: {
    // 提交登录
    handleLoginSubmit() {
      // 验证表单
      this.$refs["form"].validate(valid => {
        // 为true表示没有错误
        if (valid) {
          this.$store.dispatch('user/login', this.form).then(res=>{
            this.$router.push('/');
          })
        }
      });
    }
  }
actions总结
什么情况下把方法封装到actions?
异步的方法需要复用的时候,可以考虑把方法封装到actions,比如登录这些方法。
actions要怎么声明?
actions里面的方法第一个参数是store对象,这个对象下面可以访问到所有store的属性(commit, dispatch, state...)用commit修改state数据;
第二个是可选的,是传递进来的参数。
怎么调用actions的方法?
this.$store.dispatch('user/login', this.form).then(res=>{ this.$router.push('/'); })
store总结
什么时候使用Vuex?
项目数据比较多,需要多个组件去共享数据的时候可以使用vuex
怎么使用?
state: 存储数据
mutations: 设置修改state的数据
actions: 异步修改state的数据,把可以复用的请求放到actions里面(actions需要调用mutations的方法修改数据)
使用时候注意的问题
单词别写错
注意调用mutations和actions的方法记得加上模块名字(命名空间)

 浙公网安备 33010602011771号