


一:Docker安装:
1:安装docker :
apt install docker-ce -y
2:启动,重启,关闭,查看状态:
# 1:启动
systemctl start docker
# 2: 重启
systemctl restart docker
# 3: 关闭
systemctl stop docker
# 4: 查看状态
systemctl status docker
3: 查看版本:
# 1:精简信息
docker version
# 2:详细信息
docker info
4:加速配置:实际就是更改国内源。
# 定制加速仓库
echo '{"registry-mirrors": ["https://kcmn5udq.mirror.aliyuncs.com"]}' > /etc/docker/daemon.json

# 重启服务
systemctl restart docker
二:基础管理
<一>: 镜像管理:
1:搜索镜像:(需要联网)
docker search 镜像名
python@ubuntu:~$ docker search nginx
NAME                               DESCRIPTION                                     STARS               OFFICIAL            AUTOMATED
nginx                              Official build of Nginx.                        13818               [OK]
jwilder/nginx-proxy                Automated Nginx reverse proxy for docker con…   1887                                    [OK]
richarvey/nginx-php-fpm            Container running Nginx + PHP-FPM capable of…   788                                     [OK]
....
2: 获取镜像:
#  默认获取官方最新版本
docker pull nginx
3:查看镜像:
docker images nginx
python@ubuntu:~$ docker images nginx
REPOSITORY          TAG                 IMAGE ID            CREATED             SIZE
nginx               latest              f949e7d76d63        12 months ago       126MB
4: 查看版本的提交信息:
docker history nginx
镜像作者的提交信息
python@ubuntu:~$ docker history nginx
IMAGE               CREATED             CREATED BY                                      SIZE                COMMENT
f949e7d76d63        12 months ago       /bin/sh -c #(nop)  CMD ["nginx" "-g" "daemon…   0B
<missing>           12 months ago       /bin/sh -c #(nop)  STOPSIGNAL SIGTERM           0B
<missing>           12 months ago       /bin/sh -c #(nop)  EXPOSE 80                    0B
<missing>           12 months ago       /bin/sh -c ln -sf /dev/stdout /var/log/nginx…   22B
<missing>           12 months ago       /bin/sh -c set -x     && addgroup --system -…   56.8MB
<missing>           12 months ago       /bin/sh -c #(nop)  ENV PKG_RELEASE=1~buster     0B
<missing>           12 months ago       /bin/sh -c #(nop)  ENV NJS_VERSION=0.3.5        0B
<missing>           12 months ago       /bin/sh -c #(nop)  ENV NGINX_VERSION=1.17.4     0B
<missing>           13 months ago       /bin/sh -c #(nop)  LABEL maintainer=NGINX Do…   0B
<missing>           13 months ago       /bin/sh -c #(nop)  CMD ["bash"]                 0B
<missing>           13 months ago       /bin/sh -c #(nop) ADD file:1901172d265456090…   69.2MB
5:给镜像贴标签:
发现:有两个相同的,他们的ID相同,说明是同一个镜像。
python@ubuntu:~$ docker tag nginx:latest mynginx:version1.0
python@ubuntu:~$ docker images
REPOSITORY                TAG                 IMAGE ID            CREATED             SIZE
mynginx                   version1.0          f949e7d76d63        12 months ago       126MB
nginx                     latest              f949e7d76d63        12 months ago       126MB
mysql                     5.7.22              0d16d0a97dd1        2 years ago         372MB
delron/fastdfs            latest              8487e86fc6ee        2 years ago         464MB
delron/elasticsearch-ik   2.4.6-1.0           095b6487fb77        2 years ago         689MB
6:删除镜像:
我们发现删除了标签,但是没有删除nginx这个。原因是引用计数不为0,当再次删除nginx时,就会完全删除。
python@ubuntu:~$ docker rmi mynginx:version1.0
Untagged: mynginx:version1.0
python@ubuntu:~$ docker images
REPOSITORY                TAG                 IMAGE ID            CREATED             SIZE
nginx                     latest              f949e7d76d63        12 months ago       126MB
mysql                     5.7.22              0d16d0a97dd1        2 years ago         372MB
delron/fastdfs            latest              8487e86fc6ee        2 years ago         464MB
delron/elasticsearch-ik   2.4.6-1.0           095b6487fb77        2 years ago         689MB
此外,如果删除时使用的是id,则所有的都会被删除。
docker rmi f949e7d76d63
7:将镜像打包:
python@ubuntu:~/Desktop$ docker save -o nginx.tar.gz nginx
python@ubuntu:~/Desktop$ ls
meimei_project  nginx.tar.gz  shopping-mall-project  sql脚本  安装包文件
8:将打包的镜像恢复:
python@ubuntu:~/Desktop$ docker load < nginx.tar.gz
<二>: 容器管理:
1:查看容器:
# 1:查看正在执行的
python@ubuntu:~/Desktop$ docker ps
CONTAINER ID        IMAGE               COMMAND                  CREATED             STATUS              PORTS               NAMES
f90e380d626a        delron/fastdfs      "/usr/bin/start1.sh …"   4 weeks ago         Up 2 hours                              storage
f951dc81977c        delron/fastdfs      "/usr/bin/start1.sh …"   4 weeks ago         Up 2 hours                              tracker
python@ubuntu:~/Desktop$ docker container ls
CONTAINER ID        IMAGE               COMMAND                  CREATED             STATUS              PORTS               NAMES
f90e380d626a        delron/fastdfs      "/usr/bin/start1.sh …"   4 weeks ago         Up 2 hours                              storage
f951dc81977c        delron/fastdfs      "/usr/bin/start1.sh …"   4 weeks ago         Up 2 hours                              tracker
查看所有的: 包括不在运行的。
python@ubuntu:~/Desktop$ docker ps -a
CONTAINER ID        IMAGE                               COMMAND                  CREATED             STATUS                      PORTS               NAMES
56e2e5bd67b7        mysql:5.7.22                        "docker-entrypoint.s…"   3 weeks ago         Exited (0) 4 days ago                           mysql-slave
b5a7b35611f8        delron/elasticsearch-ik:2.4.6-1.0   "/docker-entrypoint.…"   4 weeks ago         Exited (143) 43 hours ago                       elasticsearch
f90e380d626a        delron/fastdfs                      "/usr/bin/start1.sh …"   4 weeks ago         Up 2 hours                                      storage
f951dc81977c        delron/fastdfs                      "/usr/bin/start1.sh …"   4 weeks ago         Up 2 hours                                      tracker
python@ubuntu:~/Desktop$ docker container ls -a
CONTAINER ID        IMAGE                               COMMAND                  CREATED             STATUS                      PORTS               NAMES
56e2e5bd67b7        mysql:5.7.22                        "docker-entrypoint.s…"   3 weeks ago         Exited (0) 4 days ago                           mysql-slave
b5a7b35611f8        delron/elasticsearch-ik:2.4.6-1.0   "/docker-entrypoint.…"   4 weeks ago         Exited (143) 43 hours ago                       elasticsearch
f90e380d626a        delron/fastdfs                      "/usr/bin/start1.sh …"   4 weeks ago         Up 2 hours                                      storage
f951dc81977c        delron/fastdfs                      "/usr/bin/start1.sh …"   4 weeks ago         Up 2 hours                                      tracker
2:镜像运行成容器并启动:(第一次执行的操作)
python@ubuntu:~/Desktop$ docker run -itd nginx
6c0bcf13212e3c46cdf9e32c0a1665e87017319fda83d340480429eadc9320ec
3:关闭容器:
docker stop 容器id
python@ubuntu:~/Desktop$ docker ps
CONTAINER ID        IMAGE               COMMAND                  CREATED              STATUS              PORTS               NAMES
6c0bcf13212e        nginx               "nginx -g 'daemon of…"   About a minute ago   Up About a minute   80/tcp              pensive_joliot
f90e380d626a        delron/fastdfs      "/usr/bin/start1.sh …"   4 weeks ago          Up 2 hours                              storage
f951dc81977c        delron/fastdfs      "/usr/bin/start1.sh …"   4 weeks ago          Up 2 hours                              tracker
python@ubuntu:~/Desktop$ docker stop 6c0bcf13212e
6c0bcf13212e
python@ubuntu:~/Desktop$ docker ps
CONTAINER ID        IMAGE               COMMAND                  CREATED             STATUS              PORTS               NAMES
f90e380d626a        delron/fastdfs      "/usr/bin/start1.sh …"   4 weeks ago         Up 2 hours                              storage
f951dc81977c        delron/fastdfs      "/usr/bin/start1.sh …"   4 weeks ago         Up 2 hours                              tracker
python@ubuntu:~/Desktop$
4: 启动(运行成功后):
docker start 容器id
python@ubuntu:~/Desktop$ docker ps -a
CONTAINER ID        IMAGE                               COMMAND                  CREATED             STATUS                      PORTS               NAMES
6c0bcf13212e        nginx                               "nginx -g 'daemon of…"   4 minutes ago       Exited (0) 2 minutes ago                        pensive_joliot
56e2e5bd67b7        mysql:5.7.22                        "docker-entrypoint.s…"   3 weeks ago         Exited (0) 4 days ago                           mysql-slave
b5a7b35611f8        delron/elasticsearch-ik:2.4.6-1.0   "/docker-entrypoint.…"   4 weeks ago         Exited (143) 43 hours ago                       elasticsearch
f90e380d626a        delron/fastdfs                      "/usr/bin/start1.sh …"   4 weeks ago         Up 2 hours                                      storage
f951dc81977c        delron/fastdfs                      "/usr/bin/start1.sh …"   4 weeks ago         Up 2 hours                                      tracker
python@ubuntu:~/Desktop$ docker start 6c0bcf13212e
6c0bcf13212e
5: 删除容器:
docker rm nginx
# 强制删除
docker rm -f nginx
6: 进入容器内部:
python@ubuntu:~/Desktop$ docker exec -it 6c0bcf13212e /bin/bash
root@6c0bcf13212e:/#
-i:则让容器的标准输入保持打开。

-t:让docker分配一个伪终端,并绑定到容器的标准输入上

/bin/bash:执行一个命令
7:将容器再次写入镜像:
docker commit -m '改动信息' -a "作者信息" [container_id] [new_image:tag]
8:查看容器日志:
docker logs 6c0bcf13212e
9: 查看容器的属性:
docker inspect 6c0bcf13212e
三: 数据管理:
1:数据卷:
数据卷就是将宿主机的某个目录,映射到容器中,作为数据存储的目录,我们就可以在宿主机对数据进行存储。
docker run -itd --name [容器名字] -v [宿主机文件]:[容器文件] [镜像名称]
2: 简单示例
创建测试文件
echo "file1" > /tmp/file1.txt
启动一个容器,挂载数据卷
docker run -itd --name test1 -v /tmp:/test1 nginx
测试效果
~# docker exec -it a53c61c77 /bin/bash
root@a53c61c77bde:/# cat /test1/file1.txt
file1
四: 网络管理:
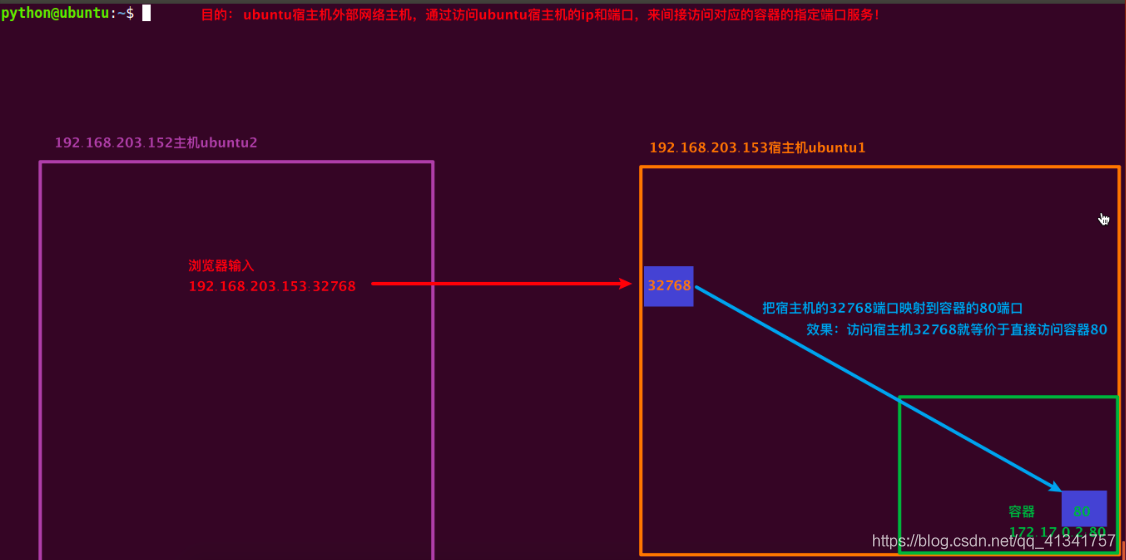
Docker 网络实现方式有两种:
端口映射 - 将容器内服务端口与宿主机端口关联在一起,通过"宿主机ip:宿主机port"达到访问容器服务效果
网络模式 - 借助于独立的docker网卡功能实现访问容器服务的效果
端口映射:
1:随机映射:
python@ubuntu:~/Desktop$ docker run -d -P nginx
f094f075d4df20e09a27ca2aa33478c292681e5f638f85d41704e4d6ea13c827
2:指定端口映射:
python@ubuntu:~$ docker run -d -p 192.168.203.153:777:80 --name nginx-3 nginx
66987d8aec1569ade156d5a9393b8daece6b3ae29e8a23574242ef868ea81044
ubuntu 访问http://192.168.203.153:777/

网络模式:
1:桥接模式:Docker的默认模式,它会在docker容器启动时候,自动配置好自己的网络信息,同一宿主机的所有容器都在一个网络下,彼此间可以通信。类似于我们vmware虚拟机的nat模式。

2:host 模式:容器和宿主机公用一个网络。
docker run --network=host -itd --name nginx-host nginx
3:连接网络和断开网络:
# 连接网络
docker network connect bridge-test nginx-new-bri
# 断开网络
docker network disconnect bridge-test nginx-new-bri

 浙公网安备 33010602011771号