
wordpress:nginx负载均衡+nignweb服务器+mysql数据库+nfs-lsync+rsync备份
所有知识结合,注意正式环境慎用:
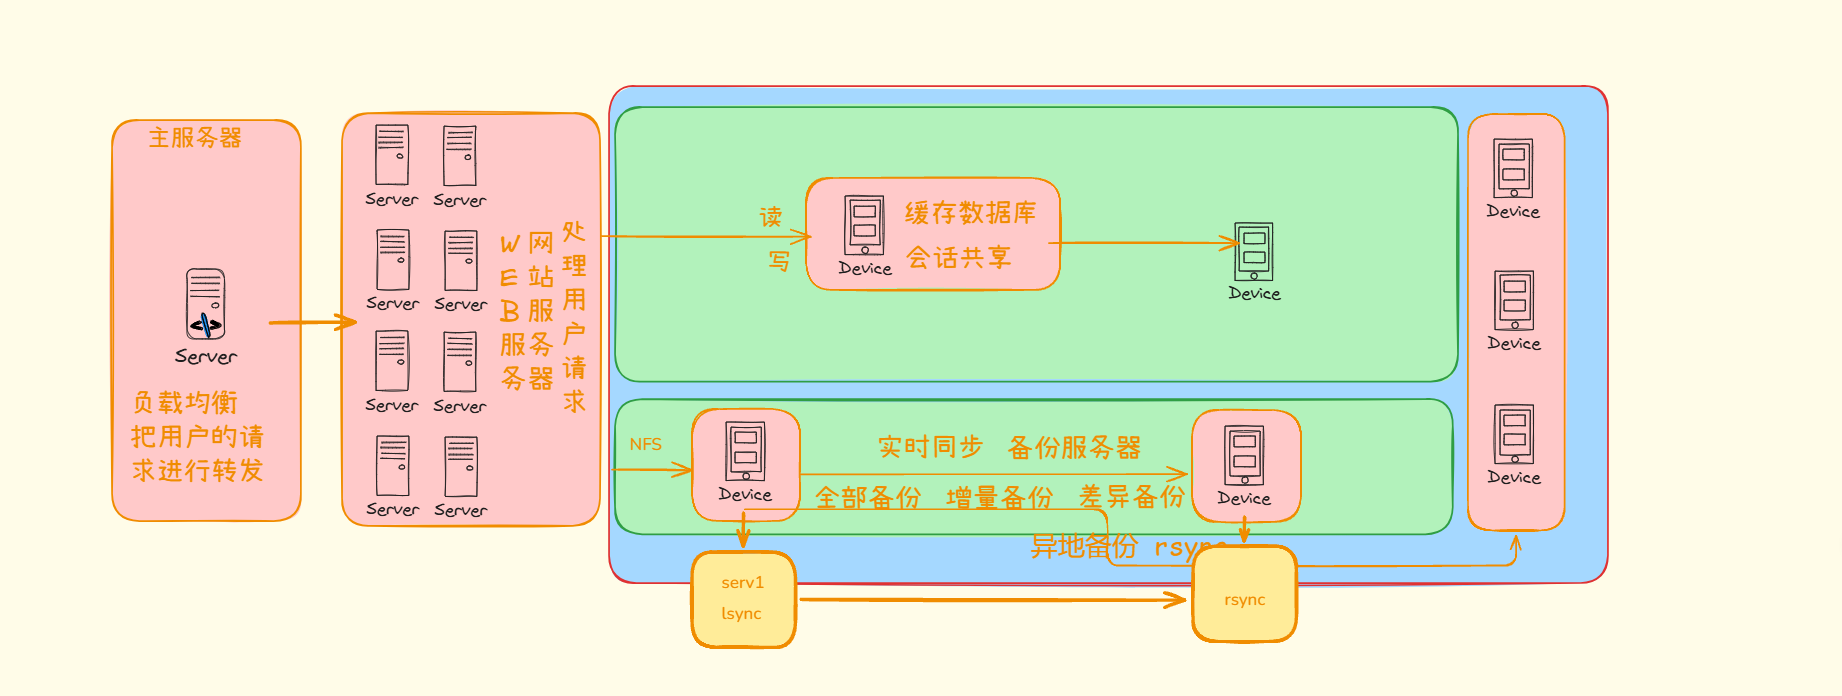
nginx负载均衡+nignweb服务器+mysql数据库+nfs-lsync+rsync备份
mariadb服务器
安装数据库
yum -y install mariadb-server启动数据库服务
systemctl enable mariadb
systemctl start mariadb
检查是否启动
ss -lntup | grep mysql
ps -ef | grep mysql
初始化数据库
mysql_secure_installation
# 第一个回车,剩下的全部按Y,注意输入密码的时候不是Y,自定义
登陆数据库
mysql -uroot -p[密码]
# 或
mysql -rroot -p
创建WordPress数据库
create database wordpress;查看是否创建成功
show databases;创建普通用户并赋予权限和密码,然后赋予本地登陆
grant all on wordpress.* to 'blog'@'localhost' identified by '1';
             [数据库名]       [创建的用户名] [是否本地登陆]        [登陆的密码]
创建普通用户并赋予权限和密码,然后赋予远程登陆,仅限远程172.16.1.0网段的用户远程登陆
grant all on wordpress.* to 'blog'@'172.16.1.%' identified by '1';

# 和上一步一样,上一步因为有了blog用户,则不再创建,所以这里生效的是有172.16.1.%这个语句
本机测试是否可以本地登陆
mysql -ublog -p远程测试是都可以远程登陆,打开另一台在172.16.1.0网段的服务器,并安装数据库进行测试
# 这条语句在另外一台同网段的服务器测试,不是本机,注意!!!
mysql -ublog -p -h 172.16.1.51
本地测试和远程测试都成功则完成!
NFS服务器配置
NFS服务器配置
在 NFS 服务器上安装所需的 NFS 服务
yum install nfs-utils -y编辑
/etc/exports文件:/etc/exports文件用于指定哪些目录共享给哪些客户端以及如何共享vim /etc/exports # 写入以下内容 # [NFS本机共享的目录] [仅限远程服务器web01访问] /wordpress 172.16.1.7/24(rw,sync,no_root_squash) /wordpress 172.16.1.8/24(rw,sync,no_root_squash)启动NFS服务
systemctl start rpcbind
systemctl enable rpcbind
systemctl status rpcbind

systemctl start nfs
systemctl enable nfs

systemctl reload nfs
刷新共享目录,并查看
exportfs -ra
exportfs -v
rpcinfo -p
showmount -e
# 全部输入然后查看内容是否符合你的配置,查看是否成功
web01服务器配置
安装NFS客户端服务工具
yum install nfs-utils -y挂载远程共享目录
mount -t nfs 172.16.1.31:/wordpress /mnt/wordpress永久挂载
vim /etc/fstab
172.16.1.31:/wordpress /mnt/wordpress nfs defaults  0  0
检查是否挂载成功
df -h
# 或者
mount | grep nfs
web02服务器配置
安装NFS客户端服务工具
yum install nfs-utils -y挂载远程共享目录
mount -t nfs 172.16.1.31:/wordpress /mnt/wordpress永久挂载
vim /etc/fstab
172.16.1.31:/wordpress /mnt/wordpress nfs defaults  0  0
检查是否挂载成功
df -h
# 或者
mount | grep nfs
上传wordpress文件并解压到NFS服务器的/wordpress中
[root@web01-kylin ~]$ wget https://cn.wordpress.org/latest-zh_CN.zip
[root@web01-kylin ~]$ mkdir ~/wordpress
[root@web01-kylin ~]$ unzip latest-zh_CN.zip -d /~
# 因为解压是解压到wordpress文件夹中,所以“/”后不加内容即可
[root@web01-kylin ~]$ mv ~/wordpress/* /wordpress
chown -R nobody.nobody /wordpress #[本机共享的目录]
web服务器配置
web01配置
安装nginx
yum install nginx写入配置文件
[root@web01-kylin ~]$ vim /etc/nginx/conf.d/blog.ren.wordpress.cn.conf
server {
   listen 80;
   server_name blog.ren.wordpress.cn;
   root /mnt/wordpress;
   error_log /var/log/nginx/blog-error.log notice;
   access_log /var/log/nginx/blog-access.log main;

   location / {
      index index.php;
   }

   location ~ \.php$ {
      fastcgi_pass 127.0.0.1:9000;
      fastcgi_index index.php;
      fastcgi_param SCRIPT_FILENAME $document_root$fastcgi_script_name;
      include fastcgi_params;
   }
}
检查语法是否正确
nginx -t启动服务以及开机自启
systemctl enable nginx
systemctl start nginx
systemctl status nginx
检查是否安装了PHP
systemctl stop php-fpm
yum -y remove php*
# 没有输出或者是没有服务是对的
安装PHP
yum -y install php php-bcmath php-cli php-common php-devel php-embedded php-fpm php-gd php-intl php-mbstring php-mysqlnd php-opcache php-pdo php-process php-xml php-json设置开机自启和开启服务
systemctl enable --now php-fpm
systemctl start php-fpm
ps -ef | grep php
ss -lntup | grep php
检查服务进程是否开启
ps -ef | grep php
ss -lntup | grep php
修改配置文件进程用户,apache ---> nginx
vim /etc/php-fpm.d/www.conf
24:user = apache
26:group = apache
38:listen = /run/php-fpm/www.sock

# 改为
user = nginx
group = nginx
listen = 127.0.0.1:9000
检查语法
php-fpm -t重启服务,重新读取配置文件
systemctl reload php-fpm
ps -ef | grep php
ss -lntup | grep php
# 检查进程服务是否更改
web02服务器配置
和web01一模一样,什么都不变,一模一样来一遍!!!
最后在Windows中,修改hosts文件,然后登陆一下,是否能进入wordpress,如果进入什么都不要做,关掉继续下一步
Nginx负载均衡
目前就一天负载均衡,所以这里就配一台
安装nginx
yum install nginx写入配置文件
[root@lb01-kylin ~]$ vim /etc/nginx/conf.d/blog.ren.wordpress.cn.conf
upstream lb_pools {
  server 10.0.0.7:80;
  server 10.0.0.8:80;
}

server {
  listen 80;
  server_name blog.ren.wordpress.cn;

  location / {
    proxy_pass http://lb_pools;
    proxy_set_header Host $http_host;
    proxy_set_header X-Forwarded-For $proxy_add_x_forwarded_for;
    proxy_set_header X-Real-Ip $remote_addr;
  }
}
检查语法错误
nginx -t重启服务以及开机自启
systemctl enable nginx
systemctl start nginx
systemctl reload nginx
systemctl status nginx
在Windows上测试能否登陆,注意在hosts文件中写入域名,进入浏览器进行测试,如果测试成功推出进行下一步
10.0.0.5 blog.ren.wordpress.cn
backup备份服务器配置rsync
先配置rsync
检查安装rsync
# 检查是否有rsync
rpm -qa |grep rsync
# 安装rsync
yum install rsync
# 查看版本
rsync -V
编辑配置文件
vim /etc/rsyncd.conf

uid=root
gid=root
max connections=10
log file=/var/log/rsyncd.log
pid file=/var/run/rsyncd.pid
lock file=/var/run/rsyncd.lock
hosts allow = 172.16.1.31  #---> 这里写的是NFS服务器的IP地址

[syncdata]
  comment=backup data
  path=/s1/bak
  read only=no
  ignore errors
  auth users=wordpress
  secrets file=/etc/rsyncd.passwd
配置密码文件
vim /etc/rsyncd.passwd

wordpress:1
[暗号]    [密码]
赋予密码文件600权限
chmod 600 /etc/rsyncd.passwd启动rsync
systemctl start rsyncd
# 或者使用
rsync --daemon --config=/etc/rsyncd.conf
检查是否启动
systemctl status rsync

# 注意这里容易failed,只要不是dead就行,先别管,如果是running更好
检查服务进程是否启动
ps -ef |grep rsync
NFS服务器安装lsync进行实时同步
NFS服务器目前已经安装了NFS共享目录服务,检查对应的/wordpress是否存在,检查web01和web02上的磁盘是否挂载正确,是否三端能够同步进行读写文件,使用touch命令进行尝试
安装lsyncd软件
yum install -y lsyncd检查安装的版本
lsyncd -version配置同步策略
vim /etc/lsyncd.conf

--全局部分主要配置lsyncd服务,日志,pid文件.
settings {
   --日志文件,主要查看日志文件.
   logfile    = "/var/log/lsyncd.log",
   --这是pid文件
   pidfile    = "/var/run/lsyncd.pid",
   --服务状态文件
   statusFile = "/var/log/lsyncd.status",
   --改为非守护进程模式,默认.rsync命令,lsyncd
   nodaemon   = true,
   --控制最多用于传输数据的进程数量 rsync进程数(最大)
   --根据cpu核心数来 一致或2倍
   maxProcesses = 2
}

--配置rsync命令,rsync服务端与客户端模式
--sync部分可以有多个.
sync {
    --指定rsync工作模式
    default.rsync,
    --指定lsyncd监控目录,源目录
    source    = "/wordpress",   -------------------------> 注意这里需要监控的目录是哪个
    --指定目标 rsync服务端    用户名@ip地址::模块名字
    target    = "wordpress@172.16.1.41::wordpress",  ----> 注意这里的写法 [暗号]@[backupIP][模块]
    --每隔5秒同步一次.
    delay     = 5,
    --这是rsync命令的  --delete 选项
    delete    = true,
    -- 配置rsync命令位置,rsync命令选项,
    rsync     = {
        -- 命令位置
        binary   = "/usr/bin/rsync",     ------------> 使用which rsync查看一下命令是否是这个位置
        -- rsync命令的 -a选项
        archive  = true,
        -- rsync命令的  -z选项 压缩
        compress = true,
        -- 配置rsync--password-file密码文件
        password_file = "/etc/rsync.client"  -------------------> 密码文件路径要记住!!!
    }
}
写入密码
vim /etc/rsync.client
1
给予密码文件600的权限
chmod 600 /etc/rsync.client启动服务
systemctl enable lsyncd
systemctl start lsyncd
systemctl status lsyncd
有错误麻烦评论,看到立马更改
注意正式环境慎用

 浙公网安备 33010602011771号