
nginx下pagespeed使用详解
1.简介
PageSpeed 是一个款Google开源(Google出品必输竞品)用来自动优化网站的神器!,作为Nginx组件,ngx_pagespeed将重写你的网页,让用户以更快的速度进行访问。重写的工作包括压缩图片、缩减CSS和JavaScript、扩展缓存时间
2.安装
官方安装讲解:地址
2.1脚本安装
可以选择使用自动脚本,可以到的一个对应的nginx版本,并且编译了pagespeed模块
查看该脚本的如何使用
$ bash <(curl -f -L -sS https://ngxpagespeed.com/install) --help

Usage: build_ngx_pagespeed.sh [options]

  Installs ngx_pagespeed and its dependencies.  Can optionally build and install
  nginx as well.  Can be run either as:

     bash <(curl -f -L -sS https://ngxpagespeed.com/install) [options]

  Or:

     git clone git@github.com:pagespeed/ngx_pagespeed.git
     cd ngx_pagespeed/
     git checkout <branch>
     scripts/build_ngx_pagespeed.sh [options]

Options:
  -v, --ngx-pagespeed-version <ngx_pagespeed version>
      What version of ngx_pagespeed to build.  Valid options include:
      * latest-beta
      * latest-stable
      * a version number, such as 1.11.33.4

      If you don't specify a version, defaults to latest-stable unless --devel
      is specified, in which case it defaults to master.

      This option doesn't make sense if we're running within an existing
      ngx_pagespeed checkout.

  -n, --nginx-version <nginx version>
      What version of nginx to build.  If not set, this script only prepares the
      ngx_pagespeed module, and expects you to handle including it when you
      build nginx.

      If you pass in 'latest' then this script scrapes the nginx download page
      and attempts to determine the latest version automatically.

  -m, --dynamic-module
      Build ngx_pagespeed as a dynamic module.

  -b, --builddir <directory>
      Where to build.  Defaults to $HOME.

  -p, --no-deps-check
      By default, this script checks for the packages it depends on and tries to
      install them.  If you have installed dependencies from source or are on a
      non-deb non-rpm system, this won't work.  In that case, install the
      dependencies yourself and pass --no-deps-check.

  -s, --psol-from-source
      Build PSOL from source instead of downloading a pre-built binary module.

  -l, --devel
      Sets up a development environment in ngx_pagespeed/nginx, building with
      testing-only dependencies.  Includes --psol-from-source, conflicts with
      --nginx-version.  Uses a 'git clone' checkout for ngx_pagespeed and nginx
      instead of downloading a tarball.

  -t, --build-type
      When building PSOL from source, what to tell it for BUILD_TYPE.  Defaults
      to 'Release' unless --devel is set in which case it defaults to 'Debug'.

  -y, --assume-yes
      Assume the answer to all prompts is 'yes, please continue'.  Intended for
      automated usage, such as buildbots.

  -a, --additional-nginx-configure-arguments
      When running ./configure for nginx, you may want to specify additional
      arguments, such as --with-http_ssl_module.  By default this script will
      pause and prompt you for them, but this option lets you pass them in.  For
      example, you might do:
        -a '--with-http_ssl_module --with-cc-opt="-I /usr/local/include"'

  -d, --dryrun
      Don't make any changes to the system, just print what changes you
      would have made.

  -h, --help
      Print this message and exit.
使用脚本自动安装
我们主要使用--nginx-version --additional-nginx-configure-arguments --dynamic-module这三个参数,选择nginx的版本,编译的参数,使用动态模块
bash <(curl -f -L -sS https://ngxpagespeed.com/install) \
     --nginx-version 1.12.1 \
     --dynamic-module \
     --additional-nginx-configure-arguments '--prefix=/usr/share/nginx --sbin-path=/usr/sbin/nginx --conf-path=/etc/nginx/nginx.conf --error-log-path=/var/log/nginx/error.log --http-log-path=/var/log/nginx/access.log --http-client-body-temp-path=/var/lib/nginx/tmp/client_body --http-proxy-temp-path=/var/lib/nginx/tmp/proxy --http-fastcgi-temp-path=/var/lib/nginx/tmp/fastcgi --http-uwsgi-temp-path=/var/lib/nginx/tmp/uwsgi --http-scgi-temp-path=/var/lib/nginx/tmp/scgi --modules-path=/usr/lib64/nginx/modules --pid-path=/run/nginx.pid --lock-path=/run/lock/subsys/nginx --user=nginx --group=nginx --with-file-aio --with-ipv6 --with-http_ssl_module --with-http_v2_module --with-http_realip_module --with-http_addition_module --with-http_auth_request_module --with-http_sub_module --with-http_dav_module --with-http_flv_module --with-http_mp4_module --with-http_gunzip_module --with-http_gzip_static_module --with-http_random_index_module --with-http_secure_link_module --with-http_degradation_module --with-http_stub_status_module --with-http_slice_module --with-mail=dynamic --with-mail_ssl_module --with-stream_ssl_module --with-threads --with-pcre --with-debug --with-cc-opt="-O2 -g -pipe -Wall -Wp,-D_FORTIFY_SOURCE=2 -fexceptions -fstack-protector-strong --param=ssp-buffer-size=4 -m64 -mtune=generic"'
脚本运行结果 类似下面
test -f '/etc/nginx/nginx.conf' \
	|| cp conf/nginx.conf '/etc/nginx/nginx.conf'
cp conf/nginx.conf '/etc/nginx/nginx.conf.default'
test -d '/run' \
	|| mkdir -p '/run'
test -d '/var/log/nginx' \
	|| mkdir -p '/var/log/nginx'
test -d '/usr/share/nginx/html' \
	|| cp -R html '/usr/share/nginx'
test -d '/var/log/nginx' \
	|| mkdir -p '/var/log/nginx'
test -d '/usr/lib64/nginx/modules' \
	|| mkdir -p '/usr/lib64/nginx/modules'
test ! -f '/usr/lib64/nginx/modules/ngx_mail_module.so' \
	|| mv '/usr/lib64/nginx/modules/ngx_mail_module.so' \
		'/usr/lib64/nginx/modules/ngx_mail_module.so.old'
cp objs/ngx_mail_module.so '/usr/lib64/nginx/modules/ngx_mail_module.so'
make[1]: Leaving directory `/root/nginx-1.12.1'

Nginx installed with ngx_pagespeed support compiled-in.

If this is a new installation you probably need an init script to
manage starting and stopping the nginx service.  See:
  http://wiki.nginx.org/InitScripts

You'll also need to configure ngx_pagespeed if you haven't yet:
  https://developers.google.com/speed/pagespeed/module/configuration
此时的变化是在相应的文件夹有个编译好的nginx,还有个编译好的ngx_pagespeed,进入相应文件夹,我使用的是root账户,这里是/root下,多了两个文件夹
incubator-pagespeed-ngx-latest-stable nginx-1.12.1
/root/nginx-1.12.1/objs/nginx 其实就是编译好的nginx可执行文件
/root/nginx-1.12.1/objs/ngx_pagespeed.so 是相应的模块
替换以前的nginx
(如果以前有yum安装,并且还想使用以前的启动脚本等,可以考虑替换,可以节省精力)
下面就是替换我以前使用yum安装的nginx,
cp /usr/sbin/nginx /usr/sbin/nginx.bak #备份
cp /opt/nginx-1.12.1/objs/nginx /usr/sbin/nginx #替换程序
cp /opt/nginx-1.12.1/objs/ngx_pagespeed.so /usr/share/nginx/modules/ #替换模块
systemctl restart nginx #重启 nginx 服务
对于使用动态模块,需要在主配置文件引入该模块才可以正常使用
load_module "modules/ngx_pagespeed.so";
这里讲一下使用yum安装pagespeed的另一种情形
可能你已经使用yum安装了nginx,并且有很多依赖重新编译可能会通过不了,并且发现已经自带编译了ngx_pagespeed,但是这个模块其实并没有真正下载,并不能直接使用,这种情况下,只要按照该源的说明,安装该模块即可,进入相关源的页面,https://webtatic.com/packages/nginx1/ 查看,然后安装该模块,这样做也很方便
yum install nginx1w-module-pagespeed
2.2 手动安装
先安装基本依赖
sudo yum install gcc-c++ pcre-devel zlib-devel make unzip libuuid-devel
构建pagespeed
cd /root
wget https://github.com/pagespeed/ngx_pagespeed/archive/release-1.6.29.5-beta.zip
unzip -q release-1.6.29.5-beta
cd ngx_pagespeed-release-1.6.29.5-beta
wget https://dl.google.com/dl/page-speed/psol/1.6.29.5.tar.gz
tar xzf 1.6.29.5.tar.gz -C ngx_pagespeed-release-1.6.29.5-beta
重新编译安装nginx
查看原Nginx配置
$ nginx -V
nginx version: nginx/1.12.1
built by gcc 4.8.5 20150623 (Red Hat 4.8.5-16) (GCC)
built with OpenSSL 1.0.2k-fips  26 Jan 2017
TLS SNI support enabled
configure arguments: --prefix=/usr/share/nginx --sbin-path=/usr/sbin/nginx --conf-path=/etc/nginx/nginx.conf --error-log-path=/var/log/nginx/error.log --http-log-path=/var/log/nginx/access.log --http-client-body-temp-path=/var/lib/nginx/tmp/client_body --http-proxy-temp-path=/var/lib/nginx/tmp/proxy --http-fastcgi-temp-path=/var/lib/nginx/tmp/fastcgi --http-uwsgi-temp-path=/var/lib/nginx/tmp/uwsgi --http-scgi-temp-path=/var/lib/nginx/tmp/scgi --modules-path=/usr/lib64/nginx/modules --pid-path=/run/nginx.pid --lock-path=/run/lock/subsys/nginx --user=nginx --group=nginx --with-file-aio --with-ipv6 --with-http_ssl_module --with-http_v2_module --with-http_realip_module --with-http_addition_module --with-http_auth_request_module --with-http_sub_module --with-http_dav_module --with-http_flv_module --with-http_mp4_module --with-http_gunzip_module --with-http_gzip_static_module --with-http_random_index_module --with-http_secure_link_module --with-http_degradation_module --with-http_stub_status_module --with-http_slice_module --with-mail=dynamic --with-mail_ssl_module --with-stream_ssl_module --with-threads --with-pcre --with-debug --with-cc-opt="-O2 -g -pipe -Wall -Wp,-D_FORTIFY_SOURCE=2 -fexceptions -fstack-protector-strong --param=ssp-buffer-size=4 -m64 -mtune=generic"
下载对应的源码,知道yum 安装nginx 的版本为1.12.1,下载对应的源码
wget http://nginx.org/download/nginx-1.12.1.tar.gz
原配置基础上增加pagespeed模块、
./configure --prefix=/usr/share/nginx --sbin-path=/usr/sbin/nginx --conf-path=/etc/nginx/nginx.conf --error-log-path=/var/log/nginx/error.log
            ...
--add-module=/root/incubator-pagespeed-ngx-latest-stable
注意:如果你想要使用动态模块安装,则使用下面参数
--add-dynamic-module=/root/incubator-pagespeed-ngx-latest-stable
编译
make && make install
同样,如果有需要,可对执行文件进行备份替换,(根据自己实际情况)
cp /usr/sbin/nginx /usr/sbin/nginx.bak #备份
cp /opt/nginx-1.12.1/objs/nginx /usr/sbin/nginx #替换
# 如果是动态模块,同时需要 cp /opt/nginx-1.12.1/objs/ngx_pagespeed.so /usr/share/nginx/modules/
systemctl restart nginx #重启 nginx 服务
3.配置
官方介绍:文档地址
3.1 开启,待机,关闭
开启
开启或关闭用 pagespeed on/off; 指令,例如:
load_module "modules/ngx_pagespeed.so";
http {
    ...
}
server {
    listen       80;
    pagespeed on;
    pagespeed FileCachePath /tmp/ngx_pagespeed_cache;
    ...
}
备机
pagespeed有一个备机模式,它不会改变你网站的原有配置,只有在以下两种情况下才会起作用
1、当你的请求带着关于pagespeed的参数的时候,这时候会按照参数的配置返回给你响应。
2、当请求.pagespeed类的资源的时候。
pagespeed standby;
关闭
pagespeed unplugged;
注意:在1.12.34.1或更早版本以前,不要使用unlugged,会导致崩溃,请使用off
3.2 功能配置
Content-Security-Policy 头部
从1.13.35.1开始,PageSpeed能够根据响应头中指定的任何内容安全策略调整其优化。在这个版本中,您需要选择加入这个特性,未来的版本可能会默认打开它。
pagespeed HonorCsp on;
HTTP Vary 协议
为了达到优化的最大效果,对于资源文件(css、js,HTML 文件除外)等,PageSpeed 是不遵循 Vary HTTP 头的,如果你希望 PageSpeed 完全遵守 Vary 协议,可以使用指令 pagespeed RespectVary on,不过除非有特殊需求,建议不开启,默认配置往往是最佳配置。关于 Vary 大体的意思是就是 Vary 可以标示同一个 url 可以返回不同的内容,主要是给缓存中间件用的,避免只缓存单一内容。
Cache-Control: no-transform 协议
PageSpeed 默认遵守 Cache-Control: no-transform 协议, 表示不可被中间代理软件改写,如果想让优化效果最大化,可以这样:
pagespeed DisableRewriteOnNoTransform off;
该指令,表示不遵守 Cache-Control: no-transform 协议。
LowercaseHtmlNames
HTML是不区分大小写的,而XML和XHTML不是。Web性能最佳实践建议使用小写。一般来说,pagespeed会根据头信息自动判断是不是html页面,但是有时候xml或者xhtml会使用错误的头信息Content-Type: text/html ,此时如果开启了转换成小写,那么当时xml和xhtml的时候可能会出现问题,所以pagespeed默认是不开启的。
pagespeed LowercaseHtmlNames on;
ModifyCachingHeaders
PageSpeed 默认情况下会修改 HTML 页面汇总的 Meta 缓存标记,将其统一执为 Cache-Control: no-cache, max-age=0,如果要保留 HTML 页面原始的缓存控制指令,可以这样:
pagespeed ModifyCachingHeaders off;
不过官方并不建议关闭该指令,官方解释如下:
Note: We do not suggest you turn this option off. It breaks PageSpeed's caching assumptions and can lead to unoptimized HTML being served from a proxy caches set up in front of the server. If you do turn it off, we suggest that you do not set long caching headers to HTML or users may receive stale or unoptimized content.
保留相对路径
默认情况下,PageSpeed 在优化时会把相对路径转成绝对路径,如果因此而产生问题,你可以使用如下指令来保留相对路径
pagespeed PreserveUrlRelativity on;
NOTE: 官方文档上说,未来会默认保留相对路径,而且将来也会移除该指令。
开启 debug 功能
ListOutstandingUrlsOnError 可以列出优化过程中所有失败的请求,debug 时很有用,失败的信息会打印到 error log 里。
pagespeed ListOutstandingUrlsOnError on;
https支持
如果你使用 https 协议,则需要加上如下指令之后,某些过滤器才能生效,从1.10版本开始,默认(fetchhttps是开启的)
pagespeed FetchHttps enable;
可以添加更多参数
pagespeed FetchHttps enable,allow_self_signed,allow_unknown_certificate_authority,allow_certificate_not_yet_valid;
开启gzip
开启gzip压缩后,后会减少网络资源传输的字节,参考示例:
pagespeed FetchWithGzip on;
gzip  on;
gzip_vary on;
# Turn on gzip for all content types that should benefit from it.
gzip_types application/ecmascript;
gzip_types application/javascript;
gzip_types application/json;
gzip_types application/pdf;
gzip_types application/postscript;
gzip_types application/x-javascript;
gzip_types image/svg+xml;
gzip_types text/css;
gzip_types text/csv;
# "gzip_types text/html" is assumed.
gzip_types text/javascript;
gzip_types text/plain;
gzip_types text/xml;

gzip_http_version 1.0;
3.3 管理页面
PageSpeed 还提供了一个 web 的管理员界面来进行监控管理,很方便
配置如下:
http下配置
#PageSpeed管理页面配置
#共享内存统计
pagespeed Statistics on;
#开启虚拟主机统计信息
pagespeed UsePerVhostStatistics on;
pagespeed StatisticsLogging on;
pagespeed StatisticsLoggingIntervalMs 60000;
pagespeed StatisticsLoggingMaxFileSizeKb 1024;
#消息缓冲区大小,默认为0,不保留消息
pagespeed MessageBufferSize 100000;
pagespeed LogDir /var/log/pagespeed;
pagespeed StatisticsPath /ngx_pagespeed_statistics;
pagespeed GlobalStatisticsPath /ngx_pagespeed_global_statistics;
pagespeed MessagesPath /ngx_pagespeed_message;
pagespeed ConsolePath /pagespeed_console;
pagespeed AdminPath /pagespeed_admin;
pagespeed GlobalAdminPath /pagespeed_global_admin;
server下配置
# admin页面
location /ngx_pagespeed_statistics {
    auth_basic "PageSpeed Admin Dashboard";
    auth_basic_user_file /etc/nginx/page_speed/.htpasswd;
}
location /ngx_pagespeed_global_statistics {
    auth_basic "PageSpeed Admin Dashboard";
    auth_basic_user_file /etc/nginx/page_speed/.htpasswd;
}
location /ngx_pagespeed_message {
    auth_basic "PageSpeed Admin Dashboard";
    auth_basic_user_file /etc/nginx/page_speed/.htpasswd;
}
location /pagespeed_console {
    auth_basic "PageSpeed Admin Dashboard";
    auth_basic_user_file /etc/nginx/page_speed/.htpasswd;
}
location ~ ^/pagespeed_admin {
    auth_basic "PageSpeed Admin Dashboard";
    auth_basic_user_file /etc/nginx/page_speed/.htpasswd;
}
location ~ ^/pagespeed_global_admin {
    auth_basic "PageSpeed Admin Dashboard";
    auth_basic_user_file /etc/nginx/page_speed/.htpasswd;
}
创建用户认证文件,/etc/nginx/page_speed/.htpasswd,使用htpasswd生成用户名和密码
# 创建auth用户
htpasswd -bc .passwd archer 123456
直接访问 <域名>/pagespeed_admin 就可以打开管理员界面了。
提一下相关知识:
1、ngx_http_auth_basic_module模块
ngx_http_auth_basic_module模块实现让访问者,只有输入正确的用户密码才允许访问web内容。web上的一些内容不想被其他人知道,但是又想让部分人看到。默认情况下nginx已经安装了ngx_http_auth_basic_module模块。
2、htpasswd的用法
htpasswd(选项)(参数)
-c:创建一个加密文件;
-n:不更新加密文件,只将加密后的用户名密码显示在屏幕上;
-m:默认采用MD5算法对密码进行加密;
-d:采用CRYPT算法对密码进行加密;
-p:不对密码进行进行加密,即明文密码;
-s:采用SHA算法对密码进行加密;
-b:在命令行中一并输入用户名和密码而不是根据提示输入密码;
-D:删除指定的用户。
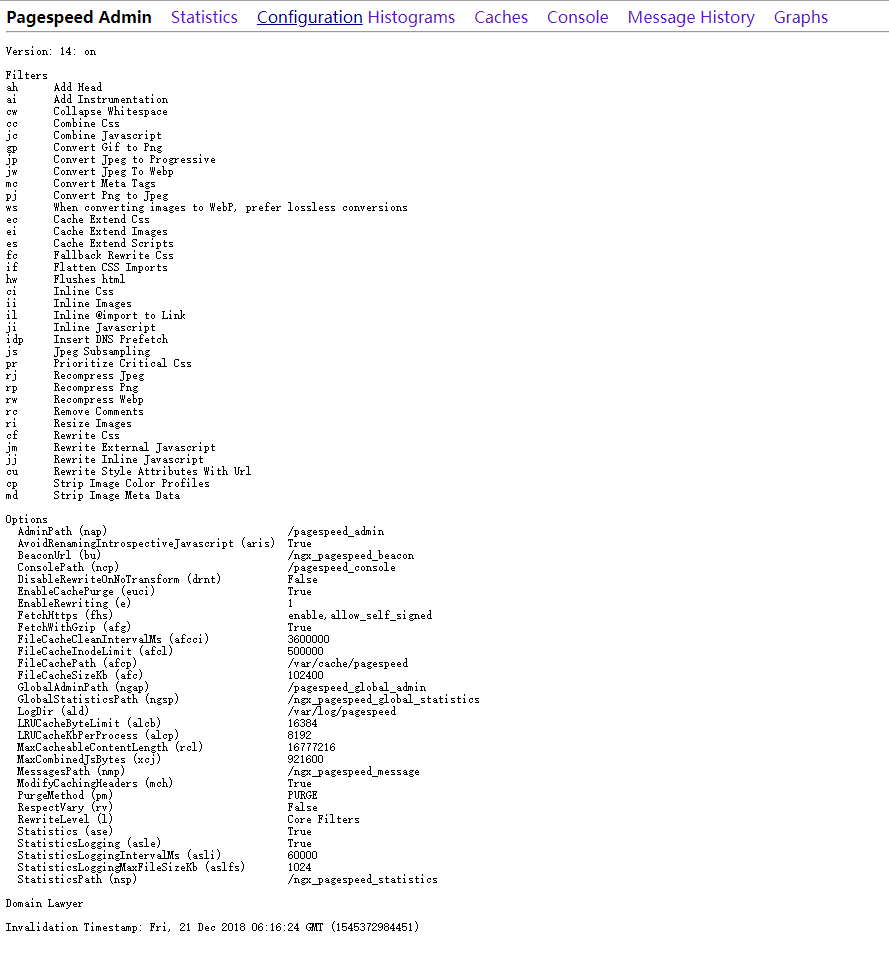
页面类似下面这样,我们可以在管理页面,查看过滤器的效果,查看日志,清除缓存。。。
3.4 过滤规则
过滤级别
PageSpeed提供了三个“级别”来简化配置:PassThrough、CoreFilters和OptimizeForBandwidth。CoreFilters集合包含PageSpeed团队认为对大多数web站点是安全的过滤器,并且是默认级别。OptimizeForBandWidth 更保守些,更安全。这里的安全是指对原始内容的改变是否会影响页面的展示、效果、功能等等。
这个链接有CoreFilters和OptimizeForBandwidth级别的对比,Enabling, Disabling, And Forbidding Specific Filters
CoreFilters级别包括以下过滤器
   add_head
   combine_css
   combine_javascript
   convert_meta_tags
   extend_cache
   fallback_rewrite_css_urls
   flatten_css_imports
   inline_css
   inline_import_to_link
   inline_javascript
   rewrite_css
   rewrite_images
   rewrite_javascript
   rewrite_style_attributes_with_url
可以选择关闭或者开启某些过滤器
# 禁用CoreFilters中的某些过滤器
pagespeed DisableFilters rewrite_images;
# 选择性地启用额外的过滤器
pagespeed EnableFilters collapse_whitespace;

#禁用过滤器用
pagespeed ForbidFilters rewrite_css,rewrite_javascript;
#禁用所有关闭的过滤器:
pagespeed ForbidAllDisabledFilters true;
关闭意思是不自动使用,但是我们可以通过输入url参数来继续使用该过滤器,关闭则是彻底禁止,即使url参数输入也不能使用。
可以通过 url 参数来动态控制过滤器
例如:
http://modpagespeed.com/rewrite_css.html?PageSpeed=on&PageSpeedFilters=rewrite_css
开启过滤器用参数 PageSpeed=on, 过滤器列表用参数 PageSpeedFilters,多个过滤器用“,” 分割。
部分配置简介
参考: https://www.ngxpagespeed.com/
####### CSS ############
# 把多个CSS文件合并成一个CSS文件,减少 HTTP 请求数量。
pagespeed EnableFilters combine_css;
# combine_css配合MaxCombinedCssBytes参数使用,影响combine_css的参数
MaxBytes是组合CSS文件的最大字节大小。大于MaxBytes的CSS文件将保持完整;其他CSS文件将被组合成一个或多个文件,每个文件的大小都不超过MaxBytes。MaxBytes的当前默认值是-1(无限制)
pagespeed MaxCombinedJsBytes MaxBytes;


# 通过删除 CSS 文件中的@import,减少 HTTP 请求往返次数。
pagespeed EnableFilters flatten_css_imports;

# 最小化 css 文件,去掉多余的空格和换行,并删除注释
pagespeed EnableFilters rewrite_css;

# 重写CSS,首先加载渲染页面的CSS规则
pagespeed EnableFilters prioritize_critical_css;

# 将小的 css 文件已内联方式引入,避免 http 请求。
inline_css

# 将 css 内容移动到 script 之前,优先于 script 渲染。
move_css_above_scripts

#将 css 文件移到头部。显示优先,让用户体验更好。
move_css_to_head


####### JS ############
# 启用JavaScript库卸载,通过自动把流行的 JavaScript 库换成免费托管的 JavaScript 库(比如由谷歌托管),减少带宽使用量
pagespeed EnableFilters canonicalize_javascript_libraries;

# 把多个JavaScript文件合并成一个JavaScript文件,减少 HTTP 请求数量。
pagespeed EnableFilters combine_javascript;
# combine_javascript配合MaxCombinedJsBytes参数使用,该参数是组合JavaScript文件的最大未压缩大小(以字节为单位)。大于MaxBytes的JavaScript文件将保持完整;其他JavaScript文件将组合成一个或多个文件,每个文件的大小不超过MaxBytes。MaxBytes的当前默认值是92160 (90K)。
pagespeed MaxCombinedJsBytes MaxBytes;

# 启用JavaScript缩小机制 ,相当于rewrite_javascript_inline(内部脚本)和rewrite_javascript_external(外部脚本)
pagespeed EnableFilters rewrite_javascript;

#将小的 js 文件已内联方式引入,避免 http 请求。
inline_javascript


####### IMAGE ############
# 延时加载客户端看不见的图片
pagespeed EnableFilters lazyload_images;

# 启用图片优化机制
pagespeed EnableFilters rewrite_images;

#将小图片的 http 调用转成内联方式调用。
inline_images

#存在多个相同的内联图片的话,通过 js 控制,只保留第一个内联的数据。这样可以删除重复数据,较小页面体积。经常和 inline_images 过滤器配合使用。
dedup_inlined_images

# 自动将多张背景图片合并成一张图片。在处理一些图标图片时很有用。
sprite_images


####### 其它 ############
# 启用压缩空白过滤器
pagespeed EnableFilters collapse_whitespace;

# 将多个 head 标签合并成一个。
pagespeed EnableFilters combine_heades;

# 删除带默认属性的标签,缩小文档大小
pagespeed EnableFilters elide_attributes;

# 通过优化网页资源的可缓存性,减少带宽使用量
pagespeed EnableFilters extend_cache;

# 移除 HTML 中的注释
remove_comments

# 移除 HTML 属性中的不必要的引号。
remove_quotes
4. 配置实例
/etc/nginx/page_speed/pagespeed_main.conf
pagespeed on;

#启用PageSpeed Gzip请求资源,此项要求ng启用gzip
pagespeed FetchWithGzip on;

#配置筛选项默认CoreFilters
pagespeed RewriteLevel CoreFilters;

#是否尊重原始header,为了达到优化最大效果,官方建议不开启
pagespeed RespectVary off;

# ···是否让PageSpeed优化缓存时间(接管缓存控制)
pagespeed DisableRewriteOnNoTransform off;

#重写HTML缓存头,官方不建议关闭,默认会统计执行为Cache-Control: no-cache, max-age=0
pagespeed ModifyCachingHeaders on;

#列出未解决的错误
pagespeed ListOutstandingUrlsOnError on;

# ···限制资源最大值启用优化,默认大小16M
pagespeed MaxCacheableContentLength 16777216;

# 单个js文件最大大小,配合combine_javascript使用,该数值过小会引起js文件不合并
pagespeed MaxCombinedJsBytes 921600;

#配置共享内存元数据缓存
pagespeed CreateSharedMemoryMetadataCache "/var/cache/pagespeed/" 51200;

#配置文件高速缓存
pagespeed FileCachePath /var/cache/pagespeed;
pagespeed FileCacheSizeKb 102400;
pagespeed FileCacheCleanIntervalMs 3600000;
pagespeed FileCacheInodeLimit 500000;

# 为了优化性能,可以写LRU缓存,nginx使用更少的进程,LRUCacheKbPerProcess可以适当大点
pagespeed LRUCacheKbPerProcess 8192;
pagespeed LRUCacheByteLimit 16384;

#缓存清除,比较方便的管理方式是,通过admin页面管理(自己可以通过配置开启)
pagespeed EnableCachePurge on;
pagespeed PurgeMethod PURGE;


#PageSpeed管理页面配置
#共享内存统计
pagespeed Statistics on;
#开启虚拟主机统计信息
pagespeed UsePerVhostStatistics on;
pagespeed StatisticsLogging on;
pagespeed StatisticsLoggingIntervalMs 60000;
pagespeed StatisticsLoggingMaxFileSizeKb 1024;
#消息缓冲区大小,默认为0,不保留消息
pagespeed MessageBufferSize 100000;
pagespeed LogDir /var/log/pagespeed;
pagespeed StatisticsPath /ngx_pagespeed_statistics;
pagespeed GlobalStatisticsPath /ngx_pagespeed_global_statistics;
pagespeed MessagesPath /ngx_pagespeed_message;
pagespeed ConsolePath /pagespeed_console;
pagespeed AdminPath /pagespeed_admin;
pagespeed GlobalAdminPath /pagespeed_global_admin;
/etc/nginx/page_speed/pagespeed_server.conf
# 禁用CoreFilters中的某些过滤器
# pagespeed DisableFilters rewrite_images;
# 选择性地启用额外的过滤器
pagespeed EnableFilters remove_comments;
pagespeed EnableFilters collapse_whitespace;
pagespeed EnableFilters prioritize_critical_css;

# 直接获取HTTPS资源,允许自签名证书资源,1.10版本后FetchHttps是默认开启的
pagespeed FetchHttps enable,allow_self_signed;

# 启用测量客户端加载和呈现页面所花费的时间
pagespeed EnableFilters add_instrumentation;
#预处理DNS
pagespeed EnableFilters insert_dns_prefetch;


# 确保对pagespeed优化资源的请求进入pagespeed处理程序并且没有额外的头部信息
location ~ "\.pagespeed\.([a-z]\.)?[a-z]{2}\.[^.]{10}\.[^.]+" {
add_header "" "";
}

# admin页面
location /ngx_pagespeed_statistics {
    auth_basic "PageSpeed Admin Dashboard";
    auth_basic_user_file /etc/nginx/page_speed/.htpasswd;
}
location /ngx_pagespeed_global_statistics {
    auth_basic "PageSpeed Admin Dashboard";
    auth_basic_user_file /etc/nginx/page_speed/.htpasswd;
}
location /ngx_pagespeed_message {
    auth_basic "PageSpeed Admin Dashboard";
    auth_basic_user_file /etc/nginx/page_speed/.htpasswd;
}
location /pagespeed_console {
    auth_basic "PageSpeed Admin Dashboard";
    auth_basic_user_file /etc/nginx/page_speed/.htpasswd;
}
location ~ ^/pagespeed_admin {
    auth_basic "PageSpeed Admin Dashboard";
    auth_basic_user_file /etc/nginx/page_speed/.htpasswd;
}
location ~ ^/pagespeed_global_admin {
    auth_basic "PageSpeed Admin Dashboard";
    auth_basic_user_file /etc/nginx/page_speed/.htpasswd;
}
同时为了优化动态文件,加入了以下命令
pagespeed LoadFromFile "https://www.archerwong.cn/public/"  "/data/gopath/src/z-blog/public/";
pagespeed LoadFromFile "https://archerwong.cn/public/"  "/data/gopath/src/z-blog/public/";
pagespeed LoadFromFileRuleMatch disallow .*;
pagespeed LoadFromFileRuleMatch allow \.css$;
pagespeed LoadFromFileRuleMatch allow \.jpe?g$;
pagespeed LoadFromFileRuleMatch allow \.png$;
pagespeed LoadFromFileRuleMatch allow \.gif$;
pagespeed LoadFromFileRuleMatch allow \.js$;
5. 其他
可以根据PageSpeed Insights的评测来定向更改自己的网站。
开启pagespeed的效果,比较直观的是多个css文件合并成了一个请求,多个js文件也合并成了一个请求


 浙公网安备 33010602011771号