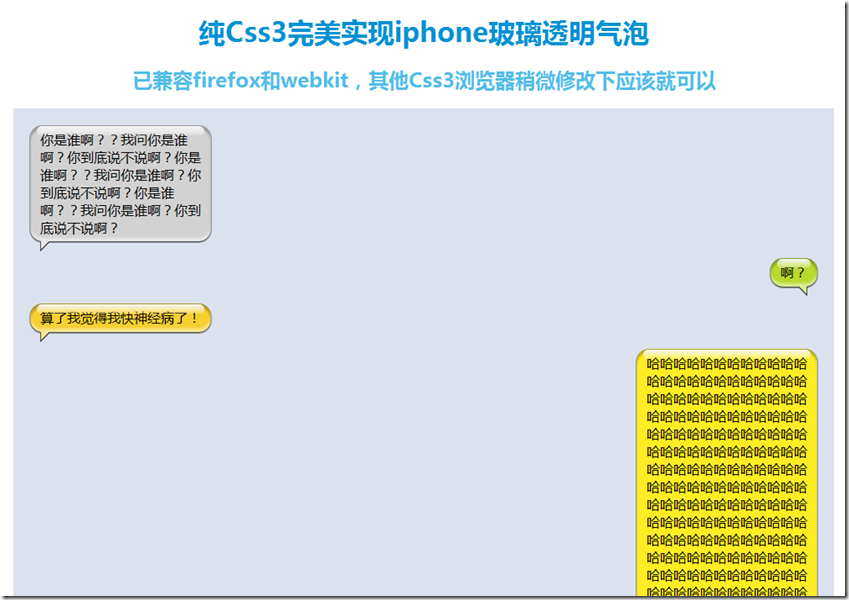
不用图片,纯Css3实现超酷的类似iphone的玻璃气泡效果
最近在一个私活做手机项目时候,需要实现一个类似ios 6中短信那样的气泡效果。
这里分享下实现心得,希望能给大家一点启发。
首先分析下iphone的气泡效果有一下特点
1. 四面圆角
2. 界面上向下的外阴影
3. 上边和下边的内阴影
4. 上边内的一个内嵌的玻璃气泡的反光效果
因为文字的长度、高度,内容多少都未知,所以如果用图片,会涉及到了多张拼贴,而且效果不好,所以就选择了CSS3。
首先定义一个容器,盒模型为display: inline-block,方便自适应文字大小
.bubble {
position: relative;
display: inline-block;
min-width: 30px;
max-width: 200px;
word-break: break-all;
word-wrap: break-word;
min-height: 22px;
background: #d2d2d2;
border-radius: 15px;
margin-bottom: 20px;
padding: 6px 8px;
-webkit-box-shadow: 0px 1px 2px #000, inset 0px 4px 4px rgba(0,0,0,.3), inset 0px -4px 4px rgba(255,255,255,.5);
-moz-shadow: 0px 1px 2px #000, inset 0px 4px 4px rgba(0,0,0,.3), inset 0px -4px 4px rgba(255,255,255,.5);
box-shadow: 0px 1px 2px #000, inset 0px 4px 4px rgba(0,0,0,.3), inset 0px -4px 4px rgba(255,255,255,.5);
}
设置断词,避免文字过长,撑开容器,同时设置最小宽度,最大宽度
设置圆角,使用border-radius
设置box-shadow: 0px 1px 2px #000实现气泡的外阴影
inset 0px 4px 4px rgba(0,0,0,.3)为上边框内阴影
inset 0px -4px 4px rgba(255,255,255,.5)为下边框的内阴影
接下来,我们需要实现最后一个效果内嵌玻璃气泡的反光效果
.bubble .content {
position: relative;
padding: 0 4px;
}
.bubble .content:before {
content: '';
position: absolute;
margin: auto;
top: -5px;
left: 0;
width: 100%;
height: 12px;
background-image: -webkit-linear-gradient(top, rgba(255,255,255,1) 0%, rgba(255,255,255,0.2) 90%, rgba(255,255,255,0) 90% );
background-image: -moz-linear-gradient(top, rgba(255,255,255,1) 0%, rgba(255,255,255,0.2) 90%, rgba(255,255,255,0) 90% );
border-radius: 10px
}
在气泡内嵌一个显示内容的block,使用block的before伪元素,实现一个圆角的渐变气泡
background-image: -webkit-linear-gradient(top, rgba(255,255,255,1) 0%, rgba(255,255,255,0.2) 90%, rgba(255,255,255,0) 90% );
最后,通过气泡的before和after伪元素,实现三角
.bubble:before {
content: '';
display: block;
font-size: 0;
width: 0;
height: 0;
border-width: 6px;
position: absolute;
bottom: -12px;
left: 12px;
border-color: #4a4c50 transparent transparent #4a4c50;
border-style: solid dashed dashed solid;
}
.bubble:after {
content: '';
display: block;
font-size: 0;
position: absolute;
bottom: -9px;
left: 13px;
width: 0;
height: 0;
border-width: 5px;
border-color: #e8e8e8 transparent transparent #e8e8e8;
border-style: solid dashed dashed solid;
}


 浙公网安备 33010602011771号