
【ABP】项目示例(9)——表现层
启动项目
在上一章节中,已经实现了数据迁移,在这一章节中,实现项目的表现层,即解决方案的启动项目
创建名称为General.Backend.Web的Web应用启动项目,接下来改造默认生成的启动项目
日志
在程序包管理控制台选中General.Backend.Web,执行以下命令安装Serilog日志相关的Nuget包
Install-Package Serilog -v 4.0.1
Install-Package Serilog.AspNetCore -v 8.0.0
Install-Package Serilog.Expressions -v 5.0.0
Install-Package Serilog.Sinks.Console -v 6.0.0
Install-Package Serilog.Sinks.File -v 6.0.0
在名称为Program的项目应用启动类中,添加Serilog日志相关配置
Directory.SetCurrentDirectory(AppContext.BaseDirectory);
InitializeLog();
var builder = WebApplication.CreateBuilder(args);
builder.Host.UseSerilog();
try
{
    app.Run();
}
catch (Exception ex)
{
    Log.Error(ex, "程序异常停止");
    throw;
}
finally
{
    Log.CloseAndFlush();
}
private static void InitializeLog()
{
    var builder = new ConfigurationBuilder();
    builder.SetBasePath(AppContext.BaseDirectory)
    .AddJsonFile("serilog.json", optional: false, reloadOnChange: false);
    // 定义Serilog配置
    Log.Logger = new LoggerConfiguration()
    #if DEBUG
    .MinimumLevel.Debug()
    #else
    .MinimumLevel.Information()
    #endif
    .MinimumLevel.Override("Microsoft", LogEventLevel.Information)
    .MinimumLevel.Override("Microsoft.EntityFrameworkCore", LogEventLevel.Warning)
    .ReadFrom.Configuration(builder.Build())
    .CreateLogger();
}
添加名称为serilog.json的日志配置文件
{
  "Serilog": {
    "Using": [ "Serilog.Sinks.File", "Serilog.Sinks.Console", "Serilog.Expressions" ],
    "MinimumLevel": {
      "Default": "Verbose", //Verbose、Debug、Information、Warning
      "Override": {
        "Microsoft": "Information",
        "System": "Information",
        "Volo.Abp": "Warning"
      }
    },
    "WriteTo": [
      {
        "Name": "Console",
        "Args": {
          "restrictedToMinimumLevel": "Verbose"
        }
      },
      {
        "Name": "Logger",
        "Args": {
          "configureLogger": {
            "WriteTo": [
              {
                "Name": "File",
                "Args": {
                  "path": "logs/log_web_.log", //格式log_20250308.log
                  "outputTemplate": "{Timestamp:yyyy-MM-dd HH:mm:ss.fff zzz} [{Level:u3}] [{SourceContext}] {Message}{NewLine}{Exception}",
                  "rollingInterval": "Day", // 日志按天保存Infinite、Year、Month、Day、Hour、Minute、RollingFile(弃用)
                  "retainedFileCountLimit": 100, //默认31,最大保存文件数
                  "restrictedToMinimumLevel": "Verbose", //Verbose、Debug、Information、Warning
                  "rollOnFileSizeLimit": true, // 默认false, 开启滚动策略
                  "fileSizeLimitBytes": 524288000 //默认1G,最大单个文件字节,100M 524288000byte=500M,rollOnFileSizeLimit如果为false,则到达单个文件大小时,在下一个滚动点之前将不会再写入日志
                }
              }
            ]
          }
        }
      }
    ],
    "Enrich": [ "FromLogContext" ]
  }
}
ABP应用
在程序包管理控制台选中General.Backend.Web,执行以下命令安装依赖注入相关的Nuget包
Install-Package Volo.Abp.Autofac -v 8.3.0
General.Backend.Web添加项目引用General.Backend.Application和General.Backend.EntityFrameworkCore
在Program启动类中的Main方法添加如下配置,来生成ABP应用
builder.Host.UseAutofac();
builder.Services.AddApplication<GeneralWebModule>();
app.InitializeApplication();
在名称为General.Backend.Web的启动项目中,新建名称为GeneralWebModule的Web模块类
[DependsOn(
    typeof(AbpAspNetCoreMvcModule),
    typeof(AbpAutofacModule),
    typeof(GeneralApplicationModule),
    typeof(GeneralEntityFrameworkCoreModule)
    )]
public class GeneralWebModule : AbpModule
{
    public override void ConfigureServices(ServiceConfigurationContext context)
    {
        var configuration = context.Services.GetConfiguration();

        Configure<AbpJsonOptions>(options =>
        {
            options.OutputDateTimeFormat = ConstantHelper.DateTimeFormat;
            options.InputDateTimeFormats = [ConstantHelper.DateTimeFormat, ConstantHelper.DateFormat];
        });
    }

    public override void OnApplicationInitialization(ApplicationInitializationContext context)
    {
        var app = context.GetApplicationBuilder();
        var env = context.GetEnvironment();

        if (env.IsDevelopment())
        {
            app.UseDeveloperExceptionPage();
        }

        app.UseStaticFiles();
        app.UseRouting();
        app.UseAuthentication();
        app.UseAuthorization();

        app.UseConfiguredEndpoints(endpoints =>
        {
            endpoints.MapControllers();
        });
    }
}
在名称为General.Backend.Domain.Shared的类库的Helper文件夹下,新建名称为ConstantHelper的常量帮助类
public static class ConstantHelper
{
    /// <summary>
    /// 日期时间格式
    /// </summary>
    public const string DateTimeFormat = "yyyy-MM-dd HH:mm:ss";

    /// <summary>
    /// 日期格式
    /// </summary>
    public const string DateFormat = "yyyy-MM-dd";
}
移除Program启动类的Main方法中相关配置,添加到GeneralWebModule的模块类中的OnApplicationInitialization方法下
if (env.IsDevelopment())
{
    app.UseDeveloperExceptionPage();
}

app.UseStaticFiles();
app.UseRouting();
app.UseCors("GeneralCors");
app.UseAuthentication();
app.UseAuthorization();
跨域
在名称为GeneralWebModule的模块类中的ConfigureServices方法下,配置跨域,允许任意来源、任意请求头部和任意方法的请求
ConfigureCors(context);
在名称为GeneralWebModule的模块类中的OnApplicationInitialization方法下,使用配置好的跨域
app.UseCors("GeneralCors"); //在app.UseRouting();之后,在app.UseAuthentication();之前调用
private static void ConfigureCors(ServiceConfigurationContext context)
{
    context.Services.AddCors(options => options.AddPolicy("GeneralCors", policy => policy.WithOrigins("*").AllowAnyHeader().AllowAnyMethod()));
}
缓存
在名称为GeneralWebModule的模块类中的ConfigureServices方法下,配置缓存绝对过期时间和滑动过期时间
ConfigureCache();
private void ConfigureCache()
{
    Configure<AbpDistributedCacheOptions>(options =>
    {
        options.GlobalCacheEntryOptions.AbsoluteExpirationRelativeToNow = TimeSpan.FromDays(1);
        options.GlobalCacheEntryOptions.SlidingExpiration = TimeSpan.FromMinutes(20);
    });
}
认证
该项目使用JWT来进行身份认证
在程序包管理控制台选中General.Backend.Web,执行以下命令安装JWT相关的Nuget包
Install-Package Microsoft.AspNetCore.Authentication.JwtBearer -v 8.0.0
在名称为GeneralWebModule的模块类中的ConfigureServices方法下,配置JWT认证
ConfigureAuthentication(context, configuration);
在名称为GeneralWebModule的模块类中的OnApplicationInitialization方法下,配置认证适用于所有的终结点
app.UseConfiguredEndpoints(endpoints =>
{
    endpoints.MapControllers().RequireAuthorization();
});
private void ConfigureAuthentication(ServiceConfigurationContext context, IConfiguration configuration)
{
    var jwtConfig = configuration.GetSection(JwtOptions.JwtOption);
    Configure<JwtOptions>(jwtConfig);
    var jwtOption = new JwtOptions();
    jwtConfig.Bind(jwtOption);

    context.Services.AddAuthentication(options =>
    {
        options.DefaultAuthenticateScheme = JwtBearerDefaults.AuthenticationScheme;
        options.DefaultChallengeScheme = JwtBearerDefaults.AuthenticationScheme;
    }).AddJwtBearer(jwtBearerOptions =>
    {
        jwtBearerOptions.TokenValidationParameters = new TokenValidationParameters
        {
            // 验证秘钥
            ValidateIssuerSigningKey = true,
            // 秘钥
            IssuerSigningKey = new SymmetricSecurityKey(Encoding.UTF8.GetBytes(jwtOption.Secret)),
            // 验证颁发者
            ValidateIssuer = true,
            // 颁发者
            ValidIssuer = jwtOption.Issuer,
            // 验证订阅者
            ValidateAudience = true,
            // 订阅者
            ValidAudience = jwtOption.Audience,
            // 验证有效时间
            ValidateLifetime = true,
            // 验证时间有效性的允许的时钟偏移量
            ClockSkew = TimeSpan.FromMinutes(5)
        };
        jwtBearerOptions.Events = new JwtBearerEvents
        {
            OnMessageReceived = (context) =>
            {
                return Task.CompletedTask;
            },
            OnTokenValidated = (context) =>
            {
                return Task.CompletedTask;
            }
        };
    });
}
还需要修改appsetting.json文件,设置ConnectionStrings和JWT节点,配置数据库连接字符串和JWT密钥、颁发者、接收者、有效时间、刷新时间
{
  "Logging": {
    "LogLevel": {
      "Default": "Information",
      "Microsoft.AspNetCore": "Warning"
    }
  },
  "AllowedHosts": "*",
  "ConnectionStrings": {
    "Default": "server=YourDatabaseConnection"
  },
  "JWT": {
    "Secret": "YourSecret",
    "Issuer": "Web",
    "Audience": "Web",
    "ExpirationTime": 120, // 过期时长,分钟
    "RefreshTime": 240 // 有效刷新时间,分钟
  }
}
控制器转换
ABP提供了实现隐藏控制器的简单配置方法,将应用服务层中方法按照一定的规则转换为Controller中的Action。可以这样理解,一个应用服务对应于一个Controller,一个方法对应于一个Action
在名称为GeneralWebModule的模块类中的ConfigureServices方法下,配置应用服务转换为Controller
ConfigureAutoApiController();
private void ConfigureAutoApiController()
{
    Configure<AbpAspNetCoreMvcOptions>(options =>
    {
        options.ConventionalControllers.Create(typeof(GeneralApplicationModule).Assembly);
    });
}
Swagger
在程序包管理控制台选中General.Backend.Web,执行以下命令安装Swagger相关的Nuget包
Install-Package Microsoft.AspNetCore.OpenApi -v 8.0.0
Install-Package Volo.Abp.Swashbuckle -v 8.3.0
GeneralWebModule模块添加AbpSwashbuckleModule模块依赖
[DependsOn(
    typeof(AbpAspNetCoreMvcModule),
    typeof(AbpAutofacModule),
    typeof(AbpSwashbuckleModule),
    typeof(GeneralApplicationModule),
    typeof(GeneralEntityFrameworkCoreModule)
    )]
public class GeneralWebModule : AbpModule
在名称为GeneralWebModule的模块类中的ConfigureServices方法下,配置Swagger,同时对Swagger页面的接口访问添加认证
ConfigureSwagger(context);
在名称为GeneralWebModule的模块类中的OnApplicationInitialization方法下,使用配置好的Swagger
app.UseSwagger();
app.UseAbpSwaggerUI(options =>
{
    options.SwaggerEndpoint("/swagger/v1/swagger.json", "General API");
    // 折叠Api
    //options.DocExpansion(Swashbuckle.AspNetCore.SwaggerUI.DocExpansion.None);
    // 去除Model显示
    //options.DefaultModelsExpandDepth(-1);
});
private void ConfigureSwagger(ServiceConfigurationContext context)
{
Configure<AbpRemoteServiceApiDescriptionProviderOptions>(options =>
{
options.SupportedResponseTypes.Clear();
});
context.Services.AddAbpSwaggerGen(options =>
{
options.SwaggerDoc("v1", new OpenApiInfo { Title = "General API", Version = "v1" });
options.DocInclusionPredicate((docName, description) => true);
options.CustomSchemaIds(type => type.FullName);
options.HideAbpEndpoints();
options.UseInlineDefinitionsForEnums();
Directory.GetFiles(AppContext.BaseDirectory, "*.xml").ToList().ForEach(file =>
{
options.IncludeXmlComments(file, true);
});
// 添加授权认证
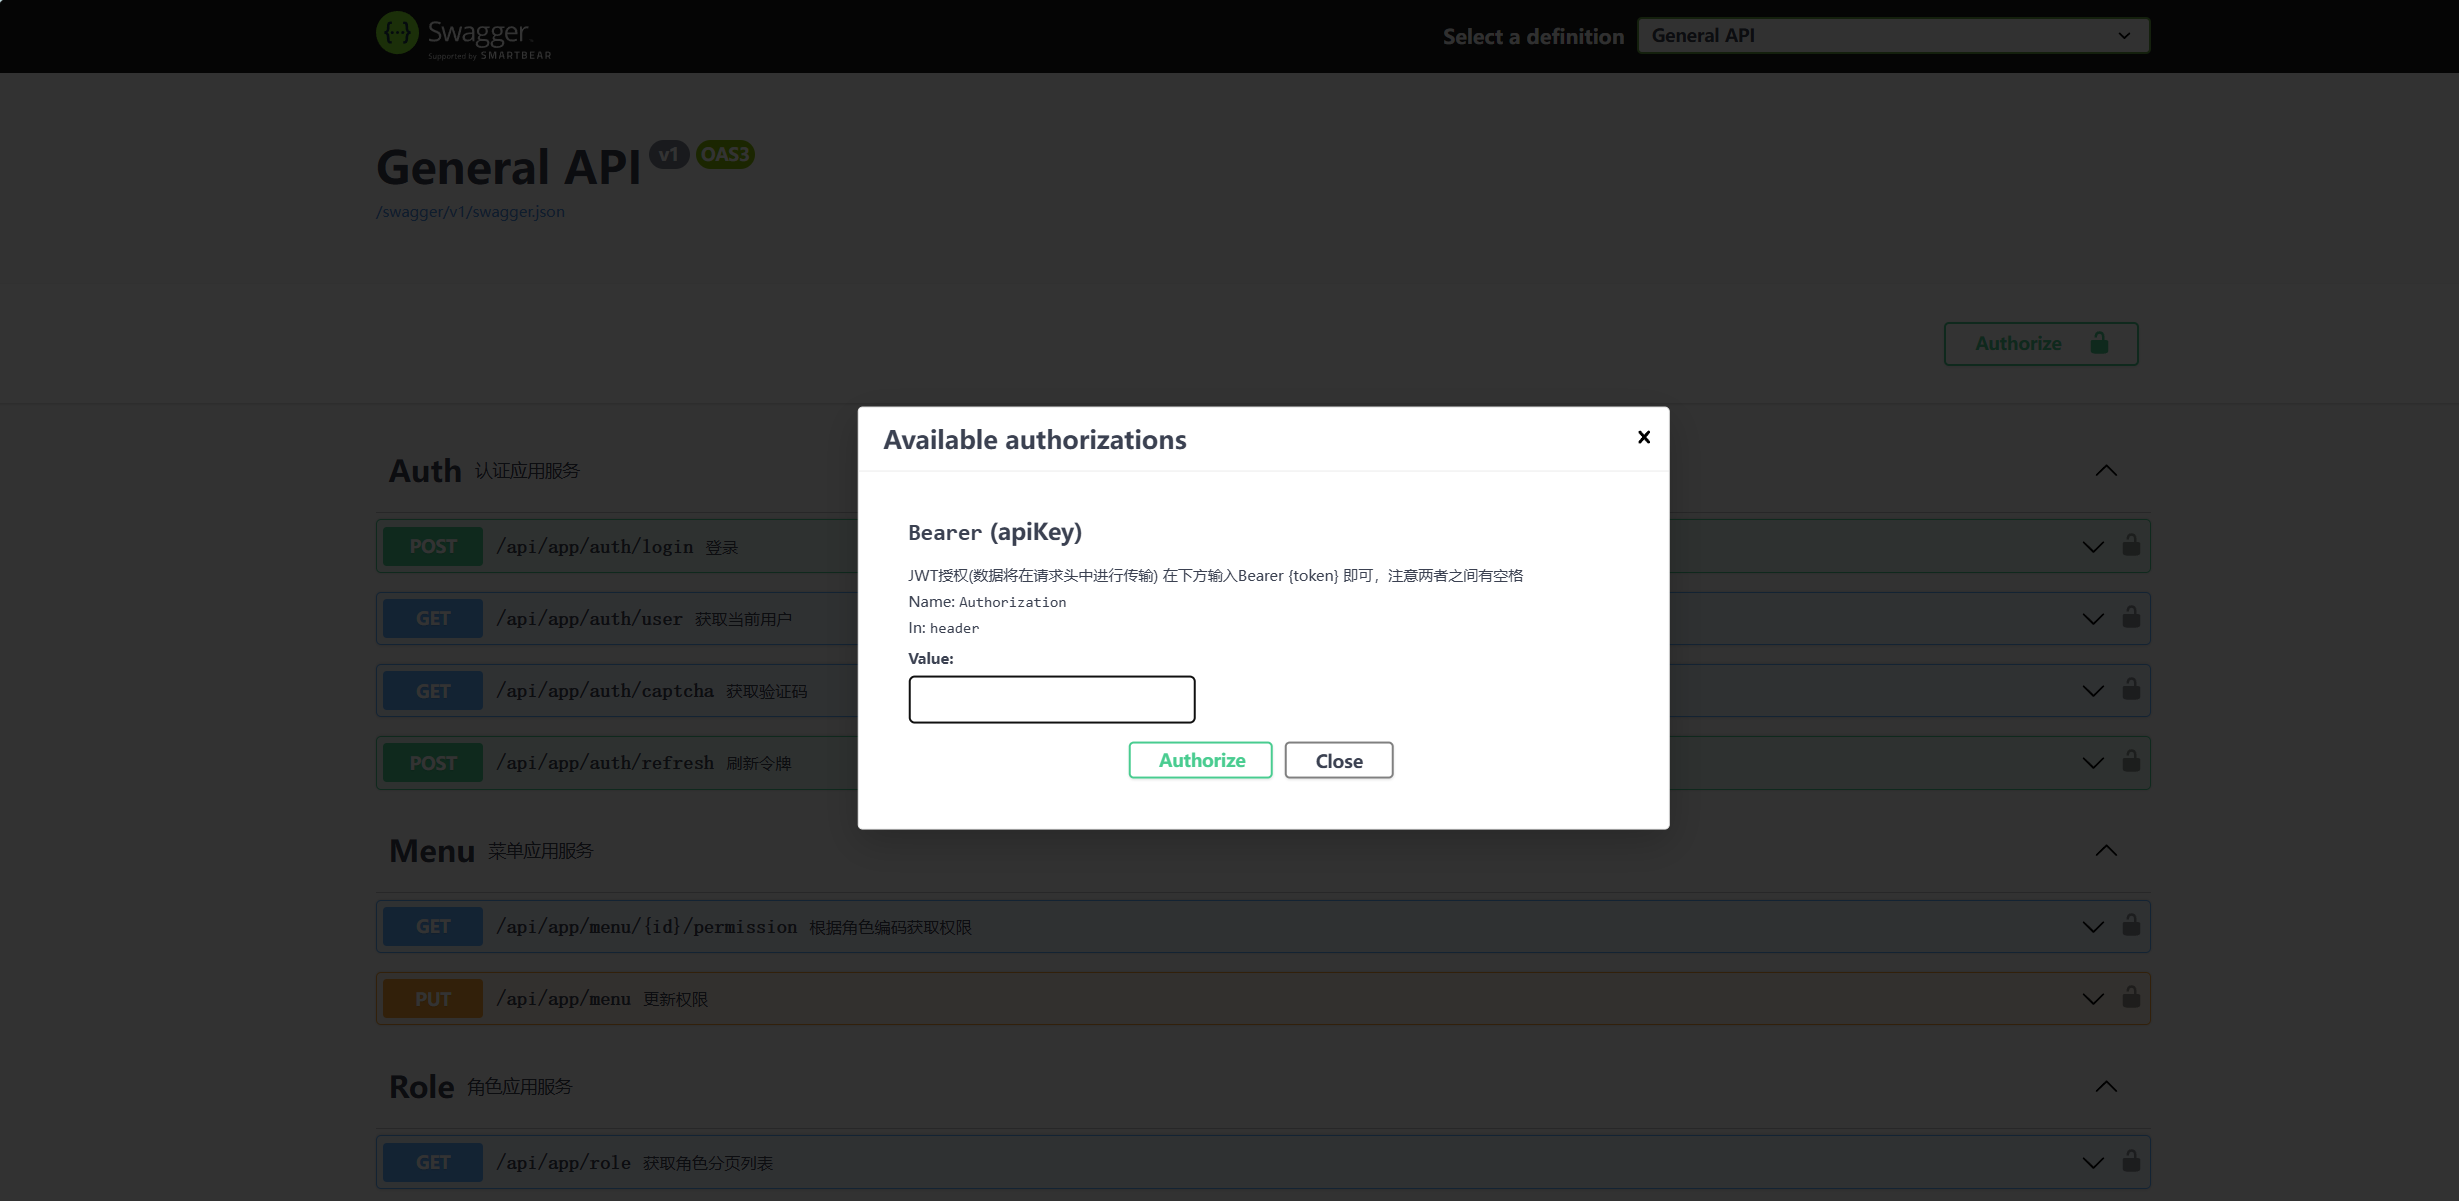
options.AddSecurityDefinition(JwtBearerDefaults.AuthenticationScheme, new OpenApiSecurityScheme
{
Description = "JWT授权(数据将在请求头中进行传输) 在下方输入Bearer {token} 即可,注意两者之间有空格",
// jwt默认的参数名称
Name = "Authorization",
// jwt默认存放Authorization信息的位置
In = ParameterLocation.Header,
Type = SecuritySchemeType.ApiKey,
BearerFormat = "JWT",
Scheme = JwtBearerDefaults.AuthenticationScheme,
});
options.AddSecurityRequirement(new OpenApiSecurityRequirement
{
// 把所有方法配置为增加bearer头部信息
{
new OpenApiSecurityScheme
{
Reference = new OpenApiReference
{
Type = ReferenceType.SecurityScheme,
Id = JwtBearerDefaults.AuthenticationScheme // 和AddSecurityDefinition方法指定的方案名称一致即可
}
},
Array.Empty<string>()
}
});
});
}
还需要在General.Backend.Application项目的属性中,设置文档文件为生成包含API文档的文件
最后将General.Backend.Web项目设置为启动项目,点击运行,访问http://localhost:5025/swagger/index.html
端口号以实际的为准,示例中为5025
可以看到生成的API文档,同时还受到JWT认证保护

 浙公网安备 33010602011771号