【ASP.NET MVC 5】第27章 Web API与单页应用程序
注:《精通ASP.NET MVC 3框架》受到了出版社和广大读者的充分肯定,这让本人深感欣慰。目前该书的第4版不日即将出版,现在又已开始第5版的翻译,这里先贴出该书的最后一章译稿,仅供大家参考。
去年,除了翻译《Pro ASP.NET MVC 4》之外,另外还翻译了两本书。一本是《HTML5+CSS3开发实战》(亚马逊、京东),由清华大学出版社出版。另一本是《ASP.NET MVC 4实战》(亚马逊、京东),也由人民邮电出版社出版。
CHAPTER 27
第27章
■ ■ ■
27 Web API and Single-page Applications
27 Web API与单页应用程序
In this chapter, I describe the Web API feature, which is a relatively new addition to the ASP.NET platform that allows you to quickly and easily create Web services that provide an API to HTTP clients, known as Web APIs.
本章描述Web API特性,它是新添加到ASP.NET平台的,让你能够快速而方便地创建Web服务,以便为HTTP客户端提供API,称之为Web API。
The Web API feature is based on the same foundation as the MVC Framework applications, but is not part of the MVC Framework. Instead, Microsoft has taken some key classes and characteristics that are associated with the System.Web.Mvc namespace and duplicated them in the System.Web.Http namespace. The idea is that Web API is part of the core ASP.NET platform and can be used in other types of Web applications or used as a stand-alone Web services engine. I have included Web API in this book because one of the main uses for it is to create single-page applications (SPAs) by combining the Web API with MVC Framework features you have seen in previous chapters. I'll explain what SPAs are and how they work later in the chapter.
Web API特性建立在MVC框架应用程序的同样基础之上,但不是MVC框架的一部分。微软从System.Web.Mvc命名空间提取了一些关键的类和特征,并将它们复制到了System.Web.Http命名空间。其思想是,Web API是核心ASP.NET平台的一部分,因而可以将其用于其他类型的Web应用程序,或者作为独立的Web服务引擎。本书之所以包含Web API内容,是因为它的主要用途是,你可以将这种Web API与前几章所看到的MVC框架特性相结合,从而创建一种单页应用程序(SPA,Single-Page Application)。本章的后面部分将解释这种SPA及其工作机制。
That is not to take away from the way that Web API simplifies creating Web services. It is a huge improvement over the other Microsoft Web service technologies that have been appearing over the last decade or so. I like the Web API and you should use it for your projects, not least because it is simple and built on the same design that the MVC Framework uses.
这并非是在贬低Web API简化创建Web服务的方式。它是对微软早在十多年前就已出现的其他Web服务技术的巨大改进。我喜欢这种Web API,你也应该将它用于自己的项目,尤其因为它简单,而且建立在MVC框架所使用的同样设计模式之上。
I start this chapter by creating a regular MVC Framework application and then using the Web API to transform it into a single-page application. This is a surprisingly simple example, so I have treated the process like an extended example and applied some of the relevant techniques from earlier chapters because you can never have enough examples. Table 27-1 provides the summary for this chapter.
本章首先从创建一个常规的MVC框架应用程序开始,然后使用Web API将其转换成一个单页应用程序。这是一个相当简单的示例,因此,我将这一创建过程处理成一个逐步扩展的示例,并运用前几章的一些相关技术,因为示例是不可能嫌多的。表27-1描述了本章概要。
| Problem 问题 |
Solution 解决方案 |
Listing 清单号 |
|---|---|---|
| Create a RESTful web service 创建REST化的Web服务 |
Add a Web API controller to an MVC Framework application. 在MVC框架的应用程序中添加一个Web API控制器 |
1–10 |
| Map between HTTP methods and action names in a Web API controller Web API控制器中HTTP方法与动作名之间的映射 |
Apply attributes such as HttpPut and HttpPost to the methods. 在动作方法上运用HttpPut、HttpPost等注解属性。 |
11 |
| Create a single-page application 创建单页应用程序 |
Use Knockout and jQuery to obtain data via Ajax and bind it to HTML elements. 使用Knockout和jQuery,以便通过Ajax获取数据,并将这些数据绑定到HTML元素。 |
12–17 |
27.1 Understanding Single-page Applications
27.1 理解单页应用程序
The term single-page application (SPA) is a broadly applied term. The most consistently-used definition is a web application whose initial content is delivered as a combination of HTML and JavaScript and whose subsequent operations are performed using a RESTful web service that delivers data via JSON in response to Ajax requests.
术语单页应用程序(SPA)是一个宽泛的用语。最惯用的定义指,这是一种Web应用程序,其呈现的最初内容由HTML和JavaScript所组成,而它的后继操作是使用REST化的Web服务执行的,这种服务对Ajax请求进行响应,并通过JSON提供数据。
This differs from the kind of application I have been building in most of the chapters of this book, where operations performed by the user result in new HTML documents being generated in response to synchronous HTTP requests, which I will refer to as round-trip applications (RTAs).
这与本书大部分章节所建立的应用程序不同,在那些应用程序中,用户执行的操作所产生的结果是,对HTTP请求以同步响应的方式生成新的HTML文档,我将其称为往返式应用程序(RTA,Round-Trip Application)。
The advantages of a SPA are that less bandwidth is required and that the user receives a smoother experience. The disadvantages are that the smoother experience can be hard to achieve and that the complexity of the JavaScript code required for a SPA demands careful design and testing.
SPA的优点是所需的带宽较少,而且用户可以得到更为流畅的体验。缺点是这种流畅的体验难以实现,而且,SPA所需的JavaScript代码较为复杂,需要进行小心的设计与测试。
Most applications mix and match SPA and RTA techniques, where each major functional area of the application is delivered as a SPA, and navigation between functional areas is managed using standard HTTP requests that create a new HTML document.
大多数应用程序会混合和搭配SPA与RTA技术,其中的主要功能区由SPA实现,而各功能区之间的导航,则使用标准的HTTP请求创建新的HTML文档进行管理。
27.2 Preparing the Example Application
27.2 准备示例项目
For this chapter, I created a new ASP.NET project called WebServices using the Empty template. I checked the options to add the folders and references for both MVC and Web API applications, as shown in Figure 27-1.
本章使用Empty模板创建了一个新的ASP.NET项目,名称为WebServices,并选中了一些选项,以便同时为MVC和Web API应用程序添加文件夹和引用,如图27-1所示。
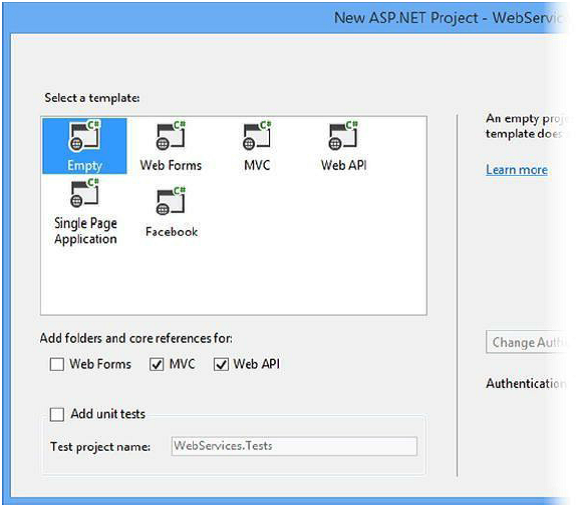
Figure 27-1. Creating the project with the MVC and Web API references
图 27-1. 创建带有MVC和Web API引用的项目
I will use this project to create a regular MVC Framework application and then use the Web API to create a web service. Once the web service is complete, I'll return to the MVC Framework application and make it into a single-page application.
本章将用该项目创建一个常规的MVC框架应用程序,然后使用Web API创建一个Web服务。Web服务完成后,将回到MVC框架应用程序,将其改成单页应用程序。
27.2.1 Creating the Model
27.2.1 创建模型
This application will create and maintain a series of reservations. I want to keep the application simple so that I can focus on the mechanics of the features I describe, and so these reservations will consist of just a name and a location. I added a class file called Reservation.cs to the Models folder, the contents of which are shown in Listing 27-1.
该应用程序将创建并维护一系列预约(Reservation)。为保持应用程序简单,以便将注意力集中于本章所描述的特性机制,因此这些预约将只包含姓名和地点。为此,在Models文件夹中添加了一个类文件,名称为Reservation.cs,其内容如清单27-1所示。
Listing 27-1. The Contents of the Reservation.cs File
清单 27-1. Reservation.cs文件的内容
namespace WebServices.Models {
    public class Reservation {
        public int ReservationId { get; set; }
        public string ClientName { get; set; }
        public string Location { get; set; }
    }
}
I am going to create a simple in-memory collection of Reservation objects to act as the model repository. I don't want to go to the trouble of setting up a database, but I do need to be able to perform CRUD operations on a collection of model objects so that I can demonstrate some important aspects of the Web API. I added a class file called ReservationRepository.cs to the Models folder and you can see the contents of the new file in Listing 27-2.
我打算创建一个简单的Reservation对象的内存集合,以此充当模型存储库。我不想介入建立数据库的麻烦,但又确实需要能够对模型对象集合执行CRUD操作,以便能够演示Web API的一些重要方面。于是在Models文件夹中添加了一个名称为ReservationRepository.cs的类文件,可以从清单27-2看到其内容。
Listing 27-2. The Contents of the ReservationRespository.cs File
清单 27-2. ReservationRespository.cs文件的内容
using System.Collections.Generic;
using System.Linq;

namespace WebServices.Models {
    public class ReservationRespository {
        private static ReservationRespository repo = new ReservationRespository();

        public static ReservationRespository Current {
            get {
                return repo;
            }
        }

        private List<Reservation> data = new List<Reservation> {
            new Reservation {
                ReservationId = 1, ClientName = "Adam", Location = "Board Room"},
            new Reservation {
                ReservationId = 2, ClientName = "Jacqui", Location = "Lecture Hall"},
            new Reservation {
                ReservationId = 3, ClientName = "Russell", Location = "Meeting Room 1"},
        };

        public IEnumerable<Reservation> GetAll() {
            return data;
        }

        public Reservation Get(int id) {
            return data.Where(r => r.ReservationId == id).FirstOrDefault();
        }

        public Reservation Add(Reservation item) {
            item.ReservationId = data.Count + 1;
            data.Add(item);
            return item;
        }

        public void Remove(int id) {
            Reservation item = Get(id);
            if (item != null) {
                data.Remove(item);
            }
        }

        public bool Update(Reservation item) {
            Reservation storedItem = Get(item.ReservationId);
            if (storedItem != null) {
                storedItem.ClientName = item.ClientName;
                storedItem.Location = item.Location;
                return true;
            } else {
                return false;
            }
        }
    }
}
■Tip In a real project, I would be concerned about tight coupling between classes and introduce interfaces and dependency injection into the application. My focus in this chapter is just on the Web API and SPA applications, so I am going to take some shortcuts when it comes to other standard techniques.
提示:在一个实际项目中,我会关注类与类之间的紧偶合情况,并在应用程序中引入接口和依赖性注入。但本章的焦点只是Web API和SPA应用程序,因此,在涉及其他标准技术时,我会采取一些简化。
The repository class has an initial list of three Reservation objects and defines methods that allow me to view, add, delete and update the collection. Since there is no persistent storage, any changes that are made to the repository will be lost when the application is stopped or restarted, but this example is all about the way in which content can be delivered and not how it is stored by the server. To ensure that there is some persistence between requests, I have created a static instance of the ReservationRespository class, which is accessible through the Current property.
上述存储库类是一个有三个初始Reservation对象的列表,并定义了能够对该集合进行浏览、添加、删除和更新的方法。由于没有持久化存储,当应用程序停止或重启时,对存储库所做的修改都会丢失,但该示例只关系到递送内容的方式,而不是如何用服务器进行存储。为了确保能够在请求之间表现一些持久化的情况,这里创建了一个静态的ReservationRespository类实例,可以通过Current属性进行访问。
27.2.2 Adding the NuGet Packages
27.2.2 添加NuGet包
I am going to rely on three NuGet packages in this chapter: jQuery, Bootstrap and Knockout. I have already described and used jQuery and Bootstrap in earlier chapters. Knockout is the library that Microsoft has adopted for single-page applications. It was created by Steve Sanderson, whom I worked with on an earlier edition of this book and who works for the Microsoft ASP.NET team. Even though Steve works for Microsoft, the Knockout package is open source and widely used and you can learn more about it at http://knockoutjs.com. I'll explain how Knockout works later in the chapter, but for the moment I just need to install the NuGet packages. Select Package Manager Console from the Visual Studio Tools → Library Package Manager menu and enter the following commands:
本章打算依靠三个NuGet包:jQuery、Bootstrap和Knockout。在前面几章中已经描述并使用过jQuery和Bootstrap。Knockout是微软为单页应用程序而采纳的一个库。它是Steve Sanderson所创建的,他曾和我一起著作过本书的早期版本,现在微软的ASP.NET团队工作。尽管Steve为微软工作,但Knockout包是开源的,而且被广泛使用,你可以从http://knockoutjs.com了解更多情况。本章稍后将解释Knockout如何工作,但此刻只需要安装这一NuGet包。在Visual Studio中选择“Tools(工具)” →“Library Package Manager(库包管理器)”,以进入“Package Manager Console(包管理器控制台)”,然后输入如下命令:
Install-Package jquery –version 1.10.2
Install-Package bootstrap –version 3.0.0
Install-Package knockoutjs –version 3.0.0
27.2.3 Adding the Controller
27.2.3 添加控制器
I added a controller called Home to the example project, the definition of which you can see in Listing 27-3.
我在项目中添加一个Home控制器,其定义如清单27-3所示。
Listing 27-3. The Contents of the HomeController.cs File
清单 27-3. HomeController.cs文件的内容
using System.Web.Mvc;
using WebServices.Models;

namespace WebServices.Controllers {

    public class HomeController : Controller {
        private ReservationRespository repo = ReservationRespository.Current;

        public ViewResult Index() {
            return View(repo.GetAll());
        }

        public ActionResult Add(Reservation item) {
            if (ModelState.IsValid) {
                repo.Add(item);
                return RedirectToAction("Index");
            } else {
                return View("Index");
            }
        }

        public ActionResult Remove(int id) {
            repo.Remove(id);
            return RedirectToAction("Index");
        }

        public ActionResult Update(Reservation item) {
            if (ModelState.IsValid && repo.Update(item)) {
                return RedirectToAction("Index");
            } else {
                return View("Index");
            }
        }
    }
}
This is a fairly typical controller for such a simple application. Each of the action methods corresponds directly to one of the methods in the repository and the only value that the controller adds is to perform model validation, to select views, and perform redirections. In a real project, there would be more business domain logic, of course, but because the example application I am using is so basic, the controller ends up being little more than a wrapper around the repository.
对于这样一个简单的应用程序,这是一个相当典型的控制器。其中的每一个方法直接对应于存储库中的相应方法,而且,控制器所添加的值只不过是为了执行模型验证、选择视图,或者执行重定向。当然,在一个实际项目中,应用程序会有较多的业务逻辑,但由于本章的应用程序如此简单,以致该控制器最终只比存储库封装程序多了一点点内容。
27.2.4 Adding the Layout and Views
27.2.4 添加布局和视图
To generate the content for the application, I started by creating the Views/Shared folder and adding a view file called _Layout.cshtml to it, the contents of which are shown by Listing 27-4.
为了生成应用程序的内容,我首先创建了Views/Shared文件夹,并添加了一个名称为_Layout.cshtml的视图文件,如清单27-4所示。
Listing 27-4. The Contents of the _Layout.cshtml File
清单 27-4. _Layout.cshtml文件的内容
@{
    Layout = null;
}

<!DOCTYPE html>

<html>
<head>
    <meta name="viewport" content="width=device-width" />
    <title>@ViewBag.Title</title>
    <link href="~/Content/bootstrap.css" rel="stylesheet" />
    <link href="~/Content/bootstrap.min.css" rel="stylesheet" />
    @RenderSection("Scripts")
</head>
<body>
    @RenderSection("Body")
</body>
</html>
This is a basic layout that has link elements for the Bootstrap CSS files. I have defined two layout sections, Scripts and Body, that I will use to insert content into the layout. My next step was to create the top-level view for the application. Although I am going through the process of creating a regular MVC Framework application, I know that I am going to end up with a single-page application and the transformation will be made easier if I create a single view that contains all the HTML that the application will require, even if it results in an odd appearance initially. I added a view file called Index.cshtml to the Views/Home folder, the contents of which you can see in Listing 27-5.
这是一个基本的布局,它具有引用Bootstrap CSS文件(Bootstrap的样式表文件——译者注)的link元素。其中定义了Scripts和Body两个布局片段,用于将内容插入该布局。下一步是创建应用程序的顶级视图。虽然中间会经过创建常规MVC框架应用程序的过程,但我知道,最终这是一个单页应用程序,而且,如果创建一个单一的视图,其中包含该应用程序所需要的全部HTML,后面的转换会更为容易,尽管该视图最初的外观有点怪异。为此,在Views/Home文件夹中添加了一个名称为Index.cshtml的视图,如清单27-5所示。
Listing 27-5. The Contents of the Index.cshtml File
清单 27-5. Index.cshtml文件的内容
@using WebServices.Models

@model IEnumerable<Reservation>

@{
    ViewBag.Title = "Reservations";
    Layout = "~/Views/Shared/_Layout.cshtml";
}

@section Scripts {
}

@section Body {
    <div id="summary" class="section panel panel-primary">
        @Html.Partial("Summary", Model)
    </div>

    <div id="editor" class="section panel panel-primary">
        @Html.Partial("Editor", new Reservation())
    </div>
}
The view model for this view is an enumeration of Reservation objects and I rely on two partial views to provide the functional building blocks that the user will see. The first partial view file is called Summary.cshtml. I created the file in the Views/Home folder and you can see the contents of the file in Listing 27-6.
该视图的视图模型是一个Reservation对象的枚举,我依靠两个分部分视图提供了用户可见的功能块。第一个分部视图文件叫做Summary.cshtml。这是在Views/Home文件夹中创建的,可以从清单27-6看到其内容。
Listing 27-6. The Contents of the Summary.cshtml File
清单 27-6. Summary.cshtml文件的内容
@model IEnumerable<WebServices.Models.Reservation>

<div class="panel-heading">Reservation Summary</div>
<div class="panel-body">
    <table class="table table-striped table-condensed">
        <thead>
            <tr><th>ID</th><th>Name</th><th>Location</th><th></th></tr>
        </thead>
        <tbody>
            @foreach (var item in Model) {
                <tr>
                    <td>@item.ReservationId</td>
                    <td>@item.ClientName</td>
                    <td>@item.Location</td>
                    <td>
                        @Html.ActionLink("Remove", "Remove",
                            new { id = item.ReservationId },
                            new { @class = "btn btn-xs btn-primary" })
                    </td>
                </tr>
            }
        </tbody>
    </table>
</div>
The view model for the partial view is the same enumeration of Reservation object and I use it to generate a Bootstrap-styled table element that displays the object property values. I use the Html.ActionLink helper method to generate a link that will invoke the Remove action on the Home controller and use Bootstrap to style it as a button.
用于该分部视图的视图模型同样是一个Reservation枚举对象,用它生成了一个Bootstrap风格的table元素,在其中显示各个对象的属性值。这里用Html.ActionLink辅助器方法生成了一个链接,它将调用Home控制器中的Remove动作,并使用Bootstrap使其成为一个按钮样式。
The other partial view is called Editor.cshtml and I put this in the Views/Home folder as well. Listing 27-7 shows the contents of this file. This partial view contains a form that can be used to create new reservations. Submitting the form invokes the Add action on the Home controller.
另一个分部视图叫做Editor.cshtml,也放在Views/Home文件夹中。清单27-7显示了该文件的内容。该分部视图含有一个表单,用它创建新的预约。递交该表单会调用Home控制器中的Add动作。
Listing 27-7. The Contents of the Editor.cshtml File
清单 27-7. Editor.cshtml文件的内容
@model WebServices.Models.Reservation

<div class="panel-heading">
    Create Reservation
</div>
<div class="panel-body">
    @using(Html.BeginForm("Add", "Home")) {
        <div class="form-group">
            <label>Client Name</label>
            @Html.TextBoxFor(m => m.ClientName, new {@class = "form-control" })
        </div>
        <div class="form-group">
            <label>Location</label>
            @Html.TextBoxFor(m => m.Location, new { @class = "form-control" })
        </div>
        <button type="submit" class="btn btn-primary">Save</button>
    }
</div>
27.2.5 Setting the Start Location and Testing the Example Application
27.2.5 设置启动位置并测试示例应用程序
The last preparatory step is to set the location that Visual Studio will navigate to when the application is started. Select WebServices Properties from the Visual Studio Project menu, switch to the Web tab and check the Specific Page option in the Start Action section. You don't have to provide a value. Just checking the option is enough. To test the application in its classic MVC Framework form, select Start Debugging from the Visual Studio Debug menu. You will see the (slightly odd) all-in-one layout that provides the user with a list of the current reservations and the ability to create and delete items, as shown in Figure 27-2.
最后一项准备工作是设置启动位置,应用程序启动时,Visual Studio将导航到该位置。在Visual Studio的“Project(项目)”菜单中选择“WebServices Properties(WebServices属性)”,切换到“ Web”选项卡,并选中“ Start Action(启动行为)”小节中的“ Specific Page(特定页面)”选项。不必为其提供一个值,只需选中该选项即可。为了对这一传统形式的MVC框架表单应用程序进行测试,可从Visual Studio的“ Debug(调试)”菜单中选择“ Start Debugging(开始调试)”。这将看到一个一体化的布局(有点怪),它给用户提供了一个当前预约的列表,并能够创建和删除条目,如图27-2所示。

Figure 27-2. Testing the example application
图 27-2. 测试示例应用程序
27.3 Using Web API
27.3 使用Web API
The Web API feature is based on adding a special kind of controller to an MVC Framework application. This kind of controller, called an API Controller, has two distinctive characteristics:
Web API特性是在MVC框架应用程序基础上添加一种特殊的控制器,这种控制叫做API控制器(API Controller),它有两个明显的特征:
- Action methods return model, rather than ActionResult, objects.
动作方法返回的是模型对象,而不是ActionResult对象。 - Action methods are selected based on the HTTP method used in the request.
动作方法是根据请求所使用的HTTP方法来选择的。
The model objects that are returned from an API controller action method are encoded as JSON and sent to the client. API controllers are designed to deliver Web data services, so they do not support views, layouts, or any of the other features that I used to generate HTML in the example application.
API控制器的动作方法所返回的模型对象被编码成JSON,并发送给客户端。API控制器的设计目的是提供Web的数据服务,因此,它们不支持视图、布局,也不支持用来在示例应用程序中生成HTML的任何其它特性。
■Tip The inability of an API controller to generate HTML from views is the reason that single-page applications combine standard MVC Framework techniques with the Web API. The MVC Framework performs the steps required to deliver HTML content to the user (including authentication, authorization, and selecting and rendering a view). Once the HTML is delivered to the browser, the Ajax requests generated by the JavaScript it contains are handled by the Web API controller.
提示:API控制无法通过视图生成HTML,这正是单页应用程序需要将标准的MVC框架技术与Web API相结合的原因。MVC框架执行的一些步骤是向用户投递HTML内容(包括认证、授权,以及选择并渲染视图等)。一旦给浏览器提供了HTML,由其中包含的JavaScript生成的Ajax请求,便可以由Web API控制器来处理了。
从这里可以看出,Web API的职责其实很简单,就是在服务器端对客户端发送过来的请求(通常为Ajax请求)进行响应,并为该请求准备数据,然后将数据回递给客户端。说得更简单一点,就是为客户端提供Web服务。
另一方面,为了实现这种Web服务,客户端需要做两件事:第一,“要求服务”。客户端要向服务器发送要求服务的请求,这通常为Ajax请求。因此,客户端通常需要使用JavaScript代码形成这种请求(通常会使用jQuery库,或渐近式Ajax库)。客户端要做的第二件事是,“处理服务”。客户端要对Web API回发过来的数据进行处理,这通常又需要用JavaScript代码对这些数据(通常为JSON格式的数据)进行解析,并将这些数据显示出来。这两件事都是在客户端发生的——译者注
As I demonstrated in Chapter 23, you can create action methods in regular controllers that return JSON data to support Ajax, but the API controller offers an alternative approach that separates the data-related actions in your application from the view-related actions, and makes creating a general-purpose Web API quick and simple.
正如第23章所演示的,你可以在常规控制器中创建返回JSON的动作方法,以支持Ajax,但这种API控制器提供了另一种办法,可以将应用程序中数据相关的动作与视图相关的动作分离开来,而且使得创建通用目的的Web API快速而简单。
27.3.1 Creating the Web API Controller
27.3.1 创建Web API控制器
Adding Web API to an application is incredibly simple. In part this is because I am creating a basic web service, but also because the integration with the underpinnings of the MVC Framework means that little work is required. I created the WebController.cs class file in the Controllers folder of the project and used it to define the controller shown in Listing 27-8.
在应用程序添加Web API简单得难以置信。一方面是因为这是在创建一个基本的Web服务,另一方面是因为这种与MVC框架基础的集成,意味着只需做很少的工作。我在项目的Controllers文件夹中创建了WebController.cs类文件,并用它定义了该控制器,如清单27-8所示。
Listing 27-8. The Contents of the WebController.cs File
清单 27-8. WebController.cs文件的内容
using System.Collections.Generic;
using System.Web.Http;
using WebServices.Models;

namespace WebServices.Controllers {

    public class WebController : ApiController {
        private ReservationRespository repo = ReservationRespository.Current;

        public IEnumerable<Reservation> GetAllReservations() {
            return repo.GetAll();
        }

        public Reservation GetReservation(int id) {
            return repo.Get(id);
        }

        public Reservation PostReservation(Reservation item) {
            return repo.Add(item);
        }

        public bool PutReservation(Reservation item) {
            return repo.Update(item);
        }

        public void DeleteReservation(int id) {
            repo.Remove(id);
        }
    }
}
That is all that is required to create a Web API. The API controller has a set of five action methods that map to the capabilities of the repository and provide web service access to the Reservation objects.
这就是创建Web API所需要的全部。该PAI控制器有五个动作方法,它们分别映射到存储库的功能,并提供了对Reservation对象进行访问的Web服务。
27.3.2 Testing the API Controller
27.3.2 测试API控制器
I will explain how the API controller works shortly, but first I am going to perform a simple test. Start the application. Once the browser loads the root URL for the project, navigate to the /api/web URL. The result that you see will depend on the browser that you are using. If you are using Internet Explorer, then you will be prompted to save or open a file that contains the following JSON data:
我很快会解释API控制器的工作机制,但我首先打算执行一个简单的测试。启动应用程序,一旦浏览器已加载了项目的根URL,便导航到/api/web。所看到的结果依赖于你所使用的浏览器。如果是Internet Explorer,将提示你保存或打开含有以下JSON数据的文件:
[{"ReservationId":1,"ClientName":"Adam","Location":"Board Room"},
 {"ReservationId":2,"ClientName":"Jacqui","Location":"Lecture Hall"},
 {"ReservationId":3,"ClientName":"Russell","Location":"Meeting Room 1"}]
If you navigate to the same URL using a different browser, such as Google Chrome, then the browser will display the following XML data:
如果用不同的浏览器导航到同样的URL,如Google Chrome,则浏览器将显示以下XML数据:
<ArrayOfReservation>
    <Reservation>
        <ClientName>Adam</ClientName>
        <Location>Board Room</Location>
        <ReservationId>1</ReservationId>
    </Reservation>
    <Reservation>
        <ClientName>Jacqui</ClientName>
        <Location>Lecture Hall</Location>
        <ReservationId>2</ReservationId>
    </Reservation>
    <Reservation>
        <ClientName>Russell</ClientName>
        <Location>Meeting Room 1</Location>
        <ReservationId>3</ReservationId>
    </Reservation>
</ArrayOfReservation>
There are a couple of interesting things to note here. The first is that the request for the /api/web URL has produced a list of all of the model objects and their properties, from which we can infer that the GetAllReservations action method in the Reservation controller was called.
这里有两件有趣的事需要注意。首先,对/api/web的请求,已经产生了全部模型对象及其属性的列表,由此可以推断,它调用了Reservation控制器中的GetAllReservations动作方法。
The second point to note is that different browsers received different data formats. You might get different results if you try this yourself because later versions of the browsers may change the way they make requests, but you can see that one of requests has produced JSON and the other has produced XML. (You can also see why JSON has largely replaced XML for Web services. XML is more verbose and harder to process, especially when you are using JavaScript.)
要注意的第二点是,不同的浏览器接受不同的数据格式。如果你自己试一试,也许会得到不同的结果。因为更高版本的浏览器也许会改变它们形成请求的方式。但可以看出,其中一个请求产生了JSON,而其他请求则产生XML(其实应当是,有些浏览器发送的请求,会导致返回JSON,而有些则返回XML——译者注)。(还可以看出,JSON为什么会广泛代替XML用于Web服务。因为XML更加冗长而难以处理,尤其是使用JavaScript时。)
The different data formats are used because the Web API uses the HTTP Accept header contained in the request to work out what data type the client would prefer to work with. Internet Explorer got JSON because this is the Accept header it sends:
之所以会使用不同的数据格式,是因为Web API会使用包含在请求中的HTTP的Accept报头,以便推断出客户端更喜欢使用哪种数据类型。Internet Explorer得到JSON,是因为它发送了以下Accept报头:
...
Accept: text/html, application/xhtml+xml, */*
...
The browser specified that it would like text/html content most of all, and then application/xhtml+xml. The final part of the Accept header is */*, which means the browser will accept any data type if the first two are not available.
浏览器指定了它最喜欢的是text/html格式的内容,其次是application/xhtml+xml。上述Accept报头的最后部分是*/*,这意味着如果前两个不可用,浏览器可以接受任何数据类型。
The Web API supports JSON and XML, but it gives preference to JSON, which is what it used to respond to the */* part of the IE Accept header. Here is the Accept header that Google Chrome sent:
Web API支持JSON和XML,但对JSON会给予优先,这也是它针对IE的Accept报头中的*/*部分所使用的响应。以下是Google Chrome所发送的Accept报头:
...
Accept : text/html, application/xhtml+xml, application/xml; q=0.9, */*; q=0.8
...
I have highlighted the important part: Chrome has said that it prefers to receive application/xml data in preference to the */* catchall. The Web API controller honored this preference and delivered the XML data. I mention this because a common problem with Web API is getting an undesired data format. This happens because the Accept header gives unexpected preference to a format, or it is missing from the request entirely.
这里已高亮了重要部分:Chrome说过,它更喜欢优先于*/*通配符而接受application/xml数据(故在上述报头中,application/xml位于*/*通配符之前——译者注)。Web API控制器遵从了这种优先,因而交付了XML数据。这里提及此事,是因为Web API的一个常见问题是,它会获得非期望的数据格式。究其原因是Accept报头对非期望的格式给予了优先——或者,Accept报头根本不在请求中出现。
27.4 Understanding How the API Controller Works
27.4 理解API控制器工作机制
You will understand a lot more about how the API controller works by navigating to the /api/web/3 URL. You will see the following JSON (or the equivalent XML if you are using another browser):
导航到/api/web/3网址,你会对API控制器的工作情况有更多了解。这会看到以下JSON(或者,如果使用其他浏览器,会看到对等的XML):
{"ReservationId":3,"ClientName":"Russell","Location":"Meeting Room 1"}This time, the Web API controller has returned details of the Reservation object whose ReservationId value corresponds to the last segment of the URL I requested. The format of the URL and the use of the URL segment should remind you of Chapter 15, where I explained how MVC Framework routes work.
这一次,Web API返回了具体的Reservation对象,其ReservationId的值对应于请求URL的最后一个片段。这种URL格式以及URL片段的用法应该让你回忆起第15章,在那里解释了MVC框架的路由工作机制。
API controllers have their own routing configuration, which is completely separate from the rest of the application. You can see the default configuration that Visual Studio creates for new projects by looking at the /App_Start/WebApiConfig.cs file, which I have shown in Listing 27-9. This is one of the files that Visual Studio adds to the project when you check the Web API box during project creation.
API控制器有其自己的路由配置,它与应用程序的其余部分是完全分开的。通过考察/App_Start/WebApiConfig.cs文件,可以看到Visual Studio为新项目所创建的默认配置,如清单27-9所示。这是在创建项目期间选中Web API复选框时,Visual Studio会添加到项目的一个文件。
Listing 27-9. The Contents of the WebApiConfig.cs File
清单 27-9. WebApiConfig.cs文件的内容
using System;
using System.Collections.Generic;
using System.Linq;
using System.Web.Http;

namespace WebServices {
    public static class WebApiConfig {
        public static void Register(HttpConfiguration config) {

            config.MapHttpAttributeRoutes();

            config.Routes.MapHttpRoute(
                name: "DefaultApi",
                routeTemplate: "api/{controller}/{id}",
                defaults: new { id = RouteParameter.Optional }
            );
        }
    }
}
The WebApiConfig.cs file contains the routes used for API Controllers, but uses different classes from the regular MVC routes defined in the RouteConfig.cs file. The Web API feature is implemented as a stand-alone ASP.NET feature and it can be used outside of the MVC Framework, which means that Microsoft has duplicated some key MVC Framework functionality in the System.Web.Http namespace to keep MVC and Web API features separate. (This seems oddly duplicative when writing an MVC Framework application but makes sense since Microsoft is trying to target non-MVC developers with Web API, too.) Visual Studio also adds a call from the Application_Start method in the Global.asax class so that the Web API routes are added to the application configuration, as shown in Listing 27-10.
该WebApiConfig.cs文件包含了用于API控制器的路由,但使用了与RouteConfig.cs文件中所定义的常规MVC路由不同的类。Web API是作为一个独立的ASP.NET特性而实现的,而且可以将它用于MVC框架之外,这意味着,微软在System.Web.Http命名空间中复制了某些关键的MVC框架功能,以保持MVC与Web API特性相互独立。(在编写MVC框架的应用程序时,这似乎是一种奇怪的重复,但这是有意义的,因为微软这是在尝试让Web API也能面向非MVC开发者)。Visual Studio也在Global.asax类的Application_Start方法中添加了一个调用,以便将Web API路由添加到应用程序,如清单27-10所示。
Listing 27-10. The Contents of the Global.asax File
清单 27-10. Global.asax文件的内容
using System;
using System.Collections.Generic;
using System.Linq;
using System.Web;
using System.Web.Mvc;
using System.Web.Routing;
using System.Web.Security;
using System.Web.SessionState;
using System.Web.Http;

namespace WebServices {
    public class Global : HttpApplication {
        void Application_Start(object sender, EventArgs e) {
            AreaRegistration.RegisterAllAreas();
            GlobalConfiguration.Configure(WebApiConfig.Register);
            RouteConfig.RegisterRoutes(RouteTable.Routes);
        }
    }
}
The result is that the application has two sets of routes: those used for MVC Framework controllers and those used for Web API controllers.
其结果是,应用程序有两套路由:分别用于MVC框架控制器和Web API控制器。
27.4.1 Understanding API Controller Action Selection
27.4.1 理解API控制的动作选择
The default Web API route, which you can see in Listing 27-9, has a static api segment, and controller and id segment variables, the latter being optional. They key difference from a regular MVC route is that there is no action segment variable, and this is where the behavior of API controllers takes shape.
默认的Web API路由(见清单27-9)有一个静态的api片段,还有controller和id两个片段变量,后者(id)是可选的。这种路由与规则MVC路由的关键差别在于,它没有action片段变量,而这正是形成API控制器行为之所在。
When a request comes in to the application that matches a Web API route, the action is determined from the HTTP method used to make the request. When I tested the API controller by requesting /api/reservation using the browser, the browser specified the GET method.
当一个与Web API路由匹配的请求到达应用程序时,动作是通过形成该请求的HTTP方法来决定的。在使用浏览器请求/api/reservation来测试API控制器时,浏览器指定的是GET方法。
The ApiController class, which is the base for API controllers, knows which controller it needs to target from the route and uses the HTTP method to look for suitable action methods.
API控制器的基类,ApiController类,通过路由会知道它需要以哪一个控制器为目标,并使用HTTP方法查找合适的动作方法。
The convention when naming API controller action methods is to prefix the name with the action method that it supports and include some reference to the model type that it operates on. But this is just a convention because Web API will match any action method whose name contains the HTTP method used to make the request.
在对API控制器的动作方法进行命名时,其约定是,以它所支持的HTTP方法为前缀,并且含有对它所操作模型类型的某种参考。但这只是一种约定,因为Web API可以匹配任何动作方法,只要其名称包含了用以形成该请求的HTTP方法。
For the example, that means that a GET request results in a choice between the GetAllReservations and GetReservation, but method names like DoGetReservation or just ThisIsTheGetAction would also be matched.
对于本示例而言,这意味着GET请求会导致在GetAllReservations和GetReservation之间进行选择,但是,也可以匹配诸如DoGetReservation或ThisIsTheGetAction之类的方法名。
To decide between the two action methods, the controller looks at the arguments that the contenders accept and uses the routing variables to make the best match. When requesting the /api/reservation API, there were no routing variables except for controller, and so the GetAllReservations method was selected because it has no arguments. When requesting the /api/reservation/3 URL, I supplied a value for the optional id segment variable, which made the GetReservation the better match because it accepts an id argument.
为了在两个动作方法之间做出决定,控制器会考察其参数,给予优先的是接收并使用了路由变量者(即动作方法具有与路由片段变量同名的参数——译者注),以形成最佳匹配。在请求/api/reservation这一API时,没有controller以外的其他路由变量,于是会选择GetAllReservations方法,因为它没有参数。当请求/api/reservation/3这一URL时,它为可选的id片段变量提供了值,这会使GetReservation更为匹配,因为它接收了一个id参数。
The other actions in the Web API controller are targeted using other HTTP methods: POST, DELETE, and PUT. This is the foundation for the Representation State Transfer (REST) style of Web API, known more commonly as a RESTful service, where an operation is specified by the combination of a URL and the HTTP method used to request it.
上述Web API控制器中的其他动作方法也进行了目标定位,使用的是其他HTTP方法:POST、DELETE以及PUT。这是“表现状态传输(Representation State Transfer,简称REST)”风格的Web API的基础,更经常地称为REST化服务(RESTful Service),在这种服务中,某个操作是通过URL和请求该URL的HTTP方法相结合的方式来指定的。
■Note REST is a style of API rather than a well-defined specification, and there is disagreement about what exactly makes a Web service RESTful. One point of contention is that purists do not consider Web services that return JSON as being RESTful. Like any disagreement about an architectural pattern, the reasons for the disagreement are arbitrary and dull. I try to be pragmatic about how patterns are applied, and JSON services are RESTful as far as I am concerned.
注:REST是一种API风格,而不是一个完善定义的规范,到底什么是Web服务的REST化是有争议的。其中一种论点是,有些纯粹主义者认为,返回JSON的Web服务不是REST化的。如同“架构模式(Architectural Pattern)”的争论一样,争论的理由是随意而无聊的。就我们而言,应尽量务实地看待如何运用模式,以及JSON服务是否是REST化的(作者倾向于认为JSON服务是REST化的——译者注)。
27.4.2 Mapping HTTP Methods to Action Methods
27.4.2将HTTP方法映射到动作方法
I explained that the ApiController base class uses the HTTP method to work out which action methods to target. It is a nice approach, but it does mean that you end up with some unnatural method names that are inconsistent with conventions you might be using elsewhere. For example, the PutReservation method might be more naturally called UpdateReservation. Not only would UpdateReservation make the purpose of the method more obvious, but it may allow for a more direct mapping between the actions in your controller and the methods in your repository.
以上曾解释过,ApiController基类会使用HTTP方法得出目标动作方法。这是一种很好的办法,但这确实意味着,你最终会有一些不自然的方法名称,它们与你可能在其他地方使用的约定不相一致。例如,PutReservation方法(注意,这是一个以HTTP方法为前缀的方法名,符合ApiController基类的命名约定——译者注)也许叫做UpdateReservation(该方法名与约定不符——译者注)会更自然些。UpdateReservation不仅使该方法的目的更为明显,而且它或许能够更为直接地映射出控制器中的动作与存储库中的方法之间的关系。
■Tip You might be tempted to derive your repository class from ApiController and expose the repository methods directly as a Web API. I recommend against that and strongly suggest you create a separate controller, even as simple as the one I created in the example. At some point, the methods you want to offer via your API and the capabilities of your repository will diverge, and having a separate API controller class will make that easier to manage.
提示:你也许会尝试根据ApiController来派生你的存储库类,并将这些存储方法直接暴露成Web API。我的建议与此相左,而是强烈建议你创建一个独立的控制器,哪怕是在创建如同此示例一样简单的项目。在有些情况下,你希望通过API提供的方法与存储的功能是有偏差的,因而拥有独立的API控制器,会更易于管理。
The System.Web.Http namespace contains a set of attributes that you can use to specify which HTTP methods an action should be used for. You can see how I have applied two of these attributes in Listing 27-11 to create a more natural set of method names.
System.Web.Http命名空间包含了一组注解属性,可以用来指定一个动作所使用的HTTP方法。从清单27-11可以看出,我已经运用了其中两个注解属性,以创建更为自然的方法名称(读者应该注意到,在以下清单中,动作方法名称并未包含POST、PUT等字样,而按命名约定是应该包含这些字样的,但由于使用了注解属性,故可以使用这种更为自然的动作方法名称——译者注)。
Listing 27-11. Applying Attributes in the WebController.cs File
Listing 27-11. 在WebController.cs文件中动作注解属性
using System.Collections.Generic;
using System.Web.Http;
using WebServices.Models;

namespace WebServices.Controllers {

    public class WebController : ApiController {
        private ReservationRespository repo = ReservationRespository.Current;

        public IEnumerable<Reservation> GetAllReservations() {
            return repo.GetAll();
        }

        public Reservation GetReservation(int id) {
            return repo.Get(id);
        }

        [HttpPost]
        public Reservation CreateReservation(Reservation item) {
            return repo.Add(item);
        }

        [HttpPut]
        public bool UpdateReservation(Reservation item) {
            return repo.Update(item);
        }

        public void DeleteReservation(int id) {
            repo.Remove(id);
        }
    }
}
You can see the duplication with the MVC Framework features and the Web API. The HttpPost and HttpPut attributes that I used in Listing 27-11 have the exact same purpose as the attributes with the same name that I used in Chapter 19, but they are defined in the System.Web.Http namespace and not System.Web.Mvc. Duplication aside, the attributes work in the same way and I have ended up with more useful method names that will still work for the POST and PUT HTTP methods. (There are, of course, attributes for all of the HTTP methods, including GET, DELETE and so on.)
可以看出,MVC框架的特性与Web API是重复的。清单27-11所使用的HttpPost和HttpPut注解属性与第19章所使用的同名注解属性具有完全相同的目的,但它们是在System.Web.Http命名空间而不是在System.Web.Mvc中定义的。除了这种重复以外,这些注解属性的工作方式也相同,于是我们最终拥有了更为有用的方法名,它们仍然能够为POST和PUT等HTTP方法而工作(当然,所有HTTP方法都有注解属性,包括GET、DELETE等)。
27.5 Using Knockout for Single-page Applications
27.5 将Knockout用于单页应用程序
The purpose of creating the Web API web service is to refactor the example application so that operations on the application data can be performed using Ajax requests whose JSON results will be used to update the HTML in the browser. The overall functionality of the application will be the same, but I won't be generating complete HTML documents for each interaction between the client and the server.
创建上述Web API这种Web服务的目的,是重新构造示例应用程序,以便使用Ajax请求来执行应用程序的数据操作,将Ajax请求的JSON结果用于更新浏览器中的HTML。应用程序的总体功能是相同的(指重构前后——译者注),但对于客户端与服务器之间的每一个交互,无需生成完整的HTML。
The transition to a single-page application puts more of a burden on the browser because I need to preserve application state at the client. I need a data model that I can update, a series of logic operations that I can perform to transform the data and a set of UI elements that allows the user to trigger those operations. In short, I need to recreate a miniature version of the MVC pattern in the browser.
转换成单页应用程序后,将更多的责任放到了浏览器端,因为需要在客户端保持应用程序的状态。我需要一个能够对之进行更新的数据模型、需要一系列能够对数据执行转换的逻辑操作,还需要一组UI元素,以便用户能够触发这些操作。简言之,我需要在浏览器中重建一个小型版的MVC模式。
The library that Microsoft has adopted for single-page applications is Knockout, which creates a JavaScript implementation of the MVC pattern (or, more accurately, the MVVM pattern which I described in Chapter 3 and is sufficiently close to the MVC pattern that I am going to treat them as the same thing). In the sections that follow, I am going to return to the MVC Framework side of the example application and apply the Knockout library to create a simple SPA.
被微软采纳用于单页应用程序的库是Knockout,它创建了JavaScript实现的MVC模式(或者更确切地说,是第3章所描述的MVVM模式,它与MVC模式十分接近,我打算把它们看成一回事)。在接下来的几小节中,将回到上述MVC框架的示例应用程序,运用这个Knockout库创建一个SPA。
■Note Knockout does a lot more than I am going to demonstrate here and I recommend you explore the library in more depth to see what it is capable of. You can learn more at http://knockoutjs.com or from my Pro JavaScript for Web Apps book, which is published by Apress. I like Knockout, but for more complex applications I prefer AngularJS. It has a steeper learning curve, but the investment is worthwhile. You can learn more at http://angularjs.org or read my Pro AngularJS book, which—as you might have guessed by now—is also published by Apress.
注:Knockout要比这里所演示的功能强大得多,建议对该库做更深入的考察,看看它能够做些什么。更多信息可参阅http://knockoutjs.com,或我著的Pro JavaScript for Web Apps,该书由Apress出版。我喜欢Knockout,但对于更复杂的应用程序,我更喜欢AngularJS。它有一个陡峭的学习曲线,但这种付出是值得的。更多信息可参阅http://angularjs.org,或阅读我的图书Pro AngularJS——你此刻可能已经猜到,该书也由Apress出版。
27.5.1 Adding the JavaScript Libraries to the Layout
27.5.1 在布局中添加JavaScript库
The first step is to add the Knockout and jQuery files to the layout so that they are available in the view. You can see the script element I added in Listing 27-12.
第一步是对布局添加Knockout和jQuery文件,以使它们在视图中是可用的。从清单27-12可以看出,已经添加了script元素。
Listing 27-12. Adding the Knockout JavaScript File to the _Layout.cshtml File
清单 27-12. 在_Layout.cshtml文件中添加Knockout和JavaScript文件
@{
    Layout = null;
}

<!DOCTYPE html>

<html>
<head>
    <meta name="viewport" content="width=device-width" />
    <title>@ViewBag.Title</title>
    <link href="~/Content/bootstrap.css" rel="stylesheet" />
    <link href="~/Content/bootstrap.min.css" rel="stylesheet" />
    <script src="~/Scripts/jquery-1.10.2.js"></script>
    <script src="~/Scripts/knockout-3.0.0.js"></script>
    @RenderSection("Scripts")
</head>
<body>
    @RenderSection("Body")
</body>
</html>
I will be using Knockout to create the MVC implementation and jQuery to handle the Ajax requests.
以下将使用Knockout来创建MVC实现,并用jQuery处理Ajax请求。
27.5.2 Implementing the Summary
27.5.2 实现Summary
The first major change I will make is to replace the Summary partial view with some inline Knockout and jQuery. You don't have to use Knockout in a single file, but I want to leave the partial views intact so you can see the difference between the standard MVC Framework way of working and the SPA techniques. In Listing 27-13, you can see the changes that I made to the Index.cstml view file.
要做的第一个重要修改是,用一些内联的Knockout和jQuery替换Summary分部视图。你不一定要在一个单一的视图中使用Knockout,这里只是希望保持该分部视图完整,以使你能够看出标准的MVC框架的工作方式与SPA技术之间的差别。从清单27-13可以看出对Index.cstml视图文件所做的修改。
Listing 27-13. Using Knockout and jQuery to Implement the Summary in the Index.cshtml File
清单 27-13. 使用Knockout和jQuery实现Index.cshtml文件中的Summary
@using WebServices.Models
@{
    ViewBag.Title = "Reservations";
    Layout = "~/Views/Shared/_Layout.cshtml";
}

@section Scripts {
    <script>
        var model = {
            reservations: ko.observableArray()
        };

        function sendAjaxRequest(httpMethod, callback, url) {
            $.ajax("/api/web" + (url ? "/" + url : ""), {
                type: httpMethod, success: callback
            });
        }

        function getAllItems() {
            sendAjaxRequest("GET", function(data) {
                model.reservations.removeAll();
                for (var i = 0; i < data.length; i++) {
                    model.reservations.push(data[i]);
                }
            });
        }

        function removeItem(item) {
            sendAjaxRequest("DELETE", function () {
                getAllItems();
            }, item.ReservationId);
        }

        $(document).ready(function () {
            getAllItems();
            ko.applyBindings(model);
        });
    </script>
}

@section Body {
    <div id="summary" class="section panel panel-primary">
        <div class="panel-heading">Reservation Summary</div>
        <div class="panel-body">
            <table class="table table-striped table-condensed">
                <thead>
                    <tr><th>ID</th><th>Name</th><th>Location</th><th></th></tr>
                </thead>
                <tbody data-bind="foreach: model.reservations">
                    <tr>
                        <td data-bind="text: ReservationId"></td>
                        <td data-bind="text: ClientName"></td>
                        <td data-bind="text: Location"></td>
                        <td>
                            <button class="btn btn-xs btn-primary"
                                data-bind="click: removeItem">Remove</button>
                        </td>
                    </tr>
                </tbody>
            </table>
        </div>
    </div>
    <div id="editor" class="section panel panel-primary">
        @Html.Partial("Editor", new Reservation())
    </div>
}
There is a lot going on here, so I am going to break down the changes and explain each of them in turn. The overall effect of the changes, however, is that the browser uses the Web API controller to get details of the current reservations.
这里做了很多事,因此我会对这些修改进行分解,并依次对它们进行解释。不过,这些修改的总体效果是,让浏览器使用Web API控制器获取当前预约的细节。
■Note Notice that I have removed the @model expression from the Index view in Listing 27-13. I am not using the view model objects to generate the content in the view, which means that I don't need a view model. The controller is still obtaining the Reservation objects from the repository and passing them to the view, but I'll fix this later in the chapter.
注:注意,清单27-13中已经删除了Index视图的@model表达式。于是将不会使用视图模型对象来生成该视图的内容,意即,这里已经不需要视图模型。但控制器仍然会获取存储库的Reservation对象,并将它们传递给视图(注意,这是指清单27-3所示的Home控制器,因为,这个Index视图是由Home控制器中的Index动作方法所渲染的。此刻,在Home控制器的Index动作方法中,仍会从存储库中获取Reservation对象,并将其传递给视图——译者注),本章稍后会对此加以修正。
1. Defining the Ajax Functions
1. 定义Ajax函数
jQuery has excellent support for making Ajax requests. To that end, I have defined a function called sendAjaxRequest that I will use to target methods on the Web API controller, as follows:
jQuery对形成Ajax请求有很好的支持。为此,我定义了一个名称为sendAjaxRequest的函数,将它用于定位Web API控制器中的目标方法,如下所示:
...
function sendAjaxRequest(httpMethod, callback, url) {
    $.ajax("/api/web" + (url ? "/" + url : ""), {
        type: httpMethod, success: callback
    });
}
...
The $.ajax function provides access to the jQuery Ajax functionality. The arguments are the URL you want to request and an object that contains configuration parameters. The sendAjaxRequest function is a wrapper around the jQuery functionality and its arguments are the HTTP method that should be used for the request (which affects the action method selected by the controller), a callback function that will be invoked when the Ajax request has succeeded and an optional URL suffix. Using the sendAjaxRequest function as a foundation, I defined functions to get all of the data available and to delete a reservation, like this:
其中的$.ajax函数提供了对jQuery Ajax功能的访问。其参数是你希望请求的URL和一个含有配置参数的对象。上述sendAjaxRequest函数是这一jQuery功能的封装程序(指sendAjaxRequest是$.ajax的封装程序——译者注),其参数是用于该请求的HTTP方法(它会影响到控制器所选择的动作方法)、Ajax请求成功后要调用的回调函数,和一个可选的URL后缀。以这个函数为基础,我定义了一些函数,用于获取所有可用数据,以及删除预约等,如下所示:
...
function getAllItems() {
    sendAjaxRequest("GET", function(data) {
        model.reservations.removeAll();
        for (var i = 0; i < data.length; i++) {
            model.reservations.push(data[i]);
        }
    });
}

function removeItem(item) {
    sendAjaxRequest("DELETE", function () {
        getAllItems();
    }, item.ReservationId);
}
...
The getAllItems function targets the GetAllReservations controller action method and retrieves all of the reservations from the server. The removeItem function targets the DeleteReservation action method and calls the getAllItems function to refresh the data after a deletion.
getAllItems函数以控制器的GetAllReservations动作方法为目标,并从服务器接收所有预约。removeItem函数以DeleteReservation动作方法为目标,并在执行删除后调用getAllItems函数,以刷新数据。
2. Defining the Model
2. 定义模型
Underpinning the Ajax functions is the model, which I defined like this:
Ajax函数的基础是模型,我是这样对它进行定义的:
...
var model = {
    reservations: ko.observableArray()
};
...
Knockout works by creating observable objects that it monitors for changes and uses to update the HTML displayed by the browser. My model is simple. It consists of an observable array, which is just like a regular JavaScript array, but is wired up so that any changes I made are detected by Knockout. You can see how I use the model in the Ajax functions, like this:
Knockout是通过创建可观察对象(Observable Object)进行工作的(可以将这种“可观察对象”理解为“Knockout可以看到(观察到)的对象”,意即,Knockout能够观察或感知该对象中所发生的数据变化——译者注),Knockout会监视该对象的变化,并用它对浏览器所显示的HTML进行更新。该模型很简单,它是一个可观察数组,这种数组如同常规的JavaScript数组一样,但被挂接起来了(被挂接到Knockout上了——译者注),因此,Knockout可以检测到该数组的任何变化。从以下代码可以看到如何在Ajax函数中使用该模型:
...
function getAllItems() {
    sendAjaxRequest("GET", function(data) {
        model.reservations.removeAll();
        for (var i = 0; i < data.length; i++) {
            model.reservations.push(data[i]);
        }
    });
}
...
The two statements I highlighted are how I get the data from the server into the model. I call the removeAll method to remove any existing data from the observable array and then iterate through the results I get from the server with the push method to populate the array with the new data.
这里高亮的两条语句,说明了如何将从服务器得到的数据送入模型。首先调用removeAll方法,以删除可观察数组中的已有数据,然后遍历从服务器得到的结果,以push方法对该数组填充新数据。
3. Defining the Bindings
3. 定义绑定
Knockout applies changes in the data model to HTML elements via data bindings. Here are the most important data bindings in the Index view:
Knockout通过数据绑定(Data Binding)将数据模型中的变化运用于HTML元素。以下是Index视图中最重要的绑定:
...
<tbody data-bind="foreach: model.reservations" >
    <tr>
        <td data-bind="text: ReservationId" ></td>
        <td data-bind="text: ClientName" ></td>
        <td data-bind="text: Location" ></td>
        <td>
            <button class="btn btn-xs btn-primary"
                data-bind="click: removeItem" >Remove</button>
        </td>
    </tr>
</tbody>
...
Knockout is expressed using the data-bind attribute and there is a wide range of bindings available, three of which I have used in the view. The basic format for a data-bind attribute is:
Knockout绑定用data-bind标签属性表示,而且有大量可用的绑定,该视图中使用了其中三个。data-bind标签属性的基本格式是:
data-bind="type: expression"
data-bind="<类型> : <表达式>"
The types of the three bindings in the listing are foreach, text and click, and I picked these three because they represent the different ways in which Knockout can be used.
上述清单中三个绑定的“类型”分别是,foreach、text和click,我之所以挑选这三种绑定,是因为它们代表示Knockout绑定所能使用的不同方式。
The first two, the foreach and text bindings, generate HTML elements and content from the data model. When the foreach binding is applied to an element, Knockout generates the child elements for each object in the expression, just like the Razor @foreach that I was using in the partial view.
前两个绑定,foreach和text,通过数据模型生成HTML及其内容。当foreach绑定被运用于一个元素时,Knockout为“表达式”中的每一个对象生成子元素,这就如同在分部视图中使用Razor的@foreach一样。
The text binding inserts the value of the expression as the text of the element that it is applied to. This means that when I use this binding, for example:
text绑定将表达式的值作为文本,插入到它所运用的元素。这意味着,当像下面这样使用绑定时:
...
<td data-bind="text: ClientName"></td>
...
Knockout will insert the value of the ClientName property of the current object being processed by the foreach binding, which has the same effect as the Razor @Model.ClientName expression I used previously.
Knockout将插入foreach绑定所处理的当前对象的ClientName属性的值,这与之前所使用的Razor表达式@Model.ClientName的效果相同。
The click directive is different: it sets up an event handler for the click event on the element to which it has been applied. You don't have to use Knockout to set up events, of course, but the click binding is integrated with the other bindings and the function you specify to call when the event is triggered is passed the data object that was being processed by the foreach binding when the binding was applied. This is why the removeItem function is able to define an argument that receives a Reservation object (or its JavaScript representation, anyway).
click指示符有所不同:它会在所运用元素上,为click事件建立一个事件处理程序。当然,你不一定要使用Knockout来建立事件,但这种click绑定是与其他绑定集成在一起的,而且,在运用该绑定时,foreach绑定所处理的数据对象,会被传递给你所指定的事件触发时要调用的函数。这是removeItem函数能够定义一个参数,以接收一个Reservation对象(或该对象的任意JavaScript事物)的原因。
4. Processing the Bindings
4. 处理绑定
Knockout bindings are not processed automatically, which is why I included this code in the script element:
Knockout绑定并不是自动执行的,这是我在script元素中包含以下代码的原因:
...
$(document).ready(function () {
    getAllItems();
    ko.applyBindings(model);
});
...
The $(document).ready call is a standard jQuery technique to defer execution of a function until all of the HTML elements in the document have been loaded and processed by the browser. Once that happens, I call the getAllItems function to load the data from the server and then the ko.applyBindings function to use the data model to process the data-bind attributes. This final call is the one that connects the data objects to the HTML elements, generates the content I require, and sets up the event handlers.
$(document).ready调用是jQuery推迟函数执行的一项标准技术,它直到浏览器加载并处理了文档的所有HTML元素之后才会执行。一旦开始执行,便调用getAllItems函数加载从服务器过来的数据,然后调用ko.applyBindings函数,使用数据模型处理那些data-bind标签属性。调用的结果是,将数据对象连接到HTML元素,生成了所需要的内容,并建立事件处理程序。
5. Testing the Summary Bindings
5. 测试Summary中的绑定
You might be wondering why I have gone to all this trouble, given that I have essentially replaced Razor expressions with their equivalent Knockout bindings. There are three important differences and to demonstrate them fully, I am going to use the browser F12 tools.
你也许会奇怪,为什么要做以上这么多麻烦事,这已经基本上用对等的Knockout绑定替换了所有Razor表达式。这里有三个重要的差别,而且,为了对这些差别进行演示,将会使用浏览器的F12工具。
The first difference is that the model data is no longer included in the HTML that is sent to the browser. Instead, once the HTML has been processed, the browser makes an Ajax request to the Web API controller and gets the list of reservations expressed as JSON. You can see this by starting the application and using the F12 tools to monitor the requests that the browser makes (as described in Chapter 26). Figure 27-3 shows the results.
第一个差别是,模型数据已经不再包含在发送给浏览器的HTML中。相反,一旦HTML已经得到了处理,浏览器便会形成一个发送给Web API控制器的Ajax请求,并得到一个表示成JSON的列表。通过启动应用程序,并用F12工具监视浏览器所形成的请求(如第26章所描述的那样),便会看到这种情况。图27-3显示了其结果(从图中可以看出,/api/web网址的请求类型是application/json,这说明该请求得到的是JSON数据,可见这是发送Ajax请求所产生的效果——译者注)。

Figure 27-3. Monitoring the connections made by the browser
图 27-3. 监视浏览器形成的连接
The second difference is that the data is processed by the browser, rather than at the server, as the view is rendered. To test this, you can edit the getAllItems function so that it doesn't make the Ajax request or process the data it receives, like this:
第二个差别是,数据是在视图被渲染时,由浏览器而不是服务器进行处理的。为了对此进行测试,你可以编辑getAllItems函数,以使它不会形成Ajax请求,或者不处理它所得到的数据,如下所示:
...
function getAllItems() {
    return;
    sendAjaxRequest("GET", function(data) {
        model.reservations.removeAll();
        for (var i = 0; i < data.length; i++) {
            model.reservations.push(data[i]);
        }
    });
}
...
The function will return before the Ajax request is made and you can see the effect by restarting the application, as shown in Figure 27-4. This may seem obvious, but it is an important characteristic of SPAs that the browser does a lot more work, including processing data and generating HTML content.
该函数会在形成Ajax请求之前就返回,通过启动应用程序,可以看到其效果,如图27-4所示。这似乎是显然的,但却是SPA的重要特征,表明浏览器做了大量工作,包括处理数据,以及生成HTML内容。

Figure 27-4. Demonstrating that the data is retrieved and processed by the browser
图 27-4. 演示数据是由浏览器进行接收和处理的
The final difference is that the data bindings are live, meaning that changes in the data model are reflected in the content that the foreach and text bindings generate. To test this, ensure that you return the getAllItems function to its working state and reload the application. Once the browser has requested, received and processed the data, open the F12 tools and switch to the Console section. Enter the following command into the console and hit Enter:
最后一个差别是,数据绑定是实时的,意即,数据模型中的变化会反映在foreach和text绑定所生成的内容中。为了对此进行测试,请确保getAllItems函数回到它的正常工作状态(掉去上述代码中的return语句——译者注),并重载应用程序。一旦浏览器发送了请求,接收并处理了数据之后,请打开F12工具,并切换到Console(控制台)小节。在控制台中输入下列命令,并按回车。
model.reservations.pop()
This expression removes the last item from the array of data objects in the model and as soon as you enter the command, the layout of the HTML page will reflect the change, as shown in Figure 27-5. The overall effect is that I have shifted some of the complexity of generating the HTML from the server to the client.
该表达式删除了模型中数据对象数组的最后一个条目,而且,只要你输入该命令,HTML页面布局就会反应出这一变化,如图27-5所示。最后的总体效果是,我已经转移了从服务器向客户端生成HTML的一些复杂性。
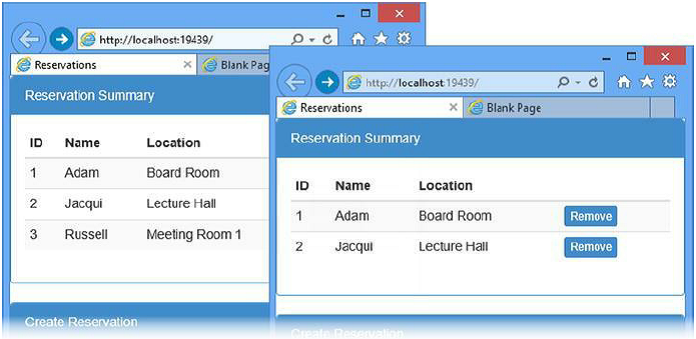
Figure 27-5. Manipulating the model via the JavaScript console
图 27-5. 通过JavaScript控制台操纵模型
27.5.3 Improving the Delete Feature
27.5.3 改善Delete特性
Now that you have seen how applying Knockout has changed the nature of the client, I am going to quickly loop back and remove a shortcut that I took when I defined the Ajax methods for the application. The removeItem function is badly written:
现在你已经看到,运用Knockout已经改变了客户端的性质,我打算立刻回过头来,去掉在为应用程序定义Ajax方法时所采用的一个简化方法。removeItem函数写得很糟:
...
function removeItem(item) {
    sendAjaxRequest("DELETE", function () {
        getAllItems();
    }, item.ReservationId);
}
...
I have highlighted the problem: the function makes two Ajax requests to the server—the first to perform the deletion and the second to request the contents of the repository to update the data model. Now that I have demonstrated that the client maintains its own model and that live bindings reflect model changes in the HTML, I can improve upon this function, as shown in Listing 27-14.
这里高亮了问题所在:该函数向服务器形成了两个Ajax请求——第一个执行删除,第二个是请求存储库的内容,以便更新数据模型。现在,我已经演示过,客户端维护它自己的模型,而且,实时绑定会在HTML中反映模型的变化,因此可以对该函数加以改进,如清单27-14所示。
Listing 27-14. Improving the RemoveItem Function in the Index.cshtml File
清单 27-14. 改善Index.cshtml文件中的RemoveItem函数
...
function removeItem(item) {
    sendAjaxRequest("DELETE", function () {
        for (var i = 0; i < model.reservations().length; i++) {
            if (model.reservations()[i].ReservationId == item.ReservationId) {
                model.reservations.remove(model.reservations()[i]);
                break;
            }
        }
    }, item.ReservationId);
}
...
When the request to the server succeeds, I remove the corresponding data object from the model, which means that the second Ajax request is no longer required.
当发送给服务器的请求成功时,我从模型中删除了相应的数据对象,这意味着已不再需要第二个Ajax请求(在上述代码中,sendAjaxRequest函数向服务器发送DELETE请求,成功时会执行上述回调函数,在该回调用函数中,直接在客户端的模型对象中删除了相应的数据对象——译者注)。
GETTING USED TO THE KNOCKOUT SYNTAX
让自己习惯于Knockout语法
There are some syntax quirks when working with Knockout observable arrays and two of them can be seen in Listing 27-14. To get an item from the array, I have to treat model.reservations like a function, as follows:
在使用Knockout可观察数组时,有一些怪异的语法。在清单27-14中可以看到其中两种。为了从数组中获取一个条目,需要将model.reservations作为一个函数来看待(以下代码中的“ ()”,就意味着已经将model.reservations看成是一个函数了——译者注),如下所示:
...
model.reservations() [i].ReservationId
...
And when it comes to removing items from the array, I use a function that is not standard JavaScript:
另外,在删除数组中的条目时,使用了一个非标准的JavaScript函数(可见,以下代码中的remove方法不属于JavaScript语法,而是Knockout提供的函数——译者注):
...
model.reservations.remove (model.reservations()[i]);
...
Knockout tries to maintain the standard JavaScript syntax, but there are some compromises required to track changes to data objects, such as these quirks. They can be confusing when you first start working with Knockout, but you soon get used to them. And you learn that when you don't get the effect you require, the likely cause is a mismatch between the standard JavaScript syntax and that required for a Knockout observable object or array. You can get further information about the Knockout API at http://knockoutjs.com.
Knockout试图保持标准的JavaScript语法,但有时需要有一些折衷的办法,以便跟踪数据对象的变化,比如,这些怪异的语法。在第一次使用Knockout时,可能会对此感到困惑,但很快便会习惯。因此,在未得到预期的效果时,应该意识到,可能的原因是,标准的JavaScript语法与需要用于Knockout可观察对象或数组的语法之间搭配不当。Knockout API的更多信息请参考http://knockoutjs.com。
27.5.4 Implementing the Create Feature
27.5.4 实现Create特性
The next step is to use Knockout to replace the Editor partial view. Once again, I could have updated the partial view to contain the Knockout functionality, but I have chosen to include everything in the Index.cshtml file, as shown in Listing 27-15.
下一个步骤是使用Knockout替换Editor分部视图。同样,可以对Editor分部视图进行更新,以便包含Knockout功能,但我选择了将所有事情都纳入Index.cshtml文件,如清单27-15所示。
Listing 27-15. Implementing the Create Feature in the Index.cshtml File
清单 27-15. 实现Index.cshtml文件中的Create特性
@using WebServices.Models
@{
    ViewBag.Title = "Reservations";
    Layout = "~/Views/Shared/_Layout.cshtml";
}

@section Scripts {
    <script>
        var model = {
            reservations: ko.observableArray(),
            editor: {
                name: ko.observable(""),
                location: ko.observable("")
            }
        };

        function sendAjaxRequest(httpMethod, callback, url, reqData) {
            $.ajax("/api/web" + (url ? "/" + url : ""), {
                type: httpMethod,
                success: callback,
                data: reqData
            });
        }

        // ... other functions omitted for brevity ...
        // ... 出于简化,忽略了其他函数 ...

        function handleEditorClick() {
            sendAjaxRequest("POST", function (newItem) {
                model.reservations.push(newItem);
            }, null, {
                ClientName: model.editor.name,
                Location: model.editor.location
            });
        }

        $(document).ready(function () {
            getAllItems();
            ko.applyBindings(model);
        });
    </script>
}

@section Body {
    <div id="summary" class="section panel panel-primary">
        <!-- elements omitted for brevity(出于简化,已忽略了这里的元素) -->
    </div>
    <div id="editor" class="section panel panel-primary">
        <div class="panel-heading">
            Create Reservation
        </div>
        <div class="panel-body">
            <div class="form-group">
                <label>Client Name</label>
                <input class="form-control" data-bind="value:model.editor.name" />
            </div>
            <div class="form-group">
                <label>Location</label>
                <input class="form-control" data-bind="value:model.editor.location" />
            </div>
            <button class="btn btn-primary"
            data-bind="click: handleEditorClick">Save</button>
        </div>
    </div>
}
To create the editor, I have used Knockout in a different way, as I'll explain step-by-step in the sections that follow.
为了创建编辑器(这里的“编辑器”是指对新预约进行编辑的HTML——译者注),我以一种不同的方式使用了Knockout,在接下来的小节中对其逐步解释。
1. Extending the Model
1. 扩展模型
I need to collect two pieces of information from the user in order to create a new Reservation in the repository: the name of the client (corresponding to the ClientName property) and the location (corresponding to the Location property). My first step is to extend the model so that I define variables that I can use to capture these values, like this:
为了在存储库中创建一个新的Reservation,需要从用户那里收集两个信息片段:客户名称(对应于ClientName属性)和地点(对应于Location属性)。我的第一个步骤是扩展模型,以便定义一些能够用来捕捉这些值的变量,如下所示:
...
var model = {
    reservations: ko.observableArray(),
    editor: {
        name: ko.observable(""),
        location: ko.observable("")
    }
};
...
The ko.observable function creates an observable value, which I will rely on later in the chapter. Changes to these values will be reflected in any bindings that use the name and location properties.
ko.observable函数可以创建一个可观察值,本章的后面要依靠这里所创建的可观察值(这里创建了两个可观察值——译者注)。对这些值的修改会反映在使用name和location属性的任何绑定中。
2. Implement the Input Elements
2. 实现input元素
The next step is to create the input elements through which the user will supply values for my new model properties. I have used the Knockout value binding, which sets the value attribute on an element, as follows:
下一个步骤是创建input元素,用户将通过这些元素为新的模型属性提供值。这里使用了Knockout的value绑定,它会设置元素上的value属性,如下所示:
...
<input class="form-control" data-bind="value: model.editor.name" />
...
The value bindings ensure that the values entered by the user into the input elements will be used to set the model properties.
value绑定确保会将用户在input元素中输入的值用于设置模型的属性。
■Tip Notice that I don't need a form element anymore. I will be using an Ajax request to send the data values to the server in response to a button click, none of which relies on the standard browser support for forms.
提示:注意,这里已不再需要form元素。我将使用一个Ajax请求将这些数据值发送给服务器,以便对一个按钮的点击事件进行响应,它们都不需要依靠浏览器对表单的标准支持。
3. Creating the Event Handler
3. 创建事件处理程序
I used the click binding to handle the click event from the button element displayed under the input elements, as follows:
我使用了click绑定,以便对显示在input元素下方的button元素的click事件进行处理,如下所示:
...
<button class="btn btn-primary" data-bind="click:handleEditorClick">Save</button>
...
The binding specifies that the handleEditorClick function should be called when the button is clicked and I defined this function in the script element, as follows:
该绑定指定,在按钮被点击时,应该调用handleEditorClick函数,该函数在script元素中已经进行了定义,如下所示:
...
function handleEditorClick() {
    sendAjaxRequest("POST", function (newItem) {
        model.reservations.push(newItem);
    }, null, {
        ClientName: model.editor.name,
        Location: model.editor.location
    });
}
...
The event handler function calls the sendAjaxRequest function. The callback adds the newly created data object sent back from the server to the model. I send an object containing the new model properties to the sendAjaxRequest function, which I have extended so that it will send them to the server as part of the Ajax request, using the data option property.
该事件处理器函数调用了sendAjaxRequest函数。其中的回调函数将服务器回发过来的新建数据对象添加到模型。在sendAjaxRequest函数中,发送了一个含有新模型属性的对象,之前已经对该对象进行了扩展,以使它随同Ajax请求一起发送给服务器,这使用了data选项属性。
4. Testing the Create Feature
4. 测试Create特性
You can see how the Knockout implementation of the create feature works by starting the application, entering a name and location into the input elements and clicking the Save button, as illustrated by Figure 27-6.
启动应用程序,在input元素中输入姓名和地点,并点击Save按钮,便可以看到上述Knockout实现的Create特性的工作情况,如图27-6所示。

Figure 27-6. Creating a new reservation
图 27-6. 创建新预约
27.6 Completing the Application
27.6 完成应用程序
Now that you have seen how I can apply Knockout and the Web API to create a single-page application, I am going to finish this chapter by completing the application to add some missing features and remove some of the quirks.
现在已经看到,可以运用Knockout和Web API来创建一个单页应用程序,本章的其余部分打算添加一些缺失的特性,并去除一些怪异的代码,以完成这一应用程序。
27.6.1 Simplify the Home Controller
27.6.1 简化Home控制器
The Home controller is still set up with action method to manipulate the repository to retrieve and manage Reservation objects, even though all of the data displayed by the client is being requested via Ajax to the Web API controller. In Listing 27-16, you can see how I have updated the controller to remove the action methods that the Web API controller has replaced. I have also updated the Index action method so that it no longer passes a view model object.
Home控制器仍然是用动作方法来操作存储库,以便接收和管理Reservation对象,尽管客户端所显示的全部数据都是通过Ajax向Web API控制器发送请求而实现的。在清单27-16中可以看到如何对该控制器进行更新,在其中删除了Web API已有的动作方法。也更新了Index动作方法,以使它不再传递视图模型对象。
Listing 27-16. Removing the Data Selection from the HomeController.cs File
清单 27-16. 去除HomeController.cs文件中的数据选择
using System.Web.Mvc;
using WebServices.Models;

namespace WebServices.Controllers {
    public class HomeController : Controller {
        public ViewResult Index() {
            return View();
        }
    }
}
27.6.2 Manage Content Visibility
27.6.2 管理内容的可见性
The final change I am going to make is to manage the visibility of the elements in the HTML document so that only the summary or the editor is visible. You can see how I have done this in Listing 27-17.
最后要做的一项修改是管理HTML文档中元素的可见性,以使得只有summary或editor是可见的。可以从清单27-17看到我已经做了些什么。
Listing 27-17. Managing Element Visibility in the Index.cshtml File
清单 27-17. 管理Index.cshtml文件中元素的可见性
@using WebServices.Models

@{
    ViewBag.Title = "Reservations";
    Layout = "~/Views/Shared/_Layout.cshtml";
}

@section Scripts {
    <script>
        var model = {
            reservations: ko.observableArray(),
            editor: {
                name: ko.observable(""),
                location: ko.observable("")
            },
            displaySummary: ko.observable(true)
        };

        function sendAjaxRequest(httpMethod, callback, url, reqData) {
            $.ajax("/api/web" + (url ? "/" + url : ""), {
                type: httpMethod,
                success: callback,
                data: reqData
            });
        }

        function getAllItems() {
            sendAjaxRequest("GET", function(data) {
                model.reservations.removeAll();
                for (var i = 0; i < data.length; i++) {
                    model.reservations.push(data[i]);
                }
            });
        }

        function removeItem(item) {
            sendAjaxRequest("DELETE", function () {
                for (var i = 0; i < model.reservations().length; i++) {
                    if (model.reservations()[i].ReservationId == item.ReservationId) {
                        model.reservations.remove(model.reservations()[i]);
                        break;
                    }
                }
            }, item.ReservationId);
        }

        function handleCreateClick() {
            model.displaySummary(false);
        }

        function handleEditorClick() {
            sendAjaxRequest("POST", function (newItem) {
                model.reservations.push(newItem);
                model.displaySummary(true);
            }, null, {
                ClientName: model.editor.name,
                Location: model.editor.location
            });
        }

        $(document).ready(function () {
            getAllItems();
            ko.applyBindings(model);
        });
    </script>
}

@section Body {
    <div id="summary" class="section panel panel-primary"
                data-bind="if: model.displaySummary">
        <div class="panel-heading">Reservation Summary</div>
        <div class="panel-body">
            <table class="table table-striped table-condensed">
                <thead>
                    <tr><th>ID</th><th>Name</th><th>Location</th><th></th></tr>
                </thead>
                <tbody data-bind="foreach: model.reservations">
                    <tr>
                        <td data-bind="text: ReservationId"></td>
                        <td data-bind="text: ClientName"></td>
                        <td data-bind="text: Location"></td>
                        <td>
                            <button class="btn btn-xs btn-primary"
                                data-bind="click:removeItem">Remove</button>
                        </td>
                    </tr>
                </tbody>
            </table>
            <button class="btn btn-primary"
                    data-bind="click: handleCreateClick">Create</button>
        </div>
    </div>
    <div id="editor" class="section panel panel-primary"
                data-bind="ifnot: model.displaySummary">
        <div class="panel-heading">
            Create Reservation
        </div>
        <div class="panel-body">
            <div class="form-group">
                <label>Client Name</label>
                <input class="form-control" data-bind="value:model.editor.name" />
            </div>
            <div class="form-group">
                <label>Location</label>
                <input class="form-control" data-bind="value:model.editor.location" />
            </div>
            <button class="btn btn-primary"
                data-bind="click: handleEditorClick">Save</button>
        </div>
    </div>
}
I have added a property to the model that specifies whether the summary should be shown. I use this property with the if and ifnot bindings, which add and remove elements to and from the DOM based on their expression. If the displaySummary property is true, then the data summary will be shown and if it is false, then the editor will be shown. The final changes I made were to add a Create button that calls a function that changes the displaySummary property and an addition to the callback function that processes new items that changes it back again. You can see the final result in Figure 27-7.
我给模型添加了一个属性(即displaySummary属性——译者注),用以指定是否应该显示summary。对该属性使用了if和ifnot绑定,它会根据其中的<表达式>,对DOM进行添加和删除元素的操作。如果displaySummary属性为true,那么便显示数据摘要,若为false,便显示编辑器。最后所做的修改是添加一个Create按钮,以便调用一个函数(即handleCreateClick函数——译者注),用以修改displaySummary属性。另外还补充了处理新条目的回调函数,将displaySummary属性再改回来。可以从图27-7看到最终的结果。
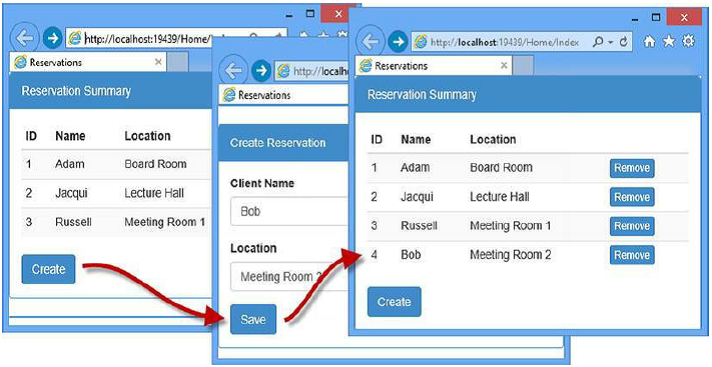
Figure 27-7. Adding a reservation using the final application
图 27-7. 在最终的应用程序中添加预约
27.7 Summary
27.7 小结
In this chapter, I showed you how to use the Web API and Knockout to create a single-page application that performs data operations using RESTful Web service. While not part of the MVC Framework, the Web API is modeled so closely on the nature and structure of MVC that it is familiar to MVC developers and, as I demonstrated, Web API controllers can be added alongside regular MVC controllers in an application.
本章展示了如何使用Web API和Knockout创建单页应用程序,以便使用REST化的Web服务执行数据操作。虽然这不属于MVC框架部分,但Web API的建模十分接近于MVC的性质与结构,这对MVC开发者来说是熟悉的。而且,正如我所演示的,在一个应用程序中,Web API控制器可以与常规的MVC控制器并存。
And that is all I have to teach you about the MVC Framework. I started by creating a simple application, and then took you on a comprehensive tour of the different components in the framework, showing you how they can be configured, customized, or replaced entirely. I wish you every success in your MVC Framework projects and I can only hope that you have enjoyed reading this book as much as I enjoyed writing it.
以上便是我需要教授的全部MVC框架内容了。本书首先创建一个简单的应用程序,然后带领你在框架的不同组件中进行了一次综合性的旅行,展示了如何对它们进行配置、定制、或者完全替换。我希望你的每一个MVC框架项目都能获得成功,也希望你能像我愉快地写作一样,也能愉快地阅读。
看完此文如果觉得有所收获,请给个推荐。
你的推荐是我继续下去的动力,也会让更多人关注并获益,这也是你的贡献。

 浙公网安备 33010602011771号