
CAFFE安装笔记【windows和ubuntu】
第一部分是windows下安装caffe的心得;第二部分是ubuntu下安装caffe的心得:
第一部分:【Win10+VS2017环境】
老版的caffe在BVLC的github上已经找不到,如果要想下载老版caffe可以下载微软的caffe版本:https://github.com/Microsoft/caffe
网上的大多安装caffe教程都是基于老版的caffe。
常规错误参考:https://www.cnblogs.com/cxyxbk/p/5902034.html
win10+VS2017
如果只编译libcaffe项目按照网上的流程,基本可以OK
如果还编译其他项目,可能会出现以下问题,以编译upgrade_net_proto_binary项目为例
一、错误 C2976 “std::array”: 模板 参数太少 caffe.managed \caffe-master-micorsoft\windows\caffe.managed\caffelib.cpp 68
类似这种错误,双击进去,将array<array<float>^>^ 中的array改成cli::array
即改成:cli::array<cli::array<float>^>^
参考:https://blog.csdn.net/m0_37287643/article/details/83020441
二、错误 LNK1104 无法打开文件“libboost_date_time-vc140-mt-gd-1_59.lib” upgrade_net_proto_binary \caffe-master-micorsoft\windows\upgrade_net_proto_binary\LINK 1
缺少boost库 。注意版本号是1.59
这里有boost安装流程:https://blog.csdn.net/u011054333/article/details/78648294
这里关联boost库: https://www.cnblogs.com/denggelin/p/5769480.html
三、错误 LNK2019 无法解析的外部符号 "__declspec(dllimport) void __cdecl google::InitGoogleLogging(char const *)" (__imp_?InitGoogleLogging@google@@YAXPEBD@Z),该符号在函数 main 中被引用 upgrade_net_proto_binary \caffe-master-micorsoft\windows\upgrade_net_proto_binary\upgrade_net_proto_binary.obj 1
没有安装Google GLOG库,这里有https://download.csdn.net/download/colorsky100/10776566下载,预编译版本的下载(实际上这个包同时提供了GLOG和GFLAGS库的包)
下载后分别在【项目属性页库|VC++目录|库目录】添加glog.dll和glog.lib所在目录,在【项目属性页库|VC++目录|包含目录】添加include所在目录,在【项目属性页库|链接器|输入|附加依赖型】添加glog.lib
说明:glog的预编译包下有三个目录bin、share、static;其中bin中是dll,share是和bin配套的lib,static是不需要dll的完整的lib。如果配的是share对应的glog.lib,则必须配bin,如果用static目录下的glog.lib,那么库目录只需要添加一个static对应的目录
上面的描述是有错误的,库目录只需要配lib所在的路径,如果这个lib是个完全的lib(即static目录下的glog.lib),则编译完直接使用,如果这个lib还需要配dll使用(即share下的glog.lib)。编译正常编译,但是在使用时,要么需要将dll所在目录设成环境变量,要么需要将dll文件(即bin下的glog.dll)拷贝到项目目录下。 不论如何,dll目录不需要配置在库目录中,都可以正常编译通过
注意,需要添加debug版本的动静态链接库文件,否则会报错误如下:
错误 LNK2038 检测到“_ITERATOR_DEBUG_LEVEL”的不匹配项: 值“0”不匹配值“2”(upgrade_net_proto_binary.obj 中) upgrade_net_proto_binary \caffe-master-micorsoft\windows\upgrade_net_proto_binary\glog.lib(logging.obj) 1
上述配置完后可能依然有错误,需要在【项目属性页库|C/C++目录|预处理器|预处理器定义】中添加GOOGLE_GLOG_DLL_DECL=宏后解决,参考:https://www.cnblogs.com/21207-iHome/p/9297329.html
四、错误 LNK2001 无法解析的外部符号 "public: __cdecl google::protobuf::internal::LogMessage::LogMessage(enum google::protobuf::LogLevel,char const *,int)" (??0LogMessage@internal@protobuf@google@@QEAA@W4LogLevel@23@PEBDH@Z) upgrade_net_proto_binary \caffe-master-micorsoft\windows\upgrade_net_proto_binary\sgd_solver.obj 1
缺少protobuff库。这里有protobuff的下载、编译,比较麻烦。参考:https://blog.csdn.net/hp_cpp/article/details/81561310
编译完,回过来配置caffe的upgrade_net_proto_binary项目,继续添加libprotocd.lib和libprotobufd.lib库目录,依赖项添加libprotocd.lib和libprotobufd.lib
如果出现错误:LNK2038 检测到“RuntimeLibrary”的不匹配项: 值“MTd_StaticDebug”不匹配值“MDd_DynamicDebug”(upgrade_net_proto_binary.obj 中) upgrade_net_proto_binary \caffe-master-micorsoft\windows\upgrade_net_proto_binary\libprotocd.lib(ruby_generator.obj) 1
则在CMAKE配置protobuff不能像帖子https://blog.csdn.net/hp_cpp/article/details/81561310推荐的那样,而是需要将protobuff_BUILD_SHARED_LIBS对应的复选框给勾上,即在protobuff编译完后的debug目录下要有dll文件
安装上面的安装还是会报无法解析外部符号问题,网上说是protobuff版本问题,改为2.5.0版本后还是有问题,又改为2.6.1版本,问题得到解决
需要注意的是:官网下载的2.6.1是win32的,需要改成x64,然后需要做以下修改:
只要编译libprotobuf项目和libprotoc项目,需要在属性页中改动以下几处:1.【常规|Windows SDK版本】下拉,选择合适的版本;2.【常规|配置类型】下拉为静态库;3.【C/C++|常规|附加包含目录】设为../src;.;%(AdditionalIncludeDirectories);4.【C/C++|代码生成|运行库】设为MDd。
五、错误 LNK2019 无法解析的外部符号 "unsigned int __cdecl google::ParseCommandLineFlags(int *,char * * *,bool)" (?ParseCommandLineFlags@google@@YAIPEAHPEAPEAPEAD_N@Z),该符号在函数 "void __cdecl caffe::GlobalInit(int *,char * * *)" (?GlobalInit@caffe@@YAXPEAHPEAPEAPEAD@Z) 中被引用 upgrade_net_proto_binary \caffe-master-micorsoft\windows\upgrade_net_proto_binary\common.obj 1
缺少gflags库,在三中提供的预编译包中同时有glog和gflags,正常配置到项目中即可
六、错误 LNK2019 无法解析的外部符号 "public: __cdecl cv::Exception::Exception(int,class std::basic_string<char,struct std::char_traits<char>,class std::allocator<char> > const &,class std::basic_string<char,struct std::char_traits<char>,class std::allocator<char> > const &,class std::basic_string<char,struct std::char_traits<char>,class std::allocator<char> > const &,int)" (??0Exception@cv@@QEAA@HAEBV?$basic_string@DU?$char_traits@D@std@@V?$allocator@D@2@@std@@00H@Z),该符号在函数 "public: unsigned char * __cdecl cv::Mat::ptr<unsigned char>(int)" (??$ptr@E@Mat@cv@@QEAAPEAEH@Z) 中被引用 upgrade_net_proto_binary \caffe-master-micorsoft\windows\upgrade_net_proto_binary\data_transformer.obj 1
这个明显是缺少opencv库,但是非常纠结的是官网提供的opencv2.14版本只提供VC14(VS2015)的预编译版本,然后下载官网的opencv3.4.5版本,这个提供VC15版本。但是配置后还是报无法解析外部符号的问题,配置是没有问题的。
后来转过头直接用opencv2.14.13版本,居然没有问题,需要添加的依赖项为opencv_core2413d.lib;opencv_highgui2413d.lib;opencv_imgproc2413d.lib;
七、错误 LNK2019 无法解析的外部符号 "public: __cdecl leveldb::WriteBatch::~WriteBatch(void)" (??1WriteBatch@leveldb@@QEAA@XZ),该符号在函数 "int `public: __cdecl caffe::db::LevelDBTransaction::LevelDBTransaction(class leveldb::DB *)'::`1'::dtor$1" (?dtor$1@?0???0LevelDBTransaction@db@caffe@@QEAA@PEAVDB@leveldb@@@Z@4HA) 中被引用 upgrade_net_proto_binary \caffe-master-micorsoft\windows\upgrade_net_proto_binary\db.obj 1
错误 LNK2001 无法解析的外部符号 "public: class std::basic_string<char,struct std::char_traits<char>,class std::allocator<char> > __cdecl leveldb::Status::ToString(void)const " (?ToString@Status@leveldb@@QEBA?AV?$basic_string@DU?$char_traits@D@std@@V?$allocator@D@2@@std@@XZ) upgrade_net_proto_binary \caffe-master-micorsoft\windows\upgrade_net_proto_binary\db_leveldb.obj 1
缺少LevelDB库,在官网https://github.com/google/leveldb/下载好后,用CMAKE-GUI配置总报错 The C++ compiler "D:/Program Files (x86)/Microsoft Visual Studio/2017/Enterprise/VC/Tools/MSVC/14.15.26726/bin/Hostx86/x64/cl.exe" is not able to compile a simple test program.
后来按照官网的指示在cmd中用cmake指令,成功了
官网说明:
Building for Windows
First generate the Visual Studio 2017 project/solution files:

mkdir -p build
cd build
cmake -G "Visual Studio 15" ..
The default default will build for x86. For 64-bit run:

cmake -G "Visual Studio 15 Win64" ..
To compile the Windows solution from the command-line:

devenv /build Debug leveldb.sln
or open leveldb.sln in Visual Studio and build from within.

Please see the CMake documentation and CMakeLists.txt for more advanced usage.
如下图,其中build是自己建的目录
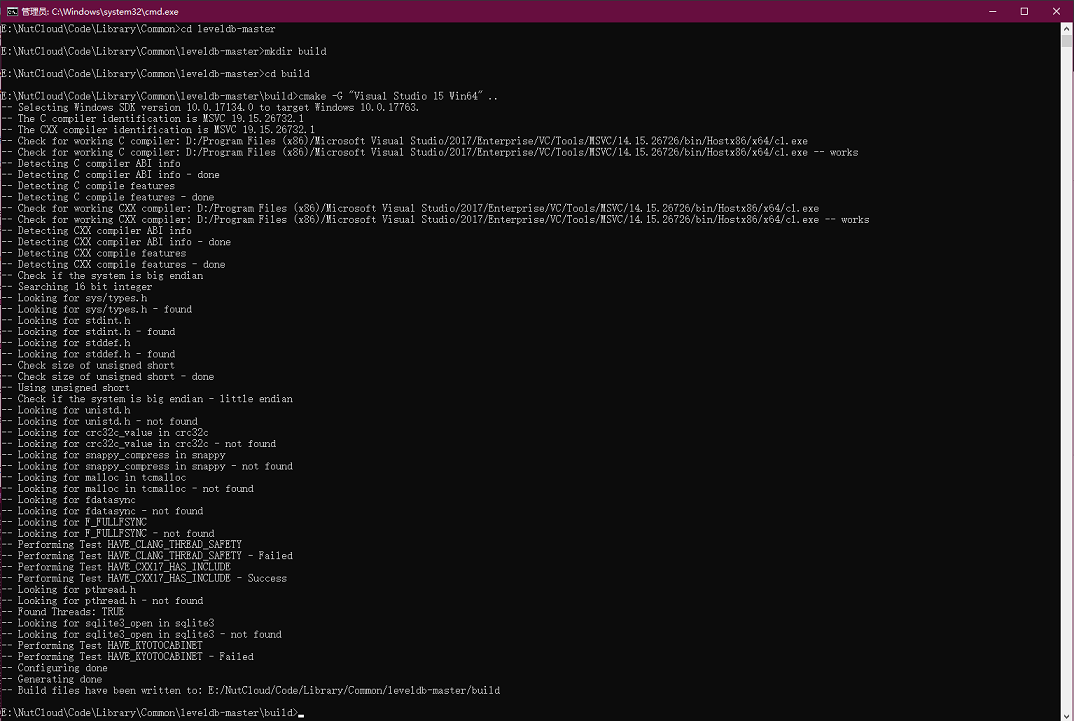
CMAKE后,直接双击leveldb.sln进VS,然后只编译leveldb项目,回过头配置caffe的upgrade_net_proto_binary。搞定
总结:
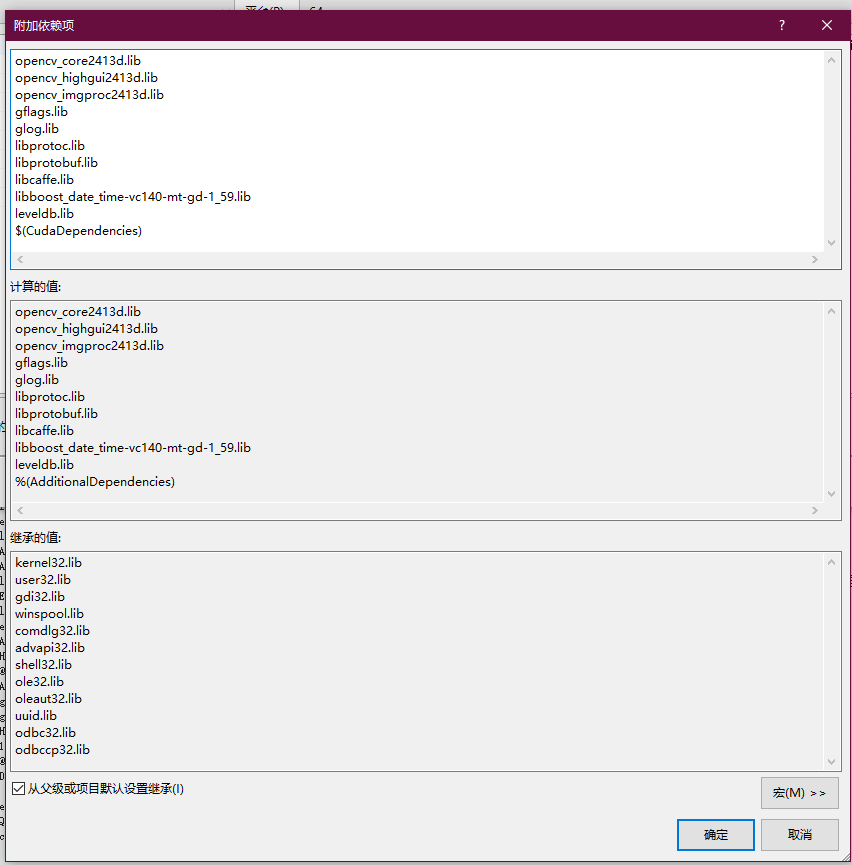
在upgrade_net_proto_binary项目中,需要的附加库包括:
1.BOOST 2.GLOG 3.PROTOBUFF 4.GFLAGS 5.OPENCV 6.LEVELDB等一系列第三方库
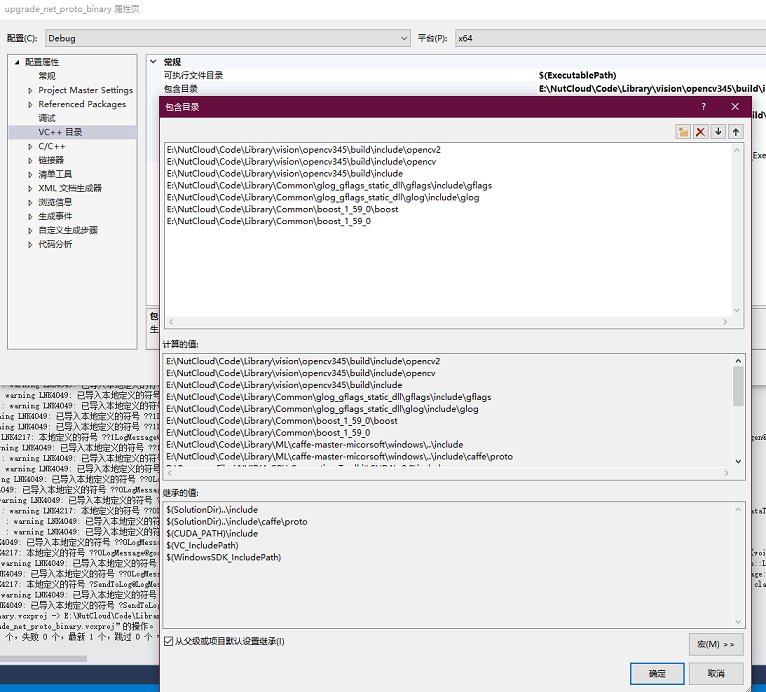
最后的属性配置页如下:
包含目录:
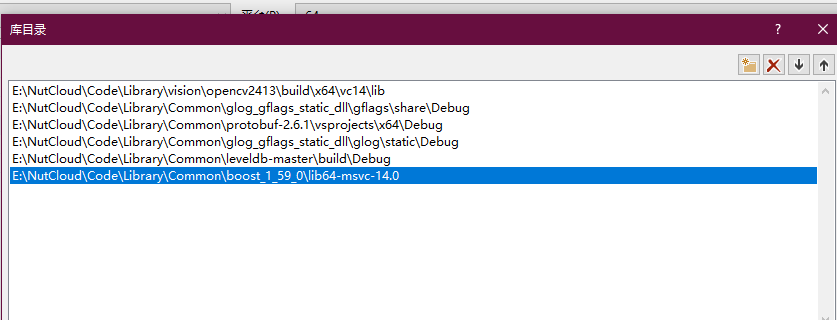
库目录:
依赖项
2019.3.24
++++++++++++++++++++++++++++++++++++++++++++++++++++++++++++++++++++++++++++++++++++++++++++++++++++++++++++++++++++++++++++++++++++++++++
第二部分:【Ubuntu16.04环境】
基本安装帖子https://www.cnblogs.com/sunshineatnoon/p/4535329.html操作
1.安装glog库
直接git clone https://github.com/google/glog/
然后进入glog目录:
./autogen.sh && ./configure && make && make install
如果报错:
./autogen.sh: 5: ./autogen.sh: autoreconf: not found
按照帖子https://blog.csdn.net/mybelief321/article/details/9208073操作
apt-get install autoconf
apt-get install automake
apt-get install libtool
2019.5.27
2. libhdf5包相关错误:
src/caffe/layers/hdf5_output_layer.cpp:4:18: fatal error: hdf5.h: 没有那个文件或目录
#include "hdf5.h"
在上面的帖子链接中,我没有按照他的步骤安装 libhdf5-serial-dev 包
正常apt install libhdf5-serial-dev。安装后,依然报这个错误,此时按照帖子https://www.cnblogs.com/xiangfeidemengzhu/p/7058391.html操作。
首先查找hdf5.h的位置,终端输入: locate hdf5.h
可以看到在 /usr/include/hdf5/serial/下有,把这个路径添加到Makefile.config 的INCLUDE_DIRS 中,即:
INCLUDE_DIRS := $(PYTHON_INCLUDE) /usr/local/include /usr/include/hdf5/serial/
继续make all,报错:
AR -o .build_release/lib/libcaffe.a
LD -o .build_release/lib/libcaffe.so.1.0.0
/usr/bin/ld: 找不到 -lhdf5_hl
/usr/bin/ld: 找不到 -lhdf5
collect2: error: ld returned 1 exit status
Makefile:582: recipe for target '.build_release/lib/libcaffe.so.1.0.0' failed
make: *** [.build_release/lib/libcaffe.so.1.0.0] Error 1
这个应该是找不到hdf5的lib文件。其实这个和上面找不到头文件是一个问题,就是apt install libhdf5-serial-dev库的时候安装的路径不在caffe库默认的编译路径下。
所以第一步还是locate
locate libhdf5
然后可以看到有个结果是
/usr/lib/x86_64-linux-gnu/hdf5/serial/libhdf5.so
将这个路径添加到Makefile.config中去,即:
LIBRARY_DIRS := $(PYTHON_LIB) /usr/local/lib /usr/lib /usr/lib/x86_64-linux-gnu/hdf5/serial/
再make all解决。
3. gflags包的问题:
AR -o .build_release/lib/libcaffe.a
LD -o .build_release/lib/libcaffe.so.1.0.0
/usr/bin/ld: /usr/local/lib/libgflags.a(gflags.cc.o): relocation R_X86_64_32 against `.rodata.str1.1' can not be used when making a shared object; recompile with -fPIC
/usr/local/lib/libgflags.a: 无法添加符号: 错误的值
collect2: error: ld returned 1 exit status
Makefile:572: recipe for target '.build_release/lib/libcaffe.so.1.0.0' failed
make: *** [.build_release/lib/libcaffe.so.1.0.0] Error 1
from:https://github.com/BVLC/caffe/issues/6317 追踪到#6200,#2171,一路看过去
其中在#2171的讨论中,有一层楼说:
just recompile the gflags with CXXFLAGS += -fPIC makes things work
该层回复较多
再回过头看前面的帖子https://blog.csdn.net/mybelief321/article/details/9208073
这个帖子在安装gflags库时明确说了要export 环境变量,即
export CXXFLAGS="-fPIC"
2019.5.29
4. gcc版本问题
[ 89%] Linking CXX executable compute_image_mean
CMakeFiles/compute_image_mean.dir/compute_image_mean.cpp.o:在函数‘std::__cxx11::basic_string<char, std::char_traits<char>, std::allocator<char> >* google::MakeCheckOpString<int, int>(int const&, int const&, char const*)’中:
compute_image_mean.cpp:(.text._ZN6google17MakeCheckOpStringIiiEEPNSt7__cxx1112basic_stringIcSt11char_traitsIcESaIcEEERKT_RKT0_PKc[_ZN6google17MakeCheckOpStringIiiEEPNSt7__cxx1112basic_stringIcSt11char_traitsIcESaIcEEERKT_RKT0_PKc]+0x50):对‘google::base::CheckOpMessageBuilder::NewString[abi:cxx11]()’未定义的引用
CMakeFiles/compute_image_mean.dir/compute_image_mean.cpp.o:在函数‘std::__cxx11::basic_string<char, std::char_traits<char>, std::allocator<char> >* google::MakeCheckOpString<unsigned long, int>(unsigned long const&, int const&, char const*)’中:
compute_image_mean.cpp:(.text._ZN6google17MakeCheckOpStringImiEEPNSt7__cxx1112basic_stringIcSt11char_traitsIcESaIcEEERKT_RKT0_PKc[_ZN6google17MakeCheckOpStringImiEEPNSt7__cxx1112basic_stringIcSt11char_traitsIcESaIcEEERKT_RKT0_PKc]+0x50):对‘google::base::CheckOpMessageBuilder::NewString[abi:cxx11]()’未定义的引用
collect2: error: ld returned 1 exit status
tools/CMakeFiles/compute_image_mean.dir/build.make:133: recipe for target 'tools/compute_image_mean' failed
make[2]: *** [tools/compute_image_mean] Error 1
CMakeFiles/Makefile2:457: recipe for target 'tools/CMakeFiles/compute_image_mean.dir/all' failed
make[1]: *** [tools/CMakeFiles/compute_image_mean.dir/all] Error 2
Makefile:127: recipe for target 'all' failed
make: *** [all] Error 2
这里的本质原因是gcc版本问题,因为前期编译cuda的时候对gcc降低了版本。所以需要将gcc的版本提升到5以上,按照这个帖子的方法进行https://blog.csdn.net/xuezhisdc/article/details/48650015 (虽然这个帖子是降版本)即:
cd /usr/bin
ls gcc*
sudo rm gcc
sudo ln -s gcc-5 gcc
sudo rm g++
sudo ln -s g++-5 g++
# 查看是否连接到5
ls –al gcc g++
gcc --version
g++ --version
完了之后,make clean
make all 还是报同样的错误。
然后再按照最开始的帖子https://blog.csdn.net/mybelief321/article/details/9208073的方法再安装一遍glog,即
cd glog-0.3.3
./configure
make
sudo make install
再cd到caffe目录
make clean
make all
2019.6.2
5. make pycaffe相关问题
CXX/LD -o python/caffe/_caffe.so python/caffe/_caffe.cpp
python/caffe/_caffe.cpp:10:31: fatal error: numpy/arrayobject.h: 没有那个文件或目录
compilation terminated.
Makefile:517: recipe for target 'python/caffe/_caffe.so' failed
make: *** [python/caffe/_caffe.so] Error 1
首先看自己机器是否已经安装了。因为numpy库是必装的,所以因为还是路径设置的问题
终端输入 locate arrayobject.h
找到
/home/qian/.local/lib/python3.5/site-packages/numpy/core/include/numpy/arrayobject.h
注意上面的错误提示是缺少numpy/arrayobject.h,而不是缺少arrayobject.h。所以在添加路径的时候,最后的numpy不要加上
修改Makefile.config如下:
PYTHON_INCLUDE := /usr/include/python3.5m \
/usr/lib/python3.5/dist-packages/numpy/core/include \
/home/qian/.local/lib/python3.5/site-packages/numpy/core/include
解决
继续make,找不到lib:
CXX/LD -o python/caffe/_caffe.so python/caffe/_caffe.cpp
/usr/bin/ld: 找不到 -lboost_python3
collect2: error: ld returned 1 exit status
Makefile:517: recipe for target 'python/caffe/_caffe.so' failed
make: *** [python/caffe/_caffe.so] Error 1
首先终端查找:locate libboost_python3.so
找不到文件
再locate libboost_python
大概结果如下:
/usr/lib/x86_64-linux-gnu/libboost_python-py27.a
/usr/lib/x86_64-linux-gnu/libboost_python-py27.so
/usr/lib/x86_64-linux-gnu/libboost_python-py27.so.1.58.0
/usr/lib/x86_64-linux-gnu/libboost_python-py35.a
/usr/lib/x86_64-linux-gnu/libboost_python-py35.so
/usr/lib/x86_64-linux-gnu/libboost_python-py35.so.1.58.0
/usr/lib/x86_64-linux-gnu/libboost_python.a
/usr/lib/x86_64-linux-gnu/libboost_python.so
因为我编译的是python3版本。所以很明显我需要创建一个指向libboost_python_py35.so的软链接,名为libboost_python3.so
root@qian-desktop:/usr/lib/x86_64-linux-gnu# ln -s libboost_python-py35.so libboost_python3.so
make pycaffe 解决
6. pip3 install -r requirements.txt相关问题
ERROR: matplotlib 3.0.3 has requirement python-dateutil>=2.1, but you'll have python-dateutil 1.5 which is incompatible.
ERROR: pandas 0.24.2 has requirement python-dateutil>=2.5.0, but you'll have python-dateutil 1.5 which is incompatible.
已经终端 pip3 install --upgrade python-dateutil 依然报此错误
解决办法:https://blog.csdn.net/CAU_Ayao/article/details/83538024
gedit requirements.txt
python-dateutil>=1.4,<2
改为:
python-dateutil //不加版本号就是默认为最新版本
继续pip3 install -r requirements.txt,问题解决。
2019.6.4
如果升级pip3后之后出现:from pip import main ImportError: cannot import name 'main' 错误
解决办法https://blog.csdn.net/qq_38522539/article/details/80678412
7. import caffe 相关错误
caffe模块找不到错误
解决办法:
export PYTHONPATH=/home/qian/libraries/caffe/python
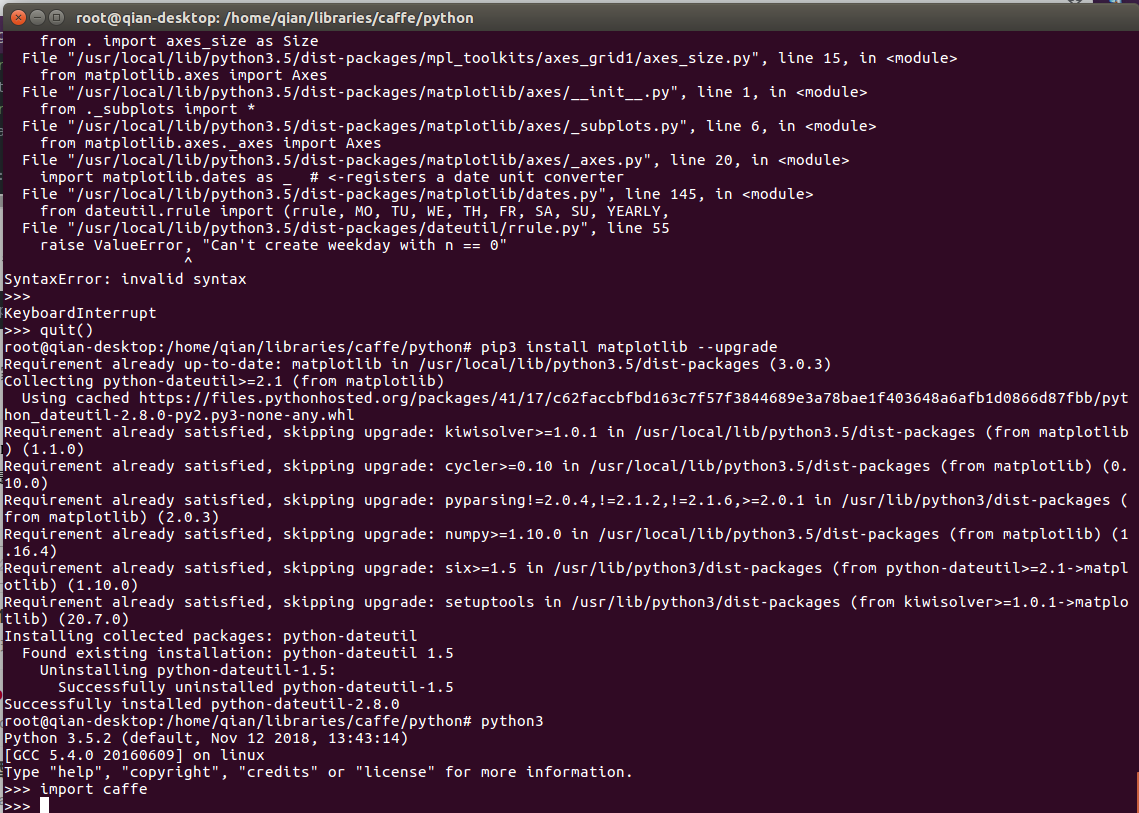
需要升级matplotlib错误
>>> import caffe
Traceback (most recent call last):
File "<stdin>", line 1, in <module>
File "/home/qian/libraries/caffe/python/caffe/__init__.py", line 1, in <module>
from .pycaffe import Net, SGDSolver, NesterovSolver, AdaGradSolver, RMSPropSolver, AdaDeltaSolver, AdamSolver, NCCL, Timer
File "/home/qian/libraries/caffe/python/caffe/pycaffe.py", line 15, in <module>
import caffe.io
File "/home/qian/libraries/caffe/python/caffe/io.py", line 2, in <module>
import skimage.io
File "/usr/local/lib/python3.5/dist-packages/skimage/__init__.py", line 135, in <module>
from .data import data_dir
File "/usr/local/lib/python3.5/dist-packages/skimage/data/__init__.py", line 13, in <module>
from ..io import imread, use_plugin
File "/usr/local/lib/python3.5/dist-packages/skimage/io/__init__.py", line 15, in <module>
reset_plugins()
File "/usr/local/lib/python3.5/dist-packages/skimage/io/manage_plugins.py", line 91, in reset_plugins
_load_preferred_plugins()
File "/usr/local/lib/python3.5/dist-packages/skimage/io/manage_plugins.py", line 71, in _load_preferred_plugins
_set_plugin(p_type, preferred_plugins['all'])
File "/usr/local/lib/python3.5/dist-packages/skimage/io/manage_plugins.py", line 83, in _set_plugin
use_plugin(plugin, kind=plugin_type)
File "/usr/local/lib/python3.5/dist-packages/skimage/io/manage_plugins.py", line 254, in use_plugin
_load(name)
File "/usr/local/lib/python3.5/dist-packages/skimage/io/manage_plugins.py", line 298, in _load
fromlist=[modname])
File "/usr/local/lib/python3.5/dist-packages/skimage/io/_plugins/matplotlib_plugin.py", line 3, in <module>
from mpl_toolkits.axes_grid1 import make_axes_locatable
File "/usr/local/lib/python3.5/dist-packages/mpl_toolkits/axes_grid1/__init__.py", line 1, in <module>
from . import axes_size as Size
File "/usr/local/lib/python3.5/dist-packages/mpl_toolkits/axes_grid1/axes_size.py", line 15, in <module>
from matplotlib.axes import Axes
File "/usr/local/lib/python3.5/dist-packages/matplotlib/axes/__init__.py", line 1, in <module>
from ._subplots import *
File "/usr/local/lib/python3.5/dist-packages/matplotlib/axes/_subplots.py", line 6, in <module>
from matplotlib.axes._axes import Axes
File "/usr/local/lib/python3.5/dist-packages/matplotlib/axes/_axes.py", line 20, in <module>
import matplotlib.dates as _ # <-registers a date unit converter
File "/usr/local/lib/python3.5/dist-packages/matplotlib/dates.py", line 145, in <module>
from dateutil.rrule import (rrule, MO, TU, WE, TH, FR, SA, SU, YEARLY,
File "/usr/local/lib/python3.5/dist-packages/dateutil/rrule.py", line 55
raise ValueError, "Can't create weekday with n == 0"
^
SyntaxError: invalid syntax
解决办法:https://blog.csdn.net/quantum7/article/details/83475530
2019.6.5
终于搞定。。。


 浙公网安备 33010602011771号