SpringMvc5整合Thymeleaf-纯注解
SpringMvc5整合Thymeleaf-纯注解
一、环境准备
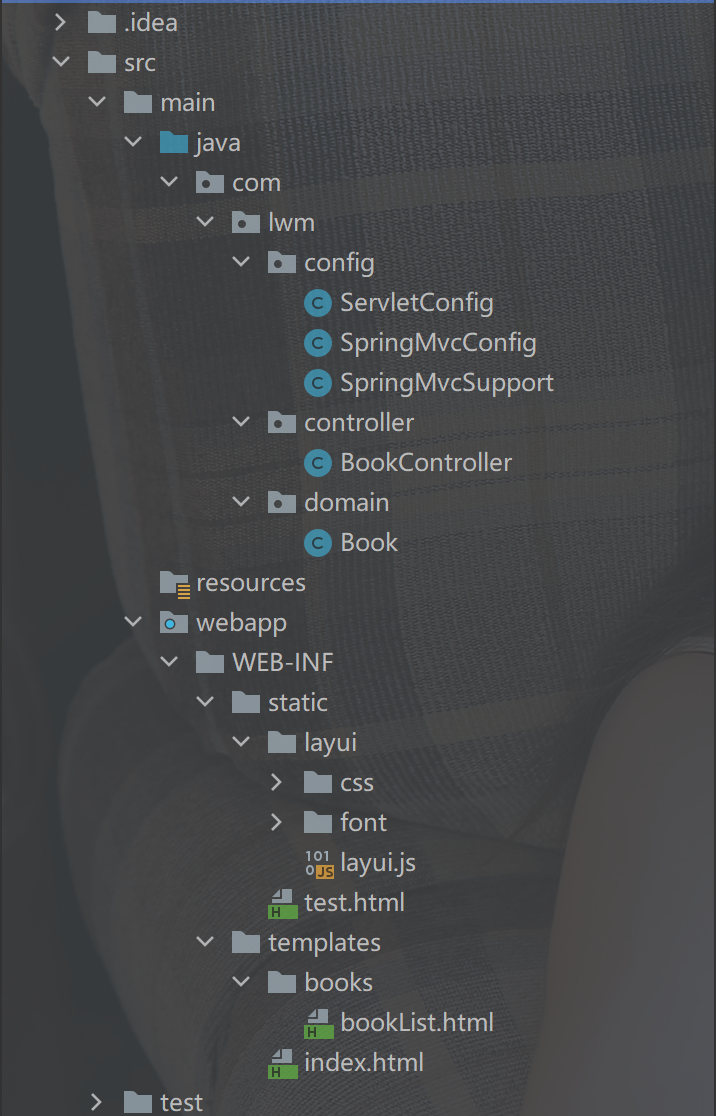
1、整体项目结构
2、pom依赖
<dependencies>
    <!--springmvc相关依赖-->
    <dependency>
        <groupId>org.springframework</groupId>
        <artifactId>spring-webmvc</artifactId>
        <version>5.2.10.RELEASE</version>
    </dependency>

    <!--servlet依赖-->
    <dependency>
        <groupId>javax.servlet</groupId>
        <artifactId>javax.servlet-api</artifactId>
        <version>3.1.0</version>
        <scope>provided</scope>
    </dependency>

    <!--jackson依赖-->
    <dependency>
        <groupId>com.fasterxml.jackson.core</groupId>
        <artifactId>jackson-databind</artifactId>
        <version>2.14.1</version>
    </dependency>

    <!--thymeleaf模板-->
    <dependency>
        <groupId>org.thymeleaf</groupId>
        <artifactId>thymeleaf</artifactId>
        <version>3.0.11.RELEASE</version>
    </dependency>

    <dependency>
        <groupId>org.thymeleaf</groupId>
        <artifactId>thymeleaf-spring5</artifactId>
        <version>3.0.11.RELEASE</version>
    </dependency>
</dependencies>

<build>
    <plugins>
        <!--Tomcat插件-->
        <plugin>
            <groupId>org.apache.tomcat.maven</groupId>
            <artifactId>tomcat7-maven-plugin</artifactId>
            <version>2.2</version>
            <configuration>
                <path>/</path>
                <port>80</port>
            </configuration>
        </plugin>
    </plugins>
</build>
3、编写实体类Book
public class Book {
	private Integer id;
    private String type;
    private String name;
    private String description;
    //setter、getter和构造器自行写入
}
4、编写配置类
SpringMvcConfig 类
@Configuration
@ComponentScan("com.lwm.controller")
@EnableWebMvc
public class SpringMvcConfig {
}
ServletConfig 类
/**
 * 定义servlet容器启动的配置类,在里面加载spring的配置
 */
public class ServletConfig extends AbstractAnnotationConfigDispatcherServletInitializer {

    //加载spring容器配置
    @Override
    protected Class<?>[] getRootConfigClasses() {
        return new Class[0];
    }

    //加载springmvc容器配置
    @Override
    protected Class<?>[] getServletConfigClasses() {
        return new Class[] {SpringMvcConfig.class};
    }

    //设置拦截请求,拦截请求归属springmvc处理
    @Override
    protected String[] getServletMappings() {
        return new String[] {"/"};
    }
}
5、编写Controller
@Controller
@RequestMapping("/books")
public class BookController {
}
此处需要注意,不要使用Rest风格的注解(@RestController),为什么呢?
要知道一点,@RestController = @Controller + @ResponseBody,@ResponseBody 的作用是什么?就是设置当前控制器返回值作为响应体。
所以,一旦使用Rest风格的注解,springmvc不会解析该返回值跳转到对应的页面去,页面上显示的一直是return的数据,可以自行测试一番
(PS:😭找了几个小时的bug)
二、进入正题
1、配置Thymeleaf和静态资源放行
新建配置类 SpringMvcSupport,让其继承 WebMvcConfigurationSupport
/**
 * 配置模板和资源放行
 */
@Configuration
public class SpringMvcSupport extends WebMvcConfigurationSupport {

    /**
     * 创建模板解析器
     *
     * @return ITemplateResolver
     */
    @Bean
    public ITemplateResolver templateResolver() {
        SpringResourceTemplateResolver templateResolver = new SpringResourceTemplateResolver();
        templateResolver.setPrefix("/WEB-INF/templates/");
        templateResolver.setSuffix(".html");
        templateResolver.setCharacterEncoding("UTF-8");
        templateResolver.setOrder(1);
        templateResolver.setTemplateMode(TemplateMode.HTML);
        templateResolver.setCacheable(false);//缓存 否则无法看到实时的页面数据
        return templateResolver;
    }

    /**
     * 创建模板引擎,并为其注入模板解析器
     *
     * @return SpringTemplateEngine
     */
    @Bean
    public SpringTemplateEngine templateEngine(ITemplateResolver templateResolver) {
        SpringTemplateEngine templateEngine = new SpringTemplateEngine();
        templateEngine.setTemplateResolver(templateResolver);//注入模板解析器
        return templateEngine;
    }

    /**
     * 注册thymeleaf视图解析器,并为其注入模板引擎
     *
     * @return ThymeleafViewResolver
     */
    @Bean
    public ThymeleafViewResolver viewResolver(SpringTemplateEngine templateEngine) {
        ThymeleafViewResolver viewResolver = new ThymeleafViewResolver();
        viewResolver.setTemplateEngine(templateEngine);
        viewResolver.setCharacterEncoding("UTF-8");//未设置,服务端传到页面上的中文数据将会 => ???
        return viewResolver;
    }

    /**
     * 静态资源放行
     *
     * @param registry 注册
     */
    @Override
    protected void addResourceHandlers(ResourceHandlerRegistry registry) {
        registry.addResourceHandler("/static/**").addResourceLocations("/WEB-INF/static/");
    }
}
2、让SpringMvcConfig类扫描到该类
即,在
@ComponentScan(),添加一个 参数,扫描到config包,如下
@Configuration
@ComponentScan({"com.lwm.controller","com.lwm.config"})
@EnableWebMvc
public class SpringMvcConfig {
}
3、在 BookController 编写控制器
@Controller
@RequestMapping("/books")
public class BookController {

    @GetMapping("/index")
    public String index(Model model) {
        model.addAttribute("skill","唱 跳 rap 篮球");
        return "index";
    }
}
4、WEB-INF目录下新建两个目录,为 static(静态资源) 和 templates(模板)
5、并在 templates 目录下创建 index.html文件
此处为了页面好看一些,笔者使用了layui,layui存放于static目录下
<!DOCTYPE html>
<!--引入Thymeleaf名称空间,使用Thymeleaf便会有语法提示-->
<html lang="en" xmlns:th="http://www.thymeleaf.org">
<head>
    <meta charset="UTF-8">
    <title>Title</title>
    <!--解析URL地址 @{}的作用是在字符串前附加『上下文路径』-->
    <link rel="stylesheet" th:href="@{/static/layui/css/layui.css}">
    <style>
        .centerBox {
            display: flex;
            justify-content: center;
            margin-top: 250px;
            font-family: 楷体;
        }

        .textCenter {
            text-align: center;
        }
    </style>
</head>
<body>
<div class="layui-container">
    <div class="layui-row layui-col-space10 centerBox">
        <div class="layui-col-md6">
            <div class="layui-panel textCenter">
                <div style="padding: 30px;">
                    <h1>IKun书屋</h1>
                    <h3 th:text="${skill}">看到我了嘛,没看到就对了</h3>
                </div>
            </div>
            <a href="" class="layui-btn layui-btn-normal layui-btn-fluid">点击查看书籍</a>
        </div>
    </div>
</div>
</body>
</html>
6、运行项目
右键,运行
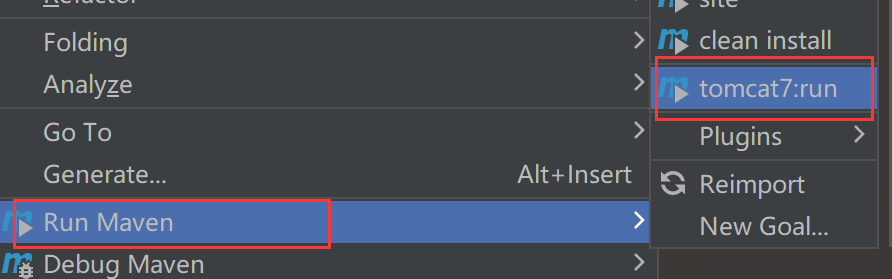
如果没有该选项,需自行下载插件 Maven Helper
浏览器访问 http://localhost/books/index
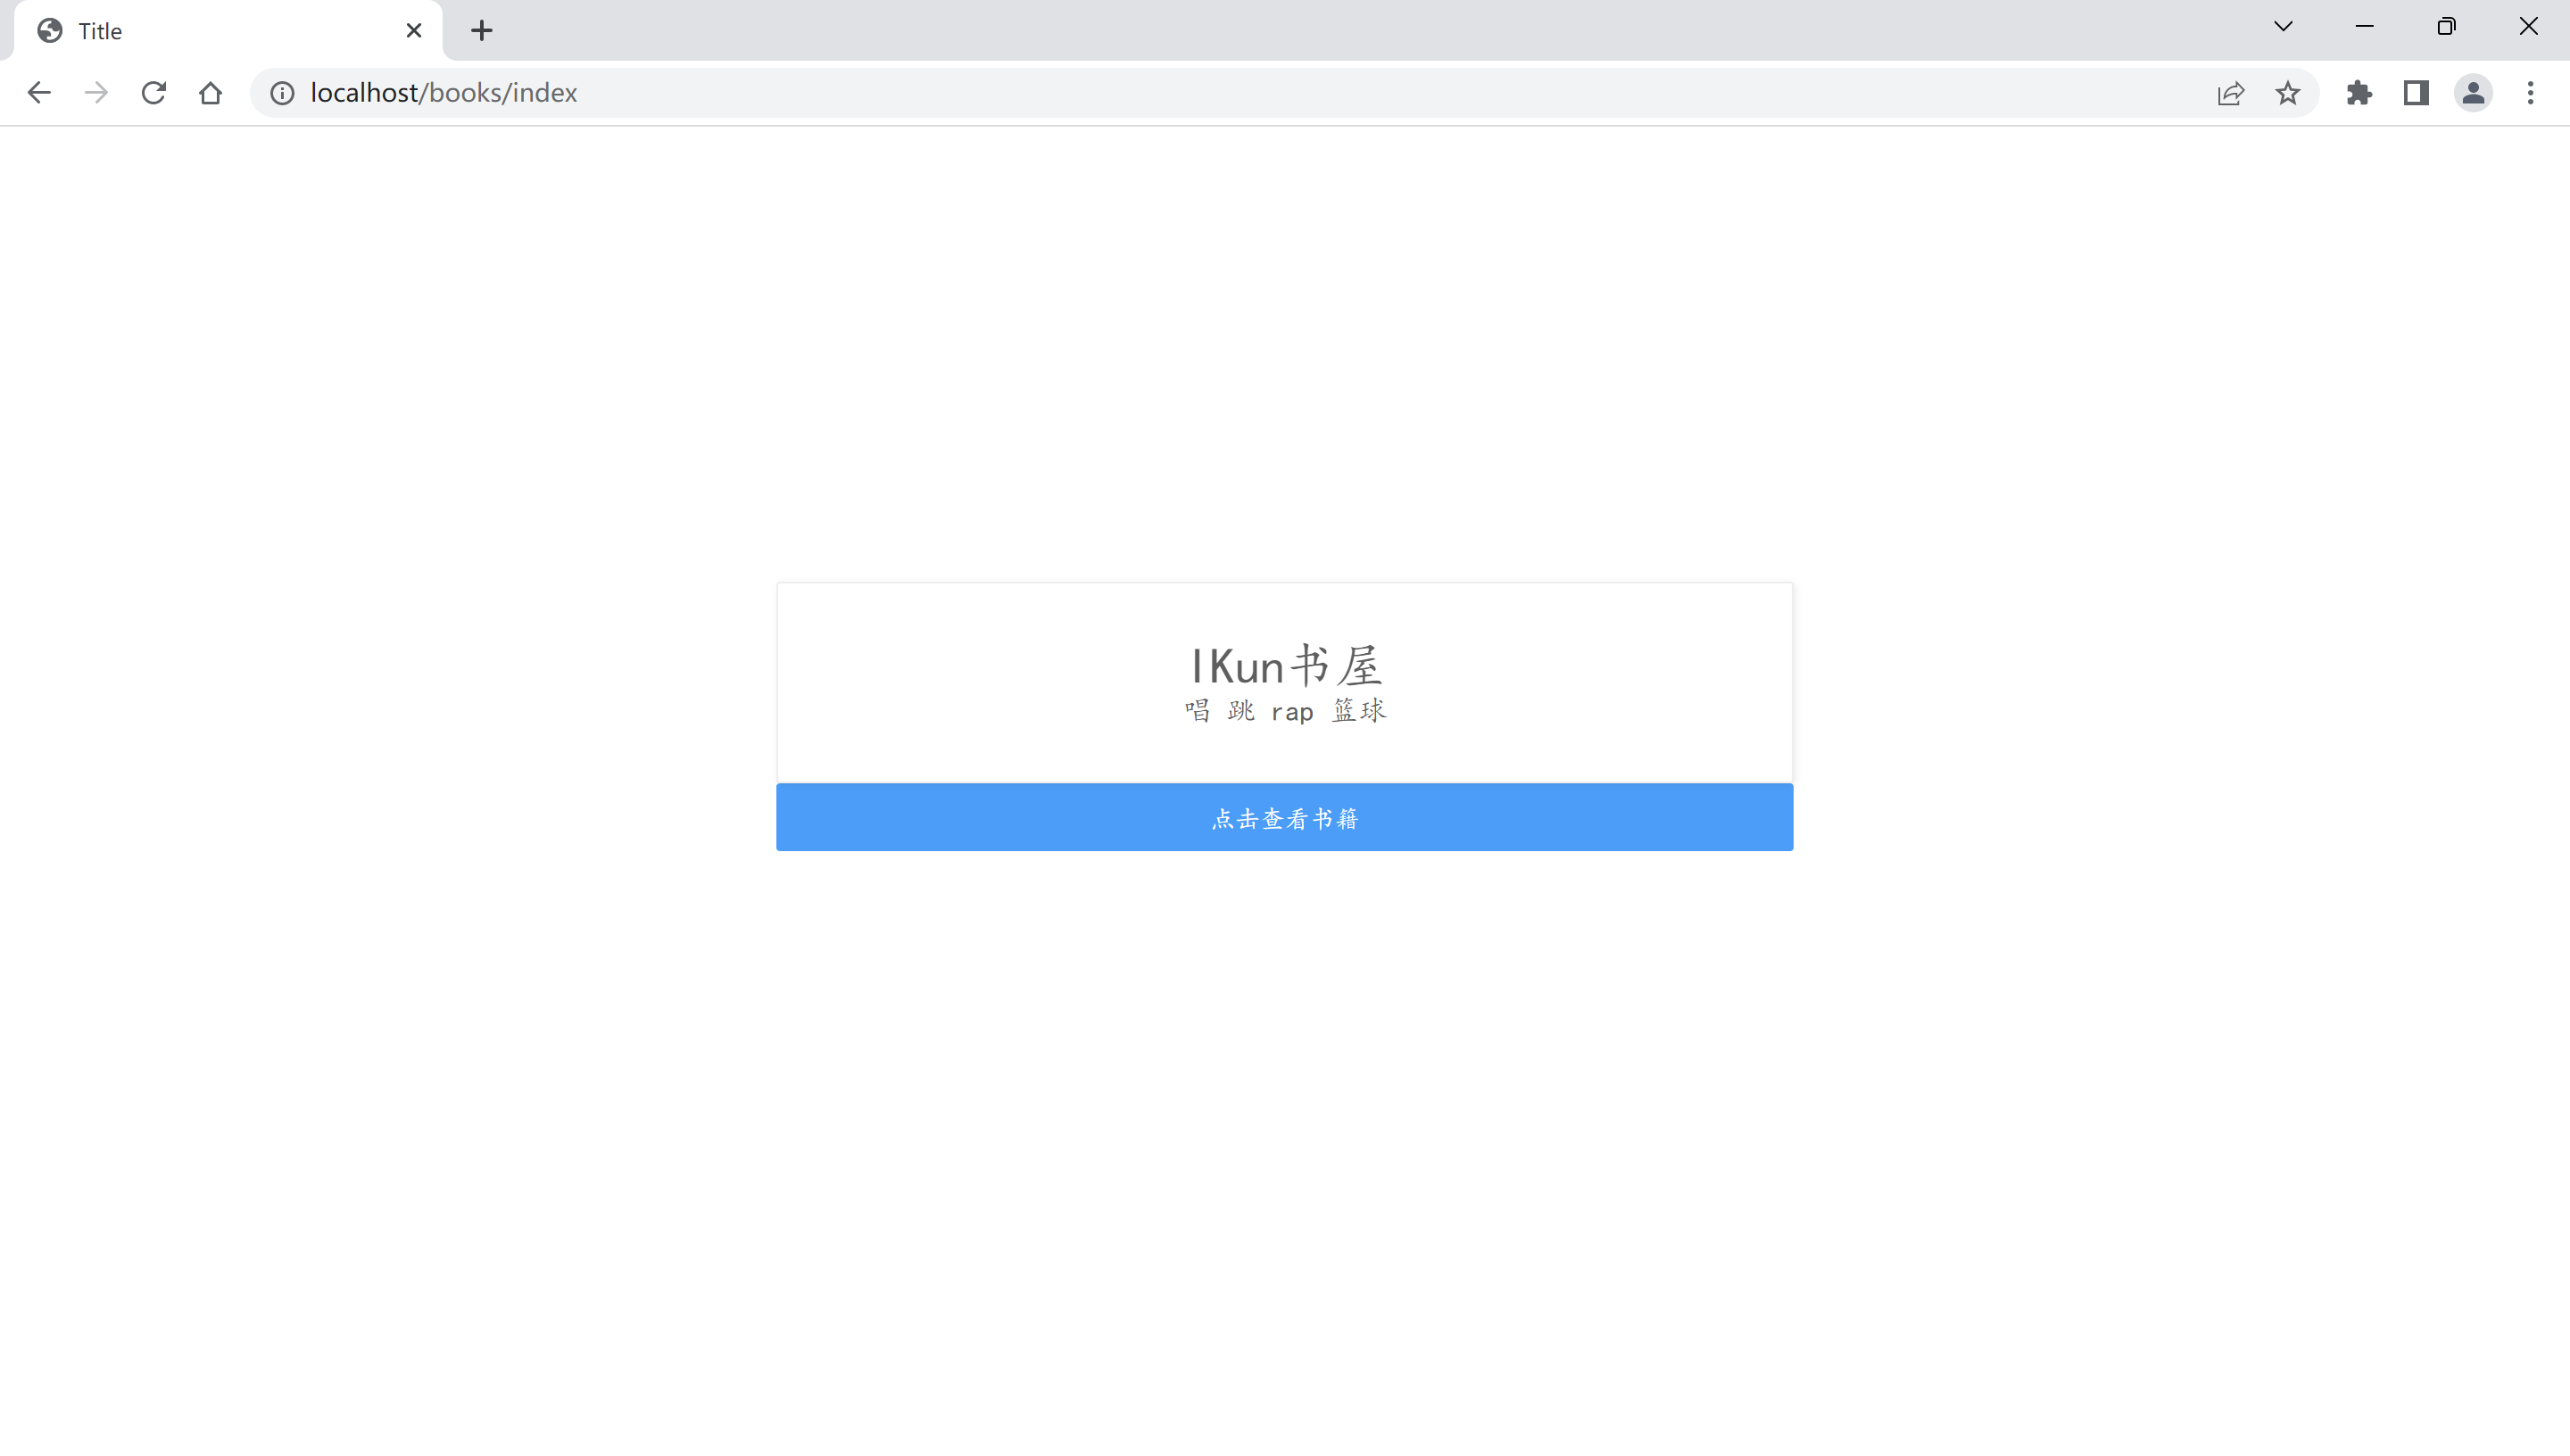
成功~
7、接着完成图书列表的展示
在 BookController 中添加新的控制器
@GetMapping("/bookList")
public String bookList(Model model) {
    //创建ArrayList对象并填充
    List<Book> bookList = new ArrayList<>();
    bookList.add(new Book(1,"计算机","Java核心技术卷1","核心技术......"));
    bookList.add(new Book(2,"计算机","java从入门到入土","入门神作,入土必选~"));
    bookList.add(new Book(3,"计算机","SpringBoot+VUE全栈开发实践","王松所著......"));
    bookList.add(new Book(4,"计算机","SSM轻量级框架应用实战","肖睿所著......"));
    model.addAttribute("bookList",bookList);
    return "books/bookList";
}
templates 目录下创建 新的目录 books,并且在 books 目录下,创建 bookList.html 文件
<!DOCTYPE html>
<html lang="en" xmlns:th="http://www.thymeleaf.org">
<head>
    <meta charset="UTF-8">
    <title>书籍列表</title>
    <link rel="stylesheet" th:href="@{/static/layui/css/layui.css}">
</head>
<body>
<div class="layui-container">
    <table class="layui-table">
        <colgroup>
            <col width="150">
            <col width="200">
            <col>
        </colgroup>
        <thead>
            <tr>
                <th>编号</th>
                <th>类型</th>
                <th>书名</th>
                <th>介绍</th>
            </tr>
        </thead>
        <tbody>
            <!--遍历出来的每一个元素的名字 : ${要遍历的集合}-->
            <tr th:each="book : ${bookList}">
                <td th:text="${book.id}">1</td>
                <td th:text="${book.type}">2</td>
                <td th:text="${book.name}">3</td>
                <td th:text="${book.description}">4</td>
            </tr>
        </tbody>
    </table>
</div>
</body>
</html>
在 index.html的按钮绑定 请求路径
<a th:href="@{/books/bookList}" class="layui-btn layui-btn-normal layui-btn-fluid">点击查看书籍</a>
8、重新启动项目
点击按钮完成列表展示

完成~~
PS:如有不当,欢迎指正,谢谢。

 浙公网安备 33010602011771号