
百度登录加密协议分析(下)
上一篇百度登录加密协议分析(上)主要讲解了codestring,gid,token,rsakey等参数的产生。好了,废话不多说,咱们进入今天的主题,咱们接着上一篇的内容往下讲解,最后还剩三个字段 callback,password,ppui_logintime。(我的新书《Python爬虫开发与项目实战》出版了,大家可以看一下样章)

第三部分:
_eventHandler: function() {
    var e,
        t = {
            focus: function(t) {
                var n = e.fireEvent('fieldFocus', {
                    ele: this
                });
                n && (this.addClass(e.constant.FOCUS_CLASS), this.removeClass(e.constant.ERROR_CLASS), baidu(e.getElement(t + 'Label')).addClass(e.constant.LABEL_FOCUS_CLASS))
            },
            blur: function(t) {
                var n = e.fireEvent('fieldBlur', {
                    ele: this
                });
                n && (this.removeClass(e.constant.FOCUS_CLASS), baidu(e.getElement(t + 'Label')).removeClass(e.constant.LABEL_FOCUS_CLASS))
            },
            mouseover: function() {
                var t = e.fireEvent('fieldMouseover', {
                    ele: this
                });
                t && this.addClass(e.constant.HOVER_CLASS)
            },
            mouseout: function() {
                var t = e.fireEvent('fieldMouseout', {
                    ele: this
                });
                t && this.removeClass(e.constant.HOVER_CLASS)
            },
            keyup: function() {
                e.fireEvent('fieldKeyup', {
                    ele: this
                })
            }
        },
        n = {
            focus: {
                userName: function() {
                    e.config.loginMerge && e.getElement('loginMerge') && (e.getElement('loginMerge').value = 'true', e.getElement('isPhone').value = '')
                },
                password: function() {
                    e._getRSA(function(t) {
                        e.RSA = t.RSA,
                            e.rsakey = t.rsakey
                    })
                },
                verifyCode: function() {}
            },
            blur: {
                userName: function() {},
                password: function(t) {
                    var n = this.get(0).value;
                    n.length && e.validate(t)
                },
                verifyCode: function(t) {
                    var n = this.get(0).value;
                    n.length && e.validate(t)
                }
            },
            change: {
                userName: function() {
                    var t = this.get(0).value;
                    e._loginCheck(t)
                },
                verifyCode: function() {}
            },
            click: {
                verifyCodeChange: function(t, n) {
                    e.getElement('verifyCode').value = '',
                        e._doFocus('verifyCode'),
                        e.getVerifyCode(),
                        n.preventDefault()
                }
            },
            keyup: {
                verifyCode: function() {
                    var t = e.getElement('verifyCode'),
                        n = baidu(t);
                    t.value && 4 == t.value.length ? e._asyncValidate.checkVerifycode.call(e, {
                        error: function(t) {
                            n.addClass(e.constant.ERROR_CLASS),
                                e.setGeneralError(t.msg)
                        },
                        success: function() {
                            n.removeClass(e.constant.ERROR_CLASS),
                                e.clearGeneralError()
                        }
                    }) : e.$hide('verifyCodeSuccess')
                }
            },
            submit: function(t) {
                e.submit(),
                    t.preventDefault()
            }
        };
    return {
        entrance: function(i) {
            e = this;
            var r = (baidu(i.target), i.target.name);
            if (!r && i.target.id) {
                var o = i.target.id.match(/\d+__(.*)$/);
                o && (r = o[1])
            }
            r && (t.hasOwnProperty(i.type) && t[i.type].apply(baidu(i.target), [
                r,
                i
            ]), n.hasOwnProperty(i.type) && ('function' == typeof n[i.type] && n[i.type].apply(baidu(i.target), [
                i
            ]), n[i.type].hasOwnProperty(r) && n[i.type][r].apply(baidu(i.target), [
                r,
                i
            ])), e.initialized || 'focus' != i.type || e._initApi())
        }
    }
}(),
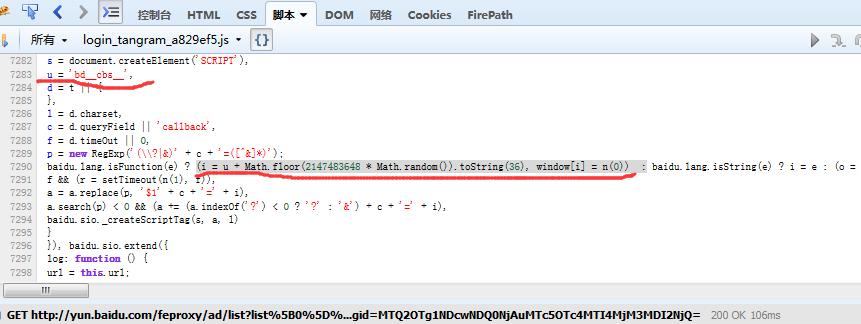
callback ='bd__cbs__'+Math.floor(2147483648 *Math.random()).toString(36)
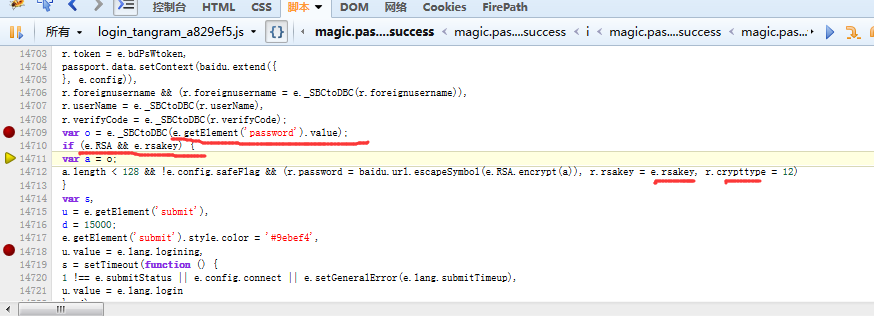
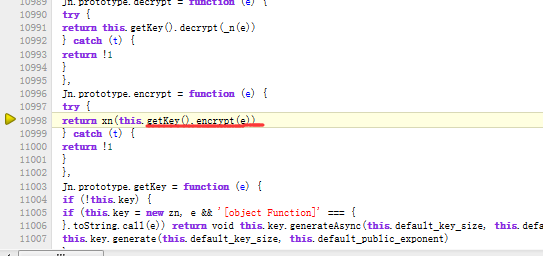
采用的是RSA加密方式:
from Crypto.PublicKey import RSA
from Crypto.Cipher import PKCS1_v1_5
password = 'xxxxxxxx'
with open('pub.pem') as f:
    pubkey = f.read()
    rsakey = RSA.importKey(pubkey)
    cipher = PKCS1_v1_5.new(rsakey)
    cipher_text = base64.b64encode(cipher.encrypt(password))
    print cipher_text
3.5 由于之前安装了pyv8,所以不把gid,callback等js函数翻译成python了,翻译过来也很简单,如果你电脑上没装pyv8,就试着翻译一下。
    function callback(){
        return 'bd__cbs__'+Math.floor(2147483648 * Math.random()).toString(36)

    }
    function gid(){
        return 'xxxxxxx-xxxx-4xxx-yxxx-xxxxxxxxxxxx'.replace(/[xy]/g, function (e) {
        var t = 16 * Math.random() | 0,
        n = 'x' == e ? t : 3 & t | 8;
        return n.toString(16)
        }).toUpperCase()

    }
3.6 似乎还有验证码没说,其实就是两个链接,一个是获取验证码的链接,一个是检测验证码是否正确的链接。验证码获取很简单,这里就不详细说了。下面我会把整个登录的源代码,贴在下面有兴趣的,可以去玩一下。
总结:
下面我用python模拟了一下登录,使用了requests和pyv8(其实想偷懒),代码如下:
#coding:utf-8
import base64
import json
import re
from Crypto.Cipher import PKCS1_v1_5
from Crypto.PublicKey import RSA
import PyV8
from urllib import quote
import requests
import time

if __name__=='__main__':
    s = requests.Session()
    s.get('http://yun.baidu.com')
    js='''
    function callback(){
        return 'bd__cbs__'+Math.floor(2147483648 * Math.random()).toString(36)

    }
    function gid(){
        return 'xxxxxxx-xxxx-4xxx-yxxx-xxxxxxxxxxxx'.replace(/[xy]/g, function (e) {
        var t = 16 * Math.random() | 0,
        n = 'x' == e ? t : 3 & t | 8;
        return n.toString(16)
        }).toUpperCase()

    }
    '''
    ctxt = PyV8.JSContext()
    ctxt.enter()
    ctxt.eval(js)
    ###########获取gid#############################3
    gid = ctxt.locals.gid()
    ###########获取callback#############################3
    callback1 = ctxt.locals.callback()
    ###########获取token#############################3
    tokenUrl="https://passport.baidu.com/v2/api/?getapi&tpl=netdisk&subpro=netdisk_web&apiver=v3" \
             "&tt=%d&class=login&gid=%s&logintype=basicLogin&callback=%s"%(time.time()*1000,gid,callback1)

    token_response = s.get(tokenUrl)
    pattern = re.compile(r'"token"\s*:\s*"(\w+)"')
    match = pattern.search(token_response.text)
    if match:
        token = match.group(1)

    else:
        raise Exception
    ###########获取callback#############################3
    callback2 = ctxt.locals.callback()
    ###########获取rsakey和pubkey#############################3
    rsaUrl = "https://passport.baidu.com/v2/getpublickey?token=%s&" \
             "tpl=netdisk&subpro=netdisk_web&apiver=v3&tt=%d&gid=%s&callback=%s"%(token,time.time()*1000,gid,callback2)
    rsaResponse = s.get(rsaUrl)
    pattern = re.compile("\"key\"\s*:\s*'(\w+)'")
    match = pattern.search(rsaResponse.text)
    if match:
        key = match.group(1)
        print key

    else:
        raise Exception
    pattern = re.compile("\"pubkey\":'(.+?)'")
    match = pattern.search(rsaResponse.text)
    if match:
        pubkey = match.group(1)
        print pubkey

    else:
        raise Exception
    ################加密password########################3
    password = 'xxxxxxx'#填上自己的密码
    pubkey = pubkey.replace('\\n','\n').replace('\\','')
    rsakey = RSA.importKey(pubkey)
    cipher = PKCS1_v1_5.new(rsakey)
    password = base64.b64encode(cipher.encrypt(password))
    print password
    ###########获取callback#############################3
    callback3 = ctxt.locals.callback()
    data={
        'apiver':'v3',
        'charset':'utf-8',
        'countrycode':'',
        'crypttype':12,
        'detect':1,
        'foreignusername':'',
        'idc':'',
        'isPhone':'',
        'logLoginType':'pc_loginBasic',
        'loginmerge':True,
        'logintype':'basicLogin',
        'mem_pass':'on',
        'quick_user':0,
        'safeflg':0,
        'staticpage':'http://yun.baidu.com/res/static/thirdparty/pass_v3_jump.html',
        'subpro':'netdisk_web',
        'tpl':'netdisk',
        'u':'http://yun.baidu.com/',
        'username':'xxxxxxxxx',#填上自己的用户名
        'callback':'parent.'+callback3,
        'gid':gid,'ppui_logintime':71755,
        'rsakey':key,
        'token':token,
        'password':password,
        'tt':'%d'%(time.time()*1000),


    }
    ###########第一次post#############################3
    post1_response = s.post('https://passport.baidu.com/v2/api/?login',data=data)
    pattern = re.compile("codeString=(\w+)&")
    match = pattern.search(post1_response.text)
    if match:
    ###########获取codeString#############################3
        codeString = match.group(1)
        print codeString

    else:
        raise Exception
    data['codestring']= codeString
    #############获取验证码###################################
    verifyFail = True
    while verifyFail:
        genimage_param = ''
        if len(genimage_param)==0:
            genimage_param = codeString

        verifycodeUrl="https://passport.baidu.com/cgi-bin/genimage?%s"%genimage_param
        verifycode = s.get(verifycodeUrl)
        #############下载验证码###################################
        with open('verifycode.png','wb') as codeWriter:
            codeWriter.write(verifycode.content)
            codeWriter.close()
        #############输入验证码###################################
        verifycode = raw_input("Enter your input verifycode: ");
        callback4 = ctxt.locals.callback()
        #############检验验证码###################################
        checkVerifycodeUrl='https://passport.baidu.com/v2/?' \
                        'checkvcode&token=%s' \
                        '&tpl=netdisk&subpro=netdisk_web&apiver=v3&tt=%d' \
                        '&verifycode=%s&codestring=%s' \
                        '&callback=%s'%(token,time.time()*1000,quote(verifycode),codeString,callback4)
        print checkVerifycodeUrl
        state = s.get(checkVerifycodeUrl)
        print state.text
        if state.text.find(u'验证码错误')!=-1:
            print '验证码输入错误...已经自动更换...'
            callback5 = ctxt.locals.callback()
            changeVerifyCodeUrl = "https://passport.baidu.com/v2/?reggetcodestr" \
                                  "&token=%s" \
                                  "&tpl=netdisk&subpro=netdisk_web&apiver=v3" \
                                  "&tt=%d&fr=login&" \
                                  "vcodetype=de94eTRcVz1GvhJFsiK5G+ni2k2Z78PYRxUaRJLEmxdJO5ftPhviQ3/JiT9vezbFtwCyqdkNWSP29oeOvYE0SYPocOGL+iTafSv8pw" \
                                  "&callback=%s"%(token,time.time()*1000,callback5)
            print changeVerifyCodeUrl
            verifyString = s.get(changeVerifyCodeUrl)
            pattern = re.compile('"verifyStr"\s*:\s*"(\w+)"')
            match = pattern.search(verifyString.text)
            if match:
            ###########获取verifyString#############################3
                verifyString = match.group(1)
                genimage_param = verifyString
                print verifyString

            else:
                verifyFail = False
                raise Exception

        else:
            verifyFail = False
    data['verifycode']= verifycode
    ###########第二次post#############################3
    data['ppui_logintime']=81755
####################################################
# 特地说明,大家会发现第二次的post出去的密码是改变的,为什么我这里没有变化呢?
#是因为RSA加密,加密密钥和密码原文即使不变,每次加密后的密码都是改变的,RSA有随机因子的关系
#所以我这里不需要在对密码原文进行第二次加密了,直接使用上次加密后的密码即可,是没有问题的。
# ###################################################################################
    post2_response = s.post('https://passport.baidu.com/v2/api/?login',data=data)
    if post2_response.text.find('err_no=0')!=-1:
        print '登录成功'

    else:
        print '登录失败'
我把整个代码上传到git上了:https://github.com/qiyeboy/baidulogin.git,大家可以star和fork。
  今天的分享就到这里,如果大家觉得还可以呀,记得推荐呦。


欢迎大家支持我公众号:

本文章属于原创作品,欢迎大家转载分享,禁止修改文章的内容。尊重原创,转载请注明来自:七夜的故事 http://www.cnblogs.com/qiyeboy/

 浙公网安备 33010602011771号