

关于mysql-5.7.23-winx64.msi的安装
1. 访问搜狐镜像 http://mirrors.sohu.com/mysql/MySQL-5.7/ 下载 mysql-5.7.23-winx64.msi
2. 安装 mysql-5.7.23-winx64.msi ,选择custom方式安装,就可以选择安装路径,否则默认安装在C盘,然后一路 next 。
3. 进入 mysql 安装目录:
此时你可能会发现两个问题:一是没有my.ini文件,二是没有data文件夹;
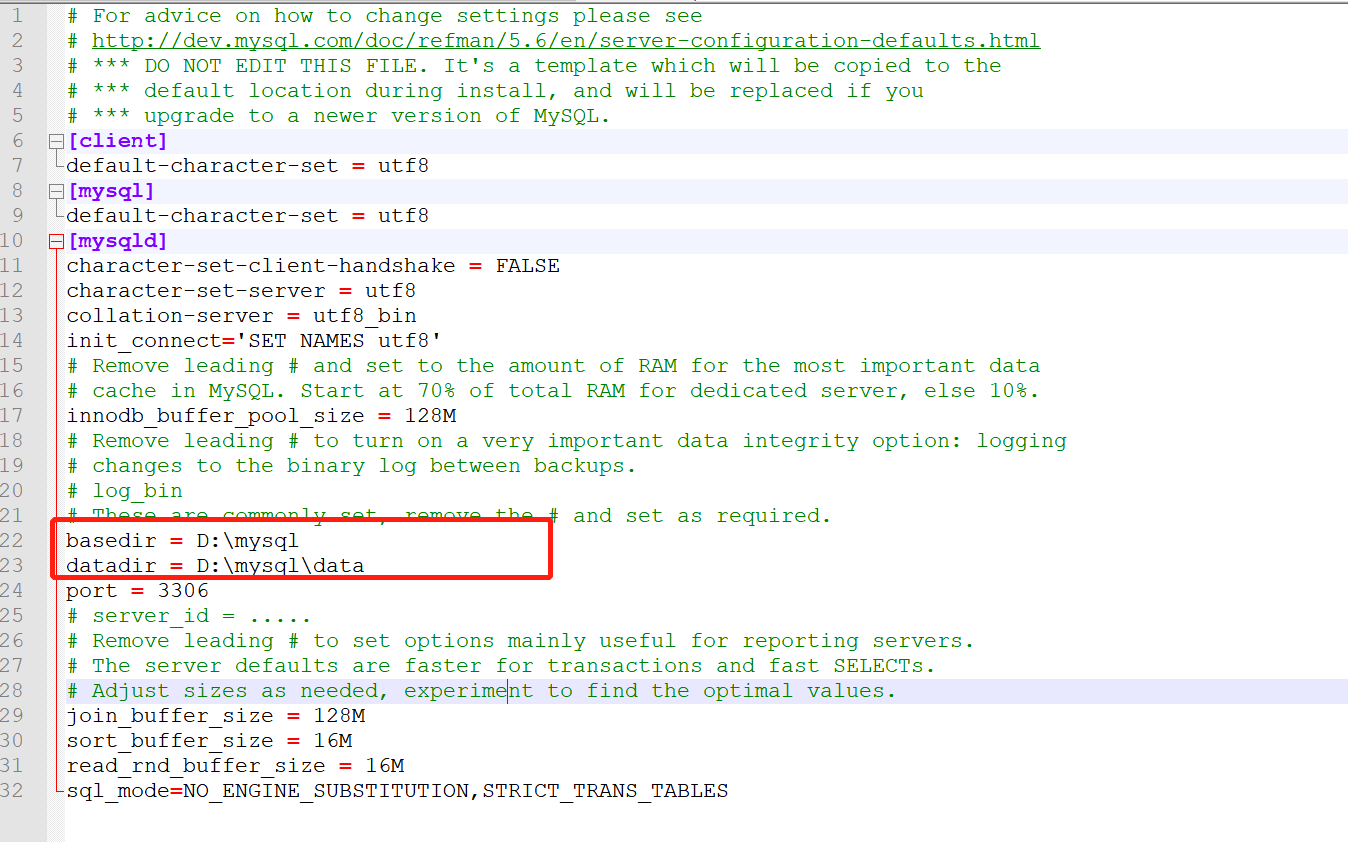
3.1 若没有my.ini文件,则自己创建个my.ini文件,将以下内容Copy进去


 1 # For advice on how to change settings please see
 2 # http://dev.mysql.com/doc/refman/5.6/en/server-configuration-defaults.html
 3 # *** DO NOT EDIT THIS FILE. It's a template which will be copied to the
 4 # *** default location during install, and will be replaced if you
 5 # *** upgrade to a newer version of MySQL.
 6 [client]
 7 default-character-set = utf8
 8 [mysql]
 9 default-character-set = utf8
10 [mysqld]
11 character-set-client-handshake = FALSE
12 character-set-server = utf8
13 collation-server = utf8_bin
14 init_connect='SET NAMES utf8'
15 # Remove leading # and set to the amount of RAM for the most important data
16 # cache in MySQL. Start at 70% of total RAM for dedicated server, else 10%.
17 innodb_buffer_pool_size = 128M
18 # Remove leading # to turn on a very important data integrity option: logging
19 # changes to the binary log between backups.
20 # log_bin
21 # These are commonly set, remove the # and set as required.
22 basedir = D:\mysql
23 datadir = D:\mysql\data
24 port = 3306
25 # server_id = .....
26 # Remove leading # to set options mainly useful for reporting servers.
27 # The server defaults are faster for transactions and fast SELECTs.
28 # Adjust sizes as needed, experiment to find the optimal values.
29 join_buffer_size = 128M
30 sort_buffer_size = 16M
31 read_rnd_buffer_size = 16M
32 sql_mode=NO_ENGINE_SUBSTITUTION,STRICT_TRANS_TABLES
注意,my.ini文件中的路径,要修改为你的安装路径:
3.2 不要新建 data 文件夹(千万不要自己手动建data文件夹,否则服务启动不起来)
4.以管理员身份运行cmd
5.进入 bin 下
6. 执行: mysqld --initialize-insecure --user=mysql
接着执行:mysqld --install mysql --defaults-file=d:\mysql\my.ini
( 此时 mysql为你的服务名,你也可以修改为你定义的名称 已经注册成 windows的系统服务 )
接着执行:net start mysql
( 或进入 "服务"手动开启 )
执行此句后,你可能会遇到服务启动不起来的情况,此时参考如下操作:
https://blog.csdn.net/fan_lulu/article/details/82011994
7. 初始密码在:你手动创建的data文件夹中,err文件内:


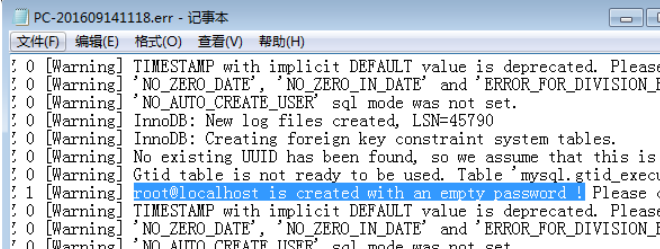
8.若密码为空,则输入:mysql -u root -p ,此时不输入密码,不输入密码,直接回车。便可进入mysql。
若密码不为空,则执行 mysql -uroot -p 输入初始密码(上一步中控制台已经打印出来了 ,形如: localhost: <Bp(=fF4cAdJ)
9.重置密码: alter user 'root'@'localhost' identified by 'root';,这样就将密码设置为了 root;
10.执行:mysql -u root -p ,回车后,输入密码 root,再次试试登录,如果登录成功,则完成mysql的安装。
参考:
https://blog.csdn.net/heshiyuan1406146854/article/details/102745031,
https://blog.csdn.net/fan_lulu/article/details/82011994;
https://www.cnblogs.com/RayWang/p/9347874.html

 浙公网安备 33010602011771号