

Flume基础(十):企业开发案例(七) 负载均衡和故障转移
[atguigu@hadoop102 job]$ cd group2/
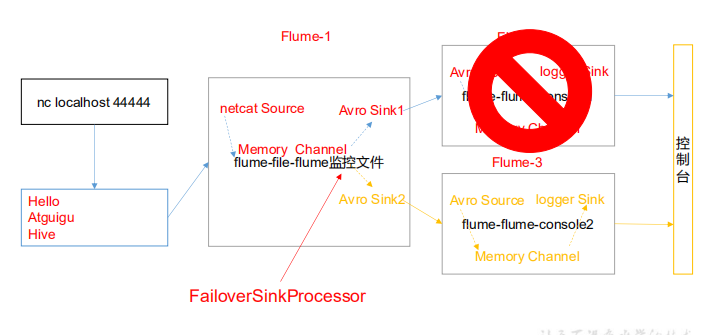
负载均衡和故障转移
1)案例需求
使用 Flume1 监控一个端口,其 sink 组中的 sink 分别对接 Flume2 和 Flume3,采用FailoverSinkProcessor,实现故障转移的功能。
2)需求分析
3)实现步骤
0.准备工作
在/opt/module/flume/job 目录下创建 group2 文件夹
1.创建 flume-netcat-flume.conf
配置 1 个 netcat source 和 1 个 channel、1 个 sink group(2 个 sink),分别输送给 flume
flume-console1 和 flume-flume-console2。
编辑配置文件
[atguigu@hadoop102 group2]$ vim flume-netcat-flume.conf
添加如下内容
# Name the components on this agent
a1.sources = r1
a1.channels = c1
a1.sinkgroups = g1
a1.sinks = k1 k2
# Describe/configure the source
a1.sources.r1.type = netcat
a1.sources.r1.bind = localhost
a1.sources.r1.port = 44444
a1.sinkgroups.g1.processor.type = failover
a1.sinkgroups.g1.processor.priority.k1 = 5
a1.sinkgroups.g1.processor.priority.k2 = 10
a1.sinkgroups.g1.processor.maxpenalty = 10000
# Describe the sink
a1.sinks.k1.type = avro
a1.sinks.k1.hostname = hadoop102
a1.sinks.k1.port = 4141
a1.sinks.k2.type = avro
a1.sinks.k2.hostname = hadoop102
a1.sinks.k2.port = 4142
# Describe the channel
a1.channels.c1.type = memory
a1.channels.c1.capacity = 1000
a1.channels.c1.transactionCapacity = 100
# Bind the source and sink to the channel
a1.sources.r1.channels = c1
a1.sinkgroups.g1.sinks = k1 k2
a1.sinks.k1.channel = c1
a1.sinks.k2.channel = c1
2.创建 flume-flume-console1.conf
配置上级 Flume 输出的 Source,输出是到本地控制台。
编辑配置文件
[atguigu@hadoop102 group2]$ vim flume-flume-console1.conf
添加如下内容
# Name the components on this agent
a2.sources = r1
a2.sinks = k1
a2.channels = c1
# Describe/configure the source
a2.sources.r1.type = avro
a2.sources.r1.bind = hadoop102
a2.sources.r1.port = 4141
# Describe the sink
a2.sinks.k1.type = logger
# Describe the channel
a2.channels.c1.type = memory
a2.channels.c1.capacity = 1000
a2.channels.c1.transactionCapacity = 100
# Bind the source and sink to the channel
a2.sources.r1.channels = c1
a2.sinks.k1.channel = c1
3.创建 flume-flume-console2.conf
配置上级 Flume 输出的 Source,输出是到本地控制台。
编辑配置文件
[atguigu@hadoop102 group2]$ vim flume-flume-console2.conf
添加如下内容
# Name the components on this agent
a3.sources = r1
a3.sinks = k1

a3.channels = c2
# Describe/configure the source
a3.sources.r1.type = avro
a3.sources.r1.bind = hadoop102
a3.sources.r1.port = 4142
# Describe the sink
a3.sinks.k1.type = logger
# Describe the channel
a3.channels.c2.type = memory
a3.channels.c2.capacity = 1000
a3.channels.c2.transactionCapacity = 100
# Bind the source and sink to the channel
a3.sources.r1.channels = c2
a3.sinks.k1.channel = c2
4.执行配置文件
分别开启对应配置文件:flume-flume-console2,flume-flume-console1,flume-netcat-flume。
[atguigu@hadoop102 flume]$ bin/flume-ng agent --conf conf/ --name
a3 --conf-file job/group2/flume-flume-console2.conf -
Dflume.root.logger=INFO,console
[atguigu@hadoop102 flume]$ bin/flume-ng agent --conf conf/ --name
a2 --conf-file job/group2/flume-flume-console1.conf -
Dflume.root.logger=INFO,console
[atguigu@hadoop102 flume]$ bin/flume-ng agent --conf conf/ --name
a1 --conf-file job/group2/flume-netcat-flume.conf
5.使用 netcat 工具向本机的 44444 端口发送内容
$ nc localhost 44444
6.查看 Flume2 及 Flume3 的控制台打印日志
7.将 Flume2 kill,观察 Flume3 的控制台打印情况。
注:使用 jps -ml 查看 Flume 进程。
本文来自博客园,作者:秋华,转载请注明原文链接:https://www.cnblogs.com/qiu-hua/p/13382702.html

 浙公网安备 33010602011771号