
Centos下安装部署Jira7的操作记录
1.jira的简介
1.什是jira
JIRA 是目前比较流行的基于Java架构的管理系统,由于Atlassian公司对很多开源项目实行免费提供缺陷跟踪服务,因此在开源领域,其认知度比其他的产品要高得多,而且易用性也好一些。同时,开源则是其另一特色,在用户购买其软件的同时,也就将源代码也购置进来,方便做二次开发。JIRA功能全面,界面友好,安装简单,配置灵活,权限管理以及可扩展性方面都十分出色。
2.JIRA的主要功能
问题追踪和管理:用它管理项目,跟踪任务、bug、需求,通过jira的邮件通知功能进行协作通知,在实际工作中使工作效率提高很多
JIRA软件是 一个功能强大的平台,将问题收集和敏捷项目管理 功能组合到一个应用程序中。使用JIRA软件可以帮助您更高效地规划和组织任务,工作流和报告。
2.jira的部署
1.java环境的准备
这个可以参考我的这篇文章https://www.cnblogs.com/qingbaizhinian/p/12201073.html(注意jira不支持openjdk,所以最好安装之前把直接的java环境清空,我们这里安装的是Oracle JDK1.8)
2.数据库的准备
数据库的安装过程可以参考https://www.cnblogs.com/qingbaizhinian/p/12404692.html
这里注意还需要把数据库的字符编码改成utf-8(这里具体安装和改字符编码这里就不做过多阐述了,可以参考我上面博客博客)
数据库安装好之后,我们进到mysql中创建jira数据库及jira用户。
mysql> CREATE DATABASE jira CHARACTER SET utf8 COLLATE utf8_bin;
Query OK, 1 row affected (0.00 sec)

mysql> grant all on jira.* to 'jira'@'%' identified by 'Jirapasswd123!';
Query OK, 0 rows affected, 1 warning (0.00 sec)

mysql> flush privileges;
Query OK, 0 rows affected (0.00 sec)

mysql> show databases;
+--------------------+
| Database           |
+--------------------+
| information_schema |
| jira               |
| mysql              |
| nacos_config       |
| performance_schema |
| sys                |
+--------------------+
6 rows in set (0.00 sec)

#手动测试下jira连接mysql
[root@linux-test-no ~]# mysql -u jira -h localhost -pJirapasswd123!
mysql: [Warning] Using a password on the command line interface can be insecure.
Welcome to the MySQL monitor.  Commands end with ; or \g.
Your MySQL connection id is 3
Server version: 5.7.31 MySQL Community Server (GPL)

Copyright (c) 2000, 2020, Oracle and/or its affiliates. All rights reserved.

Oracle is a registered trademark of Oracle Corporation and/or its
affiliates. Other names may be trademarks of their respective
owners.

Type 'help;' or '\h' for help. Type '\c' to clear the current input statement.

mysql> show databases;
+--------------------+
| Database           |
+--------------------+
| information_schema |
| jira               |
+--------------------+
2 rows in set (0.00 sec)
3.安装jira
下载atlassian-jira-software-7.4.1-x64.bin 到/opt目录(这个只是软件包存放目录,可以根据自己需求选择包放在哪里)下,下载地址https://product-downloads.atlassian.com/software/jira/downloads/atlassian-jira-software-7.4.1-x64.bin
如果下载不下来,可以下载网盘资源
链接:https://pan.baidu.com/s/1Qi2ECrL_Qyq_vYjNJi20NA
提取码:0agq
接着执行下面的操作
#我们cd的安装包目录下,看看安装包在不在
[root@linux-test-no ~]# cd /opt/
[root@linux-test-no opt]# ls
atlassian-jira-software-7.4.1-x64.bin  containerd  dockerfile  my_wordpress  registry-var
#给安装程序加上执行权限,使安装程序可执行
[root@linux-test-no opt]# chmod a+x atlassian-jira-software-7.4.1-x64.bin
#运行安装程序,建议直接已root用户运行,因为这将创建一个专用帐户来运行JIRA,并允许您将JIRA作为服务运行。
[root@linux-test-no opt]# ./atlassian-jira-software-7.4.1-x64.bin
Unpacking JRE ...
Starting Installer ...
Oct 10, 2020 6:55:12 PM java.util.prefs.FileSystemPreferences$1 run
INFO: Created user preferences directory.

This will install JIRA Software 7.4.1 on your computer.
OK [o, Enter], Cancel [c]
o                                 #这里问我们是否现在安装jira,是输入0,不是输入c
Choose the appropriate installation or upgrade option.
Please choose one of the following:
Express Install (use default settings) [1], Custom Install (recommended for advanced users) [2, Enter], Upgrade an existing JIRA installation [3]
2      #这里问我们是使用默认安装,自定义安装,还是升级安装,默认安装选择输入1,自定义安装输入2,升级安装选择3。因为我们这里想指定安装路径,所以我这里选择2,

Where should JIRA Software be installed?
[/opt/atlassian/jira]
/iflytek/atlassian/jira       #这里问我们你准备把jira安装在哪里,上面的路径是默认的安装路径,我们这里自己根据需求选择安装路径
Default location for JIRA Software data
[/var/atlassian/application-data/jira]
/iflytek/atlassian/application-data/jira   #这里是让我们选择jira的数据目录(如日志,搜索索引和文件)在哪里,上面是默认的数据目录,
Configure which ports JIRA Software will use.
JIRA requires two TCP ports that are not being used by any other
applications on this machine. The HTTP port is where you will access JIRA
through your browser. The Control port is used to startup and shutdown JIRA.
Use default ports (HTTP: 8080, Control: 8005) - Recommended [1, Enter], Set custom value for HTTP and Control ports [2]
1    #这里问我们是不是使用jira的默认端口,是选择1,自定义选2.我们这里就默认就好
JIRA can be run in the background.
You may choose to run JIRA as a service, which means it will start
automatically whenever the computer restarts.
Install JIRA as Service?
Yes [y, Enter], No [n]
y    #这里问是不是设置jira随服务器启动自动启动,是就y不是就n。这里需要你是以root用户身份运行的安装程序,你才能在这里做此选择
Details on where JIRA Software will be installed and the settings that will be used.
Installation Directory: /iflytek/atlassian/jira
Home Directory: /iflytek/atlassian/application-data/jira
HTTP Port: 8080
RMI Port: 8005
Install as service: Yes
Install [i, Enter], Exit [e]
i    #这里让你在确认一遍你的安装信息(就是你上面自定义安装后选择安装信息)是否正确,如果没问题了,就选i,重新配置选e。

Extracting files ...

Please wait a few moments while JIRA Software is configured.
Installation of JIRA Software 7.4.1 is complete
Start JIRA Software 7.4.1 now?
Yes [y, Enter], No [n]
y           #出现这个,代表已经安装成功了,问你是不是现在启动,是就y,不是就n
Start JIRA Software 7.4.1 now?
Yes [y, Enter], No [n]
y       #再确认一遍

Please wait a few moments while JIRA Software starts up.
Launching JIRA Software ...
Installation of JIRA Software 7.4.1 is complete
Your installation of JIRA Software 7.4.1 is now ready and can be accessed
via your browser.
JIRA Software 7.4.1 can be accessed at http://localhost:8080
Finishing installation ...
#至此我们jira的安装完成
从上面的安装我们知道,jira的默认安装目录为/opt/atlassian/jira,数据目录为/var/atlassian/application-data/jira,jira的端口默认是8080,这些可以在安装之后在安装目录下/conf/server.xml文件里修改。
#查看jira端口启动情况。
[root@linux-test-no ~]# ss -ntl
State      Recv-Q Send-Q                        Local Address:Port                                       Peer Address:Port
LISTEN     0      5                                         *:5901                                                  *:*
LISTEN     0      100                                      :::8080                                                 :::*
LISTEN     0      128                                      :::80                                                   :::*
LISTEN     0      128                                      :::6001                                                 :::*
LISTEN     0      128                                      :::22                                                   :::*
LISTEN     0      1                          ::ffff:127.0.0.1:8005                                                 :::*
LISTEN     0      128                                      :::389                                                  :::*
LISTEN     0      5                                        :::5801                                                 :::*
LISTEN     0      80                                       :::3306                                                 :::*
#jira的关闭
[root@linux-test-no ~]# /etc/init.d/jira stop
#jira的启动
[root@linux-test-no ~]# /etc/init.d/jira start
4.jira的破解
下载jira的破解包,下载到/opt目录下。
下载地址分别是:
链接:https://pan.baidu.com/s/1yBe2KJvNzKqQIL6uGXMVsg
提取码:qfnl
链接:https://pan.baidu.com/s/1wAgOg7PJ1880tdU2NsBkuw
提取码:jaeq
[root@linux-test-no opt]# ll total 324108 -rw-rw-r-- 1 ZF-USER ZF-USER 156503 Oct 11 16:58 atlassian-extras-3.2.jar -rwxrwxr-x 1 ZF-USER ZF-USER 328360781 Oct 10 16:51 atlassian-jira-software-7.4.1-x64.bin drwx--x--x 4 root root 28 Jul 26 20:16 containerd drwxr-xr-x 4 root root 31 Aug 2 10:16 dockerfile -rw-rw-r-- 1 ZF-USER ZF-USER 3362563 Oct 11 16:57 mysql-connector-java-5.1.49.tar.gz drwxr-xr-x 2 root root 32 Aug 4 22:01 my_wordpress drwxr-xr-x 3 root root 18 Aug 3 17:05 registry-var #把我下载下来的包进行解压。
[root@linux-test-no opt]# tar -zxvf mysql-connector-java-5.1.49.tar.gz#把破解包里面的atlassian-extras-3.2.jar和mysql-connector-java-5.1.49-bin.jar两个文件复制到安装目录的atlassian-jira/WEB-INF/lib/目录下[root@linux-test-no opt]# cp mysql-connector-java-5.1.49/mysql-connector-java-5.1.49-bin.jar /iflytek/atlassian/jira/atlassian-jira/WEB-INF/lib/ #这里问我们是不是把之前的atlassian-extras-3.2.jar覆盖,这里我们选择是。替换原来的atlassian-extras-3.2.jar文件,用作破解jira系统的。
[root@linux-test-no opt]# cp atlassian-extras-3.2.jar /iflytek/atlassian/jira/atlassian-jira/WEB-INF/lib/ cp: overwrite ‘/iflytek/atlassian/jira/atlassian-jira/WEB-INF/lib/atlassian-extras-3.2.jar’? y
#这个时候我们就可以重启一次jira了
[root@linux-test-no ~]# /etc/init.d/jira stop
[root@linux-test-no ~]# /etc/init.d/jira start
上面的atlassian-extras-3.2.jar文件,用作破解jira系统的。
而mysql-connector-java-5.1.49-bin.jar是用来连接mysql数据库的驱动软件包。5.jira的web界面初始化
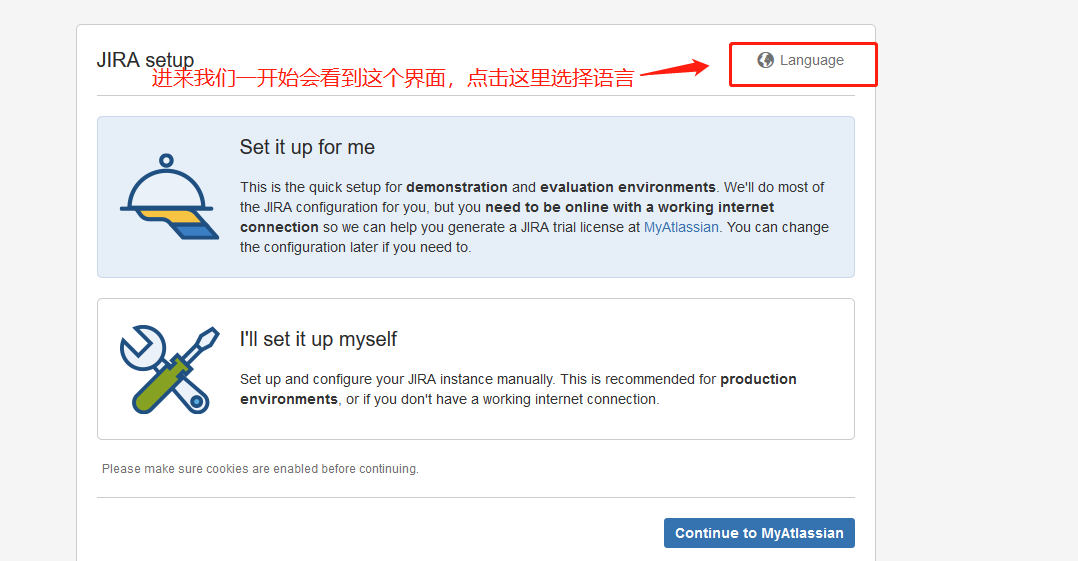
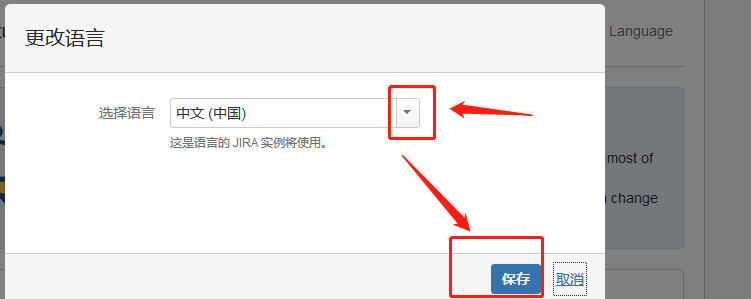
jira重新启动之后,浏览器输入http://服务器地址:8080 访问jira

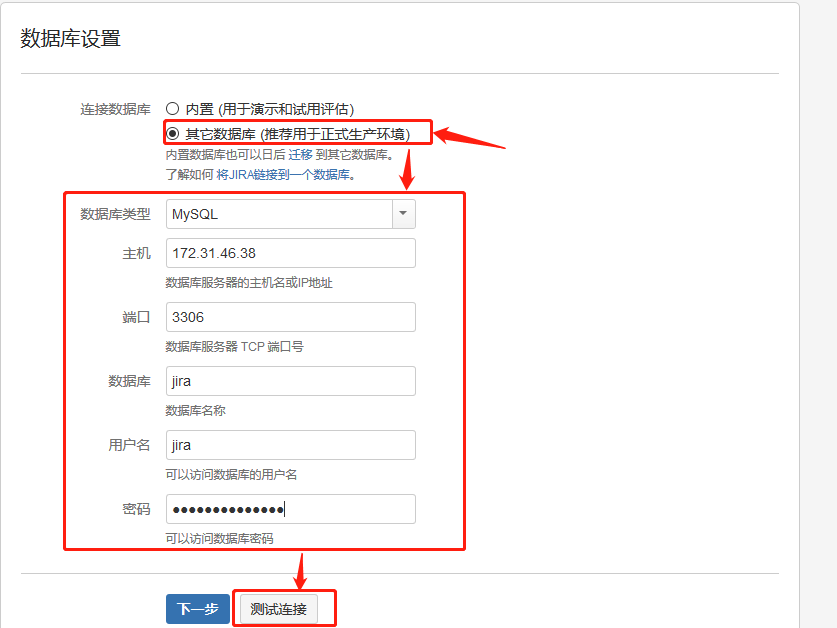
测试连接OK后,就点击"下一步"(提示:请等待数据库的设置。这可能会花费一分钟的时间)
可以在下面配置域名访问。这里我还是ip访问(后续调整为域名访问)
这里要有一个账号,最简单的方式就是用谷歌账户登录(没有谷歌账号建议申请一个,很多时候都用的上),访问这种外国的网站如果访问不了,或者使用过程中遇到不正常的问题,FQ基本上都能解决,登录之后我们到了下面的界面。
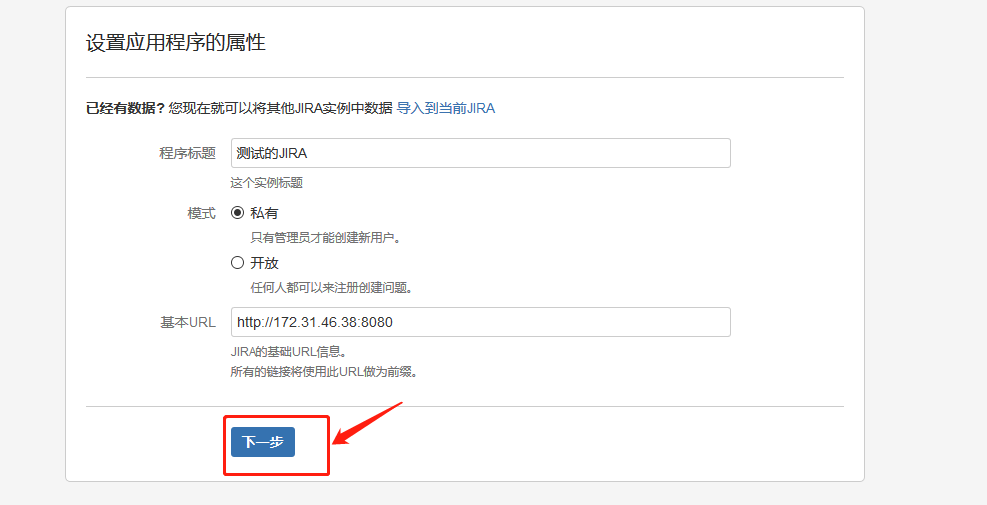
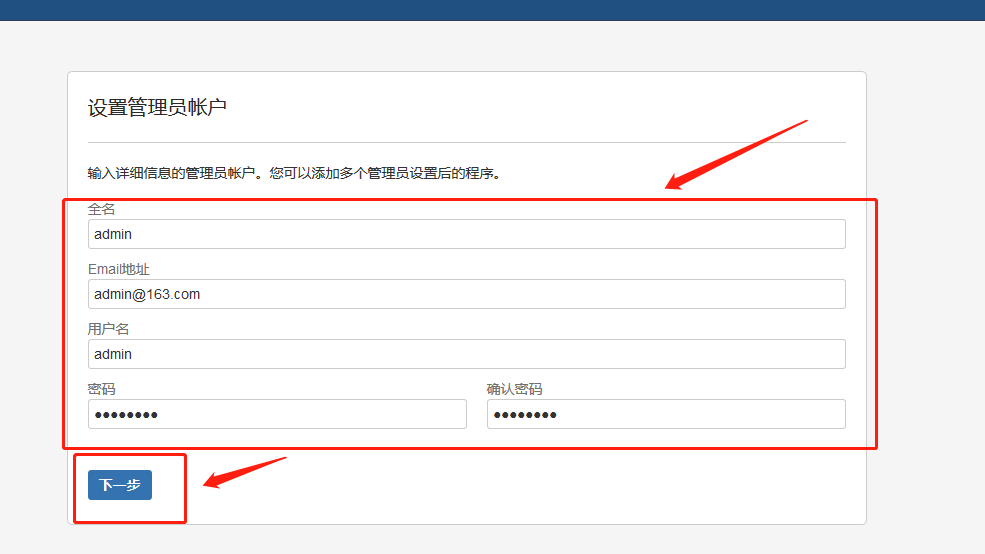
上面点击"Next"后,接着开始创建管理员账户。此过程需要等待一会儿

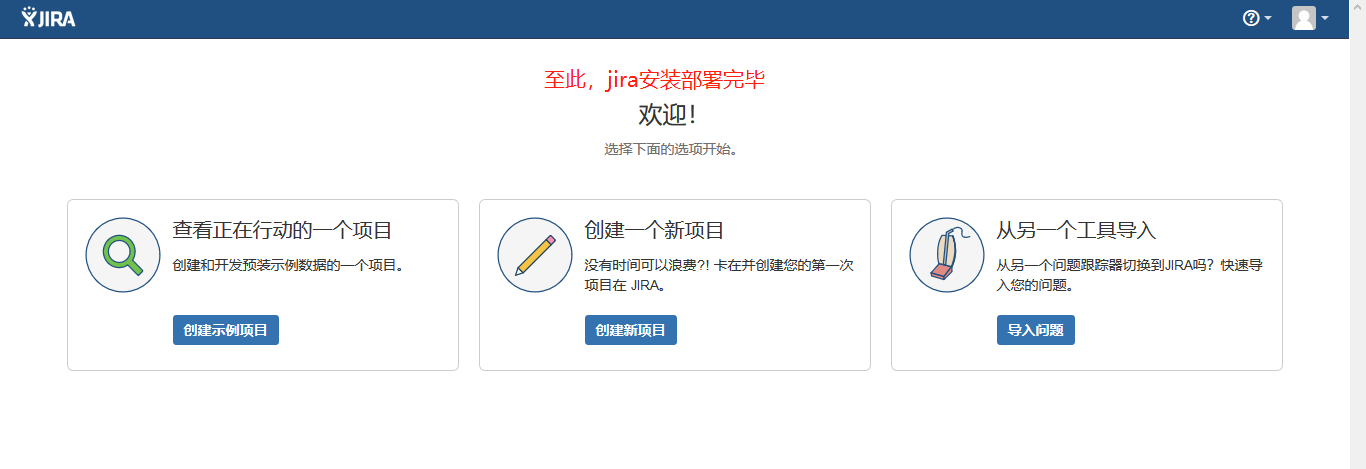
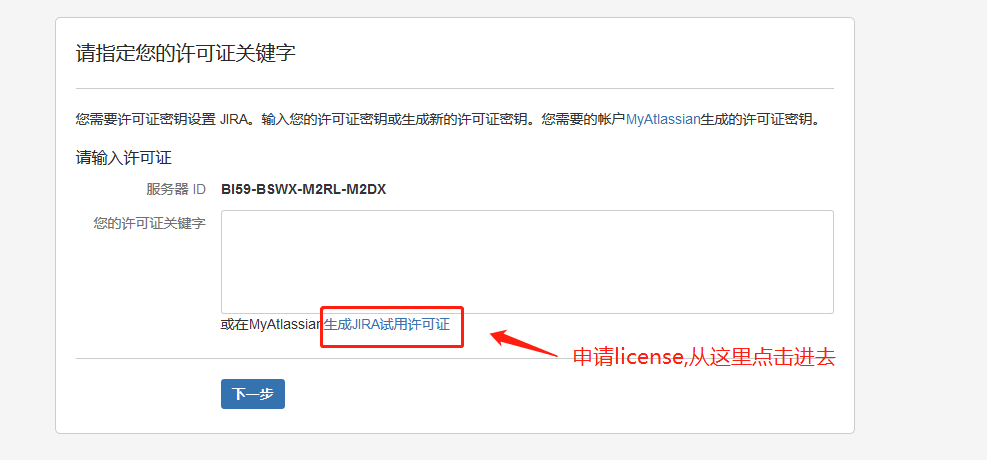
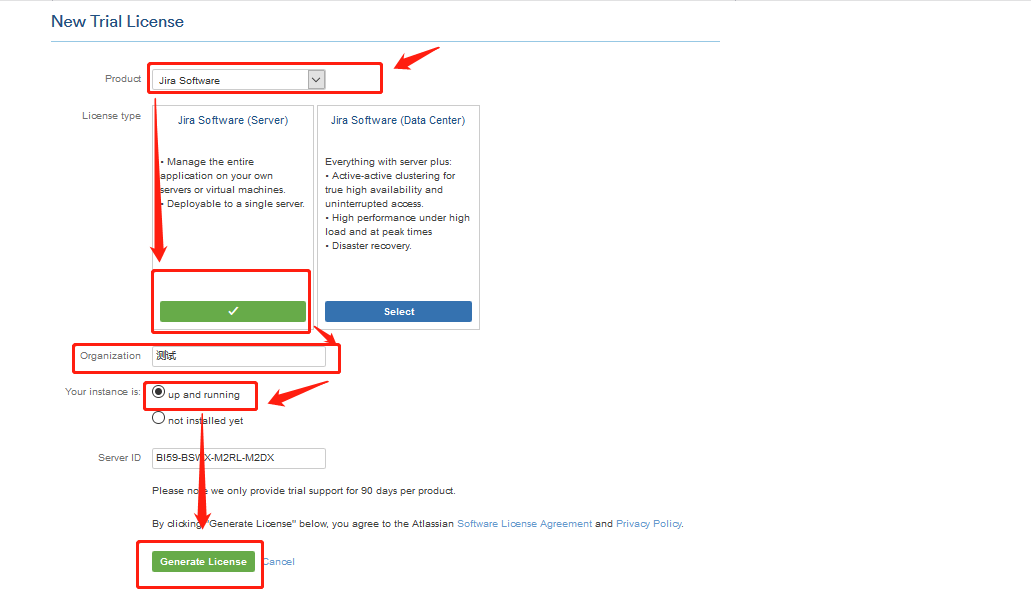
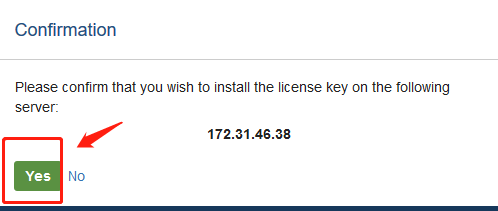
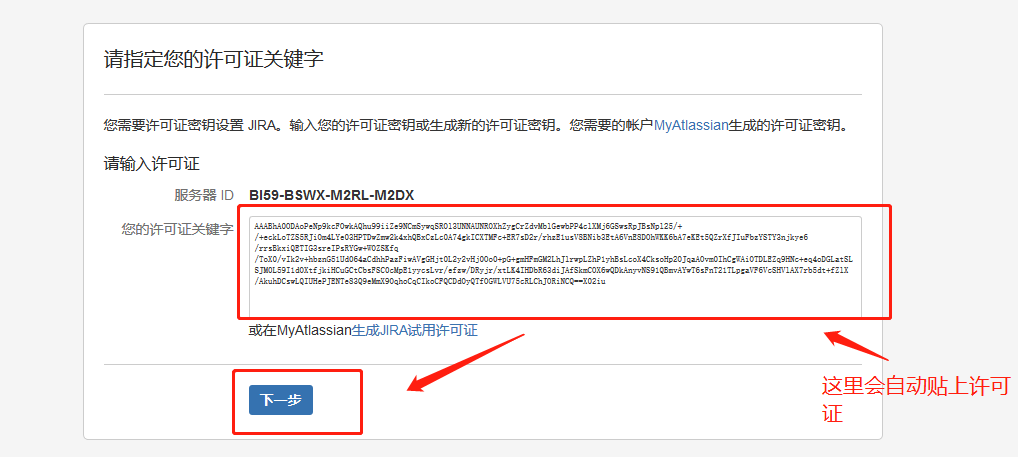
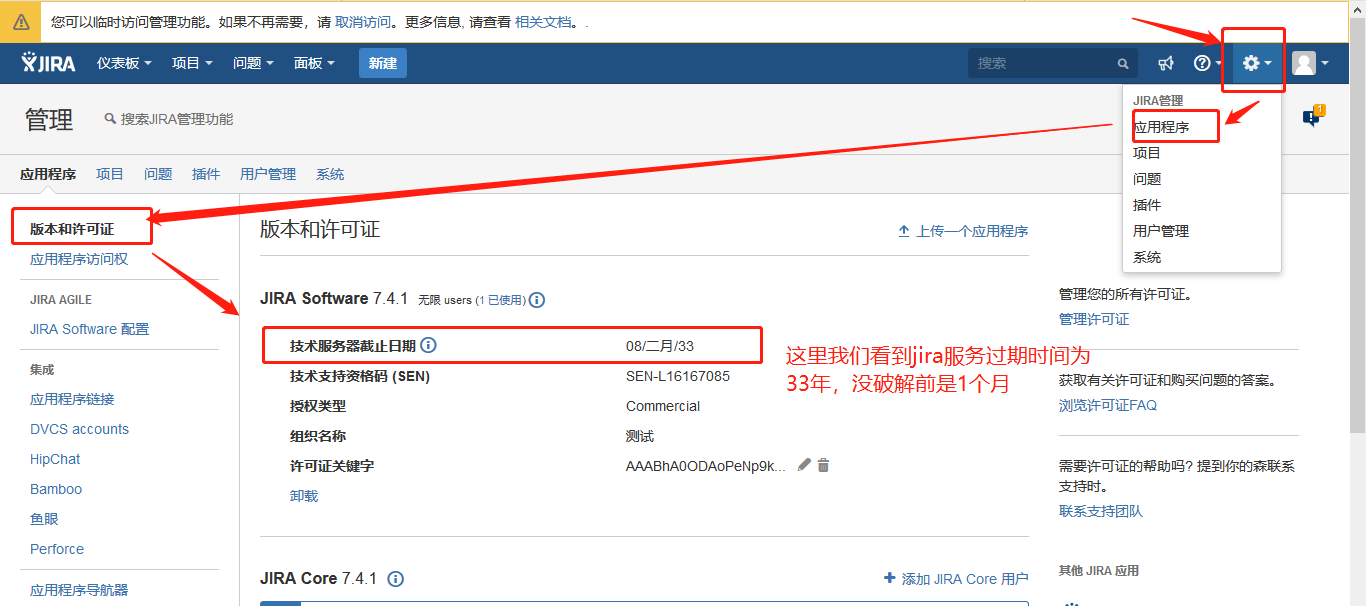
这个时候我刷新一下界面,或者重启一下jira之后,进到jira的web界面中看许可证过期时间

 浙公网安备 33010602011771号