
Vue3快速笔记
vue3快速笔记
-
参考地址:
https://blog.csdn.net/sq91fra/article/details/135963246 -
在
vue3中,一个vue组件必不可少的标签只有<template>,其余两个都可以省略 -
基础示例: 插值语法演示
// App.vue

<script setup>
......
const message = "Hello World.vue"
</script>

<template>

  <h1>这是App根组件</h1>
  <hr />
  <p>生成一个随机数字:{{(Math.random()*10).toFixed(2)}}</p>
  <div>{{message}}</div>

</template>

<style scoped>
......
</style>
- 响应式数据演示:
- 注意:以下示例中,随机数也会一起更新
<script setup>
import HelloWorld from './components/HelloWorld.vue'
import TheWelcome from './components/TheWelcome.vue'

import {ref} from 'vue'

const count = ref(0)
function increment () {
  count.value++
  console.log(count)
}
</script>

<template>

  <h1>这是App根组件</h1>
  <hr />
  <p>生成一个随机数字:{{(Math.random()*10).toFixed(2)}}</p>
  <button @click="increment">Count值为: {{count}}</button>
</template>

<style scoped>
......
</style>
这是因为 Vue 的响应式更新机制 导致的。
原因分析
-
响应式依赖追踪
当你在模板中使用{{ count }}时,Vue 会建立依赖关系:模板依赖于count这个响应式变量。 -
组件重新渲染
当你点击按钮调用increment()时:count.value++修改了响应式数据- Vue 检测到响应式数据变化
- 触发整个组件的重新渲染(Template会重新更新,故表达式会被重新计算)
-
模板重新执行
在重新渲染过程中,模板中的所有表达式都会重新计算,包括:<p>生成一个随机数字:{{(Math.random()*10).toFixed(2)}}</p>所以每次点击按钮,随机数都会重新生成。
解决办法,使用computed缓存
<script setup>
......

import {ref,computed} from 'vue'

const count = ref(0)
const randomNumber = computed(()=>(Math.random()*10).toFixed(2))

function increment () {
  count.value++
  console.log(count)
}


</script>

<template>


  <h1>这是App根组件</h1>
  <hr />
  <p>生成一个随机数字:{{randomNumber}}</p>

  <div>
    <button @click="increment">Count值为: {{count}}</button>
  </div>


</template>

<style scoped>
......
</style>
两种API
Vue3引入了许多新特性和优化,其中包括对Composition API (组合式 API)的添加,它作为新的核心特性与原有的Options API(选项式 API )一起工作
- 选项式 API 是 Vue.js 传统的组件写法,适合简单的组件和初学者。选项式 API 的优点是结构清晰,易于理解和上手。但是,当组件变得复杂时,相关的逻辑会分散在不同的选项中,使得代码组织和重用变得困难。

- 组合式 API 是 Vue 3 引入的新特性,提供了更灵活的代码组织和重用方式,可以更容易地将相关的逻辑组合在一起,并且可以跨组件重用这些逻辑。这对于编写大型和复杂的组件尤其有用。

- 开发者可以根据自己的需求选择使用 Options API 或 Composition API,两者可以共存于同一个组件中。这使得开发者可以渐进式地升级现有项目到 Vue 3,同时享受 Composition API 带来的灵活性。
setup函数介绍(和vue2中的data写法类似)
- 使用了Vue 3的Composition API,但是以选项式API的写法在``标签中使用了
setup函数举例
<script>

import {reactive} from "vue";

export default {
  setup(){ // Composition API的入口,在组件创建前执行
    let msg = "Hello"; // 普通变量 - 非响应式
    let stu = reactive({ // 声明响应式对象
      name:'cxk',
      age:18,
      gender:'女',
      hobby:{
        hobby1:'唱',
        hobby2:'跳',
        hobby3:'Rap',
        hobby4:'篮球',
      }
    });
    return { // 最后返回模板需要的数据
      msg,
      stu
    }
  }
}


</script>

<template>

  <h1>{{msg}}</h1>
  <hr>
  <h2>大家好,我是{{stu.name}},喜欢{{stu.hobby.hobby1}},{{stu.hobby.hobby2}},{{stu.hobby.hobby3}},{{stu.hobby.hobby4}}</h2>


</template>

<style scoped>
......
</style>
setup函数这种写法,和vue2中的data写法很类似
// Vue 2 写法
export default {
  data() {
   ......
    return {
      msg: "Hello",
      stu: {
        name: 'cxk',
        // ...
      }
    }
  }
}

// Vue 3 写法
export default {
  setup() {
    let msg = "Hello";
    let stu = reactive({
      name: 'cxk',
      // ...
    });
    return { msg, stu };
  }
}
响应式代理
reactive(): *定义一个*响应式对象(基本类型不要用它,要用ref,否则报错)- 注意: reactive定义的响应式数据是“深层次”的
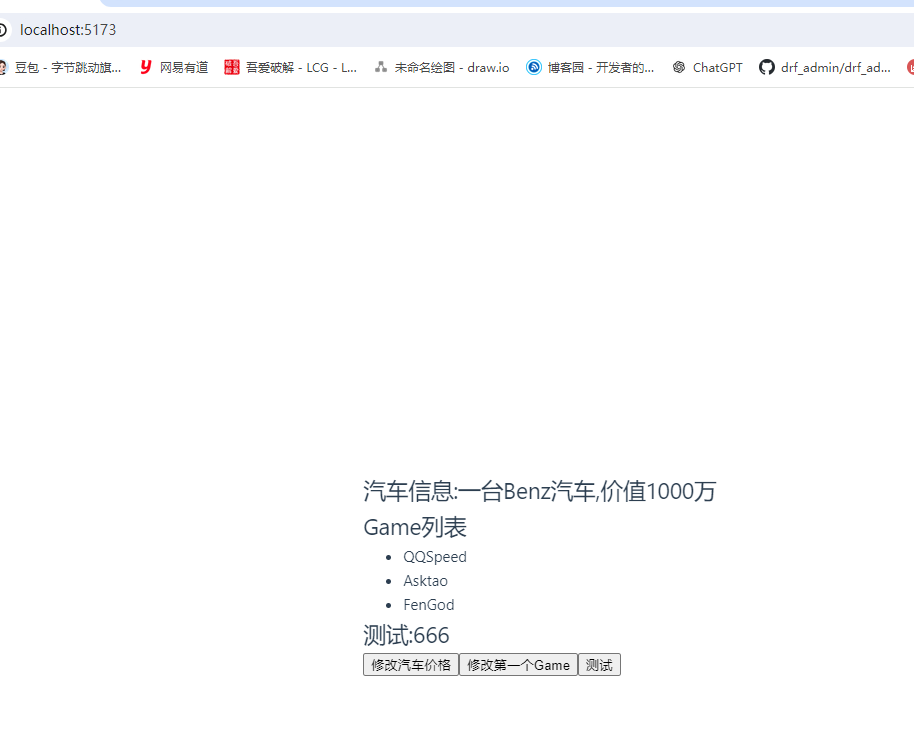
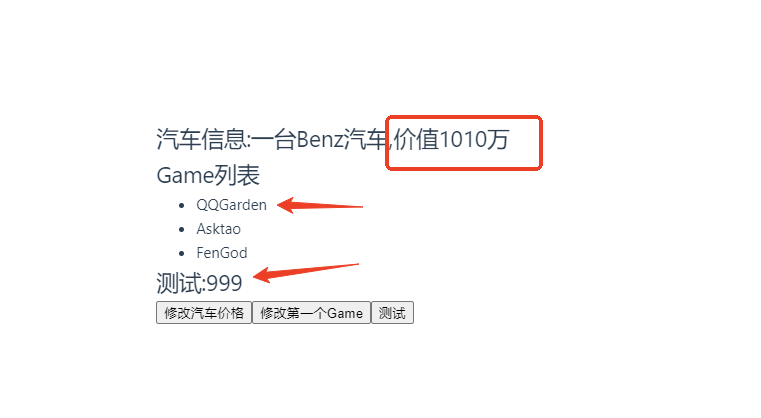
// Demo1.vue

<script setup>

import {reactive} from "vue";

let car = reactive({
  brand:'Benz',
  price:1000
})

let games = reactive([
  {id:1,name:'QQSpeed'},
  {id:2,name:'Asktao'},
  {id:3,name:'FenGod'},
])

let obj = reactive({
  a:{
    b:{
      c:{
        d:666
      }
    }
  }
})

function changeCarPrice(){
  car.price += 10
}

function changeFirstGame(){
  games[0].name = 'QQGarden'
}

function test(){
  obj.a.b.c.d = 999
}

</script>

<template>
  <div>
    <h2>汽车信息:一台{{car.brand}}汽车,价值{{car.price}}万</h2>
    <h2>Game列表</h2>
    <ul>
      <li v-for="g in games" :key="g.id">{{g.name}}</li>
    </ul>
    <h2>测试:{{obj.a.b.c.d}}</h2>
    <button @click="changeCarPrice">修改汽车价格</button>
    <button @click="changeFirstGame">修改第一个Game</button>
    <button @click="test">测试</button>
  </div>
</template>

<style scoped>

</style>
ref(): 定义响应式变量,接收的数据可以是基本类型、对象类型- 语法: let xxx = ref(初始值)
- 返回值: 一个
RefImpl的实例对象,简称ref对象或ref,ref对象的value属性是响应式的- 对于let name = ref(‘张三’)来说,name不是响应式的,name.value是响应式的//
- 注意: JS中操作数据需要:xxx.value,但模板中不需要.value,直接使用即可
// Demo2.vue

<script setup>
import {ref} from 'vue'

let name = ref('张三');
let age = ref(18);
let tel = '123454645644' // 普通变量(非响应式)

function changeName() {
  name.value = '李四';
  console.log(name.value)
  // 如下代码不会引起页面的更新(name.value才会)
  // name = ref('zhang-san')
}

function changeAge() {
  age.value += 1
  console.log(age.value)
}

function showTel(){
  alert(tel)
}

</script>

<template>
  <div>
    <h2>姓名:{{name}}</h2>
    <h2>年龄:{{age}}</h2>
    <button @click="changeName">修改名字</button>
    <button @click="changeAge">年龄+1</button>
    <button @click="showTel">点我查看联系方式</button>
  </div>
</template>

<style scoped>

</style>
小结:
- 若需要一个基本类型的响应式数据,必须使用
ref。 - 若需要一个响应式对象,层级不深,
ref、reactive都可以。 - 若需要一个响应式对象,且层级较深,推荐使用
reactive。
toRef 与 toRefs
- 作用: 将一个响应式对象中的每一个属性,转换为ref对象
- 即把对象中的属性单独拆分出来以后,该属性依然保持响应式的能力
- toRef 与 toRefs即
单个与批量的区别,其他一样!
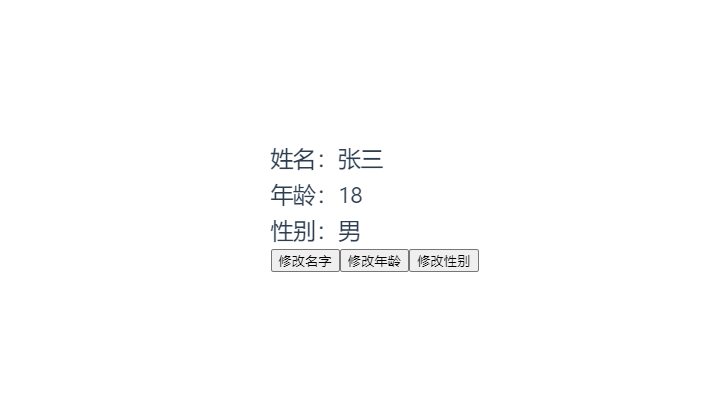
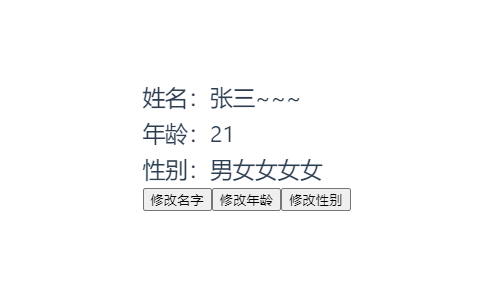
<script setup>

  import {ref,reactive,toRefs,toRef} from "vue";
  // 数据
  let person = reactive({name:'张三', age:18, gender:'男'})
  // 通过toRef将person对象中的age属性取出,且依然保持响应式的能力
  let age = toRef(person,'age')
  // 通过toRefs将person对象中的n个属性批量取出,且依然保持响应式的能力
  let {name,gender} = toRefs(person)

  function changeName() {
    name.value += '~'
  }

  function changeAge() {
    age.value += 1
  }

  function changeGender() {
    gender.value += '女'
  }


</script>

<template>
  <div>
    <h2>姓名:{{person.name}}</h2>
    <h2>年龄:{{person.age}}</h2>
    <h2>性别:{{person.gender}}</h2>
    <button @click="changeName">修改名字</button>
    <button @click="changeAge">修改年龄</button>
    <button @click="changeGender">修改性别</button>
  </div>

</template>

<style scoped>

</style>
计算属性(与vue2一样)
- 简单示例如下
<script setup>
  import {ref,computed} from "vue";

  let firstName = ref('zhang')
  let lastName = ref('san')

  // 只读不修改
  // let fullName = computed(()=>{
  //   return firstName.value + '-' + lastName.value
  // })

  let fullName = computed({
    get(){
      console.log('触发get操作')
      return firstName.value + '-' + lastName.value
    },
    set(val){
      console.log('有人修改了fullName',val)
      // 以下写法会触发无限递归
      // fullName.value = val.split('-')[0]
      // lastName.value = val.split('-')[1]
      const [first,last]=val.split('-')
      firstName.value = first
      lastName.value = last

    }
  })

  function changeFullName() {
    fullName.value = 'li-si'
  }

</script>

<template>
  <div>
    姓:<input type="text" v-model="firstName"> <br>
    名:<input type="text" v-model="lastName"> <br>
    全名:<span>{{fullName}}</span> <br>
    <button @click="changeFullName">全名改为:li-si</button>
  </div>

</template>

<style scoped>

</style>
监听器(watch,与vue2一样)
- 特点: 只能监听四种数据
ref定义的数据。reactive定义的数据。- 函数返回一个值(
getter函数)。 - 一个包含上述内容的数组。
- 监视ref定义的【基本类型】数据:直接写数据名即可,监视的是其value值的改变。
<script setup>
  import {ref,watch} from "vue";

  let sum = ref(0)
  function changeSum(){
    sum.value += 1
  }
  const stopWatch = watch(sum,(newVal,oldVal)=>{
    console.log('sum变化了',newVal,oldVal)
    if(newVal >= 10){
      stopWatch() // 通过调用 watch 返回的函数来停止监听
    }
  })
</script>

<template>
  <div>
    <h1>情况一:监视【ref】定义的【基本类型】数据</h1>
    <h2>当前求和为:{{sum}}</h2>
    <button @click="changeSum">点我Sum+1</button>
  </div>
</template>
- 若想监视对象内部的数据,需要加上配置项
{deep:true}
<script setup>
  import {ref,watch} from "vue";

  let person = ref({
    name:'张三',
    age:18
  })

  function changeName(){
    person.value.name += '~'
  }
  function changeAge(){
    person.value.age += 1
  }
  function changePerson(){
    person.value = {name:'李四',age:20}
  }

  watch(person,(newVal,oldVal)=>{
    console.log('person变化了',newVal,oldVal)
  },{deep:true}) // 这里若不配置deep,则只有执行changePerson时,才会触发watch

</script>

<template>
  <div class="person">
    <h1>情况二:监视【ref】定义的【对象类型】数据</h1>
    <h2>姓名:{{ person.name }}</h2>
    <h2>年龄:{{ person.age }}</h2>
    <button @click="changeName">修改名字</button>
    <button @click="changeAge">修改年龄</button>
    <button @click="changePerson">修改整个人</button>
  </div>
</template>
- 监视
reactive定义的【对象类型】数据,默认开启了深度监视
<script setup>
  import {reactive,watch} from "vue";

  let person = reactive({
    name:'张三',
    age:18
  })

  let obj = reactive({
    a:{
      b:{
        c:666
      }
    }
  })

  // 方法
  function changeName(){
    person.name += '~'
  }
  function changeAge(){
    person.age += 1
  }
  function changePerson(){
    Object.assign(person,{name:'李四',age:20})
  }
  function test(){
    obj.a.b.c = 888
  }
  // 监视,情况三:监视【reactive】定义的【对象类型】数据,且默认是开启深度监视的
  watch(person,(newValue,oldValue)=>{
    console.log('person变化了',newValue,oldValue)
  })
  watch(obj,(newValue,oldValue)=>{
    console.log('Obj变化了',newValue,oldValue)
  })


</script>

<template>
  <div>
    <h1>情况三:监视【reactive】定义的【对象类型】数据</h1>
    <h2>姓名:{{ person.name }}</h2>
    <h2>年龄:{{ person.age }}</h2>
    <button @click="changeName">修改名字</button>
    <button @click="changeAge">修改年龄</button>
    <button @click="changePerson">修改整个人</button>
    <hr>
    <h2>测试:{{obj.a.b.c}}</h2>
    <button @click="test">修改obj.a.b.c</button>
  </div>
</template>

<style scoped>

</style>
- 监视
ref或reactive定义的【对象类型】数据中的某个属性,注意点如下:- 若该属性值不是【对象类型】,需要写成函数形式。
- 若该属性值是依然是【对象类型】,可直接编,也可写成函数,建议写成函数。
- 结论:监视的要是对象里的属性,那么最好写函数式
- 注意点:若是对象监视的是地址值,需要关注对象内部,需要手动开启深度监视
<script setup>
  import {reactive,watch} from 'vue'
  // 数据
  let person = reactive({
    name:'张三',
    age:18,
    car:{
      c1:'奔驰',
      c2:'宝马'
    }
  })

  // 方法
  function changeName(){
    person.name += '~'
  }
  function changeAge(){
    person.age += 1
  }
  function changeC1(){
    person.car.c1 = '奥迪'
  }
  function changeC2(){
    person.car.c2 = '大众'
  }
  function changeCar(){
    person.car = {c1:'雅迪',c2:'爱玛'}
  }

  // 监视,情况四:监视响应式对象中的某个属性,且该属性是基本类型的,要写成函数式
  watch(()=>person.name,(newVal,oldVal)=>{
    console.log('person.name的值变化了',newVal,oldVal)
  })

  // 对象式写法无法触发监听
  // watch(person.car,(newVal,oldVal)=>{
  //   console.log('person.car变化了',newVal,oldVal)
  // },{deep:true})

  // 函数式写法可以触发监听
  watch(()=>person.car,(newVal,oldVal)=>{
    console.log('person.car变化了',newVal,oldVal)
  },{deep:true})


</script>

<template>
  <div class="person">
    <h1>情况四:监视【ref】或【reactive】定义的【对象类型】数据中的某个属性</h1>
    <h2>姓名:{{ person.name }}</h2>
    <h2>年龄:{{ person.age }}</h2>
    <h2>汽车:{{ person.car.c1 }}、{{ person.car.c2 }}</h2>
    <button @click="changeName">修改名字</button>
    <button @click="changeAge">修改年龄</button>
    <button @click="changeC1">修改第一台车</button>
    <button @click="changeC2">修改第二台车</button>
    <button @click="changeCar">修改整个车</button>
  </div>

</template>

<style scoped>

</style>
- watchEffect: 不用明确指出监视的数据(函数中用到哪些属性,那就监视哪些属性)。
- 而
watch要明确指出监视的数据
- 而
<script setup>
  import {ref,watch,watchEffect} from 'vue'
  // 数据
  let temp = ref(0)
  let height = ref(0)

  // 方法
  function changePrice(){
    temp.value += 10
  }
  function changeSum(){
    height.value += 1
  }

  watch([temp,height],(value)=>{
    const [newTemp,newHeight]=value
    if(newTemp >= 50 || newHeight >= 20){
      console.log('逻辑来自于watch,请联系服务器')
    }
  })

  const stopWatch = watchEffect(()=>{
    if(temp.value >= 50 || height.value >= 20){
      // console.log(document.getElementById('demo')?.innerText)
      console.log('逻辑来自于watchEffect,请联系服务器')
    }
    if(temp.value === 100 || height.value === 50){
      console.log('逻辑来自于watchEffect,清理了')
      stopWatch()
    }
  })

</script>

<template>
  <div>
    <h1>需求:水温达到50℃,或水位达到20cm,则联系服务器</h1>
    <h2 id="demo">水温:{{temp}}</h2>
    <h2>水位:{{height}}</h2>
    <button @click="changePrice">水温+1</button>
    <button @click="changeSum">水位+10</button>
  </div>

</template>

<style scoped>

</style>

- 效果: 当触发其中一个条件时,会同时触发watch和watchEffect
样式
- 如果想在
style scoped中设置全局样式:- 可以使用
:deep(过滤器)设置,例如:#app :deep(h2)就是设置app下的所有h2 - 你还可以使用
:global(过滤器)设置全局样式 - 你也可以在根组件中既使用
<style>又使用<style scoped>
- 可以使用
style module:允许你将 CSS 类名模块化,以避免全局样式的冲突
- 当你在一个
style标签上使用module属性时,所有的 CSS 类名都只在当前组件内部有效,并且每个类名都会被编译成一个唯一的字符串,以避免在不同的组件或页面中重复- 在模板中,你需要使用
$style对象来引用模块化的类名($style对象是由 Vue 自动创建)
- 在模板中,你需要使用
<template>
  <div :class="$style.red">This text is red.</div>
</template>
<style module>
.red {
  color: red;
}
</style>
- 如果你想要给模块化的类名添加前缀,以避免潜在的冲突,你可以在
module属性中指定一个前缀:
<style module="myPrefix">
.red {
  color: red;
}
</style>
模板语法
- 声明全局变量(各个组件都可以访问)
// main.js
......
app.config.globalProperties.变量="值" // 可以在任一组件中访问
- 为标签元素批量绑定属性示例
<script setup>
  import { ref } from 'vue'


  const url = 'https://vuejs.org/'
  const imgSrc = '/images/pretty.png'
  const attrs = ref({
    src: '/images/pretty.png',
    alt: 'pretty',
    style: 'width:400px;'
  })
</script>

<template>
  <h2>超链接: <a :href="url">Visit Vue.js</a>></h2>
  <img :src="imgSrc" alt="pretty" style="width: 200px">
  <hr />
  <!--批量绑定实例-->
<!--  <img :attrs=attrs />--> <!--错误写法-->
<!--  <img :=attrs />--> <!--编辑器会报错,但实际可以用-->
  <img :="attrs" /> <!--推荐这么写-->

</template>

<style scoped>

</style>
- 练习:切换图片示例
<script setup>
import {ref, computed} from "vue";

// 定义两张图片路径
const images = [
  '/images/pretty.png',
  '/images/pretty1.png'
]

// 第一张图片的切换逻辑
const currentIndex1 = ref(0)
const imgSrc = computed(() => images[currentIndex1.value])

const changeImg = () => {
  // 使用模运算:确保索引在 0 和 1(或更多)之间循环
  currentIndex1.value = (currentIndex1.value + 1) % images.length
}

// 第二张图片的切换逻辑
const currentIndex2 = ref(0)
const attrs = ref({
  alt: 'pretty',
  style: 'width:400px;'
})

// 使用计算属性动态更新src
const attrsSrc = computed(() => images[currentIndex2.value])

const changeImg2 = () => {
  // 使用模运算:确保索引在 0 和 1(或更多)之间循环
  currentIndex2.value = (currentIndex2.value + 1) % images.length
}
</script>

<template>
  <button type="button" @click="changeImg">切换图片1</button>
  <img :src="imgSrc" alt="kun kun" style="width: 200px;"/>
  <br/>
  <button type="button" @click="changeImg2">切换图片2</button>
  <img :src="attrsSrc" v-bind="attrs"/>
</template>

<style scoped>

</style>
方法事件处理器
- 引入场景: 无论点击哪个按钮,均可以触发
handleClick
<script setup>
	function handleClick() {
		alert("按钮被点击...");
	}
</script>
<template>
	<button @click="handleClick">方法事件</button>
	<button @click="handleClick()">内联事件</button>
</template>
- 区别
内联事件处理器的参数由我们自己传递,你想传递什么参数都行。$event就是事件对象,我们可以自己传递方法事件处理器的参数由vue自动传递,传递的参数为DOM事件对象,该对象包含事件触发时的相关信息- 本质就是系统自动传参和开发者手动自定义传参的区别
<script setup>
	function handleClick(...args) {
		console.log(args);
	}
</script>
<template>
	<button @click="handleClick">方法事件</button>
	<button @click="handleClick(1,2,'Hello', $event)">内联事件</button>
</template>

- 点击"方法事件"按钮的运行结果: 返回"PointerEvent"对象,该对象包含事件触发时的相关信息
- 点击"内联事件"按钮的运行结果: 返回[1,2,'Hello',PointerEvent],该对象包含事件触发时的相关信息
事件冒泡案例演示
<script setup>
function boxHandle(box) {
  console.log(box);
}
</script>
<template>
  <!-- 修改为@click.stop可以解决事件冒泡 -->
  <div class="box1" @click="boxHandle('box1')">
    box1
    <div class="box2" @click="boxHandle('box2')">
      box2
      <div class="box3" @click="boxHandle('box3')">
        box3
      </div>
    </div>
  </div>
</template>
<style scoped>
.box1 {
  width: 400px;
  height: 400px;
  background-color: red;
}
.box2 {
  width: 300px;
  height: 300px;
  background-color: yellow;
}
.box3 {
  width: 200px;
  height: 200px;
  background-color: greenyellow;
}
</style>


- 事件演示
	- 当点击"box3"的绿块时,控制台会输出 box3,box2,box1
	- 当点击"box2"的黄块时,控制台会输出 box2,box1

- 阻止事件冒泡,加上"stop"装饰器

<script setup>
function boxHandle(box) {
  console.log(box);
}
</script>
<template>
  <!-- 修改为@click.stop可以解决事件冒泡 -->
  <div class="box1" @click="boxHandle('box1')">
    box1
    <div class="box2" @click="boxHandle('box2')">
      box2
      <!--变更之处-->
      <div class="box3" @click.stop="boxHandle('box3')">
        box3
      </div>
    </div>
  </div>
</template>
<style scoped>
......
</style>

- 效果
	- 当点击"box3"的绿块时,控制台只输出 box3,不再向外冒泡
	- 而当点击"box2"的黄块时,控制台会输出 box2,box1,由于没有添加stop装饰器,依然向外冒泡
.prevent: 阻止事件默认行为(函数的逻辑会被执行,但是控件自身的默认行为会被阻止)
<script setup>
  function onSubmit(){
    console.log('onSubmit');
  }

  function handleLinkClick(){
    console.log('handleLinkClick');
  }
</script>

<template>
  <!-- 阻止表单提交刷新页面 -->
  <form @submit.prevent="onSubmit">
    <input type="text" />
    <button type="submit">提交</button>
  </form>

  <!-- 阻止链接跳转, -->
  <a href="https://baidu.com" @click.prevent="<script setup>
  function onSubmit(){
    console.log('onSubmit');
  }

  function handleLinkClick(){
    console.log('handleLinkClick');
  }
</script>

<template>
  <!-- 阻止表单提交刷新页面 ,onSubmit的逻辑会正常执行-->
  <form @submit.prevent="onSubmit">
    <input type="text" />
    <button type="submit">提交</button>
  </form>

  <!-- 阻止链接跳转,handleLinkClic的逻辑会正常执行 -->
  <a href="https://baidu.com" @click.prevent="handleLinkClick">跳转链接</a>
</template>

<style scoped>

</style>">跳转链接</a>
</template>

<style scoped>

</style>
数据绑定
- 单向数据绑定:假设a数据单向绑定了b数据,那么a数据的改变会影响b数据,但是b数据的改变不会影响a数据
<script setup>
	import {
		ref
	} from 'vue';
	const text = ref("");
	function submitHandler() {
		console.log(text.value);
	}
</script>
<template>
	<form @submit.prevent="submitHandler">
		<div><input type="text" @input="(event) => (text = event.target.value)" /></div>
		<div><input type="text" @input="(event) => (text = event.target.value)" /></div>
		<div><button>提交</button></div>
	</form>
</template>

- 单向绑定路径: 用户输入 → 触发input事件 → 更新text变量 → 响应式系统检测到变化
- 反向绑定(这个例子没有实现): text变量变化 → 自动更新输入框的文本显示
- 两个输入框没有保持同步
	- 第一个输入框改变 → 更新 text → 但第二个输入框不会自动更新
	- 第二个输入框改变 → 更新 text → 但第一个输入框不会自动更新
- 上述实例若想实现
双向绑定,使用v-model即可
<script setup>
import {
  ref
} from 'vue';
const text = ref("");
function submitHandler() {
  console.log(text.value);
}
</script>
<template>
  <form @submit.prevent="submitHandler">
<!--    <div><input type="text" @input="(event) => (text = event.target.value)" /></div>-->
<!--    <div><input type="text" @input="(event) => (text = event.target.value)" /></div>-->
    <div><input type="text" v-model="text" /></div>
    <div><input type="text" v-model="text" /></div>
    <div><button>提交</button></div>
  </form>
</template>

- 效果: 不管修改哪个输入框的值,两个输入框的文本均保持同步
- 修改上面的例子,变成一个
手动双向绑定和自动双向绑定
<script setup>
import {
  ref
} from 'vue';
const text = ref("");
function submitHandler() {
  console.log(text.value);
}
</script>
<template>
  <form @submit.prevent="submitHandler">
	<!--手动双向绑定-->
    <div><input type="text" @input="(event) => (text = event.target.value)" :value="text" /></div>
    <!--自动双向绑定-->
    <div><input type="text" v-model="text" /></div>
    <div><button>提交</button></div>
  </form>
</template>
### v-model的修饰符
.lazy使用change来处理数据,只有当绑定的数据失去焦点时才改变.trim去除前后的空格.number将数据转换为数值,如果不是数值就不会转换。
<script setup>
	import {
		ref
	} from 'vue';
	const text = ref("");
</script>
<template>
	<form>
		<!--文本内容立即改变-->
		<div>输入信息1:<input type="text" v-model="text" /><button>提交</button></div>
		<!--文本内容要等到失去鼠标焦点的时候,才发生改变-->
		<div>输入信息2:<input type="text" v-model.lazy="text" /><button>提交</button></div>
		<div>输入信息3:<input type="text" v-model.trim="text" /><button>提交</button></div>
		<div>输入信息4:<input type="text" v-model.number="text" /><button>提交</button></div>
		<div>输入信息5:<input type="text" v-model.lazy.trim="text" /><button>提交</button></div>
	</form>
</template>
Vue3组件
- 概念: 可以理解为一个自定义的
Html控件 - 把组件注册为
全局组件
import { createApp } from 'vue';
import ExampleComponent from './ExampleComponent.vue';//注意路径
const app = createApp({});
app.component('example-component', ExampleComponent);
app.mount('#app');
- 把组件注册为
局部组件(组合式API写法)
<script setup>
import ExampleComponent from './ExampleComponent.vue';//注意路径
    //其他逻辑
</script>
- 把组件注册为
局部组件(选项式API写法)
<script>
import ExampleComponent from './ExampleComponent.vue';//注意路径
export default {
  components: {
    ExampleComponent
  },
    //其他逻辑
}
</script>
父子组件之间的通信
props: 父组件通过 props 向子组件传递数据- 在子组件中,使用
defineProps()接收父组件传递的值; - 父组件给子组件传递的值是只读的,不可修改。这个特性被称为
单向数据流,这样设计是为了确保数据的安全性,方便快速找到数据错误的源头. - 如果父组件给子组件传递的值是一个对象,那么可以在子组件中修改这个对象的属性。但是尽量不要通过props在父组件修改子组件的数据,要使用自定义事件修改
- 在子组件中,使用
// Demo17Child.vue

<script setup>
	// 接收父组件传过来的值
  const props = defineProps(["count",'stu'])
</script>

<template>
  <h2>count = {{props.count}}</h2>
  <button @click="props.count++">在子组件中修改值</button> <!--无法修改-->
  <hr />
  <h2>我是{{props.stu.name}},今年{{props.stu.age}}岁</h2>
  <button @click="props.stu.age++">在子组件修改值的属性</button><!-- 可以修改,但是不推荐 -->
</template>
......

// Demo17.vue
<script setup>
import {
  ref,reactive
} from 'vue';

import Demo17Child  from "@/components/Demo17Child.vue";

const count = ref(0);
const stu = reactive({
  name: "cxk",
  age: 18,
  gender: "女",
  hobby: {
    hobby1: "唱",
    hobby2: "跳",
    hobby3: "rap",
    hobby4: "篮球",
  }
})
</script>
<template>
	......

  <Demo17Child :count="count" :stu="stu"></Demo17Child>
</template>
- 自定义事件: 子组件通过
自定义事件向父组件发送消息- 在子组件中,使用
defineEmits()声明事件 - 在子组件的
模板中使用$emit()发送事件请求,在"script"中则使用emits()发送请求
- 在子组件中,使用
// 子组件

<script setup>

  ......
  const emits = defineEmits(["response"]) // 声明自定义事件
  const sendMessage = () => {
    emits('response','Hello from child!') // 发送事件并传参
  }

</script>

<template>
  ......
  <button @click="sendMessage">sendMessage</button> <!--触发事件-->
</template>

// 父组件
<script setup>
import {
  ref,reactive
} from 'vue';

import Demo17Child  from "@/components/Demo17Child.vue";
......
const handleResponse = (response) => {
  console.log('Received response from child:',response);
}


</script>
<template>
  ......
  <!--@response标识并使用handleResponse接收子组件的消息-->
  <Demo17Child :count="count" :stu="stu" @response="handleResponse"></Demo17Child>
</template>
- 父子组件之间相互通讯完整示例
// 子组件

<script setup>
  const props = defineProps(["count",'stu'])

  const emits = defineEmits(["response"])
  const sendMessage = () => {
    emits('response','Hello from child!')
  }

</script>

<template>
  <h2>count = {{props.count}}</h2>
  <button @click="props.count++">在子组件中修改值</button> <!--无法修改-->
  <hr />
  <h2>我是{{props.stu.name}},今年{{props.stu.age}}岁</h2>
  <button @click="props.stu.age++">在子组件修改值的属性</button><!-- 可以修改,但是不推荐 -->
  <hr />
  <button @click="sendMessage">sendMessage</button>
</template>

// 父组件
<script setup>
import {
  ref,reactive
} from 'vue';

import Demo17Child  from "@/components/Demo17Child.vue";

const text = ref("");

const count = ref(0);
const stu = reactive({
  name: "cxk",
  age: 18,
  gender: "女",
  hobby: {
    hobby1: "唱",
    hobby2: "跳",
    hobby3: "rap",
    hobby4: "篮球",
  }
})

const handleResponse = (response) => {
  console.log('Received response from child:',response);
}


</script>
<template>
  <form>
    <div>输入信息1:<input type="text" v-model="text" /><button>提交</button></div>
    <div>输入信息2:<input type="text" v-model.lazy="text" /><button>提交</button></div>
    <div>输入信息3:<input type="text" v-model.trim="text" /><button>提交</button></div>
    <div>输入信息4:<input type="text" v-model.number="text" /><button>提交</button></div>
    <div>输入信息5:<input type="text" v-model.lazy.trim="text" /><button>提交</button></div>
  </form>
  <hr />

  <Demo17Child :count="count" :stu="stu" @response="handleResponse"></Demo17Child>
</template>
- 父组件这边可以有一个
变异版: 同时接收子组件参数和传递父组件参数
<script setup>
import {
  ref,reactive
} from 'vue';

......

// const handleResponse = (response) => {
//   console.log('Received response from child:',response);
// }

const handleResponse = (childMsg,parentMsg) => {
  console.log('Received response from child:',childMsg);
  console.log('Parent params:',parentMsg);
}


</script>
<template>
  ......
  <!--接收msg参数,并传递父组件自己的参数-->
  <Demo17Child :count="count" :stu="stu" @response="(msg)=>{handleResponse(msg,'ddd')}"></Demo17Child>
</template>
Vue 依赖注入(Provide/Inject
- 允许一个
祖先组件向其所有的后代组件传递数据,无论组件层次有多深(特别适合深层嵌套组件间的数据传递)
1. provide 函数
- 在祖先组件中使用,提供数据给所有后代组件
- 第一个参数是提供的键名(key)
- 第二个参数是提供的值(value)
- 可以提供响应式数据(ref)、函数、常量等
2. inject 函数
- 在后代组件中使用,注入祖先组件提供的数据
- 第一个参数是要注入的键名(key)
- 第二个参数是默认值(可选),当未找到对应提供时使用
3. readonly 函数
- 用于包装响应式数据,防止子组件直接修改
- 保持响应式,但只能读取不能写入
实例演示:
- 我们将创建四个组件:爷爷组件、父亲组件和儿子组件,孙子组件,演示从爷爷组件提供数据,儿子组件直接注入数据,而不需要通过父亲组件传递。
- 爷爷组件提供数据,父亲组件不接收任何props,儿子组件通过inject获取爷爷提供的数据。
// Grandparent.vue

<script setup>
  import { ref, provide, readonly } from 'vue'
  import Parent from "@/components/Parent.vue";

  // 准备数据源(变量,对象和方法)
  const appName = ref('Vue 依赖注入演示')
  const version = ref('1.0.0')
  const updateAppName = (newName)=>{
    appName.value = newName
  }
  const userInfo = ref({
    name: '张三',
    age: 25,
    role: '管理员'
  })

  // 提供出去
  provide('appName',appName)
  provide('updateAppName',updateAppName)
  provide('userInfo',readonly(userInfo))
  provide('version','1.0.0')


</script>

<template>
  <div class="grandparent">
    <h2>爷爷组件 (提供者)</h2>
    <p>应用名称: {{ appName }}</p>
    <p>用户: {{ userInfo.name }} ({{ userInfo.age }}岁) - {{ userInfo.role }}</p>
    <p>版本: {{ version }}</p>
    <hr />
    <Parent />
  </div>
</template>

<style scoped>
.grandparent {
  padding: 20px;
  border: 3px solid #3498db;
  border-radius: 8px;
  margin: 10px;
}
</style>
// Parent.vue

<script setup>
  import {provide} from "vue";
  import Child from "@/components/Child.vue";

  provide('parentMessage','这是来自父组件的消息')
</script>

<template>
  <div class="parent">
    <h3>父组件 (中间层)</h3>
    <p>这个组件不需要接收 props,可以直接使用注入的数据</p>
    <hr />
    <Child />
  </div>
</template>

<style scoped>
.parent {
  padding: 15px;
  border: 2px solid #2ecc71;
  border-radius: 8px;
  margin: 10px;
}
</style>
// Child.vue
<script setup>
  import { inject, ref } from 'vue'
  import Grandchild from "@/components/Grandchild.vue";


  // 接收
  const appName = inject('appName')
  const updateAppName = inject('updateAppName')
  const userInfo = inject('userInfo')
  const version = inject('version')
  const parentMessage = inject('parentMessage')
  const optionalData = inject('optionalData','默认值')

  const newName = ref('')
  // 可以修改AppName
  const handleUpdateAppName = ()=>{
    if(newName.value.trim()){
      updateAppName(newName.value)
      newName.value = ''
    }
  }
</script>

<template>
  <div class="child">
    <h4>子组件 (消费者)</h4>
    <p>从爷爷组件注入的应用名称: {{ appName }}</p>
    <p>从爷爷组件注入的用户信息: {{ userInfo.name }}, {{ userInfo.role }}</p>
    <p>从爷爷组件注入的版本: {{ version }}</p>
    <p>从父组件注入的消息: {{ parentMessage }}</p>
    <p>可选数据(带默认值): {{ optionalData }}</p>

    <div class="actions">
      <input v-model="newName" placeholder="输入新应用名称" />
      <button @click="handleUpdateAppName">更新应用名称</button>
    </div>

    <hr />
    <Grandchild />
  </div>
</template>

<style scoped>
.child {
  padding: 10px;
  border: 1px solid #e74c3c;
  border-radius: 8px;
  margin: 10px;
}

.actions {
  margin-top: 10px;
}

input {
  margin-right: 10px;
  padding: 5px;
}

button {
  padding: 5px 10px;
  background-color: #3498db;
  color: white;
  border: none;
  border-radius: 4px;
  cursor: pointer;
}

button:hover {
  background-color: #2980b9;
}
</style>
// Grandchild.vue
<script setup>
  import { inject } from 'vue'

  const appName = inject('appName')
  const userInfo = inject('userInfo')
  const version = inject('version')
  const parentMessage = inject('parentMessage')
</script>

<template>
  <div class="grandchild">
    <h5>孙子组件 (深层消费者)</h5>
    <p>从爷爷组件注入的应用名称: {{ appName }}</p>
    <p>从爷爷组件注入的用户信息: {{ userInfo.name }}, {{ userInfo.age }}岁</p>
    <p>从爷爷组件注入的版本: {{ version }}</p>
    <p>从父组件注入的消息: {{ parentMessage }}</p>
    <p><small>即使隔了两层,也能直接访问爷爷组件的数据</small></p>
  </div>
</template>

<style scoped>
.grandchild {
  padding: 8px;
  border: 1px dashed #f39c12;
  border-radius: 8px;
  margin: 10px;
  background-color: #fef9e7;
}

h5 {
  margin: 0 0 10px 0;
  color: #e67e22;
}
</style>
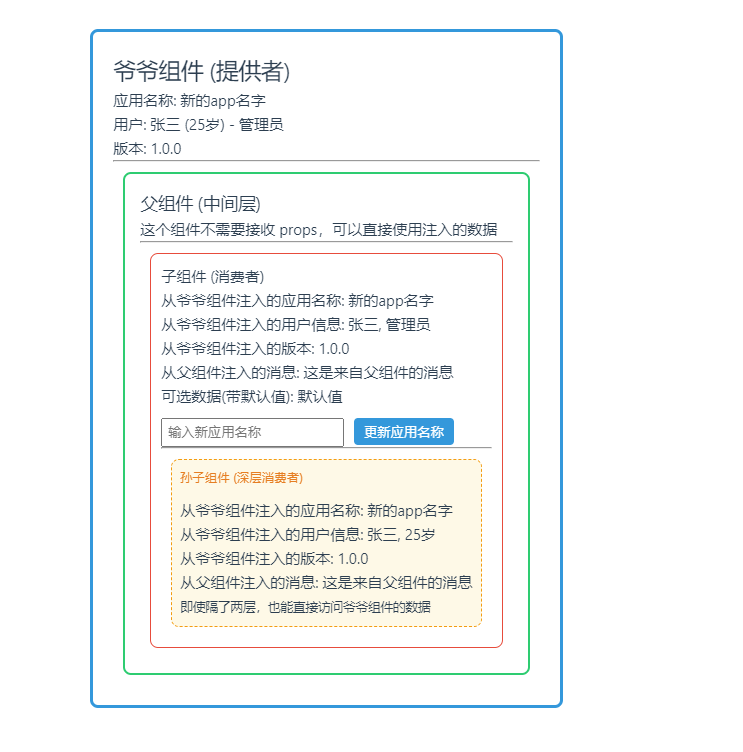
执行流程
- 爷爷组件(Grandparent)通过
provide提供数据 - 父组件(Parent)位于中间层,不需要传递 props
- 子组件(Child)和孙子组件(Grandchild)通过
inject直接获取数据 - 数据更新时,所有注入该数据的组件都会自动响应更新
优点
- 减少 Props 传递:避免层层传递 props(props drilling)
- 代码更清晰:组件间关系更明确
- 维护性更好:数据来源集中管理
- 灵活性强:任何后代组件都可以按需注入所需数据
适用场景
- 主题/样式配置
- 用户认证信息
- 全局状态(简单场景,复杂场景建议使用 Pinia)
- 国际化/本地化设置
- 表单上下文管理
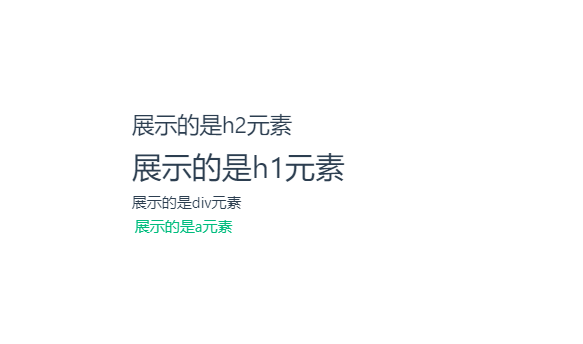
动态组件 component 元素
- 可以理解为一个自定义的html标签,传入想展示的控件,component就渲染成为那个控件
- 比如,可以将一个页面的多个元素拆分为多个组件,然后展示出来
- 其最终以什么标签呈现由
is属性决定
- 其最终以什么标签呈现由
<script setup>
  import Grandparent from "@/components/Grandparent.vue";

</script>

<template>
  <component is="h2">展示的是h2元素</component>
  <component is="h1">展示的是h1元素</component>
  <component is="div">展示的是div元素</component>
  <component is="a">展示的是a元素</component>
  <component is="Grandparent"></component>
</template>

<style scoped>

</style>
总结
- Provide/Inject 像是"局部版的 Vuex" - 适合组件树内部的共享
- Vuex/Pinia 是"专业的状态管理库" - 适合整个应用的状态管理
- 两者可以互补使用 - 全局用 Pinia,局部用 Provide/Inject
- 选择依据 - 根据项目规模、团队习惯和具体需求选择
建议:小型项目或组件内部通信用 Provide/Inject;中大型项目用 Pinia;两者结合使用能达到最佳效果。
插槽知识点
-
插槽的作用: 在组件的模板中预留一个位置,并可以决定该位置的具体内容
- 例如,先在子组件中定义插槽(即预留位置)
- 然后在父组件中引用该子组件,然后填充子组件预留的内容
-
默认插槽: 使用"slot"来定义一个插槽
默认插槽里面可以有默认内容,如果父组件定义了该组件没有传递东西,就会显示slot中的默认内容
// 子组件
......
<template>
  <div>
    <slot>我是子组件默认的内容!</slot>
  </div>
</template>
......

// 父组件
<script setup>
  import DefaultSlotSon1Demo from "@/components/slot/defaultSlotSon1Demo.vue";
</script>

<template>
  <div>我是父组件</div>
  <DefaultSlotSon1Demo /> <!--展示子组件的默认内容-->
  <DefaultSlotSon1Demo>我更改了子组件的内容</DefaultSlotSon1Demo><!--修改了子组件的默认内容-->
</template>
......
具名插槽: 如果组件中有多个"slot",可以通过添加"name"属性来区分- 在父组件中,可以通过"v-slot"(vue3中可以简写为"#"号)来对应插槽
// 子组件

......
<template>
  <div>
    <slot name="header"></slot>
    <slot>我是子组件默认的内容!</slot>
    <slot name="footer"></slot>
  </div>
</template>
......

// 父组件

<script setup>
  import nameSlotSon2Demo from "@/components/slot/nameSlotSon2Demo.vue";
</script>

<template>
  <div>我是父组件</div>
  <div>
    <nameSlotSon2Demo>
      <template v-slot:header> <!--v-slot写法-->
        <h1>填充子组件预留的header插槽内容</h1>
      </template>

      <template #default> <!--#写法-->
        <h1>修改子组件默认的插槽内容</h1>
      </template>

      <template #footer>
        <h2>填充子组件预留的footer插槽内容</h2>
      </template>
    </nameSlotSon2Demo>
  </div>
</template>
-
作用域插槽: 允许子组件向父组件传递数据,使得父组件可以定义一个模板来接收子组件传递的数据
- 注意事项: 不支持"#"号的简写
// 子组件

<script setup>
  import {ref} from "vue";

  const user = ref({
    name:'张三',
    age:18
  })
</script>

<template>
  <div>
    <slot :user="user"></slot>
  </div>
</template>

// 父组件

<script setup>

  import DomainSlotSon3Demo from "./domainSlotSon3Demo.vue"
</script>

<template>
  <div>我是父组件</div>


  <DomainSlotSon3Demo>
<!--    <template #slotProps>--> <!--这里不支持简写-->
    <template v-slot="slotProps">
      <p>姓名: {{slotProps.user.name}}</p>
      <p>年龄: {{slotProps.user.age}}</p>
    </template>
  </DomainSlotSon3Demo>
</template>

<style scoped>

</style>
作用域插槽的工作原理:子组件负责管理数据,父组件负责决定如何渲染这些数据
- 数据流向:子组件 → 父组件
- 子组件通过"slot :data=data"提供数据(专注于数据逻辑)
- 父组件通过 'v-slot="{ data }"'接收数据(自定义UI呈现)
- 渲染位置:数据来自子组件,但模板在父组件定义
- 响应式:子组件提供的数据是响应式的,父组件中的更新会影响子组件
具名插槽还支持解构赋值的写法
// 子组件不变

<script setup>
  import {ref} from "vue";

  const user = ref({
    name:'张三',
    age:18
  })
</script>

<template>
  <div>
    <slot :user="user"></slot>
  </div>
</template>
......

// 父组件

<script setup>
  ......
  import DomainSlotSon3Demo from "./domainSlotSon3Demo.vue"
</script>

<template>
  <div>我是父组件</div>
  <DomainSlotSon3Demo>
    <template v-slot="{ user }"> <--解构赋值写法-->
      <p>姓名: {{ user.name }}</p>
      <p>年龄: {{ user.age }}</p>
    </template>
  </DomainSlotSon3Demo>
</template>

<style scoped>

</style>
Teleport组件(传输组件)
- 作用: 子组件的内容"传送"到 DOM 的其他位置,解决 z-index、定位等问题
- 当需要显示模态框或弹出层时,我们可能会在Vue组件的模板中创建模态对话框,并将其作为DOM树的一部分。这意味着模态对话框将作为其父组件的一部分渲染。这样,如果页面中其他元素具有较高的z-index,可能会覆盖模态框。此外,可能会受到其他组件样式的干扰,需要额外的CSS规则来确保模态框的正确显示。

- vue3中,为我们提供了Teleport,方便设置模态框或弹出层。
- Demo演示: 当点击登录按钮后,会弹出登录的模态框,随意位置一点,模态框即消失
<!-- App.vue -->
<script setup>
 import {
  ref
 } from 'vue';
 const showModal = ref(false);
 const username = ref('');
 const password = ref('');
 function submitForm() {
  // 处理表单提交逻辑
  console.log('用户名:', username.value);
  console.log('密码:', password.value);
  showModal.value = false; // 提交后关闭模态框
 }
</script>
<template>
 <div id="app">
  <button @click="showModal = true">登录</button>
  <Teleport to="body">
   <div v-if="showModal" class="modal-overlay" @click.self="showModal = false">
    <div class="modal-content">
     <h2>登录</h2>
     <form @submit.prevent="submitForm">
      <div>
       <label for="username">用户名:</label>
       <input type="text" id="username" v-model="username" required>
      </div>
      <div>
       <label for="password">密码:</label>
       <input type="password" id="password" v-model="password" required>
      </div>
      <button type="submit">提交</button>
     </form>
     <button @click="showModal = false">关闭</button>
    </div>
   </div>
  </Teleport>
 </div>
</template>

<style scoped>
    /* modal-overlay用于创建一个覆盖整个屏幕的背景,并且当点击背景时,会关闭模态框。 */
 .modal-overlay {
  position: fixed;
  top: 0;
  left: 0;
  width: 100%;
  height: 100%;
  background-color: rgba(0, 0, 0, 0.5);
  display: flex;
  align-items: center;
  justify-content: center;
 }
    /* modal-content内部包含了登录表单和一个关闭按钮 */
 .modal-content {
  background: white;
  padding: 20px;
  border-radius: 5px;
  width: 300px;
 }
 .modal-content h2 {
  margin-top: 0;
 }
 .modal-content div {
  margin-bottom: 10px;
 }
</style>
核心功能分析
1. 响应式数据
const showModal = ref(false);    // 控制模态框显示/隐藏
const username = ref('');        // 用户名输入框数据
const password = ref('');        // 密码输入框数据
2. 表单提交函数
function submitForm() {
  console.log('用户名:', username.value);
  console.log('密码:', password.value);
  showModal.value = false; // 提交后关闭模态框
}
代码中的 Teleport
<Teleport to="body">
  <!-- 模态框内容会被渲染到 body 元素下 -->
</Teleport>
为什么要用 Teleport?
- 避免样式冲突:模态框不受父组件 CSS 影响
- 避免 z-index 问题:确保模态框在最顶层
- DOM 结构清晰:模态框直接位于 body 下
模态框显示/隐藏逻辑
1. 打开模态框
<button @click="showModal = true">登录</button>
2. 关闭模态框的三种方式
<!-- 1. 点击背景关闭 -->
<div class="modal-overlay" @click.self="showModal = false">
  <!-- .self 修饰符:只有点击自身才触发,避免点击内容区域也关闭 -->
</div>

<!-- 2. 提交表单后关闭 -->
<form @submit.prevent="submitForm">
  <!-- .prevent 修饰符阻止默认表单提交 -->
</form>

<!-- 3. 点击关闭按钮 -->
<button @click="showModal = false">关闭</button>
代码执行流程
- 初始状态:
showModal = false,模态框隐藏 - 点击登录按钮:
showModal = true,模态框显示 - 用户输入:通过
v-model双向绑定到username和password - 点击提交:
- 执行
submitForm()函数 - 输出用户名和密码到控制台
- 设置
showModal = false,模态框关闭
- 执行
CSS 样式详解
1. 模态框遮罩层
.modal-overlay {
  position: fixed;    /* 固定定位,覆盖整个视口 */
  top: 0;
  left: 0;
  width: 100%;
  height: 100%;
  background-color: rgba(0, 0, 0, 0.5);  /* 半透明黑色背景 */
  display: flex;      /* 使用 flex 居中内容 */
  align-items: center;
  justify-content: center;
}
2. 模态框内容区
.modal-content {
  background: white;   /* 白色背景 */
  padding: 20px;       /* 内边距 */
  border-radius: 5px;  /* 圆角 */
  width: 300px;        /* 固定宽度 */
}
总结
- Vue 3 的响应式数据:使用
ref管理状态 - Teleport 组件:解决模态框的定位问题
- 表单处理:双向绑定和提交逻辑
- 事件修饰符:
.prevent和.self的使用 - 模态框交互:多种关闭方式
这是一个典型的模态框实现模式,在实际项目中非常实用。
Pinia---更强大的数据(状态)管理仓库(相比Vuex)
- 安装:
npm install pinia - 在
main.js中作如下配置
import {
    createApp
} from 'vue'
import {
    createPinia
} from 'pinia' //1.引入pinia

import App from './App.vue'

const pinia = createPinia() //2.创建pinia实例
const app = createApp(App)

app.use(pinia) //3.配置vue使用pinia插件
// 挂载应用
app.mount('#app')
- 创建仓库
store.index.js
import {
    defineStore
} from "pinia"


export const useCountStore = defineStore("count", {
    //存储数据(响应式)
    state: () => ({
        count: 100
    }),
    //计算属性
    getters: {
        //箭头函数,不能使用this
        double: (state) => state.count * 2,
        //普通函数
        //double(){return this.count * 2},
    },
    //操作方法
    actions: {
        //需要使用this访问state,不推荐使用箭头函数
        increment() {
            this.count++;
        }
    }
})
- 在任意组件中使用
<script setup>
  import {useCountStore} from "@/store/index.js";

  const countStore = useCountStore();

</script>

<template>

  <div>我是父组件</div>
  <h3>count的值为: {{countStore.count}}</h3>
  <h3>count-double选项值为: {{countStore.double}}</h3>
  <button @click="countStore.$patch({count:countStore.count-1})">减法运算</button>
  <button @click="countStore.increment">加法运算</button>

</template>
......
Pinia 的核心概念
1. Store 定义
- 使用
defineStore()定义 store - 第一个参数是 store 的唯一 ID
- 第二个参数是配置对象(state, getters, actions)
2. 三种修改状态的方式
方式1:直接修改
countStore.count = 200;
方式2:使用 $patch(批量修改)
// 对象形式
countStore.$patch({
    count: countStore.count - 1,
    name: "李四"
});

// 函数形式(推荐)
countStore.$patch((state) => {
    state.count--;
    state.name = "李四";
});
方式3:使用 actions
countStore.increment(); // 调用定义好的 action
3. 响应式处理
- 在模板中直接使用
countStore.count是响应式的 - 如果需要解构,需要使用
storeToRefs()保持响应性:
import { storeToRefs } from 'pinia'

const countStore = useCountStore();
const { count, double } = storeToRefs(countStore);  // 保持响应式
Pinia vs Vuex 对比
Pinia 的优势
- 更简单的 API:不需要 mutations,actions 可以直接修改 state
- 完美的 TypeScript 支持:完全类型安全
- 模块化:每个 store 都是独立的,不需要嵌套模块
- Composition API 友好:更符合 Vue 3 的设计理念
- 更轻量:体积更小,API 更简洁
Vuex 的对应概念
| Vuex | Pinia | 说明 |
|---|---|---|
| state | state | 存储数据 |
| getters | getters | 计算属性 |
| mutations | - | Pinia 不需要 mutations |
| actions | actions | 操作方法(可直接修改 state) |
| modules | 独立 store | 每个 store 都是一个模块 |
总结
Pinia 是一个现代化、简洁且强大的状态管理解决方案:
- 安装简单:
npm install pinia - 配置直观:在 main.js 中注册即可
- API 简洁:state + getters + actions 的结构
- TypeScript 友好:完整的类型推断
- 模块化设计:每个 store 都是独立的
- 灵活性强:支持插件、持久化等高级特性
Pinia 已经成为 Vue 3 生态中官方推荐的状态管理库,特别适合新项目使用。对于已有的 Vuex 项目,Pinia 也提供了迁移指南和兼容性支持。
pinia也支持组合式的写法(推荐),现在实现一模一样的效果
import {
    defineStore
} from "pinia"

import {computed, ref} from "vue";


// export const useCountStore = defineStore("count", {
//     //数据
//     state: () => ({
//         count: 100
//     }),
//     //计算属性
//     getters: {
//         //箭头函数,不能使用this
//         double: (state) => state.count * 2,
//         //普通函数
//         //double(){return this.count * 2},
//     },
//     //方法
//     actions: {
//         //需要使用this访问state,不推荐使用箭头函数
//         increment() {
//             this.count++;
//         }
//     }
// })

export const useCountStore = defineStore("count",()=>{
    // 定义数据
    const count = ref(100)
    // 定义计算属性
    const double = computed(() => count.value*2)
    // 定义方法
    function increment() {
        count.value++
    }
    // 暴露状态
    return {count,double,increment}
})


// 应用.vue(通过生成useCountStore()实例,然后点点点数据,计算属性和方法...)

<script setup>
  ......
  import {useCountStore} from "@/store/index.js";
  const countStore = useCountStore();
</script>

<template>
  <div>我是父组件</div>
  <h3>count的值为: {{countStore.count}}</h3>
  <h3>count-double选项值为: {{countStore.double}}</h3>
  <button @click="countStore.$patch({count:countStore.count-1})">减法运算</button>
  <button @click="countStore.increment">加法运算</button>
</template>
- 解构的写法: pinia示例如果需要解构,需要使用
storeToRefs- 注意事项:
选项式的计算属性不能结构,组合式的方法不能解构
- 注意事项:
// 应用.vue

import {
        useCountStore
    } from ......
    import {
        storeToRefs
    } from "pinia";

    const countStore = useCountStore()
    // const { count, double } = countStore  // 直接解构会失去响应性
    const {
        count,
        double
    } = storeToRefs(countStore) // increment是方法,不支持解构写法
store的修改(数据修改)
pinia解构后,直接修改是没有效果的- 解构后的 ref 可以直接修改值,但不会更新 store
// 应用.vue
<div>
    <h1>解构后直接修改无效果</h1>
    <button @click="count.value++">直接修改</button> <!--按钮点击无效果-->
    <h2>现在count值为:{{count}}</h2>
</div>
- 通过
方法修改
// 应用.vue
<template>
    <div class="div">
        ......
        <button @click="countStore.increment">按钮</button><!-- 点击调用方法间接修改 -->
    </div>

</template>
- 通过
$patch补丁修改- pinia提供了
$patch进行补丁修改,可以同时修改多个状态 $patch会直接替换之前的同名状态
- pinia提供了
const clickHandler = () => {
    countStore.$patch({
        count:600
    })
    // 或
    countStore.$patch((state) => {
        state.count = 300
    })
}


<template>
    <div>
    <h1>使用patch批量修改</h1>
    <button @click="clickHandler">直接修改</button>
    <h2>现在count值为:{{count}}</h2>
  </div>

</template>
-
$rest状态重置: 将修改后的状态重置回初始状态- 模板写法(只适用于
选项式api)
<button @click=“countStore.$reset()”>重置- 如果要使用
组合式api,需要在main.js中重写$reset
...... const app = createApp(App) pinia.use(({ store }) => { const initialState = JSON.parse(JSON.stringify(store.$state)); store.$reset = () => {//重写$rest store.$patch(initialState); } }) app.use(pinia) //3.配置vue使用pinia插件 ...... - 模板写法(只适用于
-
store的监听(订阅)
- 使用
$subsribe监听store是否变化,如果变化就会调用$subsribe中的方法。$subsribe只会监听定义它的组件是否修改了store,不会监听其他组件有无修改
- 语法:
counterStore.$subscribe(callback, options)- callback: 每次 store 变化时执行的回调函数
- options: 配置对象,
detached: true表示组件销毁后继续监听
- 实例演示
- 使用
// store.counter.js

import {defineStore} from "pinia";
import {ref} from "vue";

export const useMyCounterStore = defineStore("myCounter", () => {
    const count = ref(0)
    function increment() {
        count.value++
    }

    function decrement() {
        count.value--
    }

    function reset() {
        count.value = 0
    }

    return {count,increment,decrement,reset}

})

// CounterDemo.vue
<template>
  <div>
    <h2>Pinia Store 监听演示</h2>

    <div>
      <p>当前计数: {{ count }}</p>
      <button @click="counterStore.increment">+1</button>
      <button @click="counterStore.decrement">-1</button>
      <button @click="counterStore.reset">重置</button>
      <button @click="updateWithPatch">使用 $patch 修改</button>
    </div>

    <div class="log">
      <h3>修改日志:</h3>
      <div v-for="(log, index) in logs" :key="index" class="log-item">
        {{ log }}
      </div>
    </div>
  </div>
</template>

<script setup>
import { useMyCounterStore } from "@/store/counter.js";
import { storeToRefs } from 'pinia'
import { ref, onMounted } from 'vue'

const counterStore = useMyCounterStore()
const { count } = storeToRefs(counterStore)  // 使用 storeToRefs 解构

// 监听日志
const logs = ref([])

// 设置订阅
onMounted(() => {
  // 订阅 store 的变化
  counterStore.$subscribe((mutation, state) => {
    const timestamp = new Date().toLocaleTimeString()
    let logMessage = ''

    // 直接从 state 获取最新值,不依赖 mutation.key 和 mutation.newValue
    const currentCount = state.count

    // mutation 包含修改信息
    switch (mutation.type) {
      case 'direct':
        logMessage = `[${timestamp}] 直接修改,当前值:${currentCount}`
        break
      case 'patch object':
        logMessage = `[${timestamp}] $patch 对象形式修改:${JSON.stringify(mutation.payload)},当前值:${currentCount}`
        break
      case 'patch function':
        logMessage = `[${timestamp}] $patch 函数形式修改,当前值:${currentCount}`
        break
      default:
        logMessage = `[${timestamp}] 未知修改类型:${mutation.type},当前值:${currentCount}`
    }

    // 添加日志
    logs.value.push(logMessage)

    // 只保留最近5条日志
    if (logs.value.length > 5) {
      logs.value.shift()
    }
  }, { detached: true })
})

// 使用 $patch 修改
function updateWithPatch() {
  // 对象形式
  counterStore.$patch({
    count: counterStore.count + 100  // 注意:这里使用当前值+100
  })
}
</script>

<style scoped>
.log {
  margin-top: 20px;
  padding: 15px;
  background: #f5f5f5;
  border-radius: 5px;
}

.log-item {
  margin: 5px 0;
  padding: 5px;
  background: white;
  border-left: 3px solid #3498db;
}
</style>
mutation 对象
回调函数接收的 mutation 参数包含:
- type: 修改类型
'direct': 直接修改(如count.value++)'patch object':$patch({...})'patch function':$patch((state) => {...})
- payload: 修改的数据(对于
patch object类型)
state 对象
包含修改后的完整 store 状态,可以通过 state.count 访问最新值
注意事项
- 不要在
$subscribe回调中修改 state,避免无限循环 - 使用
detached: true可以让订阅在组件销毁后依然有效 - 如果不使用
detached: true,组件销毁时订阅会自动取消
$onAction用来监听选项式api的actions或组合式api方法是否调用
countStore.$onAction(() => {
        console.log("actions执行了")
    })
......
onMounted(() => {
  counterStore.$onAction((name)=>{
    console.log("actions name:",name)
  })
  ......
  counterStore.$subscribe(......)


actions name: {args: Array(1), name: 'increment', store: Proxy(Object), after: ƒ, onError: ƒ}
actions name: {args: Array(1), name: 'decrement', store: Proxy(Object), after: ƒ, onError: ƒ}
actions name: {args: Array(1), name: 'reset', store: Proxy(Object), after: ƒ, onError: ƒ}
pinia-plugin-persistedstate 安装与使用
这是一个让 Pinia 状态持久化的插件,可以将数据保存到 localStorage 或 sessionStorage 中。
1. 安装
npm install pinia-plugin-persistedstate
2. 基本配置
main.js / main.ts
import { createApp } from 'vue'
import { createPinia } from 'pinia'
import piniaPluginPersistedstate from 'pinia-plugin-persistedstate'
import App from './App.vue'

// 创建 Pinia 实例
const pinia = createPinia()

// 使用持久化插件
pinia.use(piniaPluginPersistedstate)

const app = createApp(App)
app.use(pinia)
app.mount('#app')
3. 简单示例
3.1 基本用法 - 自动持久化
// store.couter.js

import {defineStore} from "pinia";
import {ref} from "vue";

export const useMyCounterStore = defineStore("myCounter", () => {
 ......
},{
    persist: true  // 当修改页面数据以后,重新刷新页面,数据已变,说明存储成功
})
以下是AI的用法
// stores/user.js
import { defineStore } from 'pinia'

export const useUserStore = defineStore('user', {
  state: () => ({
    name: '',
    age: 0,
    token: ''
  }),

  actions: {
    login(userInfo) {
      this.name = userInfo.name
      this.age = userInfo.age
      this.token = 'fake-jwt-token'
    },

    logout() {
      this.name = ''
      this.age = 0
      this.token = ''
    }
  },

  // 开启持久化(最简单的方式)
  persist: true
})
3.2 指定存储字段
// stores/settings.js
import { defineStore } from 'pinia'

export const useSettingsStore = defineStore('settings', {
  state: () => ({
    theme: 'light',
    language: 'zh-CN',
    fontSize: 14,
    lastVisit: null  // 这个字段我们不希望持久化
  }),

  persist: {
    // 只持久化指定的字段
    paths: ['theme', 'language', 'fontSize']
  }
})
4. 完整示例
4.1 Store 定义
// stores/counter.js
import { defineStore } from 'pinia'

export const useCounterStore = defineStore('counter', {
  state: () => ({
    count: 0,
    lastUpdated: null,
    history: []
  }),

  actions: {
    increment() {
      this.count++
      this.lastUpdated = new Date().toISOString()
      this.history.push({
        action: 'increment',
        time: this.lastUpdated,
        value: this.count
      })
    },

    decrement() {
      this.count--
      this.lastUpdated = new Date().toISOString()
      this.history.push({
        action: 'decrement',
        time: this.lastUpdated,
        value: this.count
      })
    },

    reset() {
      this.count = 0
      this.lastUpdated = new Date().toISOString()
      this.history = []
    }
  },

  persist: {
    key: 'my-counter',  // 自定义存储的 key
    storage: localStorage,  // 存储位置,默认 localStorage
    paths: ['count'],  // 只持久化 count 字段
    // beforeRestore: (ctx) => {  // 恢复前钩子
    //   console.log('准备恢复状态', ctx.store.$id)
    // },
    // afterRestore: (ctx) => {   // 恢复后钩子
    //   console.log('状态已恢复', ctx.store.$id)
    // }
  }
})
4.2 组合式 API Store
// stores/todo.js
import { defineStore } from 'pinia'
import { ref, computed } from 'vue'

export const useTodoStore = defineStore('todo', () => {
  // 状态
  const todos = ref([])
  const filter = ref('all')

  // 计算属性
  const filteredTodos = computed(() => {
    if (filter.value === 'active') {
      return todos.value.filter(todo => !todo.completed)
    }
    if (filter.value === 'completed') {
      return todos.value.filter(todo => todo.completed)
    }
    return todos.value
  })

  const remainingCount = computed(() => {
    return todos.value.filter(todo => !todo.completed).length
  })

  // 方法
  function addTodo(title) {
    todos.value.push({
      id: Date.now(),
      title,
      completed: false,
      createdAt: new Date().toISOString()
    })
  }

  function removeTodo(id) {
    const index = todos.value.findIndex(todo => todo.id === id)
    if (index !== -1) {
      todos.value.splice(index, 1)
    }
  }

  function toggleTodo(id) {
    const todo = todos.value.find(todo => todo.id === id)
    if (todo) {
      todo.completed = !todo.completed
    }
  }

  function setFilter(newFilter) {
    filter.value = newFilter
  }

  function clearCompleted() {
    todos.value = todos.value.filter(todo => !todo.completed)
  }

  return {
    // 状态
    todos,
    filter,

    // 计算属性
    filteredTodos,
    remainingCount,

    // 方法
    addTodo,
    removeTodo,
    toggleTodo,
    setFilter,
    clearCompleted
  }
}, {
  persist: {
    paths: ['todos']  // 只持久化 todos 数组
  }
})
4.3 组件中使用
<template>
  <div>
    <h2>计数器</h2>
    <p>当前计数: {{ counter.count }}</p>
    <button @click="counter.increment">+1</button>
    <button @click="counter.decrement">-1</button>
    <button @click="counter.reset">重置</button>

    <hr>

    <h2>待办事项</h2>
    <div>
      <input
        v-model="newTodo"
        @keyup.enter="addNewTodo"
        placeholder="输入待办事项"
      >
      <button @click="addNewTodo">添加</button>
    </div>

    <div class="filters">
      <button @click="todoStore.setFilter('all')">全部</button>
      <button @click="todoStore.setFilter('active')">未完成 ({{ todoStore.remainingCount }})</button>
      <button @click="todoStore.setFilter('completed')">已完成</button>
      <button @click="todoStore.clearCompleted">清除已完成</button>
    </div>

    <ul>
      <li v-for="todo in todoStore.filteredTodos" :key="todo.id">
        <input
          type="checkbox"
          :checked="todo.completed"
          @change="todoStore.toggleTodo(todo.id)"
        >
        <span :class="{ completed: todo.completed }">{{ todo.title }}</span>
        <button @click="todoStore.removeTodo(todo.id)">删除</button>
      </li>
    </ul>

    <hr>

    <div class="debug-info">
      <h3>调试信息</h3>
      <p>localStorage 中的计数器: {{ localStorageCounter }}</p>
      <p>localStorage 中的待办事项数量: {{ localStorageTodosLength }}</p>
      <button @click="clearStorage">清除所有存储</button>
      <button @click="reloadPage">刷新页面测试持久化</button>
    </div>
  </div>
</template>

<script setup>
import { useCounterStore } from '@/stores/counter'
import { useTodoStore } from '@/stores/todo'
import { ref, onMounted } from 'vue'

const counter = useCounterStore()
const todoStore = useTodoStore()
const newTodo = ref('')

// 添加新待办事项
function addNewTodo() {
  if (newTodo.value.trim()) {
    todoStore.addTodo(newTodo.value.trim())
    newTodo.value = ''
  }
}

// 调试信息
const localStorageCounter = ref('')
const localStorageTodosLength = ref(0)

// 获取 localStorage 中的数据
function updateDebugInfo() {
  const counterData = localStorage.getItem('my-counter')
  const todoData = localStorage.getItem('pinia-todo')

  if (counterData) {
    const parsed = JSON.parse(counterData)
    localStorageCounter.value = parsed.state.count
  }

  if (todoData) {
    const parsed = JSON.parse(todoData)
    localStorageTodosLength.value = parsed.state.todos?.length || 0
  }
}

// 清除所有存储
function clearStorage() {
  localStorage.clear()
  sessionStorage.clear()
  updateDebugInfo()
  alert('已清除所有存储,请刷新页面')
}

// 刷新页面
function reloadPage() {
  location.reload()
}

onMounted(() => {
  updateDebugInfo()
})
</script>

<style scoped>
.completed {
  text-decoration: line-through;
  color: #888;
}

.filters {
  margin: 10px 0;
}

.filters button {
  margin-right: 5px;
}

.debug-info {
  background-color: #f5f5f5;
  padding: 15px;
  border-radius: 5px;
  margin-top: 20px;
}
</style>
5. 配置选项详解
persist: {
  // 自定义存储的 key,默认是 store 的 id
  key: 'custom-key',

  // 存储位置,可以是 localStorage、sessionStorage 或自定义对象
  storage: localStorage, // 或 sessionStorage

  // 指定要持久化的字段,默认全部
  paths: ['user.name', 'settings.theme'],

  // 存储前钩子函数
  beforeRestore: (context) => {
    console.log('准备恢复:', context.store.$id)
    // context.store 是 store 实例
  },

  // 恢复后钩子函数
  afterRestore: (context) => {
    console.log('已恢复:', context.store.$id)
    // 可以在这里进行一些初始化操作
  },

  // 自定义序列化/反序列化
  serializer: {
    serialize: JSON.stringify,
    deserialize: JSON.parse
  },

  // 调试模式
  debug: true
}
6. 手动控制持久化
import { useUserStore } from '@/stores/user'

const userStore = useUserStore()

// 手动保存到持久化存储
userStore.$persist()

// 手动从持久化存储恢复
userStore.$hydrate()

// 手动清除持久化存储
userStore.$persist.clear()
7. 自定义存储适配器
// 创建自定义存储
const myStorage = {
  getItem: (key) => {
    // 从你的存储源获取数据
    return someCustomGetMethod(key)
  },
  setItem: (key, value) => {
    // 存储数据到你的存储源
    someCustomSetMethod(key, value)
  },
  removeItem: (key) => {
    // 从你的存储源删除数据
    someCustomRemoveMethod(key)
  }
}

// 在 store 中使用
persist: {
  storage: myStorage
}
8. TypeScript 支持
// stores/user.ts
import { defineStore } from 'pinia'

interface UserState {
  name: string
  age: number
  token: string
}

export const useUserStore = defineStore('user', {
  state: (): UserState => ({
    name: '',
    age: 0,
    token: ''
  }),

  persist: {
    key: 'user-store',
    storage: localStorage
  }
})
注意事项
- 存储限制:localStorage 通常有 5MB 限制
- 敏感信息:不要存储密码、密钥等敏感信息
- 数据结构:只能存储 JSON 可序列化的数据
- 性能:大数据量可能影响页面加载性能
- SSR:服务端渲染时要注意存储的可用性
这个插件让状态持久化变得非常简单,是 Pinia 生态中非常实用的工具之一。
路由管理Vue Router
-
作用: 在
组件页面之间切换 -
安装:
npm install vue-router@4- Vue 3 对应的是 Vue Router 的第 4 版本
-
使用方式
- 先简单创建两个
组件页面
// Home.vue ...... <template> <h1>这是Home主页</h1> </template> ...... // About.vue ...... <template> <h1>这是About主页</h1> </template> ......-
创建路由实例
// router.index.js import {createRouter,createWebHistory} from "vue-router"; import Home from "@/components/router_test_directory/Home.vue"; import About from "@/components/router_test_directory/About.vue"; const routes = [ {path:"/", component:Home}, {path:"/about", component:About}, ] const router = createRouter({ // 创建一个 history 模式的路由 history: createWebHistory(), routes, // 滚动行为:控制滚动条位置 scrollBehavior: () => ({ left: 0,top: 0 }), }) export default router;-
在main.js中引入路由
import './assets/main.css' import { createApp } from 'vue' import App from './App.vue' import router from "@/router/index.js"; ...... const app = createApp(App) app.use(router) app.mount('#app')-
展示页面效果: 页面在
Home和About之间来回切换router-link指明路由链接,Vue Router会自动处理跳转,开发者无需手动调用任何JavaScript 代码router-view用来渲染组件
// App.vue
......
<div>
    <router-link to="/">去往Home的组件导航</router-link>
    <router-link to="about">去往About的组件导航</router-link>
    <router-view></router-view>
</div>
编程式导航(router.push和router.replace)
- 先新建一个正确登录以后才能访问的页面
// MyIndex.vue <script setup> </script> <template> <h1>这是登录无误以后才能访问的页面</h1> </template> <style scoped> </style>Home.vue添加登录逻辑
<script setup> import { useRouter } from 'vue-router'; import { ref } from "vue"; const router = useRouter(); const username = ref(''); const password = ref(''); const handleSubmit = () => { if (username.value === 'admin' && password.value === '123456') { router.push({ path: '/my' }); // 用法 } else { alert('账号或密码错误!'); } }; </script> <template> <h1>这是Home主页</h1> <form @submit.prevent="handleSubmit"> <div> <label for="username">Username:</label> <input type="text" id="username" v-model="username" /> </div> <div> <label for="password">Password:</label> <input type="password" id="password" v-model="password" /> </div> <button type="submit">登录</button> </form> </template> <style scoped> </style>- 效果: 当正确登录以后,跳转到了
/my页面
- 先简单创建两个
路由守卫
-
Vue Router提供了全局守卫、路由独享守卫和组件内守卫,允许你控制路由的访问权限和导航行为。路由守卫是一种机制,用于在路由跳转之前、之后或失败时执行代码
-
每个
路由守卫接受一个回调函数作为参数,该回调函数有三个参数:to、from和next。to: 是一个即将进入的目标路由对象。from:是一个当前导航正要离开的路由对象。next: 是一个函数,必须调用它来解析这个钩子。它可以接受以下参数:next(): 进行管道中的下一个钩子。如果全部钩子执行完了,则导航的状态就是确认的。next(false): 中断当前的导航。如果浏览器的URL改变了(可能是用户手动或者浏览器后退按钮),那么URL地址会重置到from路由对应的地址。next('/')或next({ path: '/' }): 跳转到一个不同的地址。当前的导航被中断,然后进行一个新的导航。next(error): 如果传入next的参数是一个Error实例,则导航会被终止且该错误会被传递给router.onError()注册过的回调。
-
全局守卫: 通常直接在路由声明文件(router/index.js)中直接声明。全局前置守卫(router.beforeEach): 是Vue Router中的一种导航守卫,它可以在每个路由跳转之前执行一些代码。- 它可以用来检查用户的登录状态、权限验证、加载进度条等。
全局前置守卫会在路由跳转前被调用,它允许你定义一些全局的逻辑,这些逻辑需要在每次导航发生之前执行。
- 它可以用来检查用户的登录状态、权限验证、加载进度条等。
//router/index.js router.beforeEach((to, from, next) => { if (to.path === '/admin') { if (isAuthenticated()) { //isAuthenticated是用户定义的用来检验用户是否登录的函数 next(); } else { next('/login'); } } else { next(); } });全局后置守卫(router.afterEach): 在路由匹配之后执行。可以用来记录日志、执行清理操作等。
router.afterEach((to, from) => {
  console.log('Navigated from ' + from.path + ' to ' + to.path);
});
路由独享守卫
- 概念: 直接在路由定义中使用的守卫,它们可以应用于特定的路由
- 卫通常在
路由声明文件(router/index.js)的路由定义中直接声明 钩子:beforeEnter、 beforeLeave前置路由守卫
const routes = [
  {
    path: '/admin',
    component: AdminComponent,
    beforeEnter: (to, from, next) => {
      if (isAuthenticated()) {
        next();
      } else {
        next('/login');
      }
    },
  },
];
后置路由守卫
const routes = [
  {
    path: '/admin',
    component: AdminComponent,
    afterEnter: (to, from) => {
      console.log('Admin route entered');
    },
  },
];
组件内守卫
- 概念: 在组件内部定义的守卫,它们可以应用于组件的内部路由
<-- Home.vue -->
<script setup>
  beforeRouteEnter(to, from, next) {
    if (isAuthenticated()) {
      next();
    } else {
      next(false);
    }
  },
</script>
懒加载路由组件
- 为了提高应用的性能,你可以使用动态导入来懒加载路由组件
const routes = [
  {
    path: '/',
    component: () => import('../views/Home.vue')
  },
  {
    path: '/about',
    component: () => import('../views/About.vue')
  },
];
嵌套路由
- 作用: 允许你在一个路由中嵌套其他路由,从而构建多层级的页面结构
- 实现方式: 使用
children配置项
const routes = [
  {
    path: '/parent',
    component: ParentComponent,
    children: [
      {
        path: 'child',
        component: ChildComponent
      }
    ]
  }
];

- 效果: 当访问"/parent/child"路径时,Vue Router会渲染ParentComponent和ChildComponent
路由参数
- 实现方式一: 通过
:符号来实现
routes :  [
  {
    path: '/user/:id/post/:postId', // 传id和postId两个值
    component: UserPostComponent
  }
];
-
实现方式二: 通过
params参数实现- 效果: 类似于
post请求中的body,不会显示在地址栏中- 注意事项: 只能配合
name参数使用,如果提供了path,params会失效
- 注意事项: 只能配合
// 使用 params 传参 router.push({ name: 'user', params: { id: '123' } }); - 效果: 类似于
-
实现方式三: 通过
query实现 -
效果: 就是
地址栏中查询字符串的方式:/user?name=xxx?age=yyy- 注意事项: 既可以配合
path使用,也能配合name使用
// 使用 query 传参 router.push({ path: '/user', query: { name: 'John' } }); - 注意事项: 既可以配合

 浙公网安备 33010602011771号