
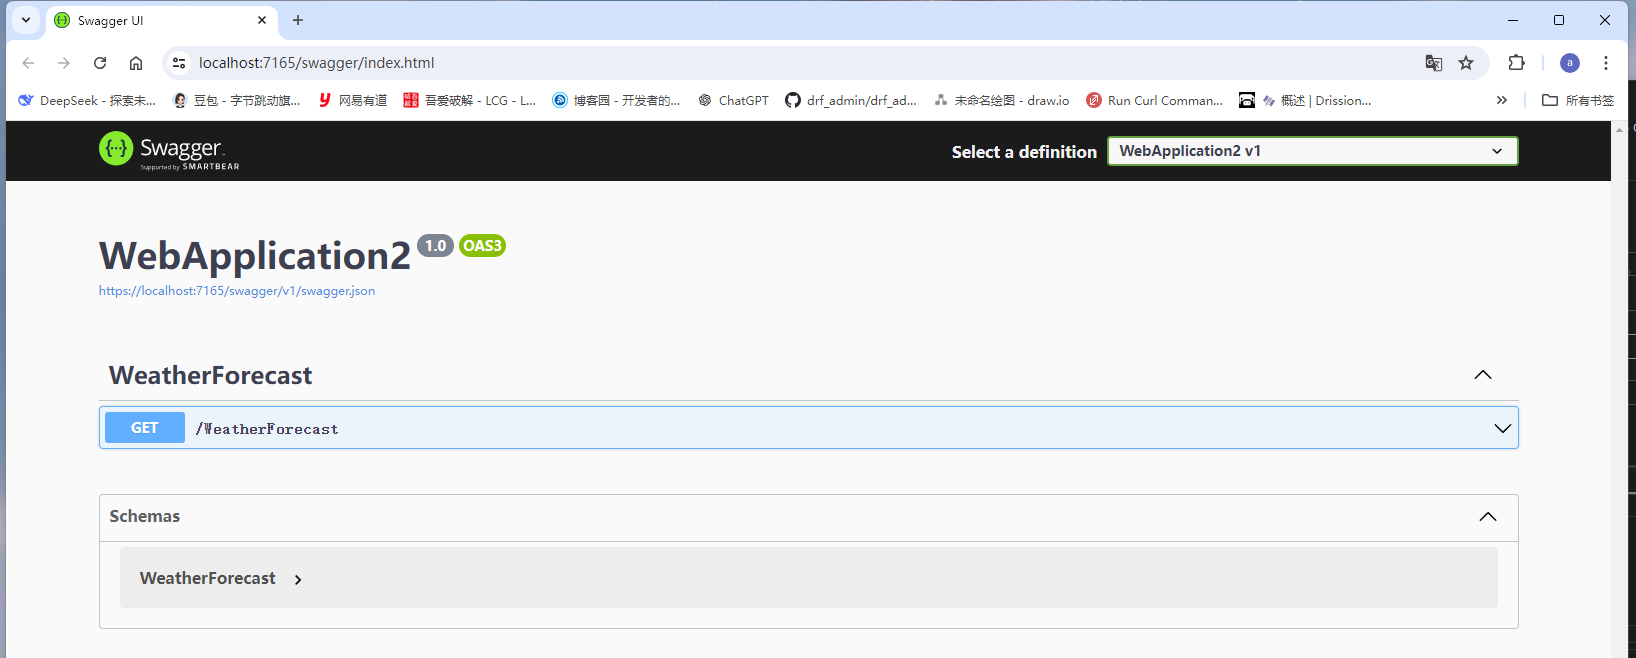
C# Web开发教程(五)之Web API
- 新建
Web API项目,然后运行,效果如下(默认写了一个WeatherForecase接口)
- 访问
WeatherForecase返回如下JSON数据
[
  {
    "date": "2025-09-17T09:47:11.8300147+08:00",
    "temperatureC": 24,
    "temperatureF": 75,
    "summary": "Hot"
  },
  {
    "date": "2025-09-18T09:47:11.8303775+08:00",
    "temperatureC": 33,
    "temperatureF": 91,
    "summary": "Hot"
  },
  {
    "date": "2025-09-19T09:47:11.8303797+08:00",
    "temperatureC": -19,
    "temperatureF": -2,
    "summary": "Warm"
  },
  {
    "date": "2025-09-20T09:47:11.8303798+08:00",
    "temperatureC": 51,
    "temperatureF": 123,
    "summary": "Hot"
  },
  {
    "date": "2025-09-21T09:47:11.8303799+08:00",
    "temperatureC": 21,
    "temperatureF": 69,
    "summary": "Mild"
  }
]
WeatherForecase接口是怎么写的呢,流程如下
// 自定义模型类 WeatherForecase.cs
namespace WebApplication2
{
    public class WeatherForecast
    {
        public DateTime Date { get; set; }

        public int TemperatureC { get; set; }

		// 声明一个只读属性
        public int TemperatureF => 32 + (int)(TemperatureC / 0.5556);

        public string? Summary { get; set; }
    }
}

- 注意事项,这里的"只读属性"相当于这么写

public int TemperatureF
{
    get { return 32 + (int)(TemperatureC / 0.5556); }
}


// Controllers.WeatherForecastController.cs
using Microsoft.AspNetCore.Mvc;

namespace WebApplication2.Controllers
{
	// 属性标记,表明这是一个 API 控制器,启用 API 特定行为
    [ApiController]
    // 路由属性,将控制器映射到 /WeatherForecast URL(自动去除"Controller"后缀)
    [Route("[controller]")]
    public class WeatherForecastController : ControllerBase
    {
    	// 声明只读字段Summaries
        private static readonly string[] Summaries = new[]
        {
            "Freezing", "Bracing", "Chilly", "Cool", "Mild", "Warm", "Balmy", "Hot", "Sweltering", "Scorching"
        };

		// 依赖注入日志和构造函数
        private readonly ILogger<WeatherForecastController> _logger;

        public WeatherForecastController(ILogger<WeatherForecastController> logger)
        {
            _logger = logger;
        }

		// 标记此方法处理 HTTP GET 请求
        // Name 参数为此路由指定名称(可用于生成 URL)
        [HttpGet(Name = "GetWeatherForecast")]
        public IEnumerable<WeatherForecast> Get()
        {
            return Enumerable.Range(1, 5).Select(index => new WeatherForecast
            {
                Date = DateTime.Now.AddDays(index),
                TemperatureC = Random.Shared.Next(-20, 55),
                Summary = Summaries[Random.Shared.Next(Summaries.Length)]
            })
            .ToArray();
        }
    }
}
- 自定义API接口,简单示例
// Person.cs
namespace WebApplication2
{
    public record Person(string Name,int Age);
}
// SaveNoteRequest.cs
namespace WebApplication2
{
   public record SaveNoteRequest(string Title,string Content);
}
// TestController.cs
using Microsoft.AspNetCore.Mvc;

namespace WebApplication2.Controllers
{
    [ApiController]
    [Route("api/[controller]")]
    public class TestController : Controller
    {

        [HttpGet]
        public Person GetPerson()
        {
            return new Person("Jim Green", 20);
        }

        [HttpPost]
        public string[] SaveNote(SaveNoteRequest req)
        {
            System.IO.File.WriteAllText(req.Title + ".txt",req.Content);
            return new string[] {"ok",req.Title};
        }

    }
}

- 访问地址(get或者post方法): /api/Test

  - [controller] 是一个令牌,会自动替换为控制器名称(去掉"Controller"后缀)

  - 对于 TestController,[controller] 会被替换为 "Test",因此完整路径为 /api/Test
您的代码中设置了默认访问路径为 /api/Test,这是因为您在控制器上使用了路由属性 [Route("api/[controller]")]。让我详细解释这个路由是如何工作的:
路由解析过程
-
[Route("api/[controller]")]属性:"api"是固定的路径段[controller]是一个令牌,会自动替换为控制器名称(去掉"Controller"后缀)- 对于
TestController,[controller]会被替换为"Test" - 因此完整路径为
/api/Test
-
[HttpGet]属性:- 没有指定路径模板,所以它使用控制器的基础路径
- 这意味着
GetPerson方法会响应GET /api/Test请求
路由工作原理示意图
HTTP请求: GET /api/Test
↓
路由系统匹配: [Route("api/[controller]")] → 找到TestController
↓
找到带有[HttpGet]的方法 → 执行GetPerson()
↓
返回Person对象(自动序列化为JSON)
如果您想更改路由
-
更改控制器基础路由:
[Route("custom/path/[controller]")] // 这将使路径变为 /custom/path/Test -
为方法添加特定路由:
[HttpGet("person")] public Person GetPerson() { return new Person("Jim Green", 20); } // 这将使路径变为 /api/Test/person -
使用路由参数:
[HttpGet("{id}")]
public Person GetPerson(int id)
{
    // 根据id获取人员
}
// 这将使路径变为 /api/Test/123 (其中123是id参数)
注意事项
-
您继承了
Controller而不是ControllerBase,这意味着这个控制器既可以处理API请求也可以返回视图 -
如果您只打算创建API端点,建议继承
ControllerBase以明确意图 -
使用
[ApiController]属性会自动启用一些API特定的行为,如自动模型验证 -
升级版示例
using Microsoft.AspNetCore.Mvc;
using System.Collections.Generic;
using System.Linq;

namespace WebApplication2.Controllers
{
    [Route("api/[controller]")]
    [ApiController]
    public class TestController : ControllerBase
    {
        // 模拟数据存储
        private static List<Person> _people = new List<Person>();
        private static List<SaveNoteRequest> _notes = new List<SaveNoteRequest>();

        // GET: api/Test
        [HttpGet]
        public IActionResult Get()
        {
            return Ok(new
            {
                People = _people,
                Notes = _notes
            });
        }

        // GET: api/Test/People
        [HttpGet("People")]
        public IActionResult GetPeople()
        {
            return Ok(_people);
        }

        // GET: api/Test/People/{id}
        [HttpGet("People/{id}")]
        public IActionResult GetPerson(int id)
        {
            if (id < 0 || id >= _people.Count)
                return NotFound();

            return Ok(_people[id]);
        }

        // POST: api/Test/People
        [HttpPost("People")]
        public IActionResult AddPerson([FromBody] Person person)
        {
            if (person == null)
                return BadRequest("Person data is required");

            _people.Add(person);
            return CreatedAtAction(nameof(GetPerson), new { id = _people.Count - 1 }, person);
        }

        // GET: api/Test/Notes
        [HttpGet("Notes")]
        public IActionResult GetNotes()
        {
            return Ok(_notes);
        }

        // GET: api/Test/Notes/{id}
        [HttpGet("Notes/{id}")]
        public IActionResult GetNote(int id)
        {
            if (id < 0 || id >= _notes.Count)
                return NotFound();

            return Ok(_notes[id]);
        }

        // POST: api/Test/Notes
        [HttpPost("Notes")]
        public IActionResult SaveNote([FromBody] SaveNoteRequest note)
        {
            if (note == null)
                return BadRequest("Note data is required");

            if (string.IsNullOrWhiteSpace(note.Title))
                return BadRequest("Title is required");

            _notes.Add(note);
            return CreatedAtAction(nameof(GetNote), new { id = _notes.Count - 1 }, note);
        }

        // 保留原有的Index方法用于MVC视图
        //public IActionResult Index()
        //{
        //    return View();
        //}
    }
}
[action]的用法
- 作用: 以
方法名称作为URL路径
namespace WebApplication3.Controllers
{
    [ApiController]
	// 未使用[action],访问地址: /api/Test
    [Route("api/[controller]")]
    public class TestController : Controller
    {


        [HttpGet]
        public Person GetPerson()
        {
            return new Person("Jim Green", 20);
        }

    }
}
......

namespace WebApplication3.Controllers
{
    [ApiController]
	// 使用[action],访问地址: /api/Test/GetPerson
    [Route("api/[controller]/[action]")]
    public class TestController : Controller
    {


        [HttpGet]
        public Person GetPerson()
        {
            return new Person("Jim Green", 20);
        }

    }
}
- 注意事项: 如果控制器中存在一个没有添加
[HttpGet]或者[HttpPost]等的public方法(private声明就不会有此烦恼,但是很少这么做),Swagger就会报错,可以用[ApiExplorerSettings(lgnoreApi = true)]
namespace WebApplication3.Controllers
{
    [ApiController]
    [Route("api/[controller]/[action]")]
    public class TestController : Controller
    {
        [HttpGet]
        public Person GetPerson()
        {
            return new Person("Jim Green", 20);
        }
		// Swagger不会再报错了(这里把public修改成private也可以,无需再添加属性说明了)
        [ApiExplorerSettings(IgnoreApi = true)]
        public void show()
        {
            Console.WriteLine("666");
        }
    }
}
- 如果想返回
一组对象,可以这么做
......
public Person[] GetAllPerson()
{
    return new Person[] { new Person("Jim Green", 20), new Person("Tom Green", 21) };
}
ControllerBase 和 Controller 的区别
在 ASP.NET Core 中,ControllerBase 和 Controller 是两个重要的基类,它们有以下主要区别:
ControllerBase 类
- 用途:专门为 Web API 设计,不包含视图支持
- 命名空间:
Microsoft.AspNetCore.Mvc - 包含的功能:
- HTTP 响应处理(Ok, BadRequest, NotFound 等方法)
- 状态码处理
- 内容协商(自动序列化为 JSON/XML)
- 模型状态验证
- 用户身份信息访问
- 但不包含任何与视图相关的方法
Controller 类
- 用途:为 MVC 模式设计,包含完整的视图支持
- 继承关系:
Controller继承自ControllerBase - 额外包含的功能(除了 ControllerBase 的所有功能):
- 视图相关方法(View, PartialView, ViewComponent)
- 重定向方法(Redirect, RedirectToAction, RedirectToRoute)
- 视图数据(ViewData, ViewBag)
- 临时数据(TempData)
代码示例对比
使用 ControllerBase(适合 Web API)
[ApiController]
[Route("api/[controller]")]
public class ApiController : ControllerBase
{
    [HttpGet]
    public IActionResult GetData()
    {
        return Ok(new { Message = "API Response" });
    }
}
使用 Controller(适合 MVC 带视图)
public class MvcController : Controller
{
    public IActionResult Index()
    {
        ViewData["Title"] = "Home Page";
        return View(); // 返回视图
    }

    public IActionResult RedirectExample()
    {
        return RedirectToAction("Index"); // 重定向
    }
}
选择指南
| 场景 | 推荐使用的基类 |
|---|---|
| 创建 Web API(返回 JSON/XML) | ControllerBase |
| 创建 MVC 控制器(返回 HTML 视图) | Controller |
| 同时提供 API 和视图的混合控制器 | Controller |
| 需要最小化依赖的轻量级 API | ControllerBase |
最佳实践
-
API 控制器应继承
ControllerBase并添加[ApiController]属性:[ApiController] [Route("api/[controller]")] public class ProductsController : ControllerBase { // API 端点 } -
MVC 控制器应继承
Controller:public class HomeController : Controller { // 返回视图的动作方法 } -
避免在 API 控制器中使用视图相关方法,即使它们继承自
Controller类。
在您的代码中,由于 TestController 只返回数据(Person 对象)而不返回视图,继承 ControllerBase 会更加合适,这样可以明确表达这是一个 API 控制器,并且避免不必要的视图相关方法。
小结
ControllerBase: 轻量级类,用于Web ApiController: 重量级类,用于传统的MVC
IActionResult 类型和 Ok() 方法详解
IActionResult 类型
IActionResult 是 ASP.NET Core 中最常用的返回类型之一,它是一个接口,表示一个操作结果,用于生成 HTTP 响应。
主要特点:
- 多态性:允许返回不同类型的响应(JSON、视图、文件、重定向等)
- 灵活性:可以根据不同条件返回不同响应类型
- 延迟执行:实际响应在返回时才生成
常见的 IActionResult 实现:
OkObjectResult- 200 OK 响应NotFoundResult- 404 未找到BadRequestResult- 400 错误请求RedirectResult- 重定向ViewResult- 视图结果JsonResult- JSON 数据FileResult- 文件下载
Ok() 方法
Ok() 是 ControllerBase 类中的一个方法,用于创建表示成功 HTTP 200 响应的 OkObjectResult。
方法签名:
protected virtual OkObjectResult Ok(object value);
使用方式:
-
返回简单成功响应:
public IActionResult Get() { return Ok(); // 返回空内容的200响应 } -
返回带数据的成功响应:
public IActionResult GetPerson() { var person = new Person("Jim Green", 20); return Ok(person); // 返回包含Person对象的200响应 } -
返回匿名对象:
public IActionResult GetData()
{
    return Ok(new {
        Name = "Jim",
        Age = 20,
        Email = "jim@example.com"
    });
}
工作原理
当您返回 Ok(object) 时:
- ASP.NET Core 框架接收
OkObjectResult - 框架使用配置的格式化程序(默认是 JSON)序列化对象
- 设置 HTTP 状态码为 200
- 将序列化后的内容写入响应体
与其他响应方法的比较
| 方法 | HTTP 状态码 | 用途 |
|---|---|---|
Ok() |
200 | 请求成功,有或没有数据 |
Created() |
201 | 资源创建成功 |
NoContent() |
204 | 请求成功,但无内容返回 |
BadRequest() |
400 | 客户端错误请求 |
NotFound() |
404 | 请求的资源不存在 |
Unauthorized() |
401 | 未授权访问 |
实际应用示例
[ApiController]
[Route("api/[controller]")]
public class UsersController : ControllerBase
{
    [HttpGet("{id}")]
    public IActionResult GetUser(int id)
    {
        // 模拟从数据库获取用户
        var user = _userRepository.GetUserById(id);

        if (user == null)
        {
            return NotFound(); // 返回404
        }

        return Ok(user); // 返回200和用户数据
    }

    [HttpPost]
    public IActionResult CreateUser([FromBody] User user)
    {
        if (!ModelState.IsValid)
        {
            return BadRequest(ModelState); // 返回400和验证错误
        }

        var createdUser = _userRepository.AddUser(user);

        // 返回201和创建的资源,以及位置头信息
        return CreatedAtAction(nameof(GetUser),
                              new { id = createdUser.Id },
                              createdUser);
    }
}
总结
IActionResult提供了处理各种 HTTP 响应的灵活性Ok()方法是返回成功响应的便捷方式- 在 Web API 开发中,使用
IActionResult和相关的辅助方法(如Ok()、NotFound()等)是标准做法 - 这些方法使代码更加清晰、可读,并且符合 RESTful API 设计原则
在您的代码中,使用 IActionResult 而不是直接返回 Person 类型会更有优势,因为这样可以处理更多场景(如验证失败、资源不存在等)。
[FromBody] 属性详解
[FromBody] 是 ASP.NET Core 中的一个属性,用于指示模型绑定系统从 HTTP 请求的正文(body)中获取数据来绑定到动作方法的参数。让我详细解释这个属性的作用和使用方式。
基本概念
作用
[FromBody] 属性告诉 ASP.NET Core:
- 不要从 URL 查询字符串、路由数据或表单数据中获取参数值
- 而是从 HTTP 请求的正文中读取数据
- 使用配置的输入格式化程序(如 JSON 或 XML 格式化程序)将正文内容反序列化为指定的参数类型
使用场景
[HttpPost]
public IActionResult CreateUser([FromBody] User user)
{
    // 处理用户创建逻辑
}
在这个例子中,[FromBody] 指示 ASP.NET Core 从请求正文中读取 JSON 数据并将其反序列化为 User 对象。
工作原理
- 请求到达:客户端发送 HTTP POST 请求,正文包含 JSON 数据
- 内容类型检查:框架检查
Content-Type头(如application/json) - 选择格式化程序:根据内容类型选择合适的输入格式化程序
- 反序列化:格式化程序将 JSON 正文反序列化为
User对象 - 模型验证:如果启用了模型验证,会验证反序列化的对象
- 方法调用:将反序列化的对象传递给动作方法
示例请求
对于上述 CreateUser 方法,客户端需要发送这样的请求:
POST /api/users HTTP/1.1
Content-Type: application/json
Host: localhost:5000

{
    "name": "Jim Green",
    "age": 20,
    "email": "jim@example.com"
}
与其他绑定属性的对比
ASP.NET Core 提供了多个绑定源属性:
| 属性 | 绑定源 | 示例 |
|---|---|---|
[FromBody] |
请求正文 | [FromBody] User user |
[FromQuery] |
查询字符串 | [FromQuery] string name |
[FromRoute] |
路由数据 | [FromRoute] int id |
[FromForm] |
表单数据 | [FromForm] IFormFile file |
[FromHeader] |
请求头 | [FromHeader] string authorization |
重要注意事项
-
每个动作只能有一个
[FromBody]参数- 因为请求正文是一个流,只能读取一次
- 如果需要多个复杂对象,可以将它们组合成一个包装对象
-
内容类型必须匹配
- 默认情况下,ASP.NET Core 期望 JSON 数据(
application/json) - 如果需要其他格式,需要配置相应的格式化程序
- 默认情况下,ASP.NET Core 期望 JSON 数据(
-
与
[ApiController]属性的交互- 在带有
[ApiController]的控制器中,复杂类型参数默认从正文绑定 - 因此,在这种情况下可以省略
[FromBody]属性 - 但显式使用可以提高代码可读性
- 在带有
实际应用示例
1. 基本用法
[HttpPost]
public IActionResult CreateProduct([FromBody] Product product)
{
    // 处理产品创建
    return CreatedAtAction(nameof(GetProduct), new { id = product.Id }, product);
}
2. 组合对象
public class CreateOrderRequest
{
    public Order Order { get; set; }
    public List<OrderItem> Items { get; set; }
}

[HttpPost("orders")]
public IActionResult CreateOrder([FromBody] CreateOrderRequest request)
{
    // 处理订单创建
    return Ok();
}
3. 验证和错误处理
[HttpPost]
public IActionResult CreateUser([FromBody] User user)
{
    if (!ModelState.IsValid)
    {
        return BadRequest(ModelState);
    }

    // 处理用户创建
    return Ok(user);
}
常见问题解决
-
415 Unsupported Media Type 错误
- 确保请求的
Content-Type头正确设置(如application/json) - 确保客户端发送的数据格式正确
- 确保请求的
-
400 Bad Request 错误
- 检查 JSON 数据格式是否正确
- 验证模型属性是否匹配(大小写敏感)
-
空参数值
- 确保请求正文不为空
- 检查 JSON 属性名称是否与模型属性匹配
总结
[FromBody] 属性是 ASP.NET Core Web API 开发中的重要组成部分,它:
- 指示框架从请求正文中绑定数据
- 使用配置的输入格式化程序反序列化数据
- 对于复杂类型参数,在带有
[ApiController]的控制器中可以省略 - 每个动作方法只能有一个
[FromBody]参数 - 需要正确的
Content-Type头才能正常工作
正确使用 [FromBody] 属性可以确保您的 API 能够正确接收和处理客户端发送的数据。
CreatedAtAction 方法详解
CreatedAtAction 是 ASP.NET Core 中 ControllerBase 类的一个方法,用于创建表示 HTTP 201 Created 响应的 CreatedAtActionResult。这个方法在 RESTful API 设计中非常重要,特别是在创建新资源后返回响应时。
方法签名
protected virtual CreatedAtActionResult CreatedAtAction(
    string actionName,
    object routeValues,
    object value
)
参数解释
-
actionName:字符串参数,指定用于生成 Location 头的动作方法名称- 使用
nameof(GetProduct)可以避免硬编码方法名,提高代码的可维护性 - 如果重命名
GetProduct方法,编译器会报错,防止运行时错误
- 使用
-
routeValues:匿名对象,包含生成 URL 所需的路由参数new { id = product.Id }创建一个包含 ID 参数的匿名对象- 这些参数将用于构建指向新创建资源的 URL
-
value:要返回的资源对象本身- 通常是刚刚创建的资源(如
product) - 这个对象会被序列化并包含在响应体中
- 通常是刚刚创建的资源(如
作用和工作原理
1. 设置 HTTP 状态码为 201 Created
- 表示请求已成功处理并创建了新资源
- 与简单的 200 OK 相比,201 Created 更准确地描述了操作结果
2. 添加 Location 头部
- 生成指向新创建资源的 URL
- 客户端可以使用这个 URL 直接访问新创建的资源
- 例如:
Location: https://api.example.com/products/123
3. 在响应体中包含创建的资源
- 返回资源的完整表示,包括服务器生成的属性(如 ID、创建时间等)
- 客户端无需立即发起另一个请求来获取资源详情
示例场景
假设有一个产品 API:
[ApiController]
[Route("api/[controller]")]
public class ProductsController : ControllerBase
{
    // POST 方法创建新产品
    [HttpPost]
    public IActionResult CreateProduct([FromBody] Product product)
    {
        // 保存产品到数据库(假设保存后会自动生成 ID)
        var createdProduct = _productService.Create(product);

        // 返回 201 Created 响应
        return CreatedAtAction(
            nameof(GetProduct), // 指向获取产品详情的动作方法
            new { id = createdProduct.Id }, // 路由参数
            createdProduct // 返回创建的产品对象
        );
    }

    // GET 方法获取特定产品
    [HttpGet("{id}")]
    public IActionResult GetProduct(int id)
    {
        var product = _productService.GetById(id);
        if (product == null)
        {
            return NotFound();
        }
        return Ok(product);
    }
}
客户端收到的响应
当客户端调用创建产品的 API 时,会收到类似这样的响应:
HTTP/1.1 201 Created
Content-Type: application/json; charset=utf-8
Location: https://api.example.com/api/products/123
Date: Wed, 01 Jan 2023 12:00:00 GMT

{
    "id": 123,
    "name": "New Product",
    "price": 29.99,
    "createdAt": "2023-01-01T12:00:00Z"
}
优势
- 符合 RESTful 设计原则:正确使用 HTTP 状态码和头部
- 提供完整的资源信息:客户端无需额外请求即可获取新资源的完整信息
- 提供资源位置:Location 头部告诉客户端如何访问新创建的资源
- 提高客户端效率:客户端可以直接使用响应中的资源数据,无需立即发起另一个请求
注意事项
- 确保指定的动作方法(如
GetProduct)存在且可访问 - 确保路由参数与动作方法的参数匹配
- 在分布式系统中,确保生成的 URL 是客户端可访问的绝对 URL
- 如果资源创建操作是异步的,确保在返回响应前资源已完全创建并持久化
替代方案
如果不想使用 CreatedAtAction,也可以手动创建响应:
var routeValues = new { id = createdProduct.Id };
var url = Url.Action(nameof(GetProduct), routeValues) ?? string.Empty;
return Created(url, createdProduct);
但使用 CreatedAtAction 更加简洁和符合 ASP.NET Core 的惯用法。
总结
CreatedAtAction 方法是 ASP.NET Core Web API 开发中的重要工具,它:
- 返回正确的 HTTP 201 Created 状态码
- 提供指向新创建资源的 Location 头部
- 在响应体中包含完整的资源表示
- 遵循 RESTful API 设计的最佳实践
- 提高客户端开发人员的体验和效率
使用这个方法可以使您的 API 更加符合 RESTful 原则,并提供更好的客户端开发体验。
异步方法演示
- 注意事项:
异步方法一般无需以Async结尾
......
[HttpGet]
public async Task<string> ReadTxtFileContent()
{
    var content = await System.IO.File.ReadAllTextAsync("d:/text.txt");
    return content.Substring(0,6);
}
......
- 访问地址: https://localhost:7214/api/Test/ReadTxtFileContent
- 如果想嵌套
JSON,可以这么写
namespace WebApplication3
{
    public record Person(string Name,int Age, string[] Hobby);
}
......
public Person GetPerson()
{
    return new Person("Jim Green", 20, new[] {"Basketball","Football"});
}
- 结果,访问: https://localhost:7214/api/Test/GetPerson

{
  "name": "Jim Green",
  "age": 20,
  "hobby": [
    "Basketball",
    "Football"
  ]
}
[FromRoute] 用法演示
- 作用: 从
url路径从获取值
[HttpGet("{Id}")] // url路径包含Id
public IActionResult GetPersonById([FromRoute] int Id)  { // 如果二者名称一致,[FromRoute]可以省略
    if(Id <= 0)
    {
        return BadRequest("无效Id");
    }

    var p = new  { Id = Id,Name="KateGreen",Age=18,Hobby=new string[] { "Basketball","Football" } };
    return Ok(p);
}

- 如果二者名称不一致,可以在[FromRoute]使用Name参数来指明

// https://localhost:7214/api/Test/2
[HttpGet("{userId}")]
public IActionResult GetPersonById([FromRoute(Name = "userId")] int Id) { // 接收userId的值并赋给Id
    if(Id <= 0)
    {
        return BadRequest("无效Id");
    }

    var p = new  { Id = Id,Name="KateGreen",Age=18,Hobby=new string[] { "Basketball","Football" } };
    return Ok(p);
}
FromQuery的用法差不多,混合用法示例
// https://localhost:7214/api/Test/1?userName=JimGreen
[HttpGet("{Id}")] // 必传参数
public IActionResult GetPersonByName([FromQuery(Name = "userName")] string Name, [FromRoute(Name = "Id")] int Id)
{

    var p = new { Id = Id, Name = Name, Age = 18, Hobby = new string[] { "Basketball", "Football" } };
    return Ok(p);
}
依赖注入的应用
- 通用的方法,通过
构造函数实现
- 自定义类
- 注册该类
- 接口的构造函数传入该类(字段的形式),并赋值
- 应用
// 自定义类
namespace WebApplication3
{
    public class Calculator
    {
        public int Add(int a, int b)
        {
            return a + b;
        }
        public int Sub(int a, int b)
        {
            return a - b;
        }
        public int Mul(int a, int b)
        {
            return a * b;
        }
        public int Div(int a, int b)
        {
            return a / b;
        }
    }
}

// Program.cs
......
builder.Services.AddSwaggerGen();
// 依赖注入(注册)
builder.Services.AddScoped<Calculator>();


// TestUserController.cs
using Microsoft.AspNetCore.Mvc;

namespace WebApplication3.Controllers
{

    [ApiController]
    [Route("test/api/user/[controller]")]
    public class TestUserController : Controller
    {

		// 以字段的形式存在
        private readonly Calculator calculator;

		// 传入构造函数
        public TestUserController(Calculator calculator) {
            this.calculator = calculator;
        }

        ...... // 其他接口

        [HttpGet]
        public IActionResult CalculatorResult(int i,int j)
        {
            return Ok(calculator.Add(i,j));
        }
    }
}
- 小结:在
Program.cs中注册服务,然后在控制器的构造函数中声明需要该服务,框架会自动注入。这样做的优点是解耦,便于测试和维护 - 特殊应用场景: 使用
[FromServices],用于在Action 方法参数级别进行依赖注入,而不是通过构造函数注入,实例演示
// User.cs

using System;


namespace WebApplication3
{
    ......

	// 新增接口和子类
    public interface ILoggerService
    {
        void LogInfo(string message);
    }

    public class LoggerService : ILoggerService
    {
        public void LogInfo(string message)
        {
            Console.WriteLine($"[INFO] {DateTime.Now}: {message}");
        }
    }


}


// Program.cs 注册
......
// 依赖注入(注册)
builder.Services.AddScoped<Calculator>();
builder.Services.AddScoped<ILoggerService,LoggerService>();

// 主接口使用

using Microsoft.AspNetCore.Mvc;

namespace WebApplication3.Controllers
{

    [ApiController]
    [Route("test/api/user/[controller]")]
    public class TestUserController : Controller
    {
		// 通过构造注入
        private readonly Calculator calculator;
        public TestUserController(Calculator calculator) {
            this.calculator = calculator;
        }

        ......

        // 使用构造函数注入的服务
        [HttpGet("add")]
        public IActionResult CalculatorResult(int i,int j)
        {
            return Ok(calculator.Add(i,j));
        }

        // 使用 [FromServices] 注入(只在当前方法使用)
        [HttpGet("multiply")]
        public IActionResult MultiplyNumbers(int i,int j, [FromServices] ILoggerService logger)
        {
            // 记录日志(只在乘法运算时需要)
            logger.LogInfo($"Multiplying {i} and {j}");
            var result = calculator.Mul(i, j);
            return Ok(result);
        }

        // 也可以完全不使用构造函数注入
        [HttpGet("subtract")]
        public IActionResult SubtractNumbers(
            int i,
            int j,
            [FromServices] Calculator calc,  // 直接注入Calculator
            [FromServices] ILoggerService logger)
        {
            logger.LogInfo($"Subtracting {j} from {i}");
            return Ok(calc.Sub(i, j));
        }


    }
}
使用场景对比:
| 方式 | 适用场景 | 优点 | 缺点 |
|---|---|---|---|
| 构造函数注入 | 服务在多个方法中使用 | 代码整洁,依赖明确 | 所有方法都能访问,可能误用 |
[FromServices] |
服务只在单个方法使用 | 作用域明确,按需使用 | 参数列表可能变长 |
第三方库Zack的使用
- 作用: 在分层项目中,让各个项目负责各自的
服务注册- 实现模块化的服务注册,即每个项目或模块可以负责注册自己的服务
- 传统的场景中,全部都在"Program.cs"中注册服务,代码一多,就是一大坨类似的东东,不美观,也不好维护
......
builder.Services.AddScoped<Calculator>();
builder.Services.AddScoped<ILoggerService,LoggerService>();
......
- 安装:
Install-Package Zack.Commons
好的!使用 Zack.Commons 包可以很方便地实现模块化服务注册,让各个项目负责注册自己的服务。下面是一个完整的简单实例:
1. 安装包
Install-Package Zack.Commons
2. 项目结构
MySolution/
├── WebAPI/                 # 主项目
│   ├── Program.cs
│   ├── Controllers/
│   └── WebAPI.csproj
├── Business/               # 业务层项目
│   ├── Services/
│   ├── ServiceInstallers/
│   └── Business.csproj
├── DataAccess/             # 数据访问层项目
│   ├── Repositories/
│   ├── ServiceInstallers/
│   └── DataAccess.csproj
└── Common/                 # 通用项目
    ├── Interfaces/
    └── Common.csproj
3. 通用接口定义 (Common 项目)
// IUserService.cs
public interface IUserService
{
    string GetUserName(int id);
}

// IProductRepository.cs
public interface IProductRepository
{
    List<string> GetProducts();
}

// 安装器接口
public interface IServiceInstaller
{
    void Install(IServiceCollection services, IConfiguration configuration);
}
4. 业务层服务注册 (Business 项目)
// Services/UserService.cs
public class UserService : IUserService
{
    public string GetUserName(int id)
    {
        return $"User_{id}";
    }
}

// ServiceInstallers/BusinessServiceInstaller.cs
public class BusinessServiceInstaller : IServiceInstaller
{
    public void Install(IServiceCollection services, IConfiguration configuration)
    {
        Console.WriteLine("注册业务层服务...");

        // 注册业务服务
        services.AddScoped<IUserService, UserService>();
        services.AddScoped<ProductService>(); // 直接注册具体类

        // 可以从配置文件中读取配置
        services.Configure<BusinessOptions>(configuration.GetSection("Business"));
    }
}
5. 数据访问层服务注册 (DataAccess 项目)
// Repositories/ProductRepository.cs
public class ProductRepository : IProductRepository
{
    public List<string> GetProducts()
    {
        return new List<string> { "Product1", "Product2", "Product3" };
    }
}

// ServiceInstallers/DataAccessServiceInstaller.cs
public class DataAccessServiceInstaller : IServiceInstaller
{
    public void Install(IServiceCollection services, IConfiguration configuration)
    {
        Console.WriteLine("注册数据访问层服务...");

        // 注册仓储
        services.AddScoped<IProductRepository, ProductRepository>();
        services.AddScoped<ICategoryRepository, CategoryRepository>();

        // 注册数据库上下文
        services.AddDbContext<AppDbContext>(options =>
            options.UseSqlServer(configuration.GetConnectionString("Default")));
    }
}
6. 主项目配置 (WebAPI 项目 - Program.cs)
using Zack.Commons;

var builder = WebApplication.CreateBuilder(args);

// 自动扫描并注册所有 IServiceInstaller 实现
builder.Services.RunModuleServices(builder.Configuration);

// 或者手动指定程序集
// builder.Services.RunModuleServices(builder.Configuration,
//     typeof(BusinessServiceInstaller).Assembly,
//     typeof(DataAccessServiceInstaller).Assembly);

builder.Services.AddControllers();
builder.Services.AddSwaggerGen();

var app = builder.Build();

if (app.Environment.IsDevelopment())
{
    app.UseSwagger();
    app.UseSwaggerUI();
}

app.UseAuthorization();
app.MapControllers();

app.Run();
7. 控制器使用 (WebAPI 项目)
[ApiController]
[Route("api/[controller]")]
public class TestController : ControllerBase
{
    private readonly IUserService _userService;
    private readonly IProductRepository _productRepo;

    public TestController(IUserService userService, IProductRepository productRepo)
    {
        _userService = userService;
        _productRepo = productRepo;
    }

    [HttpGet("user/{id}")]
    public IActionResult GetUser(int id)
    {
        return Ok(_userService.GetUserName(id));
    }

    [HttpGet("products")]
    public IActionResult GetProducts()
    {
        return Ok(_productRepo.GetProducts());
    }
}
8. 项目引用配置
WebAPI.csproj:
<Project Sdk="Microsoft.NET.Sdk.Web">
  <ItemGroup>
    <ProjectReference Include="..\Business\Business.csproj" />
    <ProjectReference Include="..\DataAccess\DataAccess.csproj" />
    <ProjectReference Include="..\Common\Common.csproj" />
  </ItemGroup>

  <ItemGroup>
    <PackageReference Include="Zack.Commons" Version="1.0.0" />
  </ItemGroup>
</Project>
Business.csproj:
<Project Sdk="Microsoft.NET.Sdk">
  <ItemGroup>
    <ProjectReference Include="..\Common\Common.csproj" />
  </ItemGroup>
</Project>
9. 配置文件 (appsettings.json)
{
  "ConnectionStrings": {
    "Default": "Server=.;Database=MyDb;Trusted_Connection=true;"
  },
  "Business": {
    "Timeout": 30,
    "MaxRetries": 3
  }
}
运行效果:
-
启动应用时,会自动扫描所有引用的程序集
-
找到所有实现了
IServiceInstaller的类 -
按顺序调用它们的
Install方法注册服务 -
控制台输出:
注册业务层服务...
注册数据访问层服务...
优点:
- 模块化:每个项目负责自己的服务注册
- 解耦:主项目不需要知道具体要注册哪些服务
- 可维护性:新增服务只需在对应模块添加,无需修改主项目
- 自动化:自动扫描,无需手动注册每个安装器
这种方式特别适合大型项目,可以让团队不同成员负责不同模块的服务注册。
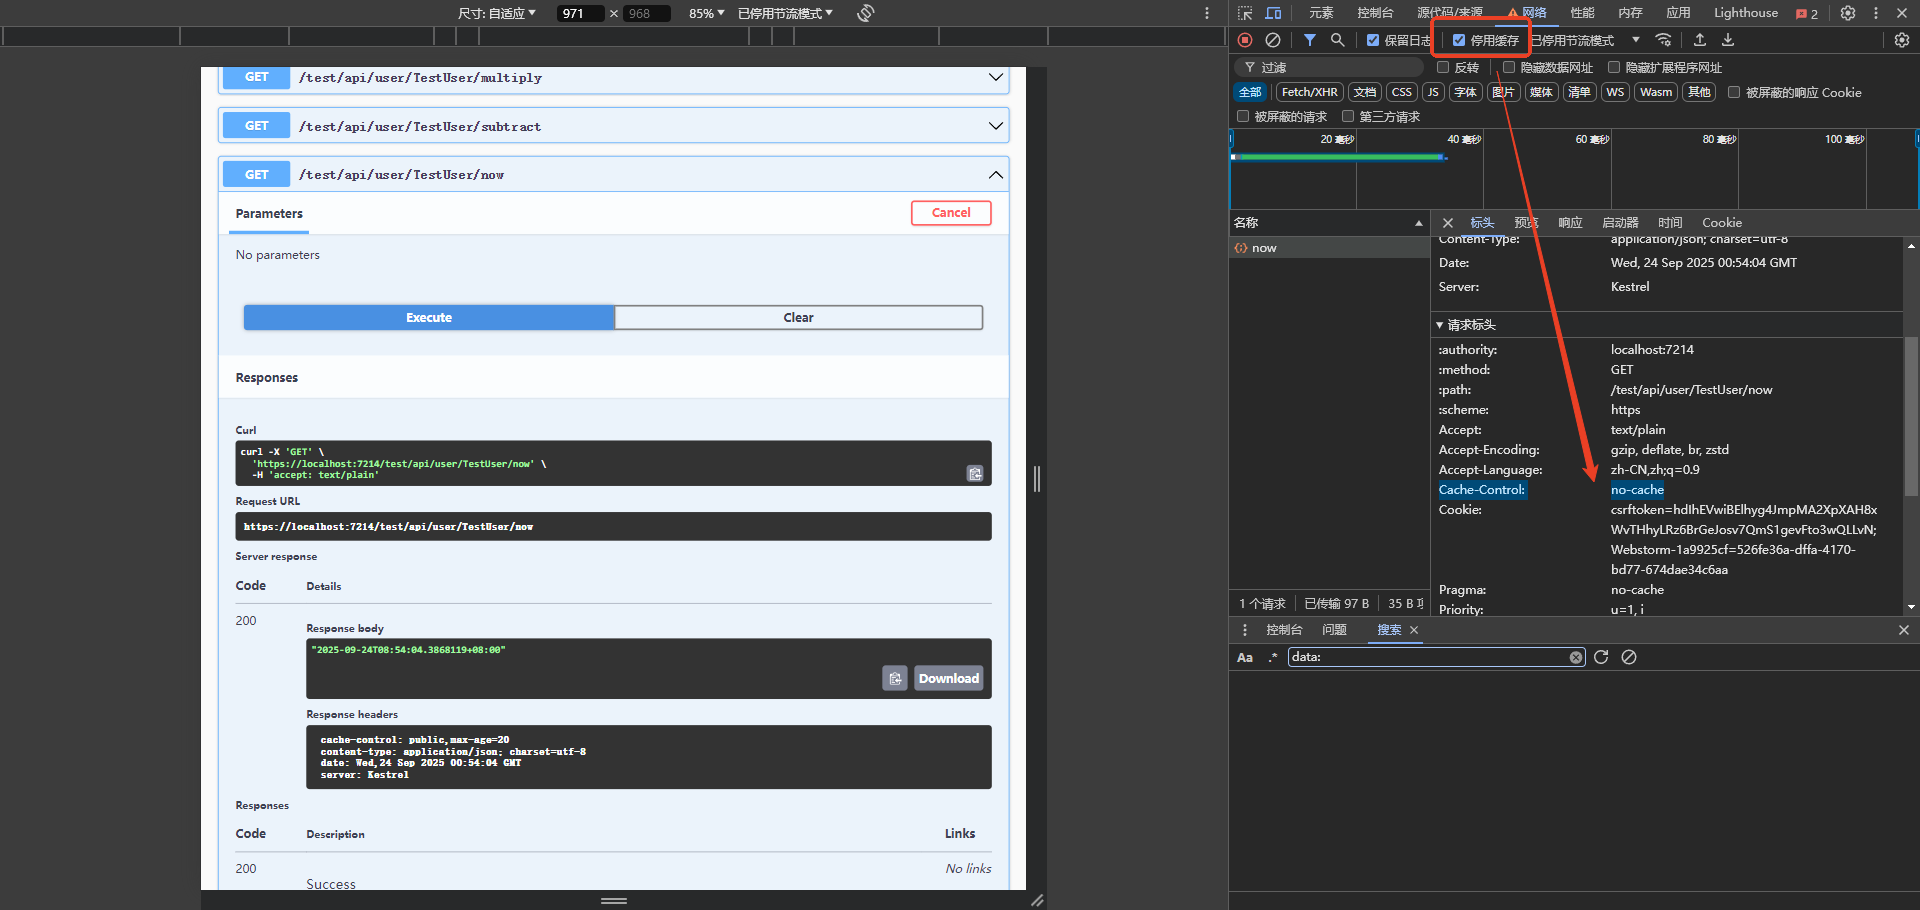
cache-control 缓存头设置
- 务器如果返回cache-control:max-age=60: 则表示服务器指示浏览器端“可以缓存这个响应内容60秒
 - 我们只要给需要进行缓存控制的控制器的操作方法添加[ResponseCacheAttribute]这个Attribute,ASP.NET Core会自动添 加cache-control报文头

 - 验证:编写一个返回当前时间的Action方法。分别加和不加ResponseCacheAttribute看区别
......
[ResponseCache(Duration = 20)] // 设置缓存
[HttpGet("now")]
public DateTime Now()
{
    return DateTime.Now;
}

- 注意事项: 谷歌开发者工具-停用缓存选项,必须不勾,才能看到效果!(勾选就没有效果)
服务端缓存: 只有第一个请求给予响应,后面的请求全部走框架的缓存
// Program.cs
......
// 启用服务端缓存
app.UseResponseCaching();
......

// 接口
......
[ResponseCache(Duration = 20)]
[HttpGet("now")]
public DateTime Now()
{
    return DateTime.Now;
}

- 打上断点调试,只有第一次进断点了,后面几次都不能触发断点(除非过20秒)
-
注意事项:
服务端缓存其实是一种鸡肋玩意,因为一旦客户端发送的请求头携带`Cache-Control:no-cache
,服务端就不会用缓存`去响应,直接进入接口
- 无法解决恶意请求给服务器带来的压力
- 服务器端响应缓存还有很多限制,包括但不限于:响应状态码为200的GET或者HEAD响应才可能被缓存;报文头中不能有Authorization、Set-Cookie等待
- 解决办法: 采用内存缓存、分布式缓存
	- 在Web服务器中,多个不同网站是运行在不同的进程中的,因此不同网站的内存缓存是不会互相干扰的.
	  而且网站重启后,内存缓存中的所有数据也就都被清空了!
内存缓存演示---builder.Services.AddMemoryCache()
// Program.cs
......
// 新增内存缓存
builder.Services.AddMemoryCache();
......

// 接口: 创建缓存对象-去缓存对象查一下,有就返回数据,没有就先缓存一下,返回给前端(查询时,优先从缓存取)
using Microsoft.AspNetCore.Mvc;
using Microsoft.Extensions.Caching.Memory;

namespace WebApplicationAboutCache.Controllers
{
    [ApiController]
    [Route("api/[controller]")]
    public class SimpleCacheController : Controller
    {
        private readonly IMemoryCache _cache;

        public SimpleCacheController(IMemoryCache cache)
        {
            _cache = cache;
        }

        // 示例1:基本缓存使用,https://localhost:7073/api/SimpleCache/time
        [HttpGet("time")]
        public IActionResult GetCachedTime()
        {
            string cacheKey = "current_time";
            if(_cache.TryGetValue(cacheKey,out string cachedTime))
            {
                return Ok($"从缓存获取的时间: {cachedTime}");
            }
            string currentTime = DateTime.Now.ToString("yyyy-MM-dd HH:mm:ss");
            _cache.Set(cacheKey, currentTime, TimeSpan.FromSeconds(30));
            return Ok($"新生成的时间: {currentTime}");
        }
        // 示例2:缓存用户信息,https://localhost:7073/api/SimpleCache/user/1
        [HttpGet("user/{id}")]
        public IActionResult GetUser(int id)
        {
            string cacheKey = $"user_{id}"; ;
            if (_cache.TryGetValue(cacheKey, out string userInfo))
            {
                return Ok($"从缓存获取的时间: {userInfo}");
            }
            string user = $"用户{id} - 张三";
            _cache.Set(cacheKey, user, TimeSpan.FromMinutes(1));
            return Ok($"从数据库查询用户: {user}");
        }
        // 示例3:清除缓存,https://localhost:7073/api/SimpleCache/clear/user_1
        [HttpDelete("clear/{key}")]
        public IActionResult ClearCache(string key)
        {
            _cache.Remove(key);
            return Ok($"已清除缓存: {key}");
        }

        //public IActionResult Index()
        //{
        //    return View();
        //}
    }
}
- 更简单的调用---
GetOrCreate演示
using Microsoft.AspNetCore.Mvc;
using Microsoft.Extensions.Caching.Memory;

namespace WebApplicationAboutCache.Controllers
{
    public class EasyCacheController : Controller
    {
        private readonly IMemoryCache _cache;

        public EasyCacheController(IMemoryCache cache)
        {
            _cache = cache;
        }

        // 最简单的缓存用法: https://localhost:7073/simple
        [HttpGet("simple")]
        public IActionResult GetSimpleData()
        {
            var data = _cache.GetOrCreate("simple_data", entry =>
            {
                entry.AbsoluteExpiration = DateTime.Now.AddMinutes(1);
                return $"这是缓存的数据,创建时间: {DateTime.Now:HH:mm:ss}";
            });

            return Ok(data);
        }

        // 缓存数字计算结果的例子(第一次计算有点慢,后面就很顺畅): https://localhost:7073/calculate/41
        [HttpGet("calculate/{number}")]
        public IActionResult CalculateSquare(int number)
        {
            string cacheKey = $"square_{number}";

            int result = _cache.GetOrCreate(cacheKey, entry =>
            {
                entry.AbsoluteExpiration = DateTime.Now.AddMinutes(2);

                // 模拟复杂计算
                Thread.Sleep(1000); // 等待1秒,模拟耗时操作(模拟前后请求耗时的不同)

                return number * number; // 返回平方值
            });

            return Ok($"{number} 的平方是: {result}");
        }

    }
}
out 关键字的作用
out 表示这个参数是输出参数,意思是:方法会给这个参数赋值,而不是使用调用者传入的值。
简单比喻
想象一下:
- 普通参数:你给朋友一个装满东西的箱子(传入值)
out参数:你给朋友一个空箱子,朋友会在里面放东西还给你(输出值)
具体例子
例子1:TryGetValue 中的 out
// 假设缓存中有没有 "user_123" 这个键,我们不知道
// TryGetValue 会告诉我们结果,并通过 out 参数返回对应的值

if (_cache.TryGetValue("user_123", out string userInfo))
{
    // 如果缓存中有这个键:
    // 1. TryGetValue 返回 true
    // 2. userInfo 变量会被赋值为缓存中的值
    Console.WriteLine(userInfo); // 输出缓存的值
}
else
{
    // 如果缓存中没有:
    // 1. TryGetValue 返回 false
    // 2. userInfo 变量会被设置为默认值(对于string是null)
    Console.WriteLine("缓存中没有找到数据");
}
例子2:自己写一个使用 out 的方法
// 定义一个使用 out 参数的方法
public bool TryDivide(int a, int b, out double result)
{
    if (b == 0)
    {
        result = 0; // 即使失败,也必须给 out 参数赋值
        return false;
    }

    result = (double)a / b; // 计算并赋值给 out 参数
    return true;
}

// 使用这个方法
if (TryDivide(10, 3, out double divisionResult))
{
    Console.WriteLine($"除法结果: {divisionResult}"); // 输出: 除法结果: 3.333...
}
else
{
    Console.WriteLine("除法失败,除数不能为0");
}
out 参数的重要规则
- 调用前不需要初始化
string userInfo; // 不需要初始化
if (_cache.TryGetValue("key", out userInfo))
{
    // ...
}
- 方法内部必须赋值
public bool GetUserInfo(out string info)
{
    // 必须在返回前给 out 参数赋值
    info = "张三"; // 必须赋值
    return true;
}
- 调用时必须用
out关键字
// 正确
TryGetValue("key", out string value);

// 错误(编译不通过)
TryGetValue("key", string value);
更多简单例子
例子3:解析字符串为数字
string input = "123";

// TryParse 使用 out 参数返回解析结果
if (int.TryParse(input, out int number))
{
    Console.WriteLine($"解析成功: {number}");
}
else
{
    Console.WriteLine("解析失败");
}
例子4:返回多个值
public bool GetMinMax(int[] numbers, out int min, out int max)
{
    if (numbers.Length == 0)
    {
        min = max = 0;
        return false;
    }

    min = numbers.Min();
    max = numbers.Max();
    return true;
}

// 使用
int[] scores = { 85, 92, 78, 96 };
if (GetMinMax(scores, out int lowest, out int highest))
{
    Console.WriteLine($"最低分: {lowest}, 最高分: {highest}");
}
总结
out 关键字的作用:
- ✅ 输出值:方法通过这个参数返回数据给调用者
- ✅ 不需要初始化:调用前变量不需要赋值
- ✅ 必须赋值:方法内部必须给 out 参数赋值
- ✅ 类似返回多个值:一个方法可以返回一个主要结果 + 多个 out 参数
在缓存示例中,TryGetValue 用 out 来返回找到的值,同时用布尔返回值告诉你是否找到,这样就很方便!
缓存时间的两种策略
绝对过期时间和滑动过期时间
- 绝对过期时间: 时间到了,缓存就被删除,需要重新缓存.
- 滑动过期时间: 缓存项在每次被访问时,过期时间都会重新计算
......
public IActionResult GetSimpleData()
{
    var data = _cache.GetOrCreate("simple_data", entry =>
    {
        //entry.AbsoluteExpiration = DateTime.Now.AddMinutes(1);
        // 使用绝对缓存
        entry.AbsoluteExpirationRelativeToNow = TimeSpan.FromSeconds(10);
        return $"这是缓存的数据,创建时间: {DateTime.Now:HH:mm:ss}";
    });

    return Ok(data);
}
注意事项
AbsoluteExpiration:适合需要在特定时间点刷新缓存的场景AbsoluteExpirationRelativeToNow:适合需要固定存活时间的缓存场景
[HttpGet("simple")]
public IActionResult GetSimpleData()
{
    var data = _cache.GetOrCreate("simple_data", entry =>
    {
        //entry.AbsoluteExpiration = DateTime.Now.AddMinutes(1);
        // entry.AbsoluteExpirationRelativeToNow = TimeSpan.FromSeconds(10);
        entry.SlidingExpiration = TimeSpan.FromSeconds(10); // 如果一直命中,就一直缓存,若10秒内没有命中,就自动消失
        return $"这是缓存的数据,创建时间: {DateTime.Now:HH:mm:ss}";
    });

    return Ok(data);
}
SlidingExpiration 的特点:
- ✅ 自动续期:只要有人访问,缓存就继续存活
- ✅ 适合热门数据:经常被访问的数据会一直留在缓存中
- ✅ 自动清理:冷数据自动过期释放内存
- ⚠️ 注意:可能造成热门数据长期不过期,建议配合
绝对过期使用
[HttpGet("simple")]
public IActionResult GetSimpleData()
{
    var data = _cache.GetOrCreate("simple_data", entry =>
    {
        // 混合使用
        entry.AbsoluteExpirationRelativeToNow = TimeSpan.FromSeconds(20);
        entry.SlidingExpiration = TimeSpan.FromSeconds(10);
        return $"这是缓存的数据,创建时间: {DateTime.Now:HH:mm:ss}";
    });

    return Ok(data);
}
缓存穿透和缓存雪崩
这是两个在使用缓存时常见的性能问题,让我用简单易懂的方式解释:
1. 缓存穿透(Cache Penetration)
什么是缓存穿透?
缓存穿透是指查询一个根本不存在的数据,导致请求直接绕过缓存,每次都打到数据库上。
形象比喻:
- 🎯 正常流程:查询数据 → 先查缓存 → 缓存有就返回,没有就查数据库 → 存入缓存
- 💥 缓存穿透:查询不存在的数据 → 缓存没有 → 查数据库 → 数据库也没有 → 下次继续查数据库
代码示例:
// 有缓存穿透风险的代码
public Product GetProduct(int productId)
{
    string cacheKey = $"product_{productId}";

    // 尝试从缓存获取
    if (_cache.TryGetValue(cacheKey, out Product product))
    {
        return product;
    }

    // 缓存没有,查询数据库
    product = _dbContext.Products.FirstOrDefault(p => p.Id == productId);

    if (product != null)
    {
        // 如果数据库有,存入缓存
        _cache.Set(cacheKey, product, TimeSpan.FromMinutes(30));
    }

    return product; // 如果数据库没有,返回null
}
攻击场景:
恶意用户不断请求不存在的ID:
请求 product_999999  (不存在)
请求 product_888888  (不存在)
请求 product_777777  (不存在)
...
每次都直接查询数据库!
解决方案:
方案1:缓存空对象
public Product GetProduct(int productId)
{
    string cacheKey = $"product_{productId}";

    if (_cache.TryGetValue(cacheKey, out Product product))
    {
        // 如果缓存的是空对象标记,返回null
        if (product?.Id == -1) return null;
        return product;
    }

    product = _dbContext.Products.FirstOrDefault(p => p.Id == productId);

    if (product != null)
    {
        _cache.Set(cacheKey, product, TimeSpan.FromMinutes(30));
    }
    else
    {
        // 缓存空对象,设置较短过期时间
        var emptyProduct = new Product { Id = -1 }; // 特殊标记
        _cache.Set(cacheKey, emptyProduct, TimeSpan.FromMinutes(5));
    }

    return product;
}
方案2:布隆过滤器(Bloom Filter)
// 初始化时加载所有存在的ID到布隆过滤器
private BloomFilter<int> _productFilter;

public Product GetProduct(int productId)
{
    // 先检查布隆过滤器
    if (!_productFilter.MightContain(productId))
    {
        return null; // 肯定不存在,直接返回
    }

    // 后续正常缓存逻辑...
    string cacheKey = $"product_{productId}";
    // ...
}
2. 缓存雪崩(Cache Avalanche)
什么是缓存雪崩?
缓存雪崩是指大量缓存同时过期,导致所有请求瞬间都打到数据库上,造成数据库压力过大甚至崩溃。
形象比喻:
- ❄️ 正常情况:缓存分批过期,数据库平稳承受查询压力
- 🌨️ 缓存雪崩:所有缓存同时过期 → 大量请求同时查询数据库 → 数据库被压垮
问题代码:
// 所有商品缓存同时设置30分钟过期
public List<Product> GetAllProducts()
{
    var products = _cache.GetOrCreate("all_products", entry =>
    {
        entry.AbsoluteExpirationRelativeToNow = TimeSpan.FromMinutes(30); // 同时过期
        return _dbContext.Products.ToList();
    });

    return products;
}
解决方案:
方案1:设置随机过期时间
private static readonly Random _random = new Random();

public List<Product> GetAllProducts()
{
    var products = _cache.GetOrCreate("all_products", entry =>
    {
        // 基础30分钟 + 随机0-10分钟,分散过期时间
        var randomExpiry = TimeSpan.FromMinutes(30 + _random.Next(0, 10));
        entry.AbsoluteExpirationRelativeToNow = randomExpiry;

        return _dbContext.Products.ToList();
    });

    return products;
}
方案2:永不过期 + 后台更新
public List<Product> GetAllProducts()
{
    var products = _cache.GetOrCreate("all_products", entry =>
    {
        // 设置永不过期
        entry.SetPriority(CacheItemPriority.NeverRemove);
        return _dbContext.Products.ToList();
    });

    // 后台任务定时更新缓存
    _ = Task.Run(async () => await RefreshProductsCacheAsync());

    return products;
}

private async Task RefreshProductsCacheAsync()
{
    while (true)
    {
        await Task.Delay(TimeSpan.FromMinutes(25)); // 25分钟更新一次

        var freshProducts = await _dbContext.Products.ToListAsync();
        _cache.Set("all_products", freshProducts);
    }
}
方案3:使用锁防止缓存击穿
private readonly SemaphoreSlim _cacheLock = new SemaphoreSlim(1, 1);

public async Task<List<Product>> GetAllProductsAsync()
{
    if (_cache.TryGetValue("all_products", out List<Product> products))
    {
        return products;
    }

    await _cacheLock.WaitAsync();
    try
    {
        // 双重检查,防止多个线程同时重建缓存
        if (_cache.TryGetValue("all_products", out products))
        {
            return products;
        }

        // 只有第一个线程会执行这里
        products = await _dbContext.Products.ToListAsync();
        _cache.Set("all_products", products, TimeSpan.FromMinutes(30));

        return products;
    }
    finally
    {
        _cacheLock.Release();
    }
}
3. 两种问题的对比
| 特性 | 缓存穿透 | 缓存雪崩 |
|---|---|---|
| 原因 | 查询不存在的数据 | 大量缓存同时过期 |
| 表现 | 单个不存在数据的频繁查询 | 大量正常数据的集中查询 |
| 影响 | 数据库压力增大 | 数据库可能崩溃 |
| 解决方案 | 缓存空对象、布隆过滤器 | 随机过期时间、永不过期+后台更新、加锁 |
4. 完整的最佳实践示例
public class CacheService
{
    private readonly IMemoryCache _cache;
    private readonly IConfiguration _config;
    private readonly Random _random = new Random();

    public Product GetProductSafely(int productId)
    {
        string cacheKey = $"product_{productId}";

        // 尝试从缓存获取
        if (_cache.TryGetValue(cacheKey, out Product product))
        {
            if (product?.Id == -1) return null; // 空对象标记
            return product;
        }

        // 查询数据库
        product = _dbContext.Products.FirstOrDefault(p => p.Id == productId);

        var cacheOptions = new MemoryCacheEntryOptions();

        if (product != null)
        {
            // 存在的数据:30-40分钟随机过期
            cacheOptions.AbsoluteExpirationRelativeToNow =
                TimeSpan.FromMinutes(30 + _random.Next(0, 10));
            _cache.Set(cacheKey, product, cacheOptions);
        }
        else
        {
            // 不存在的数据:缓存空对象,5分钟过期
            cacheOptions.AbsoluteExpirationRelativeToNow = TimeSpan.FromMinutes(5);
            _cache.Set(cacheKey, new Product { Id = -1 }, cacheOptions);
        }

        return product;
    }
}
总结
- 缓存穿透:防恶意查询,用"空对象缓存"解决
- 缓存雪崩:防同时过期,用"随机过期时间"解决
- 实际项目中通常两种问题都需要防范
缓存注意事项
- 禁止
IQueryable和IEnumerable这两种类型
- 这两种类型存在延迟加载的问题,缓存时,如果这两延迟加载的时候需要的对象已经被释放,就会执行失败!
- 实现随机缓存过期时间
使用 Zack.ASPNETCore 演示缓存最佳实践
好的,我来演示如何使用 Zack.ASPNETCore 包来避免缓存 IQueryable 和 IEnumerable 的问题,并实现随机缓存过期时间。
1. 安装 NuGet 包
Install-Package Zack.ASPNETCore
2. 问题演示:为什么要禁止缓存 IQueryable/IEnumerable
错误的做法(有延迟加载问题):
// ❌ 错误示例:缓存 IQueryable
[HttpGet("bad-queryable")]
public IActionResult GetProductsBad()
{
    var products = _cache.GetOrCreate("bad_products", entry =>
    {
        entry.AbsoluteExpirationRelativeToNow = TimeSpan.FromMinutes(10);

        // 错误:缓存 IQueryable(延迟加载)
        IQueryable<Product> query = _dbContext.Products.Where(p => p.Price > 100);
        return query; // 这里返回的是查询表达式,不是实际数据
    });

    // 当实际使用数据时,DbContext 可能已经被释放,导致异常
    return Ok(products.ToList()); // 可能抛出异常!
}
// ❌ 错误示例:缓存 IEnumerable(同样有延迟加载)
[HttpGet("bad-enumerable")]
public IActionResult GetProductsBad2()
{
    var products = _cache.GetOrCreate("bad_products2", entry =>
    {
        entry.AbsoluteExpirationRelativeToNow = TimeSpan.FromMinutes(10);

        // 错误:返回 IEnumerable(可能包含延迟加载)
        IEnumerable<Product> result = _dbContext.Products
            .Where(p => p.Price > 100)
            .AsEnumerable()
            .Select(p => new { p.Name, p.Price }); // 延迟执行

        return result;
    });

    return Ok(products); // 使用时可能出错!
}
3. 正确的做法:使用 Zack.ASPNETCore 的缓存扩展
方案1:直接使用内存缓存扩展
// Program.cs 中注册服务
builder.Services.AddMemoryCache();
builder.Services.AddScoped<ProductService>();

// 控制器或服务中使用
public class ProductService
{
    private readonly IMemoryCache _cache;
    private readonly ApplicationDbContext _dbContext;
    private readonly Random _random = new Random();

    public ProductService(IMemoryCache cache, ApplicationDbContext dbContext)
    {
        _cache = cache;
        _dbContext = dbContext;
    }

    // ✅ 正确示例:立即执行查询,缓存实际数据
    public async Task<List<ProductDto>> GetExpensiveProductsAsync()
    {
        string cacheKey = "expensive_products";

        // 使用 Zack.ASPNETCore 的缓存扩展方法
        var products = await _cache.GetOrCreateExclusiveAsync(cacheKey, async entry =>
        {
            // 设置随机过期时间(20-30分钟)
            var randomMinutes = 20 + _random.Next(0, 10);
            entry.AbsoluteExpirationRelativeToNow = TimeSpan.FromMinutes(randomMinutes);

            // ✅ 立即执行查询,获取实际数据
            var result = await _dbContext.Products
                .Where(p => p.Price > 100)
                .Select(p => new ProductDto
                {
                    Id = p.Id,
                    Name = p.Name,
                    Price = p.Price
                })
                .ToListAsync(); // 重要:立即执行

            Console.WriteLine($"缓存已刷新,过期时间: {randomMinutes}分钟");
            return result;
        });

        return products;
    }
}

// DTO 类(避免缓存实体类)
public class ProductDto
{
    public int Id { get; set; }
    public string Name { get; set; }
    public decimal Price { get; set; }
}
方案2:使用封装好的缓存服务
// 创建智能缓存服务
public class SmartCacheService
{
    private readonly IMemoryCache _cache;
    private readonly Random _random = new Random();

    public SmartCacheService(IMemoryCache cache)
    {
        _cache = cache;
    }

    // 安全的缓存方法:避免延迟加载问题 + 随机过期时间
    public async Task<T> GetOrCreateSafeAsync<T>(
        string cacheKey,
        Func<Task<T>> dataFactory,
        int baseMinutes = 30,
        int randomRange = 10)
    {
        // 尝试从缓存获取
        if (_cache.TryGetValue(cacheKey, out T cachedData))
        {
            return cachedData;
        }

        // 使用锁防止缓存击穿
        var lockKey = $"{cacheKey}_lock";
        var lockObj = _cache.GetOrCreate(lockKey, entry => new object());

        lock (lockObj)
        {
            // 双重检查
            if (_cache.TryGetValue(cacheKey, out cachedData))
            {
                return cachedData;
            }

            // 执行数据工厂函数(立即执行,避免延迟加载)
            var task = dataFactory();
            task.Wait(); // 立即执行,确保数据已经加载
            cachedData = task.Result;

            // 设置随机过期时间
            var cacheOptions = new MemoryCacheEntryOptions
            {
                AbsoluteExpirationRelativeToNow = TimeSpan.FromMinutes(
                    baseMinutes + _random.Next(0, randomRange))
            };

            _cache.Set(cacheKey, cachedData, cacheOptions);

            // 清理锁
            _cache.Remove(lockKey);
        }

        return cachedData;
    }
}

// 注册服务
builder.Services.AddScoped<SmartCacheService>();
4. 控制器中使用
[ApiController]
[Route("api/[controller]")]
public class ProductsController : ControllerBase
{
    private readonly ProductService _productService;
    private readonly SmartCacheService _smartCache;
    private readonly ApplicationDbContext _dbContext;

    public ProductsController(
        ProductService productService,
        SmartCacheService smartCache,
        ApplicationDbContext dbContext)
    {
        _productService = productService;
        _smartCache = smartCache;
        _dbContext = dbContext;
    }

    // ✅ 方式1:使用 ProductService
    [HttpGet("expensive")]
    public async Task<IActionResult> GetExpensiveProducts()
    {
        var products = await _productService.GetExpensiveProductsAsync();
        return Ok(products);
    }

    // ✅ 方式2:使用 SmartCacheService
    [HttpGet("cheap")]
    public async Task<IActionResult> GetCheapProducts()
    {
        var products = await _smartCache.GetOrCreateSafeAsync(
            cacheKey: "cheap_products",
            dataFactory: async () =>
            {
                // ✅ 立即执行,返回实际数据(不是 IQueryable/IEnumerable)
                return await _dbContext.Products
                    .Where(p => p.Price < 50)
                    .Select(p => new ProductDto
                    {
                        Id = p.Id,
                        Name = p.Name,
                        Price = p.Price
                    })
                    .ToListAsync(); // 重要:立即执行
            },
            baseMinutes: 15,    // 基础15分钟
            randomRange: 5      // 随机0-5分钟
        );

        return Ok(products);
    }

    // ✅ 方式3:缓存单个对象
    [HttpGet("{id}")]
    public async Task<IActionResult> GetProduct(int id)
    {
        var product = await _smartCache.GetOrCreateSafeAsync(
            cacheKey: $"product_{id}",
            dataFactory: async () =>
            {
                var entity = await _dbContext.Products.FindAsync(id);
                return entity == null ? null : new ProductDto
                {
                    Id = entity.Id,
                    Name = entity.Name,
                    Price = entity.Price
                };
            },
            baseMinutes: 60,    // 基础60分钟
            randomRange: 15     // 随机0-15分钟
        );

        return product == null ? NotFound() : Ok(product);
    }
}
5. 完整的缓存辅助类
// 更完整的缓存辅助类
public static class CacheExtensions
{
    private static readonly Random _random = new Random();

    // 安全的缓存扩展方法
    public static async Task<T> SafeGetOrCreateAsync<T>(
        this IMemoryCache cache,
        string key,
        Func<Task<T>> factory,
        TimeSpan? baseExpiry = null,
        TimeSpan? randomExpiry = null)
    {
        baseExpiry ??= TimeSpan.FromMinutes(30);
        randomExpiry ??= TimeSpan.FromMinutes(10);

        // 尝试从缓存获取
        if (cache.TryGetValue(key, out T result))
        {
            return result;
        }

        // 立即执行工厂方法,避免延迟加载
        result = await factory();

        // 计算随机过期时间
        var randomSeconds = _random.Next(0, (int)randomExpiry.Value.TotalSeconds);
        var totalExpiry = baseExpiry.Value.Add(TimeSpan.FromSeconds(randomSeconds));

        var options = new MemoryCacheEntryOptions()
            .SetAbsoluteExpiration(totalExpiry);

        cache.Set(key, result, options);

        return result;
    }

    // 专门用于数据库查询的缓存方法
    public static async Task<List<T>> CacheQueryAsync<T>(
        this IMemoryCache cache,
        string key,
        IQueryable<T> query,
        TimeSpan? baseExpiry = null)
    {
        return await cache.SafeGetOrCreateAsync(key, async () =>
        {
            // 确保立即执行查询
            return await query.ToListAsync();
        }, baseExpiry);
    }
}
6. 使用扩展方法
[HttpGet("using-extension")]
public async Task<IActionResult> GetProductsUsingExtension()
{
    var cache = HttpContext.RequestServices.GetRequiredService<IMemoryCache>();

    var products = await cache.CacheQueryAsync(
        key: "extension_products",
        query: _dbContext.Products
            .Where(p => p.Price > 50)
            .Select(p => new ProductDto { Id = p.Id, Name = p.Name, Price = p.Price }),
        baseExpiry: TimeSpan.FromMinutes(20)
    );

    return Ok(products);
}
关键要点总结:
-
禁止缓存 IQueryable/IEnumerable:
- 使用
.ToListAsync()或.ToArrayAsync()立即执行查询 - 缓存实际数据,而不是查询表达式
- 使用
-
随机缓存过期时间:
- 使用
Random类生成随机时间偏移 - 避免大量缓存同时过期导致的雪崩效应
- 使用
-
使用 DTO 对象:
- 避免缓存 EF Core 实体类
- 只缓存需要的数据字段
-
Zack.ASPNETCore 的优势:
- 提供了线程安全的缓存方法
- 简化了缓存的使用模式
- 内置了最佳实践的实现
这样就能安全地使用缓存,避免延迟加载问题和缓存雪崩问题!
Redis 缓存简单实例
下面是一个使用 Redis 缓存的简单示例:
1. 安装 NuGet 包
Install-Package Microsoft.Extensions.Caching.StackExchangeRedis
2. 配置 Redis 连接 (appsettings.json)
{
  "ConnectionStrings": {
    "Redis": "localhost:6379"  // 本地 Redis,默认端口
  },
  "Logging": {
    "LogLevel": {
      "Default": "Information",
      "Microsoft.AspNetCore": "Warning"
    }
  },
  "AllowedHosts": "*"
}
3. 注册 Redis 缓存服务 (Program.cs)
var builder = WebApplication.CreateBuilder(args);

// 添加 Redis 缓存
builder.Services.AddStackExchangeRedisCache(options =>
{
    options.Configuration = builder.Configuration.GetConnectionString("Redis");
    options.InstanceName = "MyApp-"; // 可选:为键添加前缀,例如MyApp-yourKey
});

builder.Services.AddControllers();

var app = builder.Build();

app.UseAuthorization();
app.MapControllers();

app.Run();
4. 创建简单的控制器
[ApiController]
[Route("api/[controller]")]
public class RedisDemoController : ControllerBase
{
    private readonly IDistributedCache _cache;

    public RedisDemoController(IDistributedCache cache)
    {
        _cache = cache;
    }

    // 1. 设置缓存
    [HttpPost("set/{key}")]
    public async Task<IActionResult> SetCache(string key, [FromBody] string value)
    {
        // 将字符串转换为字节数组
        var bytes = Encoding.UTF8.GetBytes(value);

        // 设置缓存,过期时间10分钟
        await _cache.SetAsync(key, bytes, new DistributedCacheEntryOptions
        {
            AbsoluteExpirationRelativeToNow = TimeSpan.FromMinutes(10)
        });

        return Ok($"已缓存: {key} = {value}");
    }

    // 2. 获取缓存
    [HttpGet("get/{key}")]
    public async Task<IActionResult> GetCache(string key)
    {
        // 从缓存获取字节数组
        var bytes = await _cache.GetAsync(key);

        if (bytes == null)
        {
            return NotFound($"未找到键: {key}");
        }

        // 将字节数组转换回字符串
        var value = Encoding.UTF8.GetString(bytes);
        return Ok(value);
    }

    // 3. 删除缓存
    [HttpDelete("remove/{key}")]
    public async Task<IActionResult> RemoveCache(string key)
    {
        await _cache.RemoveAsync(key);
        return Ok($"已删除: {key}");
    }

    // 4. 检查缓存是否存在
    [HttpGet("exists/{key}")]
    public async Task<IActionResult> CacheExists(string key)
    {
        var bytes = await _cache.GetAsync(key);
        return Ok(new { Key = key, Exists = bytes != null });
    }

    // 5. 缓存复杂对象(JSON序列化)
    [HttpPost("set-object/{key}")]
    public async Task<IActionResult> SetObject(string key, [FromBody] User user)
    {
        // 将对象序列化为 JSON 字符串
        var json = System.Text.Json.JsonSerializer.Serialize(user);
        var bytes = Encoding.UTF8.GetBytes(json);

        await _cache.SetAsync(key, bytes, new DistributedCacheEntryOptions
        {
            AbsoluteExpirationRelativeToNow = TimeSpan.FromMinutes(30)
        });

        return Ok($"已缓存对象: {key}");
    }

    // 6. 获取复杂对象
    [HttpGet("get-object/{key}")]
    public async Task<IActionResult> GetObject(string key)
    {
        var bytes = await _cache.GetAsync(key);

        if (bytes == null)
        {
            return NotFound($"未找到对象: {key}");
        }

        var json = Encoding.UTF8.GetString(bytes);
        var user = System.Text.Json.JsonSerializer.Deserialize<User>(json);

        return Ok(user);
    }
}

// 简单的用户类
public class User
{
    public int Id { get; set; }
    public string Name { get; set; }
    public string Email { get; set; }
}
5. 使用封装的 Redis 服务(可选)
如果你想更简单地使用,可以创建一个封装服务:
public interface IRedisService
{
    Task SetStringAsync(string key, string value, TimeSpan? expiry = null);
    Task<string> GetStringAsync(string key);
    Task SetObjectAsync<T>(string key, T value, TimeSpan? expiry = null);
    Task<T> GetObjectAsync<T>(string key);
    Task RemoveAsync(string key);
    Task<bool> ExistsAsync(string key);
}

public class RedisService : IRedisService
{
    private readonly IDistributedCache _cache;

    public RedisService(IDistributedCache cache)
    {
        _cache = cache;
    }

    public async Task SetStringAsync(string key, string value, TimeSpan? expiry = null)
    {
        var bytes = Encoding.UTF8.GetBytes(value);
        var options = new DistributedCacheEntryOptions();

        if (expiry.HasValue)
        {
            options.AbsoluteExpirationRelativeToNow = expiry;
        }
        else
        {
            options.AbsoluteExpirationRelativeToNow = TimeSpan.FromMinutes(10);
        }

        await _cache.SetAsync(key, bytes, options);
    }

    public async Task<string> GetStringAsync(string key)
    {
        var bytes = await _cache.GetAsync(key);
        return bytes == null ? null : Encoding.UTF8.GetString(bytes);
    }

    public async Task SetObjectAsync<T>(string key, T value, TimeSpan? expiry = null)
    {
        var json = System.Text.Json.JsonSerializer.Serialize(value);
        await SetStringAsync(key, json, expiry);
    }

    public async Task<T> GetObjectAsync<T>(string key)
    {
        var json = await GetStringAsync(key);
        return json == null ? default : System.Text.Json.JsonSerializer.Deserialize<T>(json);
    }

    public async Task RemoveAsync(string key)
    {
        await _cache.RemoveAsync(key);
    }

    public async Task<bool> ExistsAsync(string key)
    {
        var bytes = await _cache.GetAsync(key);
        return bytes != null;
    }
}

// 注册服务 (Program.cs 中添加)
builder.Services.AddScoped<IRedisService, RedisService>();
6. 使用封装服务的控制器
[ApiController]
[Route("api/[controller]")]
public class SimpleRedisController : ControllerBase
{
    private readonly IRedisService _redis;

    public SimpleRedisController(IRedisService redis)
    {
        _redis = redis;
    }

    [HttpPost("simple-set/{key}")]
    public async Task<IActionResult> SimpleSet(string key, [FromBody] string value)
    {
        await _redis.SetStringAsync(key, value, TimeSpan.FromMinutes(5));
        return Ok($"已设置: {key}");
    }

    [HttpGet("simple-get/{key}")]
    public async Task<IActionResult> SimpleGet(string key)
    {
        var value = await _redis.GetStringAsync(key);
        return value == null ? NotFound() : Ok(value);
    }

    [HttpPost("user/{key}")]
    public async Task<IActionResult> CacheUser(string key, [FromBody] User user)
    {
        await _redis.SetObjectAsync(key, user, TimeSpan.FromHours(1));
        return Ok($"用户已缓存: {user.Name}");
    }

    [HttpGet("user/{key}")]
    public async Task<IActionResult> GetUser(string key)
    {
        var user = await _redis.GetObjectAsync<User>(key);
        return user == null ? NotFound() : Ok(user);
    }
}
测试接口:
基本字符串操作:
-
设置缓存:
POST /api/redisdemo/set/mykey"Hello Redis" -
获取缓存:
GET /api/redisdemo/get/mykey- 返回:
"Hello Redis"
- 返回:
-
检查存在:
GET /api/redisdemo/exists/mykey- 返回:
{"key":"mykey","exists":true}
- 返回:
对象操作:
-
缓存对象:
POST /api/redisdemo/set-object/user1{ "id": 1, "name": "张三", "email": "zhangsan@example.com" } -
获取对象:
GET /api/redisdemo/get-object/user1- 返回完整的用户对象

 浙公网安备 33010602011771号