使用react-flow制作流程图
1.react-flow
react-flow是一个用于构建基于节点的应用程序的库。这些可以是简单的静态图或复杂的基于节点的编辑器。同时react-flow支持自定义节点类型和边线类型,并且它附带一些组件,可以查看缩略图的Mini Map和悬浮控制器Controls.
2、react-flow 的安装
  npm install react-flow-renderer    # npm
  yarn add react-flow-renderer       # Yarn
3.react-flow基本使用
1、每个节点固定格式 里面添加内容
代码
index.tsx
import React from 'react';
import ReactFlow, {
  addEdge,
  MiniMap,
  Controls,
  Background,
  useNodesState,
  useEdgesState,
} from 'react-flow-renderer';

import { nodes as initialNodes, edges as initialEdges } from './initial-elements';

const OverviewFlow = () => {
  const [nodes, setNodes, onNodesChange] = useNodesState(initialNodes);
  const [edges, setEdges, onEdgesChange] = useEdgesState(initialEdges);
  const onConnect = (params) => setEdges((eds) => addEdge(params, eds));

  return (
    <ReactFlow
      nodes={nodes} // 节点
      edges={edges} // 连接线
      onNodesChange={onNodesChange} // 节点拖拽等改变
      onEdgesChange={onEdgesChange} // 连接线拖拽等改变
      onConnect={onConnect} // 节点直接连接
      fitView // 渲染节点数据
      attributionPosition="top-right" // react-flow的位置,类似水印,可以通过css隐藏
    >
      // 背景图 可以配置颜色 方格宽度
      <Background color="#aaa" gap={16} />
    </ReactFlow>
  );
};

export default OverviewFlow;
initial-elements.ts节点与连接线数据
import { MarkerType } from 'react-flow-renderer';

export const nodes = [
  {
    id: '1', // id必须
    type: 'input', // 类型: input开始  default默认  output结束 区别在于连接点不一样
    data: { // 额外的数据
      label: ( // 节点名称
        <>
          Welcome to <strong>React Flow!</strong>
        </>
      ),
      // value: 5, .... // 可以将其他数据放入
    },
    position: { x: 250, y: 0 }, // 节点位置
  },
  {
    id: '2',
    data: {
      label: (
        <>
          This is a <strong>default node</strong>
        </>
      ),
    },
    position: { x: 100, y: 100 },
  },
  {
    id: '3',
    data: {
      label: (
        <>
          This one has a <strong>custom style</strong>
        </>
      ),
    },
    position: { x: 400, y: 100 },
    style: {
      background: '#D6D5E6',
      color: '#333',
      border: '1px solid #222138',
      width: 180,
    },
  },
  {
    id: '4',
    position: { x: 250, y: 200 },
    data: {
      label: 'Another default node',
    },
  },
  {
    id: '5',
    data: {
      label: 'Node id: 5',
    },
    position: { x: 250, y: 325 },
  },
  {
    id: '6',
    type: 'output',
    data: {
      label: (
        <>
          An <strong>output node</strong>
        </>
      ),
    },
    position: { x: 100, y: 480 },
  },
  {
    id: '7',
    type: 'output',
    data: { label: 'Another output node' },
    position: { x: 400, y: 450 },
  },
];

export const edges = [
  { id: 'e1-2', source: '1', target: '2', label: 'this is an edge label' },
  { id: 'e1-3', source: '1', target: '3' },
  {
    id: 'e3-4', // id必须
    source: '3', // 连接线起始节点id
    target: '4', // 连接线结束节点id
    animated: true, // 连接线是否有动画
    label: 'animated edge', // 连接线名称
  },
  {
    id: 'e4-5',
    source: '4',
    target: '5',
    label: 'edge with arrow head',
    markerEnd: { // 连接线尾部的箭头
      type: MarkerType.ArrowClosed,
    },
  },
  {
    id: 'e5-6',
    source: '5',
    target: '6',
    type: 'smoothstep', // 连接线类型 default straight step smoothstep
    label: 'smooth step edge',
  },
  {
    id: 'e5-7',
    source: '5',
    target: '7',
    type: 'step',
    style: { stroke: '#f6ab6c' }, // 连接线颜色
    label: 'a step edge',
    animated: true,
    labelStyle: { fill: '#f6ab6c', fontWeight: 700 }, // 连接线名称样式
  },
];
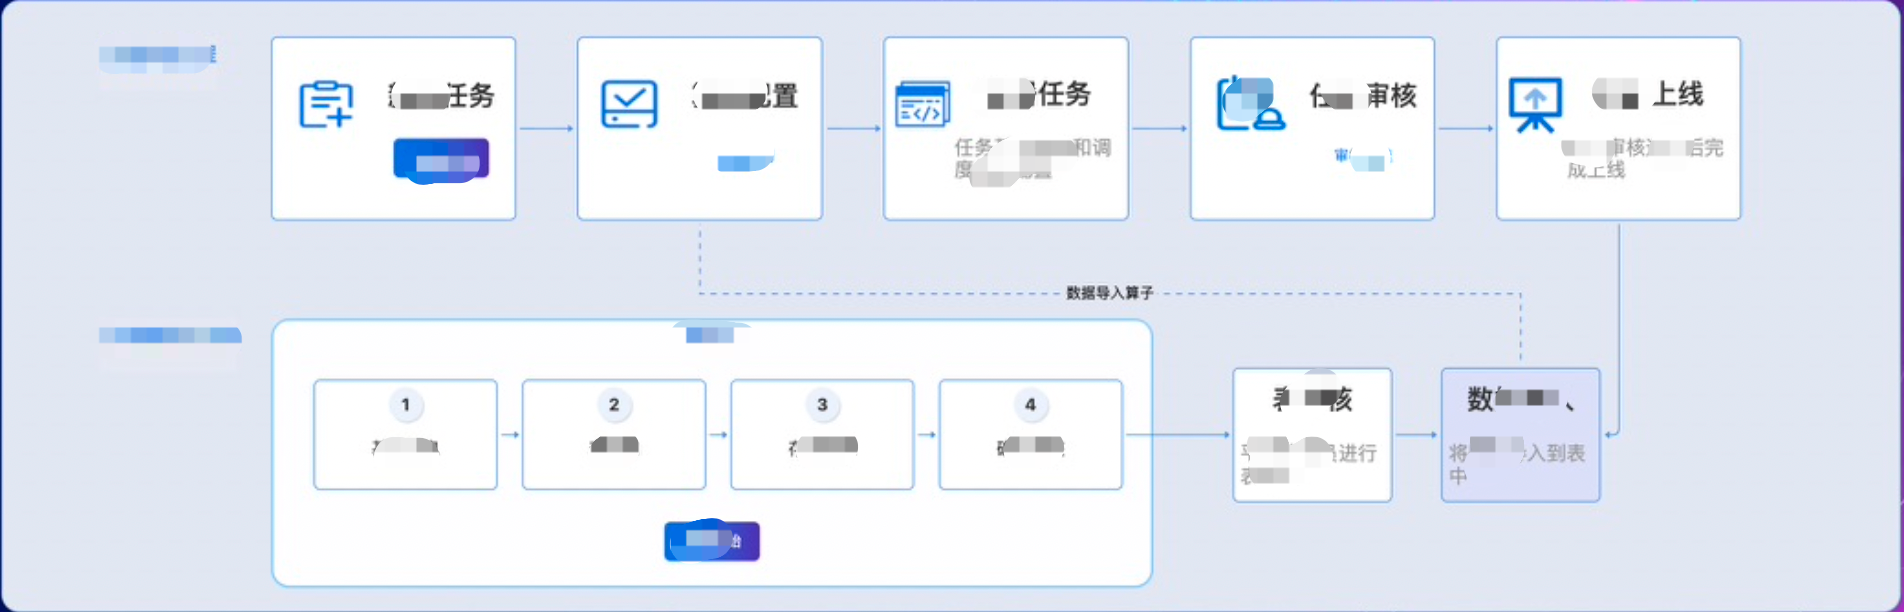
效果图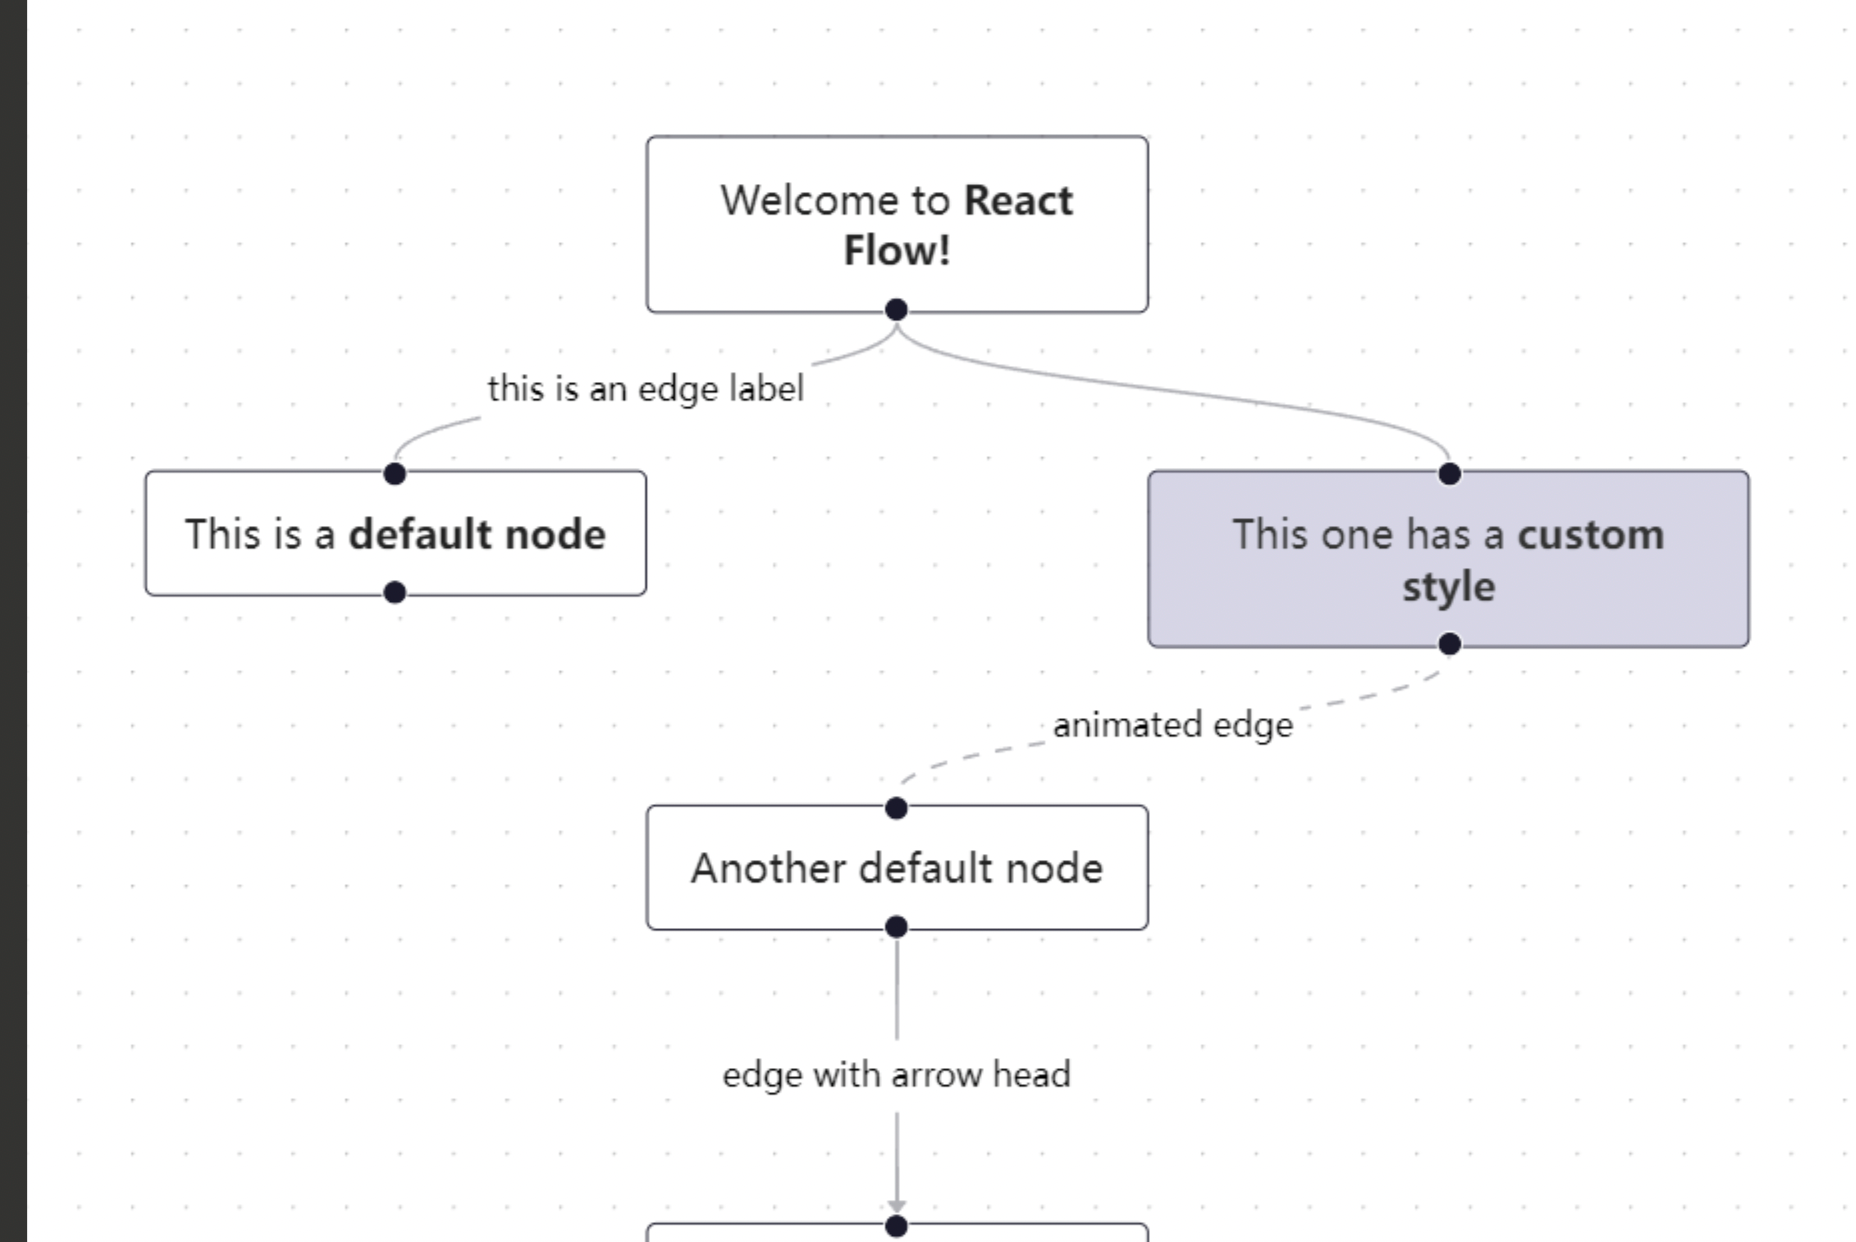
2、自定义每个节点中的内容和样式 以及连接点
这个是静态的 展示流程图 想拖动节点 加上1里面的 onNodesChange... 的参数即可
index.tsx
import React, {useEffect} from 'react';

import ReactFlow, {
    useNodesState,
    useEdgesState,
} from 'react-flow-renderer';

import {nodes as initialNodes, edges as initialEdges} from './initial-elements';
import CustomNode from './ResizableNode'; //自定义的渲染每个节点的代码

const nodeTypes = {
    custom: CustomNode, //自定义的内容
};
const OverviewFlow = ({resizeFlag}: any) => {
    const [nodes, setNodes] = useNodesState(initialNodes);
    const [edges] = useEdgesState(initialEdges);

    useEffect(() => {
        setNodes([]);
        setTimeout(() => {
            setNodes(initialNodes);
        }, 50);
    }, [resizeFlag]);

    if (!nodes?.length) {
        return null;
    }

    return (
        <ReactFlow
            nodes={nodes} // 节点
            edges={edges} // 连接线
            panOnDrag={false}
            zoomOnDoubleClick={false}
            zoomOnPinch={false}
            zoomOnScroll={false}
            panOnScroll={false}
            fitView // 渲染节点数据
            nodeTypes={nodeTypes}
            attributionPosition="top-left" // react-flow的位置,类似水印,可以通过css隐藏 =》 .react-flow__attribution.left {display: none};
        >
            {/* <Background color="#aaa" gap={16} /> */}
        </ReactFlow>
    );
};

export default OverviewFlow;
initial-elements.ts
import {MarkerType, Position} from 'react-flow-renderer';

const styles = {
    color: '#333',
    border: '1px solid #4E8FF0',
    borderRadius: '5px',
    background: 'white',

};
//因为数据太多删除了几个 不过格式都是这样写
export const nodes = [
    {
        id: '0',
        type: 'custom',//有input,output,default三种,input只有一个输出,output只有一个输入,default输入输出各有一个 或者自定义的
        data: {
            label: '',
        },
        position: {x: -20, y: 40}, // 节点位置
        style: {
            width: 1550,
            height: 500,
            border: '1px solid #91caff',
            borderRadius: '15px',
            color: '#4585F2',
            background: '#E2E6F3',
            zIndex: -2,
        },
    },
    {
        id: '1', // id必须
        type: 'custom', // 类型: input开始  default默认  output结束 区别在于连接点不一样
        data: { // 额外的数据
            label:
                '任务1',
            // value: 1 // .... // 可以将其他数据放入
        },
        position: {x: 200, y: 70}, // 节点位置
        style: {
            width: 200,
            height: 150,
            ...styles,
        },
    },
    {
        id: '2',
        type: 'custom',
        data: {
            label: '任务2',
        },
        position: {x: 450, y: 70},
        style: {
            width: 200,
            height: 150,
        },
    },
    {
        id: '3',
        type: 'custom',

        data: {
            label: (
                '任务3'
            ),
        },
        position: {x: 700, y: 70},
        style: {
            width: 200,
            height: 150,
            ...styles,
        },
    }
];

export const edges = [
    {
        id: '1-2',
        source: '1',
        target: '2',
        markerEnd: { // 连接线尾部的箭头
            type: MarkerType.ArrowClosed,
            color: '#4E8FF0',
        },
        style: {stroke: '#4E8FF0'}, // 连接线颜色
        labelStyle: {fill: '#4E8FF0', fontWeight: 700}, // 连接线名称样式
    },
    {
        id: '2-3', // id必须
        source: '2', // 连接线起始节点id
        target: '3', // 连接线结束节点id
        markerEnd: { // 连接线尾部的箭头
            type: MarkerType.ArrowClosed,
            color: '#4E8FF0',
        },
        style: {stroke: '#4E8FF0'}, // 连接线颜色
        labelStyle: {fill: '#4E8FF0', fontWeight: 700}, // 连接线名称样式
    },
    {
        id: '3-4',
        source: '3',
        target: '4',
        style: {stroke: '#4E8FF0'}, // 连接线颜色
        labelStyle: {fill: '#4E8FF0', fontWeight: 700}, // 连接线名称样式
        markerEnd: { // 连接线尾部的箭头
            type: MarkerType.ArrowClosed,
            color: '#4E8FF0',
        },
    }
];
ResizableNode.tsx
import React, {memo} from 'react';
import {Handle, Position} from 'react-flow-renderer';
import className from './home.module.scss';
import newTask from '@/static/newTask.png';
import Operator from '@/static/OperatorConfig.png';
import DeployTask from '@/static/DeploymentTask.png';
import TaskReview from '@/static/TaskReview.png';
import TaskLaunch from '@/static/TaskLaunch.png';
import {Button} from 'antd';

const datadevelopment = [
    {
        id: '0',
    },
    {
        src: newTask,
        id: '1',
        button: '快速开始',
        url: '',
        width: '50px',
        height: '50px',
    },
    {
        src: Operator,
        id: '11',
        button: '配置说明',
        link: '',
        width: '45px',
        height: '45px',
    },
    {
        src: DeployTask,
        id: '3',
        title: '任务基本信息',
        width: '55px',
        height: '55px',
    },

];

export default memo(({data, id, isConnectable}: any) => {

    // console.log(1, data);
    const position = (sum: any) => {
        switch (sum) {
            case '6':
                return Position.Right;
            case '9':
                return Position.Top;
            default:
                return Position.Left;
        }
    };

    const pageButton = (item: any) => {
        if (item.link) {
            return (
                <Button
                    target='_blank'
                    type='link'
                    htmlType='button'
                    href={item.link}
                > {item.button}
                </Button>
            );
        } else {
            return (
                <Button
                    style={{
                        background: 'linear-gradient(90deg,#2468E8,#2C61E4,#4148D0,#5127B8)',
                        border: 'none',
                    }}
                    onClick={e => {
                        e.stopPropagation();
                        window.location.hash = item.url;
                    }}
                    type='primary'
                > {item.button}
                </Button>
            );
        }
    };

    return (
        <div className={className.ResicabelNode}>
            <Handle
                style={{visibility: 'hidden'}}
                type="target"
                position={position(id)}
                isConnectable={isConnectable}
            />
            {
                datadevelopment.filter((item: any) => {
                    return item.id === id;
                }).map((item: any) => {
                    return (
                        +item.id < 12
                            ? <div
                                key={item.id}
                                className={className.nodeContent}
                                style={data.style}
                            >
                                {item.src ? <img style={{width: item.width, height: item.height}} src={item.src} /> : null}
                                <div className={className.nodeRightbox}>
                                    <p className={className.nodelabel}>{data.label}</p>
                                    {item.button
                                        ? pageButton(item)
                                        : <span className={className.nodelabelTitle}>{item.title}</span>}
                                </div>
                            </div>
                            : <div
                                key={item.id}
                                className={className.dataDistribution}
                                style={data.style}
                            >
                                {
                                    item.order
                                        ? <p className={className.circle}>
                                            {item.order}
                                        </p> : null
                                }
                                <p className={className.nodelabel}>{data.label}</p>
                                {
                                    item.button ? pageButton(item) : null
                                }
                            </div>
                    );
                })
            }
            <Handle
                style={{visibility: 'hidden'}}
                type='source'
                position={id === '11'
                || id === '5' ? Position.Bottom : Position.Right}
                id='a'
                className='my_handle'
                isConnectable={isConnectable}
            />
        </div>
    );
});
效果图
收集的一些关于 react-flow 参数讲解链接以及官网地址
https://www.5axxw.com/wiki/content/obkffc
https://reactflow.dev/

 浙公网安备 33010602011771号