简单的例子了解自定义ViewGroup(一)
在Android中,控件可以分为ViewGroup控件与View控件。自定义View控件,我之前的文章已经说过。这次我们主要说一下自定义ViewGroup控件。ViewGroup是作为父控件可以包含多个View控件,并管理其中包含的View控件。
一般自定义ViewGroup的流程如下:
onMeasure()onLayout()
我们一般不需要像自定义View一样重写onDraw(),这里需要多写一个onLayout来摆放子View的位置。除了onLayout方法之外,我们还需要确定LayoutParams,这个是子View告诉父布局的一些参数信息,比如MarginLayoutParams,则表明该ViewGroup支持margin,当然这个也可以没有。
下面我们通过一个例子来说明简单的自定义ViewGroup
一个简单的例子
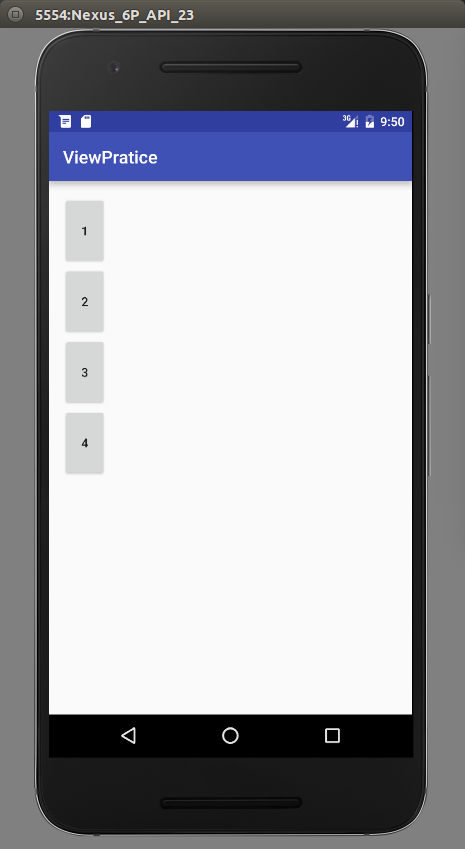
这个例子,我们将写一个ViewGroup,该ViewGroup中4个button排成一列。这个例子主要说明onMeasure和onLayout的写法。
首先我们新建一个MyViewGroup继承ViewGroup,然后重写onMeasure方法。
   @Override
    protected void onMeasure(int widthMeasureSpec, int heightMeasureSpec) {
        super.onMeasure(widthMeasureSpec,heightMeasureSpec);
        measureChildren(widthMeasureSpec,heightMeasureSpec);

    }
这个重写非常的简单,调用父类的测量方法,然后测量所有的子控件的,只要子控件不是wrap_content都会测量精准。这里为了简单,没有去考虑wrap_content的情况,后面我们完善的时候会说道。
然后重写onLayout()方法
  @Override
    protected void onLayout(boolean changed, int l, int t, int r, int b) {
        int height = 0;
        int count = getChildCount();
        View child;
        Log.e("ri", count + "");
        for(int i = 0 ;i < count;i++) {
            child = getChildAt(i);
            child.layout(0, height, child.getMeasuredWidth(),height +  child.getMeasuredHeight());
            height += child.getMeasuredHeight();

        }
    }
这里的代码很好理解,因为我们要实现4个button一列显示,然后每个子View的宽度是一样的,并且每个子View的left和right是一样的。所以每个子View只有top和bottom不一样。我们首先定义个高度height初始为0,然后得到所有子View的个数,依次设置每个子View的top和bottom。top就是定义的height,bottom则为height加上子View的高度。设置完后height累加。
xml中布局如下:
 <com.example.byhieg.viewpratice.MyViewGroup android:layout_height="match_parent"
        android:layout_width="match_parent">

        <Button
            android:text="1"
            android:layout_width="50dp"
            android:layout_height="80dp" />
        <Button
            android:text="2"
            android:layout_width="50dp"
            android:layout_height="80dp" />
        <Button
            android:text="3"
            android:layout_width="50dp"
            android:layout_height="80dp" />
        <Button
            android:text="4"
            android:layout_width="50dp"
            android:layout_height="80dp" />
    </com.example.byhieg.viewpratice.MyViewGroup>
效果如下:
下面,我们继续完善这个控件,让他适应wrap_content。这里,我们主要重写onMeasure()
   @Override
    protected void onMeasure(int widthMeasureSpec, int heightMeasureSpec) {
        super.onMeasure(widthMeasureSpec,heightMeasureSpec);
        int widthMode = MeasureSpec.getMode(widthMeasureSpec);
        int widthSize = MeasureSpec.getSize(widthMeasureSpec);
        int heightMode = MeasureSpec.getMode(heightMeasureSpec);
        int heightSize = MeasureSpec.getSize(heightMeasureSpec);
        measureChildren(widthMeasureSpec,heightMeasureSpec);
        //开始处理wrap_content,如果一个子元素都没有,就设置为0
        if (getChildCount() == 0) {
            setMeasuredDimension(0,0);
        } else if (widthMode == MeasureSpec.AT_MOST && heightMode == MeasureSpec.AT_MOST) {
            //ViewGroup,宽,高都是wrap_content,根据我们的需求,宽度是子控件的宽度,高度则是所有子控件的总和
            View childOne = getChildAt(0);
            int childWidth = childOne.getMeasuredWidth();
            int childHeight = childOne.getMeasuredHeight();
            setMeasuredDimension(childWidth, childHeight * getChildCount());
        } else if (widthMode == MeasureSpec.AT_MOST) {
            //ViewGroup的宽度为wrap_content,则高度不需要管,宽度还是自控件的宽度
            View childOne = getChildAt(0);
            int childWidth = childOne.getMeasuredWidth();
            setMeasuredDimension(childWidth,heightSize);
        } else if (heightMode == MeasureSpec.AT_MOST) {
            //ViewGroup的高度为wrap_content,则宽度不需要管,高度为子View的高度和
            View childOne = getChildAt(0);
            int childHeight = childOne.getMeasuredHeight();
            setMeasuredDimension(widthSize, childHeight * getChildCount());
        }
    }
主要通过注释,就可以很明白wrap_content的情况下,如何计算viewGroup的高度和宽度。在viewGroup的onMeasure,我们是不需要在这里面考虑每一个View的宽高,这个通过measureChildren来通知每一个子View自己测量的。我们只需要考虑viewGroup的宽高在自适应的情况下,该是多大。
LayoutParams
在上面这个简单的ViewGroup中,我们是没有设置margin的,也就是说,即使我们在子View中设置了margin也是没有效的。我们需要修改我们的自定义ViewGroup来适应margin的情况。这里我们为了简化情况,只设定第一个button有一个android:layout_margin="30dp"的属性。
这里,我们修改onMeasure方法,让viewGroup的宽度变为原来的宽度加上margin的宽度,高度也是原来的高度加上margin的高度。代码如下:
@Override
    protected void onMeasure(int widthMeasureSpec, int heightMeasureSpec) {
        super.onMeasure(widthMeasureSpec,heightMeasureSpec);

        MarginLayoutParams params = null;
        int widthMode = MeasureSpec.getMode(widthMeasureSpec);
        int widthSize = MeasureSpec.getSize(widthMeasureSpec);
        int heightMode = MeasureSpec.getMode(heightMeasureSpec);
        int heightSize = MeasureSpec.getSize(heightMeasureSpec);
        measureChildren(widthMeasureSpec,heightMeasureSpec);

        //开始处理wrap_content,如果一个子元素都没有,就设置为0
        if (getChildCount() == 0) {
            setMeasuredDimension(0,0);
        } else if (widthMode == MeasureSpec.AT_MOST && heightMode == MeasureSpec.AT_MOST) {
            //ViewGroup,宽,高都是wrap_content,根据我们的需求,宽度是子控件的宽度,高度则是所有子控件的总和
            View childOne = getChildAt(0);
            params = (MarginLayoutParams) childOne.getLayoutParams();
            int childWidth = childOne.getMeasuredWidth();
            int childHeight = childOne.getMeasuredHeight();
            setMeasuredDimension(childWidth + params.leftMargin + params.rightMargin,
                                childHeight * getChildCount() + params.topMargin + params.bottomMargin);

        } else if (widthMode == MeasureSpec.AT_MOST) {
            //ViewGroup的宽度为wrap_content,则高度不需要管,宽度还是自控件的宽度
            View childOne = getChildAt(0);
            params = (MarginLayoutParams) childOne.getLayoutParams();
            int childWidth = childOne.getMeasuredWidth();
            setMeasuredDimension(childWidth + params.leftMargin + params.rightMargin,heightSize);
        } else if (heightMode == MeasureSpec.AT_MOST) {
            //ViewGroup的高度为wrap_content,则宽度不需要管,高度为子View的高度和
            View childOne = getChildAt(0);
            params = (MarginLayoutParams) childOne.getLayoutParams();
            int childHeight = childOne.getMeasuredHeight();
            setMeasuredDimension(widthSize, childHeight * getChildCount() + params.topMargin + params.bottomMargin);
        }
    }
这里,注意这个语句params = (MarginLayoutParams) childOne.getLayoutParams(); 如果不重写layoutParams相关的代码,这样直接转换会出现问题。所以,我们需要重写如下代码:让他返回MarginLayoutParams类型的对象
@Override
    public LayoutParams generateLayoutParams(AttributeSet attrs) {
        return new MarginLayoutParams(getContext(),attrs);
    }

    @Override
    protected LayoutParams generateDefaultLayoutParams() {
        return new MarginLayoutParams(LayoutParams.MATCH_PARENT,
                LayoutParams.MATCH_PARENT);
    }

    @Override
    protected LayoutParams generateLayoutParams(LayoutParams p) {
        return new MarginLayoutParams(p);
    }
同样,我们已经测量得到了viewGroup的宽和高,接下来,需要对添加了margin的view,重新摆放。主要的摆放规则,左边的坐标为Leftmargin,第一个view的上面的坐标为topMargin,同时,第二个view的上面的坐标要加上bottomMargin。这个只是一个简单的例子来说明放入margin之后要怎么考虑,一般不会这么具体到只计算第一个view的Margin。代码看看就好
@Override
    protected void onLayout(boolean changed, int l, int t, int r, int b) {
        int height = 0;
        int count = getChildCount();
        View child;
        Log.e("ri", count + "");
        child = getChildAt(0);
        MarginLayoutParams params = (MarginLayoutParams) child.getLayoutParams();
        int c1 = params.leftMargin;
        int c2 = params.topMargin;
        int c3 = c1 + child.getMeasuredWidth();
        int c4 = c2 + child.getMeasuredHeight();
        child.layout(c1,c2, c3,c4);
        height = c4 + params.bottomMargin;
        for(int i = 1 ;i < count;i++) {
            child = getChildAt(i);
            child.layout(c1, height, c3, height + child.getMeasuredHeight());
            height += child.getMeasuredHeight();
        }
    }

总结
这是自定义ViewGroup的第一篇文章,自定义ViewGroup是比自定义View知识点更多,而且应用也更广泛。这篇只是简单的介绍了自定义ViewGroup中需要复写的方法,但是一般的viewGroup不会是这样的。上面的东西,用一个LinearLayout布局实现,然后include该布局更方便。一般viewGroup都需要我们来实现view事件的分发以及滑动的处理,接下来的文章,讲介绍滑动的多种方式。

 浙公网安备 33010602011771号