elk日志分析
1.三个节点

2.安装包

3.安装JDK-12版本
在/etc/profile添加环境变量

[root@node3 ~]# source /etc/profile
cat >>/etc/profile <EOF
export JAVA_HOME=/usr/java/jdk-12.0.1
export CLASSPATH=.:${JAVA_HOME}/jre/lib/rt.jar:${JAVA_HOME}/lib/dt.jar:${JAVA_HOME}/lib/tools.jar
export PATH=$PATH:${JAVA_HOME}/bin
EOF
4.解压到home目录
tar -xf elasticsearch-7.6.1-linux-x86_64.tar.gz -C /home
5.默认情况下root启动服务会报错

6.以es用户启动
Exception in thread "main" org.elasticsearch.bootstrap.BootstrapException: java.nio.file.AccessDeniedException: /home/elasticsearch/config/elasticsearch.keystore
7.又报错
[1]: max file descriptors [4096] for elasticsearch process is too low, increase to at least [65535]
[2]: max virtual memory areas vm.max_map_count [65530] is too low, increase to at least [262144]
sed -ri '$a\vm.max_map_count=655360' /etc/sysctl.conf
vm.max_map_count=655360
sed -ri '$a\* soft nofile 65536\n* hard nofile 65536 /etc/security/limits.conf
* soft nofile 65536
* hard nofile 65536
8.
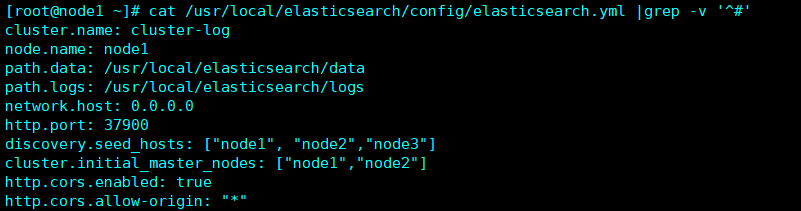
scp -r /usr/local/elasticsearch/config/elasticsearch.yml root@node2:/usr/local/elasticsearch/config/elasticsearch.yml
scp -r /usr/local/elasticsearch/config/elasticsearch.yml root@node3:/usr/local/elasticsearch/config/elasticsearch.yml
9.启动 elasticsearh
./bin/elasticsearch -d
curl http://localhost:37900
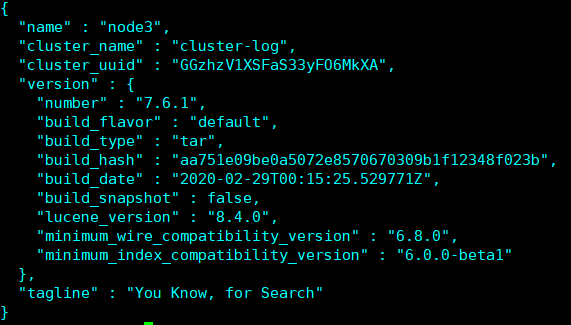
cluser_uuid 便是集群id 如果加入集群后不显示 证明加入集群失败 查看日志 检查配置文件查看
10. 安装git npm工具
clone head插件
git clone git://github.com/mobz/elasticsearch-head.git
cd elasticsearch-head/
npm install;nohup npm run start
11.安装kibana
tar -xf kibana-*.tar.gz -C /usr/local
mv /usr/local/kiba* /usr/local/kibana

网页打开 http://192.168.100.8:5601
12.安装logstash
tar -xf logstach*.tar.gz -C /usr/local/logstash 在 配置文件中键入一个文件
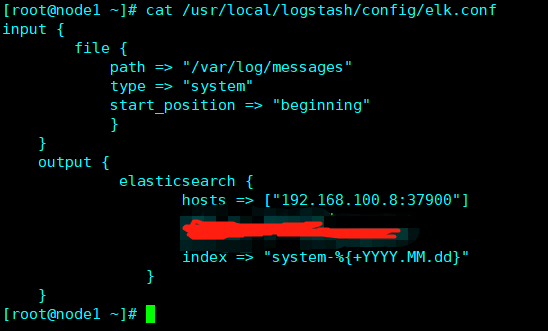
./bin/logstash

 浙公网安备 33010602011771号