openstack的glance、nova、cinder使用ceph做后端存储
块设备与 OPENSTACK
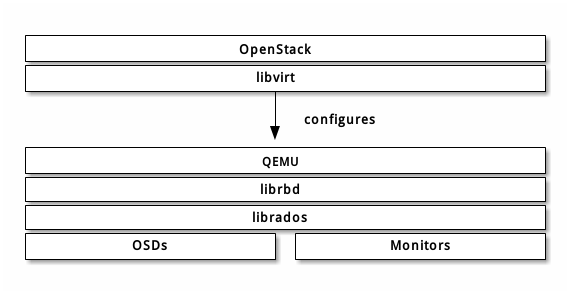
- 通过 libvirt 你可以把 Ceph 块设备用于 OpenStack ,它配置了 QEMU 到 librbd 的接口。 Ceph 把块设备映像条带化为对象并分布到集群中,这意味着大容量的 Ceph 块设备映像其性能会比独立服务器更好。
要把 Ceph 块设备用于 OpenStack ,必须先安装 QEMU 、 libvirt 和 OpenStack 。我们建议用一台独立的物理主机安装 OpenStack ,此主机最少需 8GB 内存和一个 4 核 CPU 。下面的图表描述了 OpenStack/Ceph 技术栈。
-
OpenStack 里有三个地方可以和 Ceph 块设备结合:
- Images: OpenStack 的 Glance 管理着 VM 的 image 。Image 相对恒定, OpenStack 把它们当作二进制文件、并以此格式下载。
- Volumes: Volume 是块设备, OpenStack 用它们引导虚拟机、或挂载到运行中的虚拟机上。 OpenStack 用 Cinder 服务管理 Volumes 。
- Guest Disks: Guest disks 是装有客户操作系统的磁盘。默认情况下,启动一台虚拟机时,它的系统盘表现为 hypervisor 文件系统的一个文件(通常位于 /var/lib/nova/instances/
/)。
前期配置
1.创建存储池
ceph osd pool create volumes 128
ceph osd pool create images 128
ceph osd pool create backups 128
ceph osd pool create vms 128
2.安装ceph客户端包
在运行着glance-api 、 cinder-volume 、 nova-compute 或 cinder-backup 的主机上进行安装
yum -y install python-rbd ceph
3.生成ceph配置文件
在ceph存储的管理节点上,将配置文件同步到ceph客户端
ssh {your-openstack-server} sudo tee /etc/ceph/ceph.conf </etc/ceph/ceph.conf
4.配置ceph客户端认证
如果ceph启用了客户端认证,则需要为 Nova/Cinder 和 Glance 创建新用户
ceph auth get-or-create client.cinder mon 'allow r' osd 'allow class-read object_prefix rbd_children, allow rwx pool=volumes, allow rwx pool=vms, allow rx pool=images'
ceph auth get-or-create client.glance mon 'allow r' osd 'allow class-read object_prefix rbd_children, allow rwx pool=images'
ceph auth get-or-create client.cinder-backup mon 'allow r' osd 'allow class-read object_prefix rbd_children, allow rwx pool=backups'
把 client.cinder 、 client.glance 和 client.cinder-backup 的密钥环复制到适当的节点,并更改所有权
ceph auth get-or-create client.glance | ssh {your-glance-api-server} sudo tee /etc/ceph/ceph.client.glance.keyring
ssh {your-glance-api-server} sudo chown glance:glance /etc/ceph/ceph.client.glance.keyring
ceph auth get-or-create client.cinder | ssh {your-volume-server} sudo tee /etc/ceph/ceph.client.cinder.keyring
ssh {your-cinder-volume-server} sudo chown cinder:cinder /etc/ceph/ceph.client.cinder.keyring
ceph auth get-or-create client.cinder-backup | ssh {your-cinder-backup-server} sudo tee /etc/ceph/ceph.client.cinder-backup.keyring
ssh {your-cinder-backup-server} sudo chown cinder:cinder /etc/ceph/ceph.client.cinder-backup.keyring
运行 nova-compute 的节点,其进程需要密钥环文件
ceph auth get-or-create client.cinder | ssh {your-nova-compute-server} sudo tee /etc/ceph/ceph.client.cinder.key
还得把 client.cinder 用户的密钥存进 libvirt 。 libvirt 进程从 Cinder 挂载块设备时要用它访问集群。
在运行 nova-compute 的节点上创建一个密钥的临时副本:
ceph auth get-key client.cinder | ssh {your-compute-node} tee client.cinder.key
然后,在计算节点上把密钥加进 libvirt 、然后删除临时副本:
uuidgen
457eb676-33da-42ec-9a8c-9293d545c337

cat > secret.xml <<EOF
<secret ephemeral='no' private='no'>
  <uuid>457eb676-33da-42ec-9a8c-9293d545c337</uuid>
  <usage type='ceph'>
        <name>client.cinder secret</name>
  </usage>
</secret>
EOF
sudo virsh secret-define --file secret.xml
Secret 457eb676-33da-42ec-9a8c-9293d545c337 created
sudo virsh secret-set-value --secret 457eb676-33da-42ec-9a8c-9293d545c337 --base64 $(cat client.cinder.key) && rm client.cinder.key secret.xml
保留密钥的 uuid ,稍后配置 nova-compute 时要用。
配置 OPENSTACK 使用 CEPH
配置glance
编辑/etc/glance/glance-api.conf
修改glance_store的section内容:
[glance_store]
stores = rbd
default_store = rbd
rbd_store_pool = images
rbd_store_user = glance
rbd_store_ceph_conf = /etc/ceph/ceph.conf
rbd_store_chunk_size = 8
如果你想允许使用 image 的写时复制克隆,再添加下列内容到 [DEFAULT] 段下
show_image_direct_url = True
重启glance API服务,并测试
systemctl restart openstack-glance-api.service  openstack-glance-registry.service
source admin-openrc.sh
glance image-create --name "centos6_ceph" --file /root/centos6.5-cloud.qcow2 --disk-format qcow2 --container-format bare   --visibility public --progress
openstack  image list
配置cinder
OpenStack 需要一个驱动和 Ceph 块设备交互。还得指定块设备所在的存储池名。编辑 OpenStack 节点上的 /etc/cinder/cinder.conf ,添加如下内容
[DEFAULT]
enabled_backends = ceph

[ceph]
volume_driver = cinder.volume.drivers.rbd.RBDDriver
rbd_pool = volumes
rbd_ceph_conf = /etc/ceph/ceph.conf
rbd_flatten_volume_from_snapshot = false
rbd_max_clone_depth = 5
rbd_store_chunk_size = 4
rados_connect_timeout = -1
glance_api_version = 2
rbd_user = cinder
rbd_secret_uuid = 43f7430d-cce0-46eb-a0fc-a593e27878c2
配置cinder backup
backup_driver = cinder.backup.drivers.ceph
backup_ceph_conf = /etc/ceph/ceph.conf
backup_ceph_user = cinder-backup
backup_ceph_chunk_size = 134217728
backup_ceph_pool = backups
backup_ceph_stripe_unit = 0
backup_ceph_stripe_count = 0
restore_discard_excess_bytes = true
重启cinder-volume服务
systemctl restart openstack-cinder-volume.service
在cinder管理节点查看:
[root@controller ~]# cinder-manage service list
Binary           Host                                 Zone             Status     State Updated At
cinder-scheduler controller                           nova             enabled    :-)   2016-09-19 12:44:50
cinder-volume    compute2@ceph                        nova             enabled    :-)   2016-09-19 12:44:49
cinder-volume    compute1@ceph                        nova             enabled    :-)   2016-09-19 12:44:49
配置nova
编辑所有计算节点上的 /etc/nova/nova.conf 文件,添加如下内容:
libvirt_images_type = rbd
libvirt_images_rbd_pool = vms
libvirt_images_rbd_ceph_conf = /etc/ceph/ceph.conf
libvirt_disk_cachemodes="network=writeback"
rbd_user = cinder
rbd_secret_uuid =43f7430d-cce0-46eb-a0fc-a593e27878c2
live_migration_flag="VIR_MIGRATE_UNDEFINE_SOURCE,VIR_MIGRATE_PEER2PEER,VIR_MIGRATE_LIVE,VIR_MIGRATE_PERSIST_DEST,VIR_MIGRATE_TUNNELLED"
注意修改rbd_secret_uuid 为你自己实际的id
最后重启nova-compute服务
systemctl restart openstack-nova-compute.service
问题汇总:
1.遇到删除云硬盘处于deleteing中,
经查询/var/log/cinder/volume.log日志发现提示一条[Errno 13] Permission denied: '/var/lock/cinder',于是在/var/lock目录下创建cinder目录,并赋予权限,重启cinder相关服务即可删掉。
2.从ceph启动虚拟机做磁盘影射时报错:
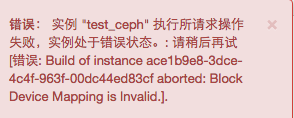
经检查发现cinder api 和volumes 之间已经断开通信,重启n遍也不行,最后发现时间同步,同步好时间之后,已可以
故障时:

修复后:


 浙公网安备 33010602011771号