设计模式之命令模式
命令模式将“请求”封装成对象,以便使用不同的请求、队列或者日志来参数化其他对象。命令模式也支持可撤销的操作。
设计自动化遥控器的API。这个遥控器有7个可编程的插槽,每个都可以指定到一个不同的家电装置。每个插槽都有对应的“打开”和“关闭”按钮。这个遥控器还具备一个整体的撤销按钮。
你要做的是创建一组控制遥控器的API,让每个插槽都能够控制一个或一组装置。请注意,要能够控制目前的装置和任何未来可能出现的装置,这一点很重要。
产商的类
public class TV {
    public void on(){}
    public void off(){}
    public void setInputChannel(){}
    public void setVolume(){}
}

public class CeilingFan {
    public void high(){}
    public void medium(){}
    public void low(){}
    public void off(){}
    public void getSpeed(){}
}

public class OutDoorLight {
    public void on(){}
    public void off(){}
}
如何设计遥控器的API?
** 要怎么将遥控器和产商类的实例解耦?可以考虑使用命令模式。**命令模式可将“动作的请求者”从“动作的执行者”对象中解耦。在这个例子里,请求者是遥控器,而执行者对象就是产商类其中之一的实例。
我们可以把请求(例如打开电灯)封装成一个特定对象(例如客厅电灯对象)。所以,如果对每个按钮都存储一个命令对象,那么当按钮被按下的时候,就可以请命令对象做相关的工作。遥控器并不需要知道工作内容是什么,只要有个命令对象能和正确的对象沟通,把事情做好就可以了。所以,遥控器和电灯对象解耦了。
进一步理解命令模式
我们都知道餐厅是怎么工作的:
- 顾客把订单交给服务员;
- 服务员拿到订单后,放在订单柜台,然后告诉厨师:“订单来了!”;
- 厨师根据订单准备餐点。
让我们更详细地研究下这个交互过程:
一张订单封装了准备餐点的请求
把订单想象成一个用来请求准备餐点的对象,和一般的对象一样,订单对象可以被传递:从服务员传递到订单柜台,或者从一个服务员传递给下一班的服务员。订单的接口只包含一个方法,这个方法封装了准备餐点所需的动作。订单内有一个到“需要进行准备工作的对象”(也就是厨师)的引用。这一切都被封装起来,所以服务员不需要知道订单上有什么,也不需要知道是谁来准备餐点;她只需要将订单放到订单窗口,然后喊一声“订单来了!”就可以了。
服务员的工作是接受订单,然后调用订单对象的方法
服务员的工作很简单:接下顾客的订单,继续帮助下一个顾客,然后将一定数量的订单放到订单柜台,并调用订单对象的方法,让厨师来准备餐点。服务员不需要担心订单的内容是什么,或者由谁来准备餐点。她只需要知道,订单有个准备餐点的方法可以调用,这就够了。
厨师具备准备餐点的知识
厨师是一种对象,他真正知道如何准备餐点。一旦服务员调用准备餐点的方法,厨师就接手,实现创建餐点的所有方法。请注意,服务员和厨师之间是彻底的解耦:服务员的订单封装了餐点的细节,她只要调用每个订单的方法即可,而厨师看了订单就知道该做些什么餐点;厨师和服务员之间从来不需要直接沟通。
把餐厅想成是OO设计模式的一种模型,而这个模型允许将“发出请求的对象”和“接受与执行这些请求的对象”分割开来。比方说,对于遥控器API,我们需要分割开“发出请求的按钮代码”和“执行请求的产商特定对象”。假如遥控器的每个插槽都持有一个像餐厅订单那样的对象,会怎么样?那么,当一个按钮被按下,只要调用该对象的方法,电灯就开了,而遥控器不需要知道事情是怎么发生的,也不需要知道涉及哪些对象。
实现一个命令对象
现在让我们开始建立第一个命令对象。
实现命令接口
首先,让所有的命令对象实现相同的包含一个execute()方法的接口:
public interface Command {
    public void execute();
}
实现一个打开电灯的命令
现在,假设想实现一个打开电灯的命令。根据产商提供的类,Light类有两个方法:on()和off()。下面是如何将它实现成一个命令:
// 这是一个命令,所以需要实现Command接口
public class LightOnCommand implements Command {
    Light light;

    // 构造器被传入了某个电灯(比方说:客厅的电灯),然后记录在实例变量中。
    // 一旦调用execute(),就由这个电灯对象成为接收者,负责接收请求。
    public LightOnCommand(Light light){
        this.light = light;
    }

    // 这个execute()方法调用接收对象(我们正在控制的电灯)的on()方法
    @Override
    public void execute() {
        light.on();
    }
}
使用命令对象
让我们把这一切简化,假设我们的遥控器只有一个按钮和对应的插槽,可以控制一个装置:
public class SimpleRemoteControl {
    // 有一个插槽持有命令,而这个命令控制着一个装置
    Command slot;

    public SimpleRemoteControl(){}

    // 这个方法用来设置插槽控制的命令。如果这段代码的客户想要改变遥控器按钮的行为,
    // 可以多次调用这个方法。
    public void setCommand(Command command){
        slot = command;
    }

    // 当按下按钮时,这个方法就会被调用,使得当前命令衔接插槽,并调用它的execute()方法
    public void buttonWasPressed(){
        slot.execute();
    }
}
遥控器使用的简单测试
下面这段代码用来测试上面的简单遥控器:
// 控制器就是调用者,会传入一个命令对象,可以用来发出请求
SimpleRemoteControl remote = new SimpleRemoteControl();
// 现在创建了一个电灯对象,此对象也就是请求的接收者
Light light = new Light();
// 在这里创建一个命令,然后将接收者传给它
LightOnCommand lightOn = new LightOnCommand(light);

// 把命令传给调用者
remote.setCommand(lightOn);
// 模拟按下按钮
remote.buttonWasPressed();
设计类图

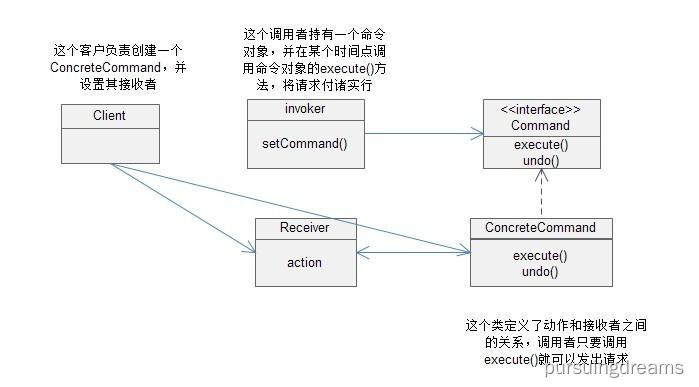
定义命令模式
命令模式将“请求”封装成对象,以便使用不同的请求、队列或者日志来参数化其他对象。命令模式也支持可撤销的操作。
我们知道一个命令对象通过在特定接收者上绑定一组动作来封装一个请求,要达到这一点,命令对象将动作和接收者包进对象中。这个对象只暴露出一个execute()方法,当此方法被调用的时候,接收者就会进行这些动作。从外面来看,其他对象不知道究竟哪个接收者进行了哪些动作,只知道如果调用execute()方法,请求的目的就能达到。
我们也看到了利用命令来参数化对象的一些例子。再回到餐厅,一整天下来,服务员参数化了许多订单。在简单遥控器中,我们用一个“打开电灯”命令加载按钮插槽。就和服务员一样,遥控器插槽根本不在乎所拥有的是什么命令对象,只要该对象实现了Command接口就可以了。
我们还未说到使用命令模式来实现“队列、日志和支持撤销操作”。这是基本命令模式相当直接的扩展,稍后就会看到这些内容。
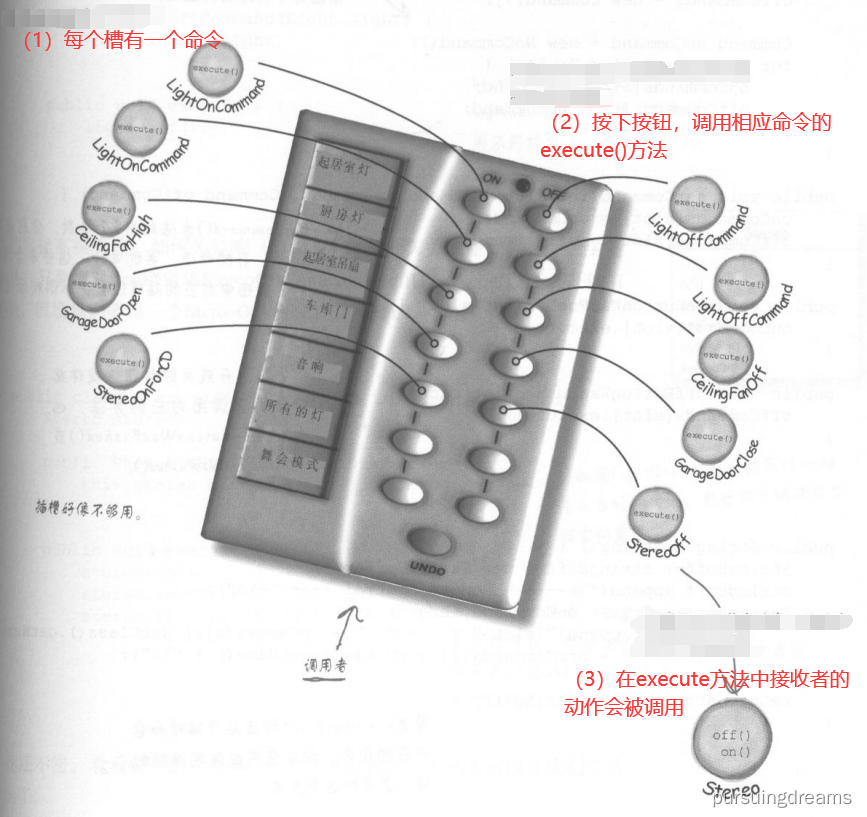
实现遥控器
现在让我们去实现有7个插槽的遥控器。
public class RemoteControl {
    // 这个时候,遥控器要处理7个开与关的命令,使用相应数组记录这些命令
    Command[] onCommands;
    Command[] offCommands;

    // 在构造器中,只需实例化并初始化这两个开与关的数组
    public RemoteControl() {
        onCommands = new Command[7];
        offCommands = new Command[7];

        Command noCommand = new NoCommand();
        for (int i = 0; i < 7; i++) {
            onCommands[i] = noCommand;
            offCommands[i] = noCommand;
        }
    }

    // setCommand()方法有3个参数,分别是插槽的位置、开的命令和关的命令。
    // 这些命令将记录在开关数组中对应的插槽位置,以供稍后使用
    public void setCommand(int slot, Command onCommand, Command offCommand) {
        onCommands[slot] = onCommand;
        offCommands[slot] = offCommand;
    }

    // 当按下开或关的按钮,硬件就会负责调用对应的方法
    public void onButtonWasPushed(int slot){
        onCommands[slot].execute();
    }

    public void offButtonWasPushed(int slot){
        offCommands[slot].execute();
    }
}
加上撤销功能
好了,我们现在需要在遥控器上加上撤销的功能。这个功能使用起来就像是这样的:比如说客厅的电灯是关闭的,然后你按下遥控器上的开启按钮,自然电灯就被打开了。现在如果按下撤销按钮,那么上一个动作将被倒转,在这个例子里,电灯将被关闭。
当命令支持撤销时,该命令就必须提供和execute()方法相反的undo()方法。不管execute()刚才做什么,undo()都会倒转过来。我们需要在Command接口中加入undo()方法。
public interface Command {
    public void execute();
    public void undo();
}
现在让我们深入电灯的命令,并实现undo()方法。
public class LightOnCommand implements Command {
    Light light;

    public LightOnCommand(Light light){
        this.light = light;
    }

    @Override
    public void execute() {
        light.on();
    }

    // execute打开电灯,所以undo()做的事情就是关闭电灯。
    @Override
    public void undo() {
        light.off();
    }
}
要加上撤销按钮,必须对遥控器做一些小修改。
public class RemoteControl {
    Command[] onCommands;
    Command[] offCommands;
    // 前一个命令将被记录在这里
    Command undoCommand;

    public RemoteControl() {
        onCommands = new Command[7];
        offCommands = new Command[7];

        Command noCommand = new NoCommand();
        for (int i = 0; i < 7; i++) {
            onCommands[i] = noCommand;
            offCommands[i] = noCommand;
        }
        // 一开始并没有所谓的“前一个命令”,所以将它设置成NoCommand
        undoCommand = noCommand;
    }

    public void setCommand(int slot, Command onCommand, Command offCommand) {
        onCommands[slot] = onCommand;
        offCommands[slot] = offCommand;
    }

    // 当按下按钮,我们取得这个命令,并优先执行它,然后将它记录在undoCommand中。
    public void onButtonWasPushed(int slot){
        onCommands[slot].execute();
        undoCommand = onCommands[slot];
    }

    public void offButtonWasPushed(int slot){
        offCommands[slot].execute();
        undoCommand = offCommands[slot];
    }

    // 当按下撤销按钮,我们调用undoCommand实例变量的undo()方法,就可以倒转前一个命令
    public void undoButtonWasPushed(){
        undoCommand.undo();
    }
}
public class RemoteLoader {
    public static void main(String[] args) {
        RemoteControlWithUndo remoteControl = new RemoteControlWithUndo();

		// 创建一个电灯对象
        Light livingRoomLight = new Light("Living Room");
		// 创建支持undo功能的命令
        LightOnCommand livingRoomLightOn = new LightOnCommand(livingRoomLight);
        LightOffCommand livingRoomLightOff = new LightOffCommand(livingRoomLight);

        remoteControl.setCommand(0, livingRoomLightOn, livingRoomLightOff);

        // 打开 关闭 撤销
        remoteControl.onButtonWasPushed(0);
        remoteControl.offButtonWasPushed(0);
        System.out.println(remoteControl);
        remoteControl.undoButtonWasPushed();

	}
}
使用状态实现撤销
吊扇
public class CeilingFan {
    String location = "";
    int speed;
    public static final int HIGH = 3;
    public static final int MEDIUM = 2;
    public static final int LOW = 1;
    public static final int OFF = 0;

    public CeilingFan(String location) {
        this.location = location;
        speed = OFF;
    }

    public void high() {
        // turns the ceiling fan on to high
        speed = HIGH;
        System.out.println(location + " ceiling fan is on high");
    }

    public void medium() {
        // turns the ceiling fan on to medium
        speed = MEDIUM;
        System.out.println(location + " ceiling fan is on medium");
    }

    public void low() {
        // turns the ceiling fan on to low
        speed = LOW;
        System.out.println(location + " ceiling fan is on low");
    }

    public void off() {
        // turns the ceiling fan off
        speed = OFF;
        System.out.println(location + " ceiling fan is off");
    }

    public int getSpeed() {
        return speed;
    }
}
加入撤销到吊扇的命令类
public class CeilingFanHighCommand implements Command {
    CeilingFan ceilingFan;
    final LinkedList<Integer> speedStack;

    public CeilingFanHighCommand(CeilingFan ceilingFan, LinkedList<Integer> speedStack) {
        this.ceilingFan = ceilingFan;
        this.speedStack = speedStack;
    }

    @Override
    public void execute() {
        speedStack.addLast(ceilingFan.getSpeed());
        ceilingFan.high();
    }

    @Override
    public void undo() {
        if (speedStack.isEmpty()) {
            ceilingFan.off();
            return;
        }
        Integer prevSpeed = speedStack.removeLast();
        if (prevSpeed == CeilingFan.HIGH) {
            ceilingFan.high();
        } else if (prevSpeed == CeilingFan.MEDIUM) {
            ceilingFan.medium();
        } else if (prevSpeed == CeilingFan.LOW) {
            ceilingFan.low();
        } else if (prevSpeed == CeilingFan.OFF) {
            ceilingFan.off();
        }
    }
}
测试吊扇
public class RemoteLoader {
    public static void main(String[] args) {
        RemoteControlWithUndo remoteControl = new RemoteControlWithUndo();

        CeilingFan ceilingFan = new CeilingFan("Living Room");

        LinkedList<Integer> stack = new LinkedList<Integer>();

        CeilingFanLowCommand ceilingFanLow =
                new CeilingFanLowCommand(ceilingFan, stack);
        CeilingFanMediumCommand ceilingFanMedium =
                new CeilingFanMediumCommand(ceilingFan, stack);
        CeilingFanHighCommand ceilingFanHigh =
                new CeilingFanHighCommand(ceilingFan, stack);
        CeilingFanOffCommand ceilingFanOff =
                new CeilingFanOffCommand(ceilingFan, stack);

        remoteControl.setCommand(0, ceilingFanMedium, ceilingFanOff);
        remoteControl.setCommand(1, ceilingFanHigh, ceilingFanOff);
        remoteControl.setCommand(2, ceilingFanLow, ceilingFanOff);

        System.out.println(remoteControl);
        remoteControl.onButtonWasPushed(0);
        remoteControl.offButtonWasPushed(0);
        remoteControl.onButtonWasPushed(1);
        remoteControl.onButtonWasPushed(2);
        remoteControl.undoButtonWasPushed();
        remoteControl.undoButtonWasPushed();
        remoteControl.undoButtonWasPushed();

    }
}
宏命令
一个按钮执行多个命令
Command[] partyOn = { lightOn, stereoOn, tvOn, hottubOn};
Command[] partyOff = { lightOff, stereoOff, tvOff, hottubOff};

MacroCommand partyOnMacro = new MacroCommand(partyOn);
MacroCommand partyOffMacro = new MacroCommand(partyOff);

remoteControl.setCommand(0, partyOnMacro, partyOffMacro);
public class MacroCommand implements Command{
    Command[] commands;
    public MacroCommand(Command[] commands) {
        this.commands = commands;
    }
    @Override
    public void execute() {
        for (int i = 0; i < commands.length; i++) {
            commands[i].execute();
        }
    }
    @Override
    public void undo() {
        for (int i = 0; i < commands.length; i++) {
            commands[i].undo();
        }
    }
}
命令模式的应用 -- 队列请求

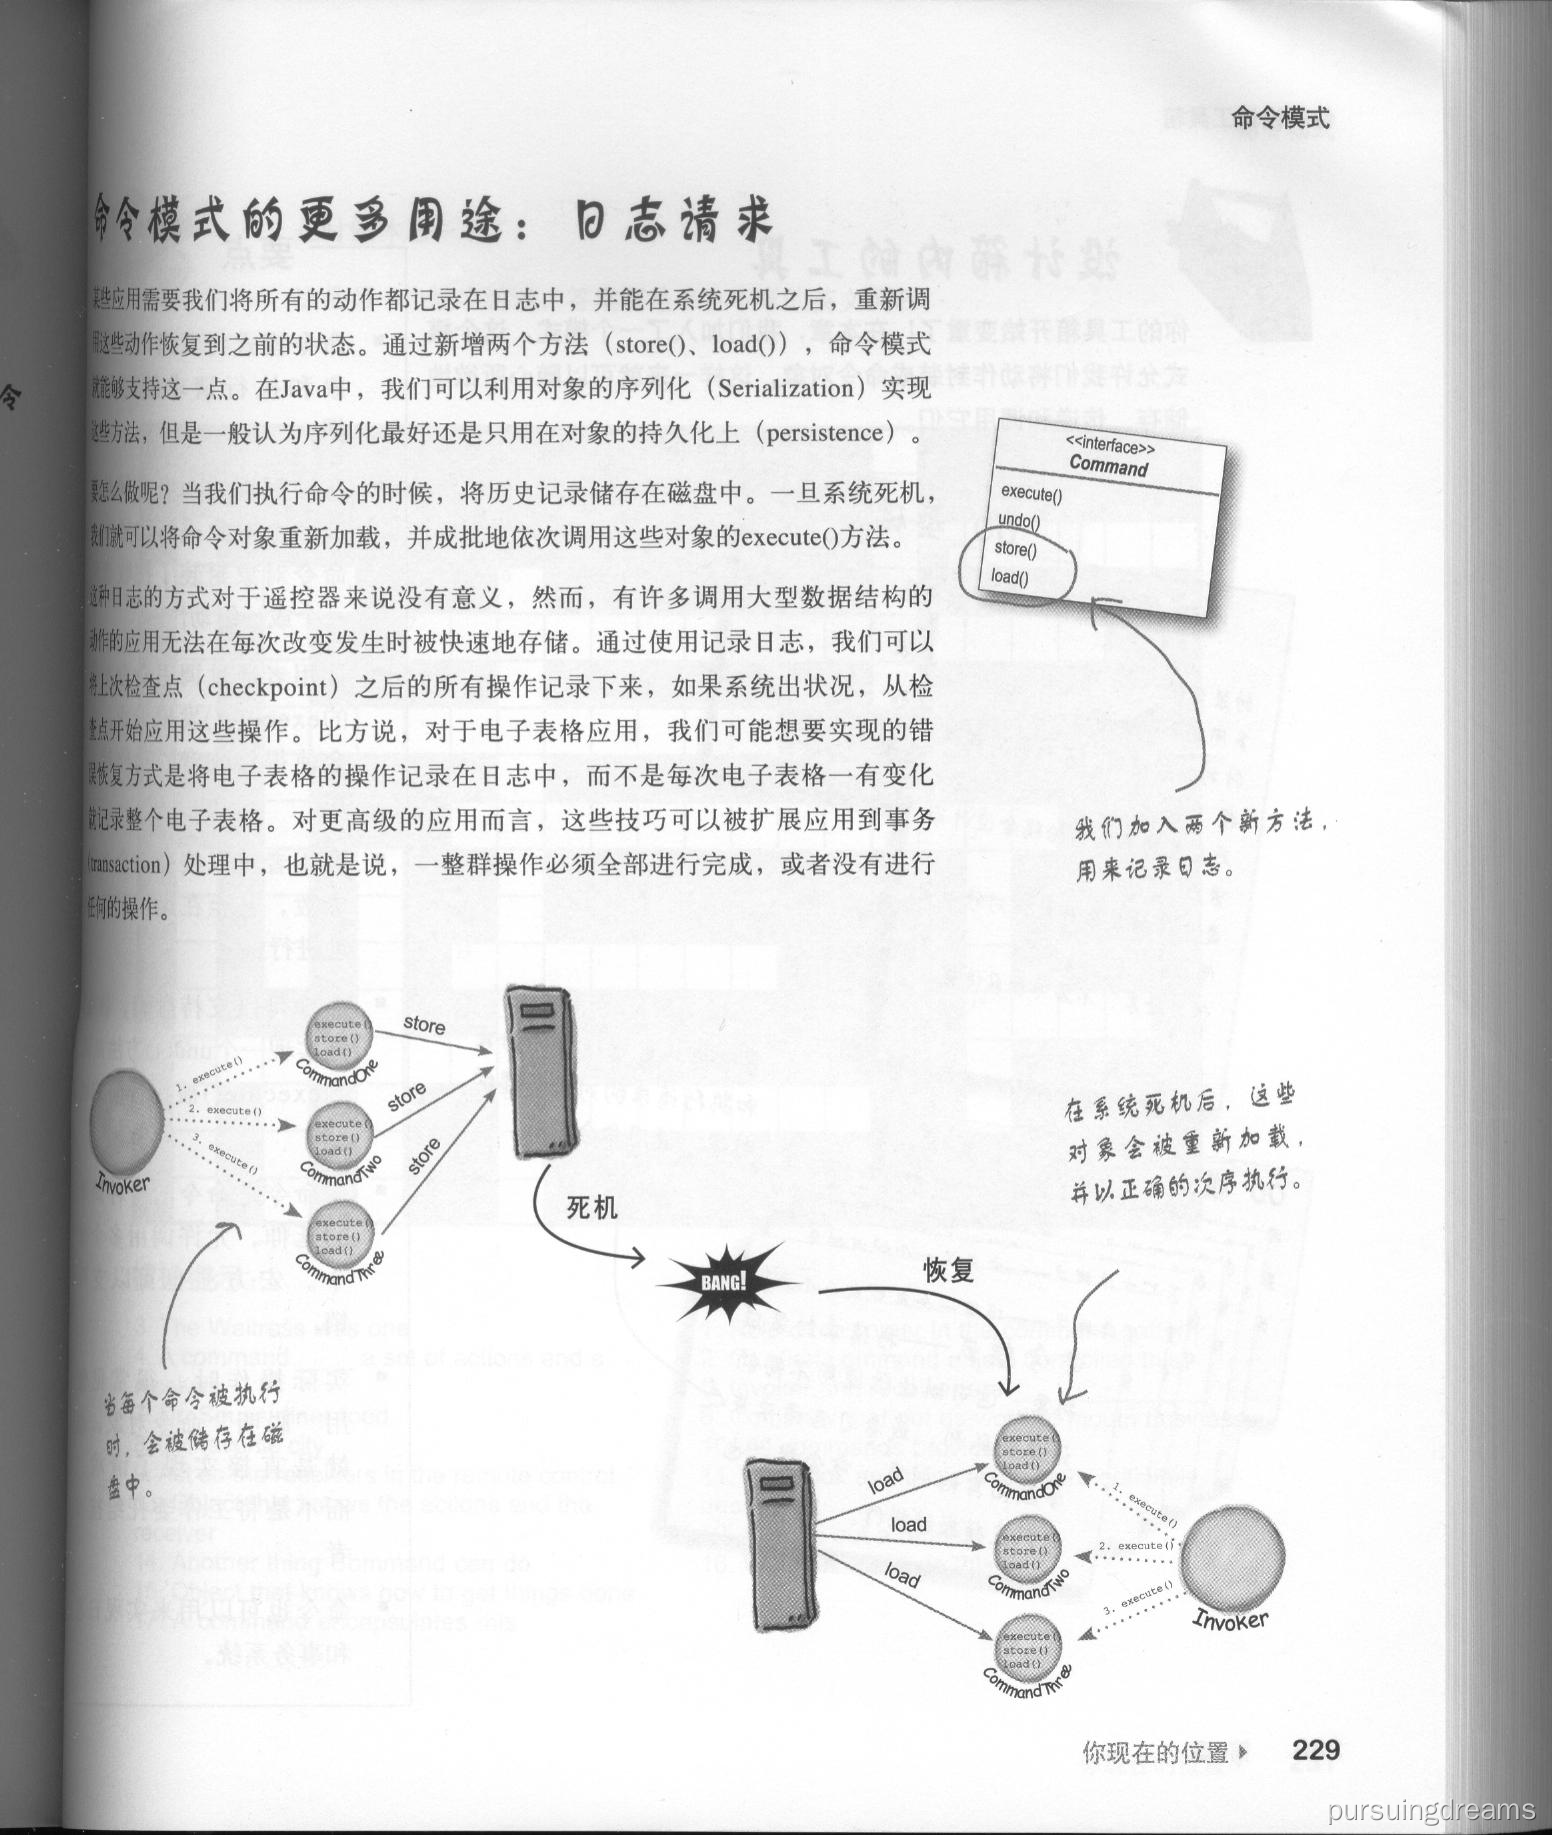
命令模式的应用 -- 日志请求

 浙公网安备 33010602011771号