
Ribbon负载均衡及Feign消费者调用服务
微服务调用Ribbon
简介
前面讲了eureka服务注册与发现,但是结合eureka集群的服务调用没讲。
这里的话 就要用到Ribbon,结合eureka,来实现服务的调用;
Ribbon是Netflix发布的负载均衡器,它有助于控制HTTP和TCP的客户端的行为。为Ribbon配置服务提供者地址后,Ribbon就可基于某种负载均衡算法,自动地帮助服务消费者去请求。Ribbon默认为我们提供了很多负载均衡算法,例如轮询、随机等。当然,我们也可为Ribbon实现自定义的负载均衡算法。
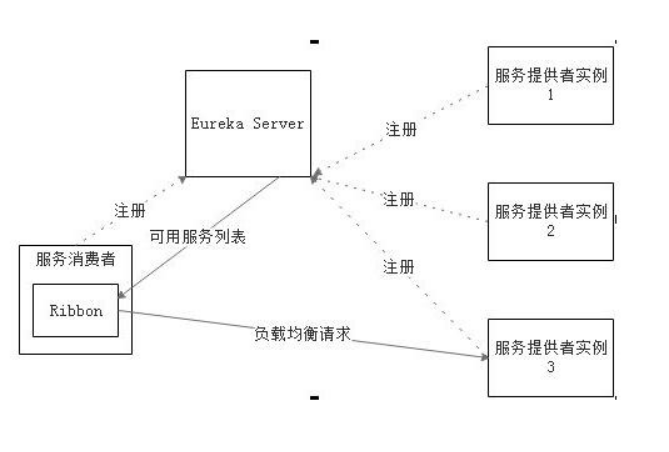
在Spring Cloud中,当Ribbon与Eureka配合使用时,Ribbon可自动从Eureka Server获取服务提供者地址列表,并基于负载均衡算法,请求其中一个服务提供者实例。展示了Ribbon与Eureka配合使用时的架构。
初步应用
Ribbon是客户端负载均衡,所以肯定集成再消费端,也就是consumer端
我们修改microservice-student-consumer-80
pom.xml 加入 ribbon相关依赖
<!--ribbon相关依赖-->
<dependency>
    <groupId>org.springframework.cloud</groupId>
    <artifactId>spring-cloud-starter-eureka</artifactId>
</dependency>
<dependency>
    <groupId>org.springframework.cloud</groupId>
    <artifactId>spring-cloud-starter-ribbon</artifactId>
</dependency>
<dependency>
    <groupId>org.springframework.cloud</groupId>
    <artifactId>spring-cloud-starter-config</artifactId>
</dependency>
application.yml加
eureka:
  client:
    service-url:
      defaultZone: http://eureka2001.psy.com:2001/eureka/,http://eureka2002.psy.com:2002/eureka/,http://eureka2003.psy.com:2003/eureka/
    register-with-eureka: false
ribbon结合eureka来调用服务提供者;
SpringCloudConfig也改成 要加个负载均衡配置 @LoadBalanced
package com.psy.microservicestudentconsumer80.config;

import org.springframework.cloud.client.loadbalancer.LoadBalanced;
import org.springframework.context.annotation.Bean;
import org.springframework.context.annotation.Configuration;
import org.springframework.web.client.RestTemplate;

@Configuration
public class SpringCloudConfig {
    @LoadBalanced  // 引入ribbon负载均衡
    @Bean
    public RestTemplate getRestTemplate(){
        return new RestTemplate();
    }
}
给启动类加上@EnableEurekaClient
这里还有一个,要修改下StudentConsumerController的PRE_HOST,改成指定的微服务应用名称;
当然这里要先在服务提供者microservice-student-provider-1001的application.yml加下配置,指定下应用名称:
application:
name: microservice-student
服务调用者这边的控制器里PRE_HOST改成 http://MICROSERVICE-STUDENT即可;
@RestController
@RequestMapping("/student")
public class StudentConsumerController {

    private final static String SERVER_IP_PORT = "http://MICROSERVICE-STUDENT";
上面配置好后,我们可以测试下;
先启动三个eureka,然后再启动服务提供者,再启动服务消费者;

Ribbon负载均衡
按照它microservice-student-provider-1001建立一个microservice-student-provider子项目,然后将microservice-student-provider-1001这个子项目干掉;
前面搭建了初步例子,但是还没实现真正负载均衡,我们这里要先搞三个服务提供者集群,然后才能演示负载均衡,以及负载均衡策略;
新建项目microservice-student-provider-1002,microservice-student-provider-1003
pom.xml,application.yml,以及java类都复制一份,启动类名称对应的改下;
yml配置文件有两处要对应的改下,port端口改下,以及服务实例名称改下;
pom依赖:
<?xml version="1.0" encoding="UTF-8"?>
<project xmlns="http://maven.apache.org/POM/4.0.0" xmlns:xsi="http://www.w3.org/2001/XMLSchema-instance"
         xsi:schemaLocation="http://maven.apache.org/POM/4.0.0 https://maven.apache.org/xsd/maven-4.0.0.xsd">
    <modelVersion>4.0.0</modelVersion>
    <parent>
        <groupId>com.psy</groupId>
        <artifactId>springcloud</artifactId>
        <version>1.0-SNAPSHOT</version>
    </parent>
    <groupId>com.psy</groupId>
    <artifactId>microservice-student-provider</artifactId>
    <version>0.0.1-SNAPSHOT</version>
    <name>microservice-student-provider</name>
    <description>Demo project for Spring Boot</description>

    <properties>
        <java.version>1.8</java.version>
    </properties>

    <dependencies>
        <dependency>
            <groupId>com.psy</groupId>
            <artifactId>microservice-common</artifactId>
        </dependency>
        <dependency>
            <groupId>org.springframework.boot</groupId>
            <artifactId>spring-boot-starter-web</artifactId>
        </dependency>
        <dependency>
            <groupId>org.springframework.boot</groupId>
            <artifactId>spring-boot-starter-test</artifactId>
            <scope>test</scope>
        </dependency>
        <dependency>
            <groupId>org.springframework.boot</groupId>
            <artifactId>spring-boot-starter-data-jpa</artifactId>
        </dependency>
        <dependency>
            <groupId>mysql</groupId>
            <artifactId>mysql-connector-java</artifactId>
        </dependency>
        <dependency>
            <groupId>org.springframework.boot</groupId>
            <artifactId>spring-boot-starter-tomcat</artifactId>
        </dependency>
        <dependency>
            <groupId>com.alibaba</groupId>
            <artifactId>druid-spring-boot-starter</artifactId>
        </dependency>
        <!--  修改后立即生效,热部署  -->
        <dependency>
            <groupId>org.springframework</groupId>
            <artifactId>springloaded</artifactId>
        </dependency>
        <dependency>
            <groupId>org.springframework.boot</groupId>
            <artifactId>spring-boot-devtools</artifactId>
        </dependency>
        <dependency>
            <groupId>com.psy</groupId>
            <artifactId>microservice-common</artifactId>
            <version>1.0-SNAPSHOT</version>
            <scope>compile</scope>
        </dependency>

        <!--添加注册中心Eureka相关配置-->
        <dependency>
            <groupId>org.springframework.cloud</groupId>
            <artifactId>spring-cloud-starter-eureka</artifactId>
        </dependency>
        <dependency>
            <groupId>org.springframework.cloud</groupId>
            <artifactId>spring-cloud-starter-config</artifactId>
        </dependency>

        <!-- actuator监控引入 -->
        <dependency>
            <groupId>org.springframework.boot</groupId>
            <artifactId>spring-boot-starter-actuator</artifactId>
        </dependency>
    </dependencies>

    <build>
        <plugins>
            <plugin>
                <groupId>org.springframework.boot</groupId>
                <artifactId>spring-boot-maven-plugin</artifactId>
            </plugin>
        </plugins>
    </build>

</project>
---
server:
  port: 1001
  context-path: /
spring:
  datasource:
    type: com.alibaba.druid.pool.DruidDataSource
    driver-class-name: com.mysql.jdbc.Driver
    url: jdbc:mysql://localhost:3306/mybatis_ssm?useUnicode=true&characterEncoding=utf8
    username: mybatis_ssm
    password: 123
  jpa:
    hibernate:
      ddl-auto: update
    show-sql: true
  application:
    name: microservice-student
  profiles: provider-1001

eureka:
  instance:
    hostname: localhost
    appname: microservice-student
    instance-id: microservice-student:1001
    prefer-ip-address: true
  client:
    service-url:
      defaultZone: http://eureka2001.psy.com:2001/eureka/,http://eureka2002.psy.com:2002/eureka/,http://eureka2003.psy.com:2003/eureka/

info:
  groupId: com.psy.springcloud
  artifactId: microservice-student-provider-1001
  version: 1.0-SNAPSHOT
  userName: http://psy.com
  phone: 123456

---
server:
  port: 1002
  context-path: /
spring:
  datasource:
    type: com.alibaba.druid.pool.DruidDataSource
    driver-class-name: com.mysql.jdbc.Driver
    url: jdbc:mysql://localhost:3306/mybatis_ssm?useUnicode=true&characterEncoding=utf8
    username: mybatis_ssm
    password: 123
  jpa:
    hibernate:
      ddl-auto: update
    show-sql: true
  application:
    name: microservice-student
  profiles: provider-1002

eureka:
  instance:
    hostname: localhost
    appname: microservice-student
    instance-id: microservice-student:1002
    prefer-ip-address: true
  client:
    service-url:
      defaultZone: http://eureka2001.psy.com:2001/eureka/,http://eureka2002.psy.com:2002/eureka/,http://eureka2003.psy.com:2003/eureka/

info:
  groupId: com.javaxl.springcloud
  artifactId: microservice-student-provider-1002
  version: 1.0-SNAPSHOT
  userName: http://psy.com
  phone: 123456

---
server:
  port: 1003
  context-path: /
spring:
  datasource:
    type: com.alibaba.druid.pool.DruidDataSource
    driver-class-name: com.mysql.jdbc.Driver
    url: jdbc:mysql://localhost:3306/mybatis_ssm?useUnicode=true&characterEncoding=utf8
    username: mybatis_ssm
    password: 123
  jpa:
    hibernate:
      ddl-auto: update
    show-sql: true
  application:
    name: microservice-student
  profiles: provider-1003

eureka:
  instance:
    hostname: localhost
    appname: microservice-student
    instance-id: microservice-student:1003
    prefer-ip-address: true
  client:
    service-url:
      defaultZone: http://eureka2001.psy.com:2001/eureka/,http://eureka2002.psy.com:2002/eureka/,http://eureka2003.psy.com:2003/eureka/

info:
  groupId: com.psy.springcloud
  artifactId: microservice-student-provider-1003
  version: 1.0-SNAPSHOT
  userName: http://psy.com
  phone: 123456
启动类:
package com.psy.microservicestudentprovider;

import org.springframework.boot.SpringApplication;
import org.springframework.boot.autoconfigure.SpringBootApplication;
import org.springframework.boot.autoconfigure.domain.EntityScan;
import org.springframework.cloud.netflix.eureka.EnableEurekaClient;

@EntityScan("com.psy.*.*")
@EnableEurekaClient
@SpringBootApplication
public class MicroserviceStudentProviderApplication {

    public static void main(String[] args) {
        SpringApplication.run(MicroserviceStudentProviderApplication.class, args);
    }

}
StudentProviderController:
    @Value("${server.port}")
    private String port;

    @RequestMapping("/ribbon")
    public String ribbon(){
        return "工号【"+port+"】正在为您服务";
    }
StudentConsumerController:
    @RequestMapping("/ribbon")
    public String ribbon(){
        return restTemplate.getForObject(SERVER_IP_PORT + "/student/ribbon", String.class);
    }
Feign简介及应用
简介
声明式服务调用Feign简单介绍下;
Feign是一个声明式的Web Service客户端,它使得编写Web Serivce客户端变得更加简单。我们只需要使用Feign来创建一个接口并用注解来配置它既可完成。它具备可插拔的注解支持,包括Feign注解和JAX-RS注解。Feign也支持可插拔的编码器和解码器。Spring Cloud为Feign增加了对Spring MVC注解的支持,还整合了Ribbon和Eureka来提供均衡负载的HTTP客户端实现。
这段话看起来比较懵逼,这里说下实际使用,前面Ribbon调用服务提供者,我们通过restTemplate调用,缺点是,多个地方调用,同一个请求要写多次,不方便统一维护,这时候Feign来了,就直接把请求统一搞一个service作为FeignClient,然后其他调用Controller需要用到的,直接注入service,直接调用service方法即可;同时Feign整合了Ribbon和Eureka,所以要配置负载均衡的话,直接配置Ribbon即可,无其他特殊地方;当然Fiegn也整合了服务容错保护,断路器Hystrix,后面再说。
应用
1、在common项目里建一个service(实际项目肯定是多个service)作为Feign客户端,用Feign客户端来调用服务器提供者,当然可以配置负载均衡;Feign客户端定义的目的,就是为了方便给其他项目调用;
修改 microservice-common
pom.xml引入Feign依赖:
<!--引入Feign依赖-->
<dependency>
    <groupId>org.springframework.cloud</groupId>
    <artifactId>spring-cloud-starter-feign</artifactId>
</dependency>
我们定义了 FeignClient,同时指定了调用的服务名称MICROSERVICE-STUDENT
common项目修改后,maven clean下 然后install下;
建StudentClientService接口:
package cpm.psy.microservicecommon.service;


import cpm.psy.microservicecommon.entity.Student;
import org.springframework.cloud.netflix.feign.FeignClient;
import org.springframework.web.bind.annotation.GetMapping;
import org.springframework.web.bind.annotation.PathVariable;
import org.springframework.web.bind.annotation.PostMapping;
import org.springframework.web.bind.annotation.RequestMapping;

import java.util.List;

/**
 * Student Feign接口客户端
 * @author Administrator
 *
 */
@FeignClient(value="MICROSERVICE-STUDENT")
public interface StudentClientService {

    /**
     * 根据id查询学生信息
     * @param id
     * @return
     */
    @GetMapping(value="/student/get/{id}")
    public Student get(@PathVariable("id") Integer id);

    /**
     * 查询学生信息
     * @return
     */
    @GetMapping(value="/student/list")
    public List<Student> list();

    /**
     * 添加或者修改学生信息
     * @param student
     * @return
     */
    @PostMapping(value="/student/save")
    public boolean save(Student student);

    /**
     * 根据id删除学生信息
     * @return
     */
    @GetMapping(value="/student/delete/{id}")
    public boolean delete(@PathVariable("id") Integer id);

    @RequestMapping("/student/ribbon")
    public String ribbon();
}
2、新建一个Feign消费者项目;
参考microservice-student-consumer-80建一个microservice-student-consumer-feign-80
代码都复制一份,包括pom.xml
3、修改启动类名称,和加注解
启动类名称改下,改成StudentConsumerFeignApplication_80,同时加个注解@EnableFeignClients
支持下Feign;
package com.psy.microservicestudentconsumerfeign80;

import org.springframework.boot.SpringApplication;
import org.springframework.boot.autoconfigure.SpringBootApplication;
import org.springframework.boot.autoconfigure.jdbc.DataSourceAutoConfiguration;
import org.springframework.boot.autoconfigure.orm.jpa.HibernateJpaAutoConfiguration;
import org.springframework.cloud.netflix.eureka.EnableEurekaClient;
import org.springframework.cloud.netflix.feign.EnableFeignClients;

@EnableEurekaClient
@EnableFeignClients(value = "com.psy.*.*")
@SpringBootApplication(exclude={DataSourceAutoConfiguration.class, HibernateJpaAutoConfiguration.class})
public class MicroserviceStudentConsumerFeign80Application {

    public static void main(String[] args) {
        SpringApplication.run(MicroserviceStudentConsumerFeign80Application.class, args);
    }

}
StudentConsumerController:
package com.psy.microservicestudentconsumerfeign80.controller;

import cpm.psy.microservicecommon.entity.Student;
import cpm.psy.microservicecommon.service.StudentClientService;
import org.springframework.beans.factory.annotation.Autowired;
import org.springframework.web.bind.annotation.*;
import org.springframework.web.client.RestTemplate;

import java.util.List;

@RestController
@RequestMapping("/student")
public class StudentConsumerController {

    private final static String SERVER_IP_PORT = "http://MICROSERVICE-STUDENT";

    @Autowired
    private StudentClientService studentClientService;

    @Autowired
    private RestTemplate restTemplate;

    @PostMapping(value = "/save")
    private boolean save(Student student) {
        return studentClientService.save(student);
    }

    @GetMapping(value = "/list")
    public List<Student> list() {
        return studentClientService.list();
    }

    @GetMapping(value = "/get/{id}")
    public Student get(@PathVariable("id") Integer id) {
        return studentClientService.get(id);
    }

    @GetMapping(value = "/delete/{id}")
    public boolean delete(@PathVariable("id") Integer id) {
        try {
            studentClientService.delete(id);
            return true;
        } catch (Exception e) {
            return false;
        }
    }

    @RequestMapping("/ribbon")
    public String ribbon(){
        return studentClientService.ribbon();
    }
}
因为现在用Fiegn,所以把restTemplate去掉,改成注入service,调用service方法来实现服务的调用

 浙公网安备 33010602011771号