3.4 基本布局类-QLayout
3.4 基本布局类-QLayout
在Qt中,有布局管理器这种东西来帮助Qt程序员来对各种控件进行布局操作,布局管理器包括了水平布局器,垂直布局器,网格布局器
和表单布局器
3.4.1 Qt中的布局器类
3.4.1 QLayout类
该类是一切Qt布局器类的基类(从它派生的类有QBoxLayout,QFormLayout,QGridLayout)
3.4.2 QBoxLayout类
该类是QLayout的派生类,而QHboxLayout和QVBoxLayout类都是QBoxLayout的派生类
3.4.4 QHBoxLayout类
该类是用于水平布局的类
3.4.5 QVBoxLayout类
该类是用于垂直布局的类
3.4.6 QFormLayout类
该类是QLayout的派生类,用于表单布局
注:上面四种类的继承关系如图所示

3.4.2 布局管理器类中常用的几个成员函数(这里以网格布局QGridLayout为例[其他的布局器类雷同])
3.4.2.1 addWidget方法
void addWidget(QWidget *widget,//表示要插入的窗体部件
int fromRow,//插入的起始行
int fromColumn,//插入的起始列
int rowSpan,//该部件要占用的行数
int columnSpan,//该部件要占用的列数
Qt::Alignment alignment = Qt::Alignment()//部件的对齐方式
)
此方法用于往一个布局管理器中插入一个Widget部件
3.4.2.2 addLayout方法
void addLayout(QLayout *layout,//要插入的布局的指针
int row,//起始行
int column,//起始列
int rowSpan,//该布局要占用的行数
int columnSpan,//该布局要占用的列数
Qt::Alignment alignment = Qt::Alignment()//布局的对齐方式
)
此方法用于往一个布局器中插入另一个布局(可以把这个布局也想象成是一个Widget)
3.4.3 案例
本案例将来实现一个"用户基本资料修改"的功能表来学习如何使用这些基本的布局管理器(如:QHboxLayout,QVBoxLayout,QGridLayout)
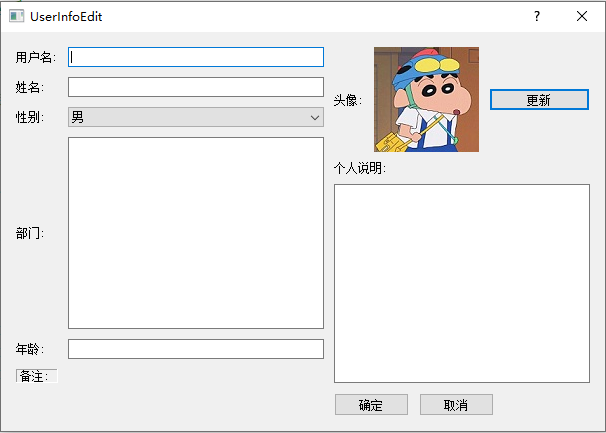
3.4.3.1 创建一个Qt的GUI项目,项目名称为UserInfoEdit,取消"创建UI界面"复选框,设置类名为UserInfoEdit,基类选择QDialog
3.4.3.2 在userinfoedit.h中编写以下代码
#ifndef USERINFOEDIT_H
#define USERINFOEDIT_H
#include <QLabel>
#include <QDialog>
#include <QLineEdit>
#include <QTextEdit>
#include <QComboBox>
#include <QPushButton>
#include <QHBoxLayout>
#include <QVBoxLayout>
#include <QGridLayout>
#include <QApplication>
#include <QGraphicsView>
class UserInfoEdit : public QDialog
{
    Q_OBJECT
public:
    UserInfoEdit(QWidget *parent = nullptr);
    ~UserInfoEdit();
private:
    QLabel*m_userNameLabel;
    QLabel*m_nameLabel;
    QLabel*m_sexLabel;
    QLabel*m_apartmentLabel;
    QLabel*m_ageLabel;
    QLabel*m_noteLabel;
    QLabel*m_headLabel;
    QLabel*m_headGraphicsLabel;
    QLabel*m_selfIntroductionLabel;
private:
    QLineEdit*m_userNameLineEdit;
    QLineEdit*m_nameLineEdit;
    QComboBox*m_sexComboBox;
    QTextEdit*m_apartmentTextEdit;
    QLineEdit*m_ageLineEdit;

    QPushButton*m_updatePushButton;
    QTextEdit*m_selfIntroductionTextEdit;
    QPushButton*m_OKPushButton;
    QPushButton*m_CancelButton;
private:
    QGridLayout*m_mainLayout;
    QGridLayout*m_leftLayout;
    QHBoxLayout*m_rightTopLayout;
    QVBoxLayout*m_rightCenterLayout;
    QHBoxLayout*m_rightBottomLayout;
    QVBoxLayout*m_rightLayout;
};
#endif // USERINFOEDIT_H
3.4.3.3 在userinfoedit.cpp中编写以下代码
#include "userinfoedit.h"
UserInfoEdit::UserInfoEdit(QWidget *parent):QDialog(parent)
{
    ///new出所有的Label对象
    m_userNameLabel = new QLabel(QString("用户名:"));
    m_nameLabel = new QLabel(QString("姓名:"));
    m_sexLabel = new QLabel(QString("性别:"));
    m_apartmentLabel = new QLabel(QString("部门:"));
    m_ageLabel = new QLabel(QString("年龄:"));
    m_noteLabel = new QLabel(QString("备注:"));
    m_noteLabel->setFrameShadow(QFrame::Shadow::Sunken);
    m_noteLabel->setFrameShape(QFrame::Shape::Panel);
    m_headLabel = new QLabel(QString("头像:"));
    m_selfIntroductionLabel = new QLabel(QString("个人说明:"));
    ///new出所有的其他部件
    m_userNameLineEdit = new QLineEdit;
    m_nameLineEdit = new QLineEdit;
    m_sexComboBox = new QComboBox;
    m_sexComboBox->addItem(QString("男"));
    m_sexComboBox->addItem(QString("女"));
    m_apartmentTextEdit = new QTextEdit;
    m_ageLineEdit = new QLineEdit;
    m_headGraphicsLabel = new QLabel;
    m_headGraphicsLabel->setPixmap(QPixmap(QApplication::applicationDirPath()+"/test.jpg"));
    m_updatePushButton = new QPushButton(QString("更新"));
    m_selfIntroductionTextEdit = new QTextEdit;
    m_OKPushButton = new QPushButton(QString("确定"));
    m_CancelButton = new QPushButton(QString("取消"));
    ///布局器
    //主布局
    m_mainLayout = new QGridLayout(this);
    //左边的网格布局
    m_leftLayout = new QGridLayout;
    m_leftLayout->addWidget(m_userNameLabel,0,0);
    m_leftLayout->addWidget(m_userNameLineEdit,0,1);
    m_leftLayout->addWidget(m_nameLabel,1,0);
    m_leftLayout->addWidget(m_nameLineEdit,1,1);
    m_leftLayout->addWidget(m_sexLabel,2,0);
    m_leftLayout->addWidget(m_sexComboBox,2,1);
    m_leftLayout->addWidget(m_apartmentLabel,3,0);
    m_leftLayout->addWidget(m_apartmentTextEdit,3,1);
    m_leftLayout->addWidget(m_ageLabel,4,0);
    m_leftLayout->addWidget(m_ageLineEdit,4,1);
    m_leftLayout->addWidget(m_noteLabel,5,0);
    //右边的布局
    //右上角的头像Label,头像GraphicsView,更新按钮
    m_rightTopLayout = new QHBoxLayout;
    m_rightTopLayout->addWidget(m_headLabel,0);
    m_rightTopLayout->addWidget(m_headGraphicsLabel,1);
    m_rightTopLayout->addWidget(m_updatePushButton,2);
    //右边中间的个人说明Label和TextEdit
    m_rightCenterLayout = new QVBoxLayout;
    m_rightCenterLayout->addWidget(m_selfIntroductionLabel,0);
    m_rightCenterLayout->addWidget(m_selfIntroductionTextEdit,1);
    //右下角的两个Button(确定和取消)
    m_rightBottomLayout = new QHBoxLayout;
    m_rightBottomLayout->addWidget(m_OKPushButton,0,Qt::AlignLeft);
    m_rightBottomLayout->addWidget(m_CancelButton,1,Qt::AlignLeft);
    m_rightBottomLayout->setAlignment(Qt::AlignRight);
    //右边的布局
    m_rightLayout = new QVBoxLayout;
    m_rightLayout->addLayout(m_rightTopLayout,0);
    m_rightLayout->addLayout(m_rightCenterLayout,1);
    ///主布局
    m_mainLayout->addLayout(m_leftLayout,0,0);
    m_mainLayout->addLayout(m_rightLayout,0,1);
    m_mainLayout->addLayout(m_rightBottomLayout,1,1);
    m_mainLayout->setMargin(15);
    m_mainLayout->setSpacing(10);
}

UserInfoEdit::~UserInfoEdit()
{
}
注:本节案例的项目代码见
https://files.cnblogs.com/files/blogs/792763/UserInfoEdit.zip?t=1697449904&download=true

 浙公网安备 33010602011771号