spring security oauth2搭建resource-server demo及token改造成JWT令牌
我们在上文讲了如何在spring security的环境中搭建基于oauth2协议的认证中心demo: https://www.cnblogs.com/process-h/p/15688971.html , 对应的还应该要有一个resource server。本章主要就是讲resource server的demo搭建,并且再将普通的token改造成JWT令牌的形式以及为什么要改成JWT令牌格式。
自定义resource-server实现类
在搭建oauth2认证中心时,我们需要再自定义一个继承AuthorizationServerConfigurerAdapter的实现类,同时在该实现类上添加@EnableAuthorizationServer注解。同样的,我们也需要创建一个继承ResourceServerConfigurerAdapter的实现类,并在该实现类上添加@EnableResourceServer注解来声明这是一个资源服务。
@Configuration
@EnableResourceServer
public class ResouceServerConfig extends ResourceServerConfigurerAdapter {
}
我们来看看ResourceServerConfigurerAdapter父类,发现它重写了2个方法。以下是这2个方法中的参数对象可以配置的属性:
ResourceServerSecurityConfigurer中主要包括:
- tokenServices:ResourceServerTokenServices 类的实例,用来实现令牌服务。
- tokenStore:TokenStore类的实例,指定令牌如何访问。
- resourceId:这个资源服务的ID,这个属性是可选的,但是推荐设置并在授权服务中进行验证。
- 其他的拓展属性例如 tokenExtractor 令牌提取器用来提取请求中的令牌。
HttpSecurity配置这个与Spring Security类似:
- 请求匹配器,用来设置需要进行保护的资源路径,默认的情况下是保护资源服务的全部路径。
- 通过http.authorizeRequests()来设置受保护资源的访问规则。
- 其他的自定义权限保护规则通过 HttpSecurity 来进行配置。
public class ResourceServerConfigurerAdapter implements ResourceServerConfigurer {
   @Override
   public void configure(ResourceServerSecurityConfigurer resources) throws Exception {
   }
   @Override
   public void configure(HttpSecurity http) throws Exception {
      http.authorizeRequests().anyRequest().authenticated();
   }

}
编写ResourceServerConfig
package com.peter.security.order.config;

import org.springframework.context.annotation.Bean;
import org.springframework.context.annotation.Configuration;
import org.springframework.security.config.annotation.method.configuration.EnableGlobalMethodSecurity;
import org.springframework.security.config.annotation.web.builders.HttpSecurity;
import org.springframework.security.config.http.SessionCreationPolicy;
import org.springframework.security.oauth2.config.annotation.web.configuration.EnableResourceServer;
import org.springframework.security.oauth2.config.annotation.web.configuration.ResourceServerConfigurerAdapter;
import org.springframework.security.oauth2.config.annotation.web.configurers.ResourceServerSecurityConfigurer;
import org.springframework.security.oauth2.provider.token.RemoteTokenServices;
import org.springframework.security.oauth2.provider.token.ResourceServerTokenServices;

/**
 * @author huang
 * @description
 * @date 2021/12/17
 **/
@Configuration
@EnableResourceServer
@EnableGlobalMethodSecurity(prePostEnabled = true)
public class ResouceServerConfig extends ResourceServerConfigurerAdapter {

    public static final String RESOURCE_ID = "res1";

    //资源服务令牌解析服务
    @Bean
    public ResourceServerTokenServices tokenService() {
        //使用远程服务请求授权服务器校验token,必须指定校验token 的url、client_id,client_secret
        RemoteTokenServices service=new RemoteTokenServices();
       service.setCheckTokenEndpointUrl("http://localhost:53020/uaa/oauth/check_token");
        // 声明只有该client 的接入方才能访问该资源服务
        service.setClientId("c1");
        service.setClientSecret("secret");
        return service;
    }
    @Override
    public void configure(ResourceServerSecurityConfigurer resources) {
        // 声明该资源服务id,以及认证的tokenSerivce对象
        resources.resourceId(RESOURCE_ID)
                .tokenServices(tokenService());
    }

    @Override
    public void configure(HttpSecurity http) throws Exception {
        http
                .authorizeRequests()
// 访问该资源服务的client的scope要有all权限
            	.antMatchers("/**").access("#oauth2.hasScope('all')")
                .and().csrf().disable()
                .sessionManagement().sessionCreationPolicy(SessionCreationPolicy.STATELESS);
    }
}
定义资源服务接口
有了配置,还需要暴露出一些资源接口给外部调用,我们这里简单定义一个接口。
package com.peter.security.order.controller;

import org.springframework.security.access.prepost.PreAuthorize;
import org.springframework.web.bind.annotation.GetMapping;
import org.springframework.web.bind.annotation.RestController;

/**
 * @author huangyizeng
 * @description
 * @date 2021/12/17
 **/
@RestController
public class OrderController {

    // 访问该资源的用户要有P1权限
    @GetMapping(value = "/r1")
    @PreAuthorize("hasAnyAuthority('p1')")
    public String r1(){
        return "访问资源1";
    }

}
示例
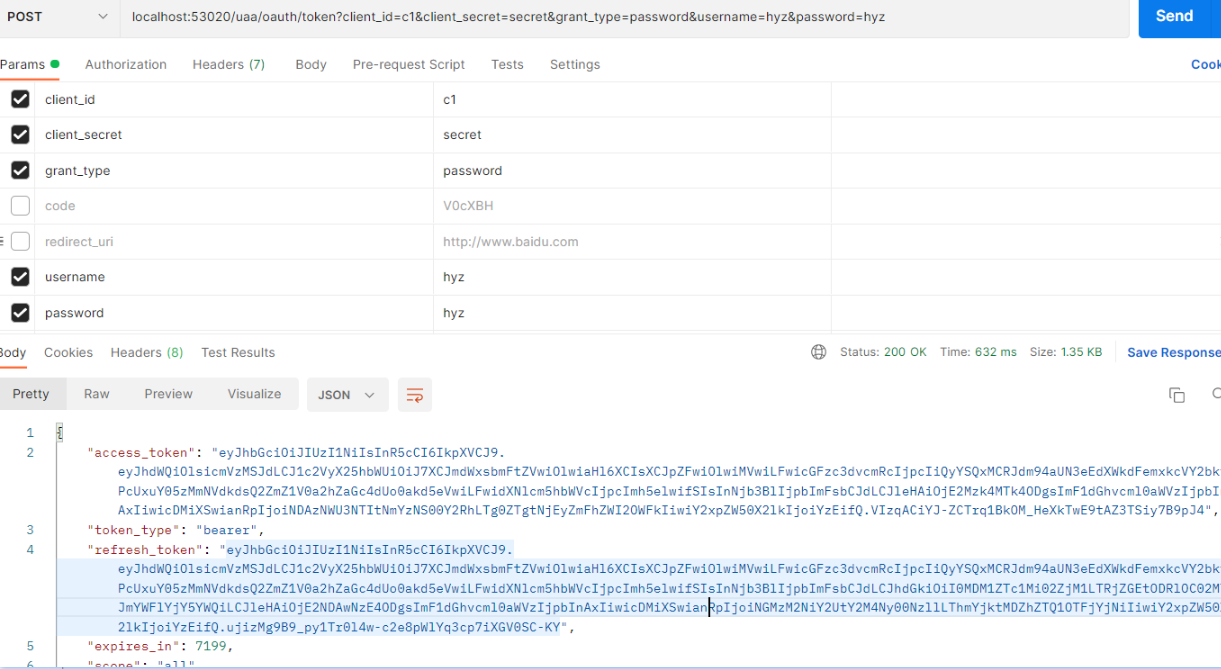
1、申请token
我们知道Oauth2协议有4中授权方式,分别是:
-
授权码(authorization_code):第三方应用先申请一个授权码,然后再用该码获取令牌。
-
密码(password):使用用户名密码进行获取token,一般是高度信任的应用(内部系统应用)。
-
客户端(client_credentials):没有前端,只有后端应用。
-
简化(implicit):有些web是纯前端应用,没有后端,将token存放在前端。
使用哪一种授权方式都是可以的,在前面一节我们使用了授权码方式进行获取: https://www.cnblogs.com/process-h/p/15688971.html 。在这里我们使用密码授权方式进行获取token,启动授权服务后,我们访问获取token端点:

2、查看token代表了哪些信息
spring security oauth2 中有个用于资源服务访问的令牌解析端点(/oauth/check_token )。我们先来看看上面返回的token中都有哪些权限,访问
http://localhost:53020/uaa/oauth/check_token?token=c46ffcf5-3043-4513-9405-808f89b02f30
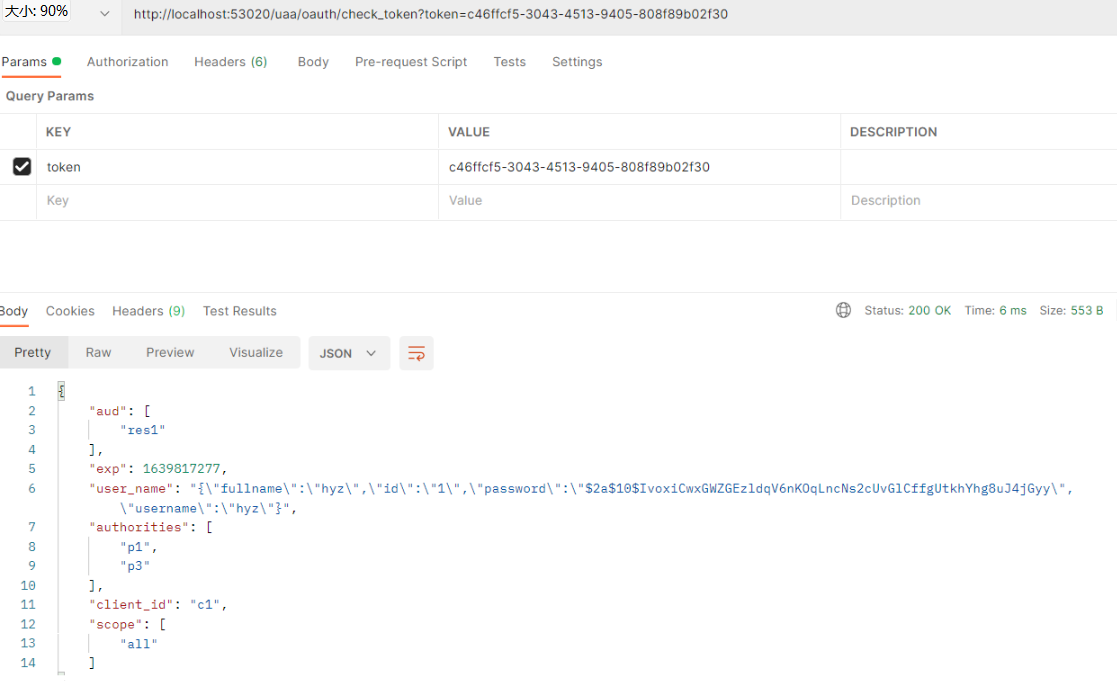
可以看到返回以下属性信息:
- 第三方client的基本信息:user_name\client_Id\scope
- 第三方client的授权列表:authorities
- 第三方client的资源服务列表:res1
如果我们传入一个不存在的token,那么将会返回
{
    "error": "invalid_token",
    "error_description": "Token was not recognised"
}
3、使用token访问资源服务
最后我们再来使用该token访问资源服务。oauth2.0 要求将token根据具体的格式放在请求头中:Authorization: Bearer token
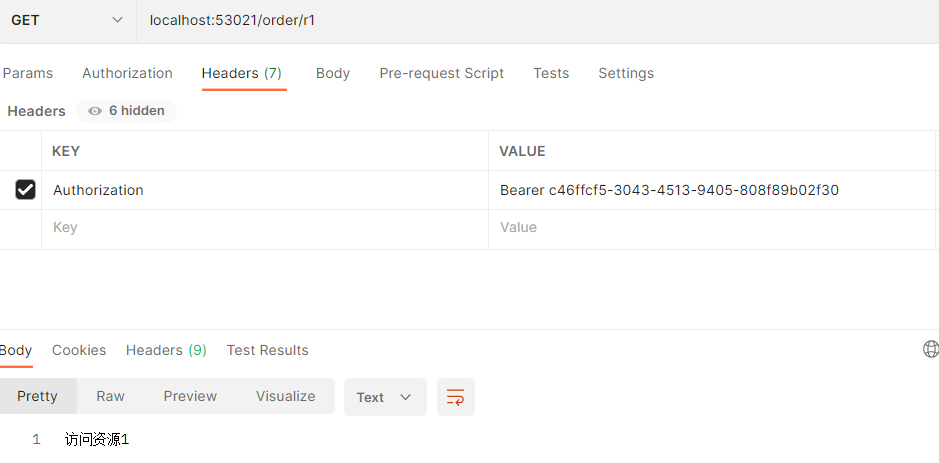
如上图,资源服务在接收到token参数后,会到授权服务的/oauth/check_token端点拿到该token的权限,然后与资源服务定义的授权进行比对,如果符合就继续执行,否则返回
{
    "error": "invalid_token",
    "error_description": "c46ffcf5-3043-4513-9405-808f89b02f301"
}
JWT令牌
通过上面的测试,当资源服务和授权服务不在一起时,资源服务需要通过网络请求去授权服务的/token/check_token端点请求验证token,如果访问量较大将会影响系统的性能。
为了解决性能问题,可以将token令牌采用jwt格式,这样用户授权后通过后将会拿到一个JWT令牌,JWT令牌中已经包含了用户相关的信息,包括权限,基本信息等,接着资源服务根据事先跟认证服务约定好的算法自行进行令牌校验,无需每次都想认证服务请求验证。
JWT具体是什么,相信童鞋们也有一定的认识了,这里不过多说明。主要说明一点,一般JWT是是用非对称加密使用的,在这里我们使用对称加密的方式,省去非对称加密密钥生成步骤。
1、配置认证服务JWT令牌
在认证服务中配置JWT令牌,即可实现生成JWT格式的令牌。
TokenConfig ,修改tokenService的实现类。
@Configuration
public class TokenConfig {

    private String SIGNING_KEY = "uaa123";
    @Bean
    public TokenStore tokenStore() {
        return new JwtTokenStore(accessTokenConverter());
    }
    @Bean
    public JwtAccessTokenConverter accessTokenConverter() {
        JwtAccessTokenConverter converter = new JwtAccessTokenConverter();
        converter.setSigningKey(SIGNING_KEY); //对称秘钥,资源服务器使用该秘钥来验证
        return converter;
    }
}
定义使用JWT令牌
public class AuthorizationServer extends AuthorizationServerConfigurerAdapter {
    @Autowired
    private JwtAccessTokenConverter accessTokenConverter;
     @Bean
    public AuthorizationServerTokenServices tokenService() {
        DefaultTokenServices service=new DefaultTokenServices();
        service.setClientDetailsService(clientDetailsService);
        service.setSupportRefreshToken(true);
        // 定义使用JWT令牌
        service.setTokenStore(tokenStore);
        TokenEnhancerChain tokenEnhancerChain = new TokenEnhancerChain();
        tokenEnhancerChain.setTokenEnhancers(Arrays.asList(accessTokenConverter));
        service.setTokenEnhancer(tokenEnhancerChain);
        service.setAccessTokenValiditySeconds(7200); // 令牌默认有效期2小时
        service.setRefreshTokenValiditySeconds(259200); // 刷新令牌默认有效期3天
        return service;
    }
}
检验令牌,根据密码授权模式来获取令牌:
由上图可见,生成的令牌确实已经是JWT的格式了。
再查看该令牌中代表了哪些信息。访问
确实访问了在上面实例中的client相关信息:
{
    "aud": [
        "res1"
    ],
    "user_name": "{\"fullname\":\"hyz\",\"id\":\"1\",\"password\":\"$2a$10$IvoxiCwxGWZGEzldqV6nKOqLncNs2cUvGlCffgUtkhYhg8uJ4jGyy\",\"username\":\"hyz\"}",
    "scope": [
        "all"
    ],
    "exp": 1639819888,
    "authorities": [
        "p1",
        "p3"
    ],
    "jti": "4035e752-6f35-4cda-84e8-612faaeb69ad",
    "client_id": "c1"
}
由此可见,基于JWT的改造已经完成。
2、修改资源服务检验令牌配置
资源服务需要和授权服务拥有一致的签字、令牌服务等:
- 将认证服务中的TokenConfig类拷贝到资源 服务中
- 将授权服务中的TokenConfig类拷贝到资源 服务中
public class ResouceServerConfig extends ResourceServerConfigurerAdapter {

    public static final String RESOURCE_ID = "res1";

    @Autowired
    private TokenStore tokenStore;

    //资源服务令牌解析服务
//    @Bean
//    public ResourceServerTokenServices tokenService() {
//        //使用远程服务请求授权服务器校验token,必须指定校验token 的url、client_id,client_secret
//        RemoteTokenServices service=new RemoteTokenServices();
//        service.setCheckTokenEndpointUrl("http://localhost:53020/uaa/oauth/check_token");
//        service.setClientId("c1");
//        service.setClientSecret("secret");
//        return service;
//    }
    @Override
    public void configure(ResourceServerSecurityConfigurer resources) {
        resources.resourceId(RESOURCE_ID)
                .tokenStore(tokenStore);
    }
}
验证令牌是否有效
我们再次使用上面基于JWT生成的令牌去访问资源服务:

由上图可知是可以正常访问的,如果该令牌有误,则会返回
{
    "error": "invalid_token",
    "error_description": "Cannot convert access token to JSON"
}
到这里,本篇就结束了,我们总结一下:
- 使用基本的token,需要去认证中心验证token是否有效等,在高并发时会有性能问题
- 令牌改成JWT格式,解决了性能问题,当然也可以考虑将令牌存放在redis中也可以解决性能问题
- 本文栗子中使用对称加密的JWT令牌,生产环境肯定是使用非对称加密的密钥对(如何配置,童鞋们可以实践一下)
spring security相关的内容就写到这里,在spring security 及Oauth2的源码中发现了许多不明白的地方,之前spring的源码由粗略看到一部分,现在觉得还是需要再回头看看spring源码,所以后续会分享spring源码的章节。

 浙公网安备 33010602011771号