|
![]() Sizing of Locally Managed Tablespaces Sizing of Locally Managed Tablespaces ![]()
More and more we are using locally managed tablespaces. They offer a large amount of benefits, so why should we not use this new feature?
Some thoughts are needed when you decided to use Uniform Extent Allocation. With the uniform method, you specify an extent size when you create the tablespace, and all extents for all objects created within that tablespace will be that size.
The uniform method also provides an enforcement mechanism, because you can’t override the uniform extent size of locally managed tablespaces when you create a schema object such as a table or an index.
The goal is to allocate as much disk space as really needed and as really used. With the uniform extent allocation you can calculate or even estimate the number of extents you want to allocate. Gaps or unused disk space within the tablespace should be avoided.
Lets assume that we create a tablespace with the uniform extent size of 1 MByte and 10 extents. Remember that locally managed tablespaces will use another 64 KBytes or the Header Bitmap:
10 * 1 * 1024K + 64K = 10304K
Note that all calculations are made in KBytes and that your chosen extent size is the multiple of your defined block size. The following statement creates this locally managed tablespace with a uniform extent size of 1 MByte:
CREATE TABLESPACE uni_test
DATAFILE ‘C:\Oradata\ASU1\tab\uni_test.dbf’
SIZE 10304K
EXTENT MANAGEMENT LOCAL UNIFORM SIZE 1024K;
Now every object created within the newly created tablespace gets its uniform extent size of 1 MByte:
CREATE TABLE tab_1 (
num NUMBER
) TABLESPACE uni_test;
CREATE TABLE tab_2 (
num NUMBER,
text VARCHAR2(255)
) TABLESPACE uni_test
STORAGE
(INITIAL 100K
NEXT 100K
MINEXTENTS 1
MAXEXTENTS UNLIMITED
PCTINCREASE 0);
CREATE TABLE tab_3 (
num NUMBER,
text VARCHAR2(255),
create_date DATE
) TABLESPACE uni_test
STORAGE
(MINEXTENTS 2
MAXEXTENTS UNLIMITED
PCTINCREASE 0);
If you are including a STORAGE clause when you create tables or indexes, Oracle will allocate as much extents as you indicate to use. Table TAB_1 will be allocated with one extent, table TAB_2 too because you need at least 100 KBytes. Table TAB_3 will be created with two extents. This could also be done by defining an INITIAL value of 2 MBytes.
The allocated blocks and extents can be verified using the view DBA_SEGMENTS:
SELECT segment_name, segment_type, blocks, extents
FROM dba_segments
WHERE owner = 'TEST'
ORDER BY EXTENTS
/
SEGMENT_NAME SEGMENT_TYPE BLOCKS EXTENTS
-------------------- ------------------ ---------- ----------
TAB_1 TABLE 256 1
TAB_2 TABLE 256 1
TAB_3 TABLE 512 2
The free space in the tablespace UNI_TEST can be verified using the view DBA_FREE_SPACE:
SELECT tablespace_name, bytes, blocks
FROM dba_free_space
WHERE tablespace_name = 'UNI_TEST'
/
TABLESPACE_NAME BYTES BLOCKS
------------------------------ ---------- ----------
UNI_TEST 6291456 1536
That means in the tablespace UNI_TEST are still 1536 blocks available. How many extents are these blocks? This can be calculated by multiplying the number of available blocks by the block size and divided by the extent size:
1536 * 4K / 1024K = 6 extents
That fits with our calculations and verifications: 4 extents are already used and another 6
extents could be used to fill up the whole tablespace.
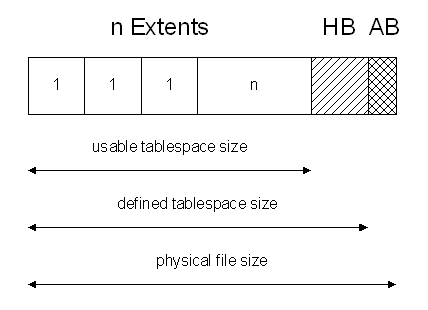
If you check the physical file size used for the tablespace UNI_TEST you will be surprised: Instead of the calculated 10304 KBytes (10'551'296 Bytes) you will find the disk file’s size of 10'555'392 Bytes. Oracle allocates another block which can not be used for object allocation. Some of the Oracle tools such as the Tablespace Manger shows the total number of blocks according to the disk file size. In our example this are 2577 blocks, but usable are only 2576 blocks minus 64 KBytes (for header bitmap).
![]()
Keep the following rules in mind during the sizing of tablespaces:
-
Each extent size is the multiple of your defined block size.
-
The usable tablespace size is the multiple of your estimated number of extents.
-
The defined tablespace size used during CREATE TABLESPACE statement adds 64
KBytes for the header bitmap (HB) to the usable tablespace size.
-
The physical file size adds one block (AB) to the defined tablespace size.
![]() Oracle8i: How to migrate LONG RAW to BLOB Oracle8i: How to migrate LONG RAW to BLOB ![]()
In Oracle8i BLOB's (Binary Large Objects) can be used instead of LONG RAW's to store binary unformatted data, like documents, images, audio and video. On the new BLOB data type many of the former LONG RAW restrictions are not valid anymore and up to 4GB can be stored. This tip shows how to migrate LONG RAW columns to BLOB's.
It is worth to create a separate tablespace for the LOB's bigger contents to gain performance. The tables containing LOB columns can be stored together with other tables in a tablespace (called tab in this sample). However the LOB columns referencing their data in a separate tablespace (called btabhere).
CREATE TABLESPACE btab
DATAFILE '.../lob/POR1_lob1.dbf' SIZE 512064K REUSE
AUTOEXTEND ON NEXT 10M MAXSIZE UNLIMITED
EXTENT MANAGEMENT LOCAL UNIFORM SIZE 256K
PERMANENT
ONLINE;
A new table must be created that contains the new BLOB column. Even if it is possible to add a BLOB column to an existing table we cannot migrate old LONG RAW data in it. The required SQL functionTO_LOB can be used in SELECT subqueries of INSERT statements only.
Lets assume the old table docs looks like this...
id NUMBER(10) NOT NULL
bdata LONG RAW NULL
... we create the new one:
CREATE TABLE newdocs (
id NUMBER(10) CONSTRAINT nn_newdocs_id NOT NULL,
bdata BLOB DEFAULT empty_blob() NULL
)
PCTFREE 5
PCTUSED 40
INITRANS 1
MAXTRANS 255
TABLESPACE tab STORAGE (
INITIAL 500K
NEXT 500K
MINEXTENTS 1
MAXEXTENTS UNLIMITED
PCTINCREASE 0
FREELISTS 1
)
LOB (bdata) STORE AS (
TABLESPACE btab
STORAGE (INITIAL 100M NEXT 100M PCTINCREASE 0)
CHUNK 50
PCTVERSION 10
NOCACHE LOGGING
);
LOB's in general do not use rollback segments. To maintain read consistency Oracle creates new LOB page versions every time a lob changes. PCTVERSION is the percentage of all used LOB data space that can be occupied by old versions of LOB data pages. As soon as old versions of LOB data pages start to occupy more than the PCTVERSION amount of used LOB space, Oracle tries to reclaim the old versions and reuse them. In other words, PCTVERSION is the percent of used LOB data blocks that is available for versioning old LOB data. The PCTVERSION can be set to the percentage of LOB's that are occasionally updated. If LOB's are inserted once and afterwards usually read only, 0% can be used.
If CACHE is specified Oracle places LOB pages in the buffer cache for faster access. NOCACHE can be used if there are occasionally no writes to stored LOB's and infrequently reads only. CACHE READ is good for busy read operations and infrequent writes.
Set CHUNK to the number of blocks of LOB data that will be accessed at one time. This reduces network roundtrip overheads. The INITIAL and NEXT storage parameters must be greater than CHUNK * DB_BLOCK_SIZE size. Use bigger CHUNK's if possible.
The default setting ENABLE STORAGE IN ROW stores LOB's less than 4KB within the table and greater LOB's are automatically moved out of the row. This is the recommended setting. DISABLE STORAGE IN ROW can be used to store all data outside the rows. A lot of small LOB's within a table can decrease performance of table operations like full table scans or multi-row accesses.
Consider that CHUNK and ENABLE/DISABLE STORAGE IN ROW cannot be altered after table creation.
Finally we can use the following SQL statement to migrate the data from the old to the new table:
INSERT INTO newdocs (id, bdata)
SELECT id, TO_LOB(bdata)
FROM docs;
To copy the data is easy. The SQL function TO_LOB( ) can be used to convert LONG RAW to BLOB. It's also possible to convert LONG to CLOB if required. The main thing of the whole data migration is to choose good storage parameter settings especially if a large number and large LOB's in size need to be stored.
![]() Net8 access trough a firewall with port forwarding using SSH Net8 access trough a firewall with port forwarding using SSH ![]()
One option for secure communication between the Net8 client and server is to tunnel the communication inside the Secure Shell protocol.
Conceptually, it works like this. First, you install an SSH client on the local machine where you run your Net8 client. You use the SSH client to establish an SSH connection to the remote host where the Net8 server is running. You also use the SSH client to establish a "listen" on a local port for Net8 requests.
Here's the cool part: when you fire up your Net8 client, it connects to the Net8 port on localhost - your machine - instead of connecting to port 143 on a remote server machine.
The SSH client then forwards everything it receives on the local Net8 port through the SSH session, or tunnel, to the remote SSH daemon, which then forwards the data to the Net8 port on the remote host.
How does the SSH daemon on the receiving end know what to do with all this Net8 information coming at it? Well, the information is part of the port-forwarding arrangement you gave the daemon when you first fired up the SSH session. For example, you'd invoke SSH from your unix client machine like this
$ ssh -f -L localport:remotehost:remoteport tail -f /dev/null
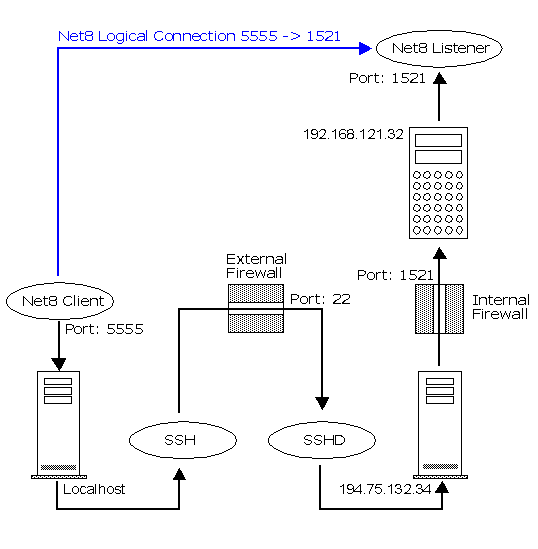
Tfhe command must be invoked as root because root privilege is required to set up port forwarding. The -f option tells SSH to run in the background after port forwarding has been established. -L localport:remotehost:remoteport specifies that the given port on the local (client) host is to be forwarded to the given host and port on the remote side. In our example, we use port 5555 on the client and port 1521 on the database server 192.168.121.32
The server port must be whichever port listens for Net8 requests (1521 on most systems). Depending on the SSH client, you'll either be prompted for your password to log in to the SSHD 194.75.132.34 server when issuing the tunneling command, or you'll have to initiate a login manually to establish the session, In all cases, you'll have to use SSH to log in to the remote host before you can use it to "launder" your connection. The entire Net8 port-forwarding scenario is shown in the next figure.
![]()
Example
We start by using lsof (list open files), a program that tells you which open files and network connections belong to which processes. to check for software listening at local TCP port 5555. There is none. We confirm this by trying to telnet to localhost at port 555 without success.
$ lsof -i tcp:5555
$ telnet localhost 5555
At this point, we're certain that there's no activity, such as a listen or an open connection, on port 555 on our local machine. That port is okay to use. Next, we set up the port forwarding by issuing an SSH command. Remember that you have to be root to set up port forwarding:
$ su -
$ ssh -f -L 5555:192.168.121.32:1521 194.75.132.34 tail -f /dev/null
$ ps -ef
The tail -f /dev/null that we tacked on the end of the SSH command is just a low-overhead command to keep the session open. We didn't want to keep an actual shell session open and running in the background when we didn't need it, so we used the tail command instead. You can verify with ps -ef, that the command is now running in the background and you now have a permanent Net8 connection through two firewalls -- cool isn't it?
Next you have to setup your TNSNAMES.ORA configuration file, then check the connection withtnsping and finally connect with sqlplus.
ORA1.WORLD =
(DESCRIPTION =
(ADDRESS_LIST =
(ADDRESS = (PROTOCOL = TCP)(HOST = localhost)(PORT = 5555))
)
(CONNECT_DATA =
(SERVICE_NAME = ORA1.WORLD)
(SRVR = DEDICATED)
)
)
$ tnsping ORA1
$ sqlplus scott/tiger@ORA1
![]() Automatically Calculating Percentages in Queries Automatically Calculating Percentages in Queries ![]()
Starting with Release 7.1 of Oracle, users have had access to a feature called an inline view. An inline view is a view within a query. Using this feature, you can easily accomplish your task.
Example: Show percentage of salaries for each department
Every row in the report must have access to the total sum of sal. You can simply divide sum (sal) by that total, and you'll have a number that represents the percentage of the total.
column percentage format 99.9
select deptno, sum(sal),sum(sal)/tot_sal*100 "PERCENTAGE"
from emp, (select sum(sal) tot_sal from emp)
group by deptno, tot_sal;
DEPTNO SUM(SAL) PERCENTAGE
---------- ---------- ----------
10 8750 30.1
20 10875 37.5
30 9400 32.4
With Oracle8i Release 2 (8.1.6 and higher), you can calculate percentages by using the new analytic functions as well. The query using an analytic function might look like this:
column percentage format 99.9
select deptno, sum(sal), (ratio_to_report(sum(sal)) over())*100 "PERCENTAGE"
from emp
group by deptno;
DEPTNO SUM(SAL) PERCENTAGE
---------- ---------- ----------
10 8750 30.1
20 10875 37.5
30 9400 32.4
The query produces the same answer—but it does so more efficiently, because it does not have to make two passes over the data to arrive at the answer. Because the analytic functions are built-in, queries that use them will find the answer more rapidly than the "pure" SQL-based approach.
![]() Show Table and System Privileges Show Table and System Privileges
It is normally difficult to list all privileges and roles assigned to a specific user in one select, since a privilege can be assigned to a role, which can be assigned to another role, which in turn can be assigned to another role
|



 浙公网安备 33010602011771号