
STM32 —— FreeModbus 从机移植,基于 Modbus 协议读取从机温度(AHT20)
STM32 —— FreeModbus 从机移植,基于 Modbus 协议读取从机温度(AHT20)
实验目的
用stm32最小核心板+AHT20模块,完成一个 modbus接口的温湿度Slave设备,能够让上位机PC通过modbus协议获取温湿度。主程序采用多任务框架,比如RT-thread Nano
实验原理
这里的具体 Modbus 原理可以看我前面的博客:
这里我们可以直接移植已有的 Modbus 协议 FreeModbus,这里我们会把下载地址放在文末,关于 FreeModbus 的详细介绍可以看 FreeMosbus 官网:FreeMODBUS
官方的 FreeModbus 只到 v1.5,且只支持从机免费,做主机的功能要收费
后来有网友基于这个开发了自己的 v1.6,主从机都免费,这里会在文末给出下载链接
关于读取温度传感器 AHT20 和 RT-Thread 移植可以看我的另外两篇博客:
FreeModbus 协议简介
FreeMODBUS 是一个奥地利人写的 Modbus 协议,它是一个针对嵌入式应用的一个免费(自由)的通用 MODBUS 协议的移植。Modbus 是一个工业制造环境中应用的一个通用协议。Modbus 通信协议栈包括两层:Modbus 应用层协议,该层定义了数据模式和功能;另外一层是网络层
FreeMODBUS 提供了 RTU/ASCII 传输模式及 TCP 协议支持。FreeModbus 遵循 BSD 许可证,这意味着用户可以将 FreeModbus 应用于商业环境中。下面给出命令表:
| 指令代码 | 描述 | 是否支持 | 备注 |
|---|---|---|---|
| Master | 主机 | 否 | |
| Slave | 从机 | 是 | |
| MB_RTU | RTU模式 | 是 | |
| MB_ASCII | ASCII模式 | 是 | |
| MB_TCP | TCP模式 | 是 | |
| 0x01 | 读线圈 | 是 | |
| 0x02 | 读离散输入 | 是 | |
| 0x03 | 读保持寄存器 | 是 | |
| 0x04 | 读输入寄存器 | 是 | |
| 0x05 | 写单个线圈 | 是 | |
| 0x06 | 写单个寄存器 | 是 | |
| 0x07 | 读异常状态 | 否 | |
| 0x08 | 诊断 | 否 | 否 |
| 0x0B | 获取事件计数器 | 否 | |
| 0x0C | 获取事件记录 | 否 | |
| 0x0F | 写多个线圈 | 是 | |
| 0x10 | 写多个寄存器 | 是 | |
| 0x11 | 报告从机ID | 是 | 协议与文档不一致 |
| 0x14 | 读文件记录 | 否 | |
| 0x15 | 写文件记录 | 否 | |
| 0x16 | 屏蔽写寄存器 | 否 | |
| 0x17 | 读/写多个寄存器 | 是 | |
| 0x18 | 写FIFO | 否 | |
| 0x2B | 封装接口传输 | 否 | |
| 0x2B/0x0D | CANopen参考请求于应答 | 否 | |
| 0x2B/0x0E | 读设备身份表示 | 否 |
HAL 库方法
FreeModbus 驱动移植准备阶段
首先要下载 FreeModbus 协议,我们这里要安装的是从机程序,下载连接会放在文末,然后将我们下载好的压缩包解压出来,解压后文件夹内容如下:

Demo 中主要放了不同平台下的移植文件,以 bare 文件夹为例:
BARE
	| - port
	|    | - portevent.c
	|    | - portserial.c
	|    | - porttimer.c
	| - demo.c
	| - Makefile
这些就是移植层需要我们适配的接口了。其中 event基本不改。主要就是适配串口接口 和 定时器 接口。
然后选择demo.c 里面的
tools:工具
modbus:主要的协议栈实现,实际上不怎么需要修改
doc:文档
然后我们进入到 demo 目录下,新建一个 STM32F103C8T6_Mosbus 用于存储适用于我们的最小系统开发板的 FreeMosbus 驱动文件
将 demo/BARE 目录下的所有文件复制到我们刚才新建的文件夹下,然后再将 demo 目录下的 modbus 文件加复制到我们刚创建的目录下,这样我们就已经准备好了 Modbus 驱动环境:

CubeMX 项目配置
RCC 配置

USART1 配置

TIM3 配置


I2C 配置

SYS 配置

RT-Thread 配置


NVIC 配置

时钟配置

引脚配置

引入驱动代码文件并添加头文件路径
首先我们需要将对应的所有驱动文件复制到我们的项目目录下:

这里具体的引入 RT-Thread 和 AHT20 可以看我前面的博客,这里不详细介绍,直接给出引入后的截图:

这里 Modbus 中添加我们 STM32F103C8T6_Mosbus/modbus 中的所有文件,Modbus_Port 中添加我们 STM32F103C8T6_Mosbus/port 中的所有文件


注意:这里同样需要将我们前面创建好的 STM32F103C8T6_Mosbus 文件夹一同添加到我们的项目中
最后添加头文件目录:

修改 FreeModbus 代码
文末会直接给出修改后的 FreeModbus 用于 STM32F103C8T6 最小系统板上的驱动程序
首先,我们要修改 RT-Thread 和 AHT20 的相关代码,直接看我前面的博客有详细内容,这里就直接使用修改后的代码,不再单独介绍
修改 portserial.c 的代码
修改的代码文件位置:

引入相关头文件
#include "usart.h"
修改 vMBPortSerialEnable 函数,该函数用于串口的接收和发送功能的打开或关闭
修改后代码如下:
void vMBPortSerialEnable( BOOL xRxEnable, BOOL xTxEnable )	第一个参数为串口的接收功能的打开与关闭,第二个参数为串口的发送功能的打开与关闭
{
    /* If xRXEnable enable serial receive interrupts. If xTxENable enable
     * transmitter empty interrupts.
     */

	if (xRxEnable)	//将串口收发中断和modbus联系起来,下面的串口改为自己使能的串口
	{
		__HAL_UART_ENABLE_IT(&huart1,UART_IT_RXNE);	//我用的是串口1,故为&huart1
	}
	else
	{
		__HAL_UART_DISABLE_IT(&huart1,UART_IT_RXNE);
	}
	if (xTxEnable)
	{
		__HAL_UART_ENABLE_IT(&huart1,UART_IT_TXE);
	}
	else
	{
		__HAL_UART_DISABLE_IT(&huart1,UART_IT_TXE);
	}
}
修改 xMBPortSerialInit 函数,该函数对 UART 串口进行初始化,由 eMBRTUInit 函数进行调用,这里改为默认返回 TRUE
修改后代码如下:
BOOL xMBPortSerialInit( UCHAR ucPORT, ULONG ulBaudRate, UCHAR ucDataBits, eMBParity eParity )
{
    return TRUE;
}
修改 xMBPortSerialPutByte 和 xMBPortSerialGetByte 函数,串口发送和接收函数,将STM32串口发送函数进行封装,供协议栈使用
修改后代码如下:
BOOL xMBPortSerialPutByte( CHAR ucByte )
{
    /* Put a byte in the UARTs transmit buffer. This function is called
     * by the protocol stack if pxMBFrameCBTransmitterEmpty( ) has been
     * called. */
	if(HAL_UART_Transmit(&huart1,(uint8_t *)&ucByte,1,0x01) != HAL_OK){
			return FALSE;
	}
	else {
		return TRUE;
	}
}

BOOL xMBPortSerialGetByte( CHAR * pucByte )
{
    /* Return the byte in the UARTs receive buffer. This function is called
     * by the protocol stack after pxMBFrameCBByteReceived( ) has been called.
     */
	if(HAL_UART_Receive (&huart1 ,(uint8_t *)pucByte,1,0x01) != HAL_OK )//添加接收一位代码
		return FALSE ;
	else {
		return TRUE;
	}
}
修改 prvvUARTTxReadyISR 和 prvvUARTRxISR 函数,总线状态改为发送后,会在发送缓冲时,自动调用 prvvUARTTxReadyISR() 中断服务程序。prvvUARTTxReadyISR() 只调用了一个函数,就是 pxMBFrameCBTransmitterEmpty ()
数据链路层是最基本的打包部分,将数据打包成帧,送到应用层。在数据链路层协议中,使用中断方式来接受。那么每次接收到字符就自动调用接收字符的 ISR 程序。按照规定,应该将中断服务程序安装给 prvvUARTRxISR(void) 函数。实际上这个函数只调用了一个函数:
pxMBFrameCBByteReceived(),这个指针调用了 xMBRTUReceiveFSM 函数。
将两个函数前的 static 去掉即可,修改后代码如下:
void prvvUARTTxReadyISR( void )
{
    pxMBFrameCBTransmitterEmpty(  );
}

void prvvUARTRxISR( void )
{
    pxMBFrameCBByteReceived(  );
}
注意:这里需要在声明函数的时候也将对应函数前的 static 去掉
完整 portserial.c 代码如下:
点击查看完整代码
/*
 * FreeModbus Libary: BARE Port
 * Copyright (C) 2006 Christian Walter <wolti@sil.at>
 *
 * This library is free software; you can redistribute it and/or
 * modify it under the terms of the GNU Lesser General Public
 * License as published by the Free Software Foundation; either
 * version 2.1 of the License, or (at your option) any later version.
 *
 * This library is distributed in the hope that it will be useful,
 * but WITHOUT ANY WARRANTY; without even the implied warranty of
 * MERCHANTABILITY or FITNESS FOR A PARTICULAR PURPOSE.  See the GNU
 * Lesser General Public License for more details.
 *
 * You should have received a copy of the GNU Lesser General Public
 * License along with this library; if not, write to the Free Software
 * Foundation, Inc., 51 Franklin St, Fifth Floor, Boston, MA  02110-1301  USA
 *
 * File: $Id$
 */

#include "port.h"

/* ----------------------- Modbus includes ----------------------------------*/
#include "mb.h"
#include "mbport.h"
#include "usart.h"

/* ----------------------- static functions ---------------------------------*/
void prvvUARTTxReadyISR( void );
void prvvUARTRxISR( void );

/* ----------------------- Start implementation -----------------------------*/
void vMBPortSerialEnable( BOOL xRxEnable, BOOL xTxEnable )
{
    /* If xRXEnable enable serial receive interrupts. If xTxENable enable
     * transmitter empty interrupts.
     */

	if (xRxEnable)															//将串口收发中断和modbus联系起来,下面的串口改为自己使能的串口
	{
		__HAL_UART_ENABLE_IT(&huart1,UART_IT_RXNE);	//我用的是串口1,故为&huart1
	}
	else
	{
		__HAL_UART_DISABLE_IT(&huart1,UART_IT_RXNE);
	}
	if (xTxEnable)
	{
		__HAL_UART_ENABLE_IT(&huart1,UART_IT_TXE);
	}
	else
	{
		__HAL_UART_DISABLE_IT(&huart1,UART_IT_TXE);
	}
}

BOOL xMBPortSerialInit( UCHAR ucPORT, ULONG ulBaudRate, UCHAR ucDataBits, eMBParity eParity )
{
    return TRUE;
}

BOOL xMBPortSerialPutByte( CHAR ucByte )
{
    /* Put a byte in the UARTs transmit buffer. This function is called
     * by the protocol stack if pxMBFrameCBTransmitterEmpty( ) has been
     * called. */
	if(HAL_UART_Transmit(&huart1,(uint8_t *)&ucByte,1,0x01) != HAL_OK){
			return FALSE;
	}
	else {
		return TRUE;
	}
}

BOOL xMBPortSerialGetByte( CHAR * pucByte )
{
    /* Return the byte in the UARTs receive buffer. This function is called
     * by the protocol stack after pxMBFrameCBByteReceived( ) has been called.
     */
	if(HAL_UART_Receive (&huart1 ,(uint8_t *)pucByte,1,0x01) != HAL_OK )//添加接收一位代码
		return FALSE ;
	else {
		return TRUE;
	}
}

/* Create an interrupt handler for the transmit buffer empty interrupt
 * (or an equivalent) for your target processor. This function should then
 * call pxMBFrameCBTransmitterEmpty( ) which tells the protocol stack that
 * a new character can be sent. The protocol stack will then call
 * xMBPortSerialPutByte( ) to send the character.
 */
void prvvUARTTxReadyISR( void )
{
    pxMBFrameCBTransmitterEmpty(  );
}

/* Create an interrupt handler for the receive interrupt for your target
 * processor. This function should then call pxMBFrameCBByteReceived( ). The
 * protocol stack will then call xMBPortSerialGetByte( ) to retrieve the
 * character.
 */
void prvvUARTRxISR( void )
{
    pxMBFrameCBByteReceived(  );
}
修改 porttimer.c 的代码
引入头文件:
#include "stm32f1xx_hal.h"
#include "tim.h"
修改 xMBPortTimersInit 函数,该函数用于定时器初始化这里改为默认返回 TRUE
修改后代码如下:
BOOL xMBPortTimersInit( USHORT usTim1Timerout50us )
{
    return TRUE;
}
修改 vMBPortTimersEnable 函数,时钟使能函数 在此使能时钟的时候,要把时钟重置
修改后代码如下:
inline void vMBPortTimersEnable(  )
{
    /* Enable the timer with the timeout passed to xMBPortTimersInit( ) */
	__HAL_TIM_CLEAR_IT(&htim3,TIM_IT_UPDATE);
	__HAL_TIM_ENABLE_IT(&htim3,TIM_IT_UPDATE);
	__HAL_TIM_SET_COUNTER(&htim3,0);
	__HAL_TIM_ENABLE(&htim3);
}
修改 vMBPortTimersDisable 函数,这里会停止定时器,因为好长时间没人发送数据过来
修改后代码如下:
inline void vMBPortTimersDisable(  )	//取消定时器中断
{
    /* Disable any pending timers. */
	__HAL_TIM_DISABLE(&htim3);
	__HAL_TIM_SET_COUNTER(&htim3,0);
	__HAL_TIM_DISABLE_IT(&htim3,TIM_IT_UPDATE);
	__HAL_TIM_CLEAR_IT(&htim3,TIM_IT_UPDATE);
}
最后由于我们需要在 stm32f1xx_it.c 中调用 prvvTIMERExpiredISR 函数,所以要将这里函数和函数定义前的 static 删掉即可
完整 porttimer.c 代码如下:
点击查看完整代码
/*
 * FreeModbus Libary: BARE Port
 * Copyright (C) 2006 Christian Walter <wolti@sil.at>
 *
 * This library is free software; you can redistribute it and/or
 * modify it under the terms of the GNU Lesser General Public
 * License as published by the Free Software Foundation; either
 * version 2.1 of the License, or (at your option) any later version.
 *
 * This library is distributed in the hope that it will be useful,
 * but WITHOUT ANY WARRANTY; without even the implied warranty of
 * MERCHANTABILITY or FITNESS FOR A PARTICULAR PURPOSE.  See the GNU
 * Lesser General Public License for more details.
 *
 * You should have received a copy of the GNU Lesser General Public
 * License along with this library; if not, write to the Free Software
 * Foundation, Inc., 51 Franklin St, Fifth Floor, Boston, MA  02110-1301  USA
 *
 * File: $Id$
 */

/* ----------------------- Platform includes --------------------------------*/
#include "port.h"

/* ----------------------- Modbus includes ----------------------------------*/
#include "mb.h"
#include "mbport.h"

#include "stm32f1xx_hal.h"
#include "tim.h"

/* ----------------------- static functions ---------------------------------*/
void prvvTIMERExpiredISR( void );

/* ----------------------- Start implementation -----------------------------*/
BOOL xMBPortTimersInit( USHORT usTim1Timerout50us )
{
    return TRUE;
}


inline void vMBPortTimersEnable(  )
{
    /* Enable the timer with the timeout passed to xMBPortTimersInit( ) */
	__HAL_TIM_CLEAR_IT(&htim3,TIM_IT_UPDATE);
	__HAL_TIM_ENABLE_IT(&htim3,TIM_IT_UPDATE);
	__HAL_TIM_SET_COUNTER(&htim3,0);
	__HAL_TIM_ENABLE(&htim3);
}

inline void vMBPortTimersDisable(  )	//取消定时器中断
{
    /* Disable any pending timers. */
	__HAL_TIM_DISABLE(&htim3);
	__HAL_TIM_SET_COUNTER(&htim3,0);
	__HAL_TIM_DISABLE_IT(&htim3,TIM_IT_UPDATE);
	__HAL_TIM_CLEAR_IT(&htim3,TIM_IT_UPDATE);
}

/* Create an ISR which is called whenever the timer has expired. This function
 * must then call pxMBPortCBTimerExpired( ) to notify the protocol stack that
 * the timer has expired.
 */
void prvvTIMERExpiredISR( void )
{
    ( void )pxMBPortCBTimerExpired(  );
}
修改 port.h 的代码
引用头文件
#include "stm32f1xx_hal.h"
修改如下位置代码:

修改后代码如下:
#define ENTER_CRITICAL_SECTION( )		__set_PRIMASK(1)	// 关闭总中断
#define EXIT_CRITICAL_SECTION( )		__set_PRIMASK(0)	// 开启总中断
修改 stm32f1xx_it.c 的代码
调用如下全局函数:
// 用于 FreeModbus
extern void prvvUARTTxReadyISR(void);
extern void prvvUARTRxISR(void);
extern void prvvTIMERExpiredISR( void );
用于 DMA 与 I2C 中断设置
extern DMA_HandleTypeDef hdma_i2c1_rx;
extern DMA_HandleTypeDef hdma_i2c1_tx;
extern I2C_HandleTypeDef hi2c1;
修改 USART1_IRQHandler 函数,用于 USART 串口 1 处理中断
修改后代码如下:
void USART1_IRQHandler(void)
{
  /* USER CODE BEGIN USART1_IRQn 0 */

  /* USER CODE END USART1_IRQn 0 */
  HAL_UART_IRQHandler(&huart1);
  /* USER CODE BEGIN USART1_IRQn 1 */
	if(__HAL_UART_GET_IT_SOURCE(&huart1, UART_IT_RXNE)!= RESET)
	{
		prvvUARTRxISR();//接收中断
	}

	if(__HAL_UART_GET_IT_SOURCE(&huart1, UART_IT_TXE)!= RESET)
	{
		prvvUARTTxReadyISR();//发送中断
	}

  HAL_NVIC_ClearPendingIRQ(USART1_IRQn);
  HAL_UART_IRQHandler(&huart1);
  /* USER CODE BEGIN USART1_IRQn 1 */

  /* USER CODE END USART1_IRQn 1 */
}
修改 HardFault_Handler 函数,这个函数用于设置设备中断,这里如果不修改则会直接报错重复定义,所以,这里我们直接修改为 I2C 的中断函数即可
修改后代码如下:
/**
  * @brief This function handles I2C1 event interrupt.
  */
void I2C1_EV_IRQHandler(void)
{
  /* USER CODE BEGIN I2C1_EV_IRQn 0 */

  /* USER CODE END I2C1_EV_IRQn 0 */
  HAL_I2C_EV_IRQHandler(&hi2c1);
  /* USER CODE BEGIN I2C1_EV_IRQn 1 */

  /* USER CODE END I2C1_EV_IRQn 1 */
}
增加 HAL_TIM_PeriodElapsedCallback 函数,用于定时器中断回调函数
函数代码如下:
void HAL_TIM_PeriodElapsedCallback(TIM_HandleTypeDef *htim)	//定时器中断回调函数,用于连接porttimer.c文件的函数
{
  /* NOTE : This function Should not be modified, when the callback is needed,
            the __HAL_TIM_PeriodElapsedCallback could be implemented in the user file
   */
	prvvTIMERExpiredISR( );
}
新增 DMA 与 I2C 中断设置函数
函数代码如下:
/**
  * @brief This function handles DMA1 channel6 global interrupt.
  */
void DMA1_Channel6_IRQHandler(void)
{
  /* USER CODE BEGIN DMA1_Channel6_IRQn 0 */

  /* USER CODE END DMA1_Channel6_IRQn 0 */
  HAL_DMA_IRQHandler(&hdma_i2c1_tx);
  /* USER CODE BEGIN DMA1_Channel6_IRQn 1 */

  /* USER CODE END DMA1_Channel6_IRQn 1 */
}

/**
  * @brief This function handles DMA1 channel7 global interrupt.
  */
void DMA1_Channel7_IRQHandler(void)
{
  /* USER CODE BEGIN DMA1_Channel7_IRQn 0 */

  /* USER CODE END DMA1_Channel7_IRQn 0 */
  HAL_DMA_IRQHandler(&hdma_i2c1_rx);
  /* USER CODE BEGIN DMA1_Channel7_IRQn 1 */

  /* USER CODE END DMA1_Channel7_IRQn 1 */
}
stm32f1xx_it.c 完整代码如下:
点击查看完整代码
/* USER CODE BEGIN Header */
/**
  ******************************************************************************
  * @file    stm32f1xx_it.c
  * @brief   Interrupt Service Routines.
  ******************************************************************************
  * @attention
  *
  * Copyright (c) 2022 STMicroelectronics.
  * All rights reserved.
  *
  * This software is licensed under terms that can be found in the LICENSE file
  * in the root directory of this software component.
  * If no LICENSE file comes with this software, it is provided AS-IS.
  *
  ******************************************************************************
  */
/* USER CODE END Header */

/* Includes ------------------------------------------------------------------*/
#include "main.h"
#include "stm32f1xx_it.h"
/* Private includes ----------------------------------------------------------*/
/* USER CODE BEGIN Includes */
/* USER CODE END Includes */

/* Private typedef -----------------------------------------------------------*/
/* USER CODE BEGIN TD */
/* USER CODE END TD */

/* Private define ------------------------------------------------------------*/
/* USER CODE BEGIN PD */

/* USER CODE END PD */

/* Private macro -------------------------------------------------------------*/
/* USER CODE BEGIN PM */

/* USER CODE END PM */

/* Private variables ---------------------------------------------------------*/
/* USER CODE BEGIN PV */

/* USER CODE END PV */

/* Private function prototypes -----------------------------------------------*/
/* USER CODE BEGIN PFP */
extern void prvvUARTTxReadyISR(void);
extern void prvvUARTRxISR(void);
extern void prvvTIMERExpiredISR( void );
/* USER CODE END PFP */

/* Private user code ---------------------------------------------------------*/
/* USER CODE BEGIN 0 */

/* USER CODE END 0 */

/* External variables --------------------------------------------------------*/
extern DMA_HandleTypeDef hdma_i2c1_rx;
extern DMA_HandleTypeDef hdma_i2c1_tx;
extern I2C_HandleTypeDef hi2c1;
extern TIM_HandleTypeDef htim3;
extern UART_HandleTypeDef huart1;
/* USER CODE BEGIN EV */

/* USER CODE END EV */

/******************************************************************************/
/*           Cortex-M3 Processor Interruption and Exception Handlers          */
/******************************************************************************/
/**
  * @brief This function handles Non maskable interrupt.
  */
void NMI_Handler(void)
{
  /* USER CODE BEGIN NonMaskableInt_IRQn 0 */

  /* USER CODE END NonMaskableInt_IRQn 0 */
  /* USER CODE BEGIN NonMaskableInt_IRQn 1 */
  while (1)
  {
  }
  /* USER CODE END NonMaskableInt_IRQn 1 */
}

/**
  * @brief This function handles I2C1 event interrupt.
  */
void I2C1_EV_IRQHandler(void)
{
  /* USER CODE BEGIN I2C1_EV_IRQn 0 */

  /* USER CODE END I2C1_EV_IRQn 0 */
  HAL_I2C_EV_IRQHandler(&hi2c1);
  /* USER CODE BEGIN I2C1_EV_IRQn 1 */

  /* USER CODE END I2C1_EV_IRQn 1 */
}

/**
  * @brief This function handles Memory management fault.
  */
void MemManage_Handler(void)
{
  /* USER CODE BEGIN MemoryManagement_IRQn 0 */

  /* USER CODE END MemoryManagement_IRQn 0 */
  while (1)
  {
    /* USER CODE BEGIN W1_MemoryManagement_IRQn 0 */
    /* USER CODE END W1_MemoryManagement_IRQn 0 */
  }
}

/**
  * @brief This function handles Prefetch fault, memory access fault.
  */
void BusFault_Handler(void)
{
  /* USER CODE BEGIN BusFault_IRQn 0 */

  /* USER CODE END BusFault_IRQn 0 */
  while (1)
  {
    /* USER CODE BEGIN W1_BusFault_IRQn 0 */
    /* USER CODE END W1_BusFault_IRQn 0 */
  }
}

/**
  * @brief This function handles Undefined instruction or illegal state.
  */
void UsageFault_Handler(void)
{
  /* USER CODE BEGIN UsageFault_IRQn 0 */

  /* USER CODE END UsageFault_IRQn 0 */
  while (1)
  {
    /* USER CODE BEGIN W1_UsageFault_IRQn 0 */
    /* USER CODE END W1_UsageFault_IRQn 0 */
  }
}

/**
  * @brief This function handles Debug monitor.
  */
void DebugMon_Handler(void)
{
  /* USER CODE BEGIN DebugMonitor_IRQn 0 */

  /* USER CODE END DebugMonitor_IRQn 0 */
  /* USER CODE BEGIN DebugMonitor_IRQn 1 */

  /* USER CODE END DebugMonitor_IRQn 1 */
}

/******************************************************************************/
/* STM32F1xx Peripheral Interrupt Handlers                                    */
/* Add here the Interrupt Handlers for the used peripherals.                  */
/* For the available peripheral interrupt handler names,                      */
/* please refer to the startup file (startup_stm32f1xx.s).                    */
/******************************************************************************/

/**
  * @brief This function handles DMA1 channel6 global interrupt.
  */
void DMA1_Channel6_IRQHandler(void)
{
  /* USER CODE BEGIN DMA1_Channel6_IRQn 0 */

  /* USER CODE END DMA1_Channel6_IRQn 0 */
  HAL_DMA_IRQHandler(&hdma_i2c1_tx);
  /* USER CODE BEGIN DMA1_Channel6_IRQn 1 */

  /* USER CODE END DMA1_Channel6_IRQn 1 */
}

/**
  * @brief This function handles DMA1 channel7 global interrupt.
  */
void DMA1_Channel7_IRQHandler(void)
{
  /* USER CODE BEGIN DMA1_Channel7_IRQn 0 */

  /* USER CODE END DMA1_Channel7_IRQn 0 */
  HAL_DMA_IRQHandler(&hdma_i2c1_rx);
  /* USER CODE BEGIN DMA1_Channel7_IRQn 1 */

  /* USER CODE END DMA1_Channel7_IRQn 1 */
}


/**
  * @brief This function handles TIM3 global interrupt.
  */
void TIM3_IRQHandler(void)
{
  /* USER CODE BEGIN TIM3_IRQn 0 */

  /* USER CODE END TIM3_IRQn 0 */
  HAL_TIM_IRQHandler(&htim3);
  /* USER CODE BEGIN TIM3_IRQn 1 */

  /* USER CODE END TIM3_IRQn 1 */
}

/**
  * @brief This function handles USART1 global interrupt.
  */
void USART1_IRQHandler(void)
{
  /* USER CODE BEGIN USART1_IRQn 0 */

  /* USER CODE END USART1_IRQn 0 */
  HAL_UART_IRQHandler(&huart1);
  /* USER CODE BEGIN USART1_IRQn 1 */
	if(__HAL_UART_GET_IT_SOURCE(&huart1, UART_IT_RXNE)!= RESET)
	{
		prvvUARTRxISR();//接收中断
	}

	if(__HAL_UART_GET_IT_SOURCE(&huart1, UART_IT_TXE)!= RESET)
	{
		prvvUARTTxReadyISR();//发送中断
	}

  HAL_NVIC_ClearPendingIRQ(USART1_IRQn);
  HAL_UART_IRQHandler(&huart1);
  /* USER CODE BEGIN USART1_IRQn 1 */

  /* USER CODE END USART1_IRQn 1 */
}

/* USER CODE BEGIN 1 */

void HAL_TIM_PeriodElapsedCallback(TIM_HandleTypeDef *htim)	//定时器中断回调函数,用于连接porttimer.c文件的函数
{
  /* NOTE : This function Should not be modified, when the callback is needed,
            the __HAL_TIM_PeriodElapsedCallback could be implemented in the user file
   */
	prvvTIMERExpiredISR( );
}


/* USER CODE END 1 */
修改 demo.c 文件
首先我们需要注释掉,demo.c 中的 main 函数,不然在编译的时候会报错重复定义
修改如下代码:

修改后的代码如下:
static USHORT   usRegInputStart = REG_INPUT_START;
//static USHORT   usRegInputBuf[REG_INPUT_NREGS];

uint16_t   usRegInputBuf[REG_INPUT_NREGS];
uint16_t InputBuff[5];
//
修改 eMBRegInputCB 函数,用于读取输入寄存器,对应功能码是 04 eMBFuncReadInputRegister
修改后代码如下:
eMBErrorCode eMBRegInputCB( UCHAR * pucRegBuffer, USHORT usAddress, USHORT usNRegs )
{
	eMBErrorCode eStatus = MB_ENOERR;
	int iRegIndex;
	int i;
	InputBuff[0] = 0x11;
	InputBuff[1] = 0x22;
	InputBuff[2] = 0x33;
	InputBuff[3] = 0x44;

	if( ( usAddress >= REG_INPUT_START ) && ( usAddress + usNRegs <= REG_INPUT_START + REG_INPUT_NREGS ) )
	{
		iRegIndex = ( int )( usAddress - usRegInputStart );
		for(i=0;i<usNRegs;i++)
		{
			*pucRegBuffer=InputBuff[i+usAddress-1]>>8;
			pucRegBuffer++;
			*pucRegBuffer=InputBuff[i+usAddress-1]&0xff;
			pucRegBuffer++;
		}
	}
	else
	{
		eStatus = MB_ENOREG;
	}

	return eStatus;
}
完整 demo.c 代码如下:
点击查看完整代码
/*
 * FreeModbus Libary: BARE Demo Application
 * Copyright (C) 2006 Christian Walter <wolti@sil.at>
 *
 * This program is free software; you can redistribute it and/or modify
 * it under the terms of the GNU General Public License as published by
 * the Free Software Foundation; either version 2 of the License, or
 * (at your option) any later version.
 *
 * This program is distributed in the hope that it will be useful,
 * but WITHOUT ANY WARRANTY; without even the implied warranty of
 * MERCHANTABILITY or FITNESS FOR A PARTICULAR PURPOSE.  See the
 * GNU General Public License for more details.
 *
 * You should have received a copy of the GNU General Public License
 * along with this program; if not, write to the Free Software
 * Foundation, Inc., 51 Franklin St, Fifth Floor, Boston, MA  02110-1301  USA
 *
 * File: $Id$
 */

/* ----------------------- Modbus includes ----------------------------------*/
#include "mb.h"
#include "mbport.h"

/* ----------------------- Defines ------------------------------------------*/
#define REG_INPUT_START 0
#define REG_INPUT_NREGS 5

/* ----------------------- Static variables ---------------------------------*/
static USHORT   usRegInputStart = REG_INPUT_START;
//static USHORT   usRegInputBuf[REG_INPUT_NREGS];

uint16_t   usRegInputBuf[REG_INPUT_NREGS];
uint16_t InputBuff[5];


/* ----------------------- Start implementation -----------------------------*/
/*int main( void )
{
    eMBErrorCode    eStatus;

    eStatus = eMBInit( MB_RTU, 0x0A, 0, 38400, MB_PAR_EVEN );

    eStatus = eMBEnable(  );

    for( ;; )
    {
        ( void )eMBPoll(  );

        usRegInputBuf[0]++;
    }
}*/

eMBErrorCode eMBRegInputCB( UCHAR * pucRegBuffer, USHORT usAddress, USHORT usNRegs )
{
	eMBErrorCode eStatus = MB_ENOERR;
	int iRegIndex;
	int i;
	InputBuff[0] = 0x11;
	InputBuff[1] = 0x22;
	InputBuff[2] = 0x33;
	InputBuff[3] = 0x44;

	if( ( usAddress >= REG_INPUT_START ) && ( usAddress + usNRegs <= REG_INPUT_START + REG_INPUT_NREGS ) )
	{
		iRegIndex = ( int )( usAddress - usRegInputStart );
		for(i=0;i<usNRegs;i++)
		{
			*pucRegBuffer=InputBuff[i+usAddress-1]>>8;
			pucRegBuffer++;
			*pucRegBuffer=InputBuff[i+usAddress-1]&0xff;
			pucRegBuffer++;
		}
	}
	else
	{
		eStatus = MB_ENOREG;
	}

	return eStatus;
}

eMBErrorCode eMBRegHoldingCB( UCHAR * pucRegBuffer, USHORT usAddress, USHORT usNRegs,
                 eMBRegisterMode eMode )
{
    return MB_ENOREG;
}


eMBErrorCode eMBRegCoilsCB( UCHAR * pucRegBuffer, USHORT usAddress, USHORT usNCoils,
               eMBRegisterMode eMode )
{
    return MB_ENOREG;
}

eMBErrorCode eMBRegDiscreteCB( UCHAR * pucRegBuffer, USHORT usAddress, USHORT usNDiscrete )
{
    return MB_ENOREG;
}
代码设计
这里需要按照我们前面几篇博客介绍的方法,对 RT-Thread 和 ATH20 的驱动代码进行修改,这里不详细介绍,直接进行 Modbus 的代码设计
由于我们是要通过 Modbus 协议获取温度并发送给上位机,所以这里我们将温度获取函数写在 Modbus 的 demo.c 中
引入头文件并设置获取温度所需要的参数:
//下面的定义的数据用于获取温湿度
#include “AHT20.h”
uint32_t CT_data[2]={0,0};
volatile int  c1,t1,c2,t2;
eMBRegInputCB 函数就是用于输出的函数,所以我们直接在这个函数中获取温度并输出,InputBuff[] 数组中存放的就是我们要输出的内容,所以我们直接将我们获取到的温度数据存储在这个数组中即可
修改后的函数如下:
eMBErrorCode eMBRegInputCB( UCHAR * pucRegBuffer, USHORT usAddress, USHORT usNRegs )
{
	eMBErrorCode eStatus = MB_ENOERR;
	int iRegIndex;
	int i;

	HAL_GPIO_WritePin(GPIOC,GPIO_PIN_13,GPIO_PIN_RESET);	// 使用 PC13 引脚上的板载小灯泡进行测试——小灯泡亮
	AHT20_Read_CTdata_crc(CT_data);       //经过CRC校验,读取AHT20的温度和湿度数据    推荐每隔大于1S读一次
	c1 = CT_data[0]*1000/1024/1024;  //计算得到湿度值c1(放大了10倍)
	t1 = CT_data[1]*2000/1024/1024-500;//计算得到温度值t1(放大了10倍)
	t2 = t1/10 + (t1/10)%10;	//温度的整数部分
	t3 = t1%10;	//温度的小数部分
	c2 = c2/10 + (c1/10)%10;	// 湿度的整数部分
	c3 = c3%10;	//湿度的小数部分

	InputBuff[0] = t2;
	InputBuff[1] = t3;
	InputBuff[2] = c2;
	InputBuff[3] = c3;

	if( ( usAddress >= REG_INPUT_START ) && ( usAddress + usNRegs <= REG_INPUT_START + REG_INPUT_NREGS ) )
	{
		iRegIndex = ( int )( usAddress - usRegInputStart );
		for(i=0;i<usNRegs;i++)
		{
			*pucRegBuffer=InputBuff[i+usAddress-1]>>8;
			pucRegBuffer++;
			*pucRegBuffer=InputBuff[i+usAddress-1]&0xff;
			pucRegBuffer++;
		}
	}
	else
	{
		eStatus = MB_ENOREG;
	}

	return eStatus;
}
然后我们在 RT-Thread 中进行任务创建,这里我们创建两个任务,一个是点亮板载灯泡,用来测试程序是否正常运行,另一个就是获取温湿度,我们将获取温湿度作为主进程,app_rt_thread.c 代码如下:
#include "rtthread.h"
#include "main.h"
#include "i2c.h"
#include "usart.h"
#include "gpio.h"
#include "stdio.h"
#include "AHT20.h"
#include "mb.h"
#include "mbport.h"

struct rt_thread led1_thread;
rt_uint8_t rt_led1_thread_stack[128];
void led1_task_entry(void *parameter);

//初始化线程函数
void MX_RT_Thread_Init(void)
{
	//初始化LED1线程
	rt_thread_init(&led1_thread,"led1",led1_task_entry,RT_NULL,&rt_led1_thread_stack[0],sizeof(rt_led1_thread_stack),3,20);
	//开启线程调度
	rt_thread_startup(&led1_thread);
}

//主任务
void MX_RT_Thread_Process(void)
{
	(void)eMBPoll();	//启动modbus监听
}

//LED1任务
void led1_task_entry(void *parameter)
{
	while(1)
	{
		HAL_GPIO_WritePin(GPIOC,GPIO_PIN_13, GPIO_PIN_RESET);
		rt_thread_delay(500);
		HAL_GPIO_WritePin(GPIOC,GPIO_PIN_13, GPIO_PIN_SET);
		rt_thread_delay(500);
	}
}
注意:这里一定要增大我们的 IRAM,并且需要重载为 STM32F103C8 的 MAP 才能够保证程序的栈空间充足,确保程序正常运行
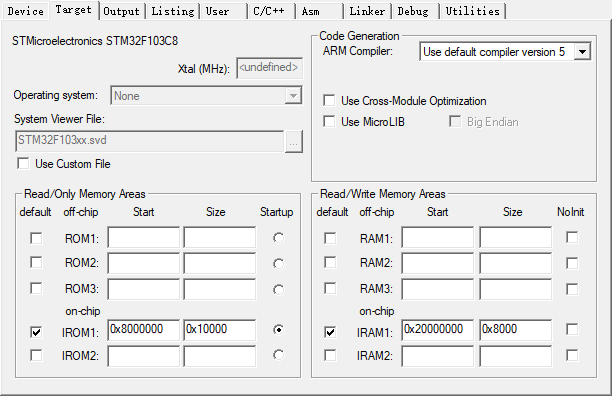
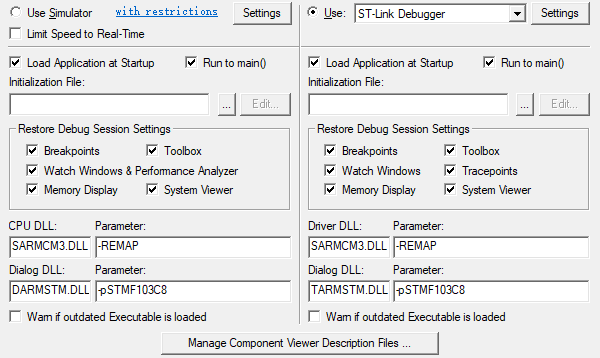
在 main.c 源文件中引入以下头文件和全局函数:
#include "rtthread.h"	// RT-Thread 头文件
#include "mb.h"	// Modbus 头文件
#include "mbport.h"	// Modbus 端口头文件
#include "AHT20.h"	// AHT20传感器驱动头文件
extern void MX_RT_Thread_Init(void);	// RT-Thread 初始化函数,初始化并执行各种进程
extern void MX_RT_Thread_Process(void);	// RT-Thread 主进程
然后在主函数中我们要对 AHT20 模块进行初始化,并对 Modbus 协议进行使能,并初始化 RT-Thread 进程,main 函数完整代码如下:
int main(void)
{
  /* USER CODE BEGIN 1 */

  /* USER CODE END 1 */

  /* MCU Configuration--------------------------------------------------------*/

  /* Reset of all peripherals, Initializes the Flash interface and the Systick. */
  HAL_Init();

  /* USER CODE BEGIN Init */

  /* USER CODE END Init */

  /* Configure the system clock */
  SystemClock_Config();

  /* USER CODE BEGIN SysInit */

  /* USER CODE END SysInit */

  /* Initialize all configured peripherals */
  MX_GPIO_Init();
  MX_DMA_Init();
  MX_I2C1_Init();
  MX_TIM3_Init();
  MX_USART1_UART_Init();
  /* USER CODE BEGIN 2 */
	AHT20_Init();	//初始化温度传感器并进行延时确保数据准确性
	HAL_Delay(2000);
	eMBInit( MB_RTU, 0x01, 1, 115200, MB_PAR_NONE);//初始化modbus,走modbusRTU,从站地址为0x01,端口为1。
	eMBEnable();//使能modbus
	MX_RT_Thread_Init();	//初始化 RT-Thread 进程
  /* USER CODE END 2 */

  /* Infinite loop */
  /* USER CODE BEGIN WHILE */
  while (1)
  {

		//( void )eMBPoll(  );//启动modbus侦听,由于在 RT-Thread 主进程中进行了监听启动,所以这里直接调用 RT-Thread 主进程

		MX_RT_Thread_Process();	//调用主进程

    /* USER CODE END WHILE */

    /* USER CODE BEGIN 3 */
  }
  /* USER CODE END 3 */
}
到此我们的程序设计全部完成
运行测试
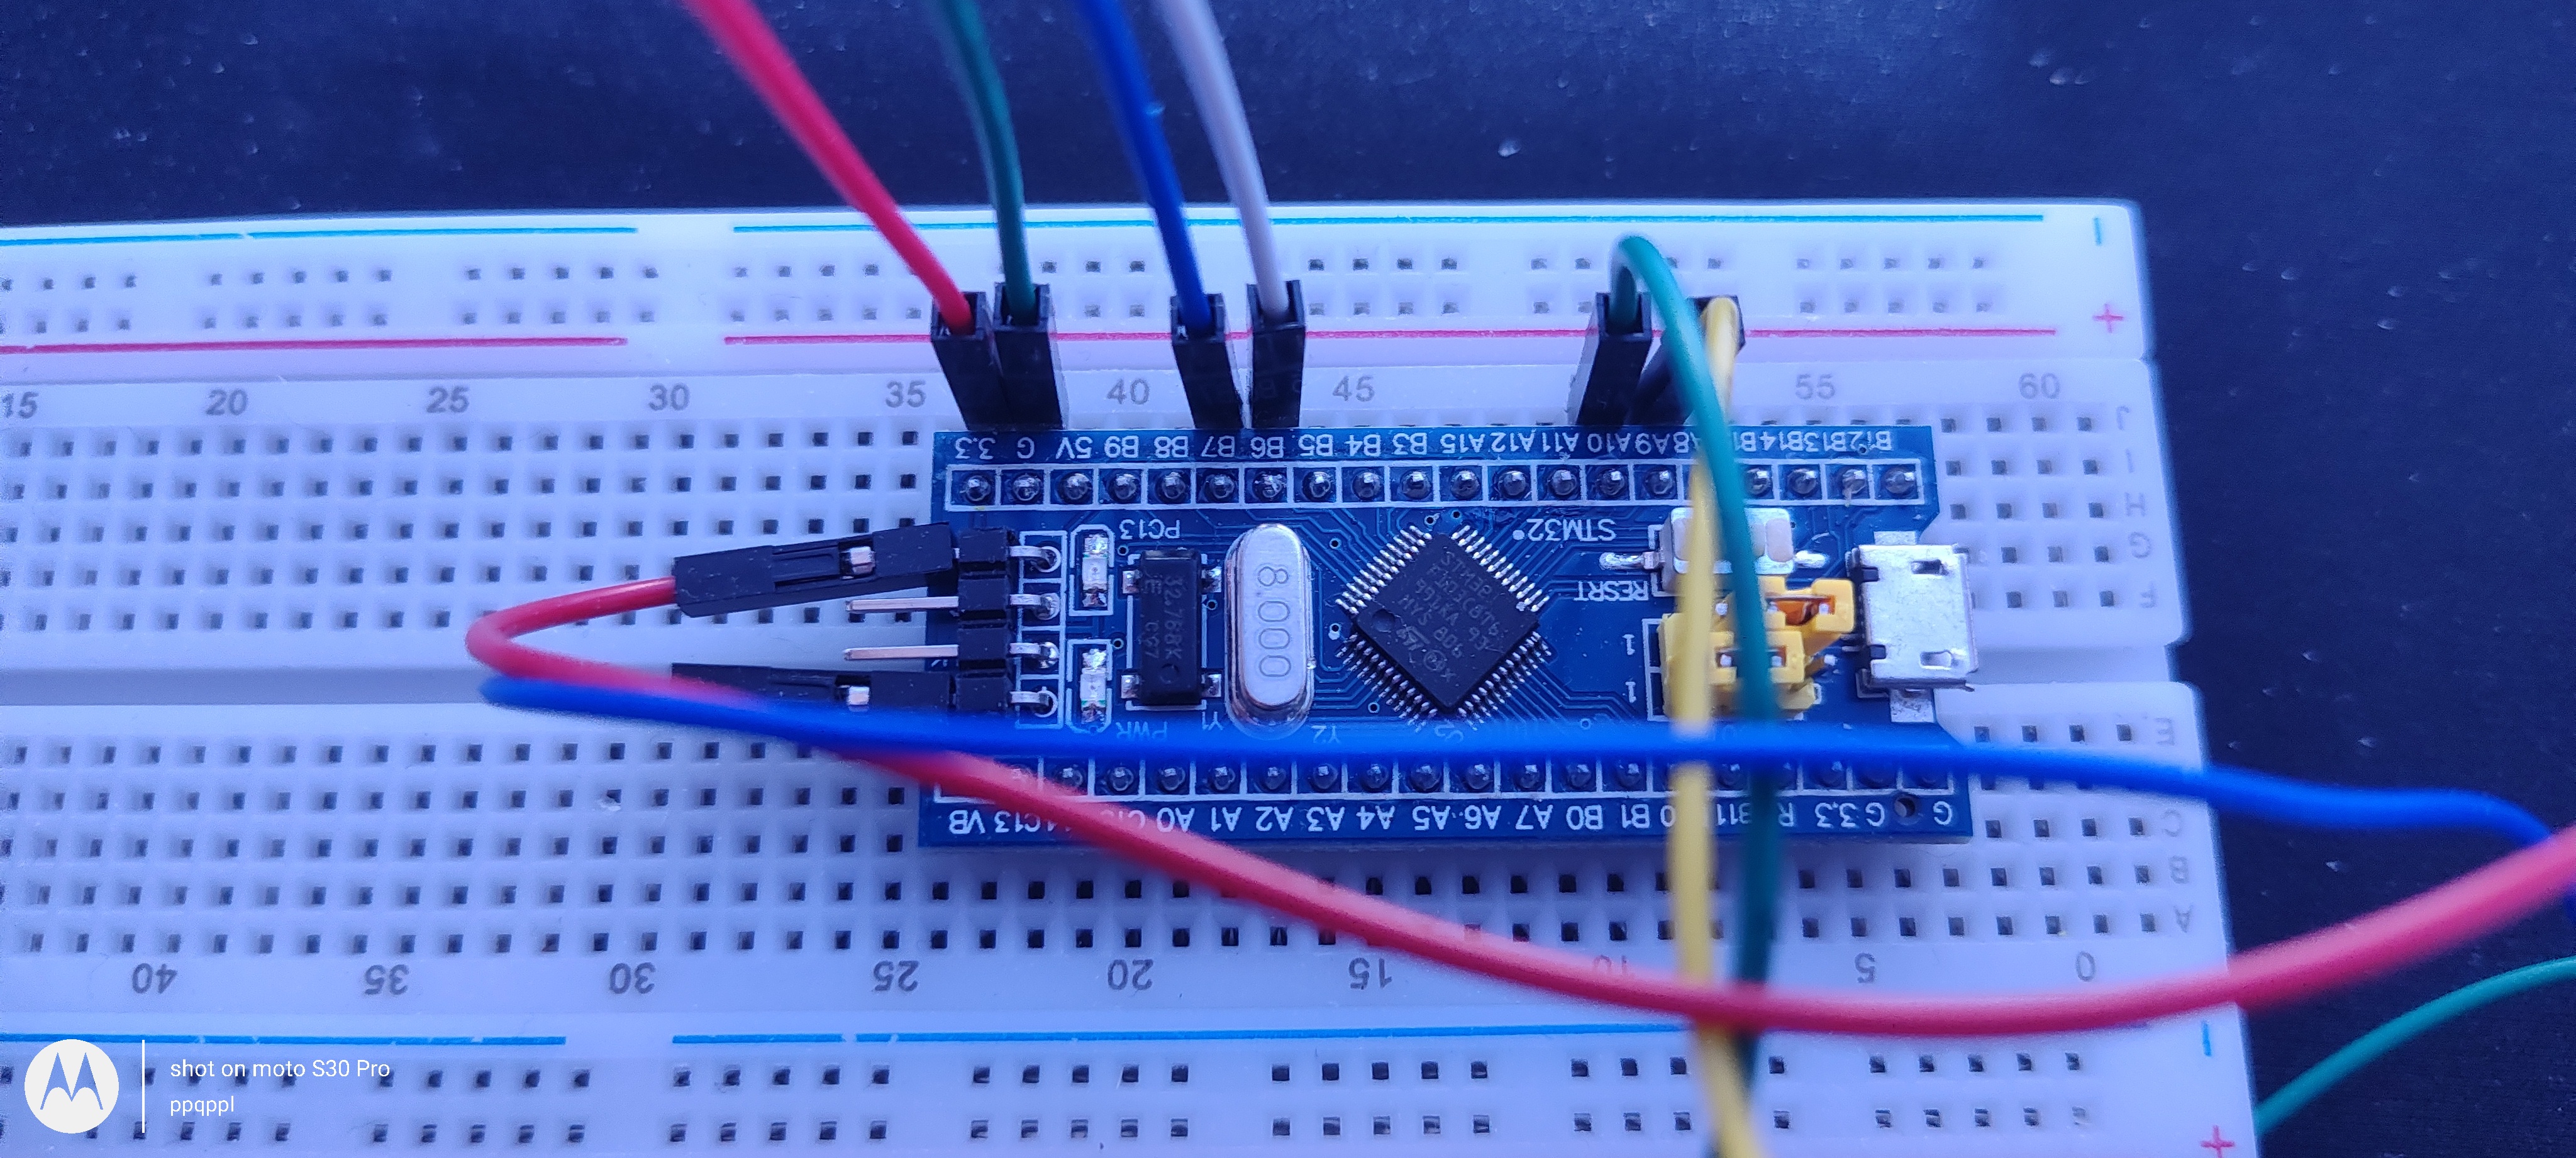
接线示例
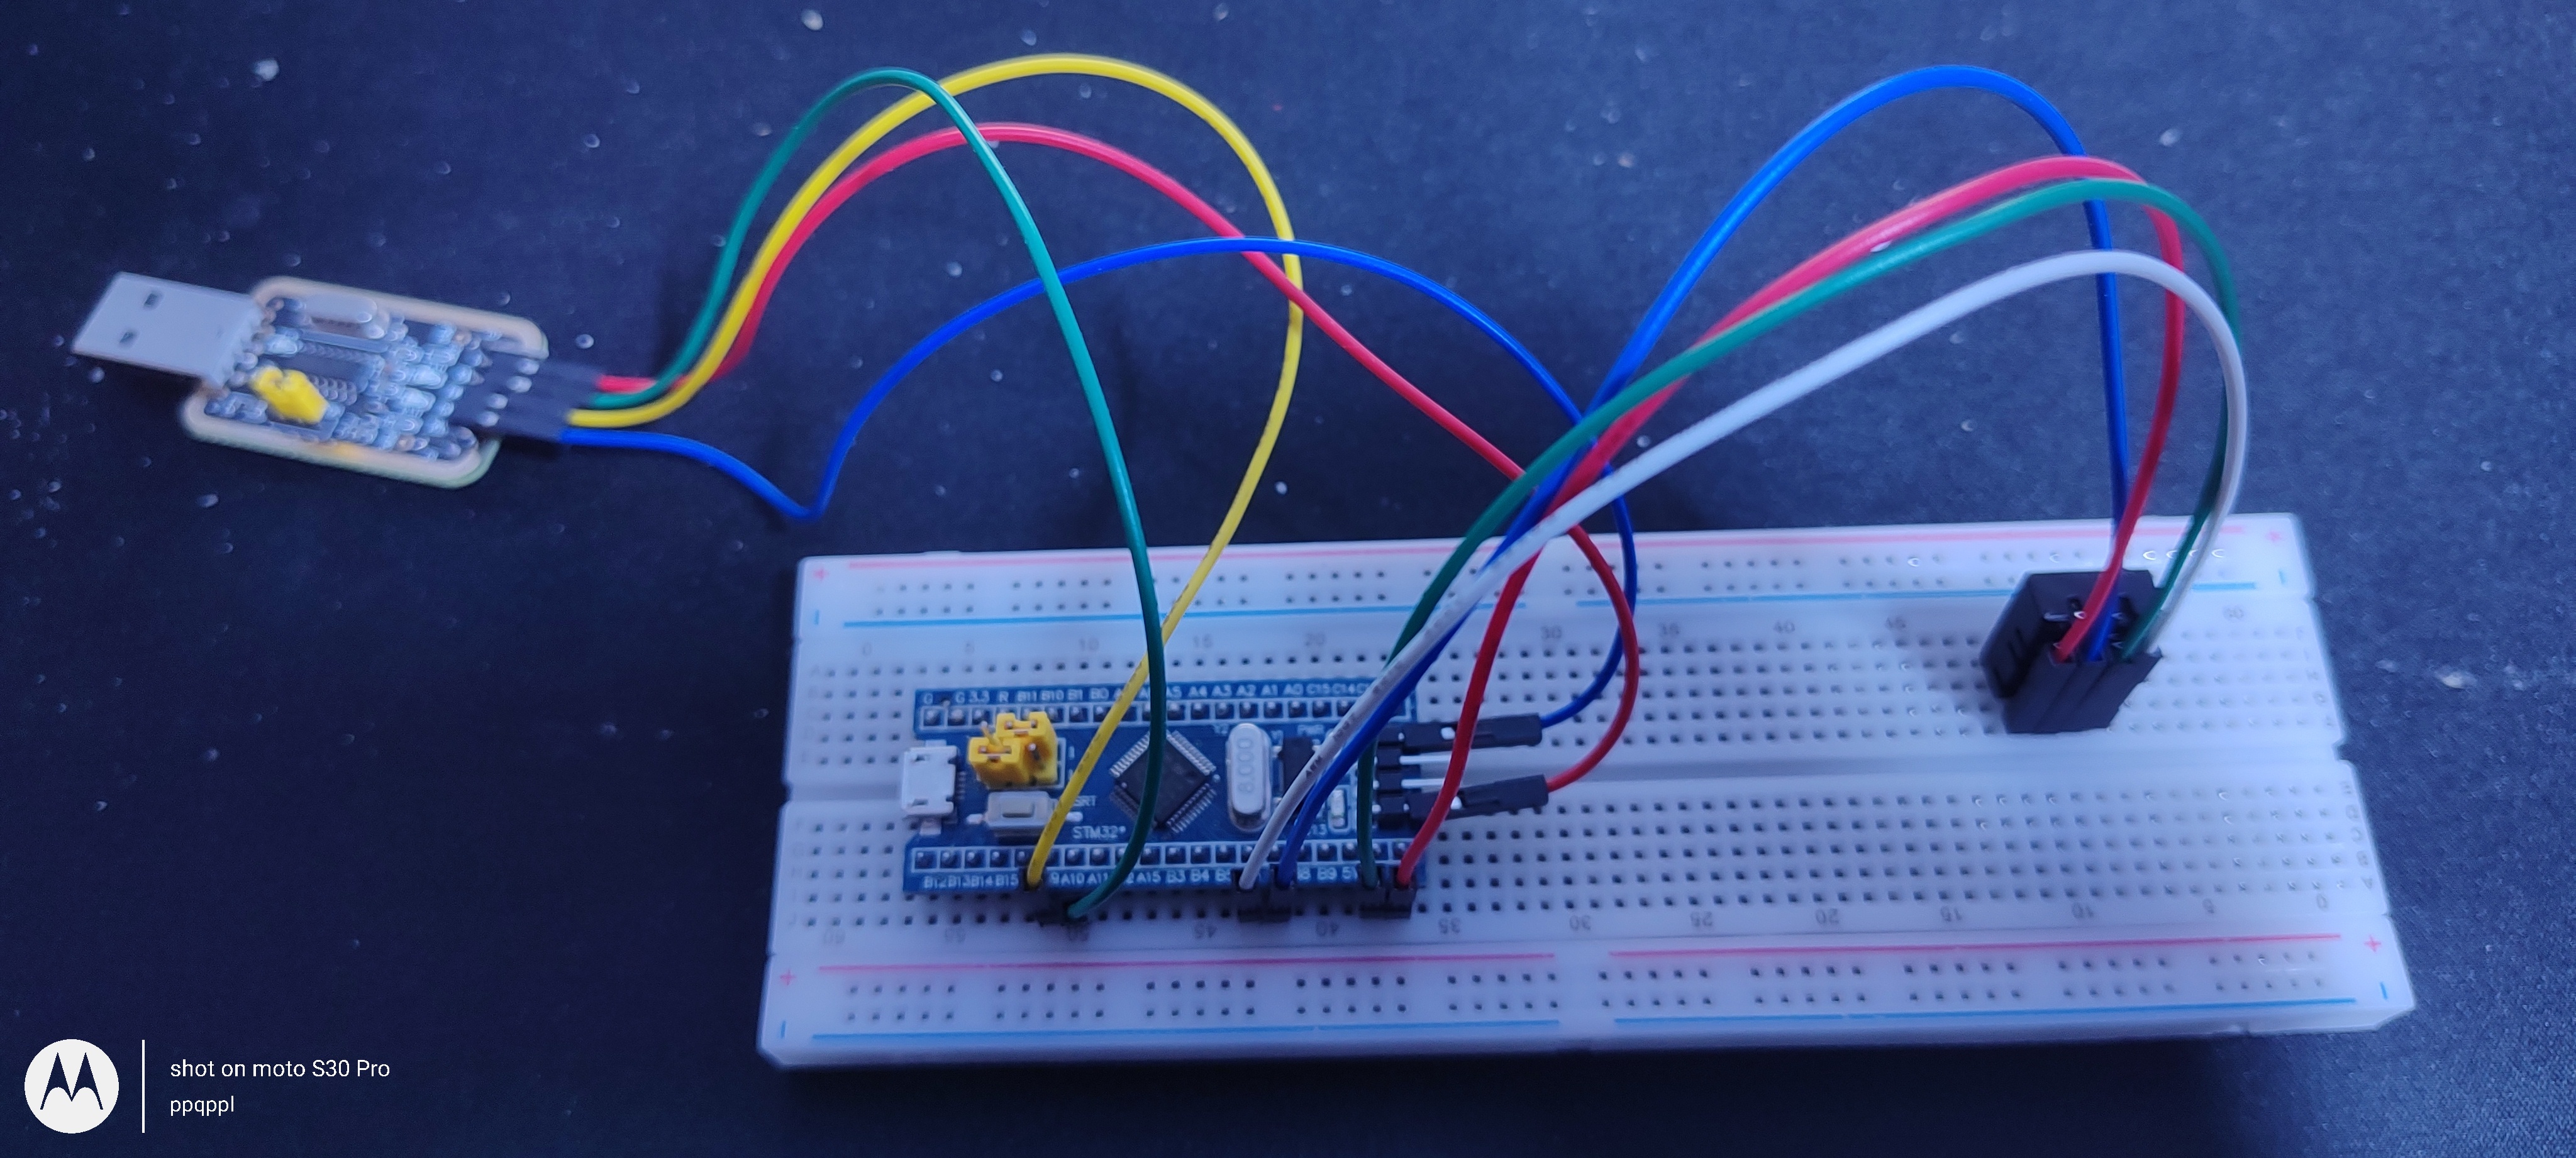
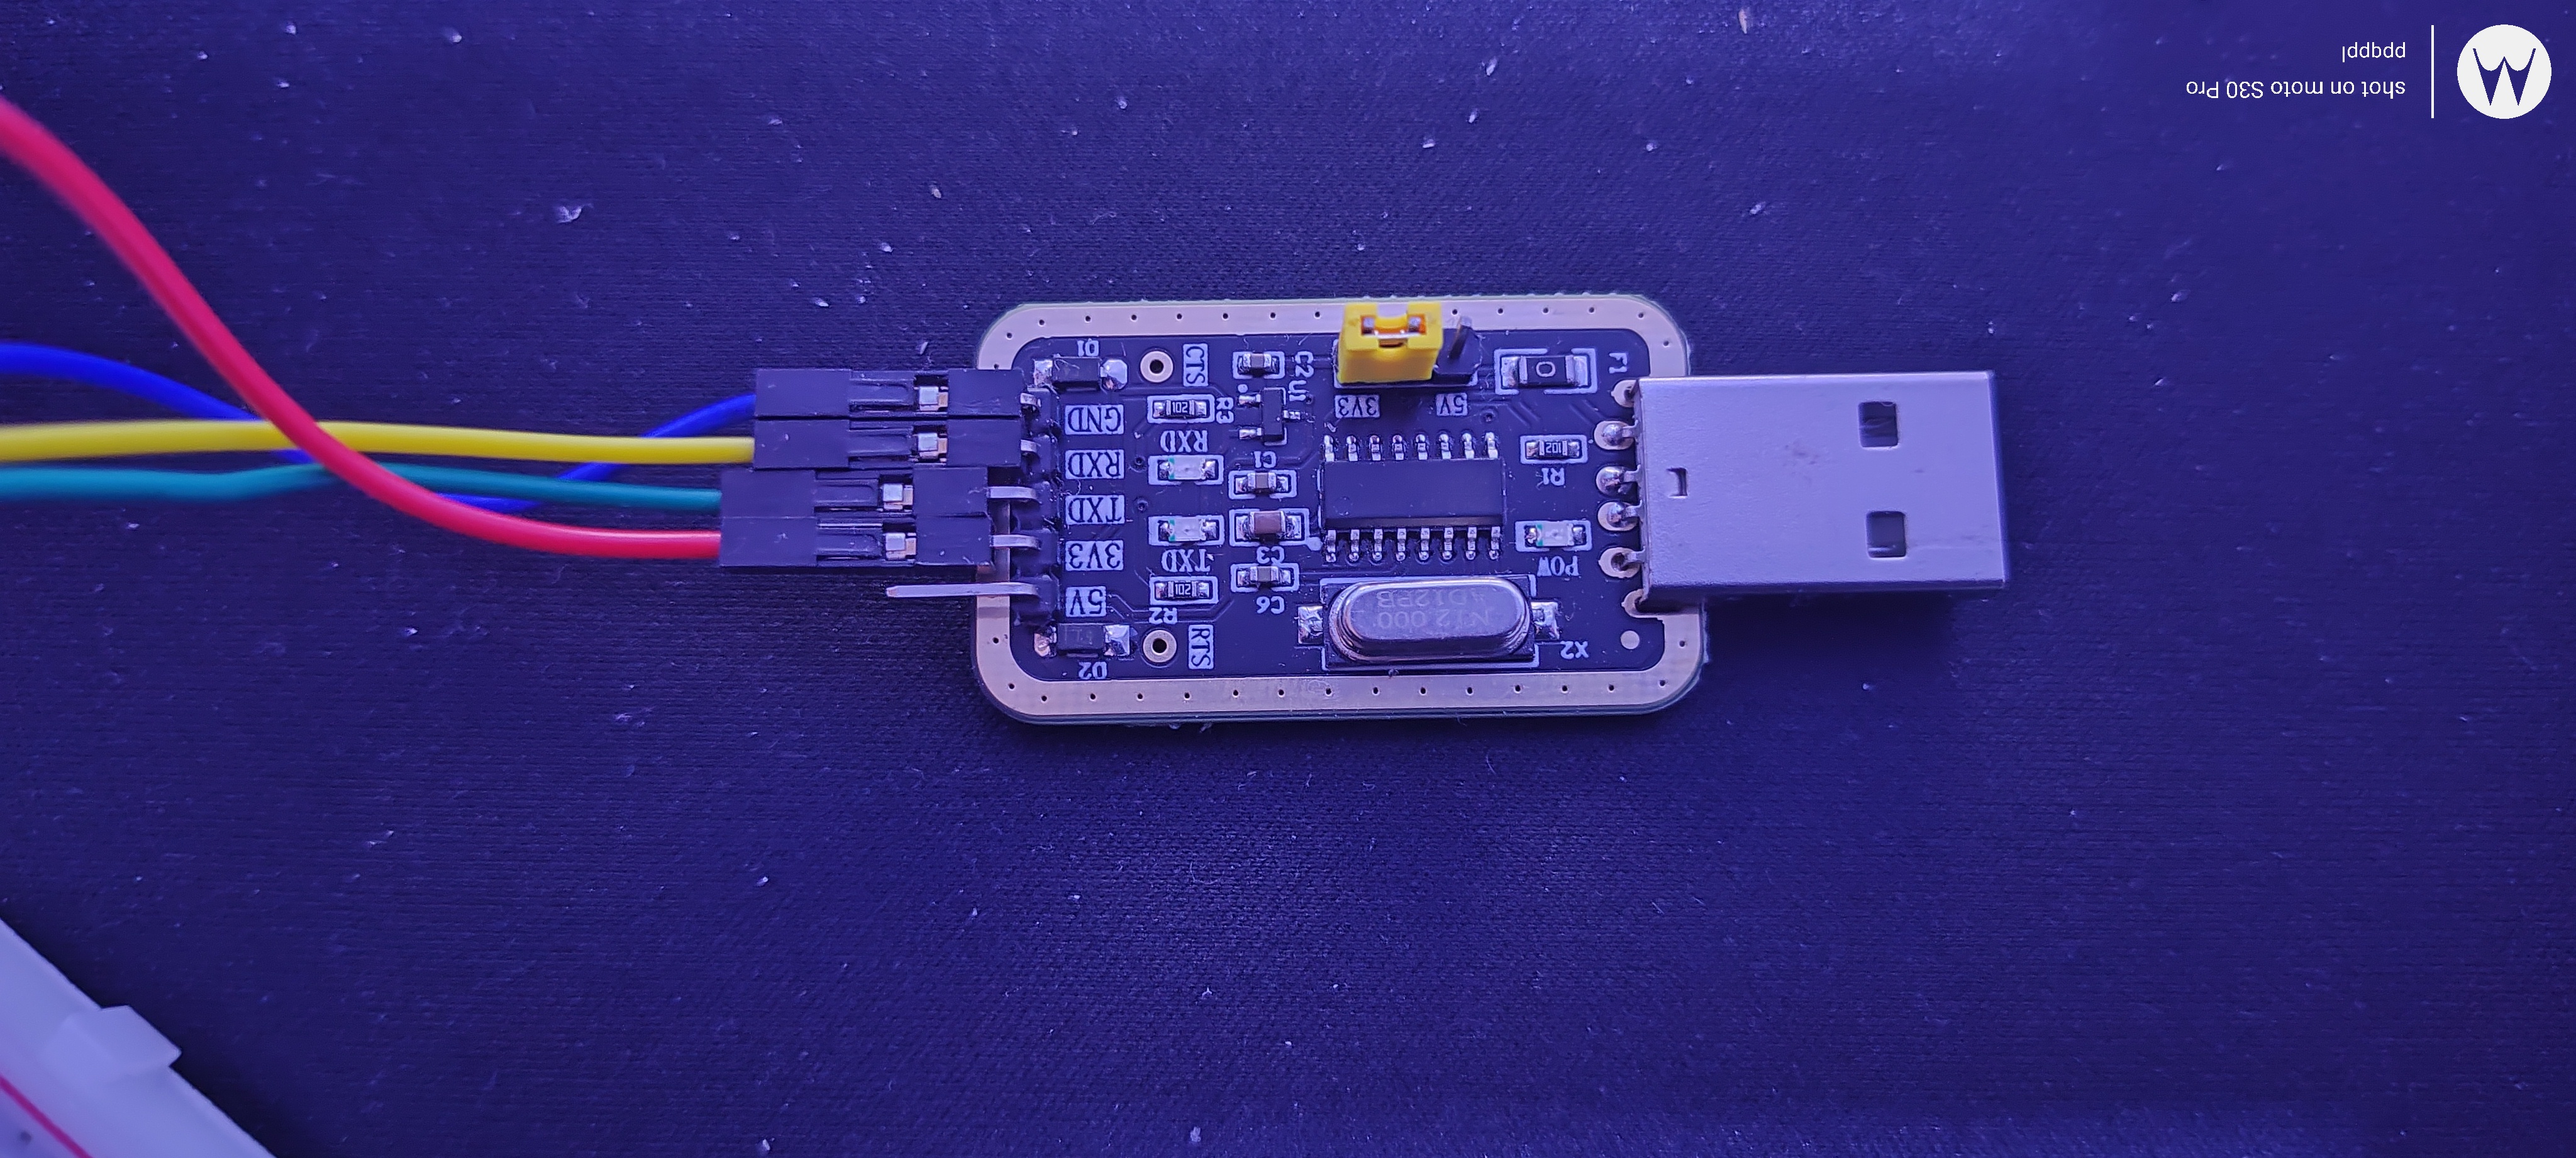
运行结果

这里使用 ModbusPoll 进行接收数据
打开 modbuspoll,点击 setup 第一个读写定义,并设置参数如下:


点击 connection 的 connect ,进入连接设置,选项如图,我使用的是 usb 转 ttl,用的是 com 端口,我连接的口是 com3,所以选择的是 port3:


最后成功获取到参数:

结果分析
这里已经成功获取到指定参数:
数据 0 是温度参数的整数部分
数据 1 是温度参数的小数部分
数据 0 是湿度参数的整数部分
数据 1 是湿度参数的小数部分
这里温度为 26.6,湿度为 30.1
错误解决方法
报错如下:
如果我们添加了驱动代码文件之后,没有修改代码就直接编译会出现很多报错
解决方案:
这并没有什么问题,不要急,只需要按照上面讲述的步骤进行修改代码即可解决所有问题
报错如下:
Modbus_CubeMX\Modbus_CubeMX.axf: Error: L6200E: Symbol HardFault_Handler multiply defined (by context_rvds.o and stm32f1xx_it.o).
解决方案:
这里是说函数 HardFault_Handler 重复定义,前面我们已经介绍了这里的修改方法,参考前面的方法修改即可
参考文档
文件下载
- FreeModbus 下载地址
官方 Github 仓库:FreeModbus v1.5 Github仓库
如果上述 Github 仓库地址无法打开,可以尝试以下连接:FreeModbus v1.5
- 网友自制 FreeModbus
Github仓库下载地址:FreeModbus v1.5
如果上述 Github 仓库地址无法打开,可以尝试以下连接:FreeModbus v1.5
- 修改后完全适用于 STM32F103C8T6 最小系统板的 FreeModbus 协议代码:
Github仓库下载地址:ppqppl-FreeModbus v1.5
如果上述 Github 仓库地址无法打开,可以尝试以下连接:ppqppl-FreeModbus v1.5
- Modbus 测试工具

 浙公网安备 33010602011771号