使用kubeadm快速部署k8s高可用集群
二进制安装方法请移步到:二进制部署高可用kubernetes-1.22.7集群
一:环境初始化
系统规划
| k8s-master01 | 192.168.113.100 | |
| k8s-master02 | 192.168.113.101 | |
| k8s-master03 | 192.168.113.102 | |
| k8s-node01 | 192.168.113.103 | |
| k8s-node02 | 192.168.113.104 | |
| k8s-master-lb(vip) | 192.168.113.99 |
所有节点修改hosts配置文件
[root@k8s-node02 ~]# vim /etc/hosts
127.0.0.1   localhost localhost.localdomain localhost4 localhost4.localdomain4
::1         localhost localhost.localdomain localhost6 localhost6.localdomain6
192.168.113.100 k8s-master01
192.168.113.101 k8s-master02
192.168.113.102 k8s-master03
192.168.113.103 k8s-node01
192.168.113.104 k8s-node02
192.168.113.99 k8s-master-lb
所有节点安装节点必备工具
[root@k8s-master01 ~]#yum install wget jq psmisc vim net-tools telnet yum-utils device-mapper-persistent-data lvm2 git -y修改所有节点yum源
[root@k8s-master01 ~]# curl -o /etc/yum.repos.d/CentOS-Base.repo https://mirrors.aliyun.com/repo/Centos-7.repo
[root@k8s-master01 ~]# yum install -y yum-utils device-mapper-persistent-data lvm2
[root@k8s-master01 ~]# cat <<EOF > /etc/yum.repos.d/kubernetes.repo
[kubernetes]
name=Kubernetes
baseurl=https://mirrors.aliyun.com/kubernetes/yum/repos/kubernetes-el7-x86_64/
enabled=1
gpgcheck=1
repo_gpgcheck=1
gpgkey=https://mirrors.aliyun.com/kubernetes/yum/doc/yum-key.gpg https://mirrors.aliyun.com/kubernetes/yum/doc/rpm-package-key.gpg
EOF
[root@k8s-master01 ~]# sed -i -e '/mirrors.cloud.aliyuncs.com/d' -e '/mirrors.aliyuncs.com/d' /etc/yum.repos.d/CentOS-Base.repo
关闭所有节点防火墙、selinux、dnsmasq、swap
[root@k8s-master01 ~]# systemctl disable --now firewalld
[root@k8s-master01 ~]# systemctl disable --now dnsmasq
[root@k8s-master01 ~]# systemctl disable --now NetworkManager
[root@k8s-master01 ~]# setenforce 0
[root@k8s-master01 ~]# sed -i 's#SELINUX=enforcing#SELINUX=disabled#g' /etc/selinux/config
[root@k8s-master01 ~]# sed -i 's#SELINUX=enforcing#SELINUX=disabled#g' /etc/sysconfig/selinux
[root@k8s-master01 ~]# swapoff -a && sysctl -w vm.swappiness=0
[root@k8s-master01 ~]# sed -ri '/^[^#]*swap/s@^@#@' /etc/fstab
所有节点安装ntpdate
yum install ntpdate -y所有节点配置时间同步(可以使用自己的时间服务器)
[root@k8s-master01 ~]# ln -sf /usr/share/zoneinfo/Asia/Shanghai  /etc/localtime
[root@k8s-master01 ~]# echo 'Asia/Shanghai' > /etc/timezone
[root@k8s-master01 ~]# crontab -e
*/5 * * * * ntpdate time2.aliyun.com
所有节点配置limit
[root@k8s-master01 ~]# ulimit  -SHn 65535              #临时生效
[root@k8s-master01 ~]# vi /etc/security/limits.conf    #修改配置永久生效需要重启服务器
# 在末尾加入
* soft nofile 65535
* hard nofile 65535
* soft nproc 65535
* hard nproc 65535
* soft memlock unlimited
* hard memlock unlimited
#不重启服务器修改ulimit方法
[root@k8s-master01 ~]# vi /etx/profile
ulimit 65535
[root@k8s-master01 ~]# source /etc/profie
二、内核配置
所有节点升级内核
#2.1:导入ELRepo公钥
[root@k8s-master01 ~]# rpm --import https://www.elrepo.org/RPM-GPG-KEY-elrepo.org
#2.2:安装ELRepo
[root@k8s-master01 ~]# yum -y install https://www.elrepo.org/elrepo-release-7.0-4.el7.elrepo.noarch.rpm
#2.3:安装kernel-it内核
[root@k8s-master01 ~]# yum -y --disablerepo='*' --enablerepo=elrepo-kernel install kernel-lt
#2.4:查看启动器
[root@k8s-master01 ~]# awk -F\' '$1=="menuentry " {print i++ " : " $2}' /etc/grub2.cfg
#2.5:设置默认内核启动项 然后重启服务器
[root@k8s-master01 ~]# grub2-set-default 0
[root@k8s-master01 ~]# restart
#重启后查看内核版本
[root@k8s-master01 ~]# uname -r
所有节点安装ipvsadm
[root@k8s-master01 yum.repos.d]# yum install ipvsadm ipset sysstat conntrack libseccomp -y --nogpgcheck所有节点配置ipvs模块
[root@k8s-master01 yum.repos.d]# vim /etc/modules-load.d/ipvs.conf
# 加入以下内容
ip_vs
ip_vs_lc
ip_vs_wlc
ip_vs_rr
ip_vs_wrr
ip_vs_lblc
ip_vs_lblcr
ip_vs_dh
ip_vs_sh
ip_vs_fo
ip_vs_nq
ip_vs_sed
ip_vs_ftp
ip_vs_sh
nf_conntrack_ipv4  #内核5.0以上的版本改为nf_conntrack参数
ip_tables
ip_set
xt_set
ipt_set
ipt_rpfilter
ipt_REJECT
ipip
加载内核配置
[root@k8s-master01 yum.repos.d]# systemctl enable --now systemd-modules-load开启一些k8s集群中必须的内核参数,所有节点配置k8s内核
[root@k8s-master01 ~]# cat <<EOF > /etc/sysctl.d/k8s.conf
net.ipv4.ip_forward = 1
net.bridge.bridge-nf-call-iptables = 1
net.bridge.bridge-nf-call-ip6tables = 1
fs.may_detach_mounts = 1
vm.overcommit_memory=1
vm.panic_on_oom=0
fs.inotify.max_user_watches=89100
fs.file-max=52706963
fs.nr_open=52706963
net.netfilter.nf_conntrack_max=2310720

net.ipv4.tcp_keepalive_time = 600
net.ipv4.tcp_keepalive_probes = 3
net.ipv4.tcp_keepalive_intvl =15
net.ipv4.tcp_max_tw_buckets = 36000
net.ipv4.tcp_tw_reuse = 1
net.ipv4.tcp_max_orphans = 327680
net.ipv4.tcp_orphan_retries = 3
net.ipv4.tcp_syncookies = 1
net.ipv4.tcp_max_syn_backlog = 16384
net.ipv4.ip_conntrack_max = 65536
net.ipv4.tcp_max_syn_backlog = 16384
net.ipv4.tcp_timestamps = 0
net.core.somaxconn = 16384
EOF
[root@k8s-master01 ~]# sysctl --system
所有节点重启
三、基本组件安装
所有节点安装Docker-ce 19.03
# docker yum源
[root@k8s-master01 ~]# yum-config-manager --add-repo https://download.docker.com/linux/centos/docker-ce.repo

# 安装Docker-ce 19.03
[root@k8s-master01 ~]# yum install docker-ce-cli-19.03.15-3.el7.x86_64 docker-ce-19.03.15-3.el7.x86_64 -y
新版kubelet建议使用systemed,将所有节点docker的CgroupDriver改成systemd
[root@k8s-master01 ~]# mkdir /etc/docker
[root@k8s-master01 ~]# cat > /etc/docker/daemon.json <<EOF
{
 "exec-opts":["native.cgroupdriver=systemd"],
 "registry-mirrors": ["https://bmd06omc.mirror.aliyuncs.com"]
}
EOF
所有节点设置开机自启动Docker
[root@k8s-master01 ~]# systemctl daemon-reload && systemctl enable --now docker
[root@k8s-master01 ~]# systemctl status docker   #查看启动状态
安装k8s组件
配置yum仓库
vim /etc/yum.repos.d/kubernetes.repo
[kubernetes]
name=Kubernetes
baseurl=http://mirrors.aliyun.com/kubernetes/yum/repos/kubernetes-el7-x86_64
enabled=1
gpgcheck=0
repo_gpgcheck=0
gpgkey=http://mirrors.aliyun.com/kubernetes/yum/doc/yum-key.gpg
所有节点安装最新版kubeadm
[root@k8s-master01 ~]# yum install kubeadm -y   #默认是下载的最新的kubeadm一定要规划好版本不然后面初始化的时候会报错
[root@k8s-master02 yaml]# yum install kubeadm-1.22.8-0.x86_64 kubelet-1.22.8-0.x86_64 -y #下载指定的版本
设置Kubelet开机自启动 ( 如果启动失败无须管理,初始化成功以后即可启动 )
[root@k8s-master01 ~]# systemctl daemon-reload
[root@k8s-master01 ~]# systemctl enable --now kubelet
四、高可用组件安装
所有Master节点通过yum安装HAProxy和KeepAlived:
[root@k8s-master01 ~]# yum install keepalived haproxy -y所有Master节点配置HAProxy(详细配置参考HAProxy文档,所有Master节点的HAProxy配置相同):
[root@k8s-master01 ~]# vim /etc/haproxy/haproxy.cfg
global
  maxconn  2000
  ulimit-n  16384
  log  127.0.0.1 local0 err
  stats timeout 30s

defaults
  log global
  mode  http
  option  httplog
  timeout connect 5000
  timeout client  50000
  timeout server  50000
  timeout http-request 15s
  timeout http-keep-alive 15s

frontend monitor-in
  bind *:33305
  mode http
  option httplog
  monitor-uri /monitor

frontend k8s-master
  bind 0.0.0.0:16443
  bind 127.0.0.1:16443
  mode tcp
  option tcplog
  tcp-request inspect-delay 5s
  default_backend k8s-master

backend k8s-master
  mode tcp
  option tcplog
  option tcp-check
  balance roundrobin
  default-server inter 10s downinter 5s rise 2 fall 2 slowstart 60s maxconn 250 maxqueue 256 weight 100
  server k8s-master01   192.168.113.100:6443  check
  server k8s-master02   192.168.113.101:6443  check
  server k8s-master03   192.168.113.102:6443  check
所有Master节点配置KeepAlived,配置不一样,注意区分
注意每个节点的IP和网卡(interface参数)
Master01节点的配置:
[root@k8s-master01 ~]# vim /etc/keepalived/keepalived.conf
! Configuration File for keepalived
global_defs {
    router_id LVS_DEVEL
script_user root
    enable_script_security
}
vrrp_script chk_apiserver {
    script "/etc/keepalived/check_apiserver.sh"
    interval 5
    weight -5
    fall 2
rise 1
}
vrrp_instance VI_1 {
    state MASTER
    interface ens33
    mcast_src_ip 192.168.113.100
    virtual_router_id 51
    priority 101
    advert_int 2
    authentication {
        auth_type PASS
        auth_pass K8SHA_KA_AUTH
    }
    virtual_ipaddress {
        192.168.113.99
    }
    track_script {
       chk_apiserver
    }
}
Master02节点的配置
[root@k8s-master01 ~]# vim /etc/keepalived/keepalived.conf
! Configuration File for keepalived
global_defs {
    router_id LVS_DEVEL
script_user root
    enable_script_security
}
vrrp_script chk_apiserver {
    script "/etc/keepalived/check_apiserver.sh"
   interval 5
    weight -5
    fall 2
rise 1
}
vrrp_instance VI_1 {
    state BACKUP
    interface ens33
    mcast_src_ip 192.168.113.101
    virtual_router_id 51
    priority 100
    advert_int 2
    authentication {
        auth_type PASS
        auth_pass K8SHA_KA_AUTH
    }
    virtual_ipaddress {
        192.168.113.99
    }
    track_script {
       chk_apiserver
    }
}
Master03节点的配置:
[root@k8s-master01 ~]# vim /etc/keepalived/keepalived.conf
! Configuration File for keepalived
global_defs {
    router_id LVS_DEVEL
script_user root
    enable_script_security
}
vrrp_script chk_apiserver {
    script "/etc/keepalived/check_apiserver.sh"
   interval 5
    weight -5
    fall 2
rise 1
}
vrrp_instance VI_1 {
    state BACKUP
    interface ens33
    mcast_src_ip 192.168.113.102
    virtual_router_id 51
    priority 100
    advert_int 2
    authentication {
        auth_type PASS
        auth_pass K8SHA_KA_AUTH
    }
    virtual_ipaddress {
        192.168.113.99
    }
    track_script {
       chk_apiserver
    }
}
所有Master节点配置KeepAlived健康检查文件:
[root@k8s-master01 ~]# vim /etc/keepalived/check_apiserver.sh
#!/bin/bash
err=0
for k in $(seq 1 3)
do
    check_code=$(pgrep haproxy)
    if [[ $check_code == "" ]]; then
        err=$(expr $err + 1)
        sleep 1
        continue
    else
        err=0
        break
    fi
done

if [[ $err != "0" ]]; then
    echo "systemctl stop keepalived"
    /usr/bin/systemctl stop keepalived
    exit 1
else
    exit 0
fi

[root@k8s-master01 ~]# chmod +x /etc/keepalived/check_apiserver.sh
[root@k8s-master01 ~]# systemctl daemon-reload
[root@k8s-master01 ~]# systemctl enable --now haproxy
[root@k8s-master01 ~]# systemctl enable --now keepalived
测试VIP
[root@k8s-master01 ~]# ping 192.168.113.99
PING 192.168.113.99 (192.168.113.99) 56(84) bytes of data.
64 bytes from 192.168.113.99: icmp_seq=1 ttl=64 time=0.261 ms
64 bytes from 192.168.113.99: icmp_seq=2 ttl=64 time=0.079 ms
64 bytes from 192.168.113.99: icmp_seq=3 ttl=64 time=0.094 ms
64 bytes from 192.168.113.99: icmp_seq=4 ttl=64 time=0.086 ms
^C
--- 192.168.113.99 ping statistics ---
4 packets transmitted, 4 received, 0% packet loss, time 3156ms
rtt min/avg/max/mdev = 0.079/0.130/0.261/0.075 ms
五、初始化集群
查看kubeadm-config配置选项
[root@k8s-master01 ~]# kubeadm config print init-defaults --component-configs KubeletConfiguration

Master01节点创建kubeadm-config.yaml配置文件如下:
[root@k8s-master01 ~]# cd /etc/kubernetes/
[root@k8s-master01 ~]# mkdir yaml && cd yaml
[root@k8s-master01 ~]# vim kubeadm-config.yaml
apiVersion: kubeadm.k8s.io/v1beta2
bootstrapTokens:
- groups:
  - system:bootstrappers:kubeadm:default-node-token
  token: 7t2weq.bjbawausm0jaxury
  ttl: 24h0m0s
  usages:
  - signing
  - authentication
kind: InitConfiguration
localAPIEndpoint:
  advertiseAddress: 192.168.113.100
  bindPort: 6443
nodeRegistration:
  criSocket: /var/run/dockershim.sock  #k8s-1.24版本过后弃用了dockershim 徐配置container配置成功criSocket: unix:///var/run/containerd/containerd.sock #如果是docker作为runtime这里修改为docker
  name: k8s-master01
  taints:
  - effect: NoSchedule
    key: node-role.kubernetes.io/master
---
apiServer:
  certSANs:
  - 192.168.113.99
  timeoutForControlPlane: 4m0s
apiVersion: kubeadm.k8s.io/v1beta2
certificatesDir: /etc/kubernetes/pki
clusterName: kubernetes
controlPlaneEndpoint: 192.168.113.99:16443
controllerManager: {}
dns:
  type: CoreDNS
etcd:
  local:
    dataDir: /var/lib/etcd
imageRepository: registry.cn-hangzhou.aliyuncs.com/google_containers
kind: ClusterConfiguration
kubernetesVersion: v1.22.8
networking:
  dnsDomain: cluster.local
  podSubnet: 172.168.0.0/16
  serviceSubnet: 10.96.0.0/12
scheduler: {}
apiVersion: kubeadm.k8s.io/v1beta3
kind: ClusterConfiguration
controlPlaneEndpoint: "192.168.113.100:6443"
更新kubeadm-config.yaml为new.yaml
[root@k8s-master01 yaml] kubeadm config migrate --old-config kubeadm-config.yaml --new-config new.yaml将new.yaml文件复制到其他master节点, 之后所有master节点提前下载镜像
#在k8s-master02跟k8s-master03上面创建目录并把k8s-master01上面生成的new.yaml拷贝到yaml目录下面并修改对应的节点名跟ip地址
cd /etc/kubernetes/
mkdir yaml && cd yaml
[root@k8s-master01 yaml]# scp new.yaml 192.168.113.101:/etc/kubernetes/yaml
[root@k8s-master01 yaml]# scp new.yaml 192.168.113.102:/etc/kubernetes/yaml
[root@k8s-master01 yaml]# kubeadm config images pull --config ./new.yaml
Master01节点初始化,初始化以后会在/etc/kubernetes目录下生成对应的证书和配置文件,之后其他Master节点加入Master01即可:
[root@k8s-master01 yaml]# kubeadm init --config ./new.yaml --upload-certs如果初始化失败,重置后再次初始化,命令如下
[root@k8s-master01 yaml]# kubeadm reset -f ; ipvsadm --clear ; rm -rf ~/.kube初始化成功以后,会产生Token值,用于其他节点加入时使用,因此要记录下初始化成功生成的token值(令牌值)
[addons] Applied essential addon: kube-proxy

Your Kubernetes control-plane has initialized successfully!

To start using your cluster, you need to run the following as a regular user:

  mkdir -p $HOME/.kube
  sudo cp -i /etc/kubernetes/admin.conf $HOME/.kube/config
  sudo chown $(id -u):$(id -g) $HOME/.kube/config

Alternatively, if you are the root user, you can run:

  export KUBECONFIG=/etc/kubernetes/admin.conf

You should now deploy a pod network to the cluster.
Run "kubectl apply -f [podnetwork].yaml" with one of the options listed at:
  https://kubernetes.io/docs/concepts/cluster-administration/addons/

You can now join any number of the control-plane node running the following command on each as root:

  kubeadm join 192.168.113.99:16443 --token 7t2weq.bjbawausm0jaxury \
	--discovery-token-ca-cert-hash sha256:040753ee163df7a89229bd8e684f8904465c99a8bcd8b3c73f97e347c4b8003e \
	--control-plane --certificate-key f1b9c55c9f886e22c2152a61be2156bc691c4adb0f06274d57f21a9cf5a1b4c1

Please note that the certificate-key gives access to cluster sensitive data, keep it secret!
As a safeguard, uploaded-certs will be deleted in two hours; If necessary, you can use
"kubeadm init phase upload-certs --upload-certs" to reload certs afterward.

Then you can join any number of worker nodes by running the following on each as root:

kubeadm join 192.168.113.99:16443 --token 7t2weq.bjbawausm0jaxury \
	--discovery-token-ca-cert-hash sha256:040753ee163df7a89229bd8e684f8904465c99a8bcd8b3c73f97e347c4b8003e
Master01节点配置环境变量,用于访问kubernetes集群:
[root@k8s-master01 kubernetes]# cat <<EOF >> /etc/profile
export KUBECONFIG=/etc/kubernetes/admin.conf
EOF
[root@k8s-master01 kubernetes]# source /etc/profile
查看节点状态:
[root@k8s-master01 kubernetes]# kubectl get node
NAME           STATUS     ROLES                  AGE   VERSION
k8s-master01   NotReady   control-plane,master   11m   v1.22.8
采用初始化安装方式,所有的系统组件均以容器的方式运行并且在kube-system命名空间内,此时可以查看Pod状态
[root@k8s-master01 kubernetes]# kubectl get pod -A -o wide
NAMESPACE     NAME                                   READY   STATUS    RESTARTS   AGE   IP                NODE           NOMINATED NODE   READINESS GATES
kube-system   coredns-7d89d9b6b8-jlprq               0/1     Pending   0          12m   <none>            <none>         <none>           <none>
kube-system   coredns-7d89d9b6b8-wbp59               0/1     Pending   0          12m   <none>            <none>         <none>           <none>
kube-system   etcd-k8s-master01                      1/1     Running   0          14m   192.168.113.100   k8s-master01   <none>           <none>
kube-system   kube-apiserver-k8s-master01            1/1     Running   0          13m   192.168.113.100   k8s-master01   <none>           <none>
kube-system   kube-controller-manager-k8s-master01   1/1     Running   0          14m   192.168.113.100   k8s-master01   <none>           <none>
kube-system   kube-proxy-sslvt                       1/1     Running   0          12m   192.168.113.100   k8s-master01   <none>           <none>
kube-system   kube-scheduler-k8s-master01            1/1     Running   0          13m   192.168.113.100   k8s-master01   <none>           <none>
六、高可用Master
初始化其他master加入集群,找到刚在k8s-master01上面初始化成功的提示信息
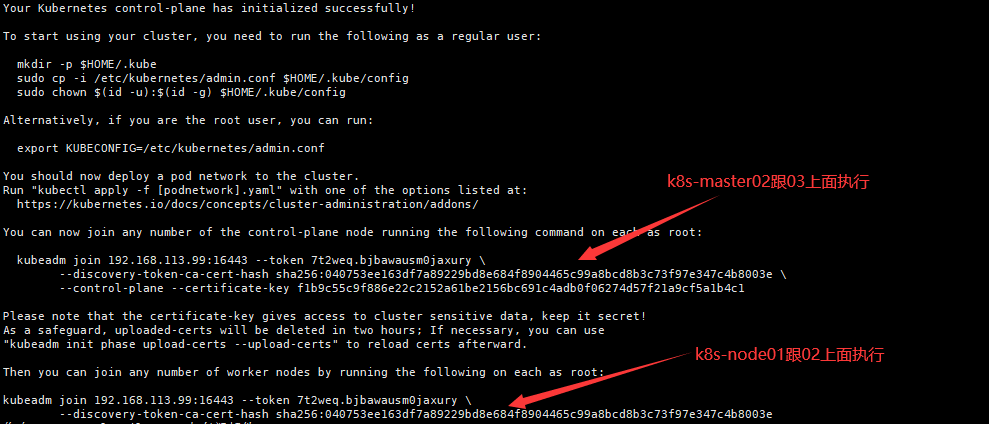
在k8s-master02跟k8s-master03上面执行
kubeadm join 192.168.113.99:16443 --token 7t2weq.bjbawausm0jaxury --discovery-token-ca-cert-hash sha256:040753ee163df7a89229bd8e684f8904465c99a8bcd8b3c73f97e347c4b8003e --control-plane --certificate-key f1b9c55c9f886e22c2152a61be2156bc691c4adb0f06274d57f21a9cf5a1b4c1七、添加Node节点
kubeadm join 192.168.113.99:16443 --token 7t2weq.bjbawausm0jaxury --discovery-token-ca-cert-hash sha256:040753ee163df7a89229bd8e684f8904465c99a8bcd8b3c73f97e347c4b8003e八、Token过期处理
Token过期后生成新的Token:
kubeadm token create --print-join-command
kubeadm join 192.168.113.99:16443 --token 0vh88n.sc2lem9mg3vpn1zv --discovery-token-ca-cert-hash sha256:d66dbd1904da037374b33cfc72b256d0f05ecbb4f67aecb87162338aebfe7e81
Master需要生成 --certificate-key
kubeadm init phase upload-certs --upload-certs
[upload-certs] Storing the certificates in Secret "kubeadm-certs" in the "kube-system" Namespace
[upload-certs] Using certificate key:
89397dbe2eccfe45c28f863126375ae455e2c63349eaa2d977daef8798b5adb2
Master加入集群:
kubeadm join 192.168.113.99:16443 --token 0vh88n.sc2lem9mg3vpn1zv --discovery-token-ca-cert-hash sha256:d66dbd1904da037374b33cfc72b256d0f05ecbb4f67aecb87162338aebfe7e81 \
        --control-plane --certificate-key 89397dbe2eccfe45c28f863126375ae455e2c63349eaa2d977daef8798b5adb2
Node加入集群:
kubeadm join 192.168.113.99:16443 --token 0vh88n.sc2lem9mg3vpn1zv --discovery-token-ca-cert-hash sha256:d66dbd1904da037374b33cfc72b256d0f05ecbb4f67aecb87162338aebfe7e81 九、flannel组件安装
以下操作只在Master01执行
[root@k8s-master01 kubernetes]# wget https://raw.githubusercontent.com/coreos/flannel/master/Documentation/kube-flannel.yml
[root@k8s-master01 kubernetes]# kubectl apply -f kube-flannel.yml
查看容器状态
[root@k8s-master01 kubernetes]# kubectl get pod -A -o wide
NAMESPACE     NAME                                   READY   STATUS    RESTARTS   AGE    IP                NODE           NOMINATED NODE   READINESS GATES
kube-system   coredns-7d89d9b6b8-2pkhk               1/1     Running   0          162m   172.168.0.3       k8s-master01   <none>           <none>
kube-system   coredns-7d89d9b6b8-p5l4v               1/1     Running   0          162m   172.168.0.2       k8s-master01   <none>           <none>
kube-system   etcd-k8s-master01                      1/1     Running   0          163m   192.168.113.100   k8s-master01   <none>           <none>
kube-system   kube-apiserver-k8s-master01            1/1     Running   0          163m   192.168.113.100   k8s-master01   <none>           <none>
kube-system   kube-controller-manager-k8s-master01   1/1     Running   0          163m   192.168.113.100   k8s-master01   <none>           <none>
kube-system   kube-flannel-ds-ghqgt                  1/1     Running   0          2m52s  192.168.113.103   k8s-node01     <none>           <none>
kube-system   kube-flannel-ds-dsada                  1/1     Running   0          3m4s   192.168.113.100   k8s-master01   <none>           <none>
kube-system   kube-proxy-hkssd                       1/1     Running   0          162m   192.168.113.100   k8s-master01   <none>           <none>
kube-system   kube-scheduler-k8s-master01            1/1     Running   0          163m   192.168.113.100   k8s-master01   <none>           <none>
十、Metrics Server部署
在新版的Kubernetes中系统资源的采集均使用Metrics-server,可以通过Metrics采集节点和Pod的内存、磁盘、CPU和网络的使用率。
将Master01节点的front-proxy-ca.crt复制到所有Node节点
[root@k8s-master01 pki]# scp /etc/kubernetes/pki/front-proxy-ca.crt 192.168.113.102:/etc/kubernetes/pki/front-proxy-ca.crt
[root@k8s-master01 pki]# scp /etc/kubernetes/pki/front-proxy-ca.crt 192.168.113.103:/etc/kubernetes/pki/front-proxy-ca.crt
[root@k8s-master01 pki]# scp /etc/kubernetes/pki/front-proxy-ca.crt 192.168.113.104:/etc/kubernetes/pki/front-proxy-ca.crt
安装metrics server
[root@k8s-master01 ~]# cd /etc/kubectl/yaml
[root@k8s-master01 yaml~]# git clone https://github.com/dotbalo/k8s-ha-install.git
[root@k8s-master01 yaml~]# cd ./k8s-ha-install && git checkout manual-installation-v1.20.x
[root@k8s-master01 yaml~]# cd ./metrics-server-0.4.x-kubeadm
[root@k8s-master01 yaml~]# kubectl apply -f comp.yaml
查看状态并进行测试
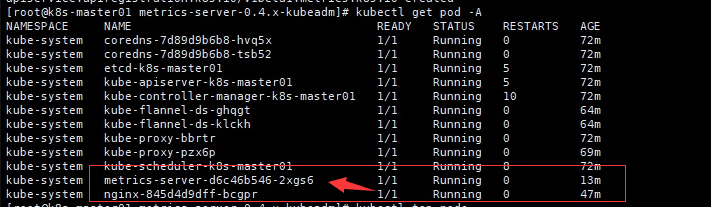
[root@k8s-master01 metrics-server-0.4.x-kubeadm]# kubectl top node
NAME           CPU(cores)   CPU%   MEMORY(bytes)   MEMORY%
k8s-master01   2892m        72%    1706Mi          44%
k8s-node01     1297m        32%    1389Mi          36%
十一、Dashboard部署(如果需要使用rancher请查看我二进制不是k8s)
[root@k8s-master01 ~]# cd /etc/kubernetes/yaml/k8s-ha-install/dashboard/    #进入到前面转的资源收集器目录下面
[root@k8s-master01 dashboard]# kubectl apply -f .
更改dashboard的svc为NodePort:
# kubectl edit svc kubernetes-dashboard -n kubernetes-dashboard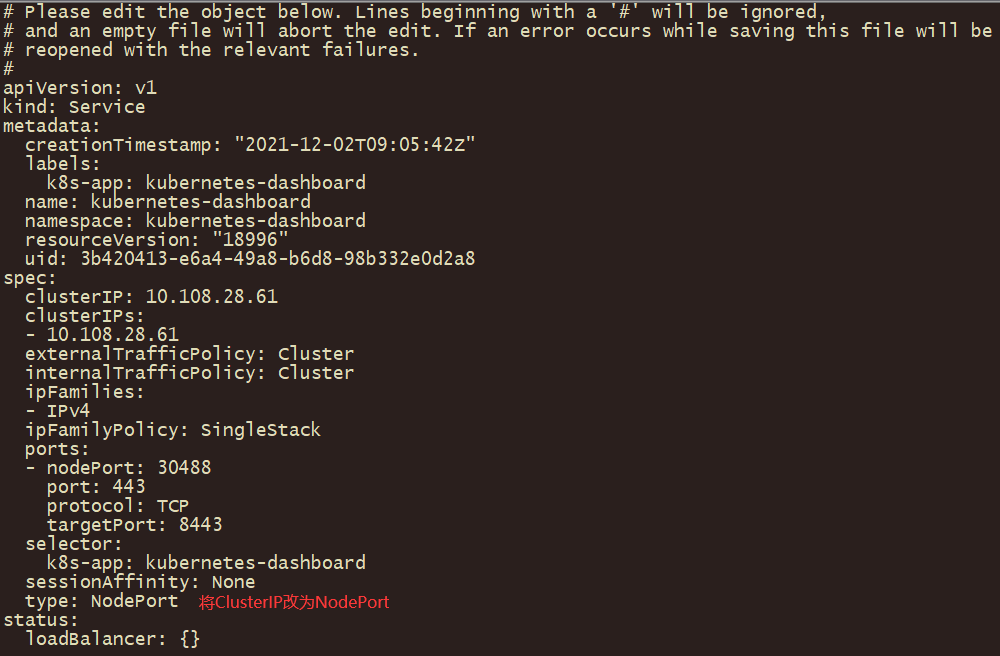
查看令牌
# kubectl -n kube-system describe secret $(kubectl -n kube-system get secret | grep admin-user | awk '{print $1}')
Name:         admin-user-token-hqqcm
Namespace:    kube-system
Labels:       <none>
Annotations:  kubernetes.io/service-account.name: admin-user
              kubernetes.io/service-account.uid: 53d47e5e-58e3-4e60-a3d2-4064737c97ea

Type:  kubernetes.io/service-account-token

Data
====
ca.crt:     1099 bytes
namespace:  11 bytes
token:      eyJhbGciOiJSUzI1NiIsImtpZCI6IlE4czB3aDNuWjNrREFGdlZoODRUR3Z1OWVMbmZNalhuY0s5ZGpUVExPa2sifQ.eyJpc3MiOiJrdWJlcm5ldGVzL3NlcnZpY2VhY2NvdW50Iiwia3ViZXJuZXRlcy5pby9zZXJ2aWNlYWNjb3VudC9uYW1lc3BhY2UiOiJrdWJlLXN5c3RlbSIsImt1YmVybmV0ZXMuaW8vc2VydmljZWFjY291bnQvc2VjcmV0Lm5hbWUiOiJhZG1pbi11c2VyLXRva2VuLWhxcWNtIiwia3ViZXJuZXRlcy5pby9zZXJ2aWNlYWNjb3VudC9zZXJ2aWNlLWFjY291bnQubmFtZSI6ImFkbWluLXVzZXIiLCJrdWJlcm5ldGVzLmlvL3NlcnZpY2VhY2NvdW50L3NlcnZpY2UtYWNjb3VudC51aWQiOiI1M2Q0N2U1ZS01OGUzLTRlNjAtYTNkMi00MDY0NzM3Yzk3ZWEiLCJzdWIiOiJzeXN0ZW06c2VydmljZWFjY291bnQ6a3ViZS1zeXN0ZW06YWRtaW4tdXNlciJ9.UuwWzbLJNGne6WF2nWNDt2eKn1YwVIQFuFkbZlxl0rIJkqySaJg7OfP9WSrKa8_FvPx_DTTzXdJPLZKN5qkuV4MhQVig9ktt52MeYvIK8i_KVoqRBzMF5t2_IoWENnNWP9sX30iqCo6-FtFqHUQoO6pjq1C4LIsx_rWQIfrwf6lGfuaWoh23J60dhPYUDq9FsIau9trQNHOuOl8bUnduDYm9jl2CFl7Xy13a-U3emGgtXU4N9JaLBJsOkAaYDrpPCPtJeBx5NaWgOiOD2T9zeUfjfeWiODr1mS1YLA_ZVzgYPeivlBMNUbPUl_oRfu5jVZ1sBhewZqzxX9YRnzyGhw
在谷歌浏览器(Chrome)启动文件中加入启动参数,用于解决无法访问Dashboard的问题,参考图:
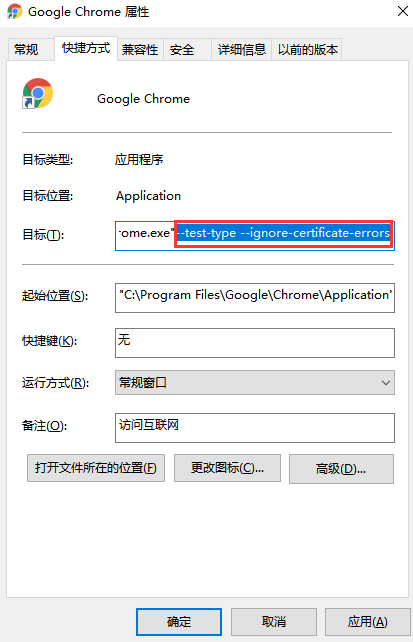
然后访问就是了

 浙公网安备 33010602011771号