JUC
1、什么是JUC
JUC是java.util.concurrent包的简称,在Java5.0添加,目的就是为了更好的支持高并发任务。让开发者进行多线程编程时减少竞争条件和死锁的问题!
2、线程和进程
进程:一个程序,比如QQ.exe,WeChat.exe
一个进程往往包含多个线程,至少会包含一个!!!
Java默认会开启两个线程,一个是main,一个是GC回收
Java能否开启线程?不能
public synchronized void start() {
        ...
        group.add(this);

        boolean started = false;
        try {
            start0();
            started = true;
        } finally {
            ...
        }
}
// 是一个本地方法,调用C++来开启线程,Java不能调用硬件
private native void start0();
并发和并行
并发:同一个时刻,多个任务交替进行(单核CPU实现的多任务就是并发),多个线程操作同一个资源类
并行:同一时刻,多个进程同时运行(多核CPU同时处理多个任务)
    public static void main(String[] args) {
        // 获取CPU的核数
        // 后边会说CPU密集型和IO密集型
        System.out.println(Runtime.getRuntime().availableProcessors());
    }
线程的几个状态
根据jdk源码可以看到,有6种状态
public enum State {
        // 新生状态
        NEW,

        // 运行状态
        RUNNABLE,

        // 阻塞状态
        BLOCKED,

        // 等待状态
        WAITING,

        // 超时等待
        TIMED_WAITING,

        // 终止
        TERMINATED;
    }
wait/sleep的区别
1、来自不同的类
wait -> Object
sleep -> Thread
2、关于锁的释放
wait会释放锁
sleep不会释放锁
3、使用的范围
wait必须在同步代码块中
sleep可以在任意地方休眠
3、Lock锁(重点)
synchronized
synchronized互斥锁(非公平锁),使用方式
// 同步代码块方式
//1、同步非静态锁,可以是this,也可以是其他的对象,但要求是同一个对象
//2、同步静态锁为当前类本身,即类.class
synchronized (对象){
    同步操作;
}

// 同步方法
public synchronized void method(){
    同步操作;
}
以卖票为例
public class SaleTicketDemo01 {
    public static void main(String[] args) {
        // 并发编程,多个线程操作同一个资源类,将资源类丢入到线程中
        Mac mac = new Mac();

        // @FunctionalInterface 函数式接口,在jdk1.8中使用了Lambda表达式(参数)->{代码}
        new Thread(()->{
            for (int i = 0; i < 60; i++) {
                mac.sale();
            }
        },"A").start();
        new Thread(()->{
            for (int i = 0; i < 60; i++) {
                mac.sale();
            }
        },"B").start();
        new Thread(()->{
            for (int i = 0; i < 60; i++) {
                mac.sale();
            }
        },"C").start();
    }
}

// 资源类 OOP
class Mac{
    // 类中只包含属性、方法
    private int num = 50;

    //卖票的方式
    void sale(){
        // synchronized 本质就是一个非公平锁
        synchronized (this){
            if(num > 0) {
                System.out.println(Thread.currentThread().getName() + "卖出了:" + (num--) + ",剩余" + num);
            }
        }
    }
}
Lock 接口

该接口有三个实现类
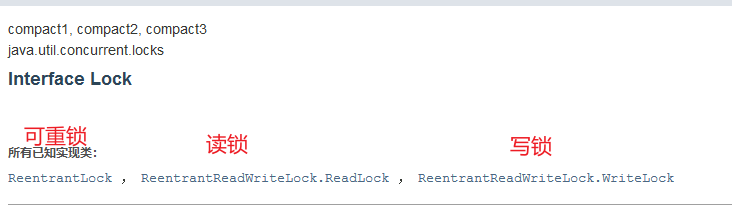
对于ReentrantLock有两个构造方法,默认无参构造指定的是非公平锁,有参构造根据boolean类型的参数,如果为true指定公平锁,false指定非公平锁
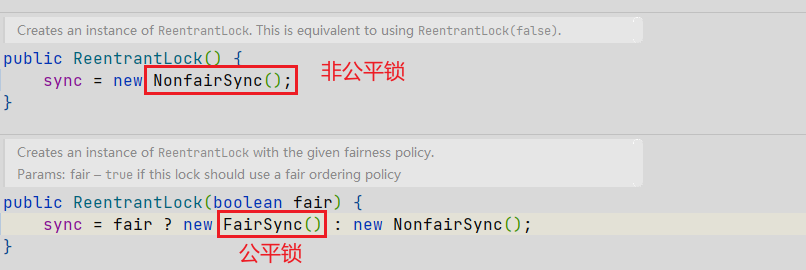
公平锁:非常公平,先来后到
非公平锁:不公平,可以插队(默认),synchronized也是非公平锁
public class SaleTicketDemo02 {
    public static void main(String[] args) {
        Mac2 m = new Mac2();
        new Thread(()->{for(int i = 0 ; i <= 60; i ++) m.sale();},"A").start();
        new Thread(()->{for(int i = 0 ; i <= 60; i ++) m.sale();},"B").start();
        new Thread(()->{for(int i = 0 ; i <= 60; i ++) m.sale();},"C").start();
    }
}

// Lock锁 三个步骤
// 1、new ReentrantLock();
// 2、 加锁
// 3、 finally -> 解锁
class Mac2{
    //资源类OOP 只包含属性和方法
    private int num = 50;

    Lock lock = new ReentrantLock();

    public void sale(){
        // 先给资源加锁
        lock.lock();
        try {
            // 业务代码块需要放在try中
            if(num > 0){
                System.out.println(Thread.currentThread().getName()+"卖出了票:"+(num --) + "剩余"+num);
            }
        }catch (Exception e){
            e.printStackTrace();
        }finally {
            // 给资源解锁
            lock.unlock();
        }
    }

}
思考:Synchronized 和 Lock锁的区别
- Synchronized是Java内置的关键字,Lock是一个Java类
- Synchronized无法判断获取锁的状态,Lock可以判断是否获取到了锁
- Synchronized会自动释放锁,Lock必须要手动释放锁,如果不释放就会造成
死锁 - Synchronized线程1(获得锁,阻塞),线程2(会一直等待),Lock锁就不一定会等待下去(tryLock()方法来获取锁)
- Synchronized可重入锁,不可以中断,非公平,Lock可重入锁,可以判断锁,非公平(可以自己进行设置)
- Synchronized适合锁少量的代码同步问题,Lock适合锁大量的同步代码。
4、生产者消费者问题
4.1、Synchronized
生产者,消费者 Synchronized版本
public class ProDucTest {
    public static void main(String[] args) {
        Data data = new Data();
        new Thread(()->{
            for (int i = 0; i < 10; i++) {
                try {
                    data.increment();
                } catch (InterruptedException e) {
                    e.printStackTrace();
                }
            }
        },"A").start();

        new Thread(()->{
            for (int i = 0; i < 10; i++) {
                try {
                    data.decrement();
                } catch (InterruptedException e) {
                    e.printStackTrace();
                }
            }
        },"B").start();
    }
}

// 三个步骤  判断等待,业务,通知
class Data{// OOP 只有属性和方法

    private int number = 0;

    //+1
    public synchronized void increment() throws InterruptedException {
        if(number != 0){
           //等待
            this.wait();
        }
        number ++;
        System.out.println(Thread.currentThread().getName()+"->"+number);
        //通知其他线程 已经生产了1个了
        this.notifyAll();
    }

    //-1
    public synchronized void decrement() throws InterruptedException {
        if(number == 0){
            //等待
            this.wait();
        }
        number --;
        System.out.println(Thread.currentThread().getName()+"->"+number);
        //通知其他线程  已经消费了一个了
        this.notifyAll();
    }
}
4.2、虚假唤醒
思考,如果按照上边的写法,单线程下没有问题,如果有4个线程的话,两个用来生产,两个用来消费,结果是否会出问题
出现问题了,因为使用的是if进行的判断,if判断的时候只判断了一次,两个生产线程可能都以一个结果为准,造成虚假唤醒,通过查阅官方文档可以看到

将上边的if判断改为while判断就可以了,测试一下
public class ProDucTest {
    public static void main(String[] args) {
        Data data = new Data();
        new Thread(()->{
            for (int i = 0; i < 10; i++) {
                try {
                    data.increment();
                } catch (InterruptedException e) {
                    e.printStackTrace();
                }
            }
        },"A").start();

        new Thread(()->{
            for (int i = 0; i < 10; i++) {
                try {
                    data.decrement();
                } catch (InterruptedException e) {
                    e.printStackTrace();
                }
            }
        },"B").start();

        new Thread(()->{
            for (int i = 0; i < 10; i++) {
                try {
                    data.increment();
                } catch (InterruptedException e) {
                    e.printStackTrace();
                }
            }
        },"C").start();

        new Thread(()->{
            for (int i = 0; i < 10; i++) {
                try {
                    data.decrement();
                } catch (InterruptedException e) {
                    e.printStackTrace();
                }
            }
        },"D").start();
    }
}

// 三个步骤  判断等待,业务,通知
class Data{// OOP 只有属性和方法

    private int number = 0;

    //+1
    public synchronized void increment() throws InterruptedException {
        while(number != 0){
           //等待
            this.wait();
        }
        number ++;
        System.out.println(Thread.currentThread().getName()+"->"+number);
        //通知其他线程 已经生产了1个了
        this.notifyAll();
    }

    //-1
    public synchronized void decrement() throws InterruptedException {
        while(number == 0){
            //等待
            this.wait();
        }
        number --;
        System.out.println(Thread.currentThread().getName()+"->"+number);
        //通知其他线程  已经消费了一个了
        this.notifyAll();
    }
}
4.3、Lock锁
JUC生产者消费者问题
和传统的Synchronized等待和通知,JUC有自己的一套体系
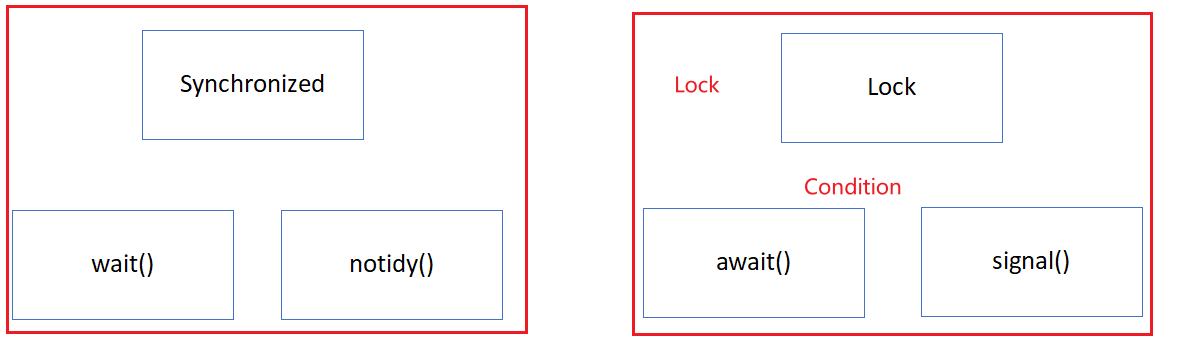
通过Lock可以找到Condition方法
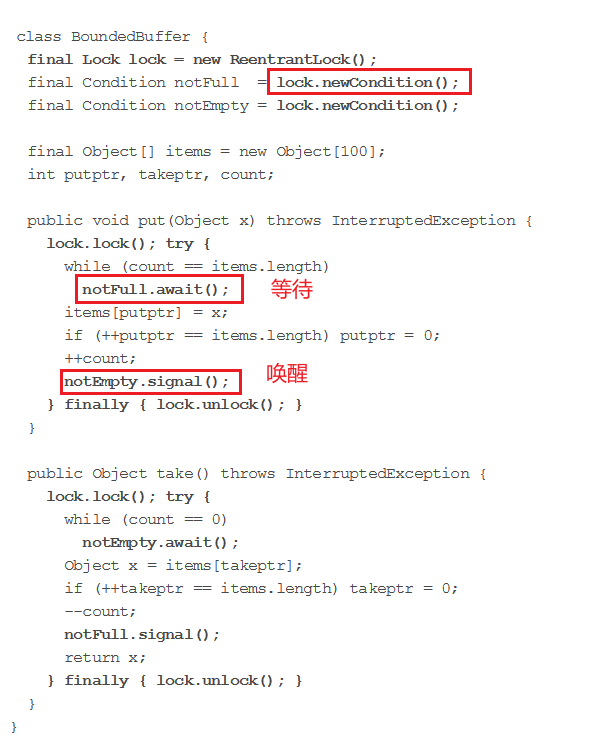
代码实现一下
public class ProDucTest2 {
    public static void main(String[] args) {
        Data2 data2 = new Data2();
        new Thread(()->{
            for (int i = 0; i < 10; i++) {
                try {
                    data2.increment();
                } catch (InterruptedException e) {
                    e.printStackTrace();
                }
            }
        },"A").start();
        new Thread(()->{
            for (int i = 0; i < 10; i++) {
                try {
                    data2.decrement();
                } catch (InterruptedException e) {
                    e.printStackTrace();
                }
            }
        },"B").start();
        new Thread(()->{
            for (int i = 0; i < 10; i++) {
                try {
                    data2.increment();
                } catch (InterruptedException e) {
                    e.printStackTrace();
                }
            }
        },"C").start();
        new Thread(()->{
            for (int i = 0; i < 10; i++) {
                try {
                    data2.decrement();
                } catch (InterruptedException e) {
                    e.printStackTrace();
                }
            }
        },"D").start();
    }
}

class Data2{//OOP 属性方法
    private int number = 0;

    private Lock lock = new ReentrantLock();
    private Condition condition = lock.newCondition();
    // +1
    public void increment() throws InterruptedException {
        // 给资源加锁
        lock.lock();
        try {
            // 所有的业务代码块写在try中
            while(number != 0){
                //等待
                condition.await();
            }
            number ++;
            System.out.println(Thread.currentThread().getName()+"->"+number);
            // 通知其他线程,我生产了一个商品
            condition.signal();
        } catch (InterruptedException e) {
            e.printStackTrace();
        } finally {
            // 给资源解锁
            lock.unlock();
        }
    }

    // -1
    public void decrement() throws InterruptedException {
        // 给资源加锁
        lock.lock();
        try{
            // 所有的业务代码块写在try中
            while(number == 0){
                //等待
                condition.await();
            }
            number --;
            // 通知其他线程,我已经消费了一个商品
            System.out.println(Thread.currentThread().getName()+"->"+number);
            condition.signalAll();
        }catch(Exception e){
            e.printStackTrace();
        }finally{
            // 给资源解锁
            lock.unlock();
        }
    }
}
这样结果看着没有什么问题,但是有可能造成A生产完毕,D消费了,C生产完毕,B消费了,如何解决这个问题?
4.4、 使用Condition实现精准的唤醒控制
实现思路:可以使用多个Condition对象来实现每个线程的精准控制
// 三个线程,A执行完毕调用B,B执行完毕调用C,C执行完毕调用A
public class TestCondition {
    public static void main(String[] args) {
        Data3 data3 = new Data3();
        new Thread(()->{for(int i = 1;  i <= 10 ; i ++) data3.print1();},"A").start();
        new Thread(()->{for(int i = 1;  i <= 10 ; i ++) data3.print2();},"B").start();
        new Thread(()->{for(int i = 1;  i <= 10 ; i ++) data3.print3();},"C").start();
    }
}

class Data3{
    private Lock lock = new ReentrantLock();

    private Condition con1 = lock.newCondition();
    private Condition con2 = lock.newCondition();
    private Condition con3 = lock.newCondition();
    private int number = 1; // 1执行A  2执行B 3执行C
    public void print1(){
        lock.lock();
        try {
            // 业务代码:判断等待 -> 执行 -> 通知
            while(number != 1){
                // 等待
                con1.await();
            }
            System.out.println(Thread.currentThread().getName()+"-> AAAAAAA");
            // 唤醒指定线程B
            // 将控制变量设置为2,并唤醒线程B
            number = 2;
            con2.signal();//唤醒当前线程
        }catch (Exception e){
            e.printStackTrace();
        }finally {
            lock.unlock();
        }
    }
    public void print2(){
        lock.lock();
        try {
            // 业务代码:判断等待 -> 执行 -> 通知
            while(number != 2){
                con2.await();
            }
            System.out.println(Thread.currentThread().getName()+"->BBBBBBBB");
            // 唤醒指定线程C
            // 将number设置为3,并唤醒线程C
            number = 3;
            con3.signal();//唤醒当前线程
        }catch (Exception e){
            e.printStackTrace();
        }finally {
            lock.unlock();
        }
    }
    public void print3(){
        lock.lock();
        try {
            // 业务代码:判断等待 -> 执行 -> 通知
            while(number != 3){
                con3.await();
            }
            System.out.println(Thread.currentThread().getName()+"->CCCCCCC");
            // 将number设置为1并唤醒指定线程A
            number = 1;
            con1.signal();
        }catch (Exception e){
            e.printStackTrace();
        }finally {
            lock.unlock();
        }
    }
}
5、8锁现象
如何判断锁的是谁!
第一组:
/**
 * 8锁,就是关于锁的8个问题
 * 1、标准情况下,两个线程先打印  打电话还是发短信 1、发短信 2、打电话
 * 2、发短信延迟4秒情况下,两个线程先打印  打电话还是发短信 1、发短信 2、打电话
 */
public class Test01 {
    public static void main(String[] args)  {
        Phone phone = new Phone();

        new Thread(()->{
            phone.sendSms();
        },"A").start();
        try {
            TimeUnit.SECONDS.sleep(1);
        } catch (InterruptedException e) {
            e.printStackTrace();
        }
        new Thread(()->{
            phone.call();
        },"B").start();
    }
}

class Phone{

    // 被synchronized锁的对象是方法的调用者
    // 两个方法用的是同一个锁,谁先拿到谁就会先执行
    public synchronized void sendSms(){
        try {
            TimeUnit.SECONDS.sleep(4);
        } catch (InterruptedException e) {
            e.printStackTrace();
        }
        System.out.println("发送短信");
    }

    public synchronized void call(){
        System.out.println("打电话");
    }
}
第二组:
/**
 * 3、增了加了一个普通方法后,两个线程是先打印发短信还是先打印hello? hello,因为hello是一个普通方法
 * 4、当有两个对象后,两个线程,分别执行对象的方法,先发短信还是打电话? 1、打电话  2、发短信
 */
public class Test02 {
    public static void main(String[] args) {
        // 两个不同的对象,两个调用者,两个锁
        Phone2 phone = new Phone2();
        Phone2 phone2 = new Phone2();

        new Thread(()->{
            phone.sendSms();
        },"A").start();

        try {
            TimeUnit.SECONDS.sleep(1);
        } catch (InterruptedException e) {
            e.printStackTrace();
        }

        new Thread(()->{
            // phone.hello();
            phone2.call();
        },"B").start();
    }
}

class Phone2{

    // synchronized锁的是对象的调用者
    public synchronized void sendSms(){
        try {
            TimeUnit.SECONDS.sleep(4);
        } catch (InterruptedException e) {
            e.printStackTrace();
        }
        System.out.println("发短信");
    }

    public synchronized void call(){
        System.out.println("打电话");
    }

    // 并不是一个同步方法,不会收到锁的影响
    public void hello(){
        System.out.println("hello");
    }
}
第三组
/**
 * 5、增加两个静态的同步方法 只有一个对象,两个线程先打印发短信还是先打印打电话? 1、发短信 2、打电话
 * 6、两个静态的同步方法 两个对象,两个线程先打印发短信还是先打印打电话? 1、发短信 2、打电话
 */
public class Test03 {
    public static void main(String[] args) {
        // 两个对象的class模板只有一个,static静态的,锁的是class
        Phone3 phone = new Phone3();
        Phone3 phone2 = new Phone3();

        new Thread(()->{
            phone.sendSms();
        },"A").start();

        try {
            TimeUnit.SECONDS.sleep(1);
        } catch (InterruptedException e) {
            e.printStackTrace();
        }

        new Thread(()->{
            phone2.call();
        },"B").start();
    }
}

class Phone3{

    // synchronized 锁的是对象方法的调用者
    // static 静态方法
    // 类一加载就有了,锁的是Class类的模板  一个类只有一个模板 Phone3.class
    public static synchronized void sendSms(){
        try {
            TimeUnit.SECONDS.sleep(4);
        } catch (InterruptedException e) {
            e.printStackTrace();
        }
        System.out.println("发短信");
    }

    public static synchronized void call(){
        System.out.println("打电话");
    }
}
第四组
/**
 * 7、一个静态同步方法,一个普通同步方法,一个对象, 两个线程,先打印发短信还是先打印打电话  1、打电话 2、发短信 锁的不是同一个内容
 * 8、一个静态同步方法,一个普通同步方法,两个对象, 两个线程,先打印发短信还是先打印打电话  1、打电话 2、发短信  锁的不是同一个内容
 */
public class Test4 {
    public static void main(String[] args) {
        Phone4 phone = new Phone4();
        Phone4 phone2 = new Phone4();

        new Thread(()->{
            phone.sendSms();
        },"A").start();

        try {
            TimeUnit.SECONDS.sleep(1);
        } catch (InterruptedException e) {
            e.printStackTrace();
        }

        new Thread(()->{
            phone2.call();
        }).start();
    }
}

class Phone4{

    // 静态的同步方法  锁的是Class的类模板
    public static synchronized void sendSms(){
        try {
            TimeUnit.SECONDS.sleep(4);
        } catch (InterruptedException e) {
            e.printStackTrace();
        }
        System.out.println("发短信");
    }

    // 普通的同步方法  锁的是对象方法的调用者
    public synchronized void call(){
        System.out.println("打电话");
    }
}
小结:
如果同步的时候是new的,也就是this,锁的是一个对象的调用者
如果同步的时候是static的,锁的是Class类的唯一的模板
6、集合类不安全
6.1、List不安全
这段代码在单线程下十分安全,但是在多线程下就会出问题
        List<String> strings = Arrays.asList("A", "B", "C", "D");
        strings.forEach(System.out::println);
多线程测试
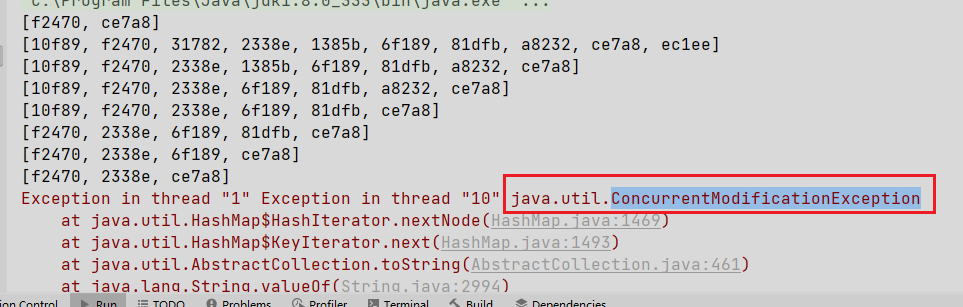
    public static void main(String[] args) {
        List<String> list = new ArrayList<>();
        for (int i = 1; i <= 10; i++) {
            new Thread(()->{
                list.add(UUID.randomUUID().toString().substring(0,5));
                System.out.println(list);
            },String.valueOf(i)).start();
        }
    }
抛异常了,java.util.ConcurrentModificationException并发修改异常
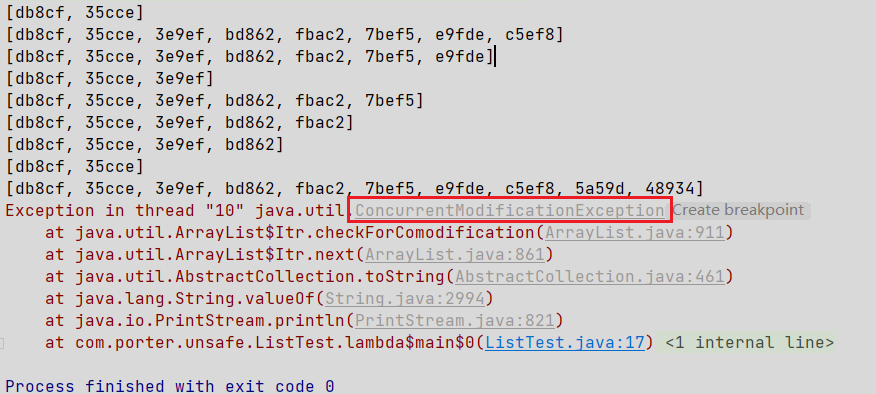
通过以上测试可以得到结果,ArrayList是线程不安全的,那么如何解解决这个问题?
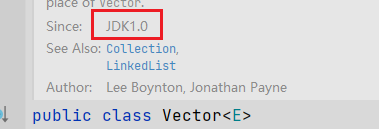
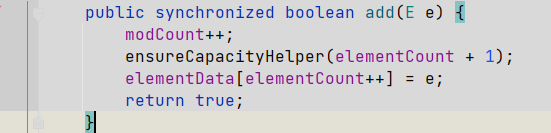
方法1:使用Vector解决(最Low的方式)
因为Vector底层方法使用Synchronized关键字修饰了
    public static void main(String[] args) {
        // ArrayList<String> list = new ArrayList<>();
        List<String> list = new Vector<>();
        for (int i = 1; i <= 10; i++) {
            new Thread(()->{
                list.add(UUID.randomUUID().toString().substring(0,5));
                System.out.println(list);
            },String.valueOf(i)).start();
        }
    }
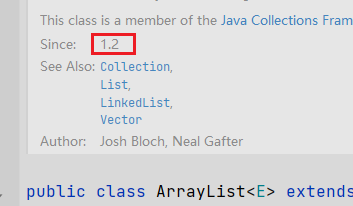
但是思考一下,为什么说使用Vector是最Low的方式,因为查看源码,Vector这个类在JDK1.0的版本就已经出来了,而ArrayList是在JDK1.2版本出来的
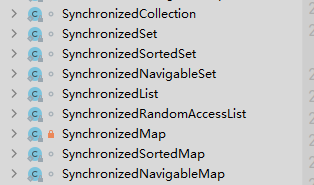
方法2:通过工具类Collections来转换
Collections工具类中包含了一系列将集合转换为线程安全的方法,参数是对应类型的集合
    public static void main(String[] args) {
        //ArrayList<String> list = new ArrayList<>();
        //List<String> list = new Vector<>();
        List<String> list = Collections.synchronizedList(new ArrayList<>());
        for (int i = 1; i <= 10; i++) {
            new Thread(()->{
                list.add(UUID.randomUUID().toString().substring(0,5));
                System.out.println(list);
            },String.valueOf(i)).start();
        }
    }
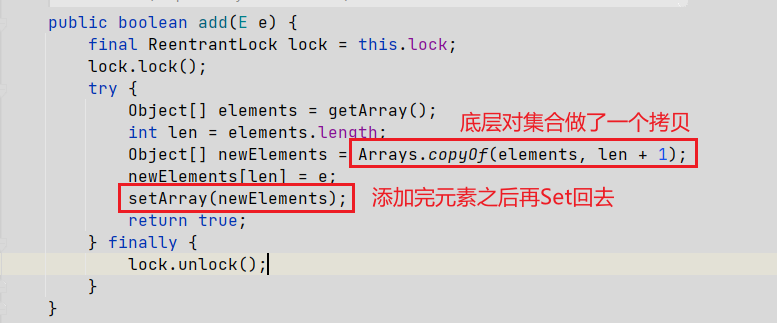
方法3:通过JUC来解决
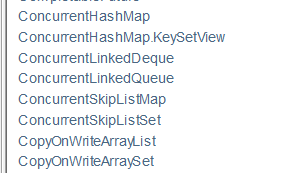
JUC包中包含了一系列并发下的集合
CopyOnWrite 写入时复制 COW 是计算机程序设计领域的一种优化策略。当多个线程在操作同一个List的时候,读取的时候是固定的,写入的时候会发生覆盖,这种思想的实现思路就是在写入的时候把原来的数据复制一份,进行写入,写入完毕之后再放回去。避免覆盖,造成数据问题(读写分离)
    public static void main(String[] args) {
        List<String> list = new CopyOnWriteArrayList<>();
        for (int i = 1; i <= 10; i++) {
            new Thread(()->{
                list.add(UUID.randomUUID().toString().substring(0,5));
                System.out.println(list);
            },String.valueOf(i)).start();
        }
    }
6.1.1、可能会遇到的面试问题
Vector和CopyOnWriteArrayList的区别
Vector底层是使用Synchronized关键字修饰的,一旦被这个关键字修饰效率就可能会很慢。
CopyOnWriteArrayList底层并没有使用Synchronized关键字,而是使用的Lock锁,效率更高
6.2、Set不安全
和List一样,向HashSet中存入数据单线程下也是没有问题的,多线程下就会抛出java.util.ConcurrentModificationException 并发修改异常
    public static void main(String[] args) {
        Set<String> set = new HashSet<>();
        for (int i = 1; i <= 10; i++) {
            new Thread(()->{
                set.add(UUID.randomUUID().toString().substring(0,5));
                System.out.println(set);
            },String.valueOf(i)).start();
        }
    }
运行结果
根据以上结果可以知道,HashSet是线程不安全的,那么如何解决这个问题?
1、使用Collections工具类将HashSet转换为线程安全
    public static void main(String[] args) {
        // Set<String> set = new HashSet<>();
        Set<String> set = Collections.synchronizedSet(new HashSet<>());
        for (int i = 1; i <= 10; i++) {
            new Thread(()->{
                set.add(UUID.randomUUID().toString().substring(0,5));
                System.out.println(set);
            },String.valueOf(i)).start();
        }
    }
2、使用JUC来解决
写入时复制,解决效率和安全性的问题
    public static void main(String[] args) {
        Set<String> set = new CopyOnWriteArraySet<>();
        for (int i = 1; i <= 10; i++) {
            new Thread(()->{
                set.add(UUID.randomUUID().toString().substring(0,5));
                System.out.println(set);
            },String.valueOf(i)).start();
        }
    }
6.3、Map不安全
HashMap在多线程的操作下也会抛出java.util.ConcurrentModificationException并发修改异常
    public static void main(String[] args) {
        Map<String, Object> map = new HashMap<>();

        for (int i = 1; i <= 30; i++) {
            new Thread(()->{
                map.put(Thread.currentThread().getName(), UUID.randomUUID().toString().substring(0,5));
                System.out.println(map);
            },String.valueOf(i)).start();
        }
    }
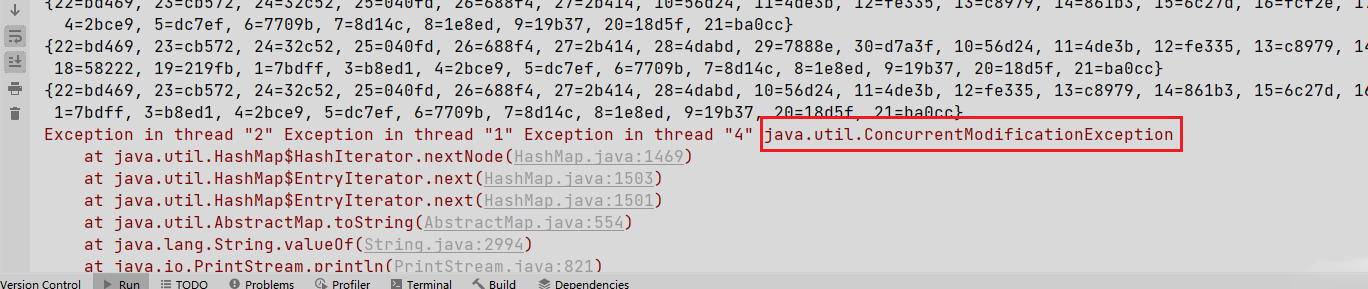
如何处理这个异常?
1、使用Collections工具类转换
    public static void main(String[] args) {
        // Map<String, Object> map = new HashMap<>();
        Map<String,Object> map = Collections.synchronizedMap(new HashMap<>());
        for (int i = 1; i <= 30; i++) {
            new Thread(()->{
                map.put(Thread.currentThread().getName(), UUID.randomUUID().toString().substring(0,5));
                System.out.println(map);
            },String.valueOf(i)).start();
        }
    }
2、使用JUC解决
    public static void main(String[] args) {
        Map<String,Object> map = new ConcurrentHashMap<>();
        for (int i = 1; i <= 30; i++) {
            new Thread(()->{
                map.put(Thread.currentThread().getName(), UUID.randomUUID().toString().substring(0,5));
                System.out.println(map);
            },String.valueOf(i)).start();
        }
    }
7、Callable
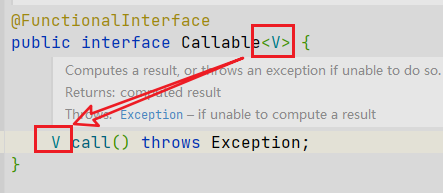
通过查看API可以得到

1、Callable可以有返回值
2、Callable可以抛出异常
3、方法不同,对于Runnable而言,底层是run(),而Callable底层是call()
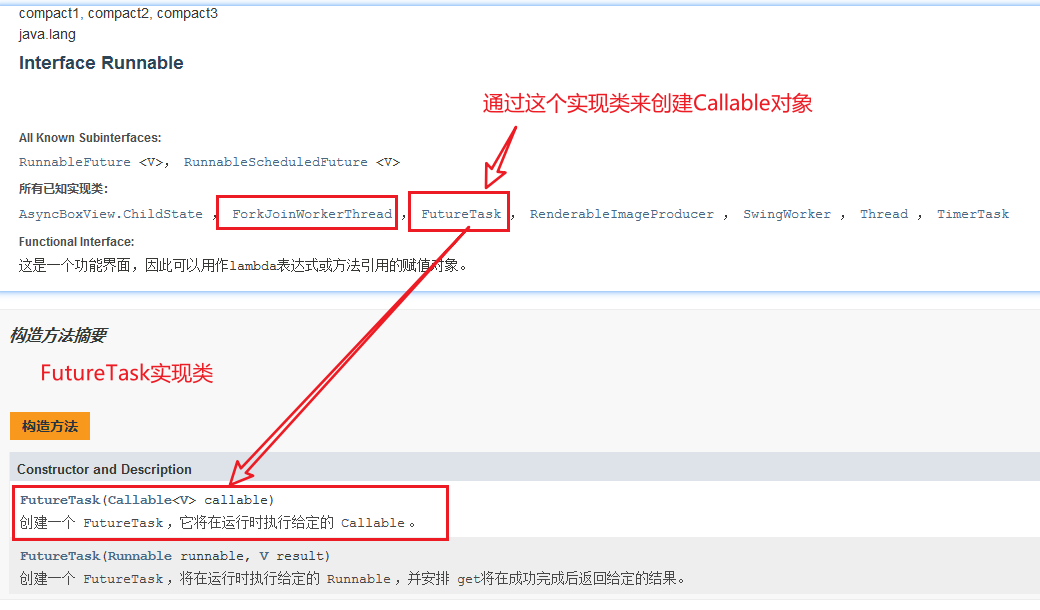
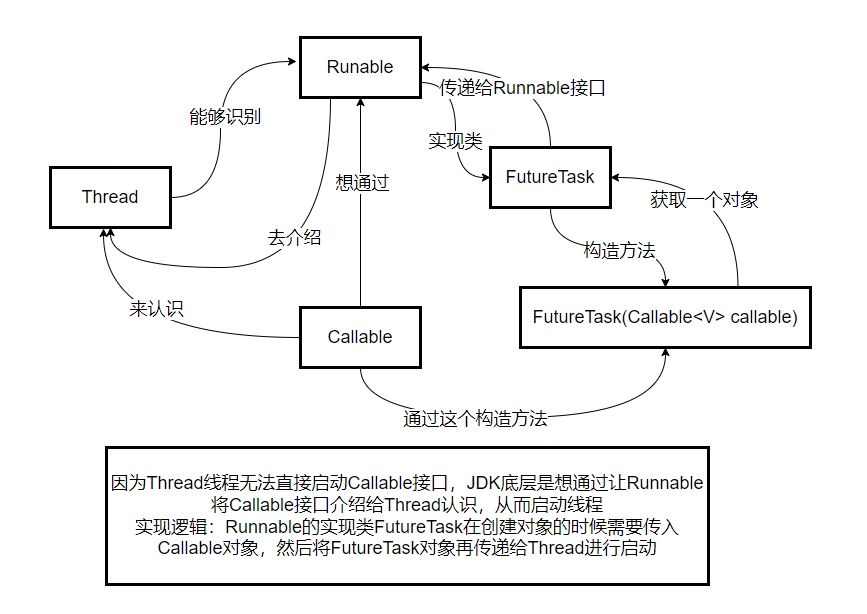
实现Callable接口的泛型就是call方法的返回值,因为Callable接口无法直接被调用,所以需要Runnable接口的实现类FutureTask来创建Callable对象,再去启动线程,通过查看API可以发现Runnable的实现类FutureTask有这么一个功能:
大概是这样一个关系
代码测试
public class CallableTest {
    public static void main(String[] args) throws ExecutionException, InterruptedException {
        MyThread myThread = new MyThread();
        // 可以将FutureTask当作一个适配类,去适配Callable接口,
        FutureTask futureTask = new FutureTask(myThread);
        // 将适配类的对象传递给线程去启动
        new Thread(futureTask).start();
        // 当我启动两条线程调用Callable接口的时候,只会出现一个结果
        // 因为执行之后结果会被缓存,提高执行效率
        new Thread(futureTask).start();

        // 可以通过适配类对象的get方法来获取Callable的返回值
        // get方法可能会阻塞,一般会把get获取返回值的方法放在最后,使用异步通信来处理
        String str = futureTask.get().toString();
        System.out.println(str);
    }
}

// 泛型就是call()方法的返回值
class MyThread implements Callable<String> {

    @Override
    public String call() throws Exception {
        System.out.println("call()");
        return "1024";
    }
}
细节
- 有缓存
- 获取返回值可能会阻塞,可以使用异步通信来解决
8、常用的辅助类 必会
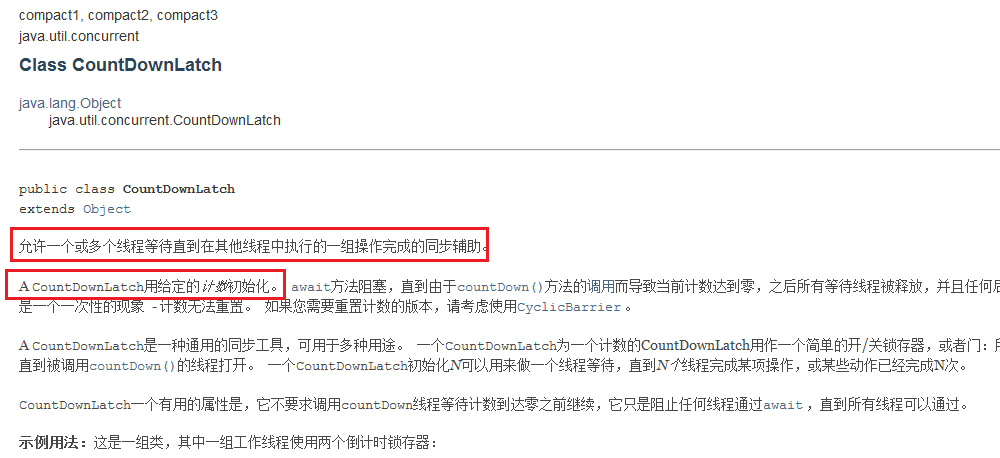
8.1、CountDownLatch
CountDownLacth是一个用来计数的辅助类
// 减法计数器
public class CountDownLatchDemo {
    public static void main(String[] args) throws InterruptedException {
        // 参数是一个int类型的变量用来统计数量
        // 如果有必须要执行的任务的时候使用CountDownLatch工具类
        CountDownLatch countDownLatch = new CountDownLatch(10);

        for (int i = 1; i <= 10; i++) {
            new Thread(()->{
                countDownLatch.countDown(); // 数量-1操作
                System.out.println(Thread.currentThread().getName()+"走了");
            },String.valueOf(i)).start();
        }

        countDownLatch.await(); // 等待计数器归0,然后向下操作
        System.out.println("门被关闭了");
    }
}
countDownLatch.countDown() 数量-1
countDownLatch.await() 等待计数器归0,然后向下执行
每次有线程调用countDown()都会数量-1,假设计数器变为0,await()方法就会被唤醒,继续往下执行
8.2、CyclicBarrier
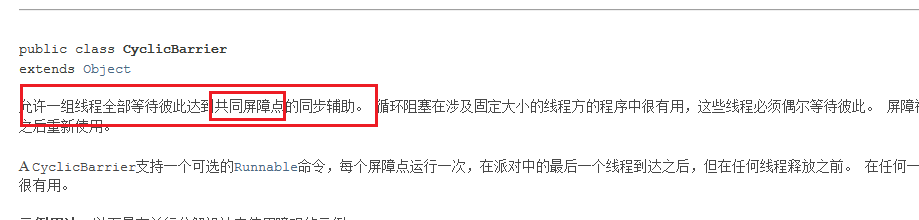
其实可以把CyclicBarrier当成一个加法计数器
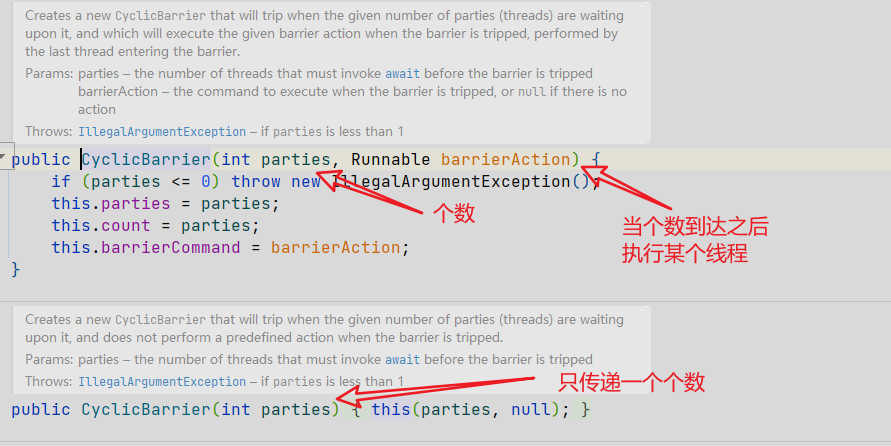
CyclicBarrier有两个构造函数,
// 加法计数器
public class CyclicBarrierDemo {
    public static void main(String[] args) {
        //集齐7颗龙珠召唤神龙
        // CyclicBarrier有两个构造函数
        // 如果当在递增时候的次数无法满足构造的参数个数的时候会一直等待
        CyclicBarrier cyclicBarrier = new CyclicBarrier(7,()->{
            System.out.println("召唤神龙");
        });

        for (int i = 1; i <= 7; i++) {
            //lambda表达式不能直接使用外部的参数,需要转换为final
            final int temp = i;
            new Thread(()->{
                System.out.println(Thread.currentThread().getName()+"收集了:"+temp+"个龙珠");
                try {
                    cyclicBarrier.await();
                } catch (InterruptedException e) {
                    e.printStackTrace();
                } catch (BrokenBarrierException e) {
                    e.printStackTrace();
                }
            }).start();
        }
    }
}
8.3、SemaPhore
限流
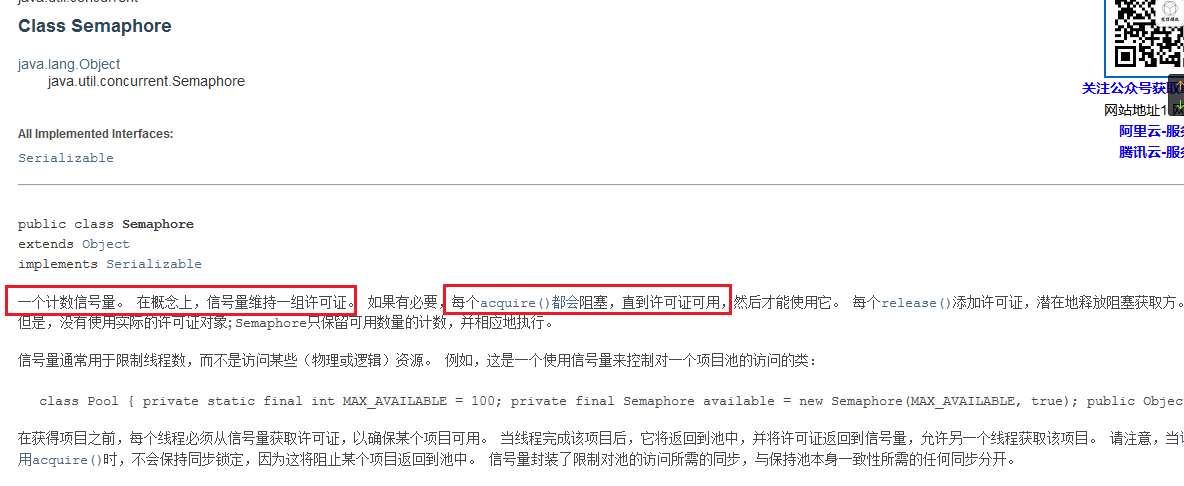
类似于10辆车同时等待3个停车位,轮流去使用
public class SemaPhoreDemo {
    public static void main(String[] args) {
        // 可以在进行限流的时候进行使用
        Semaphore semaphore = new Semaphore(3);
        for (int i = 1; i <= 10; i++) {
            new Thread(()->{
                try {
                    semaphore.acquire(); // acquire()占用
                    System.out.println(Thread.currentThread().getName()+"抢到车位了");
                    TimeUnit.SECONDS.sleep(3);
                    System.out.println(Thread.currentThread().getName()+"离开了");
                } catch (InterruptedException e) {
                    e.printStackTrace();
                }finally {
                    semaphore.release(); // release()释放
                }
            },String.valueOf(i)).start();
        }
    }
}
原理
semaphore.accquire();占用,假设如果资源已经满了,就会等待,直到等待的资源被释放semaphore.release();释放,会将当前的信号量释放+1,然后唤醒等待的线程!
作用:多个共享资源互斥的使用,并发限流,控制最大的线程数量
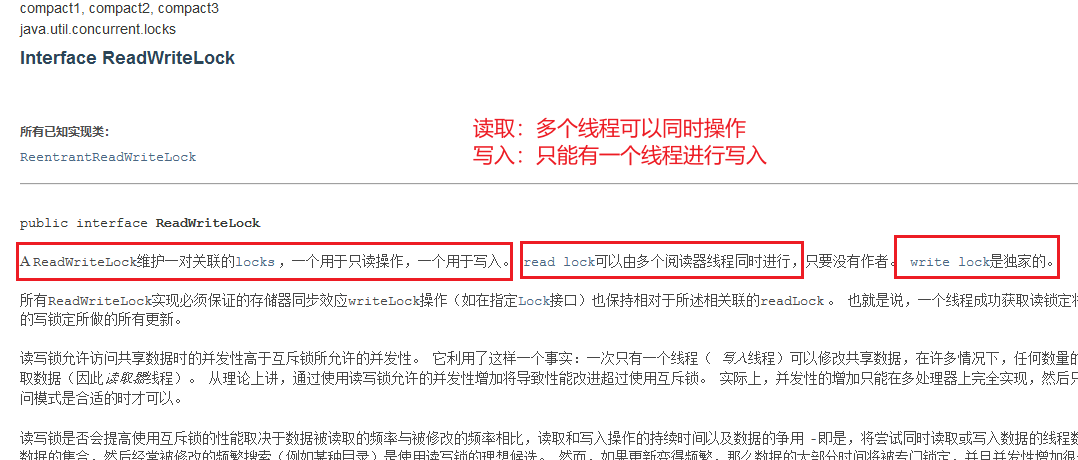
9、读写锁
ReadWriteLock
public class ReadWriteLockDemo {
    public static void main(String[] args) {
        //MyCache myCache = new MyCache();
        MyCache2 myCache = new MyCache2();

        // 写入
        for (int i = 1; i <= 5 ; i++) {
            final int temp = i;
            new Thread(()->{
                myCache.set(temp+"",temp+"");
            },String.valueOf(i)).start();
        }

        for (int i = 1; i <= 5 ; i++) {
            final int temp = i;
            new Thread(()->{
                myCache.get(temp+"");
            },String.valueOf(i)).start();
        }
    }
}

// 加完读写锁的情况
class MyCache2{
    private volatile HashMap<String,Object> map = new HashMap<>();
    // 定义一个读写锁  读写锁可以更细粒度的控制读和写
    private ReadWriteLock reentrantLock = new ReentrantReadWriteLock();

    // 存  写入   只有一个线程可以写入
    public void set(String key,Object value){
        reentrantLock.writeLock().lock();
        try{
            System.out.println(Thread.currentThread().getName()+"开始写入"+key);
            map.put(key,value);
            System.out.println(Thread.currentThread().getName()+"写入成功");
        }catch (Exception e){
            e.printStackTrace();
        }finally {
            reentrantLock.writeLock().unlock();
        }
    }

    // 读  读取   多个人可以同时读取
    public void get(String key){
        reentrantLock.readLock().lock();
        try{
            System.out.println(Thread.currentThread().getName()+"开始读取"+key);
            map.get(key);
            System.out.println(Thread.currentThread().getName()+"读取结束");
        }catch (Exception e){
            e.printStackTrace();
        }finally {
            reentrantLock.readLock().unlock();
        }
    }
}

// 普通方式在进行写入的时候多个线程会同时对缓存进行写入
class MyCache{
    private volatile HashMap<String,Object> map = new HashMap<>();

    // 存 写
    public void set(String key, Object value){
        System.out.println(Thread.currentThread().getName()+"开始写入"+key);
        map.put(key,value);
        System.out.println(Thread.currentThread().getName()+"写入成功");
    }

    // 取 读
    public void get(String key){
        System.out.println(Thread.currentThread().getName()+"开始读取"+key);
        map.get(key);
        System.out.println(Thread.currentThread().getName()+"读取成功");
    }
}
总结:
整体有三种情况:
- 读-读 可以共存 多个线程可以同时读取数据
- 读-写 不可以共存
- 写-写 不可以共存
其实还有其他的说法:
- 共享锁(读锁):多个线程可以同时读取数据
- 独占锁(写锁):只能有一个线程来写入数据
10、阻塞队列
常见的阻塞队列有4种
- SynchronousQueue ------- 直接提交队列(直接就提交,没有队列进行等待)
- ArrayBlockingQueue -------有界任务队列(不能及时执行的任务,放到自定义的队列中等待执行)
- LinkedBlockingDeque -----无界任务队列(等待队列的大小是无界,理论上大小取决于内存大小)
- PriorityBlockingQueue ----优先任务队列(这是一种特殊的无界任务队列,可以按照优先级来执行任务)
FIFO(First Input First Output先进先出)
在JUC中有BlockingQueue这个用来设置阻塞队列
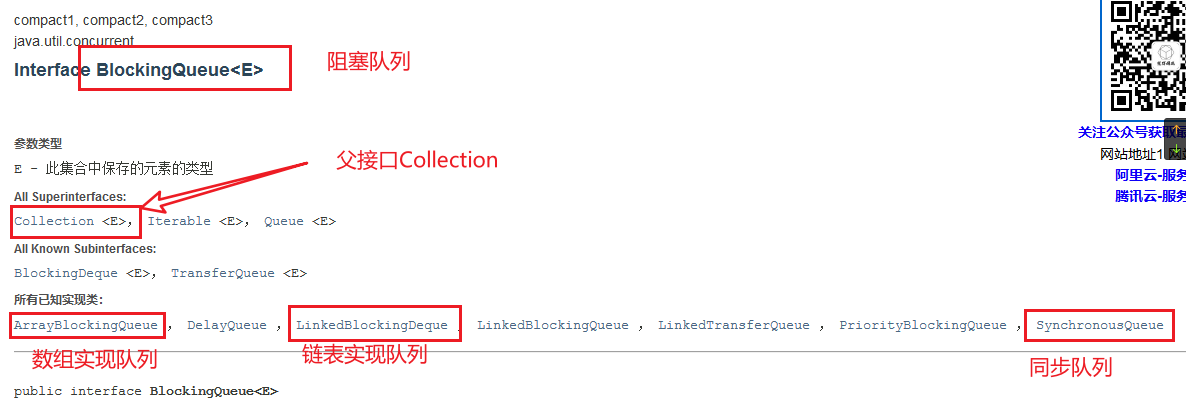
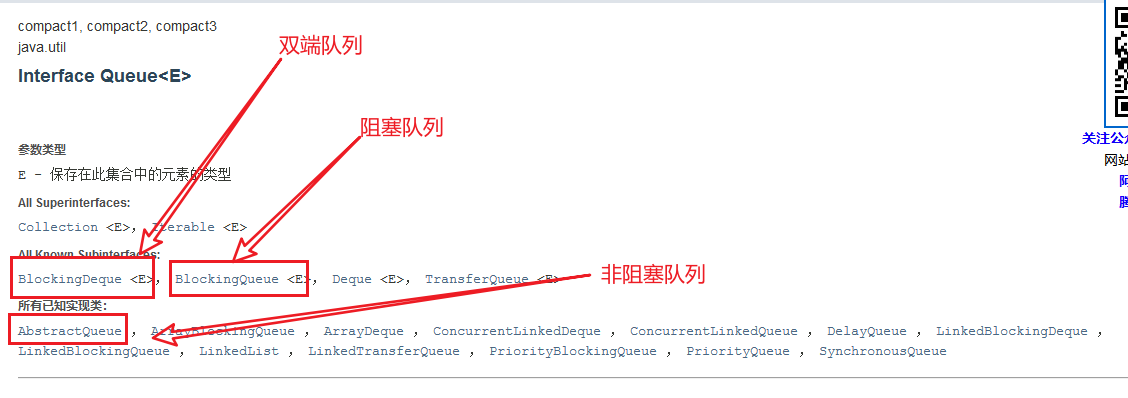
而BlockingQueue并不是一个新的东西
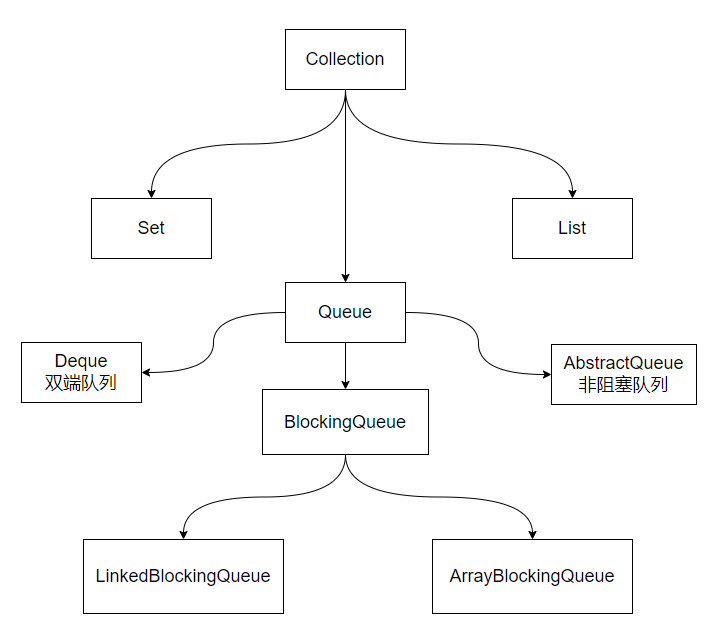
什么情况下使用阻塞队列:多线程并发处理,线程池
10.1、四组API
| 方式 | 抛出异常 | 有返回值,不会抛出异常 | 阻塞等待 | 超时等待 |
|---|---|---|---|---|
| 添加 | add | offer | put | offer(E e,long timeout,TimeUnit unit) |
| 移除 | remove | poll | take | poll(long timeout, TimeUnit unit) |
| 判断队列头部 | element | peek | - | - |
抛出异常
add()当队列满的时候会抛出异常,
remove()当队列为空的时候会抛出异常
element()会返回当前队列中头部的元素,如果队列中没有元素会抛出异常
/**
 * 抛出异常
 */
    public static void test () {
        // 默认构造函数的参数是队列的长度
        ArrayBlockingQueue arrayBlockingQueue = new ArrayBlockingQueue<>(3);

        System.out.println(arrayBlockingQueue.add("1"));
        System.out.println(arrayBlockingQueue.add("2"));
        System.out.println(arrayBlockingQueue.add("3"));

        // 会抛出异常 java.lang.IllegalStateException: Queue full 队列已满
        // System.out.println(arrayBlockingQueue.add("4"));

        // 返回队列中的首部的元素
        System.out.println(arrayBlockingQueue.element());
        System.out.println(arrayBlockingQueue.remove());
        System.out.println(arrayBlockingQueue.remove());
        System.out.println(arrayBlockingQueue.remove());

        // java.util.NoSuchElementException 队列没有元素
        System.out.println(arrayBlockingQueue.element());

        // 会抛出异常  java.util.NoSuchElementException 队列没有元素
        System.out.println(arrayBlockingQueue.remove());
    }
不抛出异常
offer(E e)当队列的数据满的时候不会抛出异常,会返回false表示添加失败
poll()当队列的数据为空的时候,会返回null表示队列中的数据都没了
peek()返回队列中的头部元素,如果队列为空,则会返回null表示列表中没有元素了
    /**
     * 有返回值没有异常
     */
    public static void test2(){
        ArrayBlockingQueue queue = new ArrayBlockingQueue(3);

        System.out.println(queue.offer("a"));
        System.out.println(queue.offer("b"));
        System.out.println(queue.offer("c"));
        // System.out.println(queue.offer("d")); // 返回false 不会抛出异常

        System.out.println(queue.poll());
        System.out.println(queue.poll());
        System.out.println(queue.poll());
        System.out.println(queue.peek()); // 返回null  队列中没有元素
        // System.out.println(queue.poll()); // 返回null  不会抛出异常
    }
一直阻塞
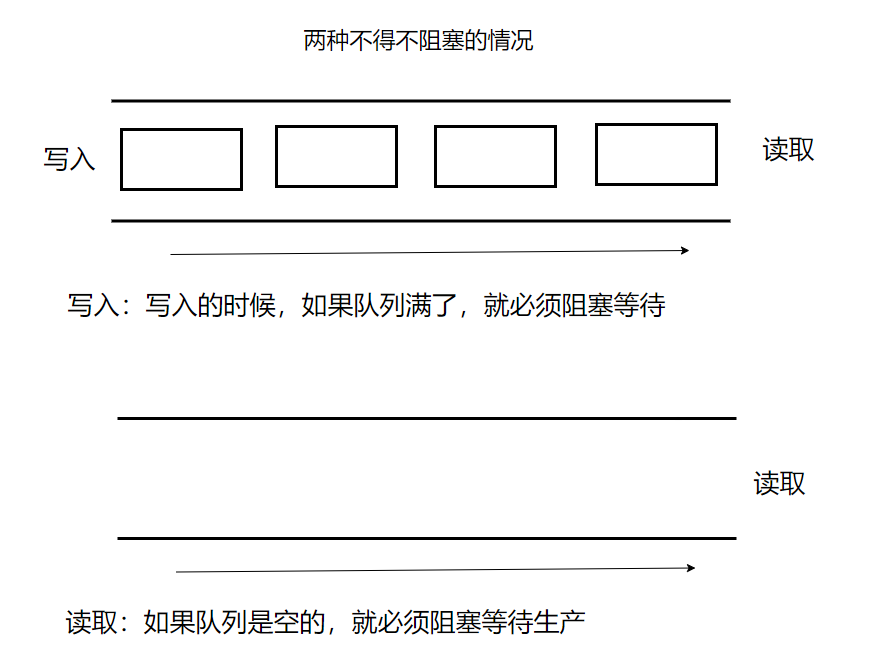
put()向队列中插入元素,没有返回值,如果队列已满,会一直阻塞等待其他线程从队列中取出元素
take()从队列中取出元素,如果队列是空的,会一直阻塞等待其他线程向队列中插入元素
    /**
     * 等待,一直阻塞
     */
    public static void test3() throws InterruptedException {
        ArrayBlockingQueue qu = new ArrayBlockingQueue(3);
        qu.put("a");
        qu.put("b");
        qu.put("c");

        // 队列中已经没有位置了,会一直阻塞等待取出元素
        // qu.put("d");

        System.out.println(qu.take());
        System.out.println(qu.take());
        System.out.println(qu.take());

        // 队列中已经没有元素了,会一直阻塞等待插入元素
        // System.out.println(qu.take());
    }
超时等待
offer(E e,long timeout,TimeUnit unit)向队列中插入元素,如果队列已满则会进行等待,超过timeout时间后,插入失败返回false
poll(long timeout,TimeUnit unit)从队列中取出元素,如果队列为空则会进行等待,超过timeout时间后,返回null
    /**
     * 超时等待
     */
    public static void test4() throws InterruptedException {
        ArrayBlockingQueue queue = new ArrayBlockingQueue(3);
        System.out.println(queue.offer("a"));
        System.out.println(queue.offer("b"));
        System.out.println(queue.offer("c"));

        // 如果队列已满则会进行等待,超过一定时间后返回false插入失败
        // System.out.println(queue.offer("d",2, TimeUnit.SECONDS));

        System.out.println(queue.poll());
        System.out.println(queue.poll());
        System.out.println(queue.poll());

        // 如果队列为空则会进行等待,超过一定时间后返回null取出失败
        System.out.println(queue.poll(2, TimeUnit.SECONDS));
    }
10.2、SynchronousQueue 同步队列
根据API可以看到,SynchronousQueue只有一个位置,存入一个元素必须等待取出之后才能取出另外一个元素
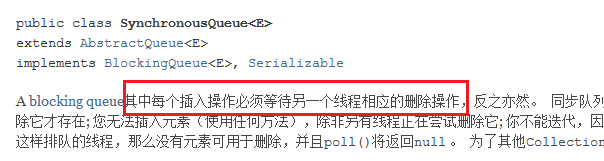
SynchronousQueue和其他BlockingQueue是不一样的,队列中只能存储一个数据
当存入一条数据后,只能等待另外一个线程将队列中的数据读取出来才能再次插入数据
public static void main(String[] args) {
        BlockingQueue<String> queue = new SynchronousQueue<>();

        // 向同步队列中存入数据
        new Thread(()->{
            try {
                System.out.println(Thread.currentThread().getName()+"put 1");
                queue.put("1");
                System.out.println(Thread.currentThread().getName()+"put 2");
                queue.put("2");
                System.out.println(Thread.currentThread().getName()+"put 3");
                queue.put("3");
            } catch (InterruptedException e) {
                e.printStackTrace();
            }
        },"t1").start();

        // 从同步队列中取出数据
        new Thread(()->{
            try {
                TimeUnit.SECONDS.sleep(3);
                System.out.println(Thread.currentThread().getName()+"take "+queue.take());
                TimeUnit.SECONDS.sleep(3);
                System.out.println(Thread.currentThread().getName()+"take "+queue.take());
                TimeUnit.SECONDS.sleep(3);
                System.out.println(Thread.currentThread().getName()+"take "+queue.take());
            } catch (InterruptedException e) {
                e.printStackTrace();
            }
        },"t2").start();
    }
11、线程池(重点)
线程池:三大方法,七大参数,四种拒绝策略
池化技术
程序的运行,本质:占用系统的资源。当我用优化系统的资源使用时就使用了池化技术
线程池、JDBC连接池、内存池、对象池...
池化技术:实现准备好一些资源,有人用就拿去用,用完之后还回去
线程池的好处
- 降低资源的消耗
- 提高响应的速度
- 方便管理
线程复用,可以控制最大并发数量,管理线程
11.1、线程的三大方法
首先,在阿里巴巴开发手册中明确的规范了,不允许使用JDK自带线程池,容易造成OOM
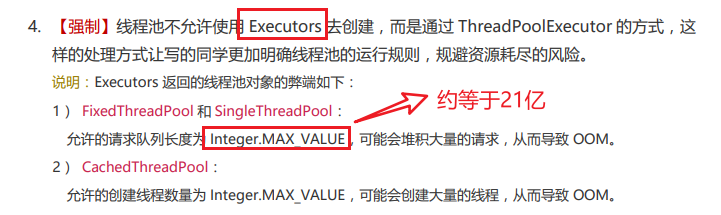
虽然不允许使用Executors创建线程池,但是先用这个去研究一下线程池的三大方法
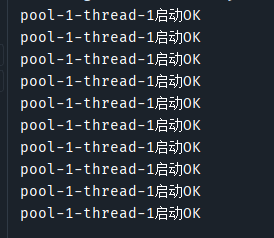
newSingleThreadExecutor线程池里只会有一个线程
    public static void main(String[] args) {
        // 通过Executors创建单个线程的线程池
        ExecutorService threadPool = Executors.newSingleThreadExecutor();
        try {
            for (int i = 1; i <= 10; i++) {
                // 线程池创建完毕后,需要通过线程池来启动线程
                threadPool.execute(()->{
                    System.out.println(Thread.currentThread().getName()+"启动OK");
                });
            }
        } catch (Exception e) {
            e.printStackTrace();
        } finally {
            // 线程池使用完毕之后需要关闭线程池
            threadPool.shutdown();
        }
    }
执行结果
newFixedThreadPool(int maxThread)线程池里最多有maxThread个线程
    public static void main(String[] args) {
        // 通过Executors创建固定数量为5个的线程池
        ExecutorService threadPool = Executors.newFixedThreadPool(5);
        try {
            for (int i = 1; i <= 10 ; i++) {
                // 线程池创建完毕后使用线程池来启动线程
                threadPool.execute(()->{
                    System.out.println(Thread.currentThread().getName()+"启动成功");
                });
            }
        } catch (Exception e) {
            e.printStackTrace();
        } finally {
            // 线程池使用完毕后关闭线程池
            threadPool.shutdown();
        }
    }
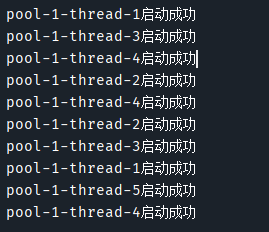
运行结果
newCachedThreadPool()可伸缩的线程池,根据线程数量自动调节线程池大小
    public static void main(String[] args) {
        // 可伸缩的线程池
        ExecutorService threadPool = Executors.newCachedThreadPool();
        try {
            for (int i = 1; i <= 10 ; i++) {
                // 通过线程池来启动线程
                threadPool.execute(()->{
                    System.out.println(Thread.currentThread().getName()+"启动成功了");
                });
            }
        } catch (Exception e) {
            e.printStackTrace();
        } finally {
            // 线程池使用结束后,关闭线程池
        }
    }
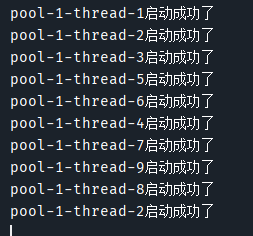
运行结果:
11.2、七大参数
上边介绍了线程池的三大方法,下边看一下各自的源码
newSingleThreadExecutor
public static ExecutorService newSingleThreadExecutor() {
    return new FinalizableDelegatedExecutorService
        (new ThreadPoolExecutor(1, 1,
                                0L, TimeUnit.MILLISECONDS,
                                new LinkedBlockingQueue<Runnable>()));
}
newFixedThreadPool
public static ExecutorService newFixedThreadPool(int nThreads) {
    return new ThreadPoolExecutor(nThreads, nThreads,
                                  0L, TimeUnit.MILLISECONDS,
                                  new LinkedBlockingQueue<Runnable>());
}
newCachedThreadPool
public static ExecutorService newCachedThreadPool() {
    return new ThreadPoolExecutor(0, Integer.MAX_VALUE,
                                  60L, TimeUnit.SECONDS,
                                  new SynchronousQueue<Runnable>());
}
通过上边三大方法的源码可以看到,底层都是new了一个ThreadPoolExecutor,而阿里巴巴也推荐使用这种方式创建线程池,下边研究一下里边的七大参数
ThreadPoolExecutor
| 参数 | 作用 |
|---|---|
| int corePoolSize | 核心线程池大小 |
| int maximumPoolSize | 最大核心线程池大小 |
| long keepAliveTime | 超时了没有人调用就会释放 |
| TimeUnit unit | 超时单位 |
| BlockingQueue< Runnable > workQueue | 阻塞队列 |
| ThreadFactory threadFactory | 线程工厂:创建线程的,一般不会动 |
| RejectedExecutionHandler handler | 拒绝策略 |
public ThreadPoolExecutor(int corePoolSize,
                          int maximumPoolSize,
                          long keepAliveTime,
                          TimeUnit unit,
                          BlockingQueue<Runnable> workQueue,
                          ThreadFactory threadFactory,
                          RejectedExecutionHandler handler) {
    if (corePoolSize < 0 ||
        maximumPoolSize <= 0 ||
        maximumPoolSize < corePoolSize ||
        keepAliveTime < 0)
        throw new IllegalArgumentException();
    if (workQueue == null || threadFactory == null || handler == null)
        throw new NullPointerException();
    this.acc = System.getSecurityManager() == null ?
            null :
            AccessController.getContext();
    this.corePoolSize = corePoolSize;
    this.maximumPoolSize = maximumPoolSize;
    this.workQueue = workQueue;
    this.keepAliveTime = unit.toNanos(keepAliveTime);
    this.threadFactory = threadFactory;
    this.handler = handler;
}
列举一个在生活中常见的案例,去银行办理业务刚开始只有两个人
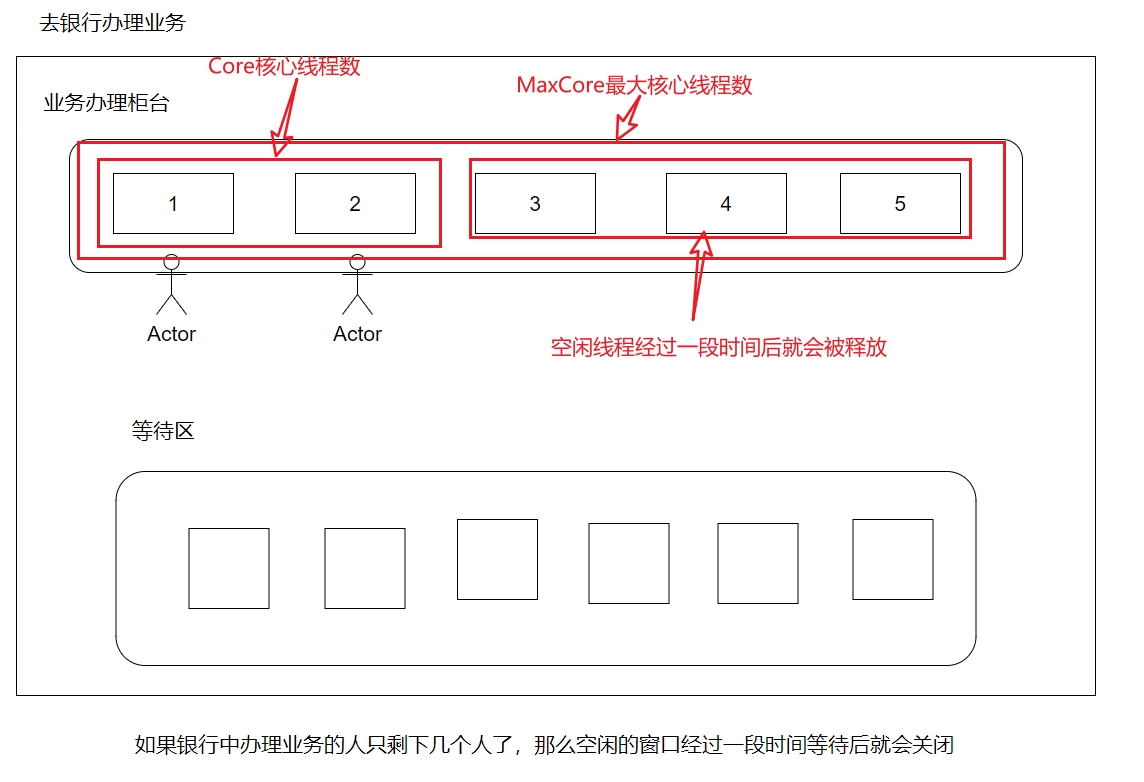
慢慢的人开始增加,但是等候区的位置并没有满
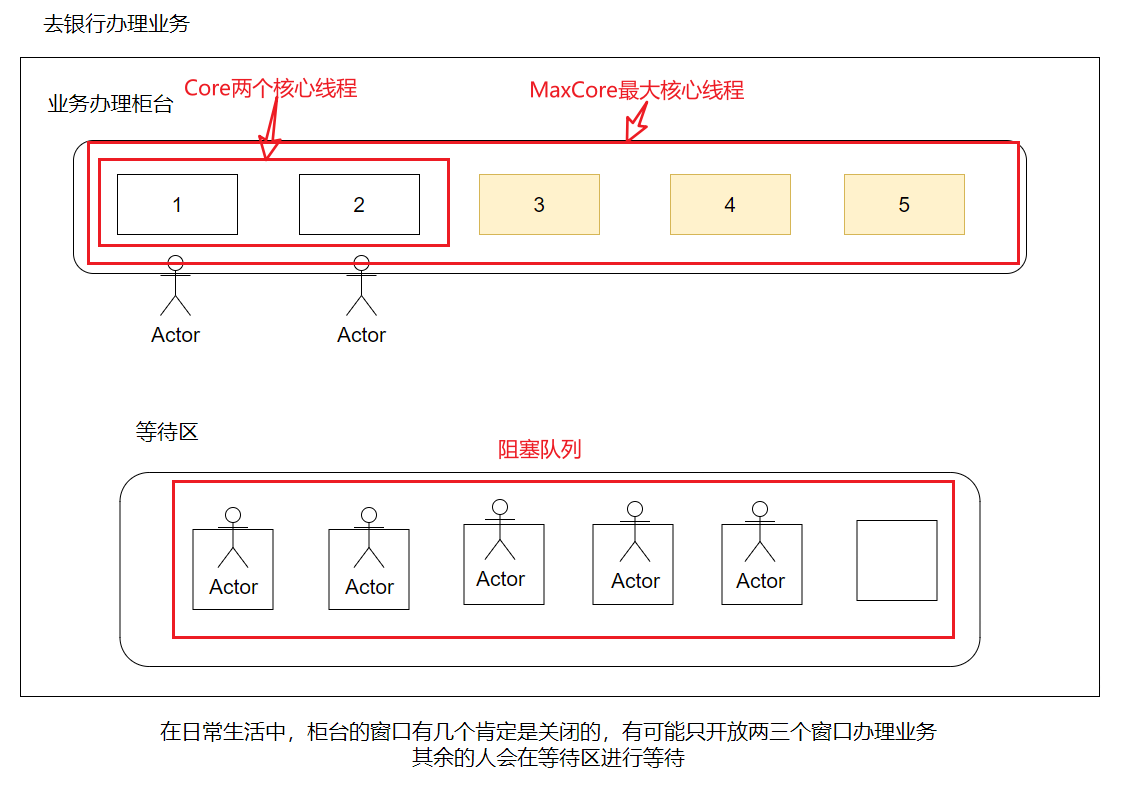
如果有一天,银行的人流量突然非常大,并且等候区已经坐满了,银行就会开启全部的窗口用来办理业务
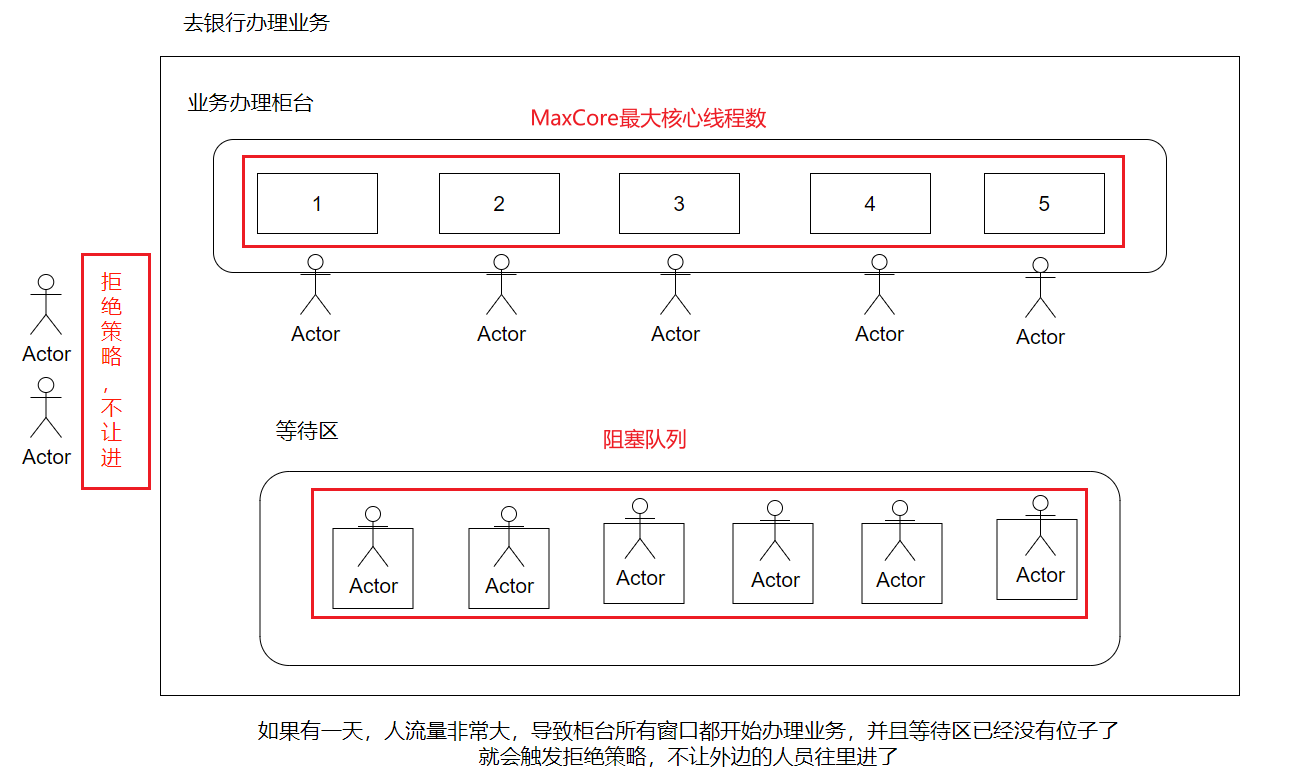
自定义线程池实现
public static void main(String[] args) {
    //按照刚才银行的例子,设置2个核心线程,5个最大核心线程
    ThreadPoolExecutor threadPool = new ThreadPoolExecutor(
            2,
            5,
            3,
            TimeUnit.SECONDS,
            new LinkedBlockingQueue<>(3),
            Executors.defaultThreadFactory(),
            new ThreadPoolExecutor.AbortPolicy()
    );
    try {
        // 线程池的最大承载数是队列数量+最大核心线程数
        // 可以从1~8依次进行测试,查看处理任务的线程
        for (int i = 1; i <= 8; i++) {
            // 通过线程池启动线程
            threadPool.execute(()->{
                System.out.println(Thread.currentThread().getName()+"正在办理业务");
            });
        }
    } catch (Exception e) {
        e.printStackTrace();
    } finally {
        threadPool.shutdown();
    }
}
11.3、四种拒绝策略
以上边的自定义线程池为例测试四种拒绝策略
可以通过查看源码,发现RejectedExecutionHandler有四种拒绝策略

ThreadPoolExecutor.AbortPolicy()
如果超过线程池的最大承载量(最大核心线程数+队列长度)还有线程去执行,会拒绝执行,并抛出异常
public static void main(String[] args) {
    //按照刚才银行的例子,设置2个核心线程,5个最大核心线程
    ThreadPoolExecutor threadPool = new ThreadPoolExecutor(
            2,
            5,
            3,
            TimeUnit.SECONDS,
            new LinkedBlockingQueue<>(3),
            Executors.defaultThreadFactory(),
            // AbortPolicy 如果人数超出线程池的最大承载数量
            // 再有线程往里进不会处理了,会抛出异常
            new ThreadPoolExecutor.AbortPolicy()
    );
    try {
        // 线程池的最大承载数是队列数量+最大核心线程数
        // 超出线程池最大承载数抛出异常RejectedExecutionException
        // 可以从1~8依次进行测试,查看处理任务的线程,超过8之后会抛出异常
        for (int i = 1; i <= 9; i++) {
            // 通过线程池启动线程
            threadPool.execute(()->{
                System.out.println(Thread.currentThread().getName()+"正在办理业务");
            });
        }
    } catch (Exception e) {
        e.printStackTrace();
    } finally {
        threadPool.shutdown();
    }
}
结果:
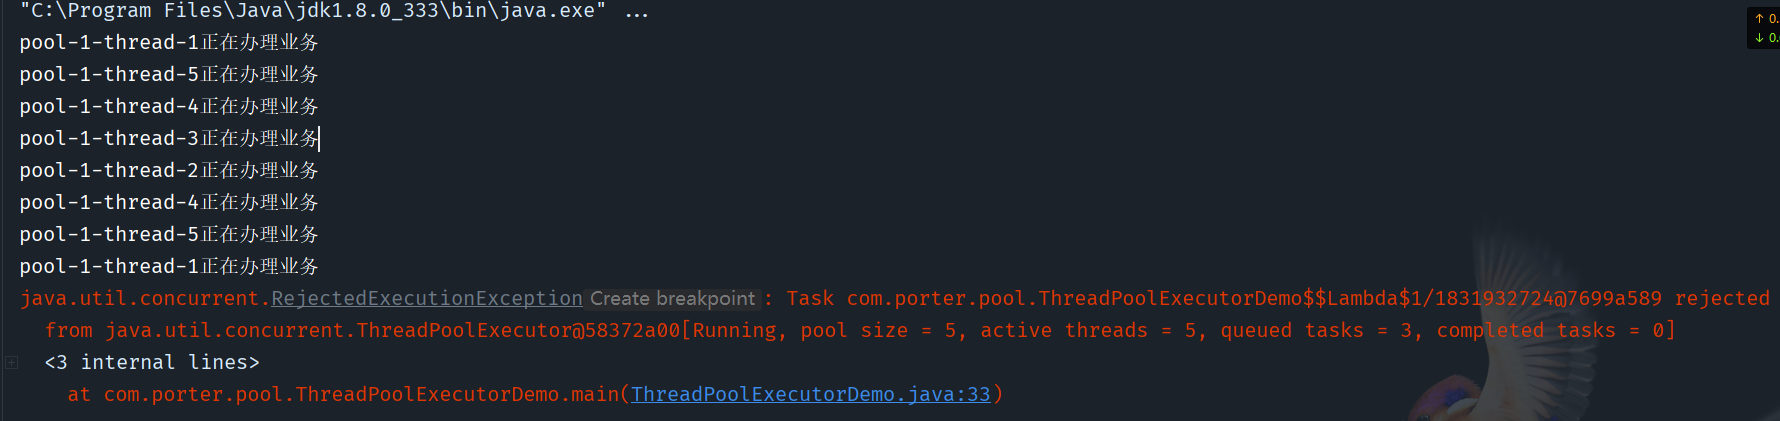
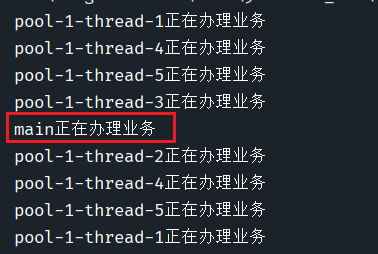
ThreadPoolExecutor.CallerRunsPolicy
这种拒绝策略不会抛出异常,超出的线程,会让他回到原来的位置,代理执行
public static void main(String[] args) {
    ThreadPoolExecutor threadPool = new ThreadPoolExecutor(
            2,
            5,
            3,
            TimeUnit.SECONDS,
            new LinkedBlockingQueue<>(3),
            Executors.defaultThreadFactory(),
            // CallerRunsPolicy超出的线程会返回,谁让这个线程进入的线程池谁去执行这个线程
            // 以银行为例,超出的人员会让他回到公司进行代办
            new ThreadPoolExecutor.CallerRunsPolicy()
    );
    try {
        // 线程池的最大承载数是队列数量+最大核心线程数
        for (int i = 1; i <= 9; i++) {
            // 通过线程池启动线程
            threadPool.execute(()->{
                System.out.println(Thread.currentThread().getName()+"正在办理业务");
            });
        }
    } catch (Exception e) {
        e.printStackTrace();
    } finally {
        threadPool.shutdown();
    }
}
结果:
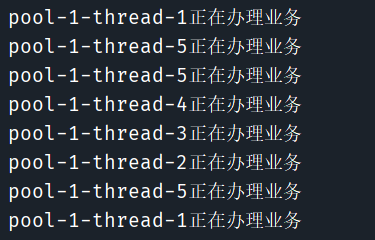
ThreadPoolExector.DiscardPolicy
当队列满了,多出的线程会被抛弃,不会抛出异常
public static void main(String[] args) {
    ThreadPoolExecutor threadPool = new ThreadPoolExecutor(
            2,
            5,
            3,
            TimeUnit.SECONDS,
            new LinkedBlockingQueue<>(3),
            Executors.defaultThreadFactory(),
            // 如果队列满了,超出的线程会被丢弃,不会抛出异常
            new ThreadPoolExecutor.DiscardPolicy()
    );
    try {
        // 线程池的最大承载数是队列数量+最大核心线程数
        for (int i = 1; i <= 9; i++) {
            // 通过线程池启动线程
            threadPool.execute(()->{
                System.out.println(Thread.currentThread().getName()+"正在办理业务");
            });
        }
    } catch (Exception e) {
        e.printStackTrace();
    } finally {
        threadPool.shutdown();
    }
}
运行结果:只有8条线程

ThreadPoolExecutor.DiscardOldestPolicy
当队列满了,多出的线程会尝试和最开始的线程去竞争,如果竞争成功则会执行,否则被抛弃,不会抛出异常
public static void main(String[] args) {
    ThreadPoolExecutor threadPool = new ThreadPoolExecutor(
            2,
            5,
            3,
            TimeUnit.SECONDS,
            new LinkedBlockingQueue<>(3),
            Executors.defaultThreadFactory(),
            // 如果队列满了,超出的线程会尝试和开始的线程竞争,
            // 如果竞争成功则执行,否则还是会被抛弃,不会抛出异常
            new ThreadPoolExecutor.DiscardOldestPolicy()
    );
    try {
        // 线程池的最大承载数是队列数量+最大核心线程数
        for (int i = 1; i <= 9; i++) {
            // 通过线程池启动线程
            threadPool.execute(()->{
                System.out.println(Thread.currentThread().getName()+"正在办理业务");
            });
        }
    } catch (Exception e) {
        e.printStackTrace();
    } finally {
        threadPool.shutdown();
    }
}
运行结果:
11.4、最大线程数如何定义(调优)
有两种方式
- CPU密集型:根据CPU来计算最大线程数
ThreadPoolExecutor threadPool = new ThreadPoolExecutor(
        2,
        Runtime.getRuntime().availableProcessors(), // 根据CPU来获取最大线程数
        3,
        TimeUnit.SECONDS,
        new LinkedBlockingQueue<>(3),
        Executors.defaultThreadFactory(),
        new ThreadPoolExecutor.DiscardOldestPolicy()
);
- IO密集型:判断系统中十分耗费IO的线程有多少 大于2倍基本就可以,假设有20个
ThreadPoolExecutor threadPool = new ThreadPoolExecutor(
        2,
        20 * 2 + 1,
        3,
        TimeUnit.SECONDS,
        new LinkedBlockingQueue<>(3),
        Executors.defaultThreadFactory(),
        new ThreadPoolExecutor.DiscardOldestPolicy()
);
具体使用哪种方式取决于服务器是看重CPU还是看重IO
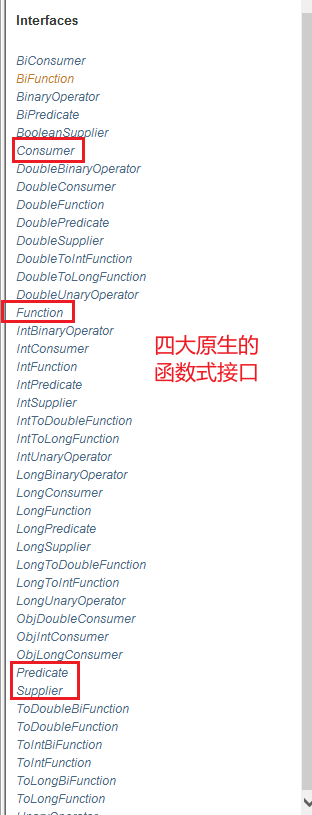
12、四大函数式接口(必须掌握)
现在作为一名合格的程序员必须要掌握lambda表达式、链式编程、函数式接口、Stream流式计算
函数式接口:有且仅有一个方法的接口
比如Runnable接口
@FunctionalInterface
public interface Runnable {
    public abstract void run();
}
在底层有非常多的@FunctionalInterface,它可以简化编程模型,在新版本的框架底层大量引用,比如foEach(消费者类型的函数式接口)
通过查看API发现有四大函数式接口Consumer,Function,Predicate,Supplier
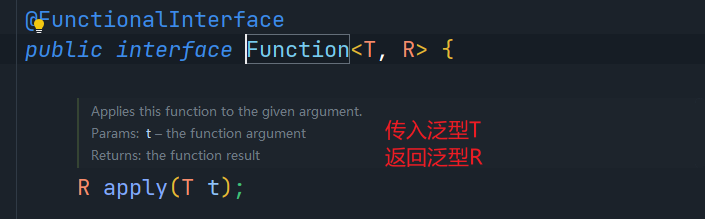
12.1、Function 函数式接口
Function函数式接口,通过查阅底层发现有泛型T,R。T是传入的参数类型,R是返回的参数类型,因为Function函数式接口,有一个输入参数,一个输出返回值,只要是函数式接口就可以使用Lambda表达式简化
代码测试
public static void main(String[] args) {
    Function<String, String> function = new Function<String,String>() {
        @Override
        public String apply(String str) {
            return str;
        }
    };
    System.out.println(function.apply("porterdong"));
}
转换为Lambda表达式后,发现节省了大量的代码
public static void main(String[] args) {
    // 具体结构 (传入的参数)->{return 返回的结果;};
    Function<String,String> function = (str)->{return str;};
    System.out.println(function.apply("porterdong"));
}
再简单一点可以把()去掉
public static void main(String[] args) {
    Function<String,String> function = str->{return str;};
    System.out.println(function.apply("porterdong"));
}
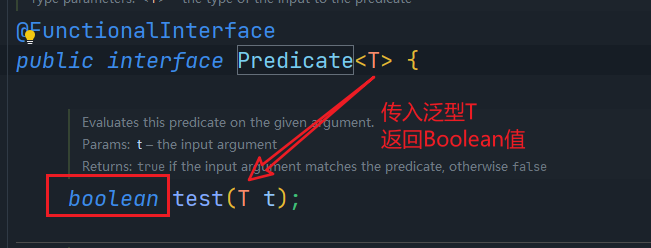
12.2、Predicate 断定式接口
Predicate断定型函数式接口,有一个输入参数,返回值只能是boolean类型
代码测试
public static void main(String[] args) {
    // 判断字符串是否为空
    Predicate<String> predicate = new Predicate<String>() {
        @Override
        public boolean test(String str) {
            return str.isEmpty();
        }
    };
    System.out.println(predicate.test("porterdong"));
}
转换为Lambda简化:
public static void main(String[] args) {
    Predicate<String> predicate = (str) -> {return str.isEmpty();};
    System.out.println(predicate.test("porterdong"));
}
12.3、Consumer 消费型接口
Consumer函数式接口,通过查阅源码,传入参数泛型T,没有返回值

代码测试
public static void main(String[] args) {
    // 字符串大写
    Consumer<String> consumer = new Consumer<String>() {
        @Override
        public void accept(String str) {
            System.out.println(str.toUpperCase());
        }
    };
    consumer.accept("porterdong");
}
改为Lambda表达式
public static void main(String[] args) {
    Consumer<String> consumer = (str) ->{System.out.println(str.toUpperCase());};
    consumer.accept("porterdong");
}
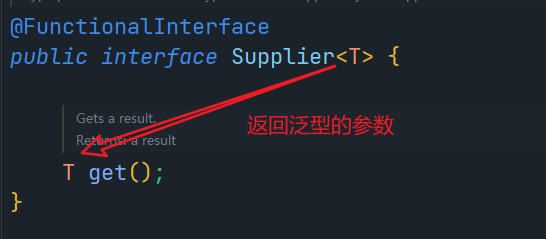
12.4、Supplier 供给型接口
Supplier函数式接口,通过查阅源码,返回泛型T,没有参数
代码测试
public static void main(String[] args) {
    Supplier<String> supplier = new Supplier<String>() {
        @Override
        public String get() {
            return "porterdong";
        }
    };
    System.out.println(supplier.get());
}
改成Lambda表达式
public static void main(String[] args) {
    Supplier<String> supplier = ()->{return "porterdong";};
    System.out.println(supplier.get());
}
13、Stream流式计算
什么是Stream流式计算
对于大数据来说本质就是数据的存储+计算,而学过的所有的集合和数据库本质都是用来存储东西的,计算都应该交给流去计算
代码测试
User实体类
// 有参、无参构造、set、get、toString
@Data
@NoArgsConstructor
@AllArgsConstructor
public class User {
    private int id;
    private String name;
    private int age;
}
Test测试类
/*
题目要求:一分钟完成此题,只能使用一行代码实现
现在有5个用户!筛选:
1、ID必须是偶数
2、年龄必须大于23岁
3、用户名转为大写字母
4、用户名字母倒着排序
5、只输出一个用户
 */
public class Test {
    public static void main(String[] args) {
        User u1 = new User(1, "a", 21);
        User u2 = new User(2, "b", 22);
        User u3 = new User(3, "c", 23);
        User u4 = new User(4, "d", 24);
        User u5 = new User(6, "e", 25);

        // 用集合来存储数据
        List<User> list = Arrays.asList(u1, u2, u3, u4, u5);

        // 计算交给Stream流
        // 这一套题整合了lambda表达式、链式编程、函数式接口、Stream流计算
        list.stream()
                .filter((user)->{return user.getId()%2 == 0;})
                .filter((user)->{return user.getAge() > 23;})
                // .peek((user)->{user.setName(user.getName().toUpperCase());}) // 返回流中的元素,并对元素做操作
                .map((user)->{return user.getName().toUpperCase();})
                .sorted((uu1,uu2)->{return uu2.compareTo(uu1);})
                .limit(1)
                .forEach(System.out::println);
    }
}
14、ForkJoin
什么是ForkJoin
ForkJoin在JDK1.7版本就出现了,主要是在大数据量的情况下并行执行任务,提高效率
比如在大数据中,需要学一个Map Reduce(把大任务拆分为若干个小任务)
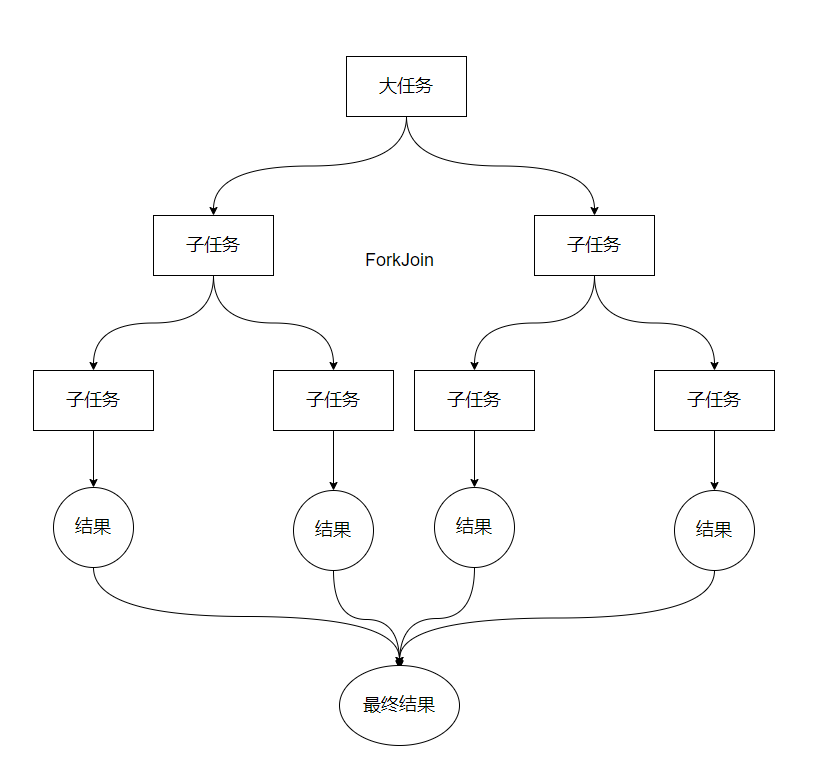
ForkJoin的特点
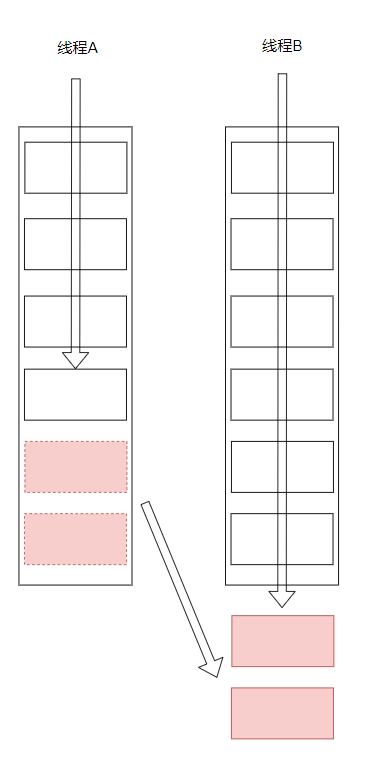
特点:工作窃取,A线程和B线程同时执行两个任务,如果B线程执行完了,A线程还没有执行完毕,B线程会将A线程任务中的一部分子任务拿过来执行。以提高工作效率,因为两个线程所执行的任务底层维护的都是双端队列
ForkJoin的操作

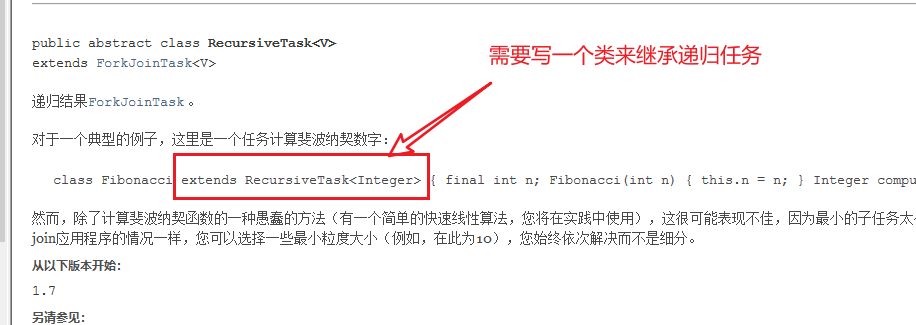
如何使用ForkJoin
- 实例化ForkJoinPool对象,通过这个对象来执行
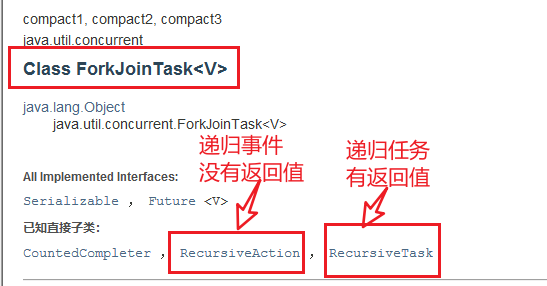
- 计算任务ForkJoinPool.execute(ForkJoinTash task)
- 计算类要继承ForkJoinTask中的RecursiveTask类
- 拆分任务,并将任务压入线程队列
- 执行子任务,获取结果
测试
ForkJoinTaskDemo
/**
 * 求和计算的任务!
 */
public class ForkJoinDemo extends RecursiveTask<Long> {
    private Long start;
    private Long end;
    // 设置临界值,可以动态调节,提高效率
    private Long temp = 100_0000L;

    public ForkJoinDemo(Long start, Long end) {
        this.start = start;
        this.end = end;
    }


    // 一个计算的方法,返回值就是泛型
    @Override
    protected Long compute() {
        if((end - start) < temp){
            Long sum = 0L;
            for (Long i = start; i <= end ; i++) {
                sum += i;
            }
            return sum;
        }else{ // ForkJoin合并运算
            // 先去计算中间值
            long middle = (start + end) / 2;
            ForkJoinDemo task1 = new ForkJoinDemo(start, middle);
            task1.fork(); // 拆分任务,将任务压入线程队列
            ForkJoinDemo task2 = new ForkJoinDemo(middle + 1, end);
            task2.fork(); // 拆分任务,将任务压入线程队列
            return task1.join() + task2.join(); // join() 返回子任务执行结果
        }
    }
}
测试类
/**
 * 初级写法 普通for循环
 * 中级写法 ForkJoin
 * 高级写法 Stream并行流
 */
public class Test {
    public static void main(String[] args) throws ExecutionException, InterruptedException {
        // 电脑配置不一致,执行结果也会不同
        // test1(); // 12224
        // test2(); //4016  可以动态调节ForkJoinTask的临界值,使效率更高
        test3(); // 214
    }

    // 普通for循环
    public static void test1(){
        long start = System.currentTimeMillis();
        long sum = 0L;
        for (long i = 1L; i <= 10_0000_0000L ; i++) {
            sum += i;
        }
        long end = System.currentTimeMillis();
        System.out.println("结果为"+sum+",执行了"+(end - start));
    }

    // 中级写法使用ForkJoin
    public static void test2() throws ExecutionException, InterruptedException {
        Long sum = 0L;
        Long start = System.currentTimeMillis();
        // 创建一个计算任务
        ForkJoinTask<Long> task = new ForkJoinDemo(0L, 10_0000_0000L);
        // 通过ForkJoinPool池子
        ForkJoinPool forkJoinPool = new ForkJoinPool();

        // 通过ForkJoinTask池子去执行计算任务
        // 通过execute异步执行
        // forkJoinPool.execute(task);
        // sum = task.get();
        // 通过submit提交任务执行
        forkJoinPool.submit(task);
        sum = task.get();

        Long end = System.currentTimeMillis();
        System.out.println("结果为"+sum+",执行了"+(end - start));
    }

    // 高级写法使用Stream流式计算
    public static void test3(){
        Long sum = 0L;
        Long start =System.currentTimeMillis();
        // 通过Stream流并行计算  获取范围                  获取并行流   获取结果
        sum = LongStream.rangeClosed(0L, 10_0000_0000L).parallel().reduce(0, Long::sum);
        Long end = System.currentTimeMillis();
        System.out.println("结果为"+sum+",执行了"+(end - start));
    }
}
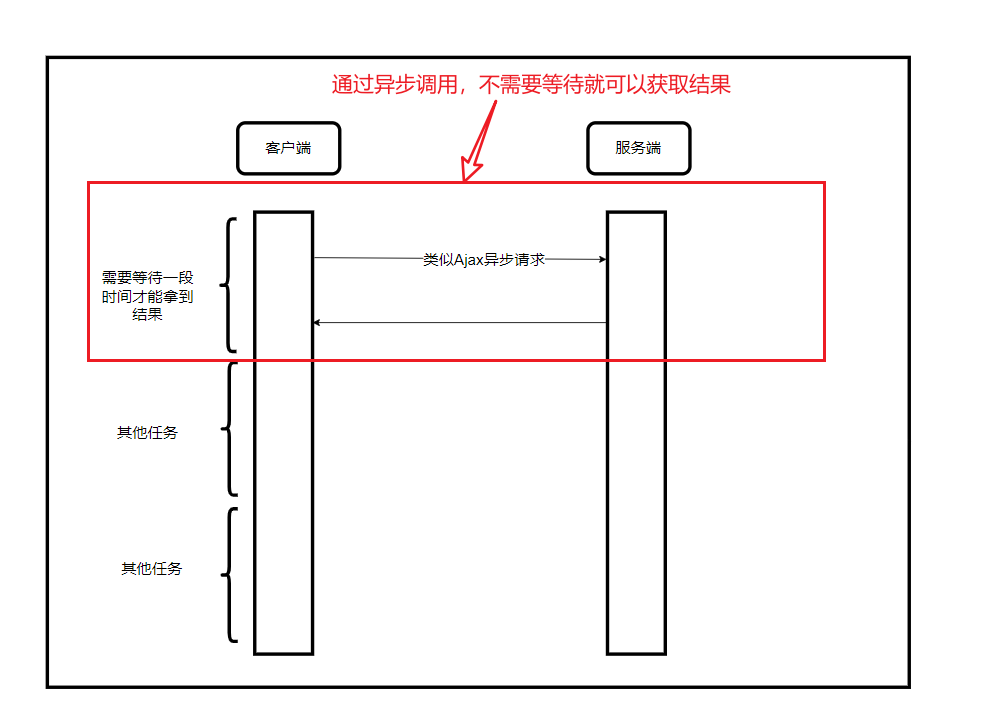
15、异步回调
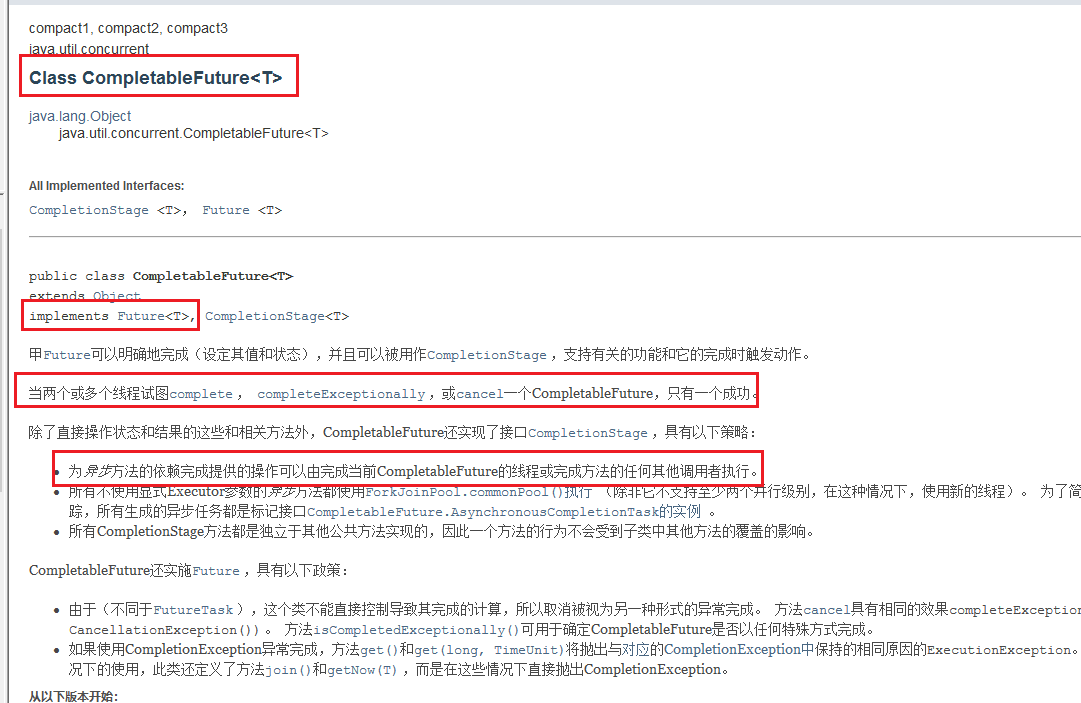
Future 设计的初衷:对将来的某个事件的结果进行建模
但是常用的异步回调使用的式Future的实现类CompletableFuture
查阅官方API
测试
// 没有返回值的Async异步回调
public static void test1() throws ExecutionException, InterruptedException {
    // Future接口的实现类CompletableFuture来执行异步回调
    CompletableFuture<Void> future = CompletableFuture.runAsync(()->{
        // 延迟2秒模式任务执行
        try {
            TimeUnit.SECONDS.sleep(2);
        } catch (InterruptedException e) {
            e.printStackTrace();
        }
        System.out.println(Thread.currentThread().getName()+"runAsync->Void");
    });

    System.out.println("正常执行");
    future.get(); // 获取阻塞的执行结果
}
因为异步回调和ajax一样,有成功也有失败
// 有返回值的Async异步回调
public static void test2() throws ExecutionException, InterruptedException {
    // Future接口的CompletableFuture实现异步回调
    CompletableFuture<Integer> future = CompletableFuture.supplyAsync(() -> {
        try {
            TimeUnit.SECONDS.sleep(2);
        } catch (InterruptedException e) {
            e.printStackTrace();
        }
        System.out.println(Thread.currentThread().getName()+"supplyAsync->String");
        // int i = 10 / 0;
        return 1024;
    });
    System.out.println("正常执行");
    System.out.println(future.whenComplete((t,v)->{
        System.out.println("t->"+t); // 正常的执行结果
        System.out.println("v->"+v); // 错误的执行结果 异常信息
    }).exceptionally((e)->{
        System.out.println(e.getMessage());
        return 404; // 如果异步请求执行失败,返回的结果
    }).get());
}
如果执行成功,直接返回supplyAsync的结果,如果异步回调产生异常,返回exceptionally的结果
16、JMM
谈谈你对Volatile的理解
Volatile是Java虚拟机提供的轻量级的同步机制
- 保证可见性
不保证原子性- 禁止指令重排
什么是JMM
JMM:Java内存模型,不存在的东西,概念!约定!
关于JMM的一些同步的约定:
- 线程解锁前,必须把共享变量立刻刷回内存
- 线程加锁前,必须读取主存中的最新值到工作内存中!
- 加锁和解锁是同一把锁
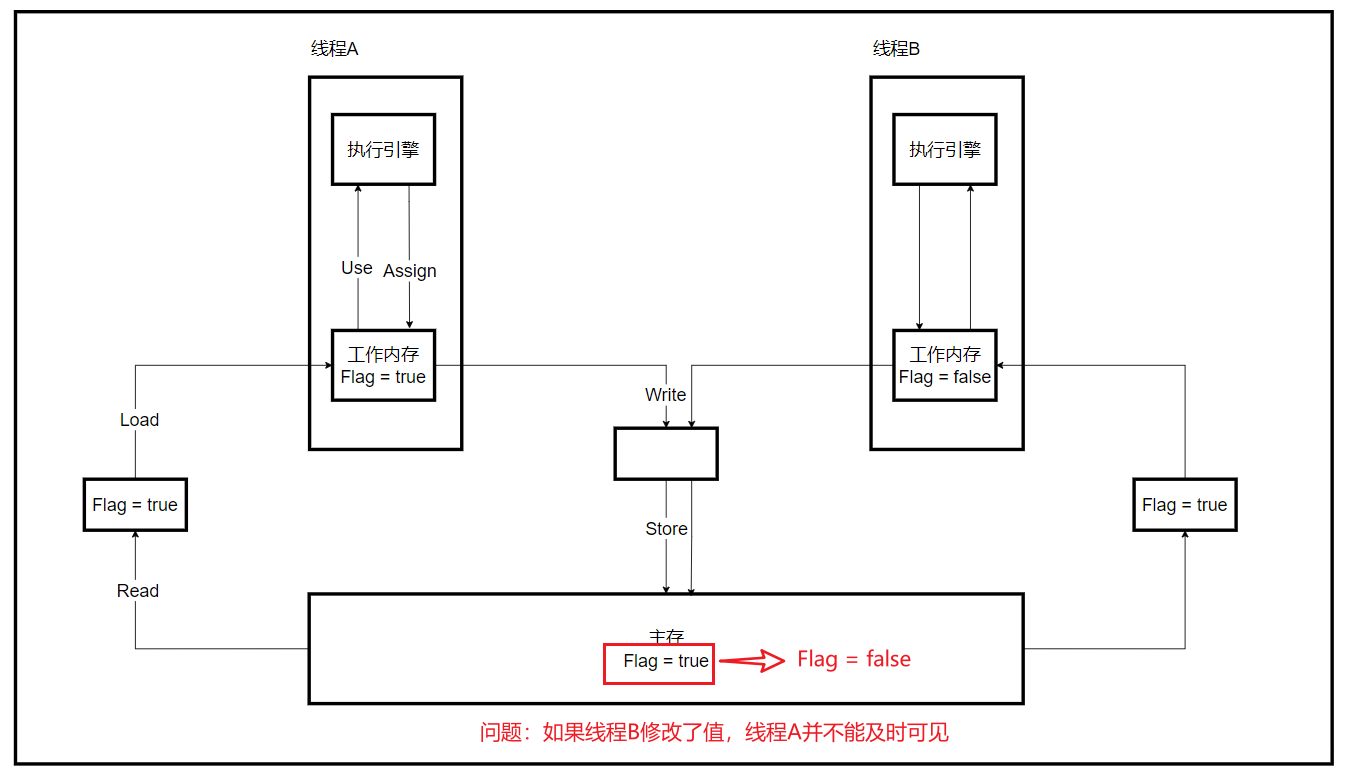
线程 工作内存、主内存
线程在操作的时候有8种操作
内存交互操作有8种,虚拟机实现必须保证每一个操作都是原子的,不可在分的(对于double和long类型的变量来说,load、store、read和write操作在某些平台上允许例外)
- lock(锁定):作用于主内存的变量,把一个变量标识为线程独占状态
- unlock(解锁):作用于主内存的变量,它把一个处于锁定状态的变量释放出来,释放后的变量才可以被其他线程锁定
- read(读取):作用于主内存变量,它把一个变量的值从主内存传输到线程的工作内存中,以便随后的load动作使用
- load(载入):作用于工作内存的变量,它把read操作从主存中变量放入工作内存中
- use(使用):作用于工作内存中的变量,它把工作内存中的变量传输给执行引擎,每当虚拟机遇到一个需要使用到变量的值,就会使用到这个指令
- assign(赋值):作用于工作内存中的变量,它把一个从执行引擎中接受到的值放入工作内存的变量副本中
- store(存储):作用于主内存中的变量,它把一个从工作内存中一个变量的值传送到主内存中,以便后续的write使用
- write(写入):作用于主内存中的变量,它把store操作从工作内存中得到的变量的值放入主内存的变量中
JMM对这八种指令的使用,制定了如下规则:
- 不允许read和load、store和write操作之一单独出现。即使用了read必须load,使用了store必须write
- 不允许线程丢弃他最近的assign操作,即工作变量的数据改变了之后,必须告知主存
- 不允许一个线程将没有assign的数据从工作内存同步回主内存
- 一个新的变量必须在主内存中诞生,不允许工作内存直接使用一个未被初始化的变量。就是怼变量实施use、store操作之前,必须经过assign和load操作
- 一个变量同一时间只有一个线程能对其进行lock。多次lock后,必须执行相同次数的unlock才能解锁
- 如果对一个变量进行lock操作,会清空所有工作内存中此变量的值,在执行引擎使用这个变量前,必须重新load或assign操作初始化变量的值
- 如果一个变量没有被lock,就不能对其进行unlock操作。也不能unlock一个被其他线程锁住的变量
- 对一个变量进行unlock操作之前,必须把此变量同步回主内存
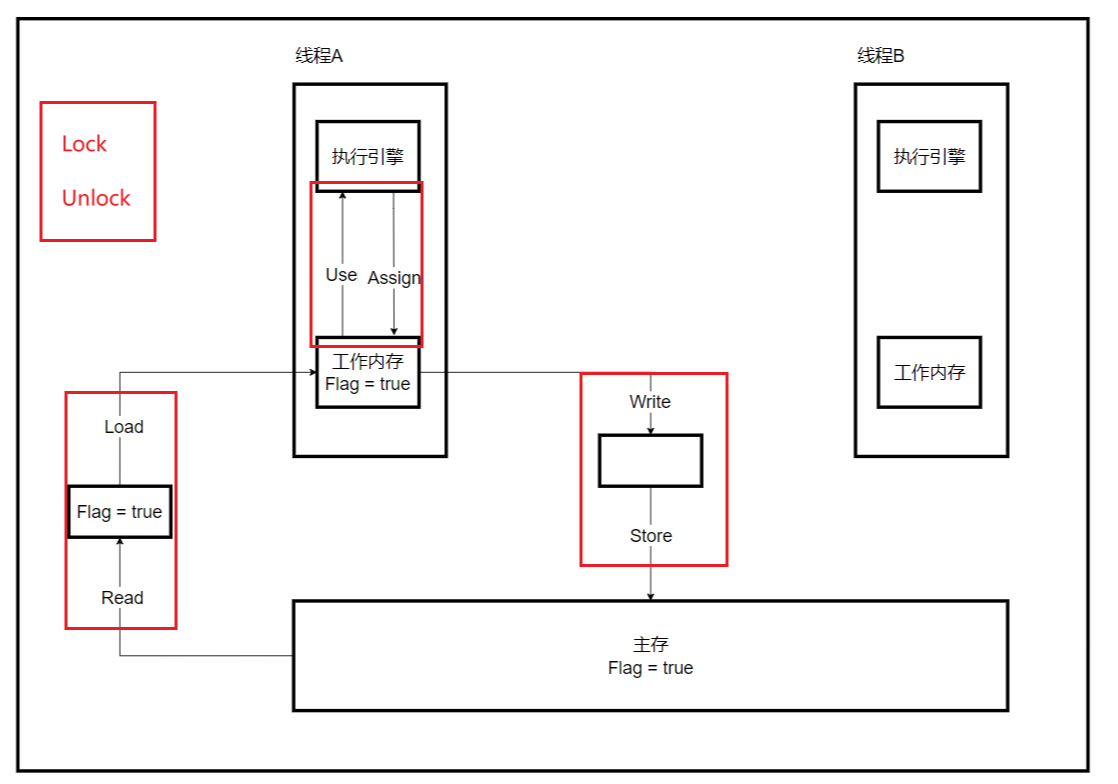
上图对于一个线程操作没有问题,但是如果两个线程同时对flag进行操作,就会引发一个问题
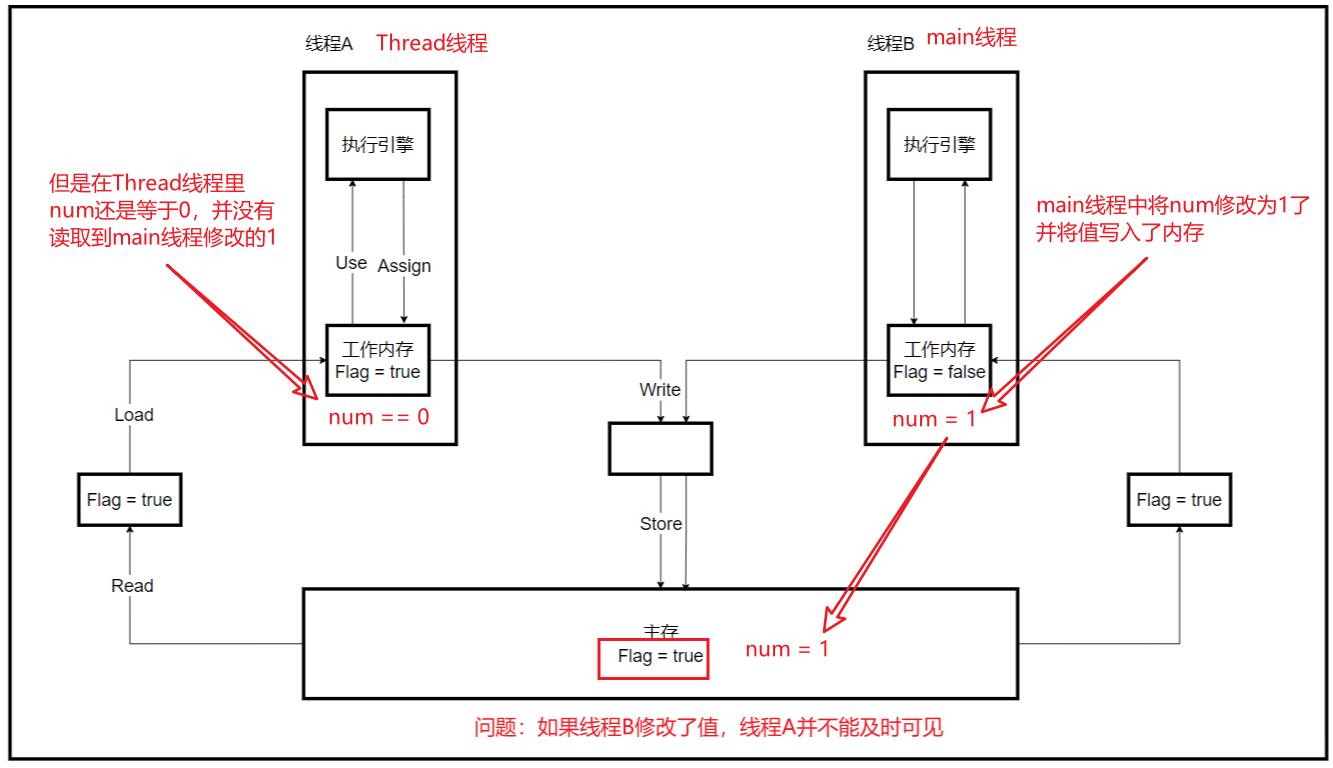
测试一下Volatile关键字
private static int num = 0;
public static void main(String[] args) {

    new Thread(()->{
        while(num == 0){

        }
    }).start();

    try {
        TimeUnit.SECONDS.sleep(1);
    } catch (InterruptedException e) {
        e.printStackTrace();
    }

    num = 1;
    System.out.println(num);
}
按照这个代码的逻辑,当Thread线程启动之后会一直循环,一秒之后,num变为1了,Thread线程应该会停止执行,但是结果并不对

上述结果大概是这样一个逻辑
17、Volatile关键字
17.1、保证可见性
对存储在内存中的变量使用volatile关键字修饰
// 将原来的变量使用volatile关键字修饰
// 这样的话,就可以保证内存中num在任何地方都可见了
private volatile static int num = 0;
public static void main(String[] args) {

    new Thread(()->{ // 原来并不知道main线程将值修改了
        while(num == 0){

        }
    }).start();

    try {
        TimeUnit.SECONDS.sleep(1);
    } catch (InterruptedException e) {
        e.printStackTrace();
    }

    num = 1;
    System.out.println(num);
}
结果,发现Thread线程监视到num值发生变化了,也就是能够读取到内存中的值发生变化了,然后引用过来

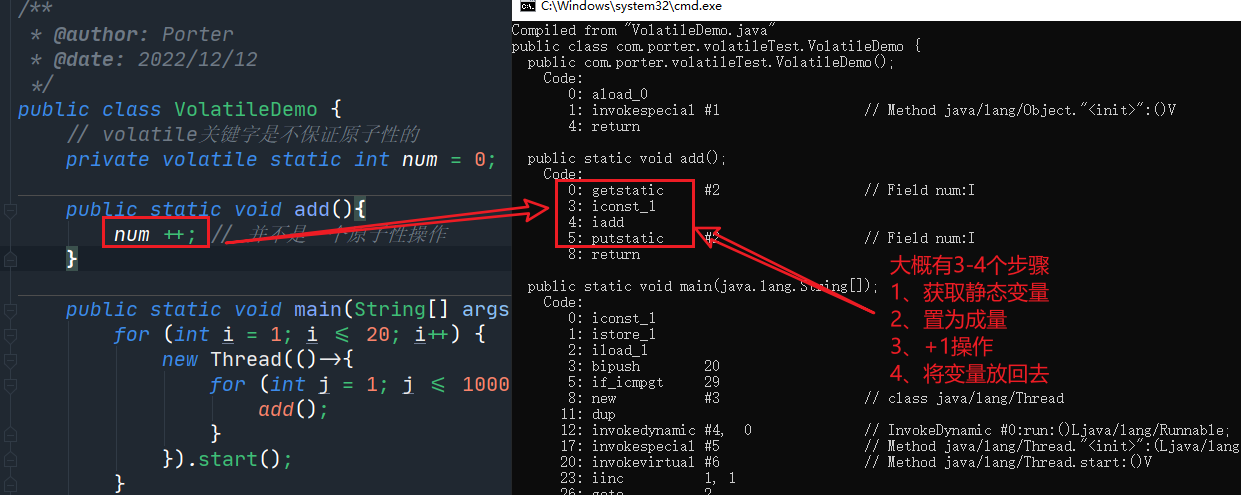
17.2、不保证原子性
如果学过数据库事务的话,应该能够知道,ACID中的原子性,事务中的命令要么全部执行成功,要么全部执行失败。
// volatile关键字是不保证原子性的
private volatile static int num = 0;

public static void add(){
    num ++; // 并不是一个原子性操作
}

public static void main(String[] args) {
    for (int i = 1; i <= 20; i++) {
        new Thread(()->{
            for (int j = 1; j <= 1000 ; j++) {
                add();
            }
        }).start();
    }

    // 判断所有线程是否执行完毕
    while(Thread.activeCount() > 2){ // java程序启动之后会有两个线程,一个main,一个gc
        Thread.yield();
    }

    // 理论上num的最终结果是20000
    // 最终结果并不是20000
    System.out.println(Thread.currentThread().getName() + " " + num);
}
思考:如果不加Lock或Synchronized关键字,如何保证原子性?
通过javap反编译可以看到,一个num++有3-4个步骤
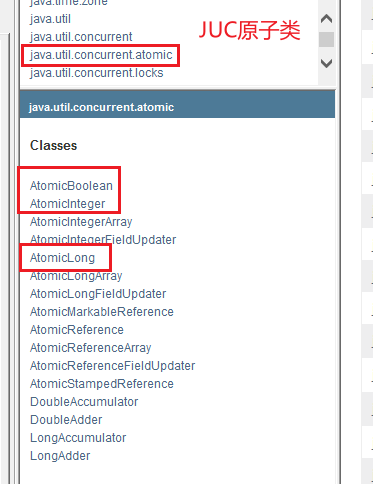
可以通过使用JUC的原子类来解决此问题,通过查阅官方API可以看到在JUC中有一个atomic原子类,可以使用这个atomic原子类来解决原子性问题
// volatile关键字是不保证原子性的
// private volatile static int num = 0;
// 将int类型的转换为AtomicInteger类
private volatile static AtomicInteger num = new AtomicInteger();

public static void add(){
    // num ++; // 并不是一个原子性操作
    num.getAndIncrement(); // AtomicInteger的+1方法  底层调用CAS
}

public static void main(String[] args) {
    for (int i = 1; i <= 20; i++) {
        new Thread(()->{
            for (int j = 1; j <= 1000 ; j++) {
                add();
            }
        }).start();
    }

    // 判断所有线程是否执行完毕
    while(Thread.activeCount() > 2){ // java程序启动之后会有两个线程,一个main,一个gc
        Thread.yield();
    }

    // 理论上num的最终结果是20000
    // 最终结果并不是20000
    System.out.println(Thread.currentThread().getName() + " " + num);
}
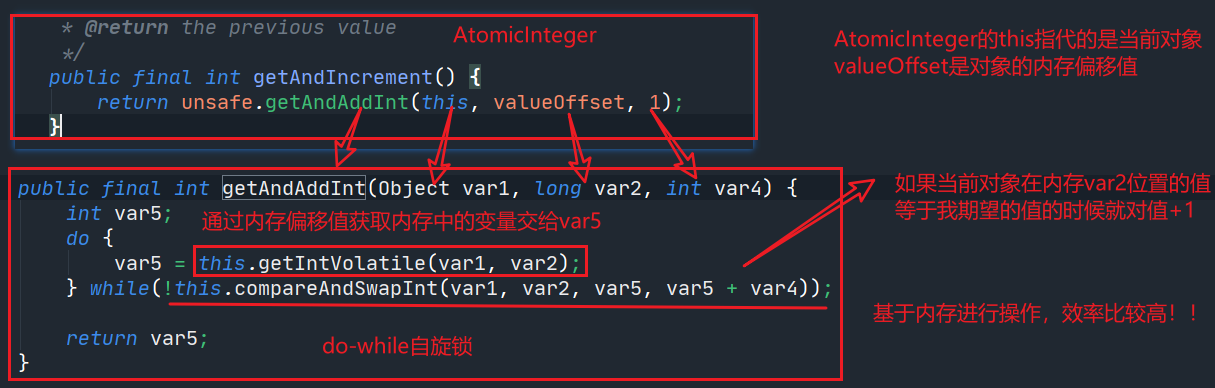
原子类的底层和操作系统挂钩,直接修改内存中的值,通过源码可以看到,底层调用了Unsafe类,这个类是一个很特殊的存在
17.3、禁止指令重排
什么是指令重排
对于程序员缩写的程序,并不是按照写的那样去执行需要经历以下几个过程
源代码-->编译器优化的重拍-->指令并行也可能会重排-->内存系统也会重排-->执行
指令重排可能会对程序运行有影响,也可能没有影响。
没有影响:
int x = 1; // 1
int y = 2; // 2
x = x + 5; // 3
y = x * x; // 4
我们所期望的执行顺序是1->2->3->4,但是可能执行的是2->1->3->4或者1->3->2->4,但是不可能是4->1->2->3
处理器在进行指令重排的时候,需要考虑数据之间的依赖性
可能有影响
a b x y这四个值默认结果都是0
| 线程A | 线程B |
|---|---|
| x = a | y = b |
| b = 1 | a = 2 |
正常的结果是 x = 0; y = 0; b = 1; a = 2;但是可能由于指令重排变成以下顺序
| 线程A | 线程B |
|---|---|
| b = 1 | a = 2 |
| x = a | y = b |
因为指令重排造成的诡异结果:a = 2; y = 1; a = 2; b = 1;
volatile关键字可以避免指令重排
在系统中存在内存屏障,可以看作指令集,作用
- 保证特定操作的执行顺序!
- 可以保证某些内存变量的可见性(利用这些特性,volatile关键字就可以实现可见性)
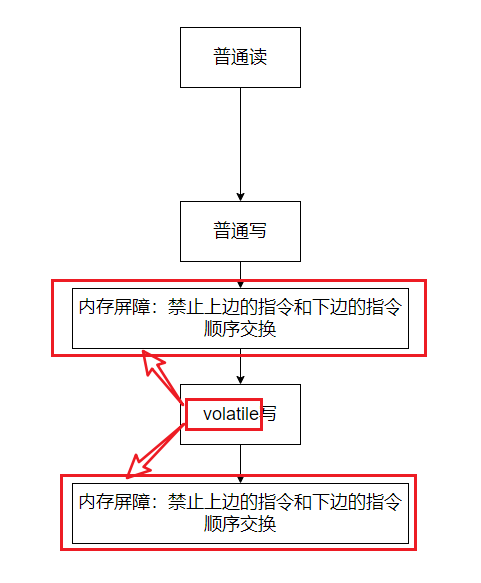
volatile使用场景,在单例模式的DCL懒汉式中使用了
18、CAS
什么是CAS
CAS是CPU的并发原语。比较当前工作内存中的值和主内存中的值,如果这个值是期望的,那么执行操作,否则就一直循环(底层是自旋锁)
使用Java实现简单的CAS
// CAS compareAndSet 比较并交换
public static void main(String[] args) {
    AtomicInteger atomicInteger = new AtomicInteger(2022);
    // expect 期望值  update 修改值
    // public final boolean compareAndSet(int expect, int update)
    // 如果达到了我期望的那个值,就进行更新,否则就不更新
    System.out.println(atomicInteger.compareAndSet(2022, 2023));
    System.out.println(atomicInteger.get());
    System.out.println(atomicInteger.compareAndSet(2022, 2024));
    System.out.println(atomicInteger.get());
}
Unsafe类
对于17.2章节,volatile关键字不保证原子性,测试方法调用了getAndIncrement方法,而方法底层调用了Unsafe类
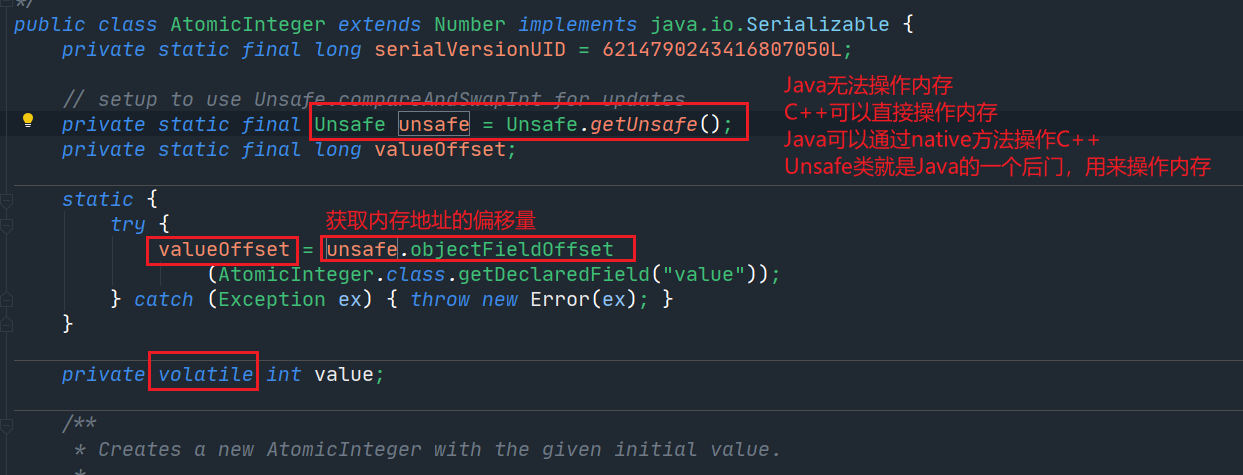
对于getAndIncrement方法底层是这样的
CAS缺点:
- 循环会耗时
- 一次性只能保证一个共享变量的原子性
- ABA问题
18.1、ABA问题
CAS:ABA问题(狸猫换太子)
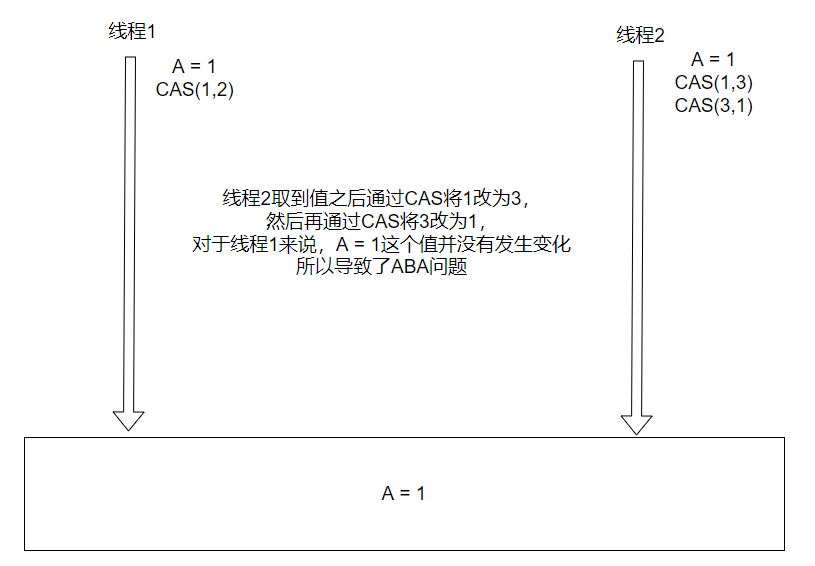
public static void main(String[] args) {
    AtomicInteger integer = new AtomicInteger(2022);
    // 对于我们所写的SQL实现方式就是乐观锁

    // 捣乱的线程
    // 有一个线程将值2022修改为了2023,然后将2023修改回了2022
    System.out.println(integer.compareAndSet(2022, 2023));
    System.out.println(integer.get());
    System.out.println(integer.compareAndSet(2023, 2022));
    System.out.println(integer.get());
    // 捣乱的线程

    // 期望的线程 对于期望的线程,发现原来的值并没有发生变化
    System.out.println(integer.compareAndSet(2022, 6666));
    System.out.println(integer.get());
}
19、原子引用
如何解决ABA问题,引入原子引用,对应的思想:乐观锁
使用带版本号的原子操作!即乐观锁
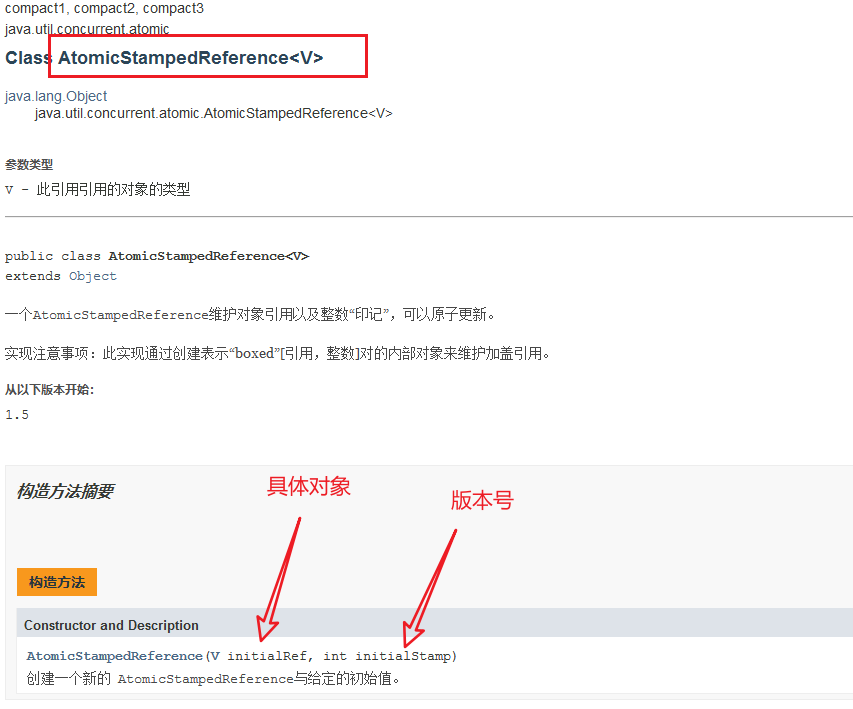
public static void main(String[] args) {
    // AtomicStampedReference 如果泛型是包装类,注意对象的引用问题
    // 正常在业务操作中,泛型引用的是一个对象
    AtomicStampedReference<Integer> reference = new AtomicStampedReference<>(1, 1);

    // 捣乱的线程
    new Thread(()->{
        System.out.println("a1->" + reference.getStamp()); // 获取版本号

        try {
            TimeUnit.SECONDS.sleep(1);
        } catch (InterruptedException e) {
            e.printStackTrace();
        }
        System.out.println(reference.compareAndSet(1, 2, reference.getStamp(), reference.getStamp() + 1));
        System.out.println("a2->" + reference.getStamp()); // 获取版本号

        System.out.println(reference.compareAndSet(2, 1, reference.getStamp(), reference.getStamp() + 1));
        System.out.println("a3->" + reference.getStamp()); // 获取版本号

    },"A").start();

    // 和乐观锁的原理相同
    // 期望的线程
    new Thread(()->{
        int stamp = reference.getStamp();
        System.out.println("B1->" + stamp); // 获取版本号
        try {
            TimeUnit.SECONDS.sleep(2);
        } catch (InterruptedException e) {
            e.printStackTrace();
        }

        // 发现版本号已经发生了变化,就证明期望的值已经并不是原来所期望的值了
        // 所以修改失败
        System.out.println(reference.compareAndSet(1, 6, stamp, stamp + 1));
        System.out.println("B1->" + reference.getStamp());

    },"B").start();
}
注意:
Integer使用了对象缓存机制,默认范围是-128~127,推荐使用静态工厂方法valueOf获取对象实例,而不是new,因为valueOf使用缓存,而new一定会创建新的对象分配新的内存空间
通过查询阿里巴巴开发手册,可以看到

20、各种锁的理解
20.1、公平锁、非公平锁
公平锁:非常公平,在队列中的数据不允许插队,必须先来后到
非公平锁:非常不公平,在队列中的数据可以插队(默认都是非公平锁)
public ReentrantLock() {
    sync = new NonfairSync();
}

public ReentrantLock(boolean fair) {
    sync = fair ? new FairSync() : new NonfairSync();
}
20.2、可重入锁(递归锁)
synchronized锁
public class SynchronizedDemo {
    public static void main(String[] args) {
        Phone phone = new Phone();
        new Thread(()->{
            phone.sms();
        },"A").start();

        new Thread(()->{
            phone.sms();
        },"B").start();
    }
}

class Phone{
    public synchronized void sms(){
        System.out.println(Thread.currentThread().getName() + "sms");
        call();
    }

    public synchronized void call(){
        System.out.println(Thread.currentThread().getName() + "call");
    }
}
lock锁
对于lock锁必须要配对使用,否则会造成死锁的现象
public class LockDemo {
public static void main(String[] args) {
Phone2 phone = new Phone2();
new Thread(()->{
phone.sms();
},"A").start();
new Thread(()->{
phone.sms();
},"B").start();
}
}
class Phone2{
Lock lock = new ReentrantLock();
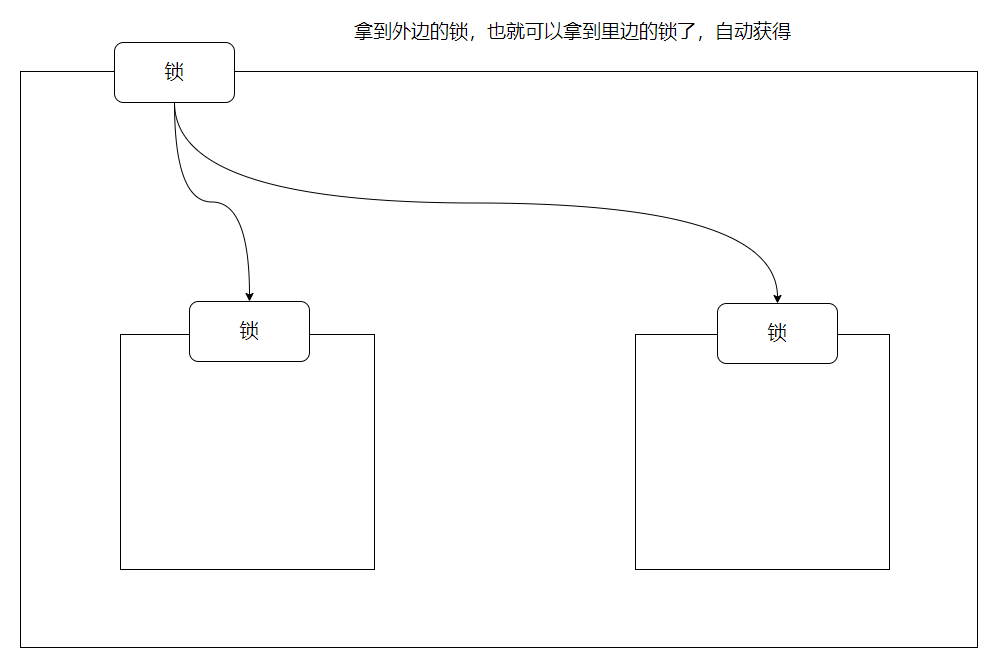
public void sms(){
lock.lock(); // 细节问题 lock.lock();lock.unlock(); lock锁必须配对,否则就会造成死锁,锁在里边
lock.lock();
try {
System.out.println(Thread.currentThread().getName()+"sms");
call(); // 这里边是另外一把锁
} catch (Exception e) {
e.printStackTrace();
} finally {
lock.unlock();
lock.unlock();
}
}
public void call(){
lock.lock();
try {
System.out.println(Thread.currentThread().getName()+"call");
} catch (Exception e) {
e.printStackTrace();
} finally {
lock.unlock();
}
}
}
20.3、自旋锁
spinLock
Unsafe类中的自旋锁

下边自定义自旋锁进行测试
public class SpinLockDemo {

    AtomicReference<Thread> reference = new AtomicReference<>();
    // 加锁
    public void myLock(){
        Thread thread = Thread.currentThread();
        System.out.println(Thread.currentThread().getName()+"-->myLock");
        // 自旋锁  如果期望的值是null,则将其进行加锁
        while(!reference.compareAndSet(null,thread)){}
    }

    // 解锁
    public void myUnLock(){
        Thread thread = Thread.currentThread();
        System.out.println(Thread.currentThread().getName()+"-->myUnLock");
        // 如果期望的值是Thread,则将其设置为null 解锁
        reference.compareAndSet(thread,null);
    }
}

class Test{
    public static void main(String[] args) throws InterruptedException {
        // 对于Lock来说
        // ReentrantLock lock = new ReentrantLock();
        // lock.lock();
        // lock.unlock();

        // 底层使用自旋锁CAS
        SpinLockDemo demo = new SpinLockDemo();
        new Thread(()->{
            demo.myLock();
            try {
                TimeUnit.SECONDS.sleep(3);
            } catch (Exception e) {
                e.printStackTrace();
            } finally {
                demo.myUnLock();
            }
        },"T1").start();
        TimeUnit.SECONDS.sleep(1);
        new Thread(()->{
            demo.myLock();
            try {
                TimeUnit.SECONDS.sleep(1);
            } catch (Exception e) {
                e.printStackTrace();
            } finally {
                demo.myUnLock();
            }
        },"T2").start();
    }
}
20.4、死锁
死锁是什么
死锁产生的四个条件
- 互斥条件:指进程对所分配到的资源进行排它性使用,即在一段时间内某资源只由一个进程占用。如果此时还有其它进程请求资源,则请求者只能等待,直至占有资源的进程用毕释放。
- 请求与保持条件:进程已经保持了至少一个资源,但又提出了新的资源请求,而该资源 已被其他进程占有,此时请求进程被阻塞,但对自己已获得的资源保持不放。
- 不可剥夺条件:进程所获得的资源在未使用完毕之前,不能被其他进程强行夺走,即只能 由获得该资源的进程自己来释放(只能是主动释放)。
- 循环等待条件:指在发生死锁时,必然存在一个进程——资源的环形链,即进程集合{P0,P1,P2,···,Pn}中的P0正在等待一个P1占用的资源;P1正在等待P2占用的资源,……,Pn正在等待已被P0占用的资源。
这四个条件是死锁的必要条件,只要系统发生死锁,这些条件必然成立,而只要上述条件之一不满足,就不会发生死锁。
死锁测试,如何排除死锁
public class DeadLockDemo {
    public static void main(String[] args) {
        String lockA = "lockA";
        String lockB = "lockB";

        new Thread(new MyThread(lockA,lockB),"T1").start();
        new Thread(new MyThread(lockB,lockA),"T2").start();
    }
}

class MyThread implements Runnable{

    private String lockA;
    private String lockB;

    public MyThread(String lockA, String lockB) {
        this.lockA = lockA;
        this.lockB = lockB;
    }

    @Override
    public void run() {
        synchronized (lockA){
            System.out.println(Thread.currentThread().getName()+"lock:" + lockA + "->get" + lockB);
            try {
                TimeUnit.SECONDS.sleep(5);
            } catch (InterruptedException e) {
                e.printStackTrace();
            }
            synchronized (lockB){
                System.out.println(Thread.currentThread().getName()+"lock:" + lockB + "->get" + lockA);
            }
        }
    }
}
解决问题
1、使用jps -l定位进程号
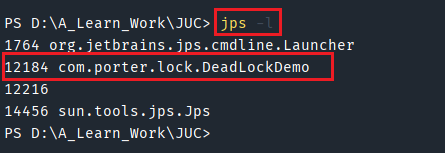
2、使用jstack 进程号码定位死锁问题
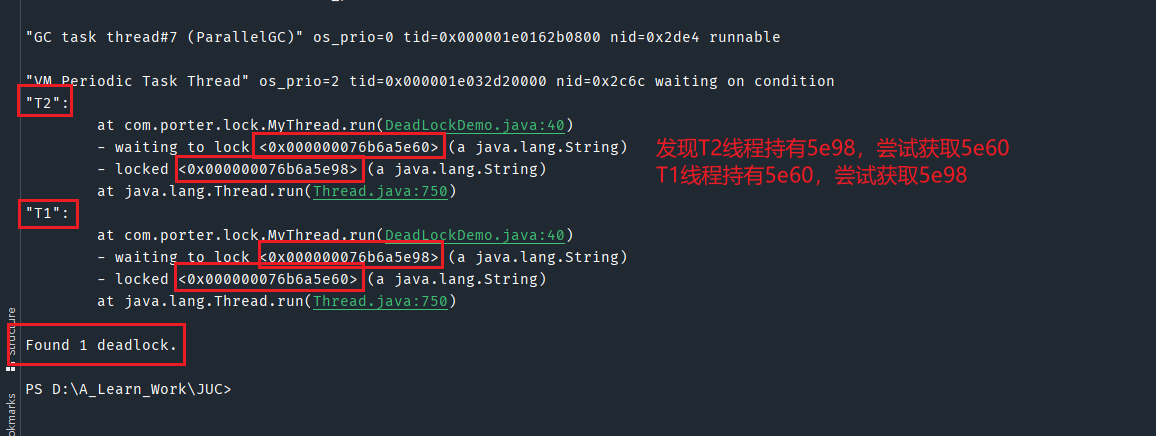
面试,工作中!排查问题
1、可以查看日志
2、查看堆栈信息jstack 进程号

 浙公网安备 33010602011771号