
qemu-system-aarch64启动Linux内核
从源码编译Linux kernel, 制作 rootfs, 使用 qemu-system-aarch64 启动, 并安装 pci 设备
名字大于七个字的都是厕纸
概要
因为要开发 qemu 设备和设备驱动, 所以需要一个调试环境来运行驱动和 debug, 网络上有很多教程讲解如何使用 qemu 启动Linux Kernel, 但使用 vexpress 开发板启动之后并不能外挂 pci 设备。本文成功启动了一个从源码编译的 Linux Kernel , 并可以在该 kernel 中使用 lspci 命令看到外挂的设备。
本文并不涉及对调试工具 gdb 的使用
~ # lspci
00:01.0 Class 0200: 1af4:1000
00:00.0 Class 0600: 1b36:0008
00:02.0 Class 00ff: 1234:11e8
~ # QEMU 6.2.0 monitor - type 'help' for more information
(qemu)
本文中使用的各个文件的相对位置如下:
gdb_test\
        linux-stable\       # 存放 Linux 源码
            arch\arm64\boot\Image
        busybox-1.37.0\     # 存放 busybox 源码
            _install\
        rootfs_tmp\         # 暂时存放 busybox 中的编译结果, 构建 root 根文件系统的中间件
        rootfs_tmp.ext3     # 打包的 root 根文件系统
        tmpfs\              # root 根文件系统的挂载点
开发环境配置
本节不是重点, 不重要
需要安装 Linux kernel 源码编译工具, busy box 源码编译工具, qemu 源码编译工具
最好安装一份 qemu 用来进行验证
Linux 源码编译, 编译源码出问题一般是没有安装某个依赖, 报错信息问一下 gpt 即可
sudo apt-get install ncurses-devel libncurses-devel flex bison bc
交叉工具链
交叉工具链的选择可以参考从源码编译 qemu 时的输出
yukikaze@yukikaze-743:~/code/gdb_test/qemu_simudevice/build$ ../configure --target-list=aarch64-softmmu,riscv64-softmmu,x86_64-softmmu

...
  Cross compilers
    aarch64                                      : aarch64-linux-gnu-gcc
    x86_64                                       : cc
可以看到 qemu 对arm 64 虚拟机支持的交叉工具链是 aarch64-linux-gnu-gcc, 在 Ubuntu 中可以使用下述的命令安装
sudo apt install gcc-aarch64-linux-gnu
编译 Linux
本人在编译 Linux 的时候并不喜欢去修改环境变量, 因此命令行可能会有些繁琐;编译的重点在于编译参数的配置,每个make中都要添加 ARCH 和 CROSS_COMPILE
-
生成配置文件
在Linux 源码的
linux-stable/arch/arm64/configs/路径下存放有基础的配置文件, 我们利用 defconfig 生成默认配置, 再在 menuconfig 中进行修改cd linux-stable/ make distclean make ARCH=arm64 CROSS_COMPILE=aarch64-linux-gnu- defconfig make ARCH=arm64 CROSS_COMPILE=aarch64-linux-gnu- menuconfig在 menuconfig 的修改目标是, 将 ath11k 的 pci 模块编译选项改成 y。刚进入时该模块的编译选项是 m :
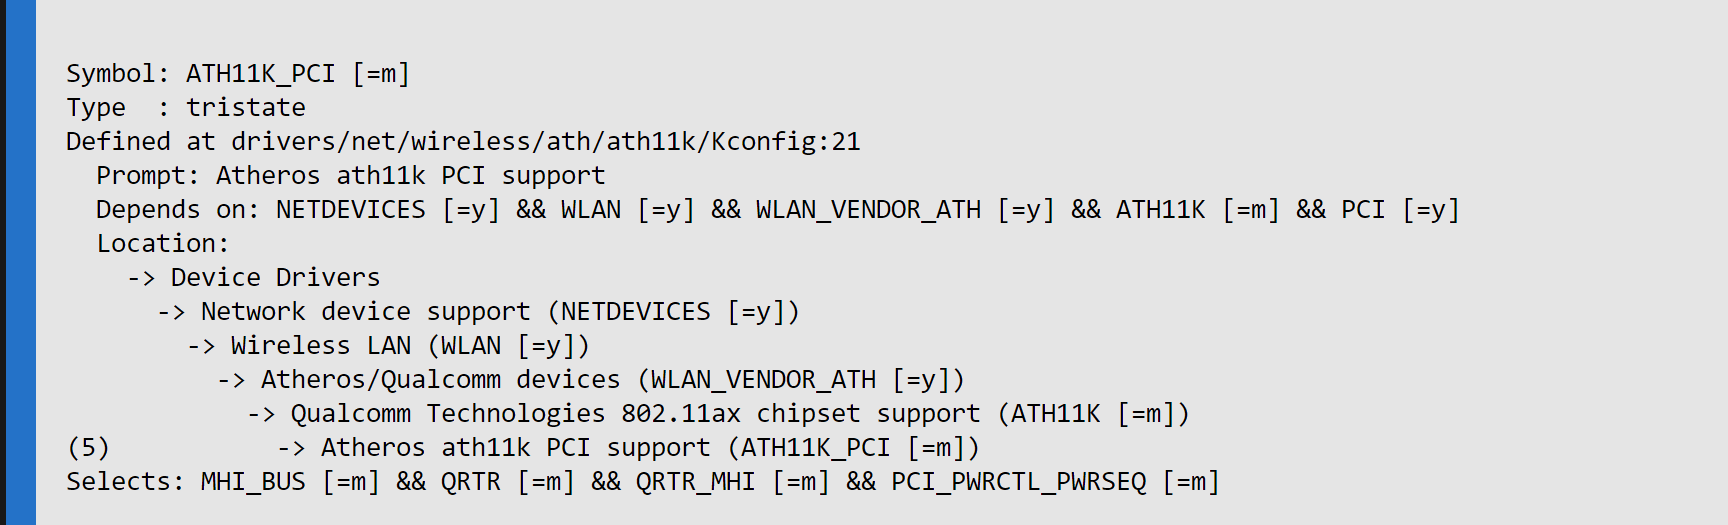
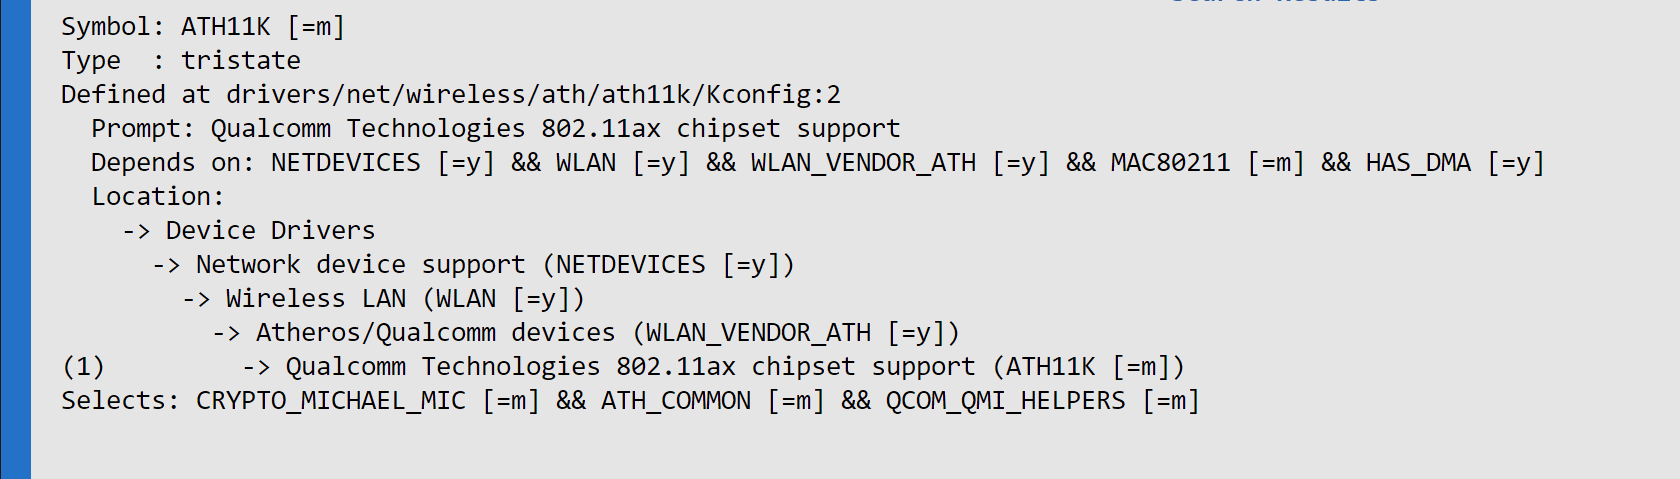
参考上述两图, 可以看到 ath11k 依赖的 mac80211 为 m, 这导致 ath11k 和其子模块 ath11k_pci 无法修改为 y

查找 mac80211 模块的位置, 如上图所示, 可以看到位置为
Location:                                                                                                                                                         │
│     -> Networking support (NET [=y])                                                                                                                                │
│       -> Wireless (WIRELESS [=y])                                                                                                                                   │
│         -> cfg80211 - wireless configuration API (CFG80211 [=m])                                                                                                    │
│ (1)       -> Generic IEEE 802.11 Networking Stack (mac80211) (MAC80211 [=m])
按照上述的方法去查找,一直将 ath11k_pci 模块配置为 y 我这里一共是修改了以下几处:
-
rf_kill 这个是 cfg80211 的依赖
-
cfg80211
-
mac80211
-
ath11k
-
ath11k_pci
-
-
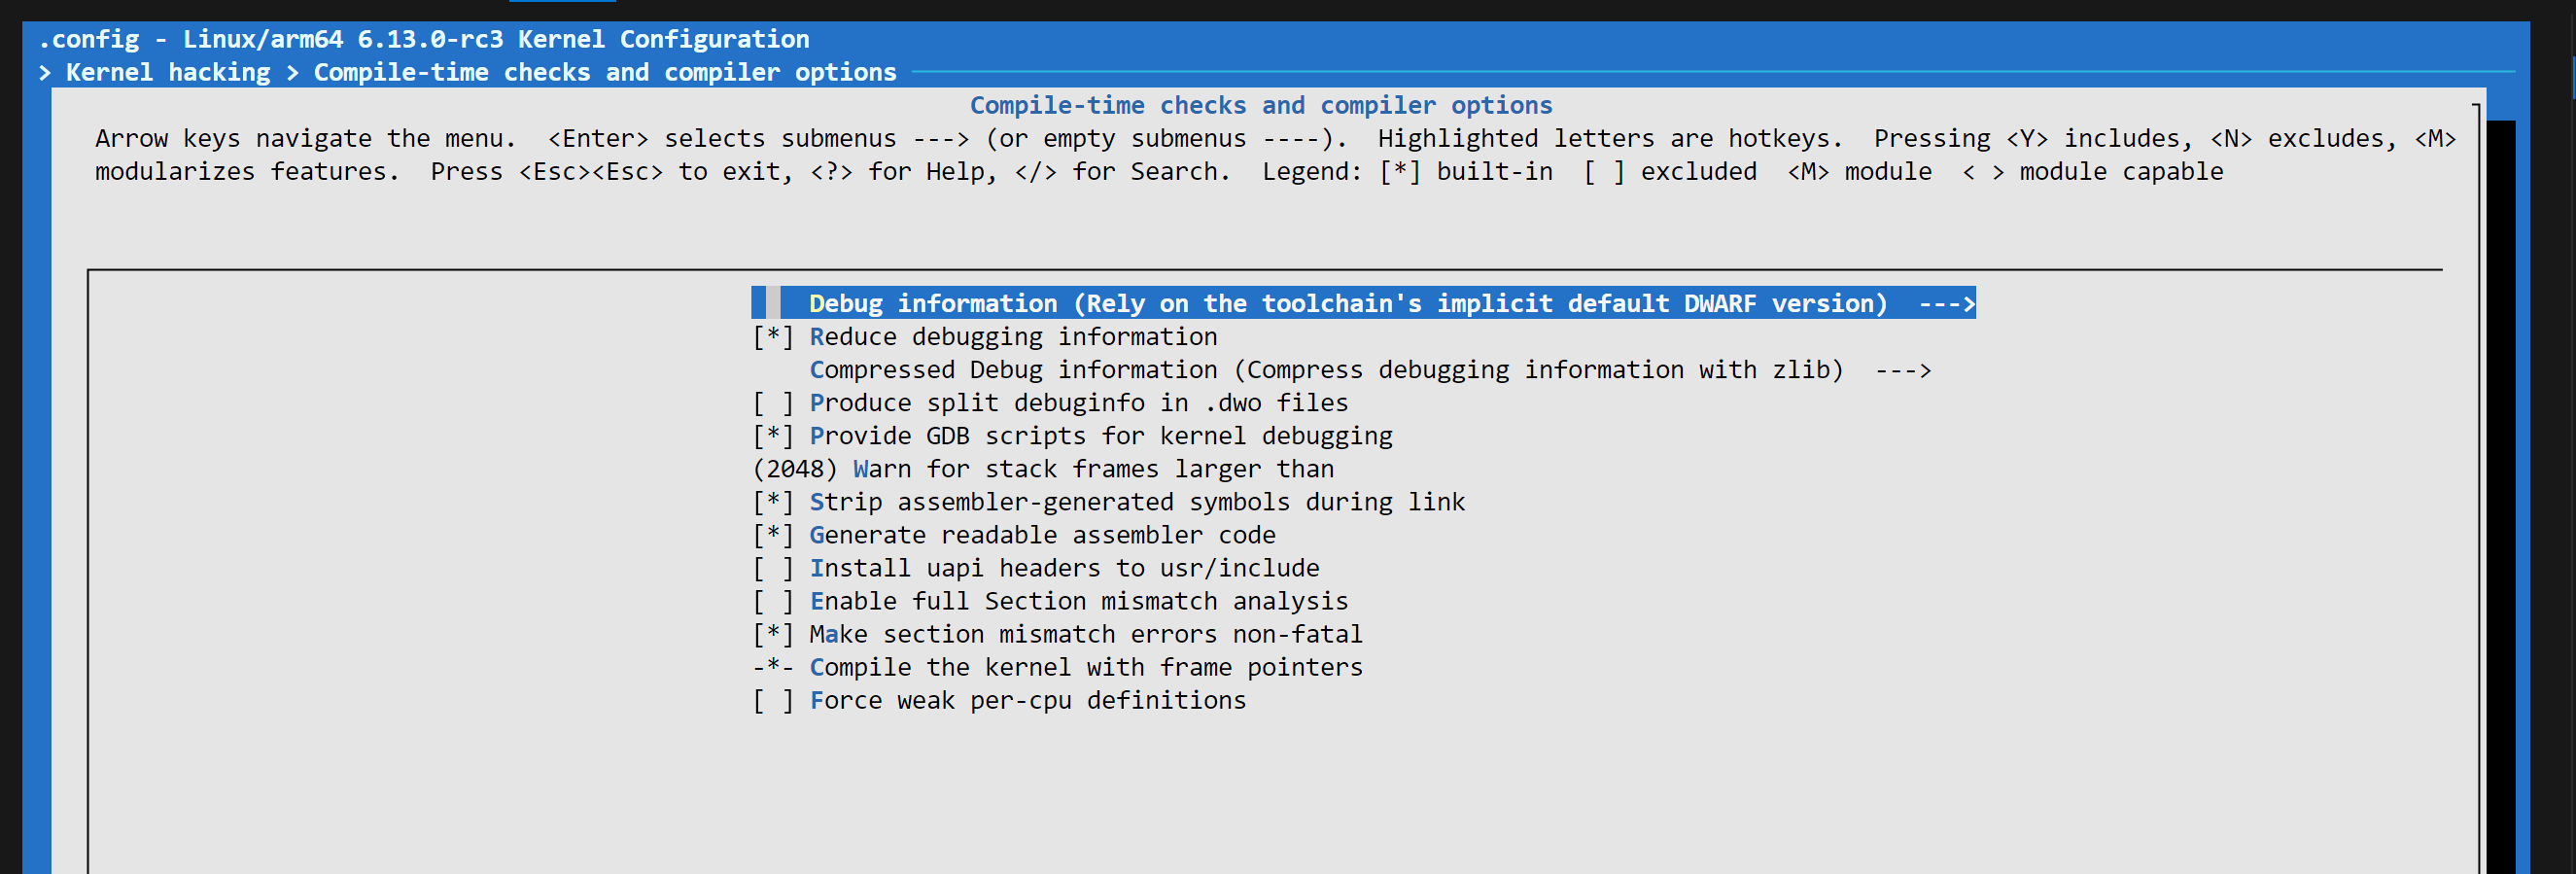
打开调试选项
上面的配置文件因为没有附加调试选项, 仅能运行而不能进行调试, 因此需要关闭/开启以下的选项来保证可以调试
-
Kernel Features -- Randomize the address of the kernel image,关闭该选项, 禁止kernel随机的选择地址
-
Kernel hacking -- Generic Kernel Debugging Instruments --- Compile-time checks and compiler options
-
-
开始编译
启动所有核心进行编译
make ARCH=arm64 CROSS_COMPILE=aarch64-linux-gnu- -j$(nproc) -
完成编译
NM      System.map
SORTTAB vmlinux
OBJCOPY arch/arm64/boot/Image
GZIP    arch/arm64/boot/Image.gz
编译结束后可以在以下路径下查看到编译结果:
-
内核镜像文件 Image
yukikaze@yukikaze-743:~/code/gdb_test/linux-stable/arch/arm64/boot$ ls dts Image Image.gz install.sh Makefile -
调试字符文件 vmlinux
yukikaze@yukikaze-743:~/code/gdb_test/linux-stable$ ls vmlinux -al -rwxrwxr-x 1 yukikaze yukikaze 101367224 12月 18 17:49 vmlinux -
各个设备的设备树文件, 在启动qemu时并不需要传入这个参数也能启动, 而且并没有 qemu 提供的 virt 的设备树
yukikaze@yukikaze-743:~/code/gdb_test/linux-stable/arch/arm64/boot/dts$ ls
actions  allwinner  amazon  amlogic  apple  bitmain   cavium     exynos     hisilicon  lg        marvell   microchip  nvidia  realtek  rockchip   sprd  synaptics  ti       xilinx
airoha   altera     amd     apm      arm    broadcom  dtbs-list  freescale  intel      Makefile  mediatek  nuvoton    qcom    renesas  socionext  st    tesla      toshiba
-
-
使用 qemu 启动内核, 可以看到会因为无法找到 root 文件系统而中止
启动命令
qemu-system-aarch64 -M virt -cpu cortex-a53 -nographic -kernel ./linux-stable/arch/arm64/boot/Image -append "console=ttyAMA0 root=" -device edu上述启动命令会在当前的控制台打印输出虚拟 Linux 的启动日志。
[    0.500203][    T1] /dev/root: Can't open blockdev
[    0.500725][    T1] VFS: Cannot open root device "" or unknown-block(0,0): error -6
[    0.500847][    T1] Please append a correct "root=" boot option; here are the available partitions:
[    0.501118][    T1] 1f00          131072 mtdblock0
[    0.501197][    T1]  (driver?)
[    0.501362][    T1] List of all bdev filesystems:
[    0.501437][    T1]  ext3
[    0.501452][    T1]  ext2
[    0.501485][    T1]  ext4
[    0.501515][    T1]  squashfs
[    0.501543][    T1]  vfat
[    0.501580][    T1]
[    0.501765][    T1] Kernel panic - not syncing: VFS: Unable to mount root fs on unknown-block(0,0)
[    0.502163][    T1] CPU: 0 UID: 0 PID: 1 Comm: swapper/0 Not tainted 6.13.0-rc3 #1 6b0f5077556243262277a17c396fccbac67be86d
[    0.502386][    T1] Hardware name: linux,dummy-virt (DT)
[    0.502581][    T1] Call trace:
[    0.502741][    T1]  show_stack+0x18/0x24 (C)
[    0.503205][    T1]  dump_stack_lvl+0x54/0x88
[    0.503307][    T1]  dump_stack+0x18/0x24
[    0.503358][    T1]  panic+0x150/0x3c8
[    0.503403][    T1]  mount_root_generic+0x264/0x34c
[    0.503462][    T1]  mount_root+0x26c/0x2dc
[    0.503505][    T1]  prepare_namespace+0x230/0x294
[    0.503551][    T1]  kernel_init_freeable+0x268/0x28c
[    0.503608][    T1]  kernel_init+0x20/0x1d4
[    0.503652][    T1]  ret_from_fork+0x10/0x20
[    0.503978][    T1] Kernel Offset: disabled
[    0.504056][    T1] CPU features: 0x000,00000c00,00800000,0200421b
[    0.504168][    T1] Memory Limit: none
[    0.504434][    T1] ---[ end Kernel panic - not syncing: VFS: Unable to mount root fs on unknown-block(0,0) ]---
上述日志表明, 文件系统VFS没有成功的加载root设备, 需要在启动参数中添加 root 的路径, 当前系统支持的文件系统包括 ext3 等等; 因此下一步的任务是制作文件系统并在启动 Linux 时加载。
使用 Ctrl + a c 来进入 qemu 的 monitor 控制台, 输入
quit退出 qemu
编译 busybox
busybox 不仅可以为我们的Linux kernel提供一套根文件系统, 还可以提供一些 Linux 基础的工具, 如 ip lspci 等等
busybox 的编译和Linux kernel的编译方式类似,同样需要构造 config 文件, 然后编译安装。注意这里及以后提到的 busybox 的安装(make xxxx install)实际上是 busybox 在自己的目录下创建文件夹 _install 然后将编译结果复制进去;
这里采用静态编译的方式来制作 rootfs 镜像, 这样可以省掉复制动态运行库的部分
-
进入 busybox 源码路径内, 删除之前编译的结果, 生成默认的配置文件(defconfig)
yukikaze@yukikaze-743:~/code/gdb_test$ cd busybox-1.37.0/ yukikaze@yukikaze-743:~/code/gdb_test/busybox-1.37.0$ make distclean yukikaze@yukikaze-743:~/code/gdb_test/busybox-1.37.0$ make ARCH=arm64 CROSS_COMPILE=aarch64-linux-gnu- defconfig -
打开 menuconfig 进行配置
yukikaze@yukikaze-743:~/code/gdb_test/busybox-1.37.0$ make ARCH=arm64 CROSS_COMPILE=aarch64-linux-gnu- menuconfig-
打开静态编译选项 y
settings --> Build static binary (no shared libs)
-
最好关闭SHA-1等加密模块的优化 n , 有时可能会报错, 反正用于开发的系统, 不需要加密
settings --> SHA1: Use hardware accelerated instructions if possible

settings --> SHA256: Use hardware accelerated instructions if possible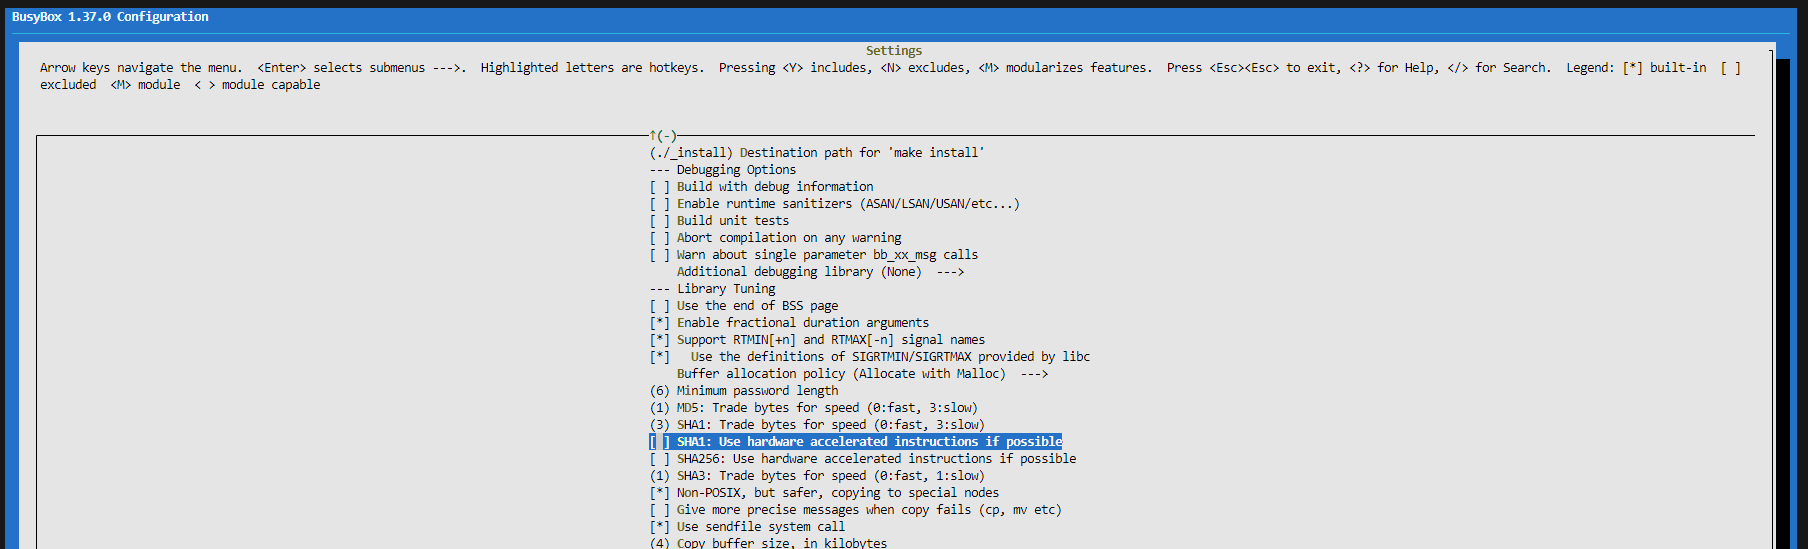
-
可以打开 debug 选项, 反正不需要考虑运行时间
settings --> Build with debug information
-
检查其他工具是否被安装, 一般来说使用了 defconfig 之后, 会自动打开所有的工具
-
-
开始编译
yukikaze@yukikaze-743:~/code/gdb_test/busybox-1.37.0$ make ARCH=arm64 CROSS_COMPILE=aarch64-linux-gnu- all install一般在编译过程中出现 warning 不用管, 出现 err 之后可以选择在 menuconfig 中关闭对相关工具的编译, 或安装相关的 libxxxxxxxxx-dev 去支持对应的 .h 文件
编译安装成功后会出现如下结果
./_install//usr/sbin/ubirsvol -> ../../bin/busybox ./_install//usr/sbin/ubiupdatevol -> ../../bin/busybox ./_install//usr/sbin/udhcpd -> ../../bin/busybox -------------------------------------------------- You will probably need to make your busybox binary setuid root to ensure all configured applets will work properly. -------------------------------------------------- -
检查编译结果是否适合目标架构
可以在打包文件系统之前检查编译结果是否正确可以运行, 如果不能运行就要检查自己的编译选项设置的是否合理等等。这里可以使用 qemu 提供的 user 模式的仿真器来尝试运行
_install/bin/busybox可执行文件yukikaze@yukikaze-743:~/code/gdb_test/busybox-1.37.0/_install/bin$ qemu-aarch64 busybox BusyBox v1.37.0 (2024-12-19 16:38:07 CST) multi-call binary. BusyBox is copyrighted by many authors between 1998-2015. Licensed under GPLv2. See source distribution for detailed copyright notices. Usage: busybox [function [arguments]...] or: busybox --list[-full] or: bus 太长了后面就不放了而错误的架构去运行会直接报错
yukikaze@yukikaze-743:~/code/gdb_test/busybox-1.37.0/_install/bin$ qemu-arm busybox
qemu-arm: busybox: Invalid ELF image for this architecture
制作根文件系统
-
复制 busybox 编译的各种文件
为了不影响busybox内的文件结构,在busybox外新建一个文件夹,并将
_install内所有文件复制进去yukikaze@yukikaze-743:~/code/gdb_test$ mkdir rootfs_tmp yukikaze@yukikaze-743:~/code/gdb_test$ cd rootfs_tmp/ yukikaze@yukikaze-743:~/code/gdb_test/rootfs_tmp$ cp -r ../busybox-1.37.0/_install/* ./ yukikaze@yukikaze-743:~/code/gdb_test/rootfs_tmp$ ls bin linuxrc sbin usr -
复制动态链接库文件
从交叉编译器拷贝动态链接库, 虽然这一步并不影响启动, 不过还是建议进行拷贝。注意上面使用那种编译器, 这一步从哪个路径拷贝链接库
yukikaze@yukikaze-743:~/code/gdb_test/rootfs_tmp$ ls bin linuxrc sbin usr yukikaze@yukikaze-743:~/code/gdb_test/rootfs_tmp$ mkdir lib yukikaze@yukikaze-743:~/code/gdb_test/rootfs_tmp$ ls bin lib linuxrc sbin usr yukikaze@yukikaze-743:~/code/gdb_test/rootfs_tmp$ sudo cp -r /usr/aarch64-linux-gnu/lib/* ./lib/ yukikaze@yukikaze-743:~/code/gdb_test/rootfs_tmp$ ls ./lib/ crt1.o ld-linux-aarch64.so.1 libasan.so.6.0.0 libBrokenLocale.so.1 libc.so libgcc_s.so.1 libitm.so.1 libmcheck.a libnss_compat.so libnss_hesiod.so.2 libresolv.so libstdc++.so.6.0.30 libubsan.so.1 rcrt1.o crti.o libanl.a libatomic.so.1 libc.a libc.so.6 libgomp.so.1 libitm.so.1.0.0 libmemusage.so libnss_compat.so.2 libpcprofile.so libresolv.so.2 libthread_db.so libubsan.so.1.0.0 Scrt1.o crtn.o libanl.so libatomic.so.1.2.0 libc_malloc_debug.so libdl.a libgomp.so.1.0.0 liblsan.so.0 libm.so libnss_dns.so.2 libpthread.a librt.a libthread_db.so.1 libutil.a gcrt1.o libanl.so.1 libBrokenLocale.a libc_malloc_debug.so.0 libdl.so.2 libhwasan.so.0 liblsan.so.0.0.0 libm.so.6 libnss_files.so.2 libpthread.so.0 librt.so.1 libtsan.so.0 libutil.so.1 grcrt1.o libasan.so.6 libBrokenLocale.so libc_nonshared.a libg.a libhwasan.so.0.0.0 libm.a libnsl.so.1 libnss_hesiod.so libresolv.a libstdc++.so.6 libtsan.so.0.0.0 Mcrt1.o -
新建
dev/文件夹, 创建设备文件yukikaze@yukikaze-743:~/code/gdb_test/rootfs_tmp$ mkdir ./dev yukikaze@yukikaze-743:~/code/gdb_test/rootfs_tmp$ sudo mknod ./dev/tty1 c 4 1 yukikaze@yukikaze-743:~/code/gdb_test/rootfs_tmp$ sudo mknod ./dev/tty2 c 4 2 yukikaze@yukikaze-743:~/code/gdb_test/rootfs_tmp$ sudo mknod ./dev/tty3 c 4 3 yukikaze@yukikaze-743:~/code/gdb_test/rootfs_tmp$ sudo mknod ./dev/tty4 c 4 4结果
yukikaze@yukikaze-743:~/code/gdb_test/rootfs_tmp$ ls -l ./dev/ total 0 crw-r--r-- 1 root root 4, 1 12月 19 17:57 tty1 crw-r--r-- 1 root root 4, 2 12月 19 17:58 tty2 crw-r--r-- 1 root root 4, 3 12月 19 17:58 tty3 crw-r--r-- 1 root root 4, 4 12月 19 17:58 tty4 -
创建或复制其他文件
这些文件的存在与否并不会影响操作系统的启动, 不过还是建议直接打包进文件系统之中
创建
proc/路径mkdir proc创建
sys/路径mkdir sys对于使用了 cfg80211 模块的操作系统, 该模块需要在操作系统中加载一份用于无线设备的数据库, 可以将本机的数据库文件直接复制到对应的路径
yukikaze@yukikaze-743:~/code/gdb_test/rootfs_tmp$ mkdir lib/firmware
yukikaze@yukikaze-743:~/code/gdb_test/rootfs_tmp$ sudo cp /lib/firmware/regulatory.db ./lib/firmware/
yukikaze@yukikaze-743:~/code/gdb_test/rootfs_tmp$ sudo cp /lib/firmware/regulatory.db.p7s ./lib/firmware/
一般应该还有一个操作系统的启动脚本, 不过没有这个脚本也可以启动, 我们可以在启动之后再输入一些命令来手动初始化一些配置
-
生成文件系统镜像文件
生成镜像文件, 通过调整
count后的参数可以调整镜像文件大小, 这里创建了一个16g的文件供虚拟Linux系统使用yukikaze@yukikaze-743:~/code/gdb_test$ dd if=/dev/zero of=aarchrootfs.etx3 bs=1M count=16384 16384+0 records in 16384+0 records out 17179869184 bytes (17 GB, 16 GiB) copied, 3.90876 s, 4.4 GB/s生成的文件
yukikaze@yukikaze-743:~/code/gdb_test$ ls -lh aarchrootfs.etx3
-rw-rw-r-- 1 yukikaze yukikaze 16G 12月 20 10:24 aarchrootfs.etx3
格式化, 注意不进行格式化是无法进行挂载的
yukikaze@yukikaze-743:~/code/gdb_test$ mkfs.ext3 aarchrootfs.etx3
mke2fs 1.46.5 (30-Dec-2021)
Discarding device blocks: done
Creating filesystem with 4194304 4k blocks and 1048576 inodes
Filesystem UUID: 125aca8f-4ecc-422f-9071-9dda6cc05151
Superblock backups stored on blocks:
        32768, 98304, 163840, 229376, 294912, 819200, 884736, 1605632, 2654208,
        4096000

Allocating group tables: done
Writing inode tables: done
Creating journal (32768 blocks): done
Writing superblocks and filesystem accounting information: done
挂载指一个空的文件夹,挂载之前记得新建文件夹
yukikaze@yukikaze-743:~/code/gdb_test$ ls
aarchrootfs.etx3  busybox-1.37.0 linux-stable  qemu_simudevice rootfs_tmp tmpfs
yukikaze@yukikaze-743:~/code/gdb_test$ sudo mount -t ext3 aarchrootfs.etx3 tmpfs/ -o loop
将之前创建的各种根文件系统的文件或文件夹复制进挂载点
yukikaze@yukikaze-743:~/code/gdb_test$ ls tmpfs/
lost+found
yukikaze@yukikaze-743:~/code/gdb_test$ sudo cp -r rootfs_tmp/* ./tmpfs/
yukikaze@yukikaze-743:~/code/gdb_test$ ls tmpfs/
bin  dev  lib  linuxrc  lost+found  proc  sbin  sys  usr
取消挂载
yukikaze@yukikaze-743:~/code/gdb_test$ sudo umount tmpfs
启动 qemu
本节中启动 qemu 的命令是本文的重点。启动qemu面对的难点主要有以下几个:
-
传统的 arm aarch 开发板并不支持走 pci 协议的设备
qemu-system-aarch64: -device edu: No 'PCI' bus found for device 'edu' -
virt 不支持 sd 设备
因此这里采用 qemu 提供的全虚拟开发板 vitr 配合原始的文件装载命令去启动虚拟机
qemu-system-aarch64 -M virt -cpu cortex-a53 -nographic \
-kernel ./linux-stable/arch/arm64/boot/Image \
-append "console=ttyAMA0 root=/dev/vda rw" \
-device virtio-blk-device,drive=disk \
-drive file=aarchrootfs.etx3,format=raw,if=none,id=disk \
-device edu
使用 -append 参数指定 root 文件系统加载位置, 下方的两个 device 和 drive 共同将文件系统加载为一个硬盘, 插入到 qemu 的启动过程中。
成功启动, 虽然没有 init 脚本
[    0.525631][    T1] EXT4-fs (vda): mounting ext3 file system using the ext4 subsystem
[    0.553643][    T1] EXT4-fs (vda): mounted filesystem 125aca8f-4ecc-422f-9071-9dda6cc05151 r/w with ordered data mode. Quota mode: none.
[    0.554071][    T1] VFS: Mounted root (ext3 filesystem) on device 254:0.
[    0.555791][    T1] devtmpfs: mounted
[    0.585662][    T1] Freeing unused kernel memory: 11200K
[    0.586473][    T1] Run /sbin/init as init process
can't run '/etc/init.d/rcS': No such file or directory

Please press Enter to activate this console.
~ # ls
bin         lib         lost+found  sbin        usr
dev         linuxrc     proc        sys
之后需要手动完成一些启动脚本完成的工作, 我这里需要手动将两个内核提供的设备挂载到文件系统之中
mount -t proc proc /proc
mount -t sysfs sysfs /sys
这样就可以正常使用一些查看设备的命令
~ # lspci
00:01.0 Class 0200: 1af4:1000
00:00.0 Class 0600: 1b36:0008
00:02.0 Class 00ff: 1234:11e8
cfg80211 报错问题
[    0.531708][   T49] platform regulatory.0: Direct firmware load for regulatory.db failed with error -2
[    0.532198][   T49] cfg80211: failed to load regulatory.db
[    0.532983][    T1] clk: Disabling unused clocks
[    0.533242][    T1] PM: genpd: Disabling unused power domains
[    0.533371][    T1] ALSA device list:
[    0.533561][    T1]   No soundcards found.
[    0.544243][    T1] EXT4-fs (vda): mounting ext3 file system using the ext4 subsystem
[    0.571782][    T1] EXT4-fs (vda): mounted filesystem 125aca8f-4ecc-422f-9071-9dda6cc05151 r/w with ordered data mode. Quota mode: none.
在启动 qemu 时可以看到日志输出了一些错误, 表示被编译进内核的 cfg80211 无法正常加载 regulatory.db 文件, 这是显然的, 因为 regulatory.db 文件存在于文件系统的 lib/firmware/ 路径下, 在内核中 cfg80211 开始工作时, 文件系统还没准备完成
但是这个错误似乎并不会影响无线网络驱动的 insmod , 我将一个 .ko 文件从内核源码中复制到 qemu 虚拟机之中, 似乎是可以正常工作的
/root/modules # insmod ath12k.ko
~ # lsmod
ath12k 348160 0 - Live 0xffff80007afa0000

 浙公网安备 33010602011771号