[图文][提供可行性脚本] CentOS 7 Fencing+Pacemaker三节点搭建高可用集群
实验说明:
实验环境:
- 宿主机系统 :Fedora 28 WorkStation
- 虚拟机管理器 :Virt-Manager 1.5.1
- 虚拟机配置 :ha1 CentOS 7.2 1511 (minimal) virbr0: 192.168.122.57
ha2 CentOS 7.2 1511 (minimal) virbr0: 192.168.122.58
ha3 CentOS 7.2 1511 (minimal) virbr0: 192.168.122.59
实验步骤:
宿主机上操作:主要涉及ntp服务器的搭建以及fencing的配置
-
确保宿主机系统是联网的,配置网络请参考 此链接
-
安装 virt-manager
# dnf install virt-manager libvirt
-
使用virt-manager创建kvm虚拟机并配置kvm虚拟机 请参考 此链接
-
安装fence、ntpd等软件
# dnf install -y ntp fence-virtd fence-virtd-multicast fence-virtd-libvirt fence-virt*
-
配置ntpd
设置区时为上海# timedatectl list-timezones | grep Shanghai # timedatectl set-timezone Asia/Shanghai
修改ntp配置文件
# 删除原配置中的相关配置项
# sed -e '/^server/d' -e '/^#server/d' -e '/^fudge/d' -e '/^#fudge/d' -i /etc/ntp.conf

# 在结尾添加ntp服务器配置
# sed -e '$a server 127.127.1.0' -e '$a fudge 127.127.1.0 stratum' -i /etc/ntp.conf
设置开机自启、开启服务并查看状态
# systemctl enable ntpd.service && systemctl start ntpd.service && systemctl status ntpd.service
ntpq -c peers
ntpq -c assoc
timedatectl
-
配置fence-virtd
创建 /etc/cluster 文件夹
# mkdir -p /etc/cluster
生成fence_xvm.key文件
# echo fecb9e62cbcf4e54dcfb > /etc/cluster/fence_xvm.key
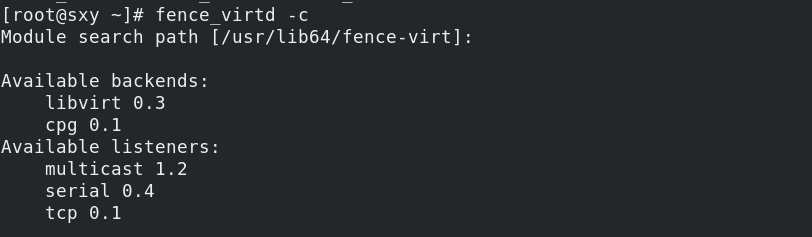
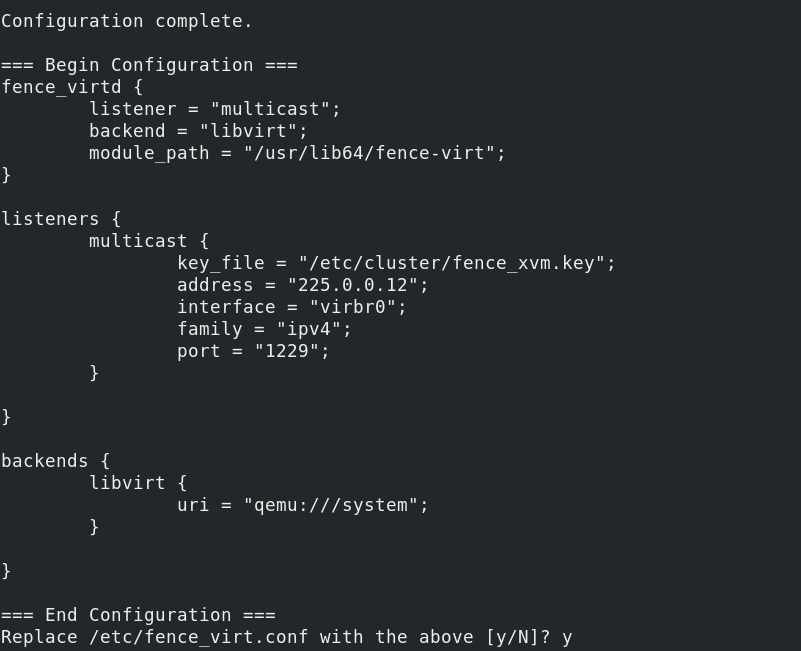
初始化fence_virtd
# fence_virtd -c
确认模块搜索路径
![]()
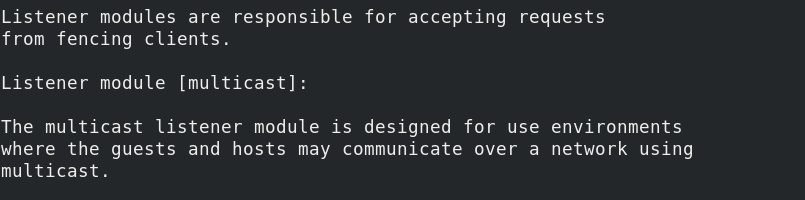
确认监听方式![]()
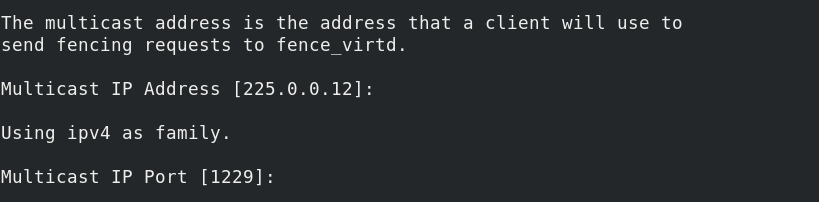
确认监听IP地址以及端口![]()
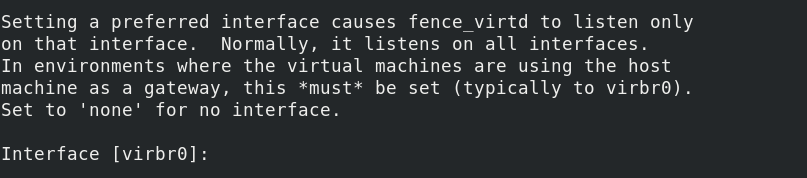
确认监听网卡接口![]()
确认密钥路径![]()
确认后端虚拟化模块![]()
确认Libvirt URL![]()
是否替换文件![]()
设置开机自启、开启服务并查看状态# systemctl enable fence_virtd && systemctl start fence_virtd && systemctl status fence_virtd
-
验证fencevirtd
查询所有状态的虚拟机# fence_xvm -o list
查询结果如下图:
![]()
-
Fencing操作
关闭所有已开启的虚拟机# 启动(on)、关机(off)、重启(reboot)、状态获取(status)
# fence_xvm -o off -H HA1 # fence_xvm -o off -H HA2 # fence_xvm -o off -H HA3再次查询,结果如下图:
![]()


kvm虚拟机上操作:主要涉及Ntp服务同步和Pacemaker集群的搭建
-
配置kvm虚拟机
-
安装ntpd、pcs等软件
# yum install -y ntp pcs pacemaker corosync fence-agents-all resource-agents
-
配置ntpd
与宿主机上操作类似,此处不再展开1 # timedatectl set-timezone Asia/Shanghai 2 3 # sed -i s/^server.*// /etc/ntp.conf 4 # echo "server 192.168.43.177 iburst" >> /etc/ntp.conf 5 # echo "SYNC_HWCLOCK=yes" >> /etc/sysconfig/ntpdate 6 # systemctl enable ntpd.service && systemctl start ntpd.service && systemctl status ntpd.service
查询当前时间设置
# timedatectl
-
配置Pacemaker集群
检查是否安装Pacemaker软件
创建Fencing设备密钥Key# mkdir -p /etc/cluster # echo fecb9e62cbcf4e54dcfb > /etc/cluster/fence_xvm.key
设置hacluster用户密码
# echo 000000|passwd --stdin hacluster
创建Pacemaker集群
创建时需要进行授权认证,以及需要添加到集群的主机名# pcs cluster auth ha1 ha2 ha3 -u hacluster -p 000000 --force
设置集群的名称时需要指定集群名称和需要添加到集群的主机名
# pcs cluster setup --force --name openstack-ha ha1 ha2 ha3
设置在集群所有节点启动时启用corosync和pacemaker
# pcs cluster enable --all
设置在集群所有节点都开启集群
# pcs cluster start --all
查询集群状态
# pcs status
为了实现对虚拟机的Fencing操作,需要为Pacemaker集群配置Stonith资源
1 # pcs stonith create fence1 fence_xvm multicast_address=225.0.0.12
2 # pcs stonith create fence2 fence_xvm multicast_address=225.0.0.12
3 # pcs stonith create fence3 fence_xvm multicast_address=225.0.0.12
查询集群状态
[root@ha1 ~]# pcs status
Cluster name: openstack-ha
Stack: corosync
Current DC: ha1 (version 1.1.18-11.el7_5.3-2b07d5c5a9) - partition with quorum
Last updated: Thu Aug 16 15:30:59 2018
Last change: Thu Aug 16 12:44:03 2018 by root via cibadmin on ha1

3 nodes configured
3 resources configured

Online: [ ha1 ha2 ha3 ]

Full list of resources:

 fence1    (stonith:fence_xvm):    Started ha1
 fence2    (stonith:fence_xvm):    Started ha2
 fence3    (stonith:fence_xvm):    Started ha3

Daemon Status:
  corosync: active/enabled
  pacemaker: active/enabled
  pcsd: active/enabled
查询当前 Pacemaker 集群中的 Stonith 资源
[root@ha1 ~]# pcs stonith show
 fence1    (stonith:fence_xvm):    Started ha1
 fence2    (stonith:fence_xvm):    Started ha2
 fence3    (stonith:fence_xvm):    Started ha3

 浙公网安备 33010602011771号