01_Centos7基本操作
一、操作系统安装
1.1 CentOS 8安装
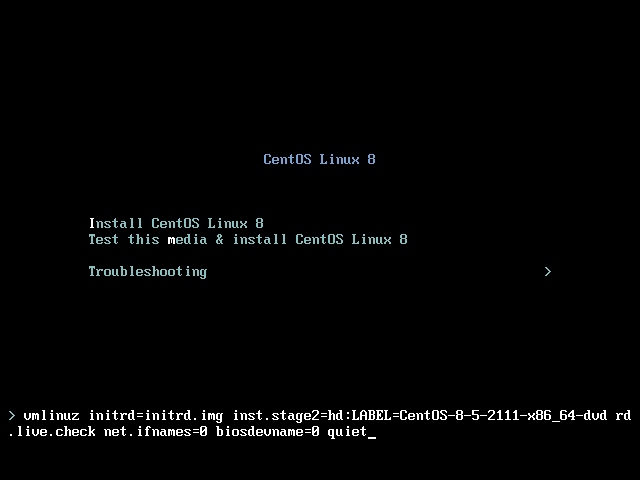
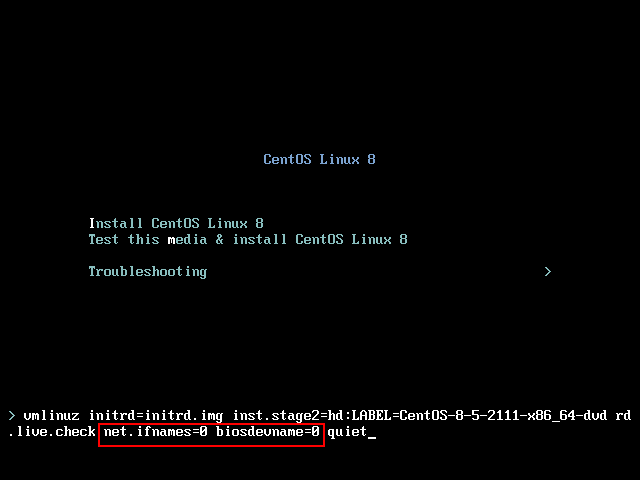
1.1.1 修改网卡名称,在quiet 前面添加如下内容 :net.ifnames=0 biosdevname=0
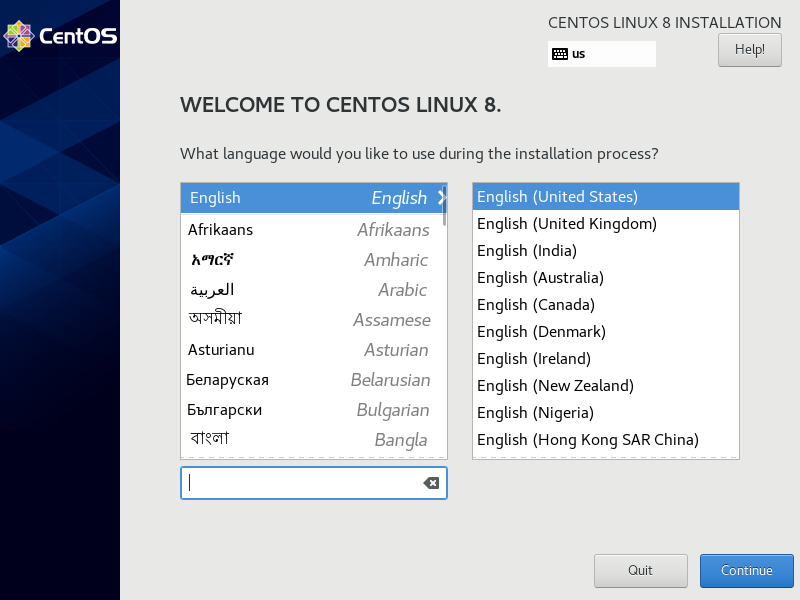
1.1.2 选择英文
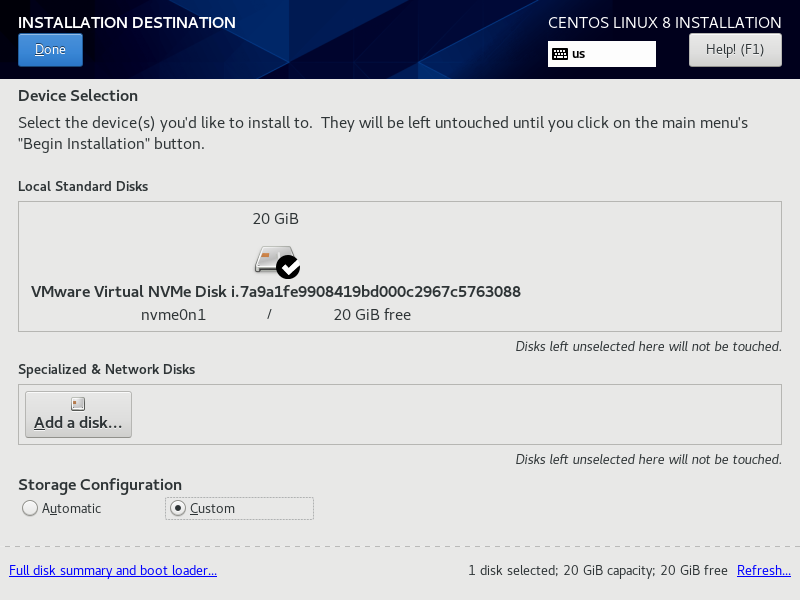
1.1.3 磁盘选择自定义分区
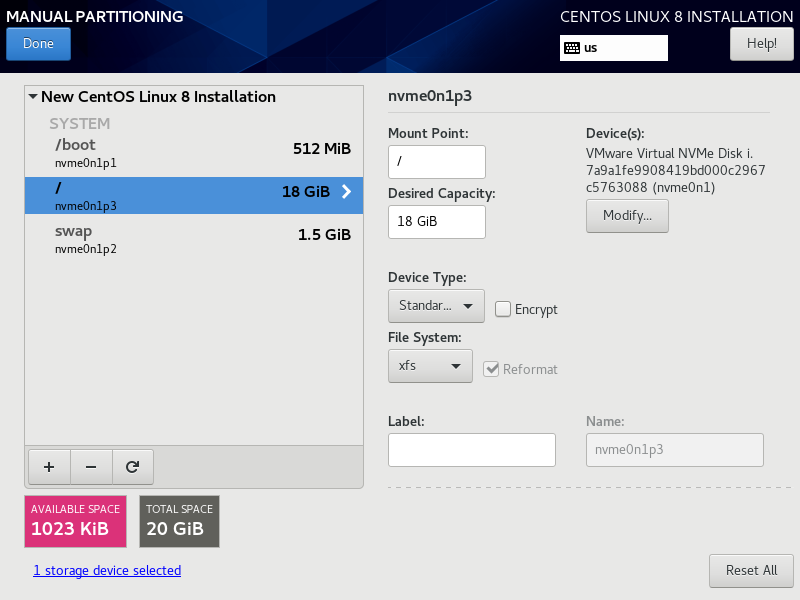
1.1.4 磁盘创建分区:boot分区、swap分区、根分区
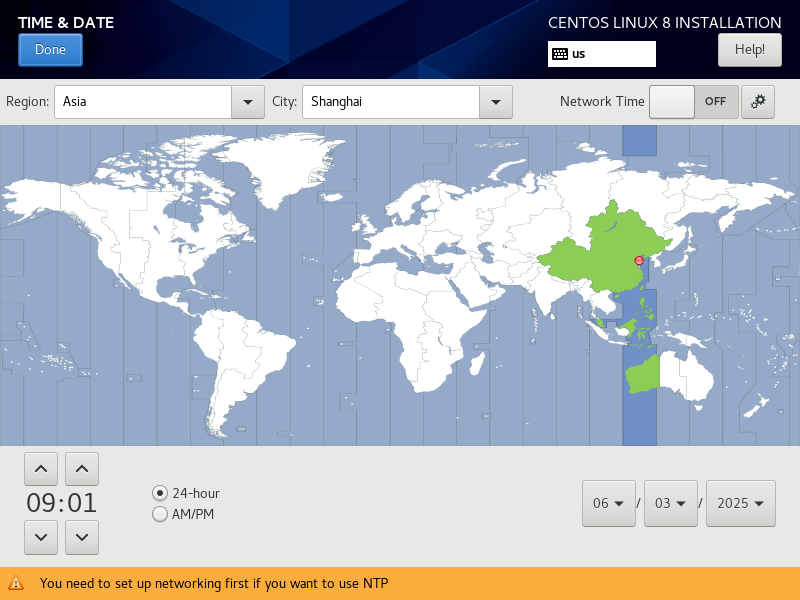
1.1.5 时区选择上海
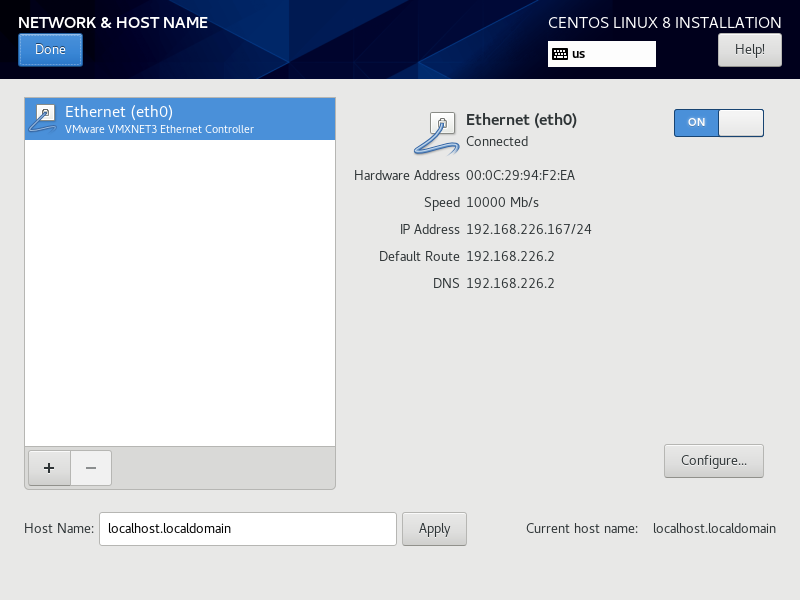
1.1.6 开启网络配置
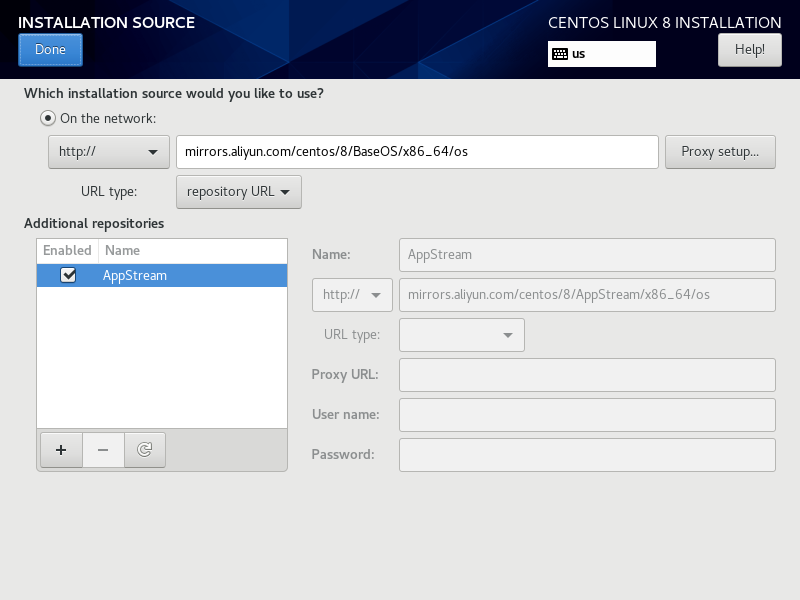
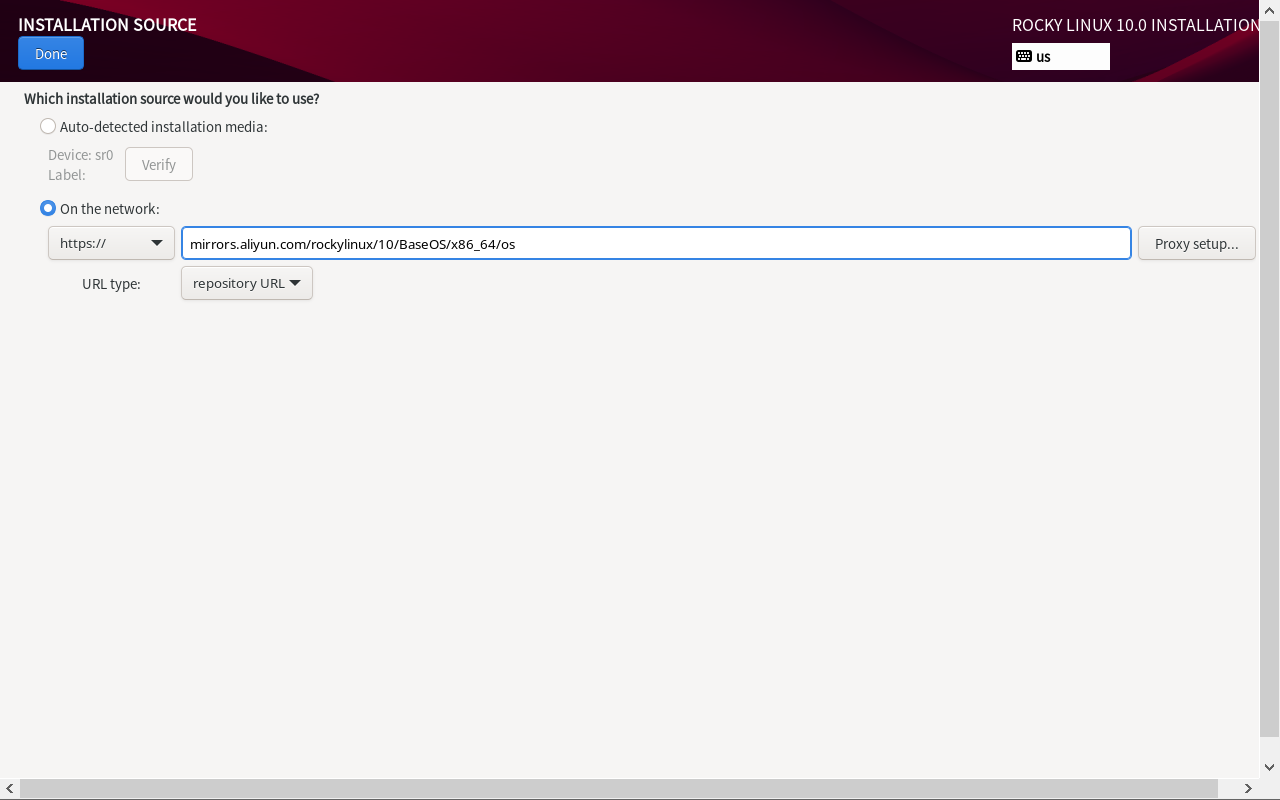
1.1.7 配置镜像源
mirrors.aliyun.com/centos/8/BaseOS/x86_64/os
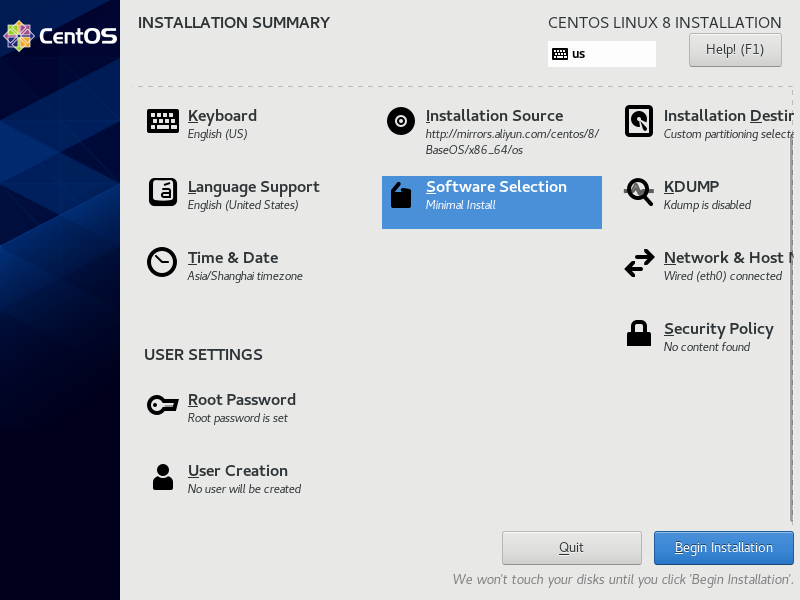
1.1.8 选择最小化安装

1.1.9 开始安装
1.2 Rocky Linux 安装
由于Centos 停止维护和更新,CentOS 9 开始采用滚动更新的方式,而不再是完整的克隆RedHat版本,导致出现很多漏洞。
CentOS 9出现的漏洞如下:
OpenSSH漏洞(如CVE-2024-6387),Linux内核漏洞,sudo堆缓冲区溢出漏洞(CVE-2021-3156),Polkit权限提升漏洞(CVE-2021-4034),以及Apache、PHP、MySQL等服务漏洞。
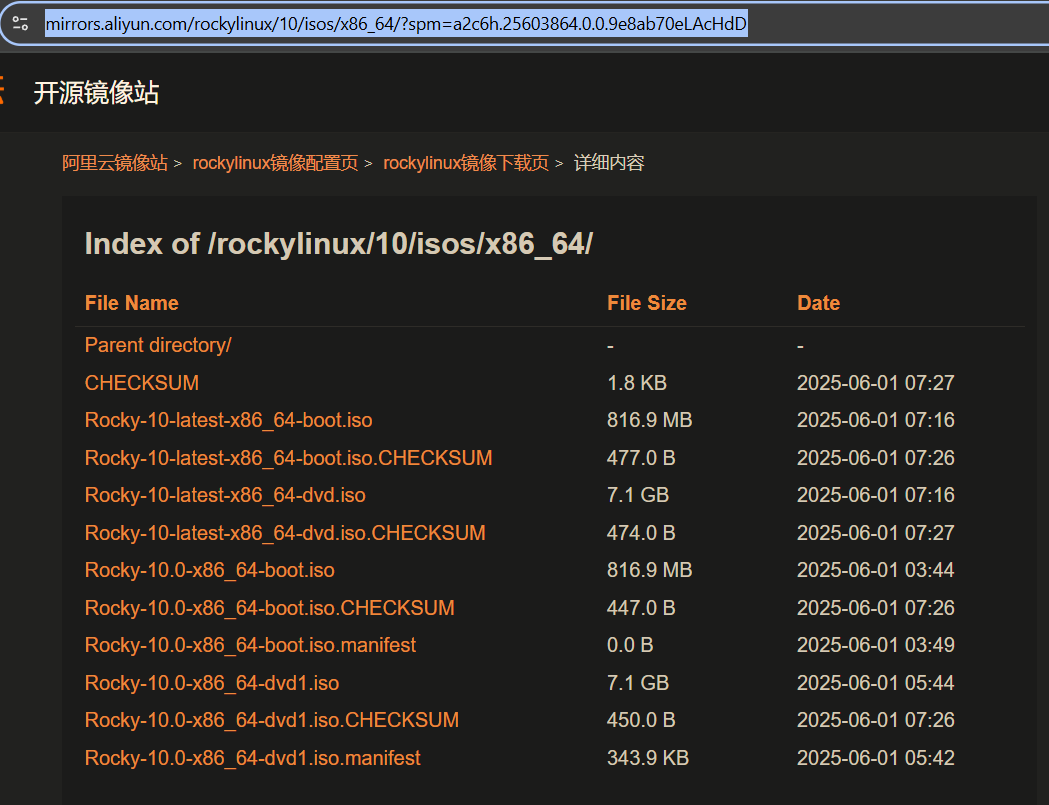
1.2.0 Rocky linux 下载地址
https://mirrors.aliyun.com/rockylinux/10/isos/x86_64/?spm=a2c6h.25603864.0.0.9e8ab70eLAcHdD
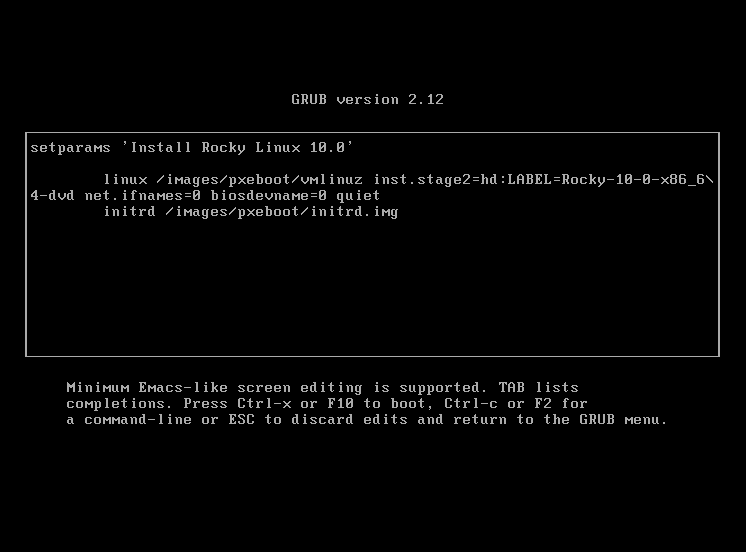
1.2.1 修改网卡名称,在quiet 前面添加如下内容 :net.ifnames=0 biosdevname=0
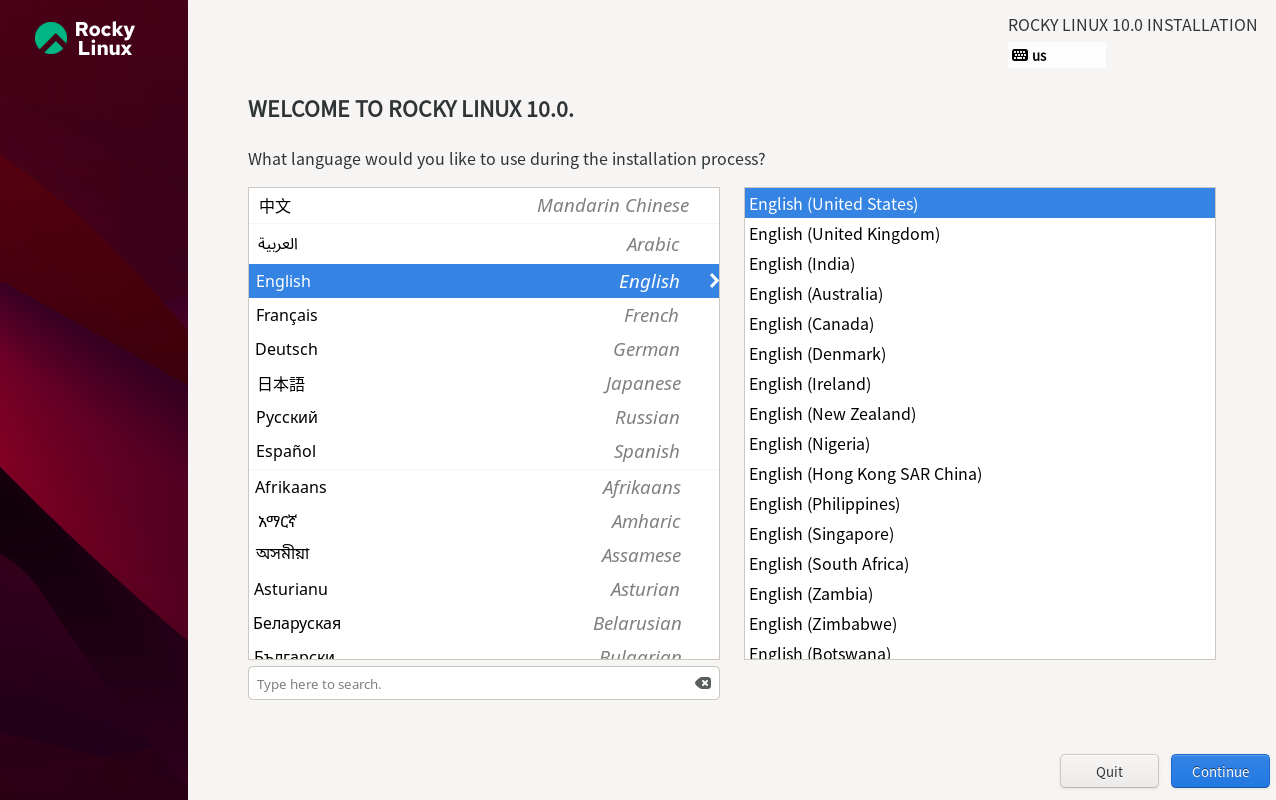
1.2.2 选择语言
1.2.3 选择国内镜像源安装
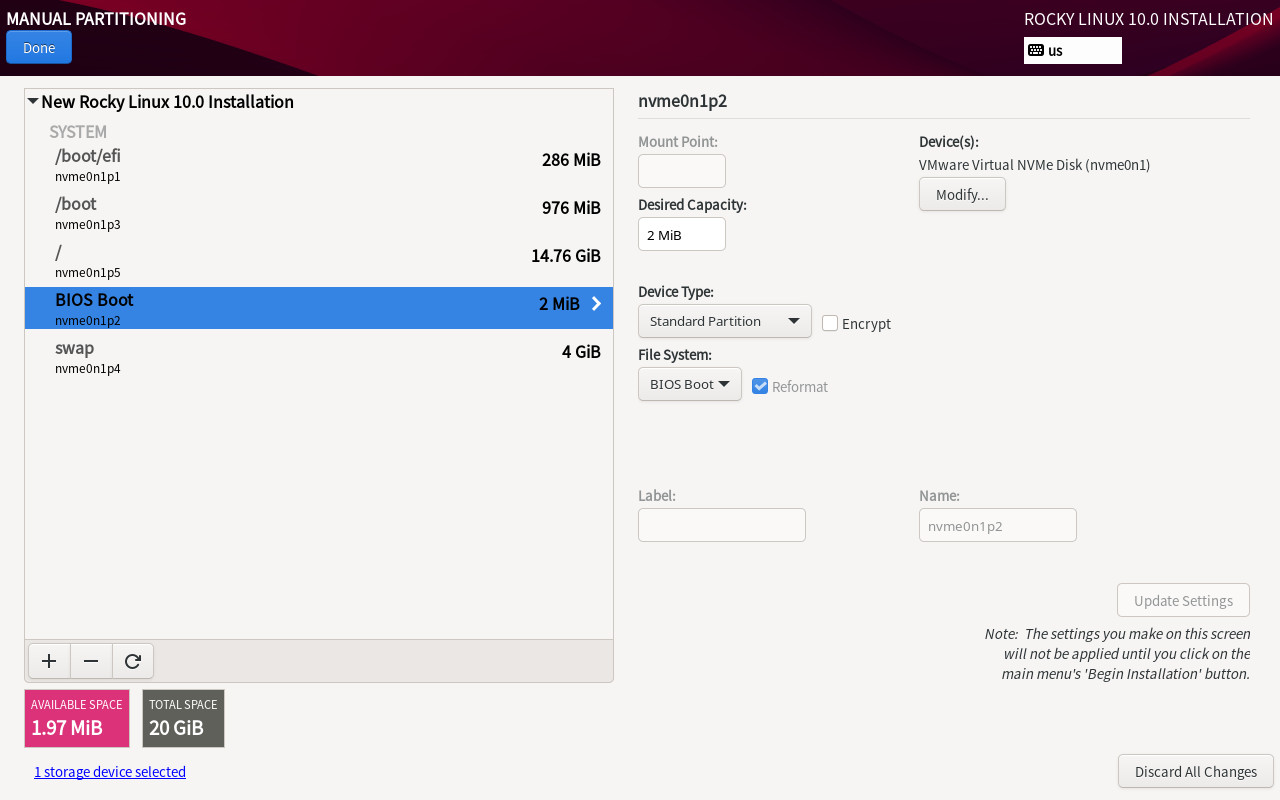
1.2.4 手动创建分区
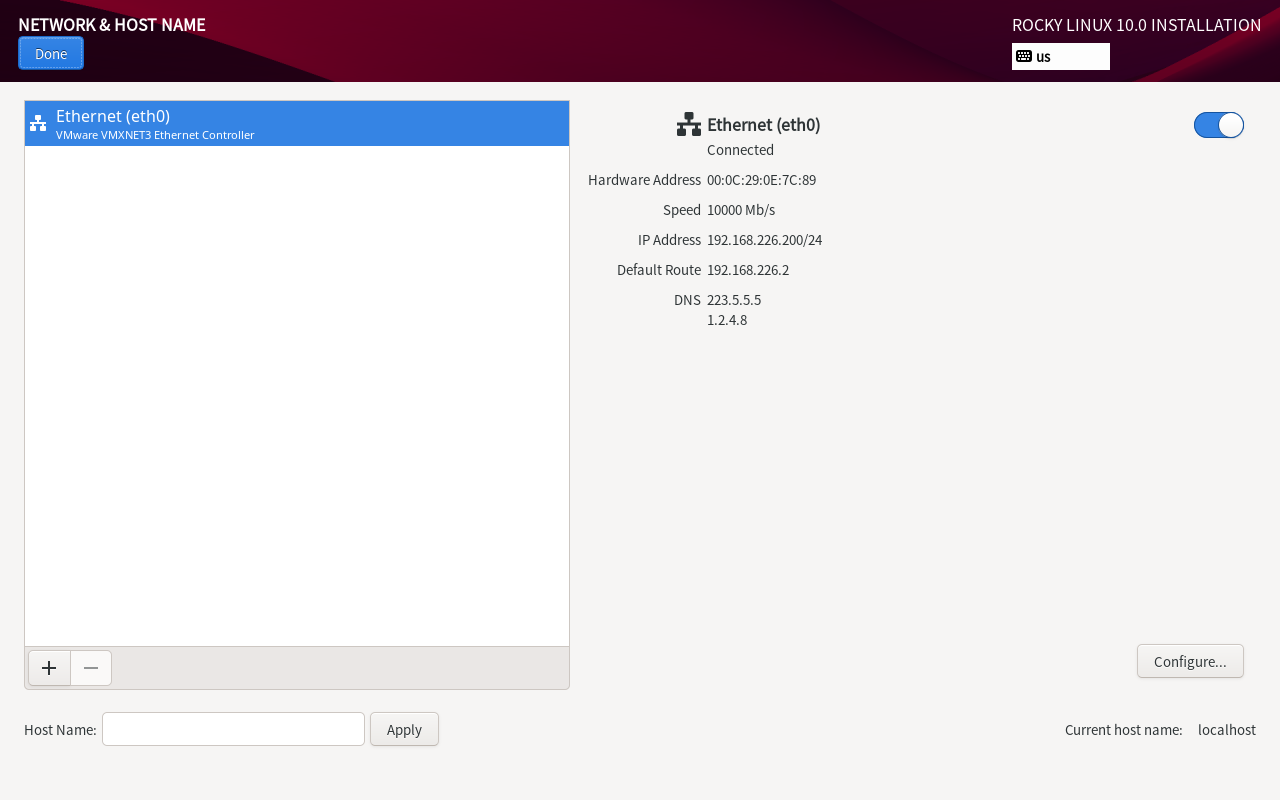
1.2.5 配置网卡
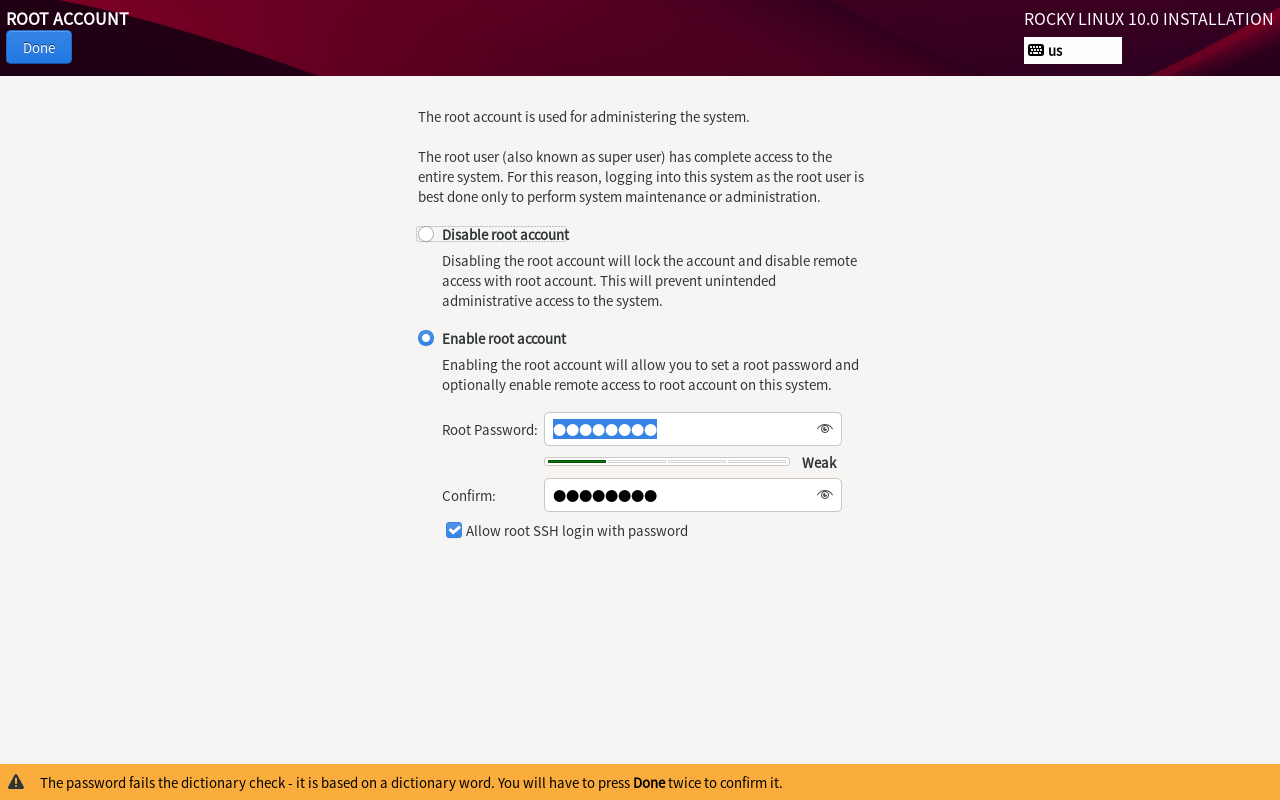
1.2.6 设置root密码
1.2.7 配置yum源仓库
可以关闭gpgcheck以免找不到报错,提示为文件已经下载缓存但是没有安装成功
关键参数说明:
-
$releasever:自动匹配系统主版本号(如 10)
-
$basearch:自动识别 CPU 架构(如 x86_64)
sudo tee /etc/yum.repos.d/Rocky-Aliyun.repo <<'EOF'
[baseos]
name=Rocky Linux $releasever - BaseOS - Aliyun
baseurl=https://mirrors.aliyun.com/rockylinux/$releasever/BaseOS/$basearch/os/
gpgcheck=0
gpgkey=https://mirrors.aliyun.com/rockylinux/RPM-GPG-KEY-Rocky

[appstream]
name=Rocky Linux $releasever - AppStream - Aliyun
baseurl=https://mirrors.aliyun.com/rockylinux/$releasever/AppStream/$basearch/os/
gpgcheck=0
gpgkey=https://mirrors.aliyun.com/rockylinux/RPM-GPG-KEY-Rocky
EOF
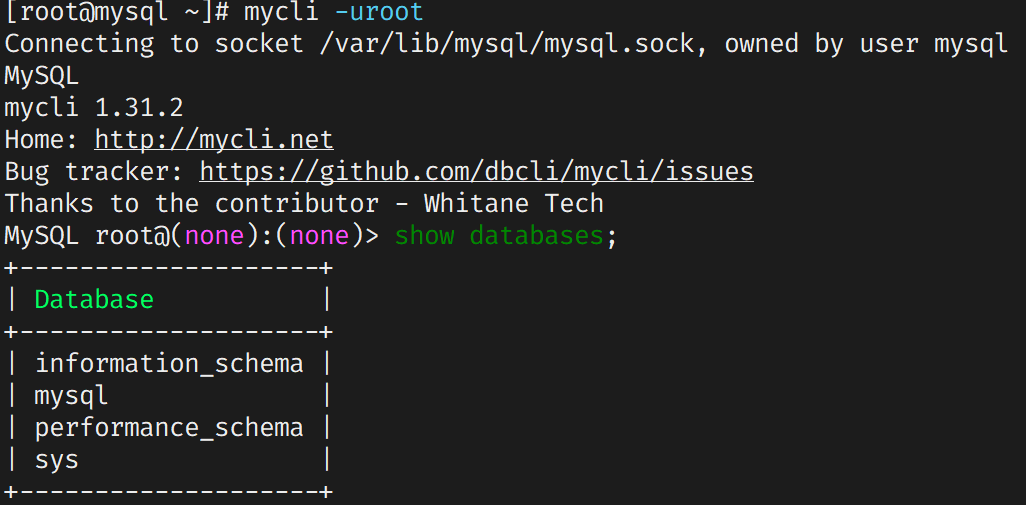
1.2.8 安装Python3、mycli、mysql8.4测试yum仓库
[root@mysql ~]# yum -y install python3 mysql8.4-server

[root@mysql ~]# pip3 install mycli

[root@mysql ~]# systemctl restart mysqld

[root@mysql ~]# systemctl status mysqld
使用mycli连接数据库
二、基础配置
2.1 配置yum仓库和rpm包管理
2.1.1 centos7 yum源配置
curl -o /etc/yum.repos.d/CentOS-Base.repo https://mirrors.aliyun.com/repo/Centos-7.repo
curl -o /etc/yum.repos.d/epel.repo https://mirrors.aliyun.com/repo/epel-7.repo
wget -O /etc/yum.repos.d/epel.repo https://mirrors.aliyun.com/repo/epel-7.repo
2.1.2 centos8 yum源配置
#下载镜像源
[root@centos8 ~]# curl -o /etc/yum.repos.d/CentOS-Base.repo https://mirrors.aliyun.com/repo/Centos-8.repo

# 解决 404 错误
[root@centos8 ~]# sudo sed -i 's/\$releasever/8/g' /etc/yum.repos.d/CentOS-Base.repo

#下载扩展镜像源仓库
[root@centos8 ~]# yum -y install epel-release
2.1.3 rpm管理
| 命令选项 | 功能说明 | 使用示例 |
|---|---|---|
| -qa | 查看系统中已安装的所有RPM软件包列表 | rpm -qa |
| -qi | 查看指定软件的详细信息(包名/版本/安装时间等) | rpm -qi vim-enhanced |
| -ql | 查询指定软件包安装的目录和文件列表 | rpm -ql nginx |
| -qc | 仅显示指定软件包安装的配置文件 | rpm -qc openssh-server |
| -qd | 仅显示指定软件包安装的文档文件 | rpm -qd python3 |
# 1. 查询所有已安装包 (常配合grep过滤)
rpm -qa | grep httpd

# 2. 查看vim的详细信息 (图中红线圈出重点)
rpm -qi vim-enhanced

# 3. 列出nginx安装的所有文件
rpm -ql nginx

# 4. 仅查看ssh服务的配置文件
rpm -qc openssh-server

# 5. 获取python3的文档文件列表
rpm -qd python3
2.2 配置vim
set nu
set ai
set tabstop=4 " #设置 Tab 键显示为 4 个空格
set shiftwidth=4 " #设置自动缩进时缩进的列数为 4
set expandtab " #将 Tab 键转换为空格
syntax on
2.3 关闭SElinux和防火墙
关闭selinux
setenforce 0
清空规则
iptasbles -F
关闭防火墙
systemctl stop firewalld
systemctl enable firewalld


[root@target ~]# cat /etc/selinux/config

# This file controls the state of SELinux on the system.
# SELINUX= can take one of these three values:
#     enforcing - SELinux security policy is enforced.
#     permissive - SELinux prints warnings instead of enforcing.
#     disabled - No SELinux policy is loaded.
SELINUX=disabled
# SELINUXTYPE= can take one of three values:
#     targeted - Targeted processes are protected,
#     minimum - Modification of targeted policy. Only selected processes are protected.
#     mls - Multi Level Security protection.
SELINUXTYPE=targeted
2.4 关闭登录超时
设置-隐式-锁屏-电源
2.5 Linux启动过程和目录结构
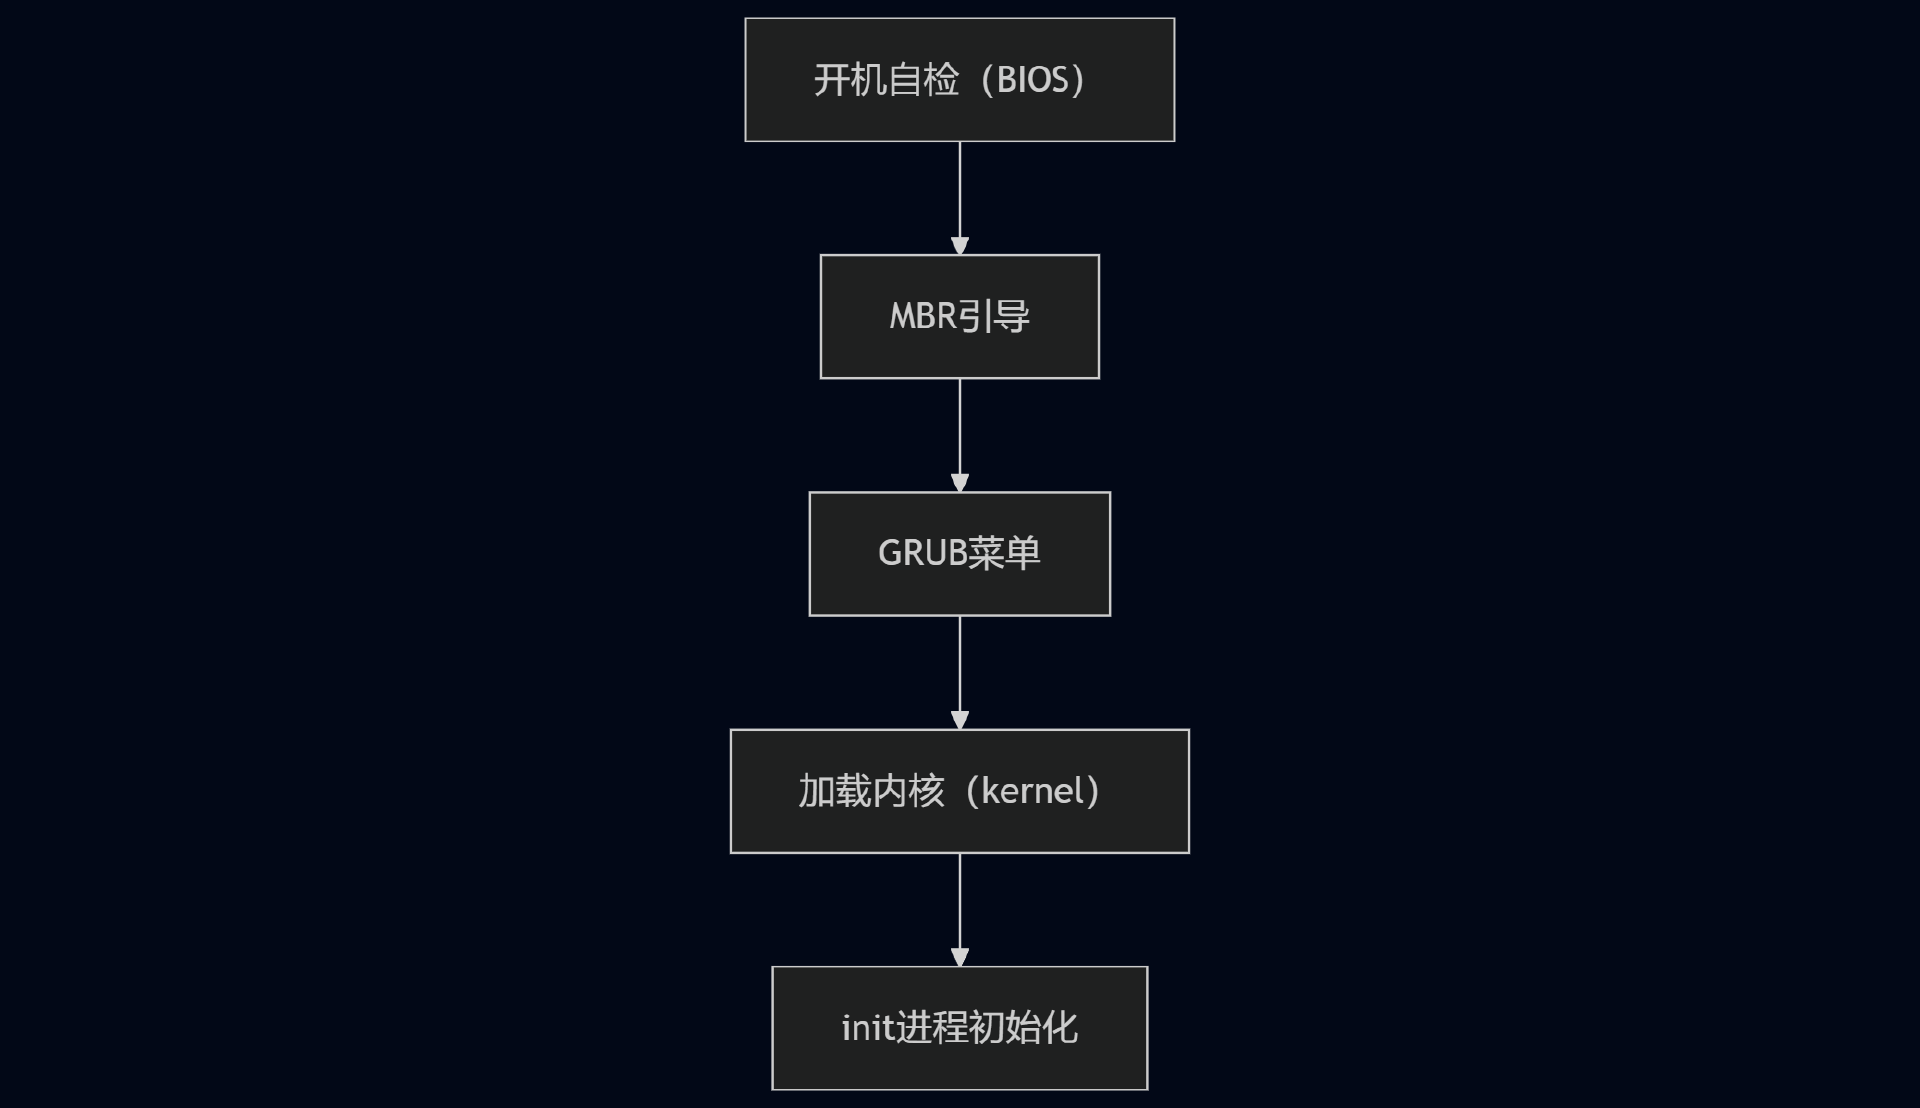
2.5.1 Linux启动过程
开机自检-MBR引导-GRUB菜单-加载内核-init进程初始化
2.5.2 Linux目录结构
| 目录 | 核心功能 | 典型内容示例 | 关键特性 |
|---|---|---|---|
| /bin | 基础用户命令 | ls, cp, bash | 单用户模式必需 |
| /sbin | 系统管理命令 | fdisk, ifconfig, reboot | 需 root 权限 |
| /etc | 系统/软件配置文件 | passwd, fstab, nginx.conf | 纯文本可编辑 |
| /dev | 硬件设备抽象接口 | sda(硬盘), tty(终端), null | 虚拟设备文件 |
| /var | 动态变化数据 | 日志、缓存、邮件队列 | 内容持续增长 |
| └── /var/log | 系统日志记录 | syslog, auth.log | 故障排查关键 |
| /usr | 用户程序资源库 | 应用二进制文件、文档、库 | 只读共享数据 |
| └── /usr/share | 架构无关共享数据 | 字体、图标、文档 | 跨平台兼容 |
| /proc | 内核/进程实时信息 | cpuinfo, meminfo, 进程状态 | 内存虚拟文件系统 |
| /tmp | 临时文件 | 安装缓存、会话文件 | 重启自动清除 |
2.6 init进程和system进程
init 进程是由Linux内核加载运行/sbin/init程序,是系统中的第一个进程PID为1
systemd进程代替init进程,成为主流程序位于/usr/lib/systemd
systemd的优势向下兼容,更快的启动速度,集中化命令管理,更合理的命令结构
2.6.1 Systemd单元类型表格
| 单元类型 | 扩展名 | 说明 |
|---|---|---|
| Service | .service | 描述一个系统服务 |
| Socket | .socket | 描述一个进程间通信的套接字 |
| Device | .device | 描述一个内核识别的设备文件 |
| Mount | .mount | 描述一个文件系统的挂载点 |
| Automount | .automount | 描述一个文件系统的自动挂载点 |
| Swap | .swap | 描述一个内存交换设备或交换文件 |
| Path | .path | 描述一个文件系统中文件或目录 |
| Timer | .timer | 描述一个定时器(用于实现类似cron的调度任务) |
| Snapshot | .snapshot | 用于保存一个systemd的状态 |
| Scope | .scope | 使用systemd的总线接口以编程的方式创建外部进程 |
| Slice | .slice | 描述居于Cgroup的一组通过层次组织的管理系统进程 |
| Target | .target | 描述一组systemd的单元 |
2.6.2 system和init进程操作
| 运行级别 | Systemd的target | 说明 |
|---|---|---|
| 0 | poweroff.target | 关机状态,使用该级别时将会关闭主机 |
| 1 | rescue.target | 单用户模式,不需要密码验证即可登录系统,多用于系统维护 |
| 2 | multi-user.target | 用户定义/域特定运行级别。默认等同于3 |
| 3 | multi-user.target | 字符界面的完整多用户模式,大多数服务器主机运行在此级别 |
| 4 | multi-user.target | 用户定义/域特定运行级别。默认等同于3 |
| 5 | graphical.target | 图形界面的多用户模式,提供了图形桌面操作环境 |
| 6 | reboot.target | 重新启动,使用该级别时将会重启主机 |
init 0 #关机
init 1 #单用户模式
init 2 #多用户没网络
init 3 #多用户模式黑窗口
init 5 #多用户图形界面
init 6 #重启

systemctl isolate multi-user.target #将目前的操作环境改为纯文本模式,关掉图形界面
systemctl isolate graphical.target #将目前的操作环境改为图形界面
systemctl poweroff
systemctl reload #有的程序在进程中 所以有的服务无法加载成功
systemctl restart
systemctl status
systemctl disable

#管理服务
systemctl list-unit-files
主机名称更改
[root@web01 ~]# hostnamectl set-hostname web01

runlevel #查看运行级别
[root@target ~]# runlevel
N 3
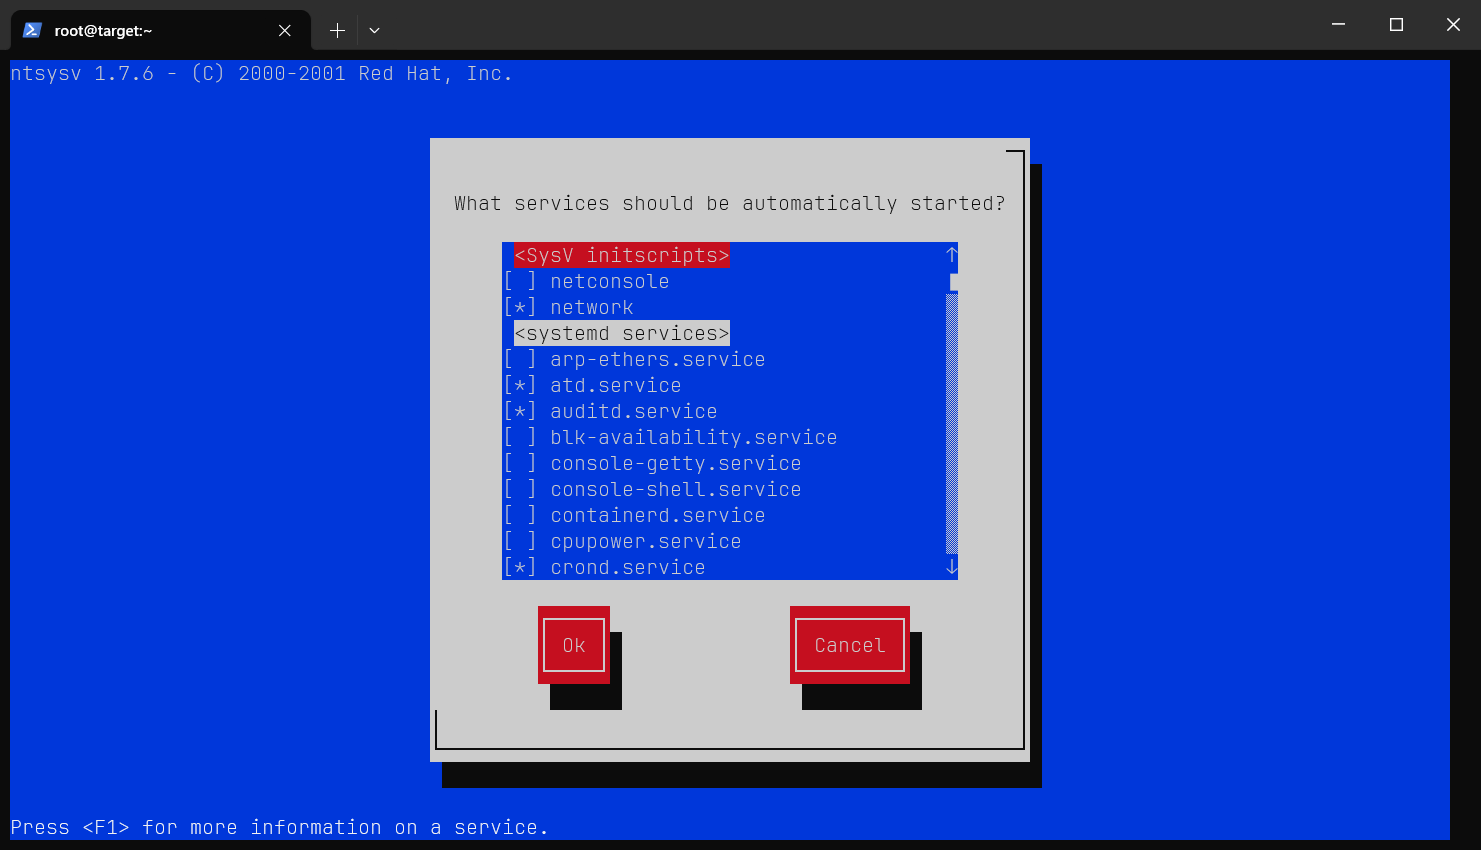
2.6.3 ntsysv 系统图形化服务管理工具
用于快速管理服务
2.8 磁盘管理
2.8.1 磁盘分区管理
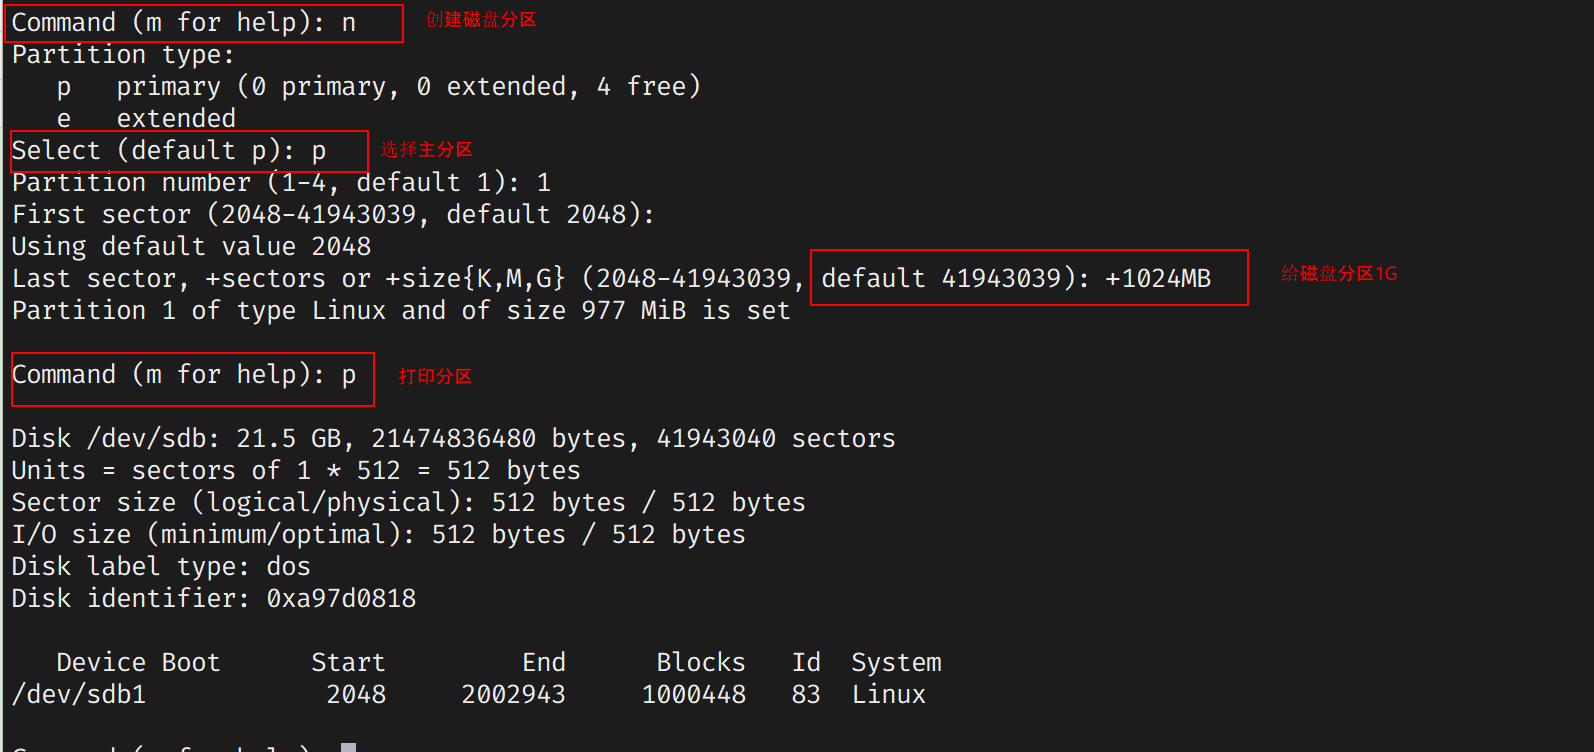
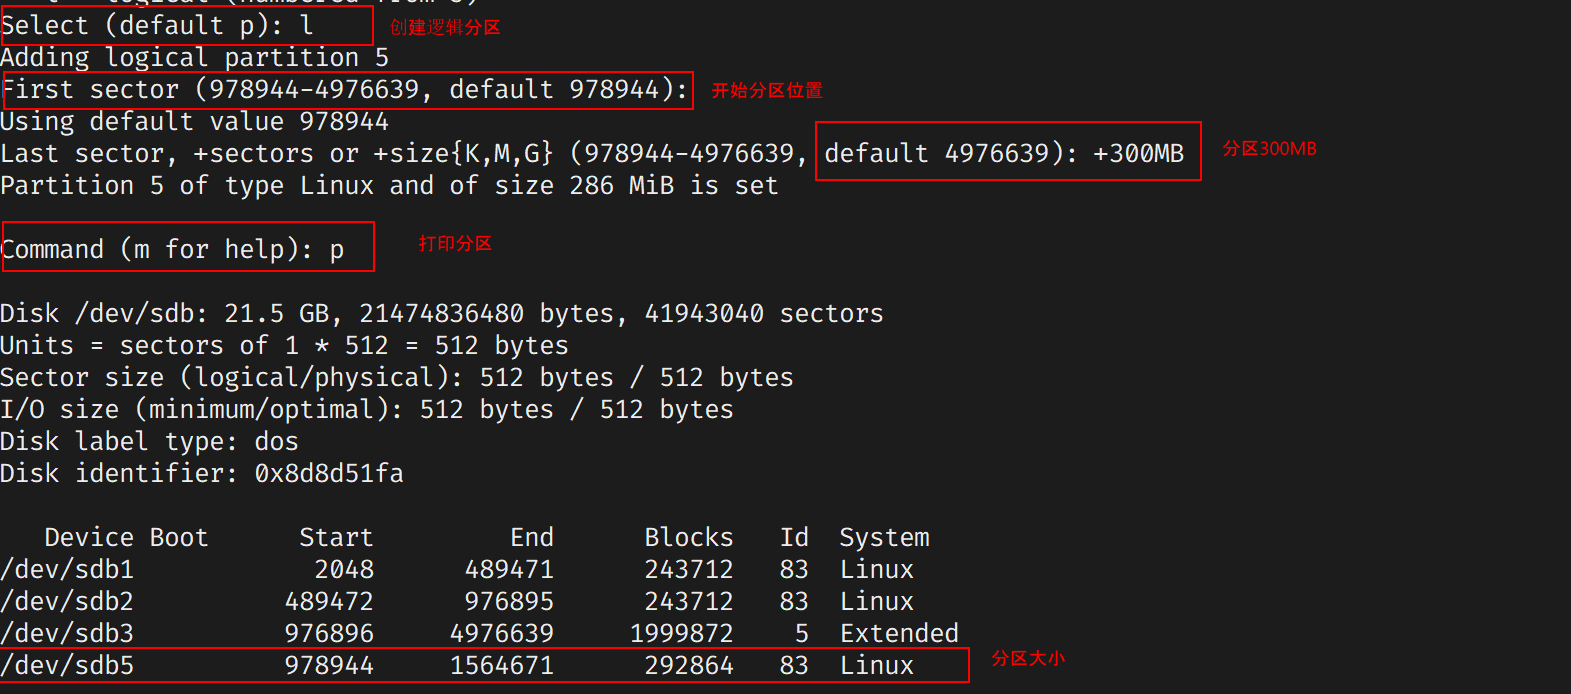
一般有4个主分区,2个主分区,第三个可以设置成逻辑分区,所有的逻辑分区第一个设备是/dev/sdb5
| 分区类型 | 设备名 | 功能说明 |
|---|---|---|
| 主分区1 | /dev/sdb1 | 系统引导分区(如 /boot) |
| 主分区2 | /dev/sdb2 | 根分区(/) |
| 扩展分区 | /dev/sdb3 | 容器(不直接使用) |
| 逻辑分区1 | /dev/sdb5 | /home 用户数据 |
| 逻辑分区2 | /dev/sdb6 | /var 日志文件 |
2.8.2 fdisk 命令
2.8.2.1 fdisk命令参数表
| 类型 | 指令/参数 | 功能说明 | 使用场景 |
|---|---|---|---|
| 基础语法 | fdisk -l [磁盘设备] | 只读查看指定磁盘的分区列表 | 预览分区结构(如 fdisk -l /dev/sda) |
| fdisk [磁盘设备] | 进入交互模式管理指定磁盘 | 编辑分区(如 fdisk /dev/sdb) | |
| 交互指令 | m | 查看所有操作命令的帮助文档 | 忘记指令时查询 |
| p | 打印当前分区表(显示分区详情) | 操作前确认分区状态 | |
| n | 新建分区(设置大小/位置/类型) | 扩容或重新划分磁盘空间 | |
| d | 删除选中分区 | 清理无用分区或调整布局 | |
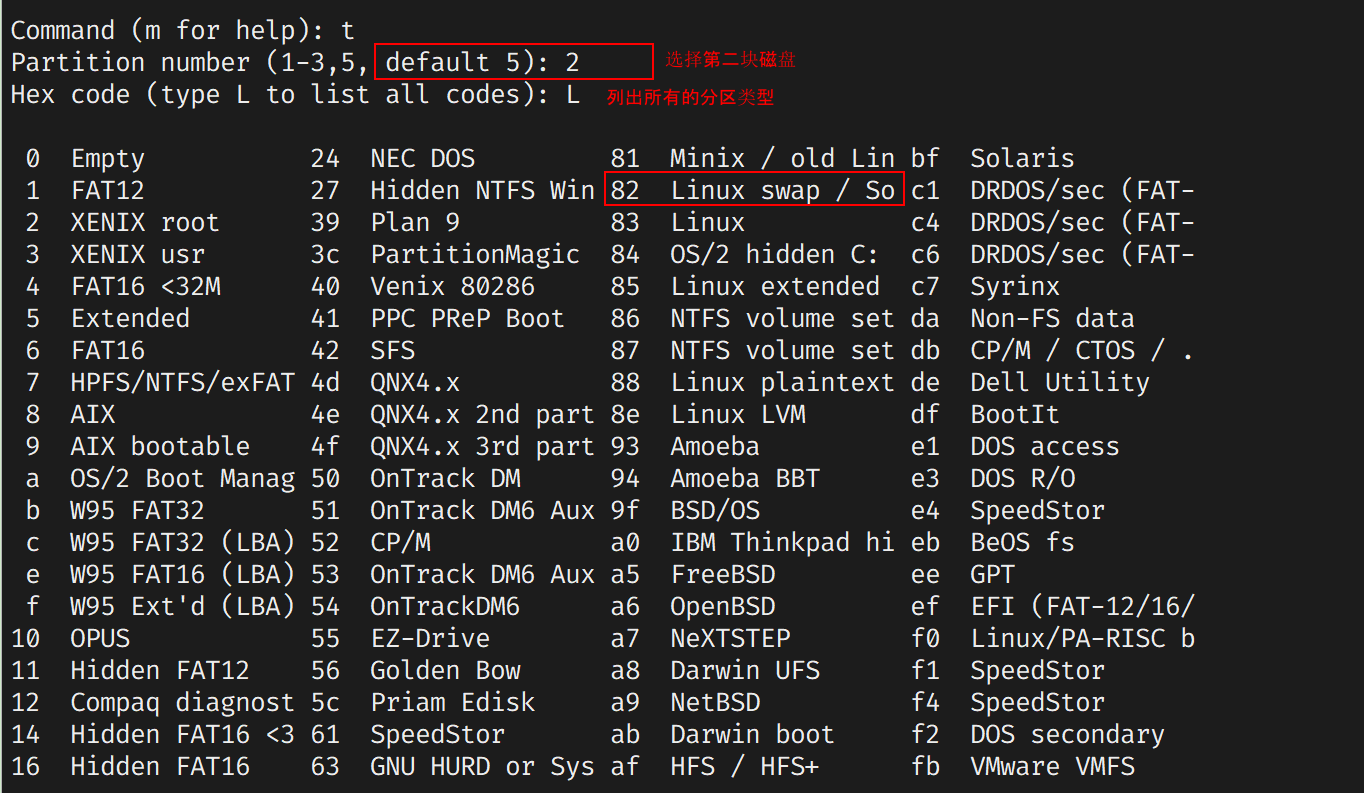
| t | 变更分区类型(如改为swap/Linux/NTFS) | 适配不同文件系统需求 | |
| 退出操作 | w | 保存分区设置并退出 | 确认修改后生效 |
| q | 放弃修改并退出 | 操作失误时安全退出 |
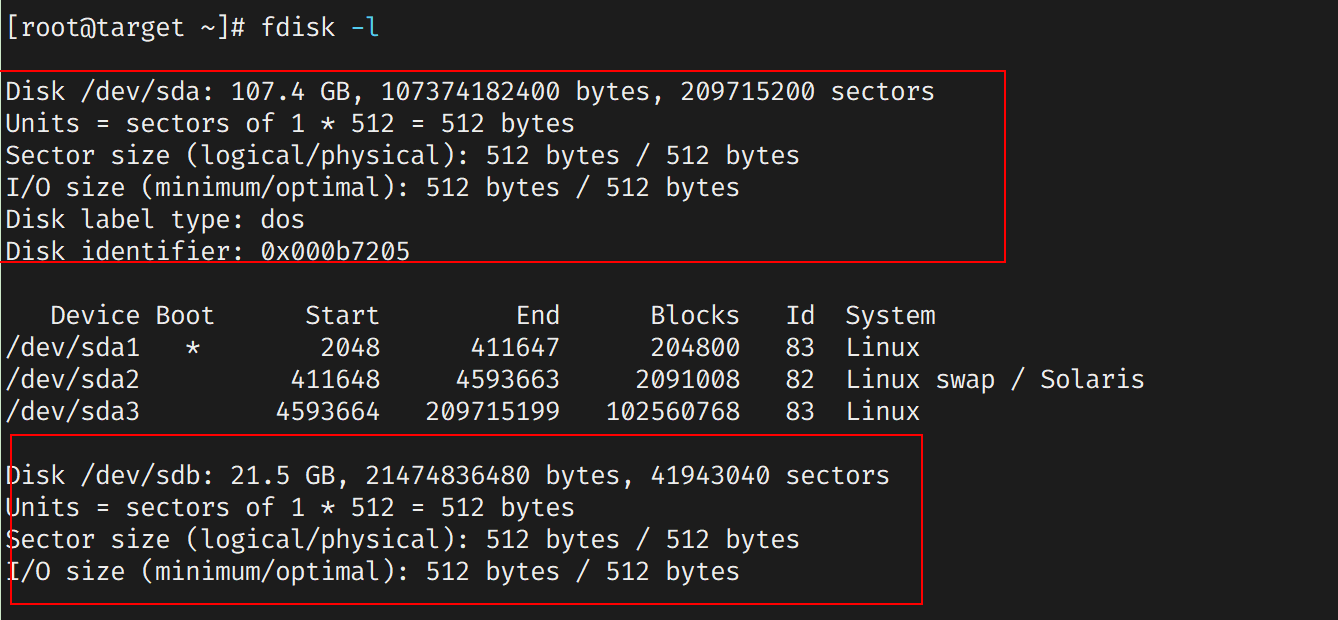
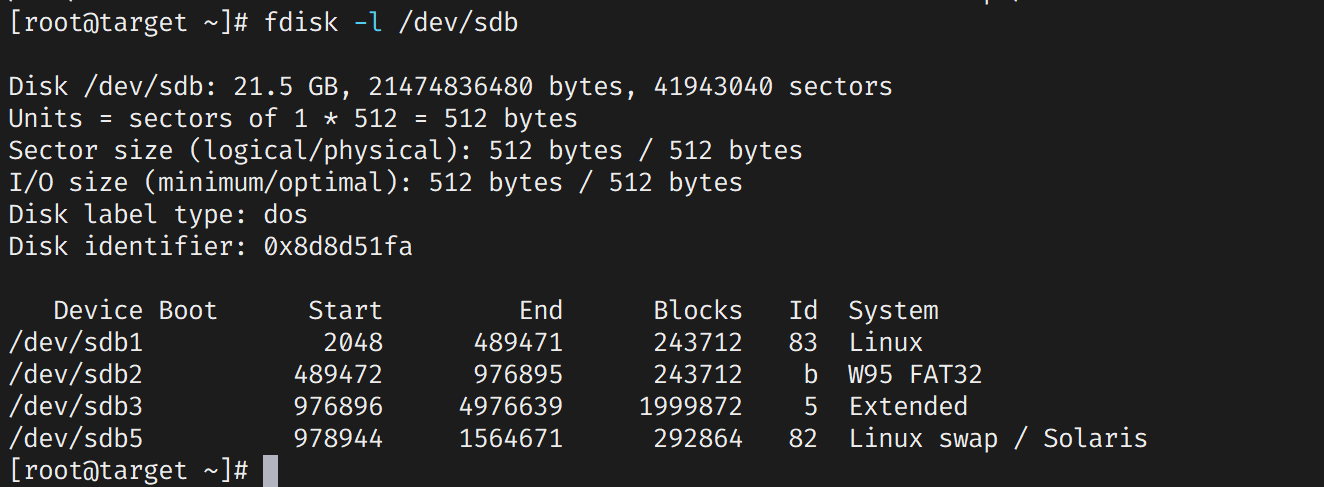
2.8.2.1 fdisk -l
可以看到有两块磁盘
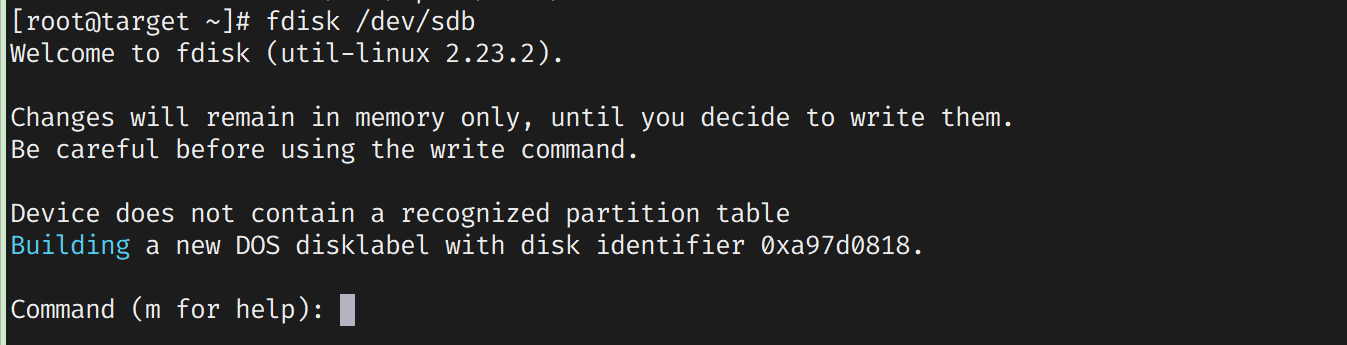
2.8.2.2 fdisk 分区/dev/sdb
fdisk /dev/sdb
2.8.2.3 fdisk 创建主分区/dev/sdb1
2.8.2.4 fdisk创建逻辑分区
2.8.2.5 修改磁盘的分区类型
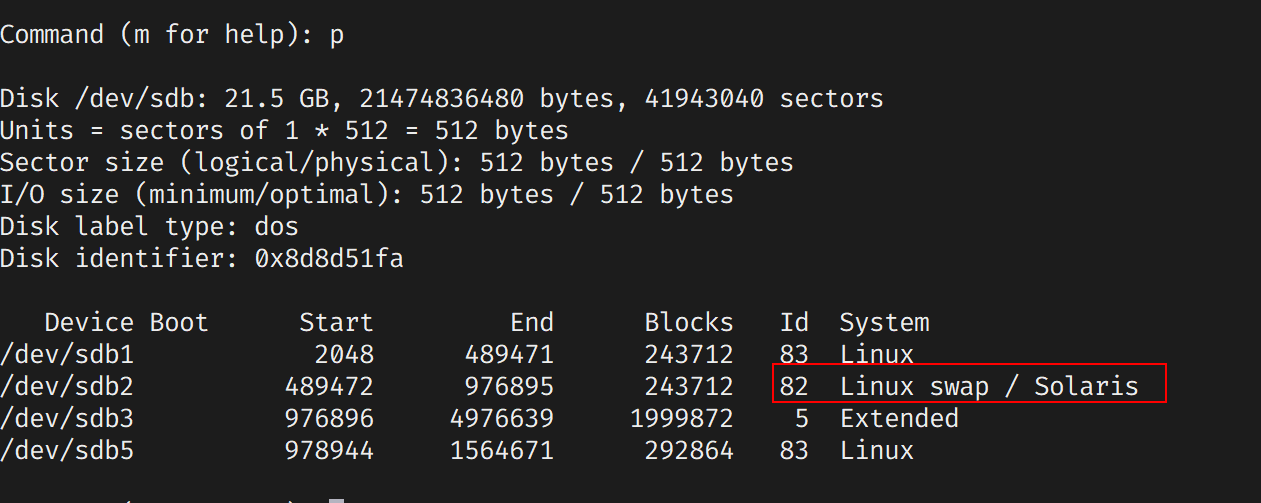
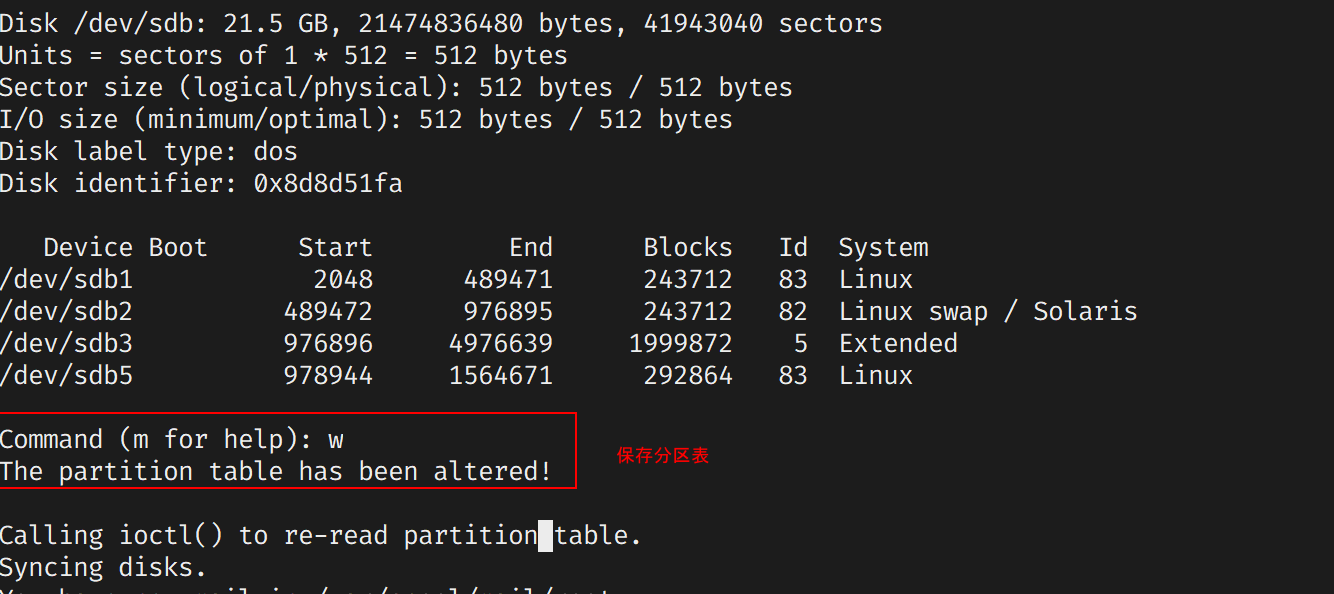
2.8.2.6 保存分区表
2.8.3 mkfs 格式化分区表
2.8.3.1 查看创建的分区表
磁盘分区配置明细表
| 设备名 | 分区类型 | 大小 | 文件系统/用途 | 挂载点 | 特殊说明 |
|---|---|---|---|---|---|
| sdb1 | 主分区 (Primary) | 250 MB | Linux 标准分区 (ext4/xfs) | /mailbox | 独立存储空间 |
| sdb2 | 主分区 (Primary) | 250 MB | FAT32/NTFS (Windows兼容) | /share | 跨平台文件共享 |
| sdb4 | 扩展分区 (Extended) | 剩余空间 | 容器分区 | 无挂载 | 用于容纳逻辑分区 |
| sdb5 | 逻辑分区 (Logical) | 250 MB | swap | 无挂载 | 虚拟内存空间(隶属于sdb4) |
2.8.3.2 格式化分区sdb1表为ext4
mkfs.ext4 /dev/sdb1
[root@target ~]# mkfs.ext4 /dev/sdb1
mke2fs 1.42.9 (28-Dec-2013)
Filesystem label=
OS type: Linux
Block size=1024 (log=0)
Fragment size=1024 (log=0)
Stride=0 blocks, Stripe width=0 blocks
60960 inodes, 243712 blocks
12185 blocks (5.00%) reserved for the super user
First data block=1
Maximum filesystem blocks=33816576
30 block groups
8192 blocks per group, 8192 fragments per group
2032 inodes per group
Superblock backups stored on blocks:
        8193, 24577, 40961, 57345, 73729, 204801, 221185

Allocating group tables: done
Writing inode tables: done
Creating journal (4096 blocks): done
Writing superblocks and filesystem accounting information: done


[root@target ~]# mkdir /tmp/mailbox
[root@target ~]# mount /dev/sdb1  /tmp/mailbox/
[root@target ~]# du -sh /tmp/mailbox/
13K     /tmp/mailbox/
[root@target ~]# lsblk
NAME   MAJ:MIN RM  SIZE RO TYPE MOUNTPOINT
sda      8:0    0  100G  0 disk
├─sda1   8:1    0  200M  0 part /boot
├─sda2   8:2    0    2G  0 part [SWAP]
└─sda3   8:3    0 97.8G  0 part /
sdb      8:16   0   20G  0 disk
├─sdb1   8:17   0  238M  0 part /tmp/mailbox
├─sdb2   8:18   0  238M  0 part
├─sdb3   8:19   0    1K  0 part
└─sdb5   8:21   0  286M  0 part
sr0     11:0    1 1024M  0 rom
2.8.3.3 格式化分区sdb2表为fat32
mkfs.vfat -F 32 /dev/sdb2
#1.安装mkfs.vfat命令系统默认没有
[root@target ~]# yum -y install dosfstools

#2.sdb2创建分区
[root@target ~]# mkfs.vfat /dev/sdb2
mkfs.fat 3.0.20 (12 Jun 2013)
#3.创建挂载点
[root@target ~]# mkdir /tmp/share
#4.挂载设备
[root@target ~]# mount /dev/sdb2 /tmp/share

#5.查看设备是否挂载成功
[root@target ~]# lsblk
NAME   MAJ:MIN RM  SIZE RO TYPE MOUNTPOINT
sda      8:0    0  100G  0 disk
├─sda1   8:1    0  200M  0 part /boot
├─sda2   8:2    0    2G  0 part [SWAP]
└─sda3   8:3    0 97.8G  0 part /
sdb      8:16   0   20G  0 disk
├─sdb1   8:17   0  238M  0 part /tmp/mailbox
├─sdb2   8:18   0  238M  0 part /tmp/share
├─sdb3   8:19   0    1K  0 part
└─sdb5   8:21   0  286M  0 part
sr0     11:0    1 1024M  0 rom

#6.查看设备是否挂载成功
[root@target ~]# mount |tail -2
/dev/sdb1 on /tmp/mailbox type ext4 (rw,relatime,data=ordered)
/dev/sdb2 on /tmp/share type vfat (rw,relatime,fmask=0022,dmask=0022,codepage=437,iocharset=ascii,shortname=mixed,errors=remount-ro)
2.8.3.3 格式化分区sdb5表为swap
# 1. 创建交换分区
[root@target ~]# mkswap /dev/sdb5
Setting up swapspace version 1, size = 2097148 KiB
no label, UUID=9673550e-9dfd-4fa8-8683-255680230f10

# 2. 查看初始交换空间总量
[root@target ~]# cat /proc/meminfo | grep SwapTotal
SwapTotal: 8257532 kB

# 3. 启用交换分区
[root@target ~]# swapon /dev/sdb5

# 4. 验证交换空间扩容
[root@target ~]# cat /proc/meminfo | grep SwapTotal
SwapTotal: 10354680 kB  # 增加2097148 kB (约2GB)

# 5. 禁用交换分区
[root@target ~]# swapoff /dev/sdb5
2.8.3.4 开机挂载
[root@target ~]# tail -2 /etc/fstab
/dev/sdb1       /tmp/mailbox    ext4    defaults 0 0
/dev/sdb2       /tmp/share              vfat    defaults 0 0
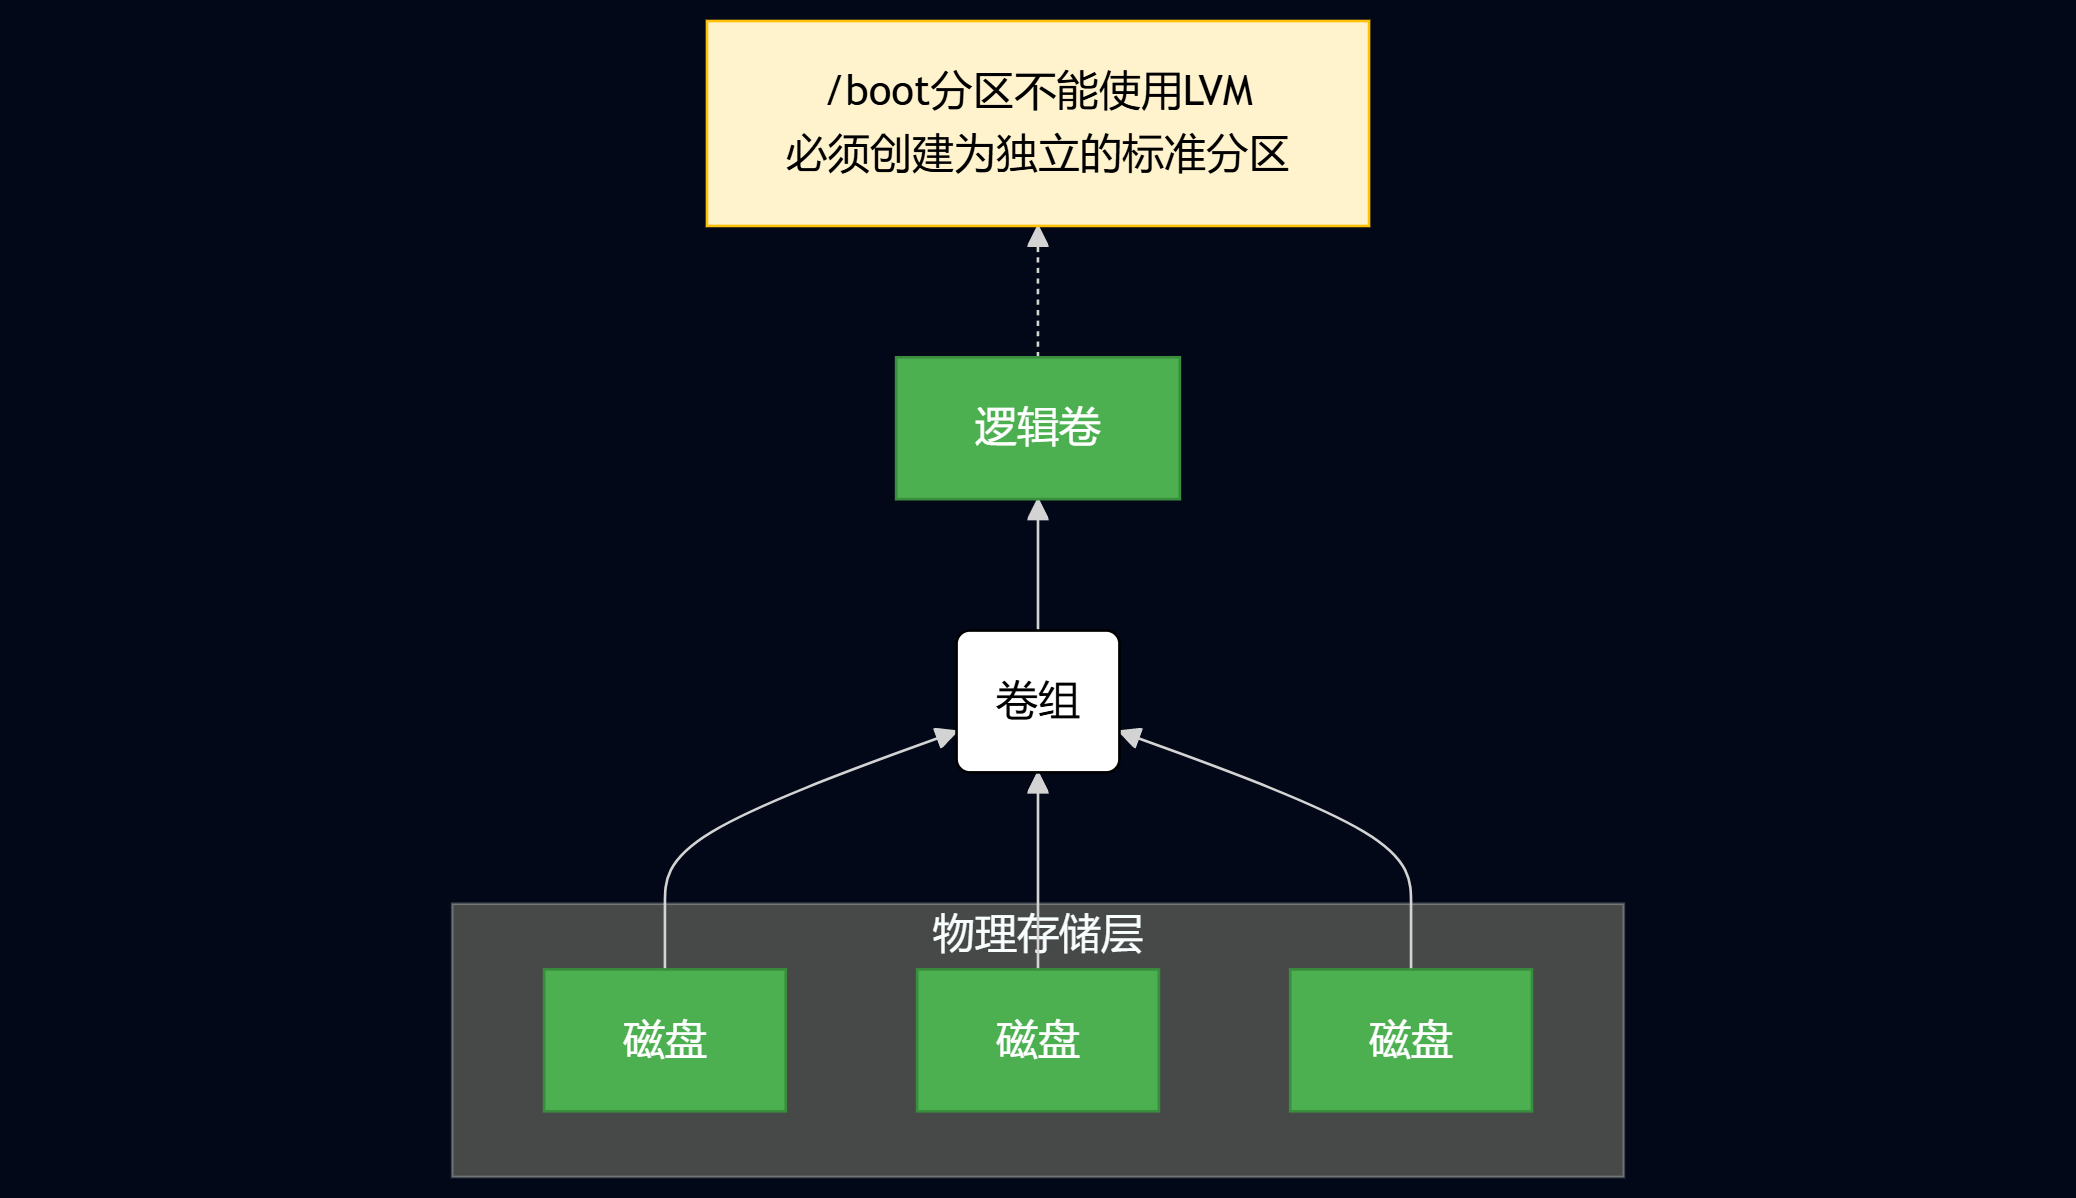
2.8.4 LVM
2.8.4.1 LVM 定义和核心优势
- 什么是LVM?
LVM(Logical Volume Manager,逻辑卷管理)是Linux系统中一种高级磁盘管理技术。它通过抽象化物理磁盘资源,允许用户动态调整磁盘分区大小(即“动态调整磁盘容量”),而无需重启系统或迁移数据。 - 核心优势(基于图片描述):
- 提高磁盘管理的灵活性:允许在运行时扩展、缩小或移动磁盘空间,避免传统分区(如ext4)的固定大小限制。
- 资源池化:将多个物理磁盘整合为一个可灵活分配的池,优化存储利用率
2.8.4.2 LVM 层级结构
逻辑卷 (Logical Volume) → 卷组 (Volume Group) → 物理卷 (Physical Volume)。以下是各级的详细解释和相互关系:
- 物理卷 (Physical Volume, PV):
- 位置:结构中最底层(对应“磁盘”)。
- 作用:代表物理磁盘或分区(如/dev/sda1),是LVM的基础存储单元。在使用前需通过
pvcreate命令初始化为LVM物理卷。 - 典型操作:添加或移除物理磁盘以扩展存储池。
- 卷组 (Volume Group, VG):
- 位置:中间层(箭头从物理卷指向卷组)。
- 作用:将多个物理卷组合成一个逻辑存储池(如命名为
vg_data)。VG是资源分配的核心,其空间可被划分为多个逻辑卷。 - 关键特性:支持动态扩展(通过添加物理卷)或缩减(通过移除物理卷)。
- 逻辑卷 (Logical Volume, LV):
- 位置:最上层(箭头从卷组指向逻辑卷)。
- 作用:从卷组中划分出的逻辑分区(如命名为
lv_home),可直接格式化为文件系统(如ext4)并挂载使用。 - 优势:可在线调整大小(如用
lvextend命令),支持快照备份等高级功能。
2.8.4.3 LVM 主要命令速查表
| 功能 | 物理卷管理 (PV) | 卷组管理 (VG) | 逻辑卷管理 (LV) |
|---|---|---|---|
| Scan 扫描 | pvscan |
vgscan |
lvscan |
| Create 建立 | pvcreate |
vgcreate |
lvcreate |
| Display 显示 | pvdisplay |
vgdisplay |
lvdisplay |
| Remove 删除 | pvremove |
vgremove |
lvremove |
| Extend 扩展 | - | vgextend |
lvextend |
| Reduce 减少 | - | vgreduce |
lvreduce |
2.8.4.4 LVM创建过程
三块硬盘,其中两块先添加成lvm,最后一块扩展添加
-
查看磁盘分别是
sdb、sdc、sdd[root@mysql ~]# lsblk NAME MAJ:MIN RM SIZE RO TYPE MOUNTPOINT sda 8:0 0 100G 0 disk ├─sda1 8:1 0 200M 0 part /boot ├─sda2 8:2 0 2G 0 part [SWAP] └─sda3 8:3 0 97.9G 0 part / sdb 8:16 0 1G 0 disk sdc 8:32 0 1G 0 disk sdd 8:48 0 1G 0 disk sr0 11:0 1 1024M 0 rom -
安装lvm功能命令
[root@mysql ~]# yum -y install lvm2 -
创建lvm逻辑卷
#典型工作流示例(创建逻辑卷):
[root@mysql ~]# pvcreate /dev/sdb /dev/sdc # 初始化物理卷
  Physical volume "/dev/sdb" successfully created.
  Physical volume "/dev/sdc" successfully created.

[root@mysql ~]# vgcreate vg_data /dev/sdb /dev/sdc   # 创建卷组
  Volume group "vg_data" successfully created

[root@mysql ~]# vgdisplay #查看卷组大小
  --- Volume group ---
  VG Name               vg_data
  System ID
  Format                lvm2
  Metadata Areas        2
  Metadata Sequence No  1
  VG Access             read/write
  VG Status             resizable
  MAX LV                0
  Cur LV                0
  Open LV               0
  Max PV                0
  Cur PV                2
  Act PV                2
  VG Size               1.99 GiB
  PE Size               4.00 MiB
  Total PE              510
  Alloc PE / Size       0 / 0
  Free  PE / Size       510 / 1.99 GiB
  VG UUID               vJeXdx-ntSS-ossK-Jogn-3Fd3-RVif-NgqnpE


[root@mysql ~]# lvcreate -L 1.9G -n lv_data vg_data  # 创建逻辑卷
  Rounding up size to full physical extent 1.90 GiB
  Logical volume "lv_data" created.
-
格式化并创建文件系统
[root@mysql vg_data]# mkfs.ext4 /dev/vg_data/lv_data mke2fs 1.42.9 (28-Dec-2013) Filesystem label= OS type: Linux Block size=4096 (log=2) Fragment size=4096 (log=2) Stride=0 blocks, Stripe width=0 blocks 124672 inodes, 498688 blocks 24934 blocks (5.00%) reserved for the super user First data block=0 Maximum filesystem blocks=511705088 16 block groups 32768 blocks per group, 32768 fragments per group 7792 inodes per group Superblock backups stored on blocks: 32768, 98304, 163840, 229376, 294912 Allocating group tables: done Writing inode tables: done Creating journal (8192 blocks): done Writing superblocks and filesystem accounting information: done -
查看磁盘
[root@mysql vg_data]# lsblk NAME MAJ:MIN RM SIZE RO TYPE MOUNTPOINT sda 8:0 0 100G 0 disk ├─sda1 8:1 0 200M 0 part /boot ├─sda2 8:2 0 2G 0 part [SWAP] └─sda3 8:3 0 97.9G 0 part / sdb 8:16 0 1G 0 disk └─vg_data-lv_data 253:0 0 1.9G 0 lvm sdc 8:32 0 1G 0 disk └─vg_data-lv_data 253:0 0 1.9G 0 lvm sdd 8:48 0 1G 0 disk -
挂载
lvm到share下[root@mysql vg_data]# mkdir /share [root@mysql vg_data]# mount /dev/vg_data/lv_data /share/ [root@mysql vg_data]# echo `hostname` > /share/1.txt [root@mysql vg_data]# cat /share/1.txt mysql -
开机自动化挂载
[root@mysql vg_data]# tail -n 2 /etc/fstab
/dev/vg_data/lv_data  /share/ ext4 defaults 0 0
2.8.4.5 LVM添加扩展磁盘
- 将一块磁盘扩展添加到
lvm中
 # 将一块磁盘加入LVM系统
[root@mysql vg_data]# pvcreate /dev/sdd
  Physical volume "/dev/sdd" successfully created.

# 将新磁盘/dev/sdd加入卷组
[root@mysql vg_data]# vgextend vg_data /dev/sdd
  Volume group "vg_data" successfully extended
- 查看
lvm vg大小
[root@mysql vg_data]# vgdisplay
  --- Volume group ---
  VG Name               vg_data
  System ID
  Format                lvm2
  Metadata Areas        3
  Metadata Sequence No  3
  VG Access             read/write
  VG Status             resizable
  MAX LV                0
  Cur LV                1
  Open LV               1
  Max PV                0
  Cur PV                3
  Act PV                3
  VG Size               <2.99 GiB
  PE Size               4.00 MiB
  Total PE              765
  Alloc PE / Size       487 / 1.90 GiB
  Free  PE / Size       278 / <1.09 GiB
  VG UUID               vJeXdx-ntSS-ossK-Jogn-3Fd3-RVif-NgqnpE
- 将
vg里面的1G添加到lv里
# 为lv_data增加1G
[root@mysql vg_data]# lvextend -L +1G /dev/vg_data/lv_data
  Size of logical volume vg_data/lv_data changed from 1.90 GiB (487 extents) to 2.90 GiB (743 extents).
  Logical volume vg_data/lv_data successfully resized.
- 使扩展的空间对文件系统生效
[root@mysql vg_data]# resize2fs /dev/vg_data/lv_data
resize2fs 1.42.9 (28-Dec-2013)
Filesystem at /dev/vg_data/lv_data is mounted on /share; on-line resizing required
old_desc_blocks = 1, new_desc_blocks = 1
The filesystem on /dev/vg_data/lv_data is now 760832 blocks long.
- 查看磁盘
[root@mysql vg_data]# lsblk
NAME              MAJ:MIN RM  SIZE RO TYPE MOUNTPOINT
sda                 8:0    0  100G  0 disk
├─sda1              8:1    0  200M  0 part /boot
├─sda2              8:2    0    2G  0 part [SWAP]
└─sda3              8:3    0 97.9G  0 part /
sdb                 8:16   0    1G  0 disk
└─vg_data-lv_data 253:0    0  2.9G  0 lvm  /share
sdc                 8:32   0    1G  0 disk
└─vg_data-lv_data 253:0    0  2.9G  0 lvm  /share
sdd                 8:48   0    1G  0 disk
└─vg_data-lv_data 253:0    0  2.9G  0 lvm  /share
2.9 用户管理
usermod -L user #锁定账户不让登录
lchange -l user #查看账户是否锁定
usermod -g username lisi # -g 用户组 用户名 更改组id号
useradd -g username zhangsan # -g 用户组 用户名 创建用户时自动加入到用户组中
usermod -G lisi zhangsan #-G添加到附属组中
gpasswd -d zhangsan lisi #gpasswd -d 用户名 组名 删除附属组
2.10 文件操作
文件 rwx 分别代表的含义:
r 文件内容可以查看
w 文件内容可以编辑
x 程序文件可以执行

目录rwx 分别代表的含义:
r 目录下可以查看文件和目录
w 目录下可以创建文件和目录
x 目录下可以 cd 切换进入

4 = r
2 = w
1 = x
2.11 压缩文件内容
tar -tf #查看压缩文件内容
tar -zcf xx.tar.gz file1 file2 #将文件打包压缩
tar -zxf xx.tar.gz -C /tmp #将文件压缩包到指定的目录tmp下
tar -cf xx.tar.gz file1 file2 #将文件打包不压缩

gzip 打包文件会自动删除原文件
gzip file
gzip -d file.gz

zip 打包文件不会删除
zip -r xx.zip file1 file2
unzip xx.zip -d /tmp/zip/

#rar 解压
yum -y install epel-release
yum -y install unar
unar -o /tmp/rar file.rar
2.12 后台程序
#查看后台进程
jobs -l
#将进程放到前台运行
fg
#将进程放到后台运行
bg
2.13 安装网络管理工具
#安装网络管理、屏幕、tab键加强、进程Pstree
yum -y install net-tools screen bash-completion psmisc
[root@localhost ~]#source /etc/profile.d/bash_completion.sh
[root@localhost ~]# screen -ls
There is a screen on: 1826.pts-0.localhost (Attached) 1 Socket in /var/run/screen/S-root.
[root@localhost ~]# screen -r 1826

#curl模拟浏览器的方式访问
[root@localhost ~]# curl -H "User-Agent: Mozilla/5.0 (Windows NT 10.0; Win64; x64) AppleWebKit/537.36 (KHTML, like Gecko) Chrome/58.0.3029.110 Safari/537.3" https://ip138.com/
2.14 开启路由转发功能管理
#使用route命令转发数据
[root@attack_server_one ~]# route add -net 172.16.10.0/24 gw 192.168.226.162

[root@localhost ~]# cat /etc/sysctl.conf
# sysctl settings are defined through files in
# /usr/lib/sysctl.d/, /run/sysctl.d/, and /etc/sysctl.d/.
#
# Vendors settings live in /usr/lib/sysctl.d/.
# To override a whole file, create a new file with the same in
# /etc/sysctl.d/ and put new settings there. To override
# only specific settings, add a file with a lexically later
# name in /etc/sysctl.d/ and put new settings there.
#
# For more information, see sysctl.conf(5) and sysctl.d(5).
net.ipv4.ip_forward = 1

[root@localhost ~]# sysctl -p
net.ipv4.ip_forward = 1

#使用iptable nat转发使内网主机访问外网
iptables -t nat -F
iptables -t nat -A POSTROUTING -s 172.16.10.0/24 -j MASQUERADE
echo "net.ipv4.ip_forward = 1" >> /etc/sysctl.conf
sysctl -p
2.15 日志管理
#清空所有history日志
[root@web01 ~]# > ~/.bash_history
#清空当前内存中的history日志
[root@web01 ~]# history -c
2.16 基本命令
#导出帮助文档
[root@target ~]# man ls | col -b >ls_help.tx
#ls命令
[root@target ~]# ls -A #查看当前所有文件和目录
ARL-plus-docker-main  .bash_history  .bash_profile  .cshrc   .lesshst     .mysql_history  .tcshrc   .vimrc
backup                .bash_logout   .bashrc        .docker  ls_help.txt  .pki            .viminfo

[root@target ~]# ls -lh #长格式显示当前文件夹
total 8.0K
drwxr-xr-x 8 root root  118 Jul  5 12:37 ARL-plus-docker-main
drwxr-xr-x 3 root root  128 Jun 16 19:59 backup
-rw-r--r-- 1 root root 7.4K Jul  5 13:26 ls_help.txt

du -ha 文件路径 查看当前文件目录下面所有文件的大小
du -hs 文件路径 查看当前文件目录的总大小

#软链接 inode节点不一样 文件内容被修改 链接文件也被修改
ln -s 文件路径 文件路径
#硬链接 inode 节点一样 相当于备份 文件内容被修改 链接文件也被修改
ln 文件路径 文件路径

#find查找命令
find | xargs -I {} cp {} ;\
find -size +1024K
find /etc -type f | xargs -I {} grep -l ServerName {}
find /data -type f -size +1G -exec ls -lh {} \; > large_files.log

find . -name "*.old" -print0 | xargs -0 -I {} mv {} {}.new


systemctl list-unit-files |grep enable

rpm -qf /usr/sbin/ifconfig 查看命令文件是那个rpm软件包安装的

rpm -qpl 888.rpm 查看rpm包安装到哪里
chmod u+s /usr/sbin/ifconfig 设置拥有属主、属组的权限
三、系统主机服务管理
3.1 网卡管理
3.1.1 网卡名称配置
网卡名称在centos6以后不再是eth0的方式显示,需要在安装时添加 net.ifnames=0 biosdevname=0
3.1.2 网卡重启报错
一般网卡重启报错存在两个问题:
1.是NetworkManager的原因。
2.是网卡Mac地址的原因。
#网卡重启报错
[root@localhost ~]# /etc/init.d/network restart
Restarting network (via systemctl): Job for network.service failed because the control process exited with error code. See "systemctl status network.service" and "journalctl -xe" for details.
[FAILED]
[root@localhost ~]# systemctl status network
● network.service - LSB: Bring up/down networking
Loaded: loaded (/etc/rc.d/init.d/network; bad; vendor preset: disabled)
Active: failed (Result: exit-code) since Sun 2025-05-11 14:03:49 CST; 55s ago
Docs: man:systemd-sysv-generator(8)
Process: 4618 ExecStart=/etc/rc.d/init.d/network start (code=exited, status=1/FAILURE)

May 11 14:03:49 localhost.localdomain network[4618]: RTNETLINK answers: File exists
May 11 14:03:49 localhost.localdomain network[4618]: RTNETLINK answers: File exists
May 11 14:03:49 localhost.localdomain network[4618]: RTNETLINK answers: File exists
May 11 14:03:49 localhost.localdomain network[4618]: RTNETLINK answers: File exists
May 11 14:03:49 localhost.localdomain network[4618]: RTNETLINK answers: File exists
May 11 14:03:49 localhost.localdomain network[4618]: RTNETLINK answers: File exists
May 11 14:03:49 localhost.localdomain systemd[1]: network.service: control process exited, code=exited status=1
May 11 14:03:49 localhost.localdomain systemd[1]: Failed to start LSB: Bring up/down networking.
May 11 14:03:49 localhost.localdomain systemd[1]: Unit network.service entered failed state.
May 11 14:03:49 localhost.localdomain systemd[1]: network.service failed.

#查看日志报错信息
[root@localhost ~]# journalctl -xeu network.service
--
-- The result is failed.
May 11 14:03:49 localhost.localdomain systemd[1]: Unit network.service entered failed state.
May 11 14:03:49 localhost.localdomain systemd[1]: network.service failed.
May 11 14:05:10 localhost.localdomain systemd[1]: Starting LSB: Bring up/down networking...
-- Subject: Unit network.service has begun start-up
-- Defined-By: systemd
#关闭
[root@localhost network-scripts]# systemctl stop NetworkManager
#禁用
[root@localhost network-scripts]# systemctl disable NetworkManager
Removed symlink /etc/systemd/system/multi-user.target.wants/NetworkManager.service.
Removed symlink /etc/systemd/system/dbus-org.freedesktop.nm-dispatcher.service.
Removed symlink /etc/systemd/system/network-online.target.wants/NetworkManager-wait-online.service.
#卸载
[root@localhost network-scripts]# yum remove NetworkManager
3.2 firewalld管理
3.2.1 firewalld基本设置
[root@localhost ~]# firewall-cmd --list-ports
[root@localhost ~]# firewall-cmd --list-services

[root@localhost ~]# cat /etc/firewalld/zones/public.xml
<?xml version="1.0" encoding="utf-8"?>
<zone>
<short>Public</short>
<description>For use in public areas. You do not trust the other computers on networks to not harm your computer. Only selected incoming connections are accepted.</description>
<service name="ssh"/>
<service name="dhcpv6-client"/>
</zone>

[root@localhost ~]# cat /usr/lib/firewalld/services/ssh.xml
<?xml version="1.0" encoding="utf-8"?>
<service>
<short>SSH</short>
<description>Secure Shell (SSH) is a protocol for logging into and executing commands on remote machines. It provides secure encrypted communications. If you plan on accessing your machine remotely via SSH over a firewalled interface, enable this option. You need the openssh-server package installed for this option to be useful.</description>
<port protocol="tcp" port="22"/>
</service>
3.2.2 开启3306端口
[root@mysql ~]# firewall-cmd --permanent --zone=public --add-port=3306/tcp
success
[root@mysql ~]# firewall-cmd --reload
success
[root@mysql ~]# firewall-cmd --list-ports | grep 3306
3306/tcp
3.3 配置dhcp服务器
yum install dhcp
vim /etc/dhcp/dhcpd.conf

[root@localhost dhcp]# tail -n 8 /etc/dhcp/dhcpd.conf
subnet 172.16.10.0 netmask 255.255.255.0 {
range 172.16.10.10 172.16.10.90;
option routers 172.16.10.100;
option subnet-mask 255.255.255.0;
option domain-name-servers 223.5.5.5;
default-lease-time 600;
max-lease-time 7200;
}

[root@localhost dhcp]# tail -n 2 /etc/sysconfig/dhcpd
INTERFACES="eth1" # 监听eth1两个接口
[root@localhost dhcp]# systemctl restart network
[root@localhost dhcp]# systemctl restart dhcpd
[root@localhost dhcp]# cat /var/log/messages
3.4 时间同步服务管理
3.4.1 客户端有两种时间同步方式
ntpdate ntp.aliyun.com #ntpdate 只能手动同步
chronyc -a makestep #chronyc 自动同步
3.4.2 安装chronyc
[root@web01 ~]# yum -y install chrony
3.4.3 配置chronyc服务
[root@web01 ~]# grep  "ntp.aliyun.com" /etc/chrony.conf
server ntp.aliyun.com iburst
3.4.4 重启服务和开机自启
[root@web01 ~]# systemctl restart chronyd
3.4.5 强制同步时间和设置时区
[root@web01 ~]# chronyc -a makestep
[root@web01 ~]# timedatectl set-timezone Asia/Shanghai
#查看当前的时区
[root@web01 ~]# timedatectl
      Local time: Sat 2025-05-31 15:08:06 CST
  Universal time: Sat 2025-05-31 07:08:06 UTC
        RTC time: Sat 2025-05-31 07:08:06
       Time zone: Asia/Shanghai (CST, +0800)
     NTP enabled: yes
NTP synchronized: yes
 RTC in local TZ: no
      DST active: n/a
3.5 文件共享服务
3.5.1 FTP
3.5.1.1 FTP安装
#使用yum安装
yum -y install vsftpd

#查看安装路径
[root@localhost yum.repos.d]# rpm -ql `rpm -qa |grep vsftpd` |grep ".conf$"
/etc/vsftpd/vsftpd.conf
/usr/share/doc/vsftpd-3.0.2/EXAMPLE/INTERNET_SITE/vsftpd.conf
/usr/share/doc/vsftpd-3.0.2/EXAMPLE/INTERNET_SITE_NOINETD/vsftpd.conf
/usr/share/doc/vsftpd-3.0.2/EXAMPLE/VIRTUAL_USERS/vsftpd.conf
3.5.1.2 FTP配置
#关闭vsftpd匿名用户访问
[root@localhost yum.repos.d]# grep "^anonymous_enable" /etc/vsftpd/vsftpd.conf
anonymous_enable=NO
#添加vsftpd用户,登录使用该用户
[root@localhost yum.repos.d]# useradd -s /sbin/nologin vsftpd
[root@localhost yum.repos.d]# echo 123456 | passwd --stdin vsftpd
Changing password for user vsftpd.
passwd: all authentication tokens updated successfully.
#不允许vsftpd登录shell
[root@localhost yum.repos.d]# grep vsftpd /etc/passwd
vsftpd:x:1000:1000::/home/vsftpd:/sbin/nologin
#配置vsftp访问路径、限制用户可以访问的路径、允许用户可以上传文件
#myself FTP
local_root=/opt/data
chroot_local_user=YES
allow_writeable_chroot=YES
[root@localhost ~]# grep -A 3 "myself FTP" /etc/vsftpd/vsftpd.conf
#myself FTP
local_root=/opt/data
chroot_local_user=YES
allow_writeable_chroot=YES
#创建ftp访问目录、
[root@localhost yum.repos.d]# mkdir /opt/data
#限制权限
[root@localhost yum.repos.d]# chown -R vsftpd:vsftpd /opt/data/
#验证权限
[root@localhost yum.repos.d]# ls -lhd /opt/data
drwxr-xr-x 2 vsftpd vsftpd 6 Jul 29 18:03 /opt/data
#在ftp目录先创建一个文件
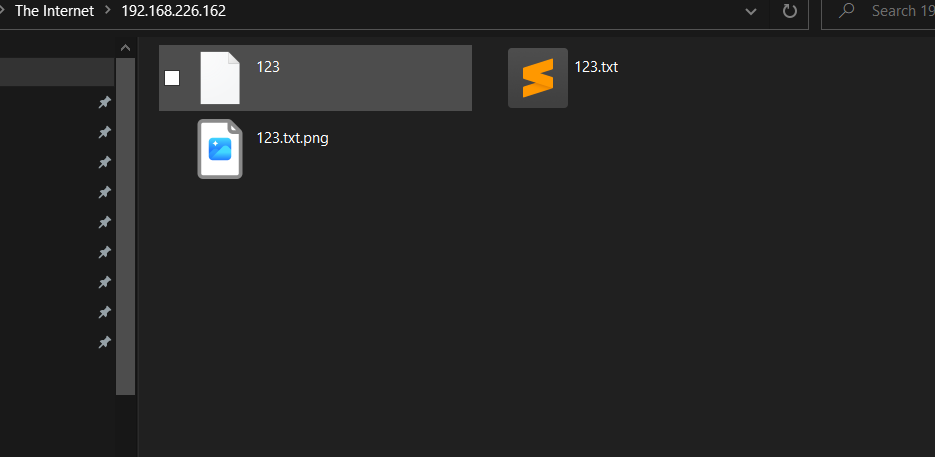
touch /opt/data/123.txt.png
3.5.1.3 FTP验证
-
ftp 命令

-
windows 资源管理器窗口
3.5.2 smb
3.5.3 NFS
3.6 备份
四、Nginx Web服务管理
4.1 重置nginx配置文件
[root@web01 ~]# grep -Ev "#|^$" /etc/nginx/nginx.conf.default
[root@web01 nginx]# grep -Ev "#|^$" /etc/nginx/nginx.conf.default > /etc/nginx/nginx.conf
4.2 nginx配置双ip地址访问不同站点
4.2.1 给网卡配置两个不同的IP地址
[root@web01 nginx]# head /etc/sysconfig/network-scripts/ifcfg-eth0
TYPE="Ethernet"
PROXY_METHOD="none"
BROWSER_ONLY="no"
BOOTPROTO="static"
IPADDR1="192.168.226.162"
IPADDR2="192.168.226.163"
NETMASK="255.255.255.0"
GATEWAY="192.168.226.2"
DEFROUTE="yes"
4.2.2 查看配置的网卡IP地址
[root@web01 nginx]# ip addr show dev eth0
2: eth0: <BROADCAST,MULTICAST,UP,LOWER_UP> mtu 1500 qdisc pfifo_fast state UP group default qlen 1000
link/ether 00:0c:29:bc:51:47 brd ff:ff:ff:ff:ff:ff
inet 192.168.226.162/24 brd 192.168.226.255 scope global eth0
valid_lft forever preferred_lft forever
inet 192.168.226.163/24 brd 192.168.226.255 scope global secondary eth0
valid_lft forever preferred_lft forever
inet6 fe80::20c:29ff:febc:5147/64 scope link
valid_lft forever preferred_lft forever
4.2.3 查看nginx配置两个不同的IP地址网站
[root@web01 nginx]# cat /etc/nginx/nginx.conf
worker_processes 4;
events {
  worker_connections 1024;
}
http {
  include mime.types;
  default_type application/octet-stream;
  sendfile on;
  keepalive_timeout 65;
  server {
    listen 192.168.226.162:80;
    server_name localhost;
    location / {
      root /opt/game/HTML5;
      index index.html index.htm;
    }
  }
  server {
    listen 192.168.226.163:80;
    server_name localhost;
    location / {
      root /opt/game/Game/Games-master/;
      index index.html index1.html;
    }
  }
}
4.3 不同域名配置访问不同的nginx网站
[root@web01 conf.d]# cat /etc/nginx/nginx.conf
worker_processes 4;
events {
  worker_connections 1024;
}
http {
  include mime.types;
  charset utf-8;
  default_type application/octet-stream;
  sendfile on;
  keepalive_timeout 65;
  include /etc/nginx/conf.d/*.conf;
}

#web1的配置文件
[root@web01 conf.d]# cat /etc/nginx/conf.d/HTML5.conf
server {
  listen 80;
  server_name www.pingzhe.com;
  location / {
    root /opt/game/HTML5;
    index index.html index.htm;
  }
}

#web2的配置文件
[root@web01 conf.d]# cat /etc/nginx/conf.d/Game.conf
server {
  listen 80;
  server_name www.pingze.com;
  location / {
  root /opt/game/Game/Games-master/;
  index index.html index1.html;
  }
}

#修改主机域名
C:\Windows\System32\drivers\etc\hosts
4.4 给不同的网站配置不同的访问日志
#1.给ngix配置网站访问日志格式
[root@web01 nginx]# cat /etc/nginx/nginx.conf
worker_processes 4;
events {
  worker_connections 1024;
}
http {
  include mime.types;
  charset utf-8;
  default_type application/octet-stream;
  sendfile on;
  keepalive_timeout 65;
  include /etc/nginx/conf.d/*.conf;

  log_format custom    '[$time_local] $remote_addr - $remote_user '
                '"$request" $status $body_bytes_sent ';
}

#2.给web1配置访问日志路径
[root@web01 nginx]# cat /etc/nginx/conf.d/HTML5.conf
server {
  listen 80;
  server_name www.pingzhe.com;
  access_log /opt/nginx/log/HTML5.log;
  location / {
  root /opt/game/HTML5;
  index index.html index.htm;
  }
}

#3.给web2配置访问日志路径
[root@web01 nginx]# cat /etc/nginx/conf.d/Game.conf
server {
  listen 80;
  server_name www.pingze.com;
  access_log /opt/nginx/log/Game.log;
  location / {
    root /opt/game/Game/Games-master/;
    index index.html index1.html;
  }
}
#4.给存放访问日志的文件修改属主属组权限
[root@web01 nginx]# chown -R nginx:nginx /opt/nginx/
#5.查看修改后的权限
[root@web01 nginx]# ls -lh /opt/nginx/
total 0
drwxr-xr-x 2 nginx nginx 39 May 26 14:54 log
4.5 使用htpasswd加密网站
#1.使用htpasswd创建密码
[root@web01 nginx]# cat /etc/nginx/htpasswd
tom:ajrFVgiA9Y9gw
#2.开启basic 用户访问控制
[root@web01 nginx]# cat /etc/nginx/conf.d/HTML5.conf
server {
    listen 80;
    server_name www.pingzhe.com;
    access_log /opt/nginx/log/HTML5.log;
  location / {
    auth_basic "www.pingzhe.com";
    auth_basic_user_file /etc/nginx/htpasswd;
    root /opt/game/HTML5;
    index index.html index.htm;
  }
}
4.6 使用openssl给网站添加https
1.1 安装openssl
[root@web01 ~]# yum -y install openssl
1.2 生成证书和私钥
[root@web01 ssl]# openssl req -x509 -nodes -days 365 -newkey rsa:2048 -keyout /etc/nginx/ssl/html5.key -out /etc/nginx/ssl/html5.crt
1.3 配置证书和私钥到网站上
[root@web01 ~]# cat /etc/nginx/conf.d/HTML5.conf
server {
    listen 80;
    server_name www.pingzhe.com;
    return 301 https://$host$request_uri; #强制http替换成https301重定向

    access_log /opt/nginx/log/HTML5.log;
}

server{
    listen 443 ssl http2; # 启用HTTP/2协议
    server_name www.pingzhe.com;
    ssl_certificate /etc/nginx/ssl/html5.crt; # 证书路径
    ssl_certificate_key /etc/nginx/ssl/html5.key; # 私钥路径

    # 协议与加密套件
    ssl_protocols TLSv1.2 TLSv1.3; # 禁用老旧协议
    ssl_ciphers 'ECDHE-ECDSA-AES128-GCM-SHA256:ECDHE-RSA-AES128-GCM-SHA256';
    ssl_prefer_server_ciphers on;

    # 会话缓存优化
    ssl_session_cache shared:SSL:10m;
    ssl_session_timeout 24h;

    location / {
        auth_basic "www.pingzhe.com";
        auth_basic_user_file /etc/nginx/htpasswd;
        root /opt/game/HTML5;
        index index.html index.htm;
    }
}


#证书路径
ssl_certificate /etc/nginx/ssl/html5.crt; # 证书路径
ssl_certificate_key /etc/nginx/ssl/html5.key; # 私钥路径
# 协议与加密套件
ssl_protocols TLSv1.2 TLSv1.3; # 禁用老旧协议[7,11](@ref)
ssl_ciphers 'ECDHE-ECDSA-AES128-GCM-SHA256:ECDHE-RSA-AES128-GCM-SHA256';
ssl_prefer_server_ciphers on;

# 会话缓存优化
ssl_session_cache shared:SSL:10m;
ssl_session_timeout 24h;

1.4 安全优化
Let's Encrypt
certbot certonly --standalone -d pingzhe.ren -d www.pingzhe.com
sudo certbot --nginx --test-cert -d example.com # 使用--test-cert避免限频


sudo yum install snapd -y
sudo systemctl enable --now snapd.socket
sudo ln -s /var/lib/snapd/snap /snap # 创建软链
sudo snap install --classic certbot
sudo ln -s /snap/bin/certbot /usr/bin/certbot
certbot --nginx -d pingzhe.com -d www.pingzhe.com
4.7 nginx开启gzip压缩功能
http {
gzip on;
gzip_buffers 16 8k;
gzip_comp_level 6;
gzip_min_length 1k;
gzip_http_version 1.1;
gzip_types text/plain text/css application/json application/javascript text/xml;
gzip_vary on;
gzip_proxied any;
gzip_disable "MSIE [1-6]\.";
}
4.8 nginx 开启目录浏览功能
#1.开启目录浏览功能的配置
[root@web01 ~]# cat /etc/nginx/conf.d/download.conf
server {
     listen       80;
     server_name  download.pingzhe.com;

     location = /download/ {
     autoindex on;           # 启用目录浏览[1,2,3]
     autoindex_exact_size off;  # 显示文件友好大小(如 MB/KB),而非精确字节
     autoindex_localtime on;    # 显示服务器本地时间而非 UTC 时间

     root /opt/game/;  # 指定实际文件系统路径(若未全局定义)

     }
}

#2.确保 Nginx 用户(如 www-data)对目标目录有读取权限
chown -R www-data:www-data /var/www/html/downloads
chmod -R 755 /var/www/html/downloads
4.9 nginx 黑白名单禁止IP地址访问
4.9.1 使用主机防火墙禁止访问
开启防火墙
[root@pingzhe ~]# systemctl start firewalld
添加禁止访问的IP地址规则
[root@pingzhe ~]# firewall-cmd --add-rich='rule family=ipv4 source address="192.168.226.1" drop'
success

所有区域的规则
[root@pingzhe ~]# firewall-cmd --list-all-zones

查看开放的服务
[root@pingzhe ~]# firewall-cmd --list-services
查看开放的端口
sudo firewall-cmd --list-ports

查看富规则(高级过滤规则)
[root@pingzhe ~]# firewall-cmd --list-rich-rules
rule family="ipv4" source address="192.168.226.1" drop


当前生效规则
[root@pingzhe ~]# firewall-cmd --list-all
public
target: default
icmp-block-inversion: no
interfaces:
sources:
services: dhcpv6-client ssh
ports:
protocols:
masquerade: no
forward-ports:
source-ports:
icmp-blocks:
rich rules:
rule family="ipv4" source address="192.168.226.1" drop
4.9.2 使用nginx规则禁止IP地址访问
#拒绝所有的IP地址,允许192.168.226.1访问
[root@pingzhe conf.d]# grep -En "allow|deny" /etc/nginx/conf.d/mario.conf
31: deny 0.0.0.0/0;
32: allow 192.168.226.1;

拒绝192.168.226.1访问,允许所有的IP地址
[root@pingzhe ~]# grep -En "deny|allow" /etc/nginx/conf.d/mario.conf
31: deny 192.168.226.1;
32: allow 0.0.0.0/0;
4.10 使用location对文件路径访问控制
[root@nginx_proxy ~]# egrep -v "^$" /etc/nginx/conf.d/download.conf
server {
     listen       80;
     server_name  download.pingzhe.com;
     root /opt/game/;  # 指定实际文件系统路径(若未全局定义)
     location =  /download/ {
     autoindex on;           # 启用目录浏览[1,2,3]
     autoindex_exact_size off;  # 显示文件友好大小(如 MB/KB),而非精确字节
     autoindex_localtime on;    # 显示服务器本地时间而非 UTC 时间
     }
}
4.11 nginx控制防盗链
4.11.1 说明
- 使用防盗链有两种方法:
-
服务器控制,规定那些网站可以访问链接,客户端无法伪造,使用nginx的valid_referers变量。
-
客户端控制,根据客户端发送的请求报文http_referer变量来控制链接是否可以访问呢,客户端可以伪造,不够安全。
4.11.2 valid_referers使用说明
location ~* \.(gif|jpg|jpeg|png|bmp|ico|mp4)$ {
valid_referers none blocked domain.com *.domain.com;
if ($invalid_referer) {
return 403; # 非法引用返回403
}
}
-
none:允许无 Referer 的请求(如直接输入 URL)。
-
blocked:允许 Referer 被代理或防火墙隐藏的请求。
-
pingzhe.com:仅允许该域名及其子域名引用资源。
-
文件类型:gif|jpg|... 可扩展需保护的静态资源后缀。
4.11.3 使用valid_referers控制达到防盗链
[root@web01 ~]# grep -A 5 ".mp4" /etc/nginx/conf.d/mario.conf
location ~* \.(gif|jpg|jpeg|png|bmp|ico|mp4)$ {
valid_referers www.pingzhe.com;
if ($invalid_referer) {
return 403; # 非法引用返回403
}
}
4.11.4 使用http_referer达到防盗链的效果
[root@web01 ~]# grep -A 4 ".mp4" /etc/nginx/conf.d/mario.conf
location ~* \.(gif|jpg|jpeg|png|bmp|ico|mp4)$ {
if ($http_referer !~* "www.pingzhe.com") { #!~* 不等于意思
return 404; # 非法引用返回404
}
}
4.12 LNMP搭建可道云
4.12.1 安装扩展包
[root@web01 ~]# yum -y install epel-release
4.12.2 安装指定的版本php7.3
[root@web01 ~]       # wget http://rpms.remirepo.net/enterprise/remi-release-7.rpm
[root@web01 ~]       # rpm -ivh remi-release-7.rpm
[root@web01 ~]       # yum install yum-utils -y
[root@web01 ~]       # yum-config-manager --enable remi-php73
[root@web01 ~]       # yum install -y php php-cli php-fpm php-mysqlnd php-gd php-mbstring php-curl php-xml php-zip php-json
4.12.3 安装Web服务和数据库
[root@web01 ~]# yum install -y nginx mariadb-server mariadb
4.12.4 重启和开机自启动 Web服务、php服务、数据库
[root@web01 ~]# systemctl restart php-fpm nginx mariadb
[root@web01 ~]# systemctl enable php-fpm nginx mariadb
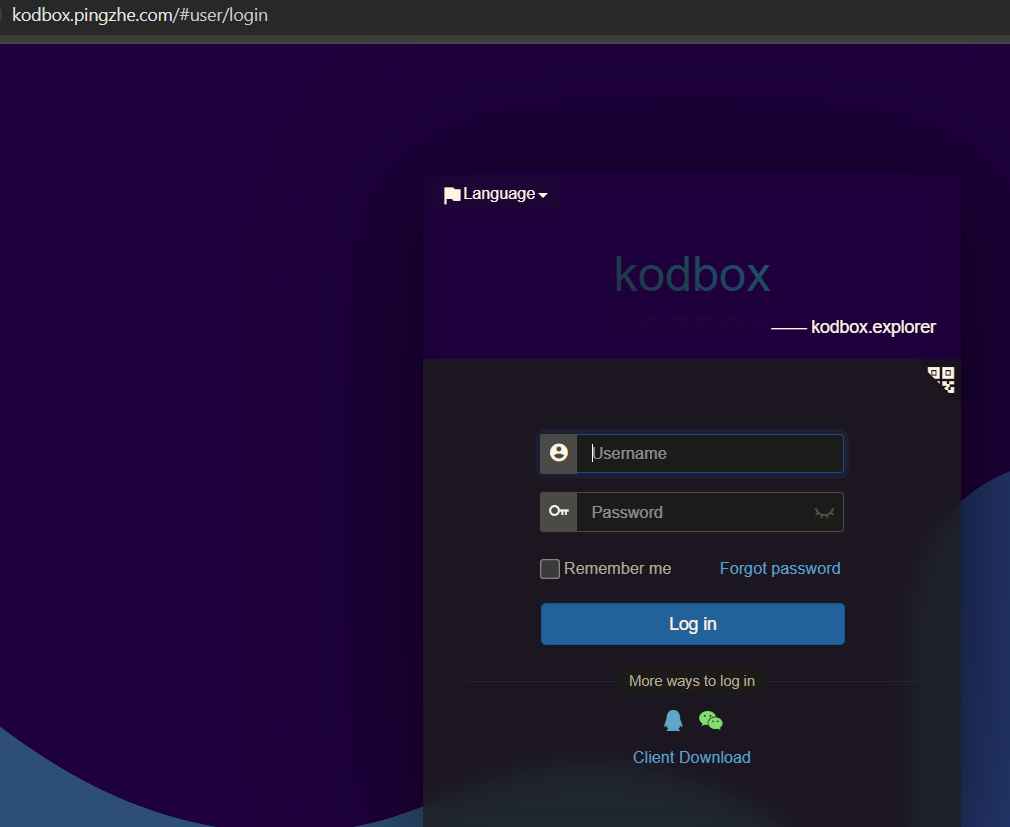
4.12.5 修改kodbox的权限
[root@web01 kodbox]# chown -R nginx:nginx /opt/Netdisk/kodbox
[root@web01 kodbox]# chmod -R 755 /opt/Netdisk/kodbox
4.12.6 web服务配置
[root@web01 ~]# cat /etc/nginx/conf.d/kodbox.conf
server {
    listen 80;
    server_name kodbox.pingzhe.com;  # 替换为服务器 IP 或域名

    location / {
        root /opt/Netdisk/kodbox/;
        index index.php index.html;
    }

    location ~ \.php$ {
        root /opt/Netdisk/kodbox/;
        fastcgi_index index.php;
        fastcgi_pass 127.0.0.1:9000;
        fastcgi_param SCRIPT_FILENAME /opt/Netdisk/kodbox$fastcgi_script_name;
        include fastcgi_params;
    }
}
4.12.7 数据库配置
MariaDB [(none)]> SELECT * FROM mysql.db WHERE Db='kodbox' AND User='root';
MariaDB [(none)]> grant all on kodbox.* to 'root'@'localhost' identified by '123456';
4.12.8 安全优化
[root@web01 config]# grep "disable_functions" /etc/php.ini
disable_functions = system,eval
4.12.9 安装完成界面
4.13 nginx正向代理访问
4.13.1 配置正向代理要访问的服务器
#配置web01nginx服务器
[root@web01 conf.d]# egrep -v "^$" /etc/nginx/conf.d/web01.conf
server {
        listen 80;
        server_name web01.pingzhe.com;
        location / {
                root /opt/html;
                index index.html;

        }
}

#配置web02nginx服务器
#  egrep -v "^$" /etc/nginx/conf.d/web02.conf
server {
        listen 80;
        server_name web02.pingzhe.com;
        location / {
                root /opt/html/;
                index index.html;
        }
}
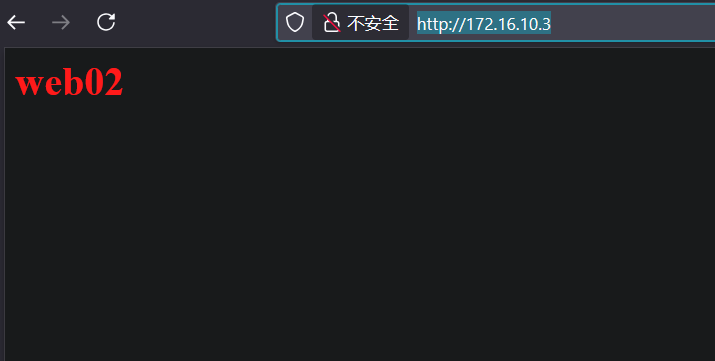
4.13.2 在nginx_pronxy上访问配置好的web服务器
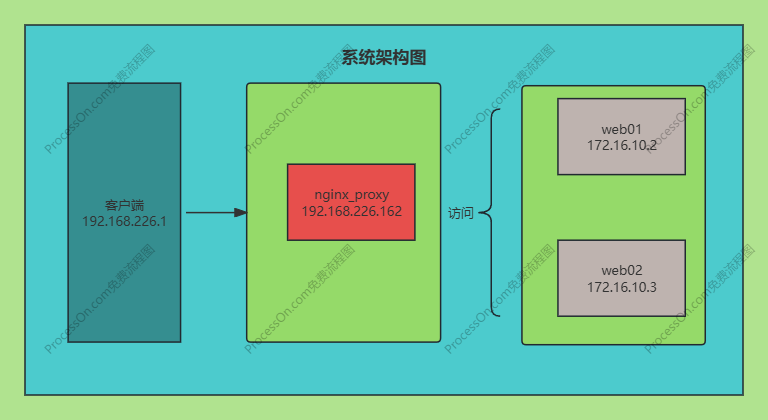
[root@nginx_proxy ~]# curl http://172.16.10.2/index.html
<h1 style="color:blue">web01</h1>
[root@nginx_proxy ~]# curl http://172.16.10.3/index.html
<h1 style="color:red">web02</h1>
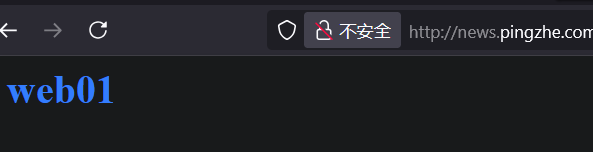
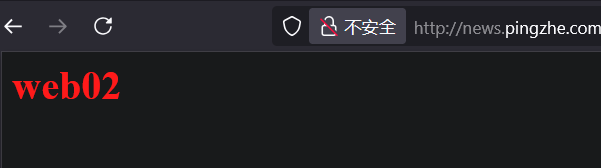
4.13.3 配置nginx的正向代理
[root@nginx_proxy ~]# egrep -v "^$|#" /etc/nginx/conf.d/news.conf
server{
    listen 8080;
    server_name news.pingzhe.com;
    location / {
        proxy_set_header Host $http_host;
        proxy_buffers 256 4k;
        proxy_connect_timeout 30s;

    }
}
4.13.4 配置firefox的代理
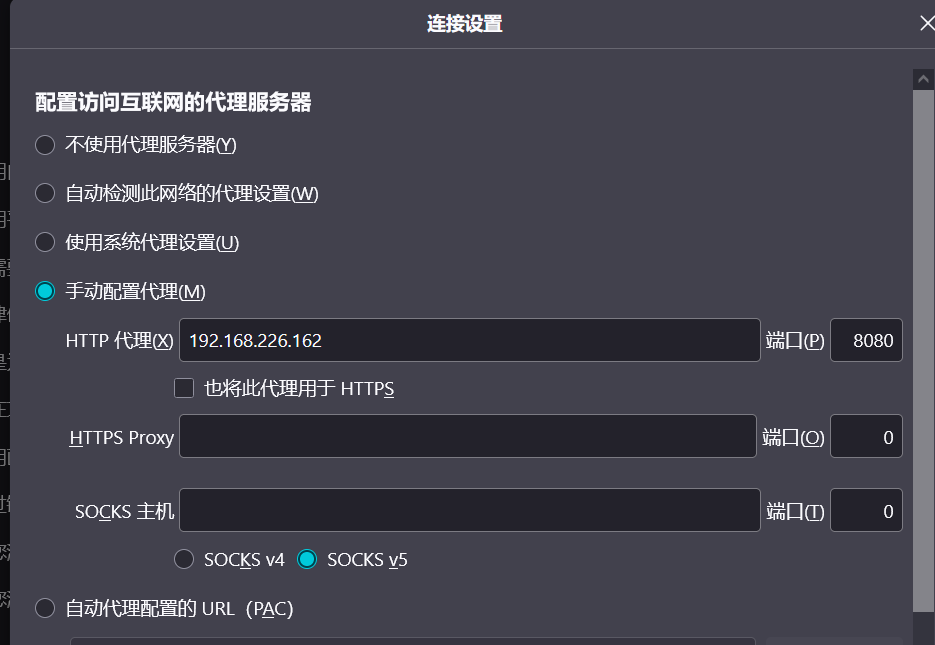
4.13.5 使用firefox访问代理的服务器Web01、Web02
web01服务器

web02服务器
4.14 nginx负载均衡和反向代理
4.14.1 nginx_pronxy 负载均衡配置
[root@nginx_proxy ~]# cat /etc/nginx/nginx.conf
worker_processes  auto;
events {
    worker_connections  1024;
}
http {
    include       mime.types;
    charset       utf-8;
    default_type  application/octet-stream;
    sendfile        on;
    keepalive_timeout  65;

    include     /etc/nginx/conf.d/*.conf;

    #负载均衡设置
    upstream web_cluster {
        server 172.16.10.2 weight=3;
        server 172.16.10.3;
    }

}
4.14.2 nginx反向代理服务器配置
[root@nginx_proxy ~]# egrep -v "#" /etc/nginx/conf.d/news.conf
server{
    listen 8080;
    server_name news.pingzhe.com;

    location / {
        proxy_pass http://web_cluster;
        proxy_set_header Host $host;

    }

}
4.14.3 客户端Firefox访问Web01、Web02
访问web01
访问web02
五、Tomcat Web服务管理
5.1 Tomcat war包安装
5.1.1 tomcat 安装
[root@tomcat ~]# yum install -y repl-release
[root@tomcat ~]# yum install -y java-1.8.0-openjdk-devel
[root@tomcat ~]# yum -y install  tomcat tomcat-webapps
5.1.2 zrlog 下载
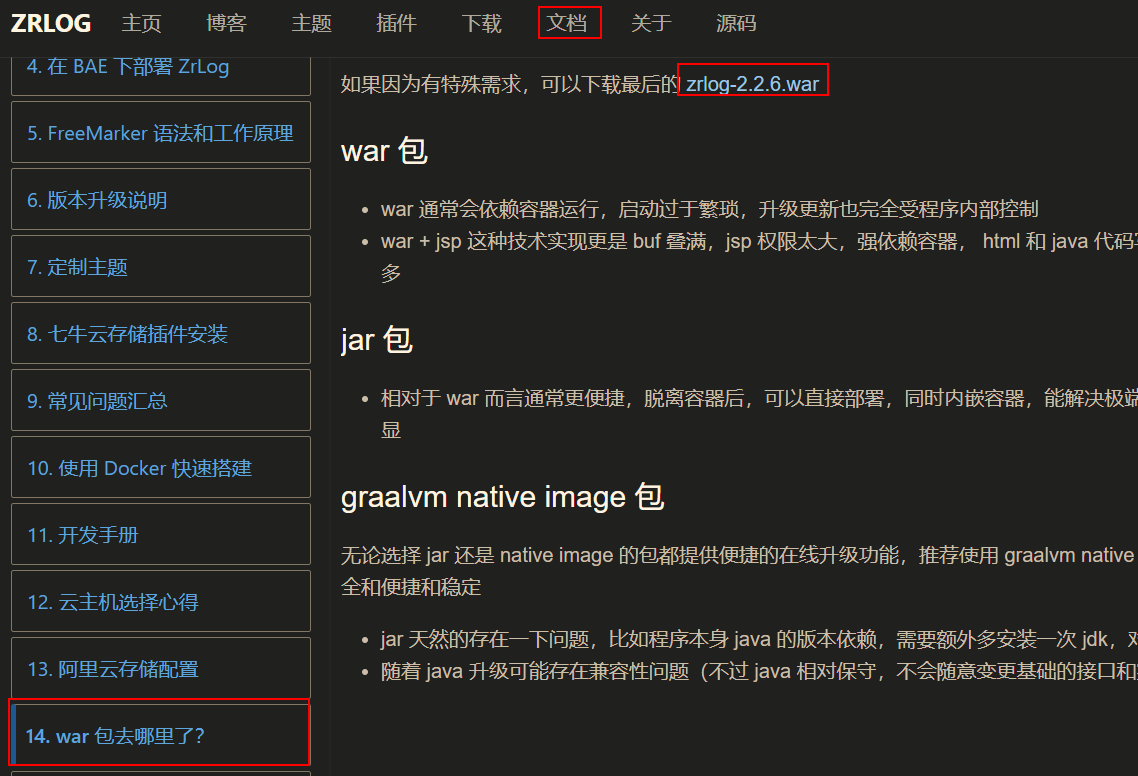
5.1.3 zrlog war包上传
[root@tomcat ~]# ls /usr/share/tomcat/webapps/
ROOT  zrlog  zrlog.war
5.1.4 数据库创建
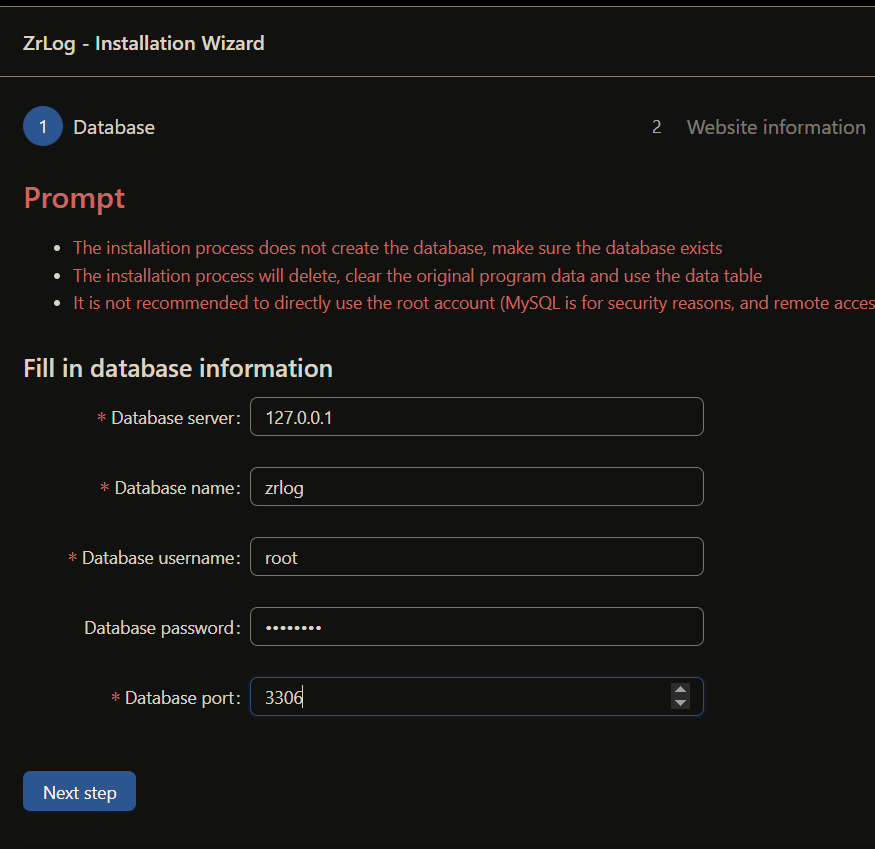
[root@tomcat ~]# mysql -uroot -p123456
MariaDB [(none)]> create database zrlog;
5.1.5 浏览器打开安装
浏览器打开页面
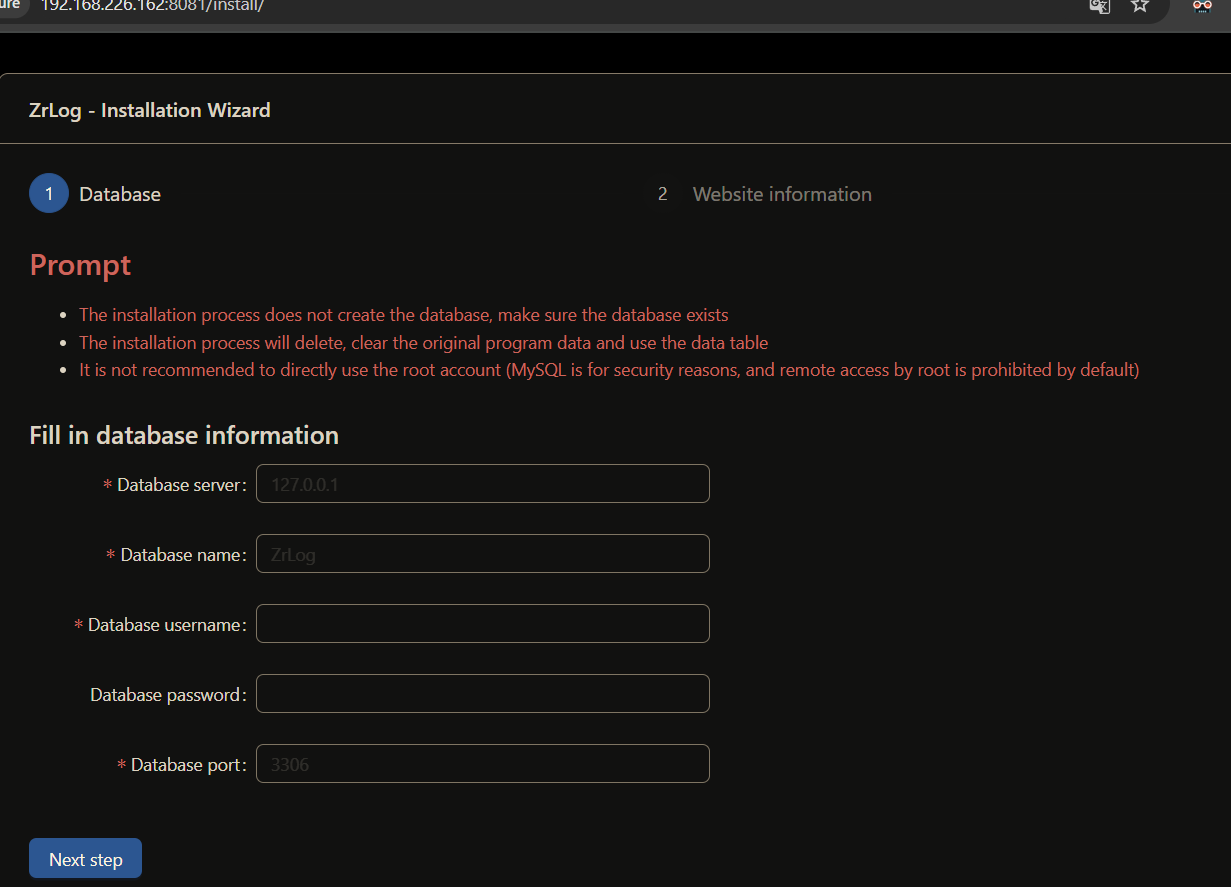
输入数据库密码安装
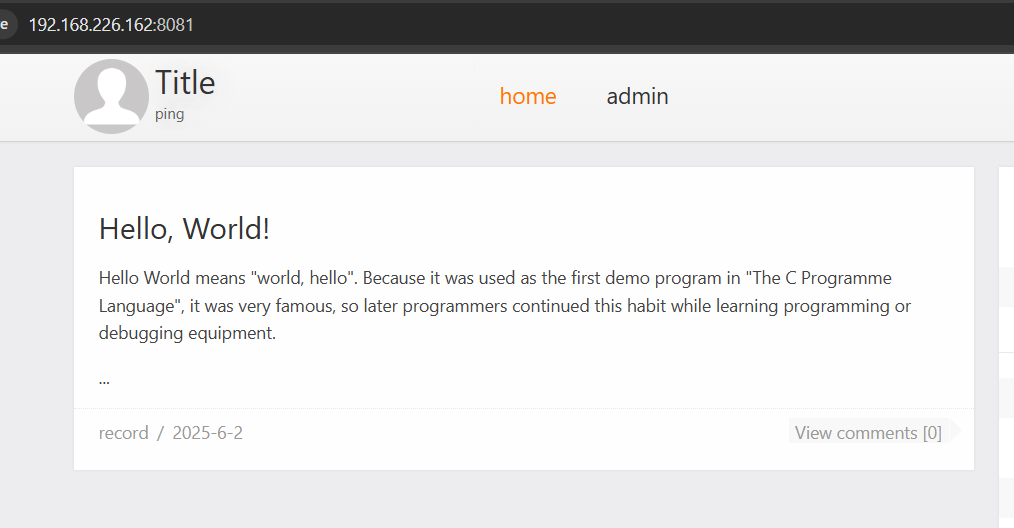
安装成功
5.2 安装Jar包程序
jar包文件是包含Web Server 的,可以不使用web中间件。war包是不包含web server,需要使用web中间件
5.2.1 下载Jar包
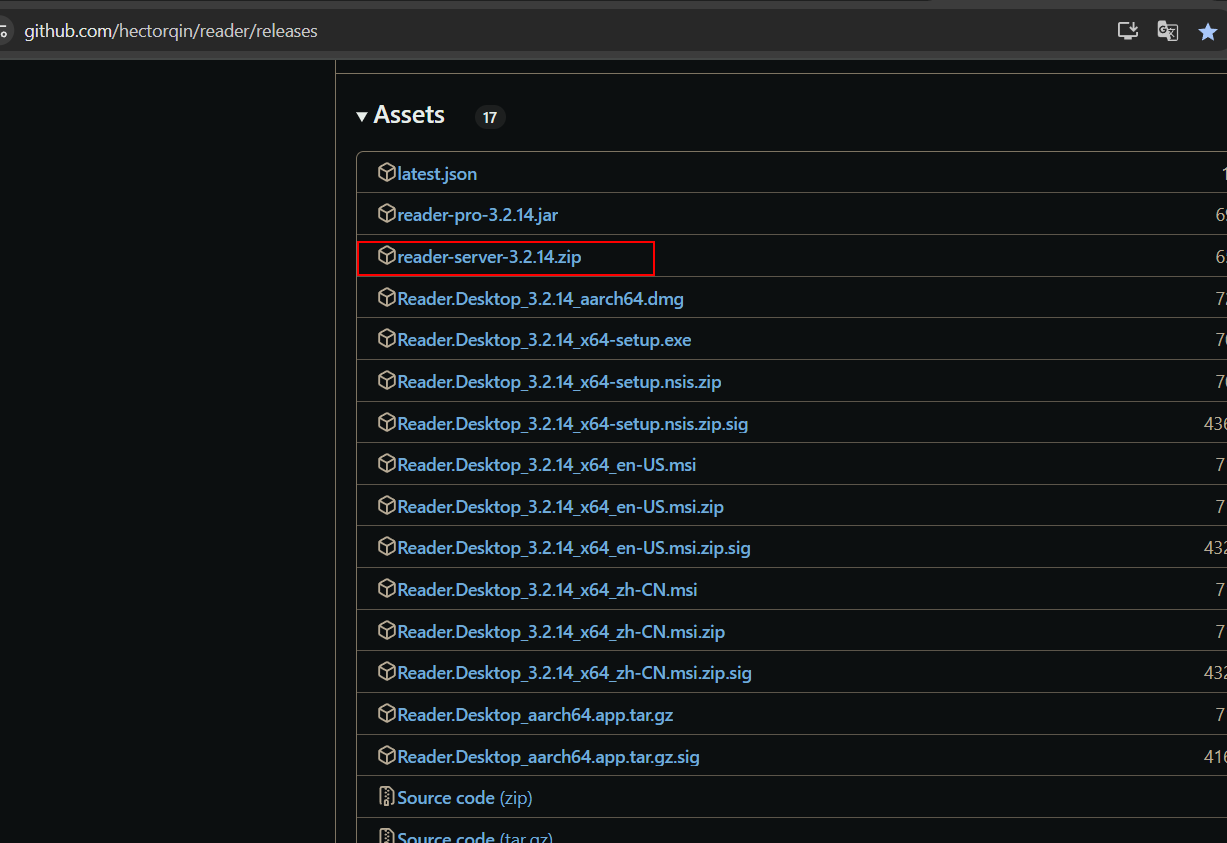
5.2.2 上传解压
[root@tomcat jar]# pwd
/usr/share/jar
[root@tomcat jar]# unzip reader-server-3.2.14.zip
[root@tomcat jar]# ls
bin  conf  logs  reader-server-3.2.14.zip  storage  target
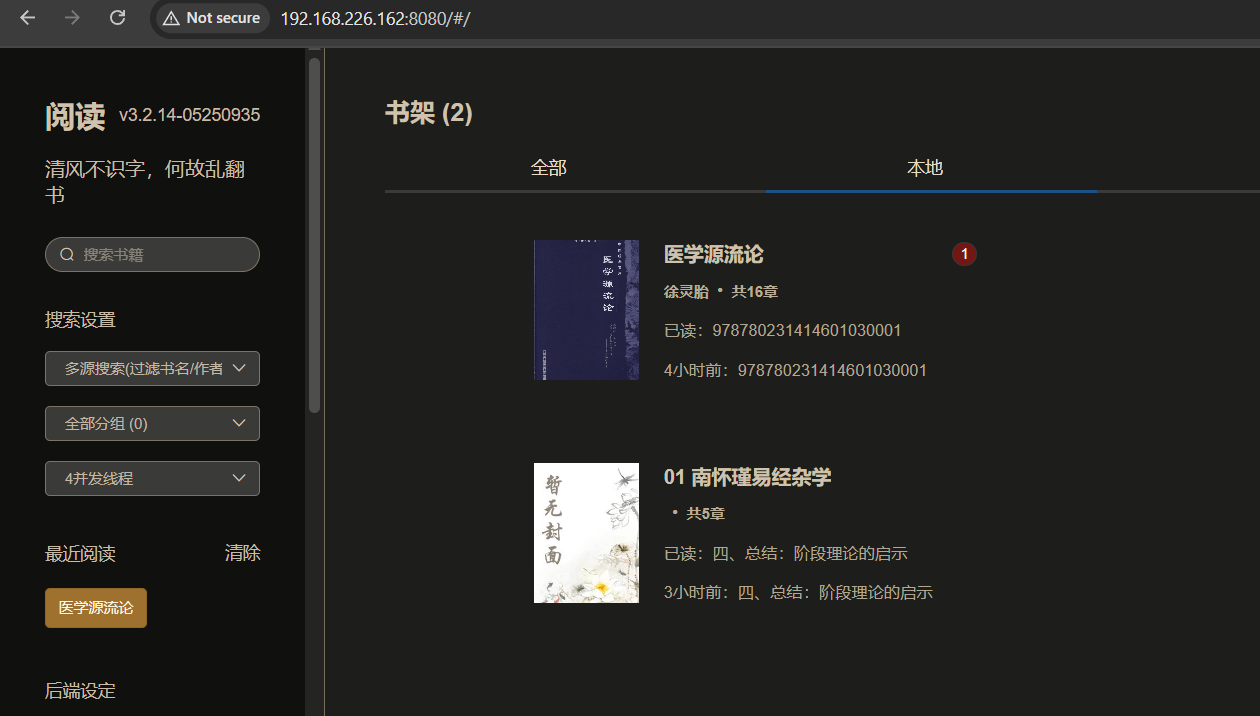
5.2.3 访问网站

 浙公网安备 33010602011771号