API 网关 Kong
什么是 API 网关?
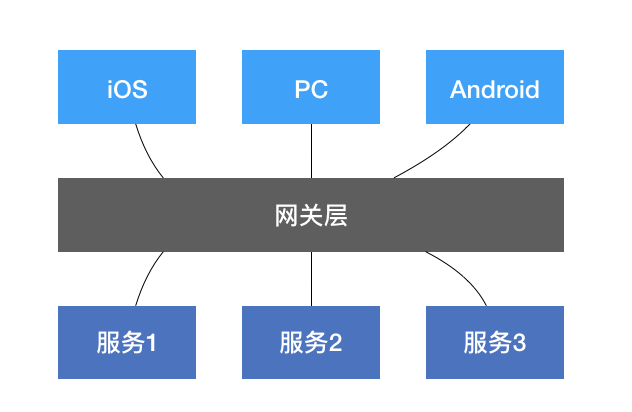
所谓网关,主要作用就是连接两个不同网络的设备,而今天所讲的 API 网关是指承接和分发客户端所有请求的网关层。
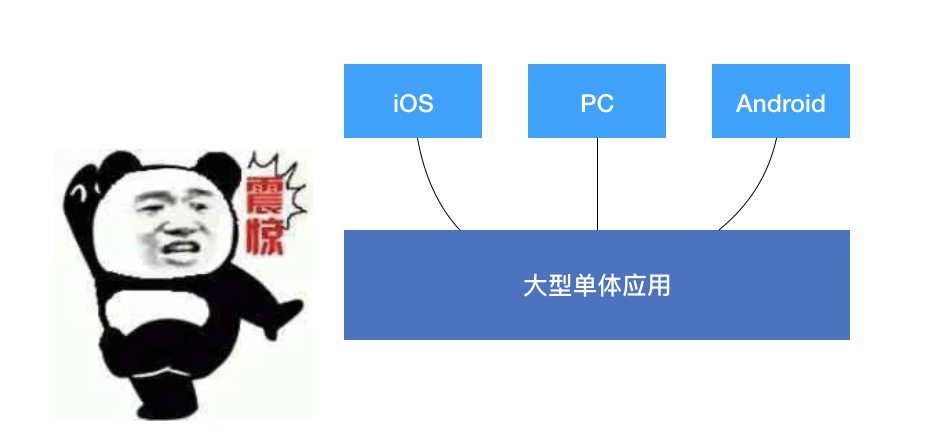
为什么需要网关层?最初是单体服务时,客户端发起的所有请求都可以直接请求到该服务,但随着产品用户越来越多,单体应用存在显而易见的单点问题,除此之外,当单体应用大小升至几个 G 时,持续发布将会非常缓慢,所以服务的拆分成为了必然趋势。
当服务拆分为多个之后,我们不得不面临一个问题,就是如何控制用户请求到对应服务节点,于是网关层应运而生,它不仅可以负责负载均衡,还可以让它处理认证校验、请求限流、日志记录以及监控服务节点等等。

当然,网关层并不需要我们手动实现,市面上有很多 API 网关开源项目,比如 Zuul、Kong、Tyk 等,今天主要介绍 Kong。
安装 Kong
Kong 是一个在 Nginx 中运行的 Lua 程序,由 lua-nginx-module 实现,和 Openresty 一起打包发行,支持多种操作环境下的安装,可以用来做 HTTP 基本认证、密钥认证、TCP、UDP、文件日志、API 请求限流、请求转发等等。
第一步,创建一个 docker 网络。
$ docker network create kong-net
创建用于存储 Kong 数据的数据库,可以使用 Cassandra 或 PostgreSQL,本示例采用 Cassandra。
Cassandra 是由 Facebook 开发的分布式 NoSQL 数据库。
$ docker run -d --name kong-database \
               --network=kong-net \
               -p 9042:9042 \
               cassandra:3
初始化数据到 Cassandra 数据库。
$ docker run --rm \
	--network=kong-net \
	-e "KONG_DATABASE=cassandra" \
	-e "KONG_PG_HOST=kong-database" \
	-e "KONG_PG_PASSWORD=kong" \
	-e "KONG_CASSANDRA_CONTACT_POINTS=kong-database" \
	kong:latest kong migrations bootstrap
启动 Kong 容器连接数据库。
 $ docker run -d --name kong \
     --network=kong-net \
     -e "KONG_DATABASE=cassandra" \
     -e "KONG_PG_HOST=kong-database" \
     -e "KONG_PG_PASSWORD=kong" \
     -e "KONG_CASSANDRA_CONTACT_POINTS=kong-database" \
     -e "KONG_PROXY_ACCESS_LOG=/dev/stdout" \
     -e "KONG_ADMIN_ACCESS_LOG=/dev/stdout" \
     -e "KONG_PROXY_ERROR_LOG=/dev/stderr" \
     -e "KONG_ADMIN_ERROR_LOG=/dev/stderr" \
     -e "KONG_ADMIN_LISTEN=0.0.0.0:8001, 0.0.0.0:8444 ssl" \
     -p 8000:8000 \
     -p 8443:8443 \
     -p 0.0.0.0:8001:8001 \
     -p 0.0.0.0:8444:8444 \
     kong:latest
通过 curl 模拟请求本地 8001 端口可以获取 Kong 的详细信息。截止目前整个 kong 服务就跑起来了,接下来可以注册服务节点到 kong 中。
$ curl -i http://localhost:8001/
注册服务
注册名为 baidu-service 的服务到 kong,如果请求匹配到该服务会跳转至 url。
$ curl -i -X POST \
  --url http://localhost:8001/services/ \
  --data 'name=baidu-service' \
  --data 'url=http://baidu.com'
注册成功之后会得到如下提示。
HTTP/1.1 201 Created
Date: Sat, 16 May 2020 06:35:56 GMT
Content-Type: application/json; charset=utf-8
Connection: keep-alive
Access-Control-Allow-Origin: *
Server: kong/2.0.4
Content-Length: 292
X-Kong-Admin-Latency: 103

{"host":"baidu.com","created_at":1589610956,"connect_timeout":60000,"id":"6660aaa7-5afa-4f02-85f8-11dfb81fba84","protocol":"http","name":"baidu-service","read_timeout":60000,"port":80,"path":null,"updated_at":1589610956,"retries":5,"write_timeout":60000,"tags":null,"client_certificate":null}
服务配置路由
服务添加成功后,需要告知 kong 什么样的请求才使用该服务,而这个规则被称为 route,也就是路由,路由的作用是按规则匹配客户端的请求,然后转发到对应的 service,每个 route 都对应一个 service,一个 service 可能有多个 route。
$ curl -i -X POST \
  --url http://localhost:8001/services/baidu-service/routes \
  --data 'hosts[]=baidu.com'
以上代码的作用是当请求域名是 baidu.com 时,则将请求转发到 baidu-service 指定的 url,我们可以通过 curl 模拟测试。
$ curl -i -X GET \
  --url http://localhost:8000/ \
  --header 'Host: baidu.com'
HTTP/1.1 200 OK
Content-Type: text/html; charset=UTF-8
Content-Length: 81
Connection: keep-alive
Date: Sat, 16 May 2020 06:45:12 GMT
Server: Apache
Last-Modified: Tue, 12 Jan 2010 13:48:00 GMT
ETag: "51-47cf7e6ee8400"
Accept-Ranges: bytes
Cache-Control: max-age=86400
Expires: Sun, 17 May 2020 06:45:12 GMT
X-Kong-Upstream-Latency: 92
X-Kong-Proxy-Latency: 17
Via: kong/2.0.4

<html>
<meta http-equiv="refresh" content="0;url=http://www.baidu.com/">
</html>
负载均衡配置
与 nginx 同理,先创建一个 upstream,名为 hello。
$ curl -X POST http://localhost:8001/upstreams --data "name=hello"
{"created_at":1589633009,"hash_on":"none","id":"3bab80bb-7e62-40c8-8b7c-7efdcc329675","algorithm":"round-robin","name":"hello","tags":null,"hash_fallback_header":null,"hash_fallback":"none","hash_on_cookie":null,"host_header":null,"hash_on_cookie_path":"\/","healthchecks":{"threshold":0,"active":{"https_verify_certificate":true,"type":"http","http_path":"\/","timeout":1,"unhealthy":{"http_statuses":[429,404,500,501,502,503,504,505],"tcp_failures":0,"timeouts":0,"http_failures":0,"interval":0},"healthy":{"http_statuses":[200,302],"interval":0,"successes":0},"https_sni":null,"concurrency":10},"passive":{"unhealthy":{"http_failures":0,"http_statuses":[429,500,503],"tcp_failures":0,"timeouts":0},"healthy":{"http_statuses":[200,201,202,203,204,205,206,207,208,226,300,301,302,303,304,305,306,307,308],"successes":0},"type":"http"}},"hash_on_header":null,"slots":10000}
为 upstream 添加两个负载均衡的节点,我就拿京东和淘宝来做测试了。
curl -X POST http://localhost:8001/upstreams/hello/targets --data "target=jd.com" --data "weight=100"
curl -X POST http://localhost:8001/upstreams/hello/targets --data "target=taobao.com" --data "weight=50"
如上配置就相当于 nginx 中的
upstream hello {
	server jd.com weight=100;
	server taobao.com weight=50;
}
接下来创建一个 service 指向 upstream,host 即对应 upstream 名。
curl -X POST http://localhost:8001/services --data "name=hello" --data "host=hello"
为 service 创建路由,凡是包含 /hello 的地址全部走 hello upstream。
curl -i -X POST --url http://localhost:8001/services/hello/routes --data 'paths[]=/hello'
curl -X POST --url http://localhost:8001/routes --data 'paths[]=/hello' --data 'service.id=8ad06aa5-be0a-4763-a84d-90b8046765f5'
现在访问 localhost:8000 就可以看到已经成功做了负载均衡。
限流
因为服务器不能处理无限量的请求,为了避免请求数高到服务器无法处理,必须做限流操作。关于限流,kong 使用了 rate-limiting 插件,它可以在 service、route、consumer 不同粒度上控制请求,配置非常简单。
curl -X POST http://kong:8001/services/{service}/plugins \
    --data "name=rate-limiting"
    --data "config.second=5" \
    --data "config.hour=10000"
config.second 代表一秒钟内处理的最大请求次数,config.hour 表示一小时内最大请求次数。
Route 的示例
curl -X POST http://kong:8001/routes/{route}/plugins \
    --data "name=rate-limiting"
    --data "config.second=5" \
    --data "config.hour=10000"
Consumer 的示例
curl -X POST http://kong:8001/consumers/{consumer}/plugins \
    --data "name=rate-limiting-advanced" \
    --data "config.second=5" \
    --data "config.hour=10000"
原文首发:https://pingyeaa.com/2020/05/16/architecture/gateway-kong/
我是平也,这有一个专注Gopher技术成长的开源项目「go home」
感谢大家的观看,如果觉得文章对你有所帮助,欢迎关注公众号「平也」,聚焦Go语言与技术原理。


 浙公网安备 33010602011771号