
环境准备
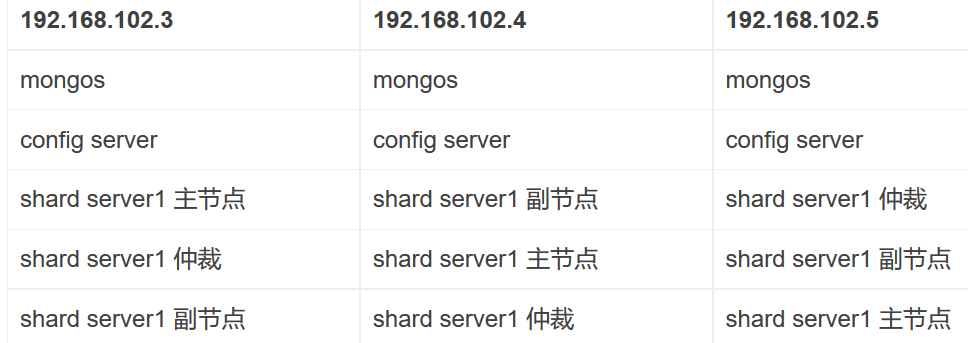
服务器
环境搭建
文件配置和目录添加
新建目录的操作要在三台机器中进行,为配置服务器新建数据目录和日志目录
mkdir -p $MONGODB_HOME/config/data
mkdir -p $MONGODB_HOME/config/log
为分片服务器新建数据目录和日志目录
mkdir -p $MONGODB_HOME/shared1/data
mkdir -p $MONGODB_HOME/shared1/log
mkdir -p $MONGODB_HOME/shared2/data
mkdir -p $MONGODB_HOME/shared2/log
mkdir -p $MONGODB_HOME/shared3/data
mkdir -p $MONGODB_HOME/shared3/log
为路由服务器新建数据目录和日志目录(路由服务器只用到日志目录)
mkdir -p $MONGODB_HOME/mongos/log
配置服务器搭建
在三台机器上做相同的配置
#vim $MONGODB_HOME/conf/config.cfg
## 配置文件内容
pidfilepath=/root/softWare/mongodb3.4.7/mongodb-linux-x86_64-debian71-3.4.7/config/log/configsrv.pid
dbpath=/root/softWare/mongodb3.4.7/mongodb-linux-x86_64-debian71-3.4.7/config/data
logpath=/root/softWare/mongodb3.4.7/mongodb-linux-x86_64-debian71-3.4.7/config/log/congigsrv.log
logappend = true
bind_ip = 0.0.0.0
port = 21000
fork = true

#declare this is a config db of a cluster;
configsvr = true

#副本集名称
replSet=configs

#设置最大连接数
maxConns=20000
启动三台机器上的mongo实例,
mongod -f $MONGODB_HOME/conf/config.cfg
登录任意一台config服务器,进行初始化
#mongo --port 21000

config = {
  "_id": "configs",
  "members": [
    {
      "_id": 0,
      "host": "192.168.102.3:21000"
    },
    {
      "_id": 1,
      "host": "192.168.102.4:21000"
    },
    {
      "_id": 2,
      "host": "192.168.102.5:21000"
    }
  ]
}
分片服务器搭建
每个分片服务都是有3台机器上的复制集组成,所以以下每个分片服务的配置要在三台机器上进行相同的操作
第一个分片服务器的搭建
新建配置文件
#vim $MONGODB_HOME/conf/shared1.cfg
#配置文件内容

pidfilepath = /root/softWare/mongodb3.4.7/mongodb-linux-x86_64-debian71-3.4.7/shared1/log/shared1.pid
dbpath = /root/softWare/mongodb3.4.7/mongodb-linux-x86_64-debian71-3.4.7/shared1/data
logpath = /root/softWare/mongodb3.4.7/mongodb-linux-x86_64-debian71-3.4.7/shared1/log/shared1.log
logappend = true

bind_ip = 0.0.0.0
port = 27001
fork = true

#打开web监控
httpinterface=true
rest=true

#副本集名称
replSet=shared1

#declare this is a shard db of a cluster;
shardsvr = true

#设置最大连接数
maxConns=20000
然后启动每个机器上的分片服务,
mongod -f $MONGODB_HOME/conf/shared1.cfg
登录任意分片服务器,进行初始化
#mongo --port 27001
config={
  "_id": "shared1",
  "members": [
    {
      "_id": 0,
      "host": "192.168.102.3:27001"
    },
    {
      "_id": 1,
      "host": "192.168.102.4:27001"
    },
    {
      "_id": 2,
      "host": "192.168.102.5:27001",
      "arbiterOnly": true
    }
  ]
}
第二个分片服务器的搭建
新建配置文件
#vim $MONGODB_HOME/conf/shared2.cfg
pidfilepath = /root/softWare/mongodb3.4.7/mongodb-linux-x86_64-debian71-3.4.7/shared2/log/shared2.pid
dbpath = /root/softWare/mongodb3.4.7/mongodb-linux-x86_64-debian71-3.4.7/shared2/data
logpath = /root/softWare/mongodb3.4.7/mongodb-linux-x86_64-debian71-3.4.7/shared2/log/shared2.log
logappend = true

bind_ip = 0.0.0.0
port = 27002
fork = true

#打开web监控
httpinterface=true
rest=true

#副本集名称
replSet=shared2

#declare this is a shard db of a cluster;
shardsvr = true

#设置最大连接数
maxConns=20000
然后启动每个机器上的分片服务,
mongod -f $MONGODB_HOME/conf/shared2.cfg
登录任意分片服务器,进行初始化
#mongo --port 27002
config={
  "_id": "shared2",
  "members": [
    {
      "_id": 0,
      "host": "192.168.102.3:27002"
    },
    {
      "_id": 1,
      "host": "192.168.102.4:27002",
      "arbiterOnly": true
    },
    {
      "_id": 2,
      "host": "192.168.102.5:27002"
    }
  ]
}
第三个分片服务器的搭建
新建配置文件
#vim $MONGODB_HOME/conf/shared3.cfg
pidfilepath = /root/softWare/mongodb3.4.7/mongodb-linux-x86_64-debian71-3.4.7/shared3/log/shared3.pid
dbpath = /root/softWare/mongodb3.4.7/mongodb-linux-x86_64-debian71-3.4.7/shared3/data
logpath = /root/softWare/mongodb3.4.7/mongodb-linux-x86_64-debian71-3.4.7/shared3/log/shared3.log
logappend = true

bind_ip = 0.0.0.0
port = 27003
fork = true

#打开web监控
httpinterface=true
rest=true

#副本集名称
replSet=shared3

#declare this is a shard db of a cluster;
shardsvr = true

#设置最大连接数
maxConns=20000
然后启动每个机器上的分片服务,
mongod -f $MONGODB_HOME/conf/shared3.cfg
登录任意分片服务器,进行初始化
#mongo --port 27003
config={
  "_id": "shared3",
  "members": [
    {
      "_id": 0,
      "host": "192.168.102.3:27003"
    },
    {
      "_id": 1,
      "host": "192.168.102.4:27003",
      "arbiterOnly": true
    },
    {
      "_id": 2,
      "host": "192.168.102.5:27003"
    }
  ]
}
路由服务器搭建
路由服务器同样也是要在三台机器上做相同的配置和操作
pidfilepath = /root/softWare/mongodb3.4.7/mongodb-linux-x86_64-debian71-3.4.7/mongos/log/mongos.pid
logpath = /root/softWare/mongodb3.4.7/mongodb-linux-x86_64-debian71-3.4.7/mongos/log/mongos.log
logappend = true

bind_ip = 0.0.0.0
port = 20000
fork = true

#监听的配置服务器,只能有1个或者3个 configs为配置服务器的副本集名字
configdb = configs/192.168.102.3:21000,192.168.102.4:21000,192.168.102.5:21000

#设置最大连接数
maxConns=20000
登录mongos服务,在程序里面进行设置让分片生效
#mongo --port 20000
use admin
sh.addShard("shared1/192.168.102.3:27001,192.168.102.4:27001,192.168.102.5:27001")
sh.addShard("shared2/192.168.102.3:27002,192.168.102.4:27002,192.168.102.5:27002")
sh.addShard("shared3/192.168.102.3:27003,192.168.102.4:27003,192.168.102.5:27003")
指定相应的数据库与表的分片生效
#指定testdb分片生效
db.runCommand( { enablesharding :"testdb"});
#指定数据库里需要分片的集合和片键
db.runCommand( { shardcollection : "testdb.table1",key : {id: 1} } )
分片测试
登录mongos进行数据的插入。具体过程如下:
mongo  192.168.102.3:20000
#使用testdb
use  testdb;
#插入测试数据
for (var i = 1; i <= 100000; i++)
db.table1.save({id:i,"test1":"testval1"});
#查看分片情况如下,部分无关信息省掉了
db.table1.stats();

{
        "sharded" : true,
        "ns" : "testdb.table1",
        "count" : 100000,
        "numExtents" : 13,
        "size" : 5600000,
        "storageSize" : 22372352,
        "totalIndexSize" : 6213760,
        "indexSizes" : {
                "_id_" : 3335808,
                "id_1" : 2877952
        },
        "avgObjSize" : 56,
        "nindexes" : 2,
        "nchunks" : 3,
        "shards" : {
                "shard1" : {
                        "ns" : "testdb.table1",
                        "count" : 42183,
                        "size" : 0,
                        ...
                        "ok" : 1
                },
                "shard2" : {
                        "ns" : "testdb.table1",
                        "count" : 38937,
                        "size" : 2180472,
                        ...
                        "ok" : 1
                },
                "shard3" : {
                        "ns" : "testdb.table1",
                        "count" :18880,
                        "size" : 3419528,
                        ...
                        "ok" : 1
                }
        },
        "ok" : 1
}
分片的key的设置会影响每个分片的数据量。
集群维护
启动集群
启动集群的顺序是:
1,启动配置服务。
2,启动分片服务。
3,启动路由服务。
JackerWang 于2017年8月29日上午的广州

 浙公网安备 33010602011771号