

【iOS开发每日小笔记(十)】自制带圆框的头像 利用在CALayer设置“寄宿图”
这篇文章是我的【iOS开发每日小笔记】系列中的一片,记录的是今天在开发工作中遇到的,可以用很短的文章或很小的demo演示解释出来的小心得小技巧。它们可能会给用户体验、代码效率得到一些提升,或是之前自己没有接触过的技术,很开心的学到了,放在这里得瑟一下。90%的作用是帮助自己回顾、记忆、复习。
在上一篇文章中,我详细地回顾、复习了Core Graphics框架中利用Quartz 2D来绘制各种各样的图形,其实这些绘图就是绘制到了UIView的CALayer层上。这次,受到另一篇博文(http://www.cnblogs.com/kenshincui/p/3972100.html)的启发,我利用在CALayer层上设置“寄宿图”,重新优化了自己项目中的一个小控件。本篇文章将介绍在CALayer层上设置“寄宿图”。(demo地址:https://github.com/pigpigdaddy/CircleHeadViewDemo)
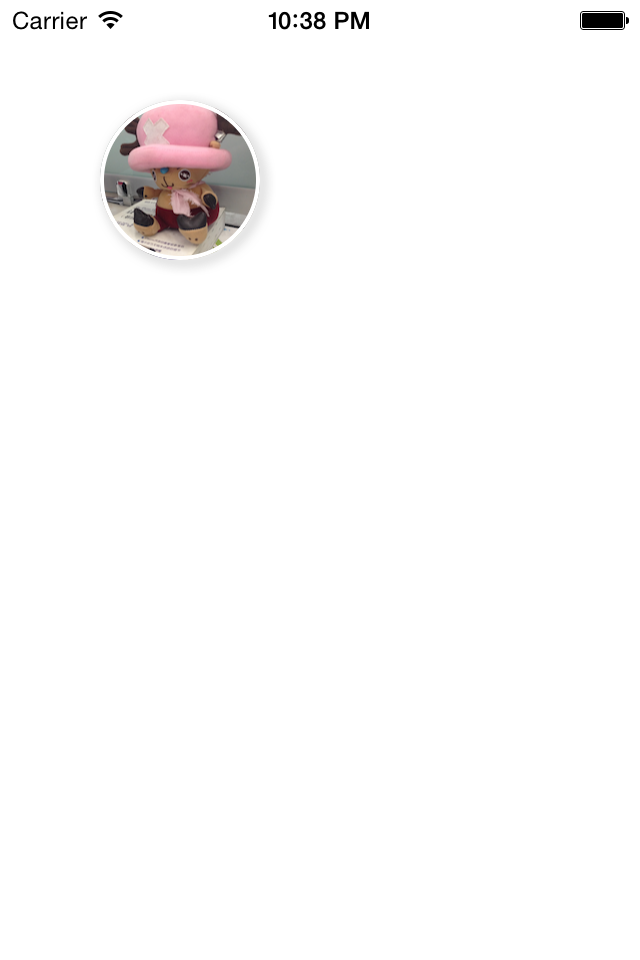
效果是这样的:用户的头像不再是一个矩形,而是一个有这白色边框,带边框阴影的圆形。类似的效果比如“唱吧”、“QQ”。


下面是我自己写的效果:(带有一点点阴影。)
以前,我们使用一个讨巧的方法,那就是让UI组给我们切一个“中间镂空”的图片,蒙在UIImageView(我们的头像)上面。这样做挺讨巧,但是水平未免也太低了,而且灵活度非常低。“边宽”、“边颜色”、“阴影”,要改变这些只能麻烦UI组的同学重新切图。总之非常不科学。
因此来看看我自己写的一个很简单的类,解决这些问题:(demo地址:https://github.com/pigpigdaddy/CircleHeadViewDemo)
用于处理照片的类:
 1 //
 2 //  CircleHeadView.h
 3 //  CircleHeadViewDemo
 4 //
 5 //  Created by pigpigdaddy on 14-9-24.
 6 //  Copyright (c) 2014年 pigpigdaddy. All rights reserved.
 7 //
 8
 9 #import <UIKit/UIKit.h>
10
11 typedef enum {
12     CircleHeadViewContentResize,
13     CircleHeadViewContentResizeAspect,
14     CircleHeadViewContentResizeAspectFill
15 } CircleHeadViewContentType;
16
17 @interface CircleHeadView : UIView
18
19 @property (nonatomic, strong)UIColor *strokeColor;
20 @property (nonatomic, assign)CGFloat strokeWidth;
21 @property (nonatomic, strong)UIImage *originalImage;
22 @property (nonatomic, assign)BOOL needShadow;
23 @property (nonatomic, assign)CircleHeadViewContentType contentType;
24
25 - (void)setCircleImage:(UIImage *)image;
26
27 @end
 1 //
 2 //  CircleHeadView.m
 3 //  CircleHeadViewDemo
 4 //
 5 //  Created by pigpigdaddy on 14-9-24.
 6 //  Copyright (c) 2014年 pigpigdaddy. All rights reserved.
 7 //
 8
 9 #import "CircleHeadView.h"
10
11 @implementation CircleHeadView
12
13 - (id)initWithFrame:(CGRect)frame
14 {
15     self = [super initWithFrame:frame];
16     if (self) {
17         // Initialization code
18         // 设置默认值
19         self.needShadow = NO;
20         self.strokeColor = [UIColor whiteColor];
21         self.strokeWidth = 2.0;
22         self.contentType = CircleHeadViewContentResize;
23     }
24     return self;
25 }
26
27 // 设置原始图片
28 - (void)setCircleImage:(UIImage *)image
29 {
30     self.originalImage = image;
31
32     // 正圆形
33     CGRect bounds=CGRectMake(0, 0, self.bounds.size.height, self.bounds.size.height);
34     CGFloat cornerRadius=self.bounds.size.height/2;
35
36     if (self.needShadow) {
37         // 创建阴影层
38         [self createShadowLayer:bounds cornerRadius:cornerRadius];
39     }
40     // 创建照片层
41     [self createImageLayer:bounds cornerRadius:cornerRadius];
42 }
43
44 - (void)createShadowLayer:(CGRect)bounds cornerRadius:(CGFloat)cornerRadius
45 {
46     CALayer *layerShadow=[[CALayer alloc]init];
47     layerShadow.bounds=bounds;
48     layerShadow.position=CGPointMake(self.bounds.size.width/2, self.bounds.size.height/2);
49     layerShadow.cornerRadius=cornerRadius;
50     layerShadow.shadowColor=[UIColor grayColor].CGColor;
51     layerShadow.shadowOffset=CGSizeMake(2, 2);
52     layerShadow.shadowOpacity=0.7;
53     layerShadow.borderColor=self.strokeColor.CGColor;
54     layerShadow.borderWidth=self.strokeWidth;
55     [self.layer addSublayer:layerShadow];
56 }
57
58 - (void)createImageLayer:(CGRect)bounds cornerRadius:(CGFloat)cornerRadius
59 {
60     CALayer *layer=[[CALayer alloc]init];
61     layer.bounds=bounds;
62     layer.position=CGPointMake(self.bounds.size.width/2, self.bounds.size.height/2);
63     layer.backgroundColor=[UIColor blackColor].CGColor;
64     layer.cornerRadius=cornerRadius;
65     layer.masksToBounds=YES;
66     layer.borderColor=self.strokeColor.CGColor;
67     layer.borderWidth=self.strokeWidth;
68     layer.contents=(id)self.originalImage.CGImage;
69     [self.layer addSublayer:layer];
70
71     // 设置照片的平铺方式
72     switch (self.contentType) {
73         case CircleHeadViewContentResize:
74         {
75             layer.contentsGravity = kCAGravityResize;
76         }
77             break;
78         case CircleHeadViewContentResizeAspect:
79         {
80             layer.contentsGravity = kCAGravityResizeAspect;
81         }
82             break;
83         case CircleHeadViewContentResizeAspectFill:
84         {
85             layer.contentsGravity = kCAGravityResizeAspectFill;
86         }
87             break;
88
89         default:
90             break;
91     }
92 }
93
94 @end
我用了两个CALayer层,来分别绘制“阴影”和“照片”。
调用方法:
1     CircleHeadView *view = [[CircleHeadView alloc] initWithFrame:CGRectMake(50, 50, 80, 80)];
2     view.needShadow = YES;
3     view.strokeWidth = 2.0;
4     view.strokeColor = [UIColor whiteColor];
5     view.contentType = CircleHeadViewContentResizeAspectFill;
6     [view setCircleImage:[UIImage imageNamed:@"photo.png"]];
7     [self.view addSubview:view];
很简单,也很灵活,可以设置“阴影”、“边宽”、“边颜色”、“平铺类型”。其实还可以设置的更多,因为CALayer可以自定义的东西有很多。在此就不一一扩展了。
(demo地址:https://github.com/pigpigdaddy/CircleHeadViewDemo)
参考文章:

 浙公网安备 33010602011771号