

基于Chrome的扩展开发(二)
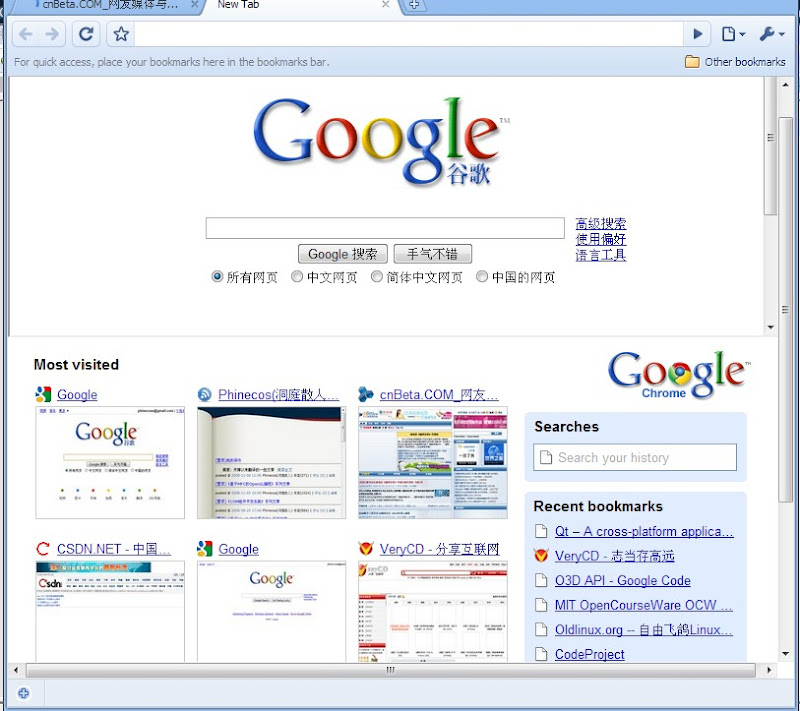
Chrome启动时默认的效果如下图所示,有”most visited”,”Searches”,”Recent bookmarks”,”recently closed”这几个区域,但每次打开标签都是这样的页面,相信让很多人都感到烦躁。

本文要介绍的扩展名为Custom New Tab,可以从这里直接下载安装包:Custom New tab。这个扩展实现的功能是让用户可以对标签页打开后的显示效果进行自定义,实现的具体功能如下:
1、隐藏/显示最热门网页略缩图
2、隐藏/显示新标签页上的搜索栏
3、隐藏/显示最近的书签
4、隐藏/显示最近关闭的标签
5、将新标签页重定向到任意页面
6、在新标签页中嵌入任意页面
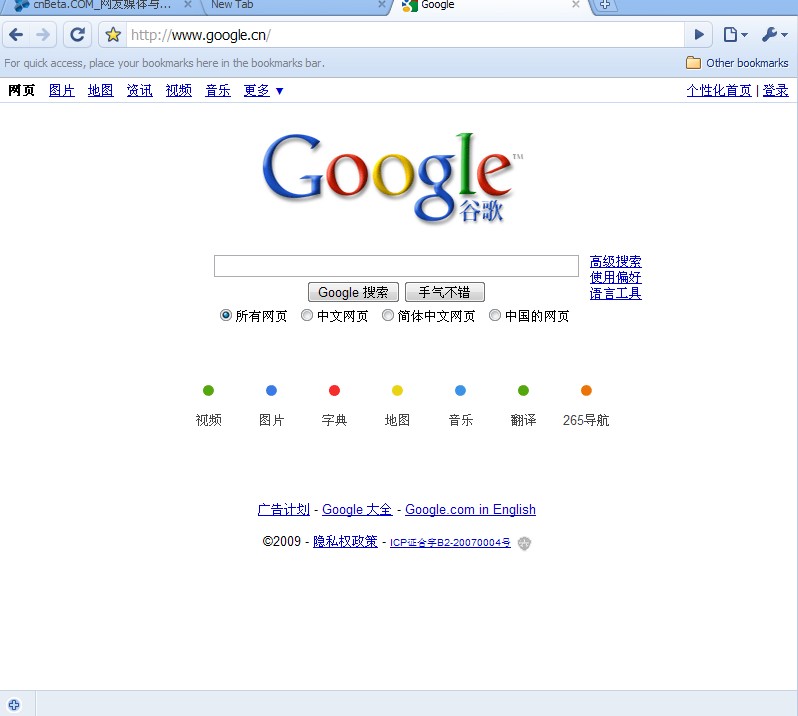
具体效果如下面两图所示:
好了,现在来看看这个扩展究竟是如何实现的,首先需要进行准备工作,你需要使用Chrome 2.0.180.0或更新版本
1)首先创建一个文件夹,例如c:/ myextension,在这个目录下创建一个文本文件,命名为manifest.json,在其中放入下面几句:
"format_version": 1,
"id": "AAAAAAAAAAAAAAAAAAAAAAAAAAAAAAAAAAAAAAA2",
"version": "0.2",
"name": "CustomNewTab",
"description": "Customize your new tab page.",
"toolstrips": [
"CustomNewTab_toolstrip.html"
],
"content_scripts": [
{
"js": ["CustomNewTab.js"],
"matches": ["chrome://newtab/*"],
"run_at": "document_start"
}
]
}
其中各个参数含义如下:
format_version(必需的):向Chrome指明扩展所使用的清单格式版本。目前只有一个格式版本,因此设为1.
id(必需的):扩展的ID号(唯一的)。
version(必需的):扩展的版本号。可以使用任意点分格式的数字串
name(必需的):扩展的名称。
description(可选的):扩展的描述信息
toolstrips: 在此指定的页面将加入到Chrome工具栏
content_scripts: 此处指定的内容在Chrome的content中加载,这里指定了加载的js文件,以及待匹配的url模式,运行的时刻应该是文档打开时。
2)先来看要加入工具栏的页面CustomNewTab_toolstrip.html,它只有一个div,指明类型是toolstrip-button,也就是会作为工具栏按钮显示,并且指定了工具栏按钮图标。
<img id="icon" src="ui/icon.png" />
</div>
再来看其中的JavaScript代码,settings数组中保存了新标签页中应该显示区域的默认设置。
"displayAnotherPageInstead": "0",
"pageToDisplayURL" : "",
"hideMostVisited": "false",
"hideSearches" : "false",
"hideRecentBookmarks" : "false",
"hideRecentlyClosedTabs" : "false"
};
这里为Chrome的connect事件注册了一个监听器,当扩展加载进来时会首先触发此事件,并且会在一个端口中进行监听,于是这里为此端口注册了一个监听器来监听可能到来的消息。
function handleConnect(port)
{
console.log("Handling connect
 ");
");myport = port;
myport.onMessage.addListener(handleMessage);
console.log("Done handling connect
");}
在端口的事件处理函数中,首先确认消息类型是否是getsettings,若是,则使用Ajax技术读取扩展根目录下的config.xml配置文件,并返回给请求者。
{
console.log("Handling message
");if(message != "getsettings")
{
console.error("Not getsettings");
return;
}
req = new XMLHttpRequest();
req.onload = loadconfig;
console.log("Getting settings
");//从config.xml文件中读取配置信息
req.open("GET",
"config.xml",
false);
req.send(null);
console.log("Done handling message
");}
function loadconfig()
{//加载配置信息
if( this.readyState == 4 )
{
console.log("Loading config
");var xmlDoc = req.responseXML;
bindSettings(xmlDoc);
console.log("Done loading config
");console.log("Sending settings
");console.log(settings);
myport.postMessage(settings);//向请求者应答提交配置信息
console.log("Done sending settings
");}
}
3)再来看页面content加载时加载进来的Javascript文件CustomNewTab.js。
它使用一个端口连接到扩展,在此端口上注册一个监听器来处理从扩展发送过来的消息,在初始化时它会利用此端口向扩展发送一个消息去通知扩展读取本地的配置文件。
{
var theBody = document.body;
if(theBody == null)
{//页面还未加载完毕
console.debug("CS: Body not loaded yet
");if(currentWait < maxWaitTime)
{
currentWait++;
window.setTimeout(init,1);
}
else
{
currentWait=0;//重新归零
}
return;
}
console.debug("CS: Hiding body
");theBody.style.display = "none";
console.debug("CS: Sending message
");myport.postMessage("getsettings");//请求配置信息
console.debug("CS: Done sending message
");}
扩展发送过来的就是读取到的配置信息,然后使用这些配置信息来对新标签页进行区域显示的设置。
myport.onMessage.addListener(handleMessage);//加入监听者
function handleMessage(settings)
{
console.debug("CS: Handling received settings
");console.debug(settings);
console.debug("CS: Start customizing
");console.debug(settings);
customizeNewTab(settings);//使用读取到的配置信息设置页面
console.debug("CS: Done customizing
");if(settings["displayAnotherPageInstead"] != "1")
{
showBody();
}
console.debug("CS: Done handling received settings
");}
对新标签页面的显示区域处理就非常简单了,就是DOM进行处理即可
{
if(document.body == null)
{//页面还未加载完毕
console.debug("CS: Cannot customize, no body");
window.setTimeout(customizeNewTab,1,settings);
return;
}
if(settings['displayAnotherPageInstead']=="1")
{//重定向到指定页面,比如www.google.com
console.debug("CS: Redirecting");
window.location = settings['pageToDisplayURL'];
return;
}
if(settings['displayAnotherPageInstead']=="2")
{//把新打开的页面作为一个frame加入
console.debug("CS: Adding IFrame");
addPageIFrame(settings['pageToDisplayURL']);
}
if(settings['hideMostVisited'] == "true")
hideDiv("mostvisitedsection");
if(settings['hideSearches'] == "true")
hideDiv("searches");
if(settings['hideRecentBookmarks'] == "true")
hideDiv("recentlyBookmarked");
if(settings['hideRecentlyClosedTabs'] == "true")
hideDiv("recentlyClosedTabs");
}
4)此扩展还提供了一个图形化的配置页面,但实际意义不大,因为它只是产生配置文件信息,最终还是需要手工去修改扩展根目录下的config.xml文件,仍然需要进一步改进

5)最后,将上述文件打包为Crx安装包,请参考本系列的上一篇文章《基于Chrome的扩展开发(一)》,
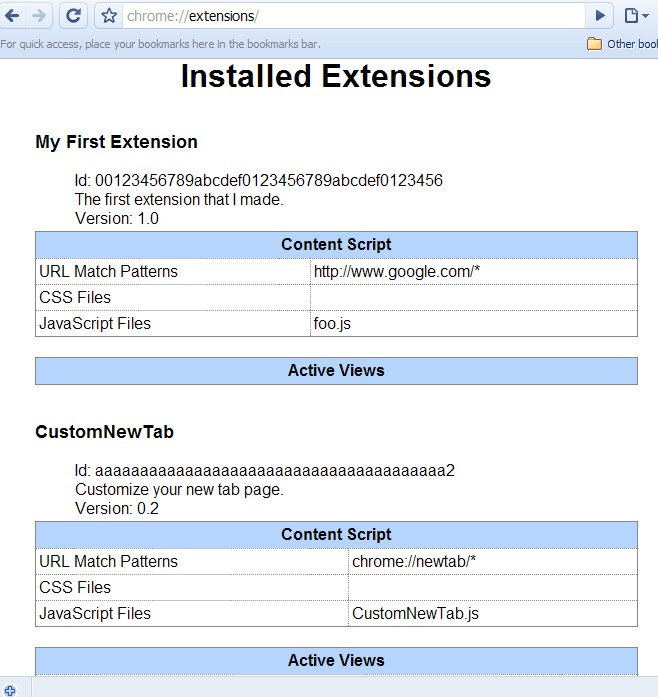
6)输入下列URL:chrome://extensions/,将会列出所有已经安装的扩展,同时还会显示扩展系统启动时发生的错误信息。
7)google官方还放出了两个扩展示例,但是由于官网http://dev.chromium.org/好像被wall掉了,所以无法得到那两个示例来研究。
参考资料
作者:洞庭散人
出处:http://phinecos.cnblogs.com/
posted on 2009-05-18 16:58 Phinecos(洞庭散人) 阅读(5820) 评论(23) 收藏 举报

 浙公网安备 33010602011771号