初识Django框架
今天开始对Django开始学习了,对于一个小白来说经常听到开发说什么MVC、MTV的,感觉好高深的样子,下面在学习Django之前先来介绍一下什么是MVC&MTV。
一、MVC&MTV
MVC:全名Model View Controller,是模型(model)-视图(view)-控制器(controller)的缩写,一种软件设计典范,用一种业务逻辑、数据、界面显示分离的方法组织代码,将业务逻辑聚集到一个部件里面,在改进和个性化定制界面及用户交互的同时,不需要重新编写业务逻辑。
-
M(Models) --> 操作数据库
-
V(Views) --> 放置HTML模板
-
C(Controller) --> 处理用户请求
MTV:有些WEB框架觉得MVC的字面意思很别扭,就给它改了一下。view不再是HTML相关,而是主业务逻辑了,相当于控制器。html被放在Templates中,称作模板,于是MVC就变成了MTV。这其实就是一个文字游戏,和MVC本质上是一样的,换了个名字和叫法而已,换汤不换药。
-
M(Models) --> 操作数据库
-
T(Template) --> 放置HTML模板
-
V(Views) --> 处理用户请求
二、Django的工作方式
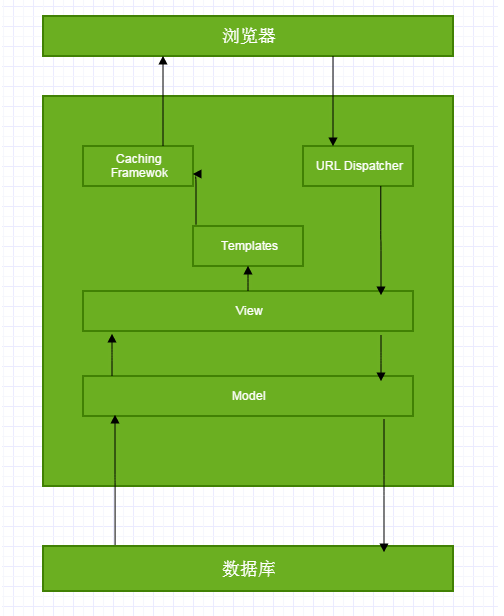
用户在浏览器中输入URL后回车,浏览器会对URL进行检查,首先判断协议,如果是HTTP就按照Web来处理,然后调用DNS查询,将域名转换为IP地址,然后通过网络传输到达对应Web服务器,服务器对URL进行解析后,调用View中的逻辑,其中涉及到Model与数据库的进行交互,然后将数据发送到Template进行渲染,发送到浏览器中,浏览器以合适的方式呈现给用户。
三、项目和APP
1、Django安装
|
1
2
3
4
5
6
|
pip install django #安装最新版本的Djangopip install -v django==1.7.1 #或者指定安装版本#如果在Windows中装了多个版本的python,可以通过python3 -m pip install Django进行安装 |
2、创建Django项目
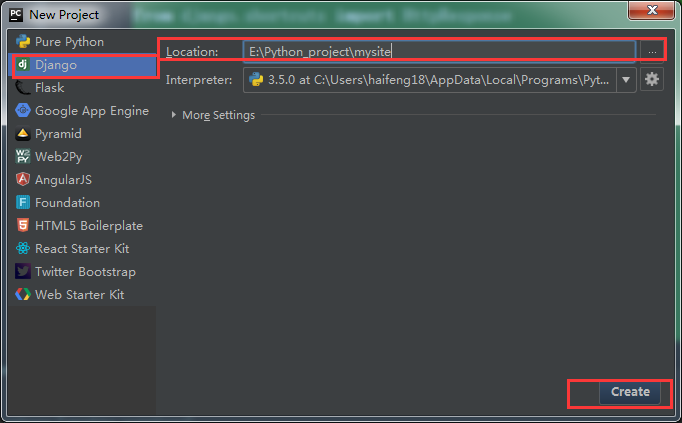
通过pythonIDE:Pycharm创建 File-->New Project -->Django
Linux命令行中创建:
|
1
|
django-admin.py startproject mysite |
Django将自动生成下面的目录结构:
|
1
2
3
4
5
6
7
8
9
|
[root@brand007 soft]# tree mysite/mysite/├── manage.py #Django管理主程序├── mysite│ ├── __init__.py│ ├── settings.py #主配置文件│ ├── urls.py #URL路由系统文件│ └── wsgi.py #网络通信接口└── template #该目录放置HTML文件模板 |
3、创建APP
在每个Django项目中可以包含多个APP,相当于一个大型项目中的分系统、子模块、功能部件等等,相互之间比较独立,但也有联系,所有的APP共享项目资源。
执行命令:
|
1
2
3
|
python manage.py startapp cmdb#创建一个名字为cmdb的app |
|
1
2
3
4
5
6
7
8
9
10
|
[root@brand007 mysite]# tree cmdb/cmdb/├── admin.py ├── apps.py ├── __init__.py├── migrations│ └── __init__.py├── models.py ├── tests.py└── views.py |
4、编写路由规则
路由都在urls文件里,它将浏览器的URL映射到响应的业务处理逻辑。
|
1
2
3
4
5
6
7
8
|
from django.conf.urls import urlfrom django.contrib import adminfrom cmdb import viewsurlpatterns = [ #url(r'^admin/', admin.site.urls), url(r'^index/', views.index),] |
5、编写业务处理逻辑views
|
1
2
3
4
5
6
7
8
9
10
11
12
13
|
from django.shortcuts import render#首先导入HttpResponse模块from django.shortcuts import HttpResponse# Create your views here.def index(request): """ :param request: 这个参数必须有,类似self的默认规则,可以改,它封装了用户请求的所有内容 :return: 不能直接返回字符串,必须有HttpResponse这个类封装起来,这是Django的规则 """ return HttpResponse("Hello,World") |
6、运行Web服务
|
1
2
3
|
命令行:python manage.py runserver 127.0.0.1 8080Pycharm:点击执行按钮或通过点击edit configurations进行执行 |
访问地址:http://127.0.0.1:8000/index/ 可以看到我们定义的返回结果"Hello,World"。
7、返回HTML文件
上面的例子返回给用户浏览器的是一个字符串,在实际工作中肯定没这么干的,通常我们都是将渲染后的HTML文件返回给用户。
7.1 首先定义一个HTML文件index.html:
|
1
2
3
4
5
6
7
8
9
10
11
|
<!DOCTYPE html><html lang="en"><head> <meta charset="UTF-8"> <title>first Django</title></head><body> <h1 style="background-color: black;color: green">Hello,world!!!</h1></body></html> |
7.2 然后,修改我们的views文件:
|
1
2
3
4
5
6
7
8
9
10
11
12
13
14
15
16
|
from django.shortcuts import render#首先导入HttpResponse模块from django.shortcuts import HttpResponse# Create your views here.def index(request): """ render方法用来渲染(其实就是打包的意思) :param request: 这个参数必须有,类似self的默认规则,可以改,它封装了用户请求的所有内容 :return: 不能直接返回字符串,必须有HttpResponse这个类封装起来,这是Django的规则 """ return render(request,"index.html",) |
7.3 为了让Django知道我们的HTML模板在什么地方,需要在settings文件中进行配置,默认是配置好的无需修改。
|
1
2
3
4
|
TEMPLATES = [ { 'BACKEND': 'django.template.backends.django.DjangoTemplates', 'DIRS': [os.path.join(BASE_DIR, 'templates')] |
配置完成后,重启Web服务,在浏览器里可以看到带样式的"Hello,World!!!"

8、使用静态文件
我们已经可以将HTML文件返回给用户了,在实际工作中我们还会用到CSS,JS的这些插件的功能。在Django中,我们将这些静态文件放在static目录中。
8.1 创建static目录,并将下载好的插件放到该目录下:
|
1
2
3
4
5
6
7
8
9
10
11
12
13
14
15
16
17
18
19
20
21
22
23
|
[root@brand007 soft]# tree mysite/mysite/├── cmdb│ ├── admin.py│ ├── apps.py│ ├── __init__.py│ ├── migrations│ │ └── __init__.py│ ├── models.py│ ├── tests.py│ └── views.py├── manage.py├── mysite│ ├── __init__.py│ ├── __pycache__│ │ ├── __init__.cpython-35.pyc│ │ └── settings.cpython-35.pyc│ ├── settings.py│ ├── urls.py│ └── wsgi.py├── static│ └── jquery-1.12.4.js└── template |
8.2 为了让我们的Django找到这个目录,需要对settings做以下修改:
|
1
2
3
4
5
6
7
8
|
STATIC_URL = '/static/' STATICFILES_DIRS = ( os.path.join(BASE_DIR,'static'),) #注意:1、STATICFILES_DIRS这个变量名必须这样定义# 2、os.path.join(BASE_DIR,'static'),因为是一个元组,最后面的逗号不能忽略,必须注意 |
8.2 最后我们的index.html引入js文件:
|
1
2
3
4
5
6
7
8
9
10
11
|
<!DOCTYPE html><html lang="en"><head> <meta charset="UTF-8"> <title>first Django</title></head><body> <h1 style="background-color: black;color: green">Hello,world!!!</h1> <script src="/static/jquery-1.12.4.js"></script></body></html> |
9、返回动态页面
通常我们会根据用户的数据,进行处理后在返回给用户。这时候,Django采用自己的模板语言,类似jinja2,根据提供的数据,替换掉HTML中的相应部分,请看下例。
修改views.py文件:
|
1
2
3
4
5
6
7
8
9
10
11
12
13
14
15
16
17
18
19
|
from django.shortcuts import renderfrom django.shortcuts import HttpResponse# Create your views here.# 处理用户请求USER_INPUT = [ {'user':'jack', 'pwd': '123'}, {'user':'eric', 'pwd': '456'},]def index(request): # ... # 判断用户是否是POST请求 if(request.method == 'POST'): user = request.POST.get('user',None) pwd = request.POST.get('pwd',None) temp = {'user': user, 'pwd': pwd} USER_INPUT.append(temp) return render(request, 'index.html', {'data': USER_INPUT }) |
修改index.html:
|
1
2
3
4
5
6
7
8
9
10
11
12
13
14
15
16
17
18
19
20
21
22
23
24
25
26
27
28
29
|
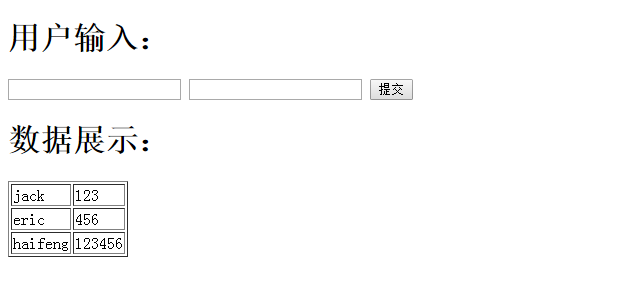
<!DOCTYPE html><html lang="en"><head> <meta charset="UTF-8"> <title></title></head><body> <h1>用户输入:</h1> <form action="/index/" method="POST"> <input type="text" name="user" /> <input type="text" name="pwd" /> <input type="submit" value="提交" /> </form> <h1>数据展示:</h1> <table border="1"> {% for item in data %} <tr> <td>{{ item.user }}</td> <td>{{ item.pwd }}</td> </tr> {% endfor %} </table> <script src="/static/jquery-1.12.4.js"></script></body></html> |
重新项目,当我们在input框里输入信息后,点击提交后会报下面的错误:
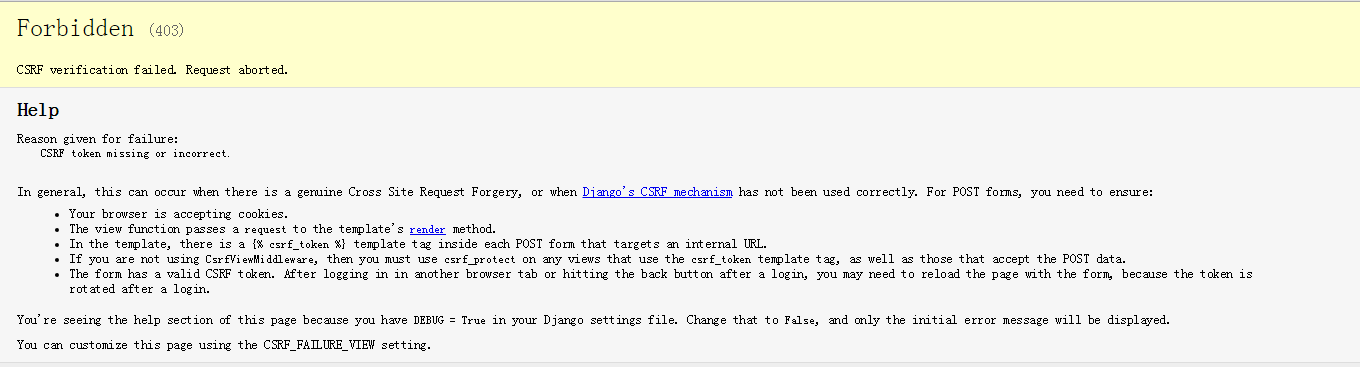
这是Django的一个跨站请求保护机制,我们现在还用不到这个功能,因此需要在settings文件里将其注释掉。
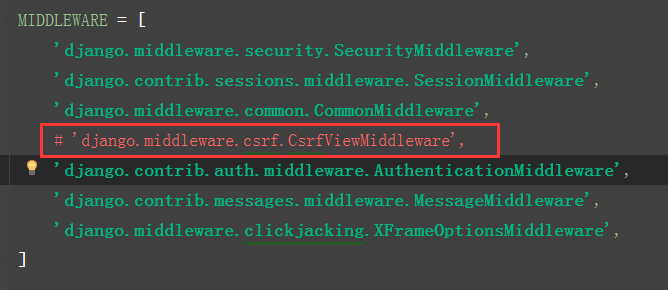
注释掉后再次刷新,可以看到我们提交的数据:
10、与数据库交互
上例中我们我们提交的数据都是保存在了内存中,一旦关闭重新打开数据就会丢失,这里就引出了Django和数据库的交互,还是上面的例子,我们通过数据库,来讲用户提交的信息,持久化到数据库中。
首先,在settings文件中将我们的APP添加进去:
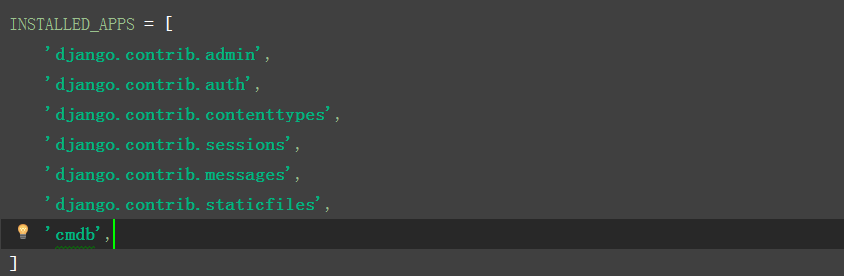
不注册它,数据库就不知道该给那个app创建表了,然后我们在settings中指定数据库的相关参数,下面的例子我们使用自带的sqlite数据库:

使用MySQL数据库,配置如下:

修改models.py,来常见数据库:
|
1
2
3
4
5
6
7
|
from django.db import models# Create your models here. class UserInfo(models.Model): #创建的类必须继承models.Model这个类,这是固定写法 user = models.CharField(max_length=32) pwd = models.CharField(max_length=32) |
这里我们创建了2个字段,分别为用户名和密码长度为32,接下来我们需要执行两条命令来让Django自动给我们创建数据库:
|
1
2
3
4
5
6
7
8
9
10
|
#首先执行python manage.py makemigrations #执行结果:E:\Python_project\mysite>python3 manage.py makemigrationsMigrations for 'cmdb': cmdb\migrations\0001_initial.py: - Create model UserInfo |
|
1
2
3
4
5
6
7
8
9
10
11
12
13
14
15
16
17
18
19
20
21
22
23
24
|
#其次执行python manage.py migrate#执行结果: E:\Python_project\mysite>python3 manage.py migrateOperations to perform: Apply all migrations: admin, auth, cmdb, contenttypes, sessionsRunning migrations: Applying contenttypes.0001_initial... OK Applying auth.0001_initial... OK Applying admin.0001_initial... OK Applying admin.0002_logentry_remove_auto_add... OK Applying contenttypes.0002_remove_content_type_name... OK Applying auth.0002_alter_permission_name_max_length... OK Applying auth.0003_alter_user_email_max_length... OK Applying auth.0004_alter_user_username_opts... OK Applying auth.0005_alter_user_last_login_null... OK Applying auth.0006_require_contenttypes_0002... OK Applying auth.0007_alter_validators_add_error_messages... OK Applying auth.0008_alter_user_username_max_length... OK Applying cmdb.0001_initial... OK Applying sessions.0001_initial... OK |
最后在修改我们的业务逻辑views.py:
|
1
2
3
4
5
6
7
8
9
10
11
12
13
14
15
16
17
18
19
20
21
22
|
from django.shortcuts import renderfrom django.shortcuts import HttpResponsefrom django.shortcuts import redirectfrom cmdb import models# Create your views here.# 处理用户请求def index(request): # ... # 判断用户是否是POST请求 # return redirect('http://baidu.com') # return redirect('') if(request.method == 'POST'): user = request.POST.get('user',None) pwd = request.POST.get('pwd',None) models.UserInfo.objects.create(user=user,pwd=pwd) data_list = models.UserInfo.objects.all() # [UserInfo对象,UserInfo对象,。。。] # for item in data_list: # print(item.user,item.email) return render(request, 'index.html', {'data': data_list }) |
重启程序,这样我们就可以将用户提交的数据持久化到数据库了 。

 浙公网安备 33010602011771号