WinForm知识
控件相关
1.文本框/label高度
文本框Multiline属性,设为true就可以了。改完高度后再将此属性改回来,要不然多行文本框,按回去就去下一行了。
label的改autoSize属性,设为false就可以了。
2.控件中文字居中
TextAlign属性:MiddleCenter
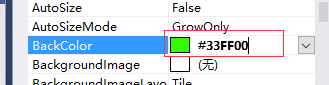
3.颜色属性
直接输入 #xxxx
4.如何去掉button按钮的边框线
设置FlatStyle为Flat,并且设置FlatAppearance下的BorderSize为0。将按钮所在的容器的底色和按钮颜色设置为不同的。
5.ComboBox
下拉列表的高度通过字体大小来改变,微软雅黑,12pt(小四)
DrawMode 默认设置为normal就好,设置为 OwnerDrawVariable,高度可变,但是此时下拉列表的值为不可见的(尽管存在)。设置选中值: SelectText;获取选中值:Text;
6.DataGridView
- 宽度和字体
显示宽度属性:AutoSizeColumnsMode:AllCells
或者设置高度小一点:
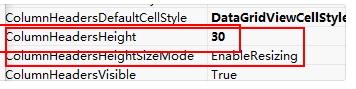
字体:columnHeadersDefaultCellStyle、DefaultCellStyle
- 类型checkboxColumn的选中
首先DataGridView必须设置可编辑。
1、用DataGridViewRow.Cells[0].EditedFormattedValue.ToString()=="True"
不用FormattedValue,它是操作提交后的结果,而EditedFormattedValue是当前的结果,不管结果是否已经提交。
2、DataGridViewCheckBoxColumn设置CheckBox默认选中
((DataGridViewCheckBoxCell)dgvDownloadList.Rows[i].Cells["Column1"]).Value = true;
3、设置是否选中
dataGridViewSiteInfo.Rows[i].Cells[0].Value = "True";
http://blog.csdn.net/wzy0754/article/details/52368377
- 单击DataGridView中一单元格后立即进入编辑状态
将datagridview1的SelectionMode设置为FullRowSelect(某一行全选中),
在双击事件中代码如下
private void datagridview1_CellDoubleClick(object sender, DataGridViewCellEventArgs e)

{ this.datagridview1.Rows[e.RowIndex].Cells[e.ColumnIndex].ReadOnly = false;//将当前单元格设为可读
7.datetimepicker初始为空值的方法
方法一:
在窗口初始化函数中添加,并在日期改变事件里定义格式:


dateTimePickerEnd.Format = DateTimePickerFormat.Custom;
dateTimePickerEnd.CustomFormat = " ";

private void dateTimePickerEnd_ValueChanged(object sender, EventArgs e)
{
dateTimePickerEnd.CustomFormat =  "yyyy-MM-dd HH:mm:ss";
}
方法二:
在日期控件上面覆盖一个文本框,然后初始化时候文本框是空值,每次日期选择之后将值赋在文本框里面。
8、设计时,用户控件被锁定,大小无法调整
是因为控件继承了其他用户控件,需要调整父控件大小,子控件大小才能改变。
9、checkbox的大小调整
把checkBox.AutoSize = false; 然后控件Size就可以修改,但是这样仅是选区大了,框框大小还是没法调整。
窗体属性
1. 窗体不加边框
this.FormBorderStyle = FormBorderStyle.FixedToolWindow;
this.StartPosition = FormStartPosition.CenterScreen;
2. 窗体只显示一个
static formDevice _formDevice;
 if(_formDevice==null||_formDevice.IsDisposed )
            {
                _formDevice = new formDevice();
                _formDevice.Show();
            }
            else
            {
                _formDevice.WindowState = FormWindowState.Normal;
                _formDevice.Activate();
            }
程序启动【单例】
//获取欲启动进程名
string strProcessName = System.Diagnostics.Process.GetCurrentProcess().ProcessName;
            ////获取版本号
            //CommonData.VersionNumber = Application.ProductVersion;
            //检查进程是否已经启动,已经启动则显示报错信息退出程序。
            if (System.Diagnostics.Process.GetProcessesByName(strProcessName).Length > 1)
            {
                MessageBox.Show("程序已经运行!", "消息", MessageBoxButtons.OK, MessageBoxIcon.Exclamation);
                Application.Exit();
                return;
            }
EXE 图标修改问题
1、窗体属性中找到Icon,单击最右侧的“…”按钮,选择备好的ico图标。【这时窗体图标已经变化了,这是程序内部显示图标的修改方法】
2、程序外部图标的修改方法
右击项目名称,在下拉列表中选择“属性”,
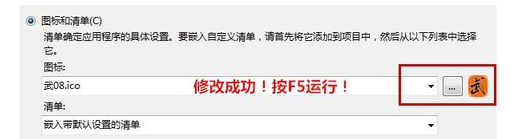
会发现生成的bin目录下的exe图标已经发生变化了。
3、修改ico文件,却发现生成的exe图标未发生变化。重新生成项目也一样,清理后再生成也一样
网上看到的解决方案是:
可能是资源管理器的问题,估计它是有一个缓存,所以在资源管理器中总是显示原来那个图标, 我把这个EXE文件拷到其他文件夹下,图标就正确显示了。
还有,你也可以按住CTRL+滚动鼠标 改变图标的大小(文件的大图标显示和小图标显示),这时你也可以观察到已经改变的图标。
C#界面假死问题
当一个WinForm程序在事件函数中进行IO操作、网络操作或耗CPU大的操作时,窗体会出现明显的卡顿现象。原因在于窗体的消息循环被耗时的操作停住了,UI线程被阻塞。在相关操作没有完成之前,用户不能对窗体进行任何的操作,包括关闭应用程序。
解决思路是——能不能将阻塞线程的操作在另外一个线程中执行,这样就不会堵塞UI线程。
然而从另外一个线程操作windows窗体上的控件,就会和主线程产生竞争,造成不可预料的结果。因为windowsGUI编程有一个规则,就是只能通过创建控件的线程来操作控件的数据。
好在因此Control类实现了ISynchronizeInvoke接口,提供了Invoke和BeginInvoke方法来提供让其它线程更新GUI界面控件的机制。
两者区别是:Invoke,需要等待委托的方法执行返回后才执行下面的代码;begininvoke则不需要。
        private void buttonX1_Click(object sender, EventArgs e)
        {
            Waitting waitting = new Waitting();
            waitting.Show();
            Task.Factory.StartNew(() => // 将阻塞线程的操作在另外一个线程中执行,这样就不会堵塞UI线程。
            {
                ConnectSDE(); //运行时间5s左右
                MessageBox.Show("连接SDE数据库成功", "信息", MessageBoxButtons.OK, MessageBoxIcon.Information);
                waitting.BeginInvoke((Action)waitting.Close);//BeginInvoke方法返回UI线程更新UI界面控件的机制。
            });
        }
参考:解决C#界面假死问题
跨线程调用
访问 Windows 窗体控件本质上不是线程安全的。 如果有两个或多个线程操作某一控件的状态,则可能会迫使该控件进入一种不一致的状态。 还可能会出现其他与线程相关的 Bug,例如争用情况和死锁。 确保以线程安全方式访问控件非常重要。
在未使用 Invoke 方法的情况下,从不是创建某个控件的线程的其他线程调用该控件是不安全的。
.NET Framework 可帮助您检测以非线程安全方式访问控件这一问题。 在调试器中运行应用程序时,如果一个不是创建某个控件的线程的其他线程调用该控件,则调试器会引发一个 InvalidOperationException,并显示以下消息:“从不是创建控件控件名称 的线程访问它。”
此异常在调试期间和运行时的某些情况下可靠地发生。 在调试以 .NET Framework 2.0 版之前的 .NET Framework 编写的应用程序时,可能会出现此异常。 我们强烈建议您在发现此问题时进行修复,但您可以通过将
CheckForIllegalCrossThreadCalls 属性设置为 false 来禁用它。(不推荐)
对 Windows 窗体控件进行线程安全调用
-
查询控件的 InvokeRequired 属性。
-
如果 InvokeRequired 返回 true,则使用实际调用控件的委托来调用 Invoke。
- 如果 InvokeRequired 返回 false,则直接调用控件。
在下面的代码示例中,将在由后台线程执行的 ThreadProcSafe 方法中实现线程安全调用。 如果 TextBox 控件的 InvokeRequired 返回 true,则 ThreadProcSafe 方法会创建 SetTextCallback 的一个实例,并将该实例传递给窗体的 Invoke 方法。 这使得 SetText 方法被创建 TextBox 控件的线程调用,而且在此线程上下文中将直接设置 Text 属性。
using System;
using System.ComponentModel;
using System.Threading;
using System.Windows.Forms;

namespace CrossThreadDemo
{
    public class Form1 : Form
    {
        // This delegate enables asynchronous calls for setting
        // the text property on a TextBox control.
        delegate void SetTextCallback(string text);

        // This thread is used to demonstrate both thread-safe and
        // unsafe ways to call a Windows Forms control.
        private Thread demoThread = null;

        // This BackgroundWorker is used to demonstrate the
        // preferred way of performing asynchronous operations.
        private BackgroundWorker backgroundWorker1;

        private TextBox textBox1;
        private Button setTextUnsafeBtn;
        private Button setTextSafeBtn;
        private Button setTextBackgroundWorkerBtn;

        private System.ComponentModel.IContainer components = null;

        public Form1()
        {
            InitializeComponent();
        }

        protected override void Dispose(bool disposing)
        {
            if (disposing && (components != null))
            {
                components.Dispose();
            }
            base.Dispose(disposing);
        }

        // This event handler creates a thread that calls a
        // Windows Forms control in an unsafe way.
        private void setTextUnsafeBtn_Click(
            object sender,
            EventArgs e)
        {
            this.demoThread =
                new Thread(new ThreadStart(this.ThreadProcUnsafe));

            this.demoThread.Start();
        }

        // This method is executed on the worker thread and makes
        // an unsafe call on the TextBox control.
        private void ThreadProcUnsafe()
        {
            this.textBox1.Text = "This text was set unsafely.";
        }

        // This event handler creates a thread that calls a
        // Windows Forms control in a thread-safe way.
        private void setTextSafeBtn_Click(
            object sender,
            EventArgs e)
        {
            this.demoThread =
                new Thread(new ThreadStart(this.ThreadProcSafe));

            this.demoThread.Start();
        }

        // This method is executed on the worker thread and makes
        // a thread-safe call on the TextBox control.
        private void ThreadProcSafe()
        {
            this.SetText("This text was set safely.");
        }

        // This method demonstrates a pattern for making thread-safe
        // calls on a Windows Forms control.
        //
        // If the calling thread is different from the thread that
        // created the TextBox control, this method creates a
        // SetTextCallback and calls itself asynchronously using the
        // Invoke method.
        //
        // If the calling thread is the same as the thread that created
        // the TextBox control, the Text property is set directly.

        private void SetText(string text)
        {
            // InvokeRequired required compares the thread ID of the
            // calling thread to the thread ID of the creating thread.
            // If these threads are different, it returns true.
            if (this.textBox1.InvokeRequired)
            {
                SetTextCallback d = new SetTextCallback(SetText);
                this.Invoke(d, new object[] { text });
            }
            else
            {
                this.textBox1.Text = text;
            }
        }

        // This event handler starts the form's
        // BackgroundWorker by calling RunWorkerAsync.
        //
        // The Text property of the TextBox control is set
        // when the BackgroundWorker raises the RunWorkerCompleted
        // event.
        private void setTextBackgroundWorkerBtn_Click(
            object sender,
            EventArgs e)
        {
            this.backgroundWorker1.RunWorkerAsync();
        }

        // This event handler sets the Text property of the TextBox
        // control. It is called on the thread that created the
        // TextBox control, so the call is thread-safe.
        //
        // BackgroundWorker is the preferred way to perform asynchronous
        // operations.

        private void backgroundWorker1_RunWorkerCompleted(
            object sender,
            RunWorkerCompletedEventArgs e)
        {
            this.textBox1.Text =
                "This text was set safely by BackgroundWorker.";
        }

        #region Windows Form Designer generated code

        private void InitializeComponent()
        {
            this.textBox1 = new System.Windows.Forms.TextBox();
            this.setTextUnsafeBtn = new System.Windows.Forms.Button();
            this.setTextSafeBtn = new System.Windows.Forms.Button();
            this.setTextBackgroundWorkerBtn = new System.Windows.Forms.Button();
            this.backgroundWorker1 = new System.ComponentModel.BackgroundWorker();
            this.SuspendLayout();
            //
            // textBox1
            //
            this.textBox1.Location = new System.Drawing.Point(12, 12);
            this.textBox1.Name = "textBox1";
            this.textBox1.Size = new System.Drawing.Size(240, 20);
            this.textBox1.TabIndex = 0;
            //
            // setTextUnsafeBtn
            //
            this.setTextUnsafeBtn.Location = new System.Drawing.Point(15, 55);
            this.setTextUnsafeBtn.Name = "setTextUnsafeBtn";
            this.setTextUnsafeBtn.TabIndex = 1;
            this.setTextUnsafeBtn.Text = "Unsafe Call";
            this.setTextUnsafeBtn.Click += new System.EventHandler(this.setTextUnsafeBtn_Click);
            //
            // setTextSafeBtn
            //
            this.setTextSafeBtn.Location = new System.Drawing.Point(96, 55);
            this.setTextSafeBtn.Name = "setTextSafeBtn";
            this.setTextSafeBtn.TabIndex = 2;
            this.setTextSafeBtn.Text = "Safe Call";
            this.setTextSafeBtn.Click += new System.EventHandler(this.setTextSafeBtn_Click);
            //
            // setTextBackgroundWorkerBtn
            //
            this.setTextBackgroundWorkerBtn.Location = new System.Drawing.Point(177, 55);
            this.setTextBackgroundWorkerBtn.Name = "setTextBackgroundWorkerBtn";
            this.setTextBackgroundWorkerBtn.TabIndex = 3;
            this.setTextBackgroundWorkerBtn.Text = "Safe BW Call";
            this.setTextBackgroundWorkerBtn.Click += new System.EventHandler(this.setTextBackgroundWorkerBtn_Click);
            //
            // backgroundWorker1
            //
            this.backgroundWorker1.RunWorkerCompleted += new System.ComponentModel.RunWorkerCompletedEventHandler(this.backgroundWorker1_RunWorkerCompleted);
            //
            // Form1
            //
            this.ClientSize = new System.Drawing.Size(268, 96);
            this.Controls.Add(this.setTextBackgroundWorkerBtn);
            this.Controls.Add(this.setTextSafeBtn);
            this.Controls.Add(this.setTextUnsafeBtn);
            this.Controls.Add(this.textBox1);
            this.Name = "Form1";
            this.Text = "Form1";
            this.ResumeLayout(false);
            this.PerformLayout();

        }

        #endregion


        [STAThread]
        static void Main()
        {
            Application.EnableVisualStyles();
            Application.Run(new Form1());
        }

    }
}
C#跨线程调用窗体控件(比如TextBox)引发的线程安全问题
让pictureBox显示图像(包含GIF)
public void ShowImage(string path)
        {
            if ((this.pictureBox1.Image != null)) //先释放
            {
                pictureBox1.Image.Dispose();
                pictureBox1.Image = null;
            }

            Image img = Image.FromFile(path);   //加载图片
            MemoryStream mstr = new MemoryStream(); //创建新的MemoryStream
            img.Save(mstr, ImageFormat.Gif);        // 保存这个对象
            pictureBox1.Image = Image.FromStream(mstr); //显示
            img.Dispose();//释放占用       //File.Delete(path);
        }
c#Winform程序,让pictureBox显示图像(包含GIF),并且不被占用,能即时删除图片
WinForm布局
Dock与Anchor
1、Dock
Dock属性用于指定控件应停放在窗口的边框上,用户重新设置了窗口的大小,这个控件将继续停放在窗口的边框上,例如:如果指定控件停放在窗口的底部边界上,则无论窗口的大小改变,这个控件都将改变大小,或移动其位置,确保总是位于屏幕的底部。
this.Controls.Add(this.splitContainer1);
this.Controls.Add(this.menuStrip1);
this.Controls.Add(this.statusStrip1);
我这3个被添加的控件都设置了dock属性,menu是Dock.Top,Status是Dock.Bottom,splitContainer是Dock.Fill,将控件添加到父容器中,对于设置了Dock属性的控件有1个显示的优先级,越靠后添加的控件,其最先在父容器中占位置,本例中先给statusStrip分配位置,其次是menuStrip,最后是splitContainer,如果你不小心先添加了menuStrip,再添加splitContainer,那么你的splitContainer将覆盖住menuStrip,splitContainer的Location和Size属性怎么调都无效,因为其布局是Dock.Fill,因此当你手写布局的时候一定要记得你添加的这些控件应该占据的位置,并合理在代码中添加它的先后顺序。永远记住:越靠后添加的控件将越先占据位置(在Dock属性下)。注意: 设置了Dock属性的窗体 是移动不了的,必须是None
从Designer中去调整顺序,即找到 this.Control.Add(xxx)、this.Control.Add(yyy)
2、Anchor锚点
Anchor属性用于指定在用户重新设置窗口的大小时控件应该如何响应,可以指定如果控件重新设置了大小,就根据控件的边界锁定它,或者其大小不变,但根据窗口的边界来锚定它的位置。
这个属性迫使控件将其自身定位在父窗体或父控件中的某个相对或绝对位置。
简单理解为将你的控件4个角订上钉子,当它所在的父容器变化时,会先去看下是在这个控件的哪个方向钉住的,如果是Left,那么这个控件将与父容器的左边线距离始终不变,同理可知其他3个设置,也可以设置多个,比如设置left, top,比如设置left, right,这样的话该控件就会缩放,以与父容器的左右边线距离不变,以此类推。
参考:
Winform多个容器控件设置Dock属性为fill时出现包含情况解决办法
WinForm混搭WPF编程
非模态窗体与模态窗体转换
如果一个窗体打开时,是非模态窗体,当单击了一个按钮后,想将这个窗体显示成 模态窗体,可以:
if (!this.Modal)
            {
                //非模式显示时,将窗体显示为模式对话框
                this.Visible = false;
                this.ShowDialog();
            }
此时窗体变为模态窗体。
但是 要变回 非模态窗体,则需要关闭close()窗体后重新show()。
控件学习参考

 浙公网安备 33010602011771号