

ElasticSearch集群
单机搭建
把课件中的 elasticsearch-5.6.8.tar.gz 拷贝到服务器中 /usr/local/es-cluster/es1 目录下,并解压。
[root@localhost es1]# tar -zxvf elasticsearch-5.6.8.tar.gz
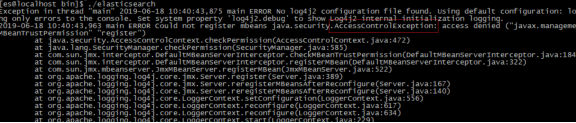
解压后直接启动报错
JNA错误问题,如果发生此问题是因为在32位操作系统中jar冲突了
解决办法
直接删除或备份Elasticsearch-5.6.8/lib目录下面的jna文件:
mv jna-4.4.0-1.jar jna-4.4.0-1.jar.bak
在lib目录下:
wget http://repo1.maven.org/maven2/net/java/dev/jna/jna/4.4.0/jna-4.4.0.jar
注意此jar包1M多下载较慢,
可以删除mv jna-4.4.0-1.jar后,直接上传进去lib目录下
创建es账号
由于安全问题,es不允许使用root账号登录,直接启动会报错
所以需要额外创建账号,如下代码:
[root@localhost es]# useradd es
[root@localhost es]# passwd es
Changing password for user es.
New password:
BAD PASSWORD: it is too simplistic/systematic
BAD PASSWORD: is too simple
Retype new password:
passwd: all authentication tokens updated successfully.
(此处密码可以随便设置)
目录授权
[root@localhost es]# chown -R es es1
如果不授权目录会报如下错误:
配置elasticsearch.yml
修改elasticsearch.yml配置
[root@localhost /]# cd /usr/local/es-cluster/es1/config
[root@localhost config]# vim elasticsearch.yml
修改如下:
# ======================== Elasticsearch Configuration =========================
#
# NOTE: Elasticsearch comes with reasonable defaults for most settings.
# Before you set out to tweak and tune the configuration, make sure you
# understand what are you trying to accomplish and the consequences.
#
# The primary way of configuring a node is via this file. This template lists
# the most important settings you may want to configure for a production cluster.
#
# Please consult the documentation for further information on configuration options:
# https://www.elastic.co/guide/en/elasticsearch/reference/index.html
#
# ---------------------------------- Cluster -----------------------------------
#
# Use a descriptive name for your cluster:
#集群名称
cluster.name: es-cluster
#
# ------------------------------------ Node ------------------------------------
#
# Use a descriptive name for the node:
#节点名称,其余两个节点分别为node-2 和node-3
node.name: node-1
#
# Add custom attributes to the node:
#
#node.attr.rack: r1
#
# ----------------------------------- Paths ------------------------------------
#
# Path to directory where to store the data (separate multiple locations by comma):
#数据存储路径
path.data: ../data
#
# Path to log files:
#日志存储路径
path.logs: ../logs
#
# ----------------------------------- Memory -----------------------------------
#
# Lock the memory on startup:
# 不锁定内存,可以使用虚拟内存
bootstrap.memory_lock: false
bootstrap.system_call_filter: false
#
# Make sure that the heap size is set to about half the memory available
# on the system and that the owner of the process is allowed to use this
# limit.
#
# Elasticsearch performs poorly when the system is swapping the memory.
#
# ---------------------------------- Network -----------------------------------
#
# Set the bind address to a specific IP (IPv4 or IPv6):
#绑定IP
network.host: 192.168.218.128
#
# Set a custom port for HTTP:
#置对外服务的http端口,默认为9201
http.port: 9201
#设置节点间交互的tcp端口,默认是9300
transport.tcp.port: 9301
#
# For more information, consult the network module documentation.
#
# --------------------------------- Discovery ----------------------------------
#
# Pass an initial list of hosts to perform discovery when new node is started:
# The default list of hosts is ["127.0.0.1", "[::1]"]
#这提供了自动集群体验,而无需进行任何配置。数组设置或逗号分隔的设置。每个值的形式应该是host:port或host
discovery.zen.ping.unicast.hosts: ["192.168.218.128:9301", "192.168.218.128:9302", "192.168.218.128:9303"]
#
# Prevent the "split brain" by configuring the majority of nodes (total number of master-eligible nodes / 2 + 1):
#集群节点个数
discovery.zen.minimum_master_nodes: 3
#
# For more information, consult the zen discovery module documentation.
#
# ---------------------------------- Gateway -----------------------------------
#
# Block initial recovery after a full cluster restart until N nodes are started:
#
#gateway.recover_after_nodes: 3
#
# For more information, consult the gateway module documentation.
#
# ---------------------------------- Various -----------------------------------
#
# Require explicit names when deleting indices:
#
#action.destructive_requires_name: true
# 允许跨域访问
http.cors.enabled: true
http.cors.allow-origin: "*"
可以复制以上配置文件,也可以按照注释自行修改
参数说明
cluster.name 集群的名字
node.name 节点名字
network.host 网络地址
http.port http 端口
path.data 数据的存储路径
path.log 日志的存储路径
discovery.zen.ping.unicast.hosts 集群节点
discovery.zen.minimum_master_nodes 集群节点个数
bootstrap.memory_lock 是否锁定内存,不适用虚拟内存
启动并解决错误
切换账号,启动es
[root@localhost /]# su es
[es@localhost /]$ cd /usr/local/es-cluster/es1/bin
[es@localhost bin]$ ./elasticsearch
继续报错
解决方法:
切换到root账号,修改limits.conf文件 ,在该文件结尾添加如下配置:
vim /etc/security/limits.conf
添加内容如下:
* soft nofile 65536
* hard nofile 131072
* soft nproc 2048
* hard nproc 4096
* soft memlock unlimited
* hard memlock unlimited
修改/etc/security/limits.d/90-nproc.conf,将1024改成2048
[root@localhost bin]# vim /etc/security/limits.d/90-nproc.conf
* soft nproc 1024
改成
* soft nproc 2048
修改/etc/sysctl.conf,追加如下代码
vm.max_map_count = 655360
改完上面参数后,执行sysctl -p 会出现如下参数配置信息
net.ipv4.ip_forward = 0
net.ipv4.conf.default.rp_filter = 1
net.ipv4.conf.default.accept_source_route = 0
kernel.sysrq = 0
kernel.core_uses_pid = 1
net.ipv4.tcp_syncookies = 1
kernel.msgmnb = 65536
kernel.msgmax = 65536
kernel.shmmax = 68719476736
kernel.shmall = 4294967296
vm.max_map_count = 655360
重新启动测试
[es@localhost /]$ cd /usr/local/es-cluster/es1/bin
[es@localhost bin]$ ./elasticsearch
集群搭建
集成IK分词器
IK分词器下载地址https://github.com/medcl/elasticsearch-analysis-ik/releases
将ik分词器上传到服务器上,先上传到第1个es的plugins目录下,并解压,并将解压后为ik文件夹。
[root@localhost plugins]# unzip elasticsearch-analysis-ik-5.6.8.zip -d ./ik
[root@localhost plugins]# cp -r ik /usr/local/es-cluster/es1/plugins
node-2 node-3 配置
3.2.3.1 node-2配置
修改elasticsearch.yml
[root@localhost /]# cd /usr/local/es-cluster/es2/config
[root@localhost config]# vim elasticsearch.yml
修改如下:
#节点名称
node.name: node-2
修改完成后,记得删除data和logs目录
[root@localhost es2]# rm -rf data
[root@localhost es2]# rm -rf logs
启动ES
项目中使用ES集群
在项目中,只需要修改下节点配置即可实现使用ES集群。
<elasticsearch:transport-client id="client"
cluster-name="es-cluster"
cluster-nodes="192.168.218.128:9301,192.168.218.128:9302,192.168.218.128:9303"/>

 浙公网安备 33010602011771号