03谷粒商城-高级篇三
前言
可以间接性堕落,但总不能一直清醒的堕落吧
9.商城业务-认证服务
9.1环境搭建
主要步骤:
-
创建
gulimall-auth-service,application.yml配置nacos -
配置
gulimall-auth-service的pom.xml,此服务暂不需要mybatis-plus -
配置
hosts文件 -
上传登录和注册的静态资源到
nginx -
配置
nginx -
配置
gulimall-gateway网关服务 -
gulimall-auth-service添加登录页和注册页,登录页改为index.html方便测试 -
修改登录页和注册页的静态资源访问地址
-
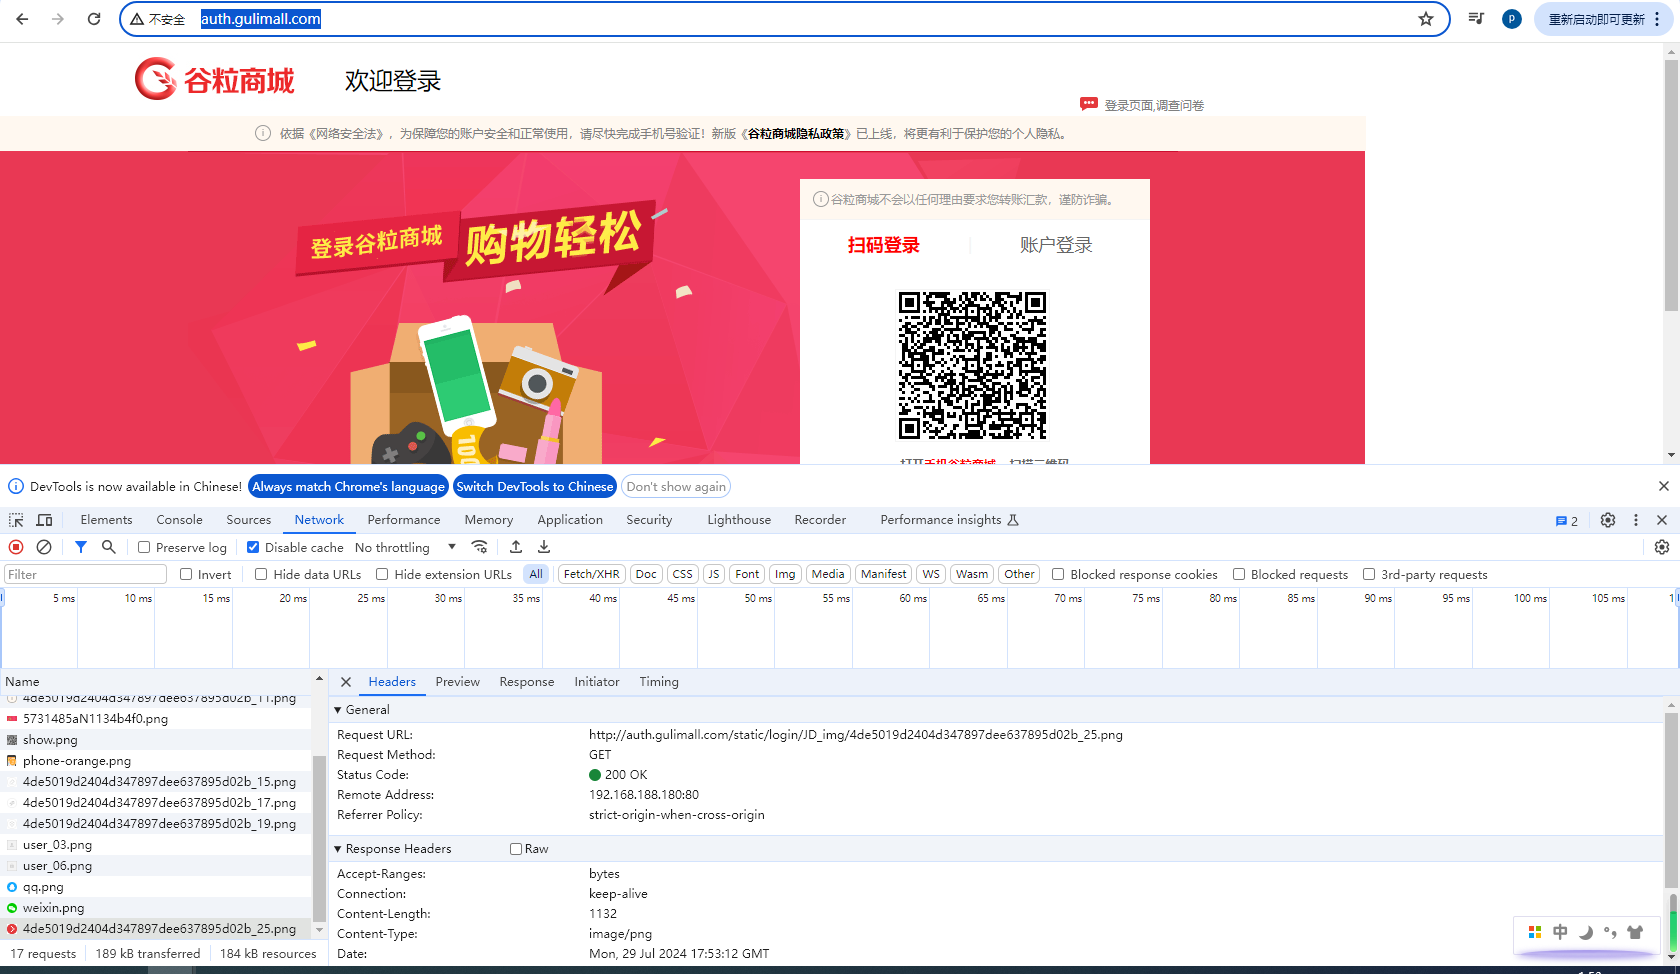
测试访问http://auth.gulimall.com/
创建gulimall-auth-service ,application.yml配置nacos地址
server:
  port: 8209
spring:
  application:
    name: gulimall-auth-service
  main:
    allow-circular-references: true
  cloud:
    nacos:
      discovery:
        server-addr: 192.168.188.180:8848 # nacos地址

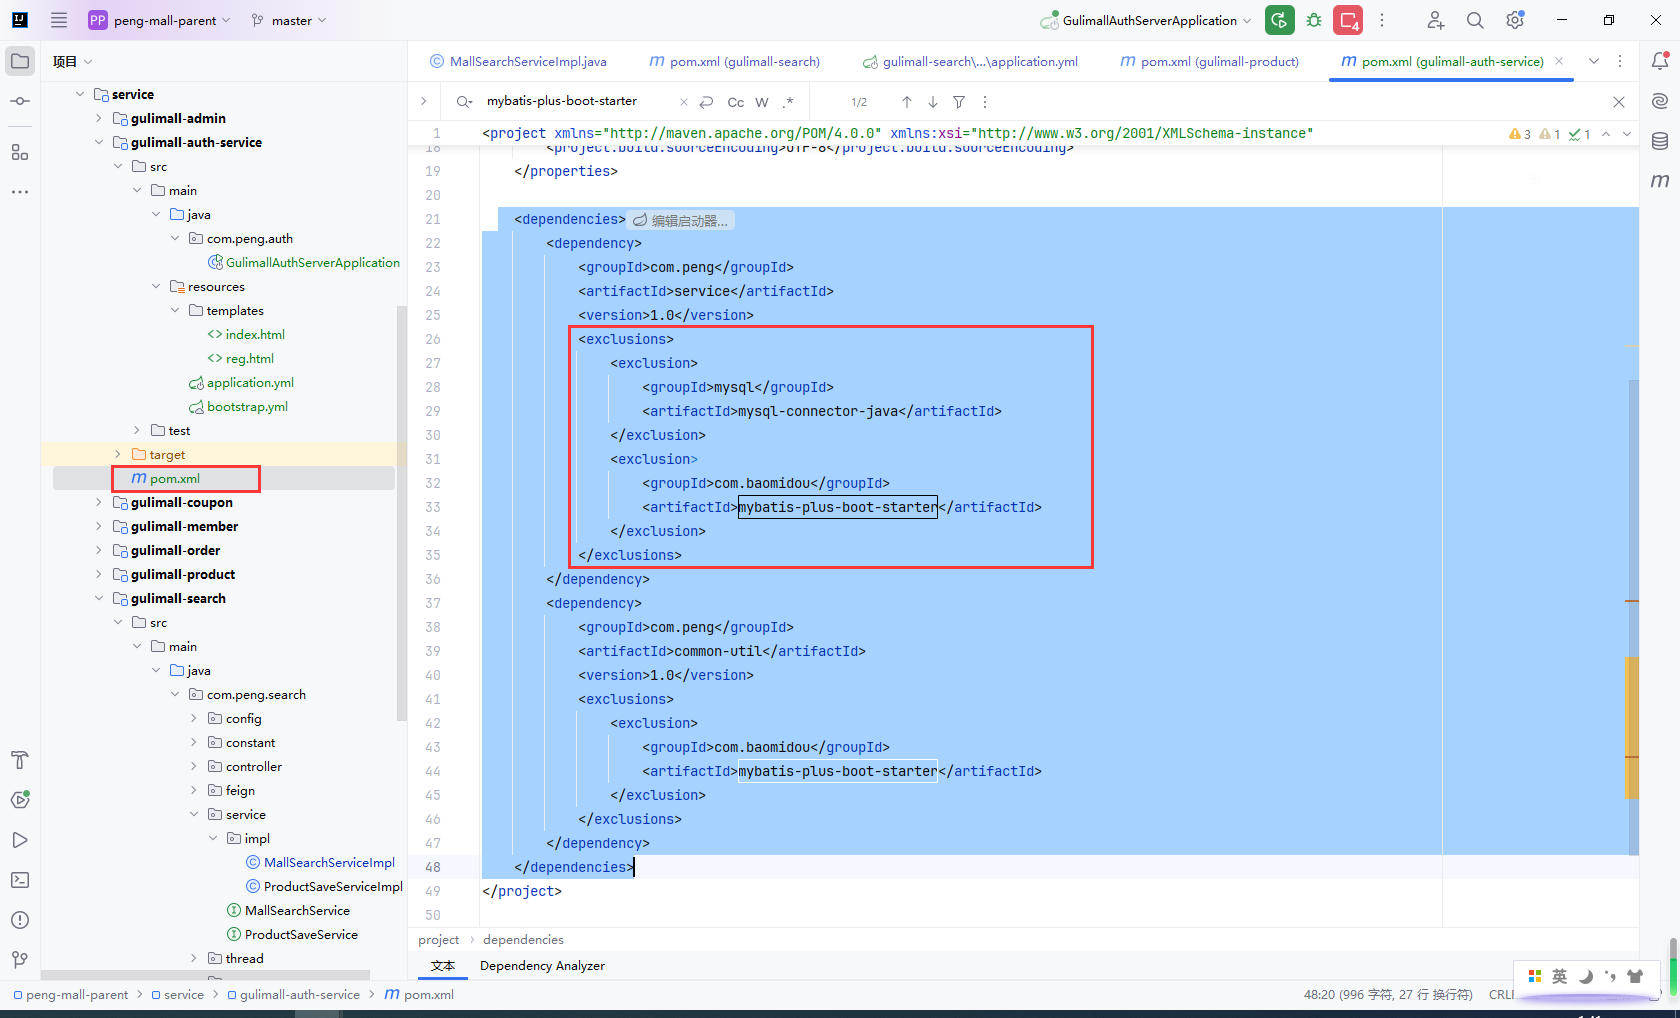
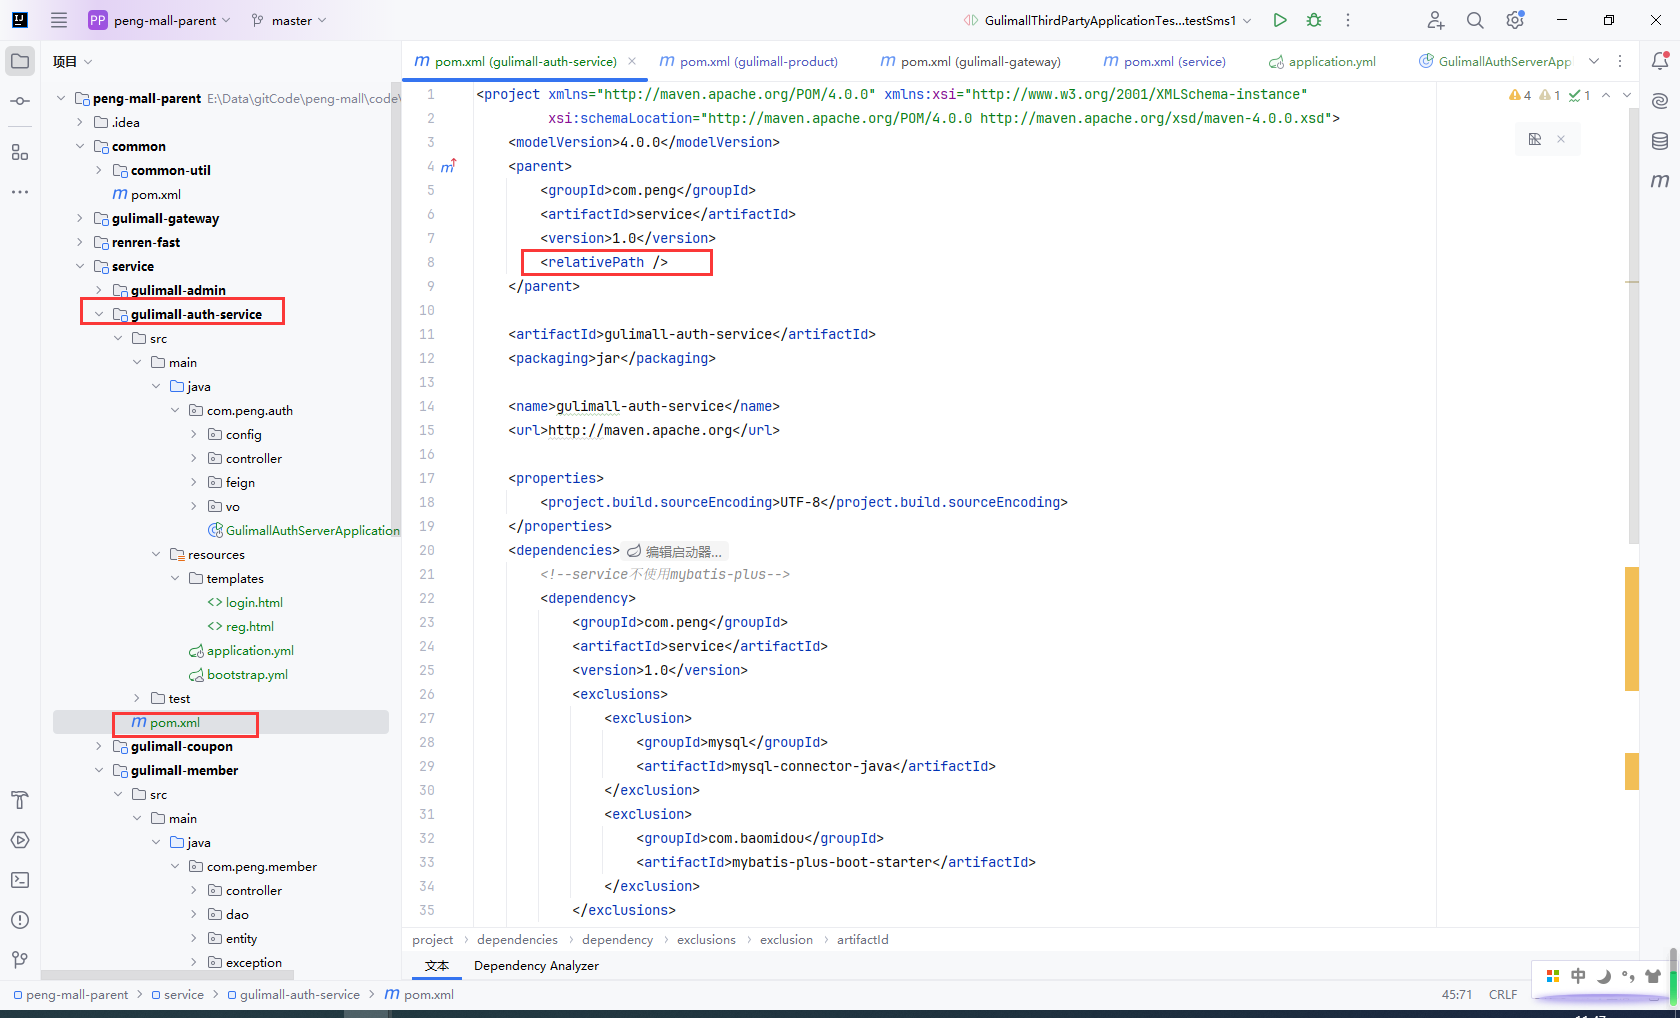
gulimall-auth-service 配置pom.xml,此服务暂不需要mybatis-plus,需要从继承的父类中排除
需要检查父类继承的其他包有没有使用mybatis-plus,需要一并排除
    <parent>
        <groupId>com.peng</groupId>
        <artifactId>service</artifactId>
        <version>1.0</version>
        <relativePath />
    </parent>

      <dependencies>
        <dependency>
            <groupId>com.peng</groupId>
            <artifactId>service</artifactId>
            <version>1.0</version>
            <exclusions>
                <exclusion>
                    <groupId>mysql</groupId>
                    <artifactId>mysql-connector-java</artifactId>
                </exclusion>
                <exclusion>
                    <groupId>com.baomidou</groupId>
                    <artifactId>mybatis-plus-boot-starter</artifactId>
                </exclusion>
            </exclusions>
        </dependency>
        <dependency>
            <groupId>com.peng</groupId>
            <artifactId>common-util</artifactId>
            <version>1.0</version>
            <exclusions>
                <exclusion>
                    <groupId>com.baomidou</groupId>
                    <artifactId>mybatis-plus-boot-starter</artifactId>
                </exclusion>
            </exclusions>
        </dependency>
    </dependencies>
管理员启动SwitchHosts,配置hosts文件
192.168.188.180 auth.gulimall.com

上传登录和注册的静态资源到nginx的/root/mall/nginx/html/static/目录下

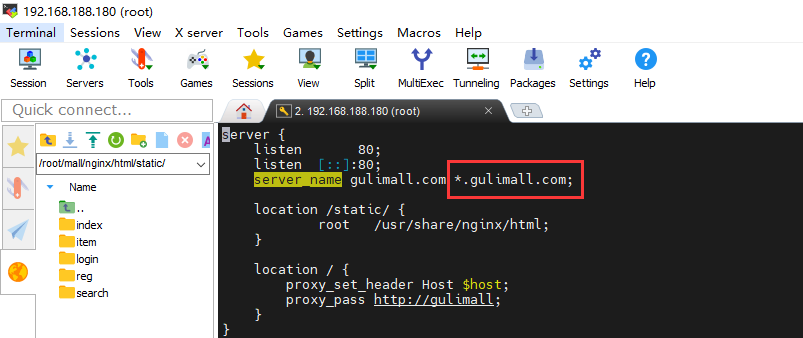
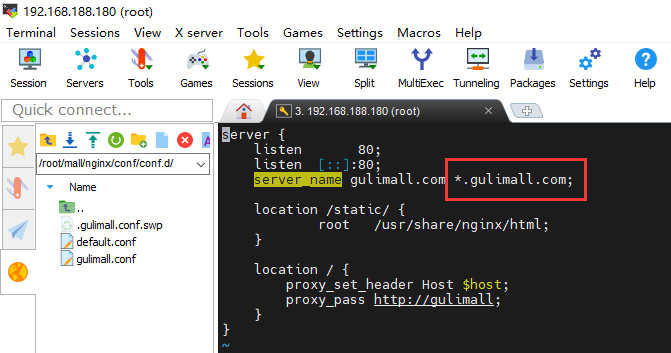
配置nginx,因为 auth.gulimall.com匹配*.gulimall.com,这里不需要多加配置,留意一下即可
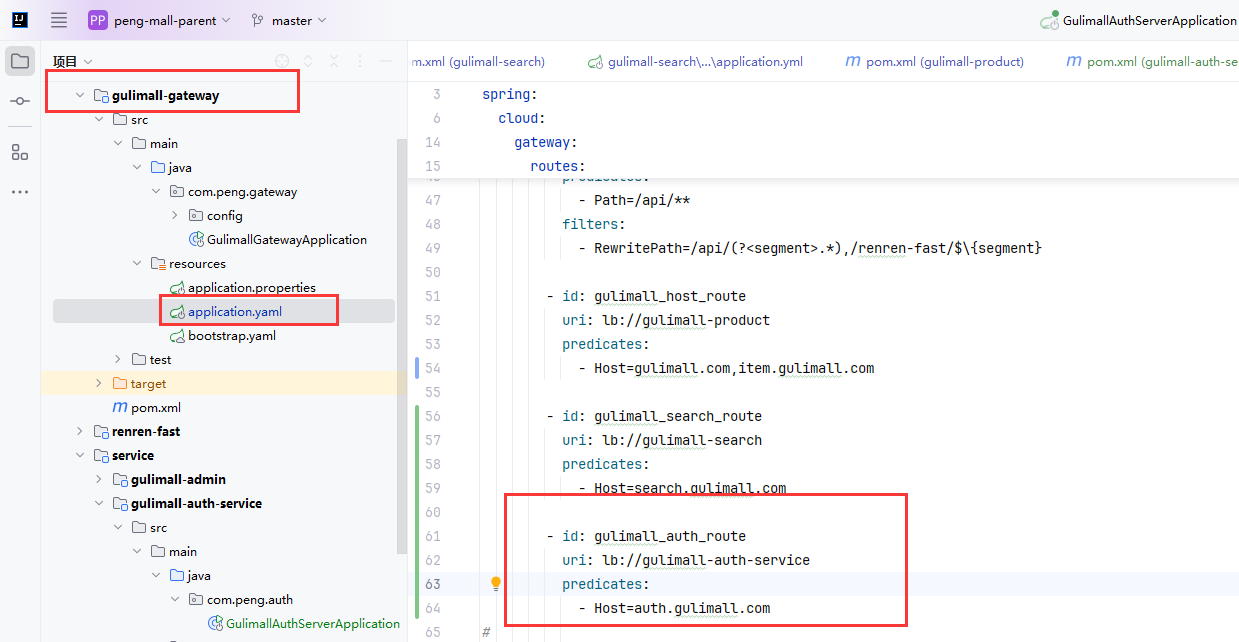
配置gulimall-gateway网关服务,添加gulimall-auth-service服务的转发
- id: gulimall_auth_route
  uri: lb://gulimall-auth-service
  predicates:
    - Host=auth.gulimall.com
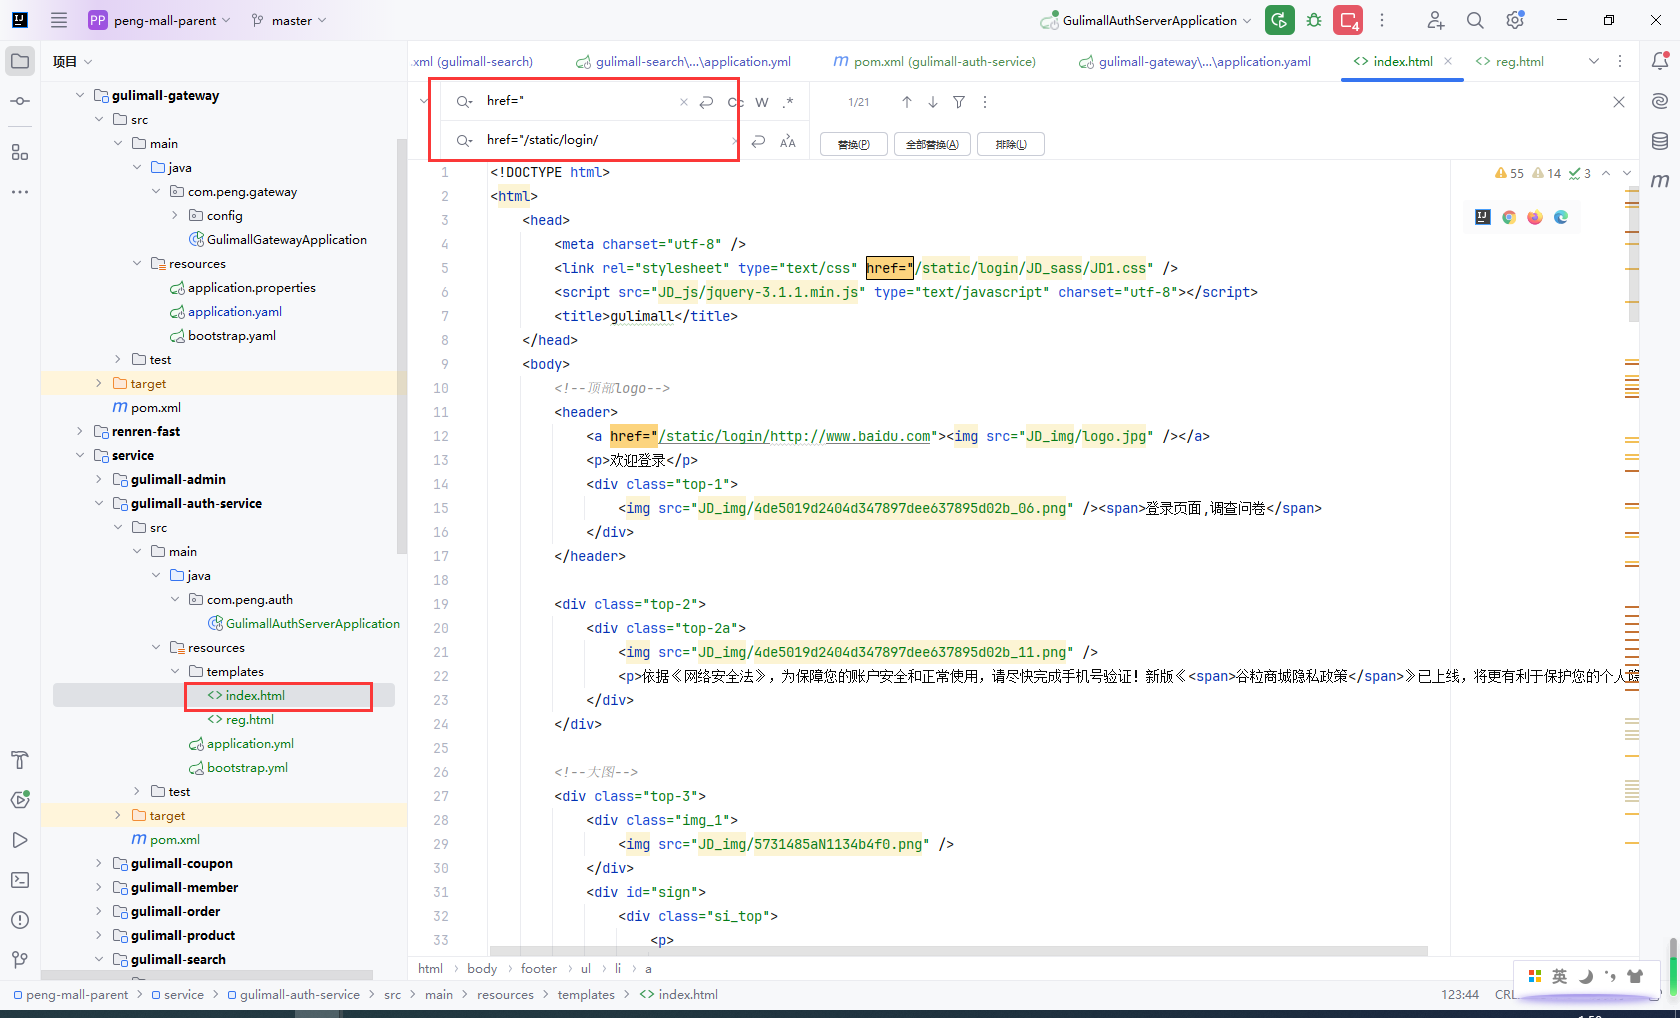
gulimall-auth-service添加登录页和注册页,登录页就为index.html方便测试

修改登录页和注册页的静态资源访问地址
登录页
# 静态资源路径
href="
href="/static/login/
# 图片路径
src="
src="/static/login/
注册页
# 静态资源路径
href="
href="/static/reg/
# 图片路径
src="
src="/static/reg/

测试访问http://auth.gulimall.com/
9.2验证码倒计时
主要步骤:
-
创建创建
LoginController,登录页、注册页跳转 -
首页、登录页、注册页跳转
-
发送短信倒计时
- 全局声明
var num = 60倒计时 - 当前标签添加类
disabled,防止重复点击开启定时器 num = 0时结束倒计时,重置num = 60,清除类disablednum > 0时,启动定时器计时
- 全局声明
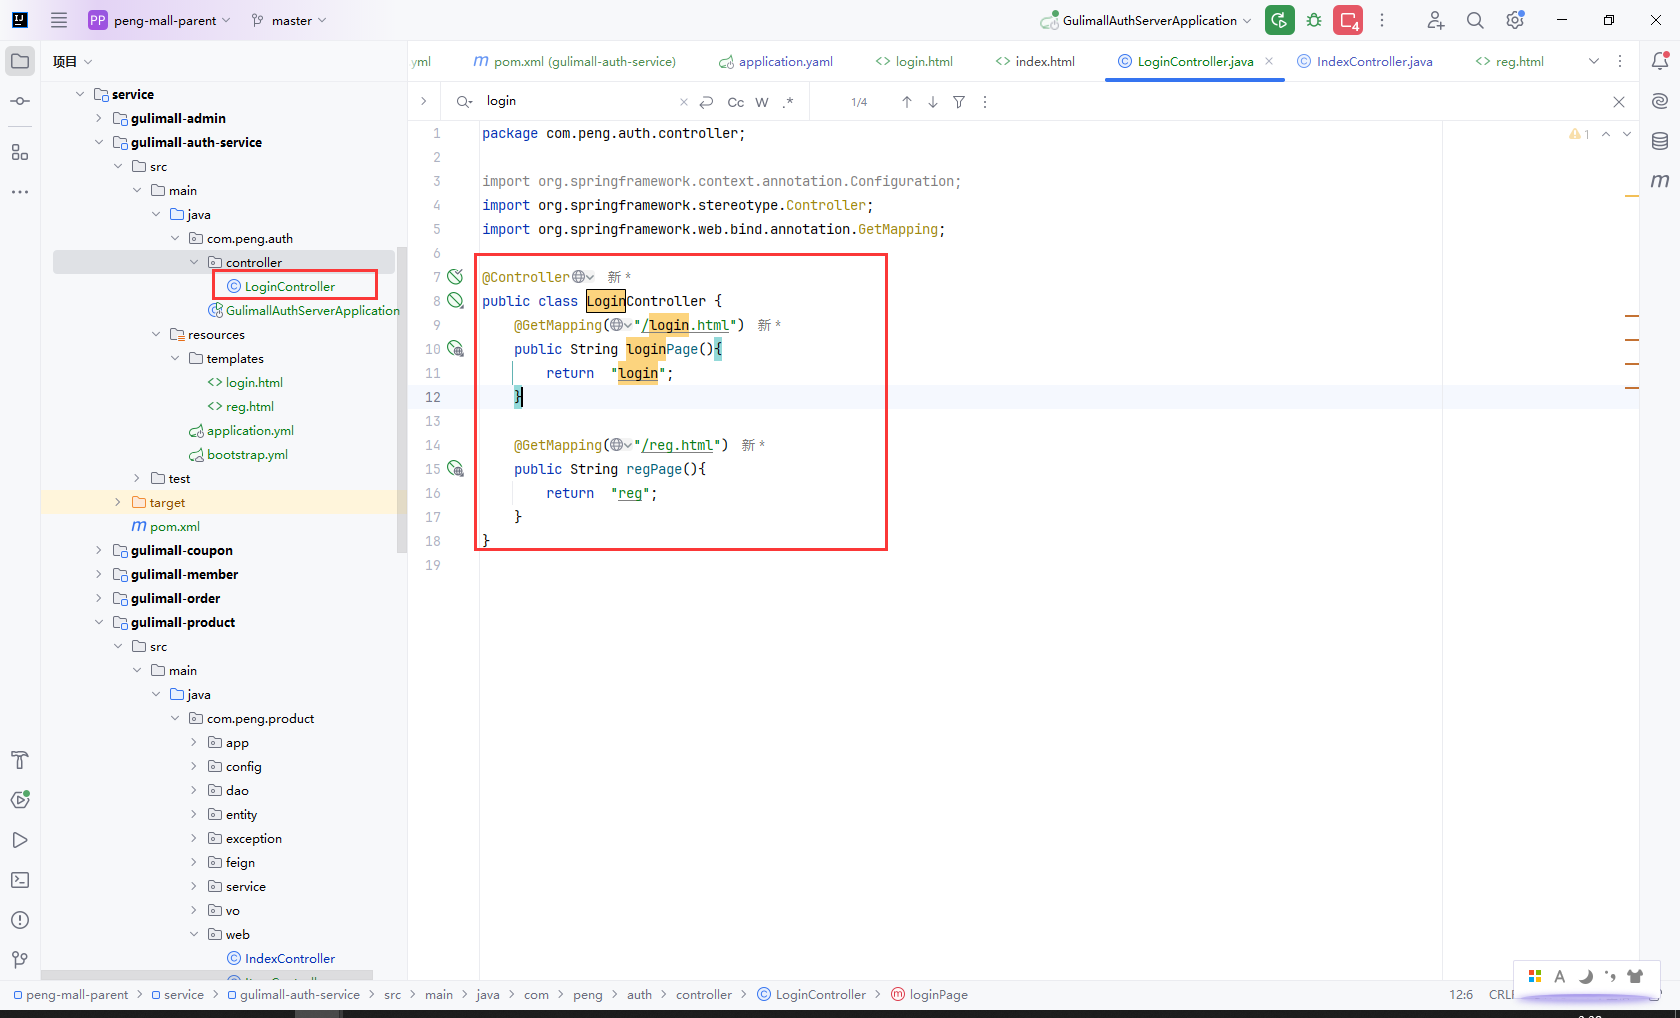
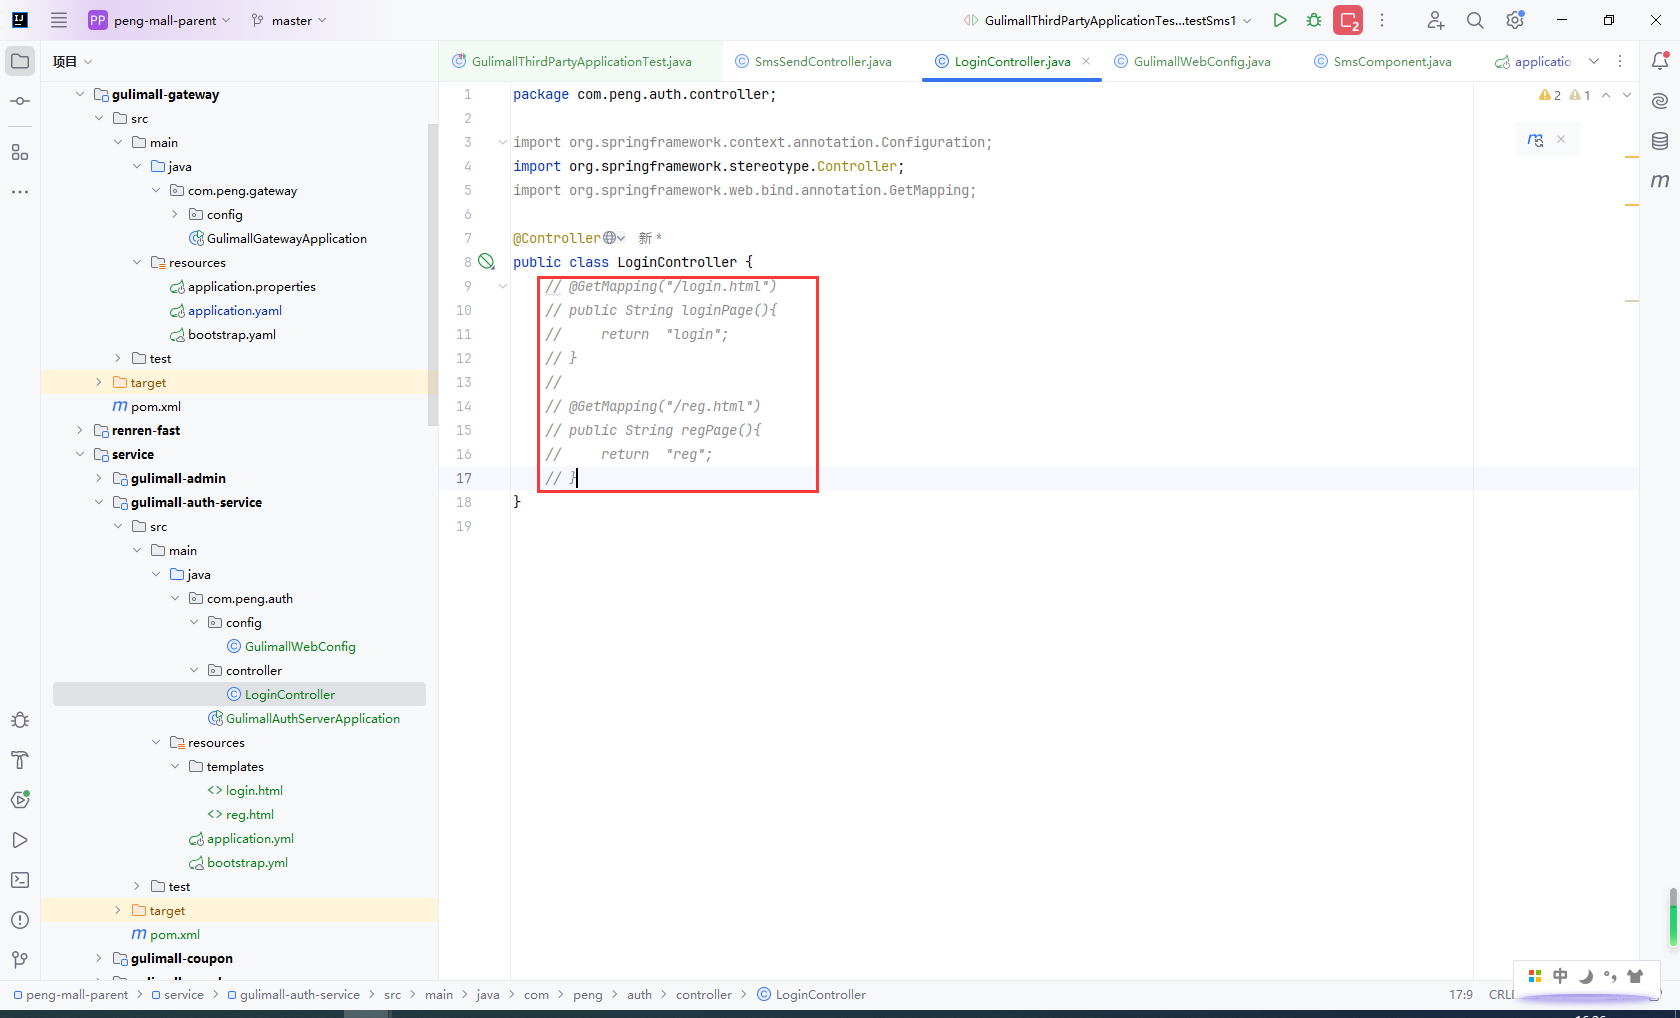
创建LoginController,登录页、注册页跳转
@Controller
public class LoginController {
    @GetMapping("/login.html")
    public String loginPage(){
        return  "login";
    }

    @GetMapping("/reg.html")
    public String regPage(){
        return  "reg";
    }
}
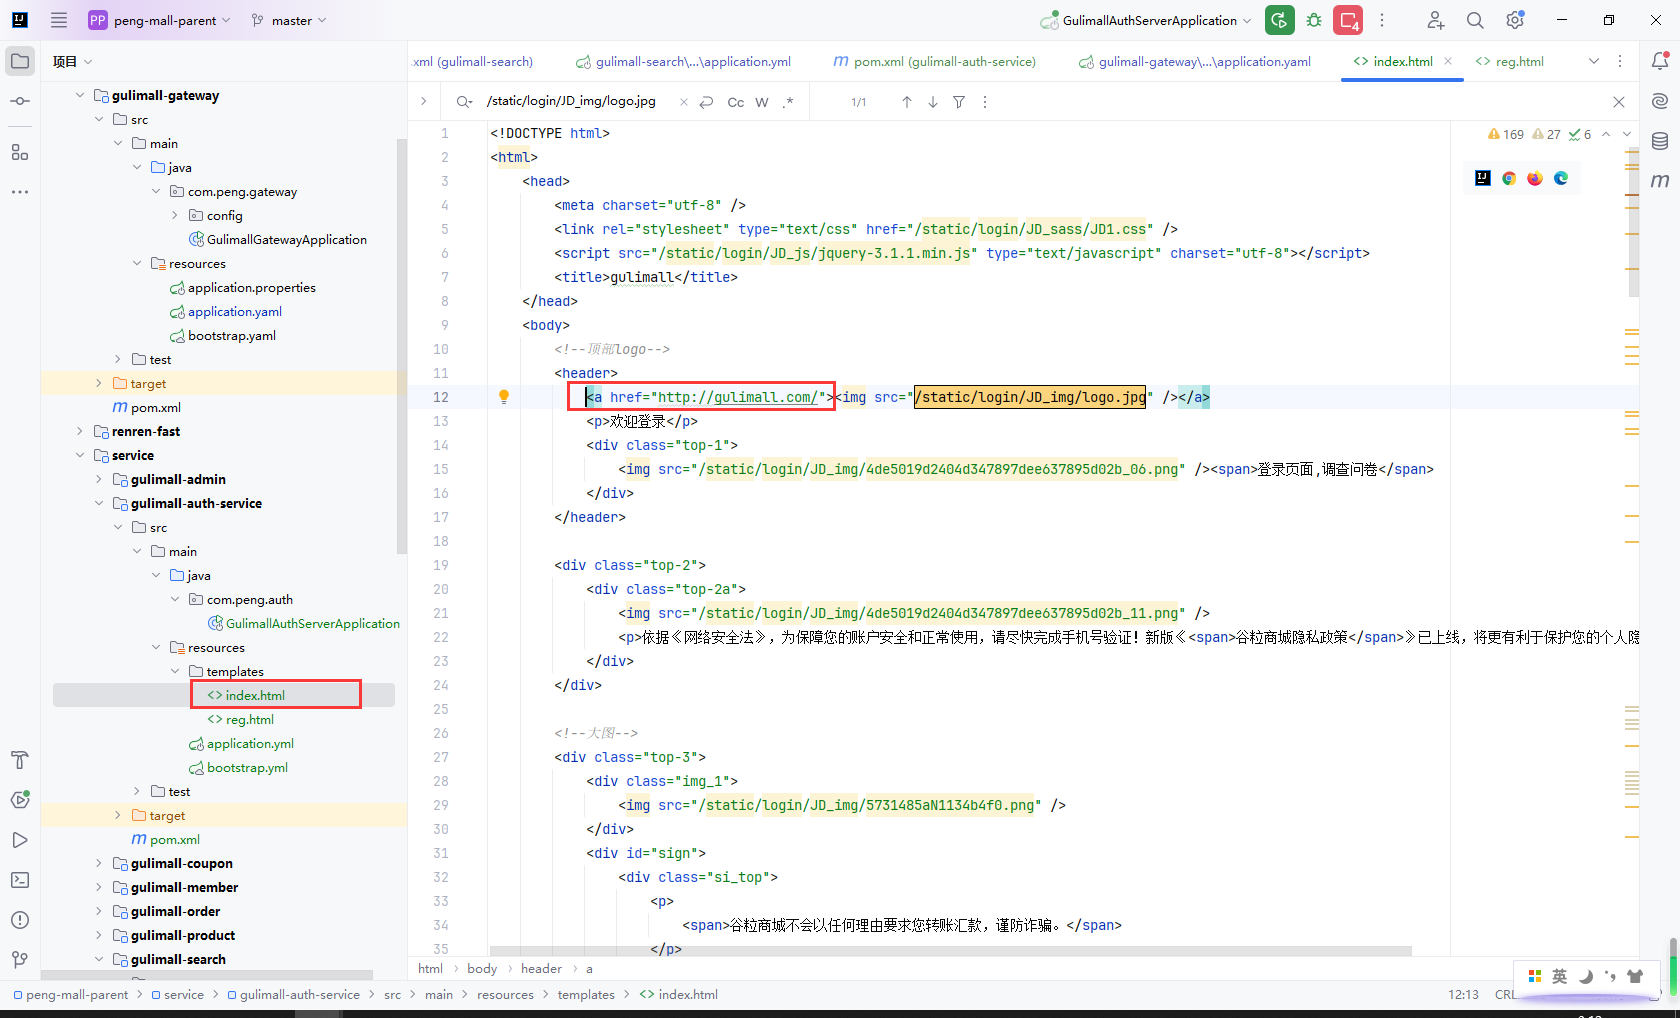
登录页
<!--顶部logo-->
		<header>
			<a href="http://gulimall.com/"><img src="/static/login/JD_img/logo.jpg" /></a>
			<p>欢迎登录</p>
			<div class="top-1">
				<img src="/static/login/JD_img/4de5019d2404d347897dee637895d02b_06.png" /><span>登录页面,调查问卷</span>
			</div>
		</header>
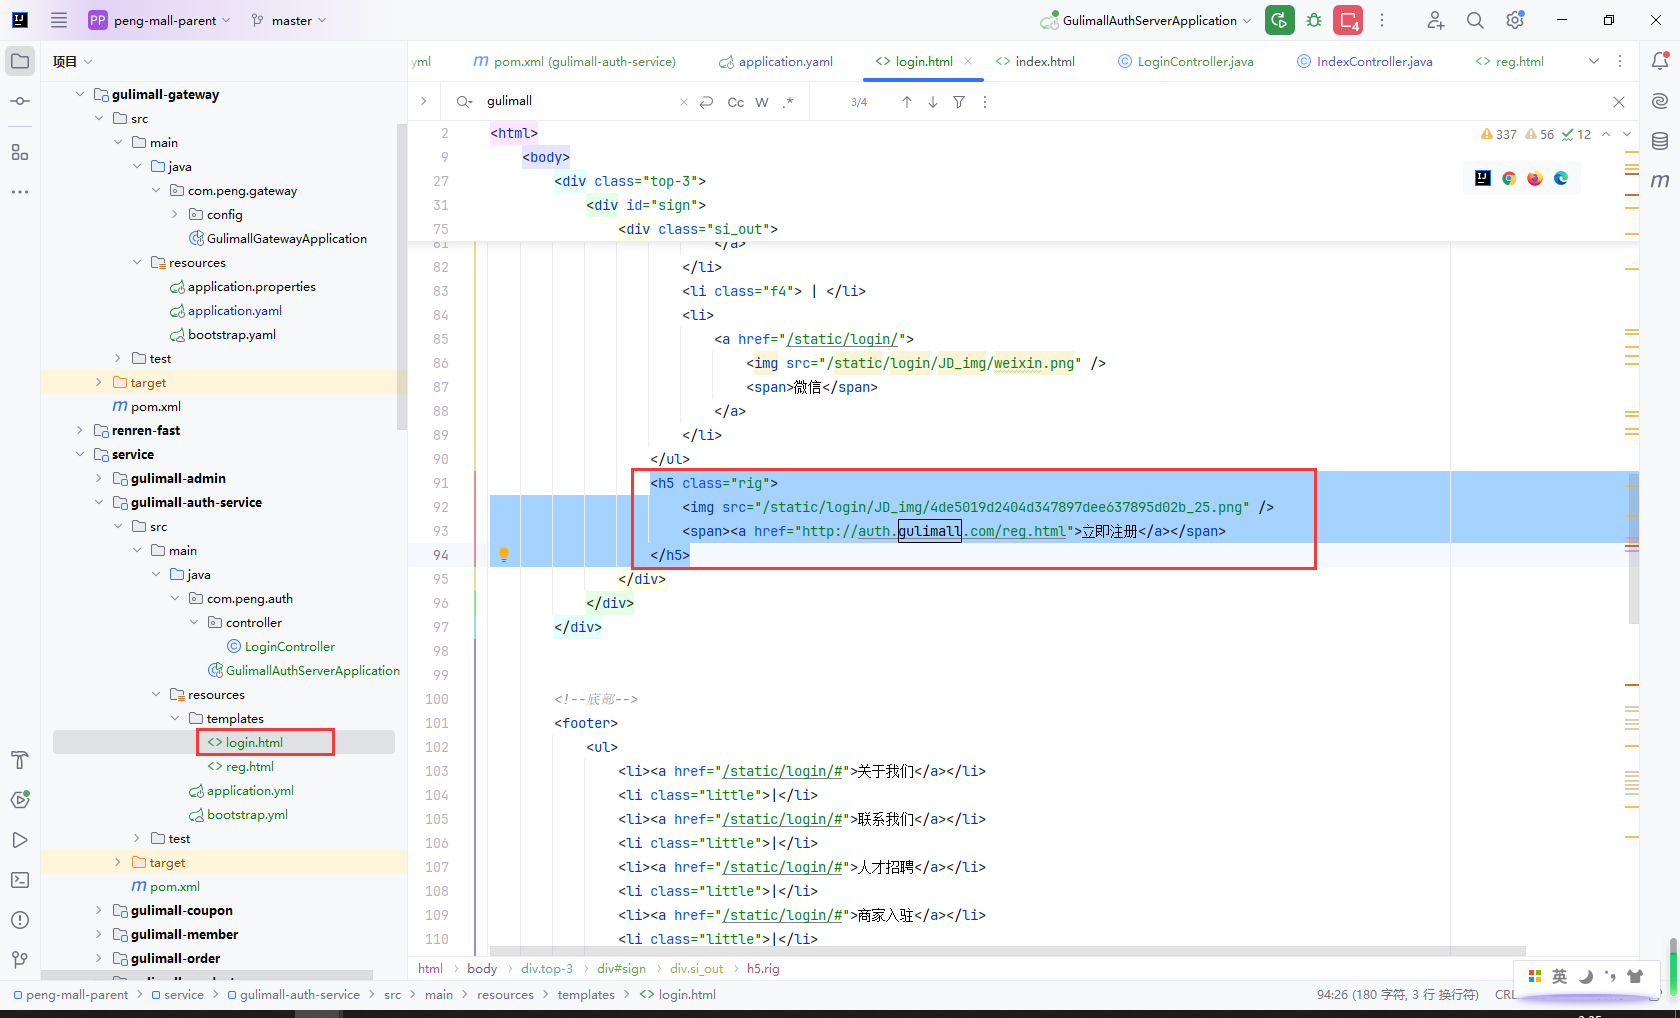
登录页:立即注册
<h5 class="rig">
    <img src="/static/login/JD_img/4de5019d2404d347897dee637895d02b_25.png" />
    <span><a href="http://auth.gulimall.com/reg.html">立即注册</a></span>
</h5>
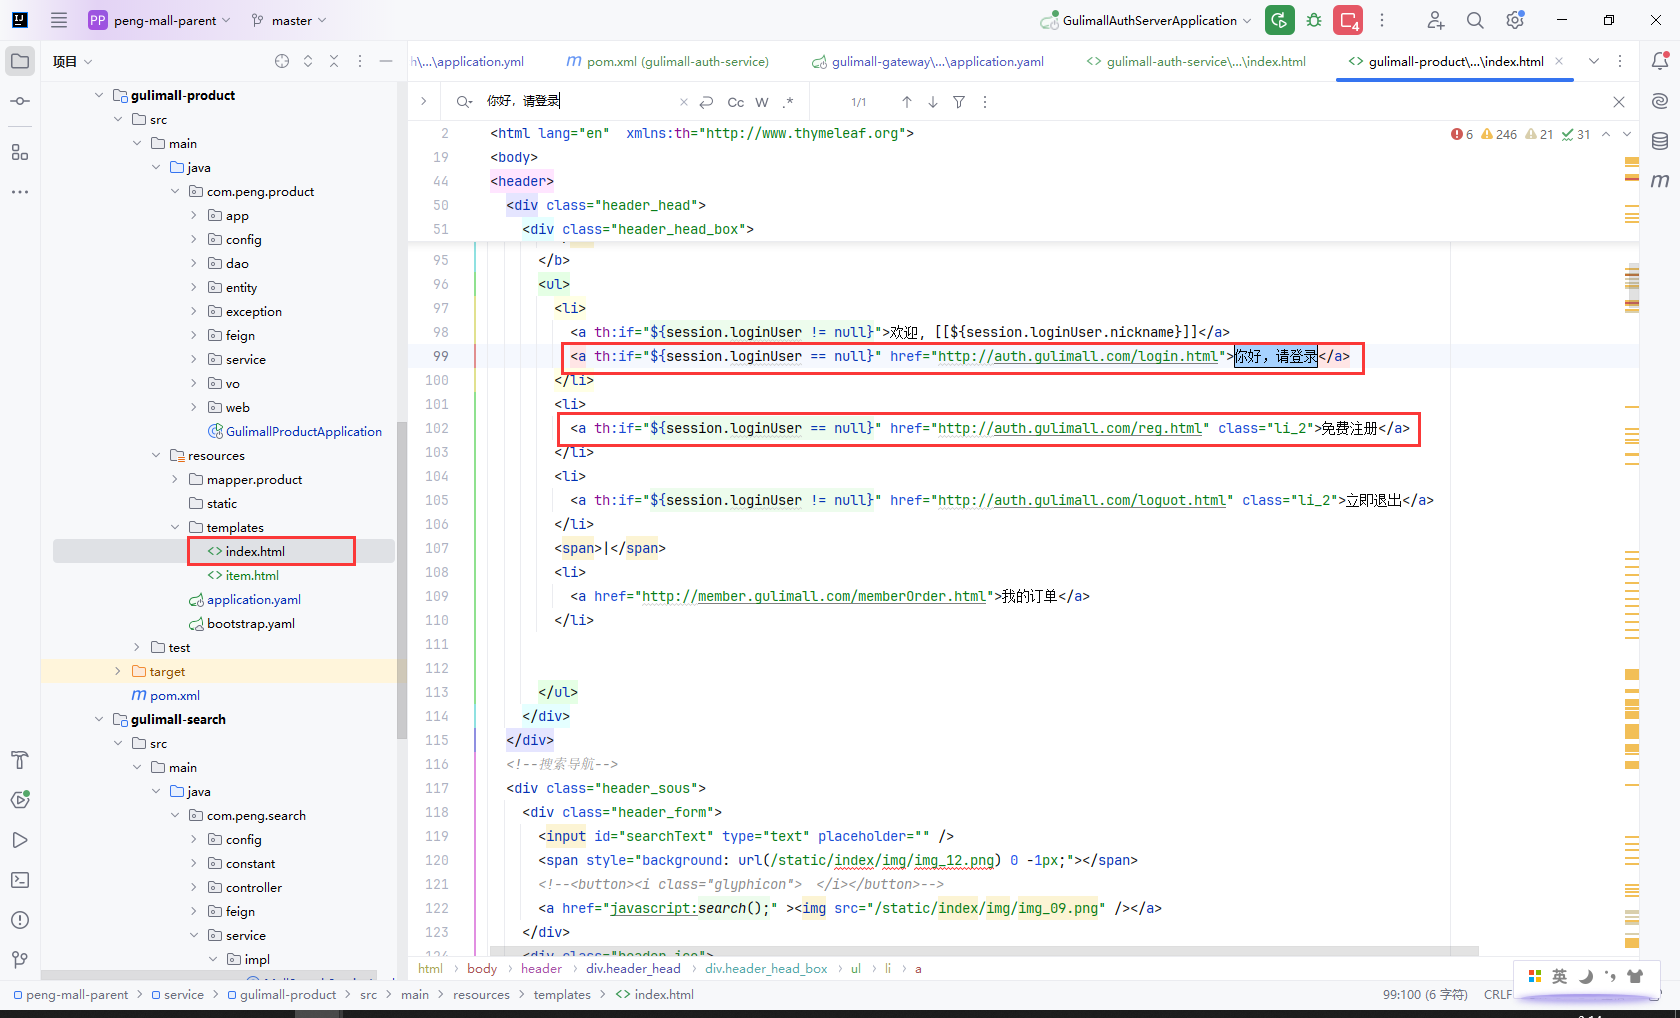
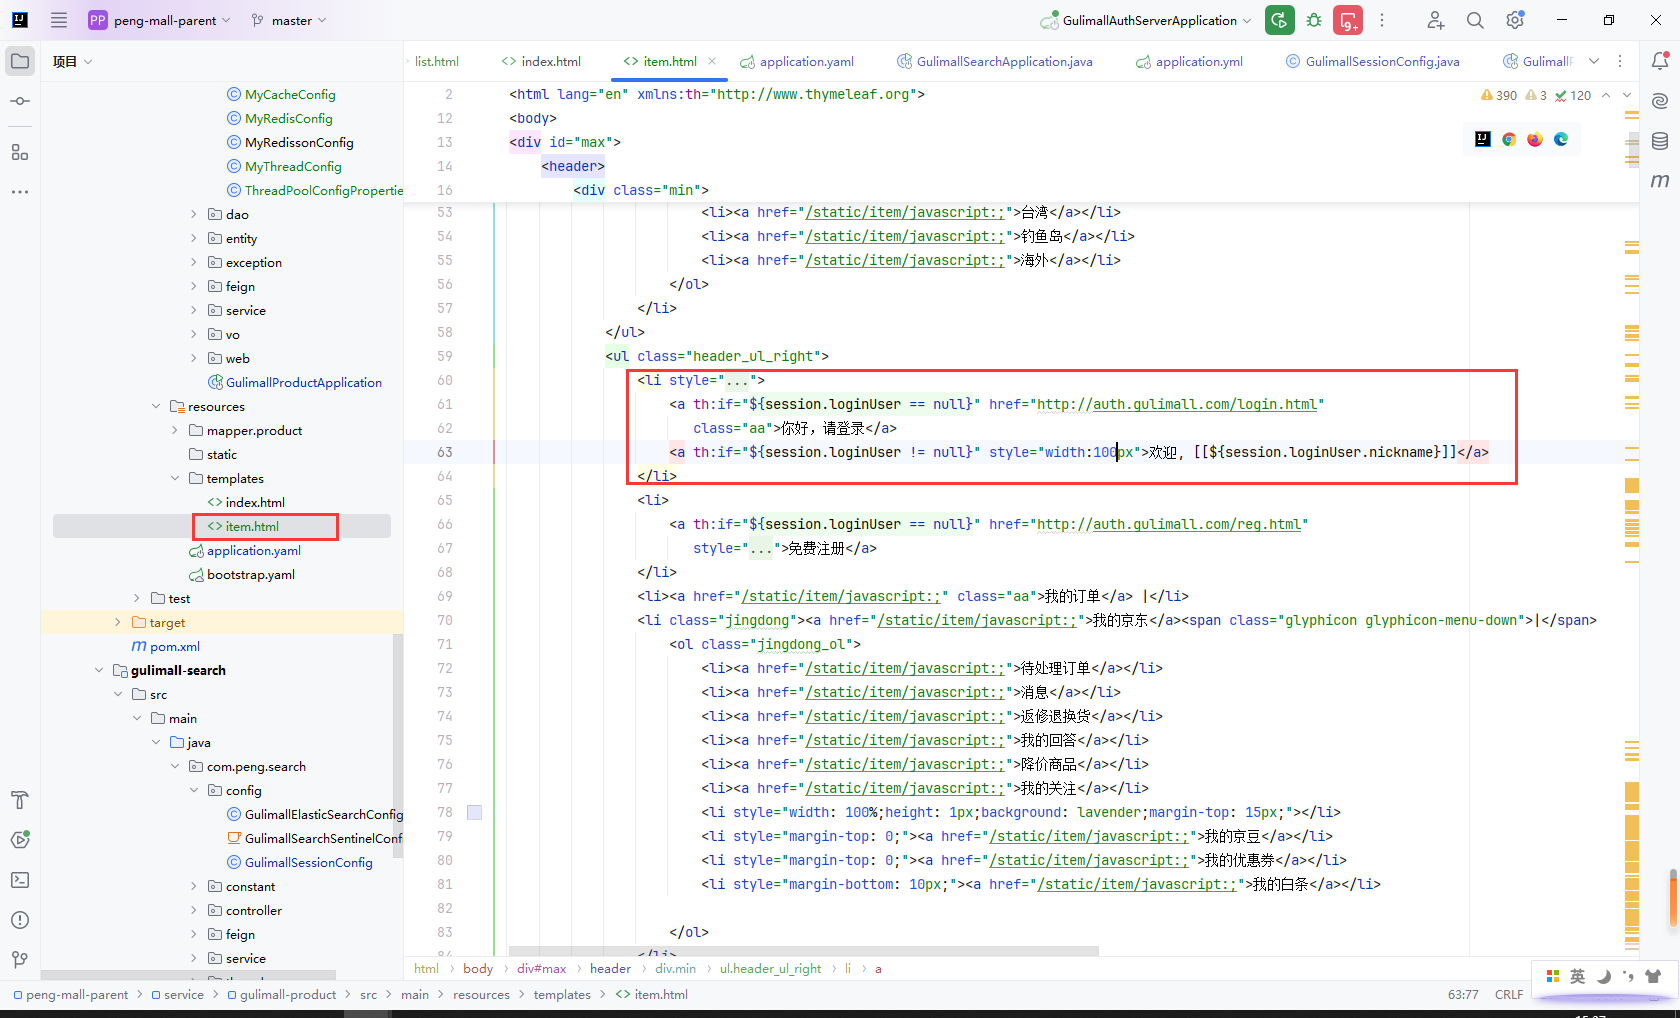
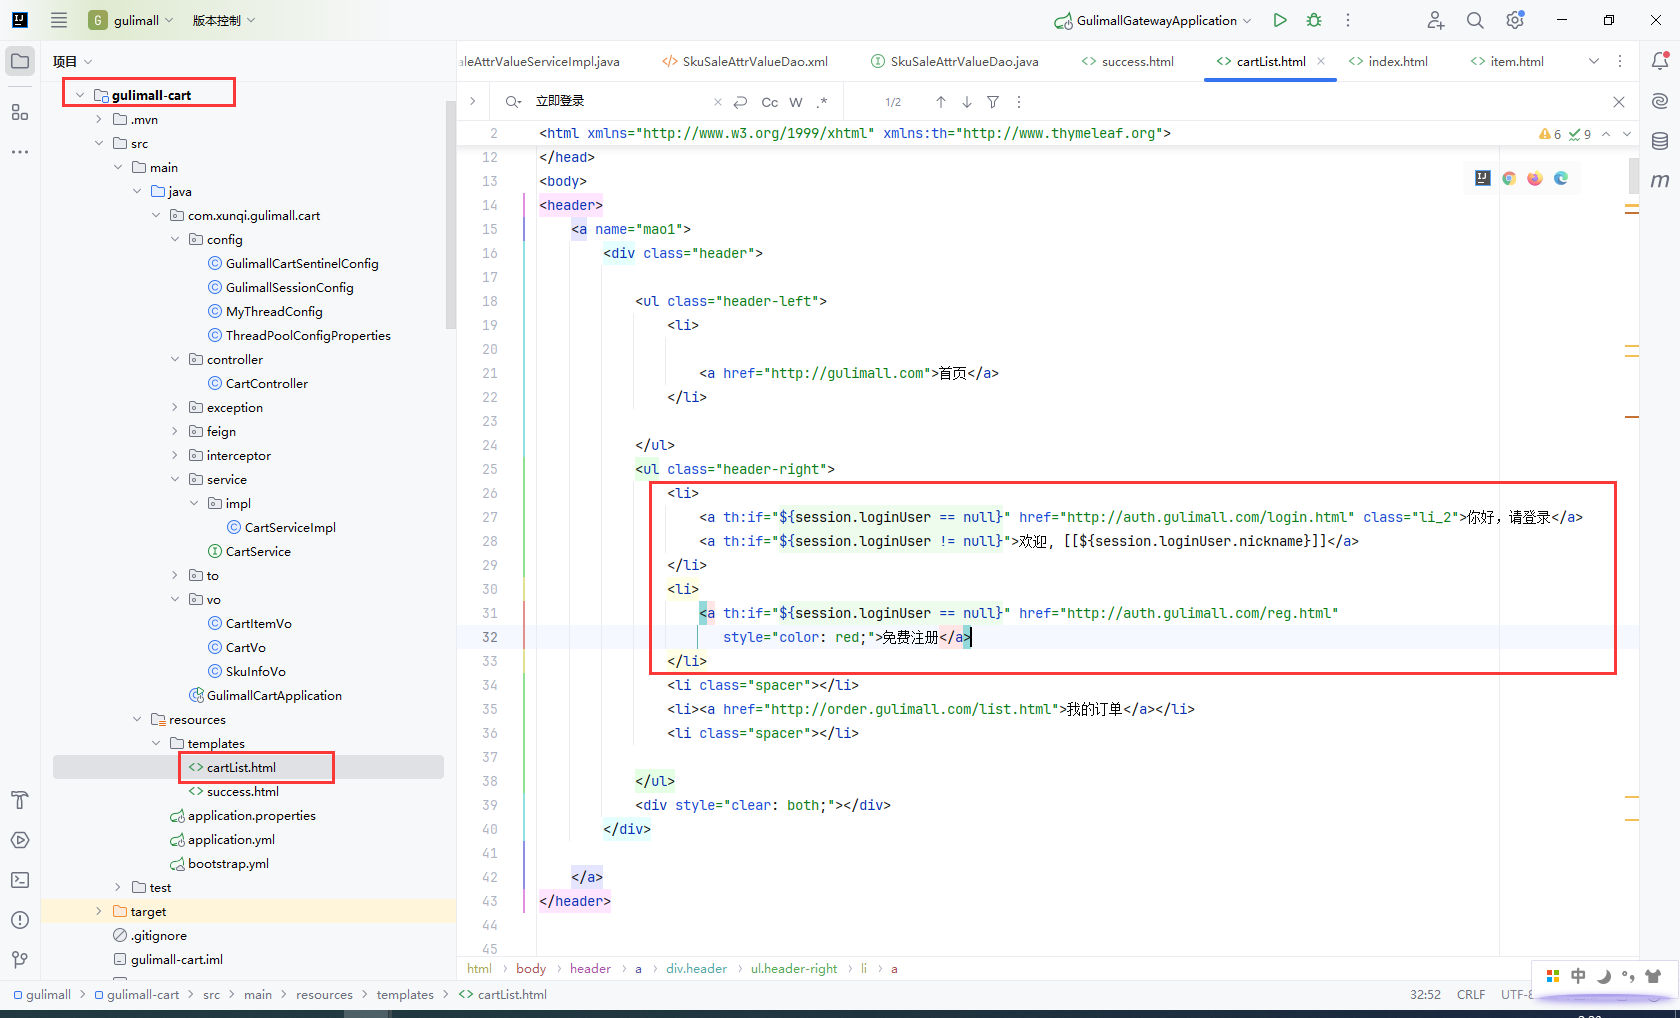
商品服务index.html
<li>
  <a th:if="${session.loginUser != null}">欢迎, [[${session.loginUser.nickname}]]</a>
  <a th:if="${session.loginUser == null}" href="http://auth.gulimall.com/login.html">你好,请登录</a>
</li>
<li>
  <a th:if="${session.loginUser == null}" href="http://auth.gulimall.com/reg.html" class="li_2">免费注册</a>
</li>
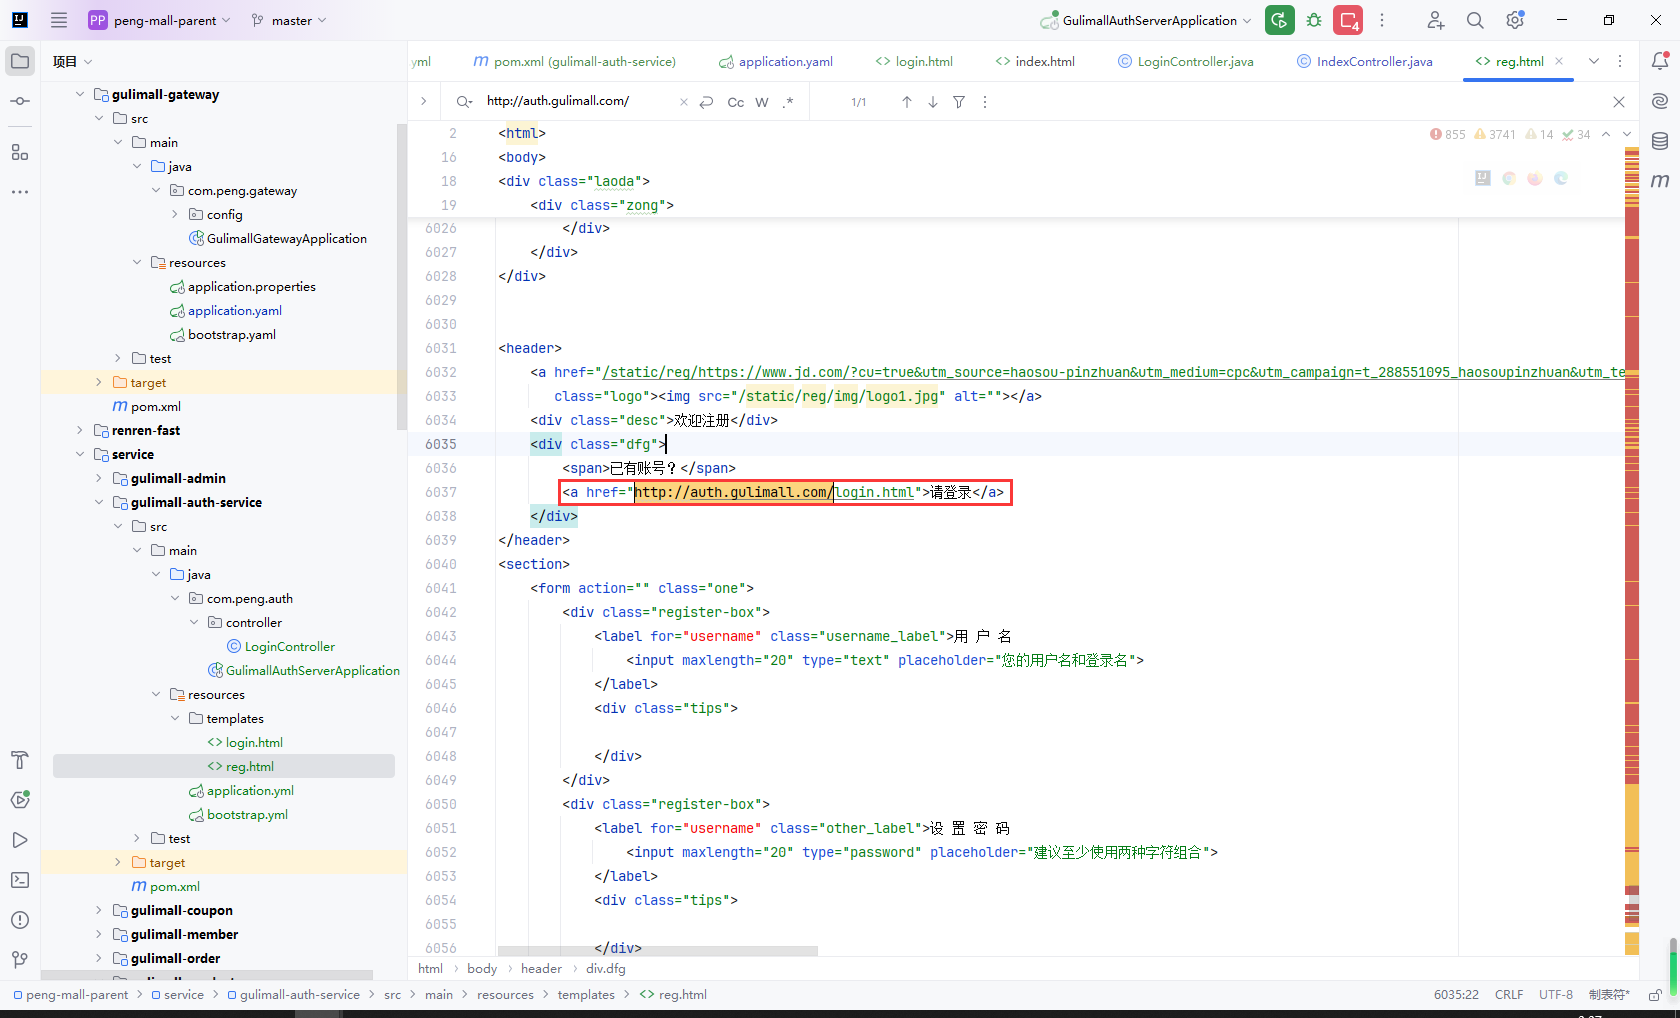
注册页:请登录
<div class="dfg">
    <span>已有账号?</span>
    <a href="http://auth.gulimall.com/login.html">请登录</a>
</div>
发送短信倒计时
$(function () {
    $("#sendCode").click(function () {
       //2、倒计时
       if($(this).hasClass("disabled")) {
          //正在倒计时中
       } else {
          timeoutChangeStyle();
       }
    });
});
var num = 60;
function timeoutChangeStyle() {
    $("#sendCode").attr("class","disabled");
    if(num == 0) {
       $("#sendCode").text("发送验证码");
       num = 60;
       $("#sendCode").attr("class","");
    } else {
       var str = num + "s 后再次发送";
       $("#sendCode").text(str);
       setTimeout("timeoutChangeStyle()",1000);
    }
    num --;
}
自定义导航
@Configuration
public class GulimallWebConfig implements WebMvcConfigurer {

    /**·
     * 视图映射:发送一个请求,直接跳转到一个页面
     * @param registry
     */
    @Override
    public void addViewControllers(ViewControllerRegistry registry) {

        registry.addViewController("/login.html").setViewName("login");
        registry.addViewController("/reg.html").setViewName("reg");
    }
}
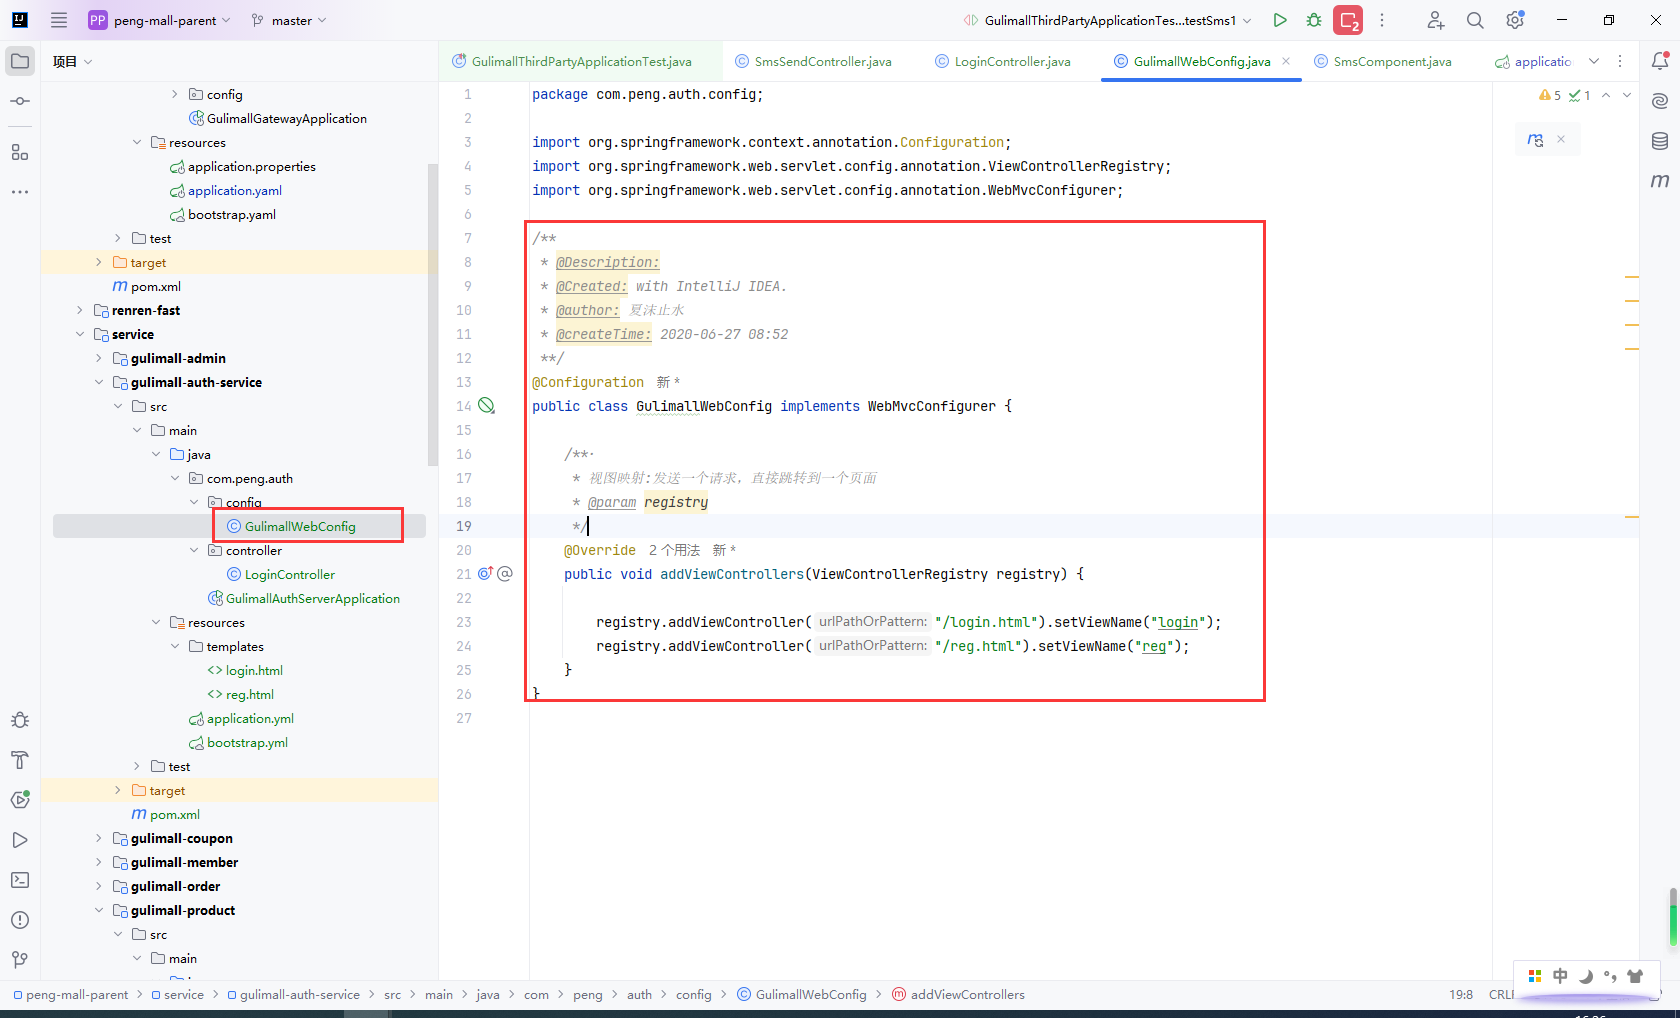
然后可以删掉LoginController的导航
9.3整合短信验证码
主要步骤:
- 1.申请阿里云短信验证码服务
- 2.整合并测试短信验证码服务
申请阿里云短信验证码服务
地址:https://www.aliyun.com/benefit/waitou/V2?utm_content=se_1018076021
打开云市场
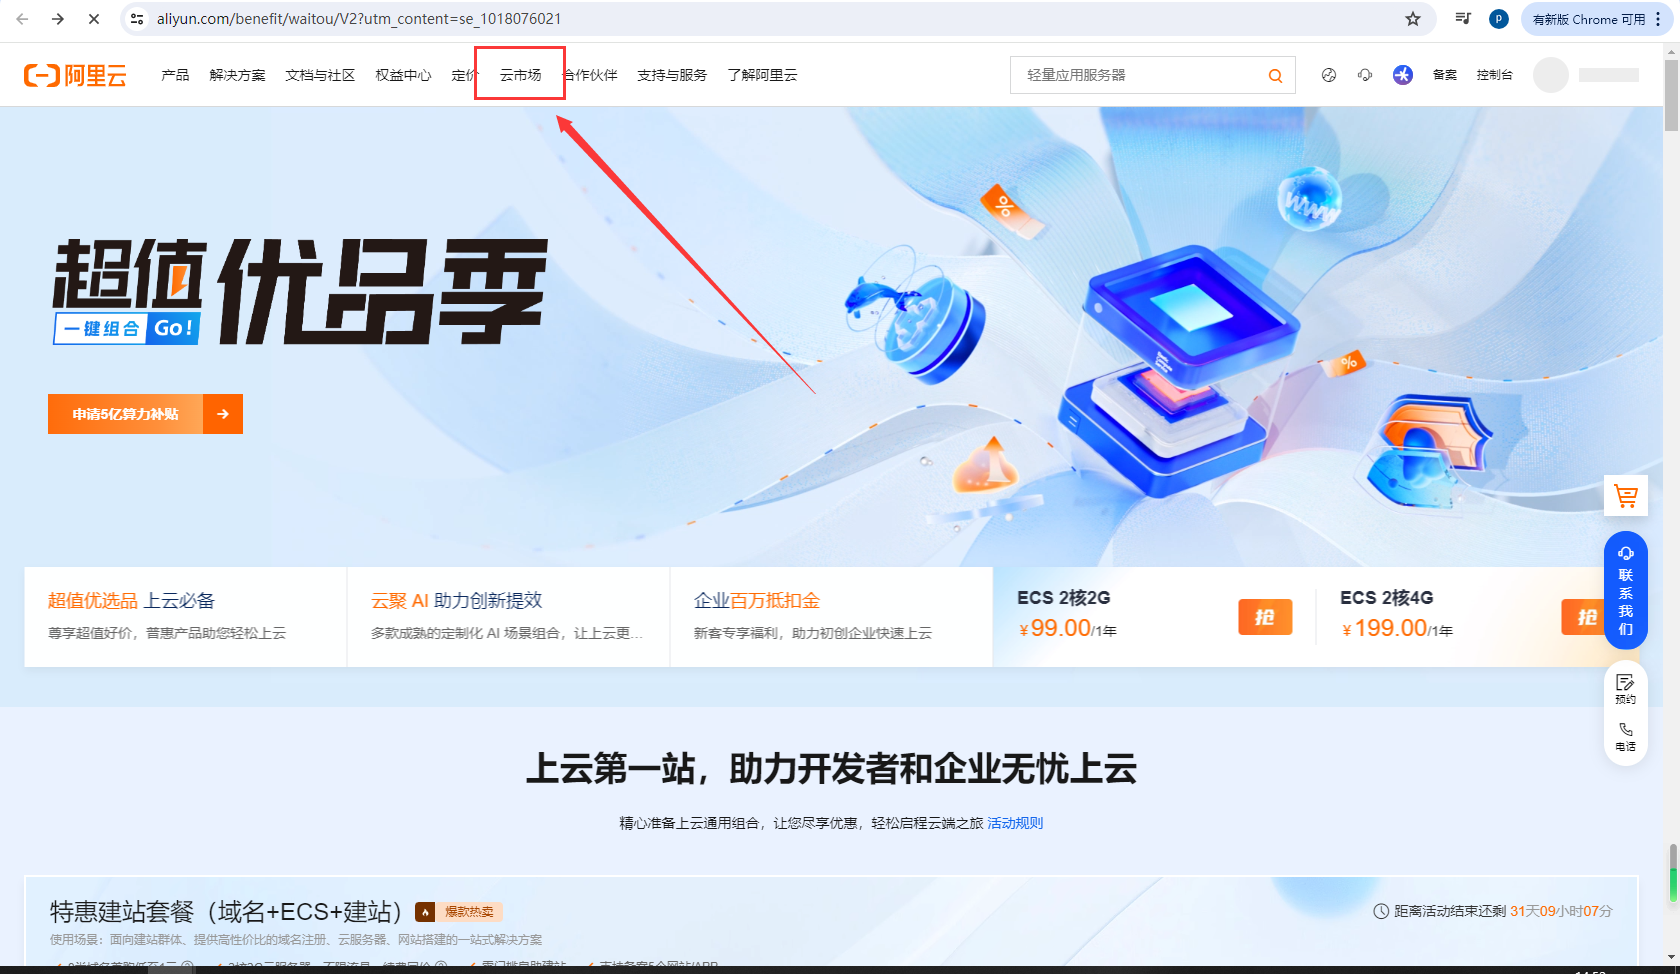
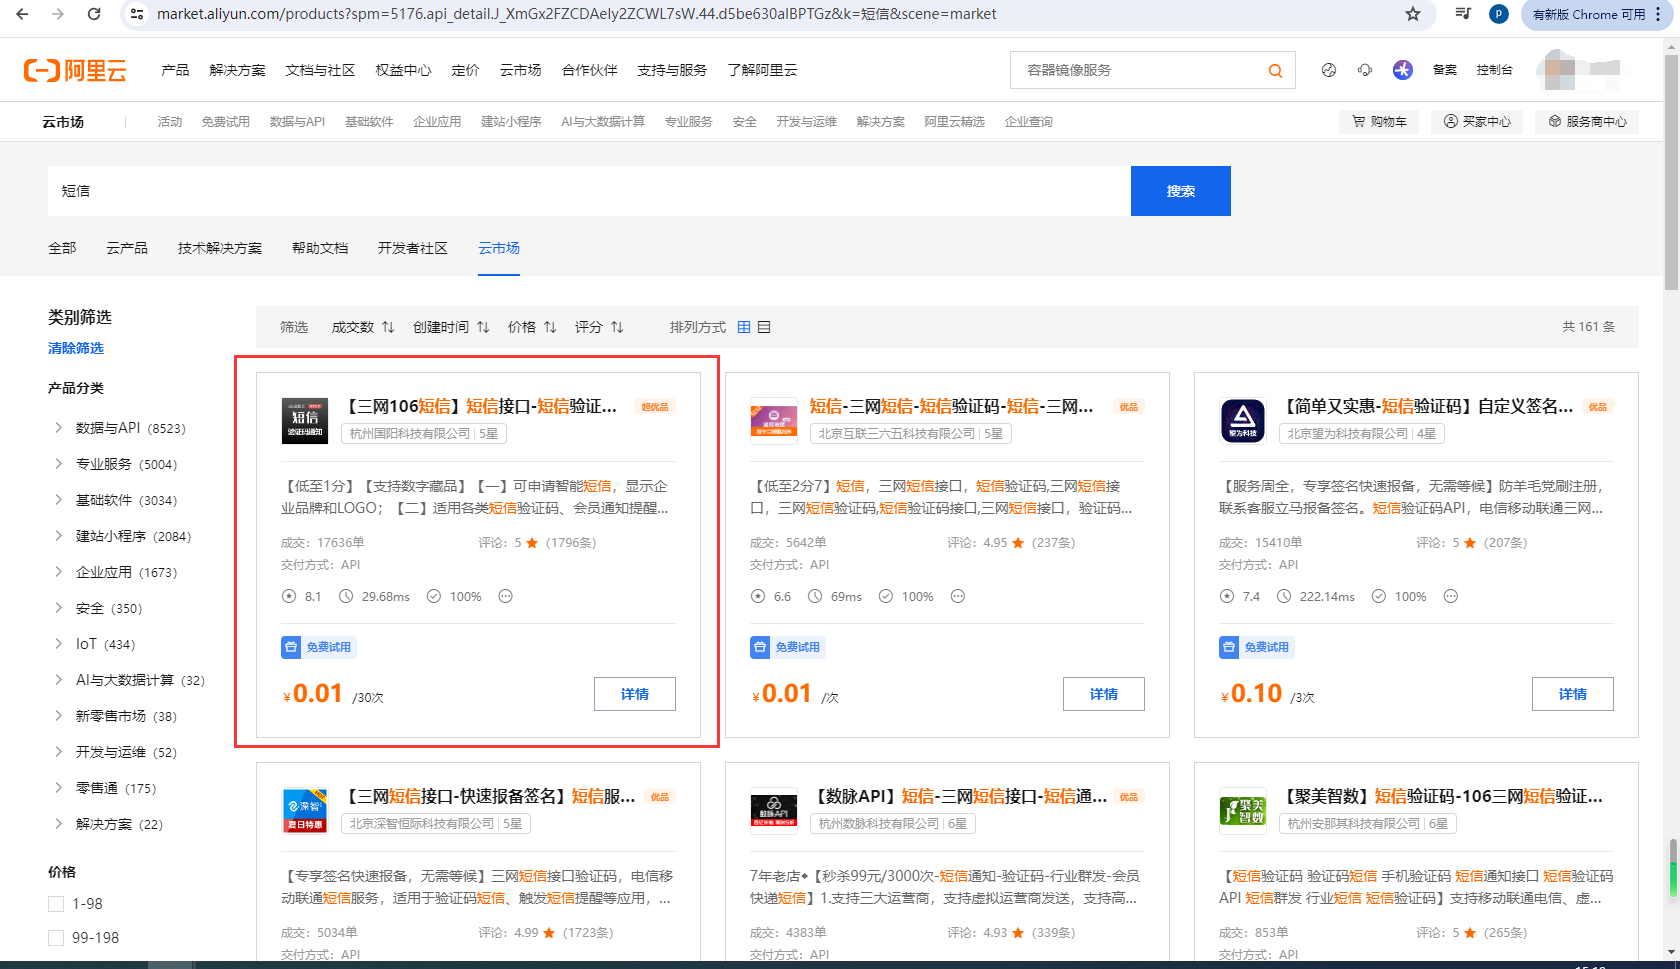
点击搜索框,找到短信
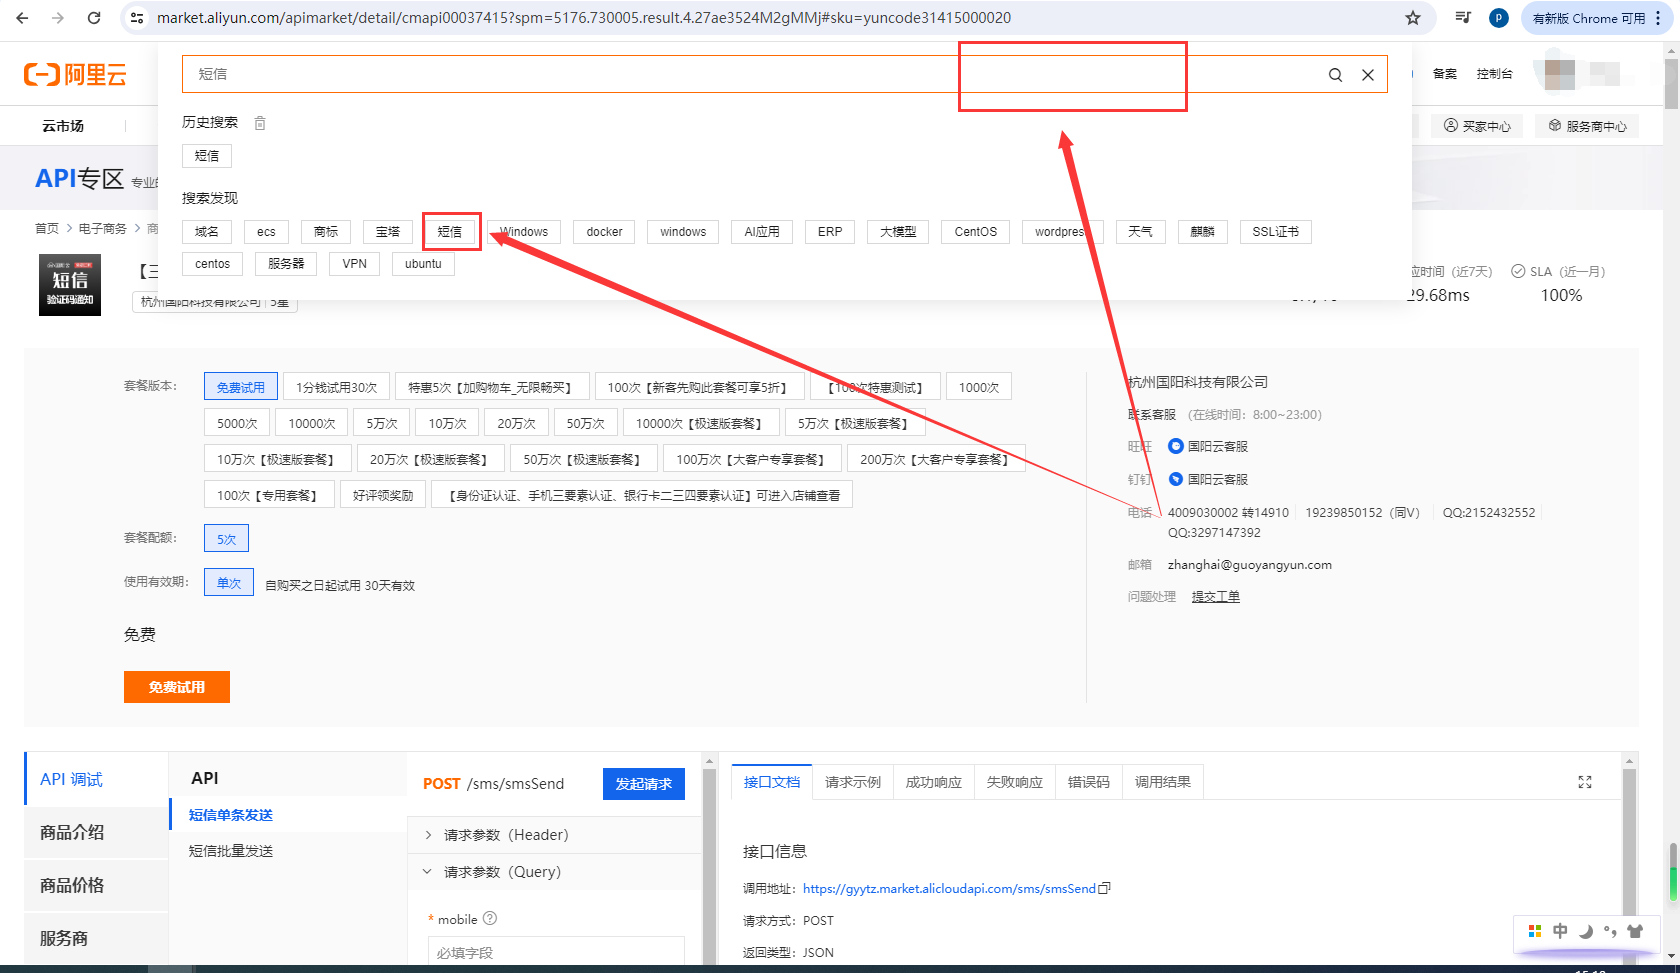
随便选择一个服务商
选择免费试用
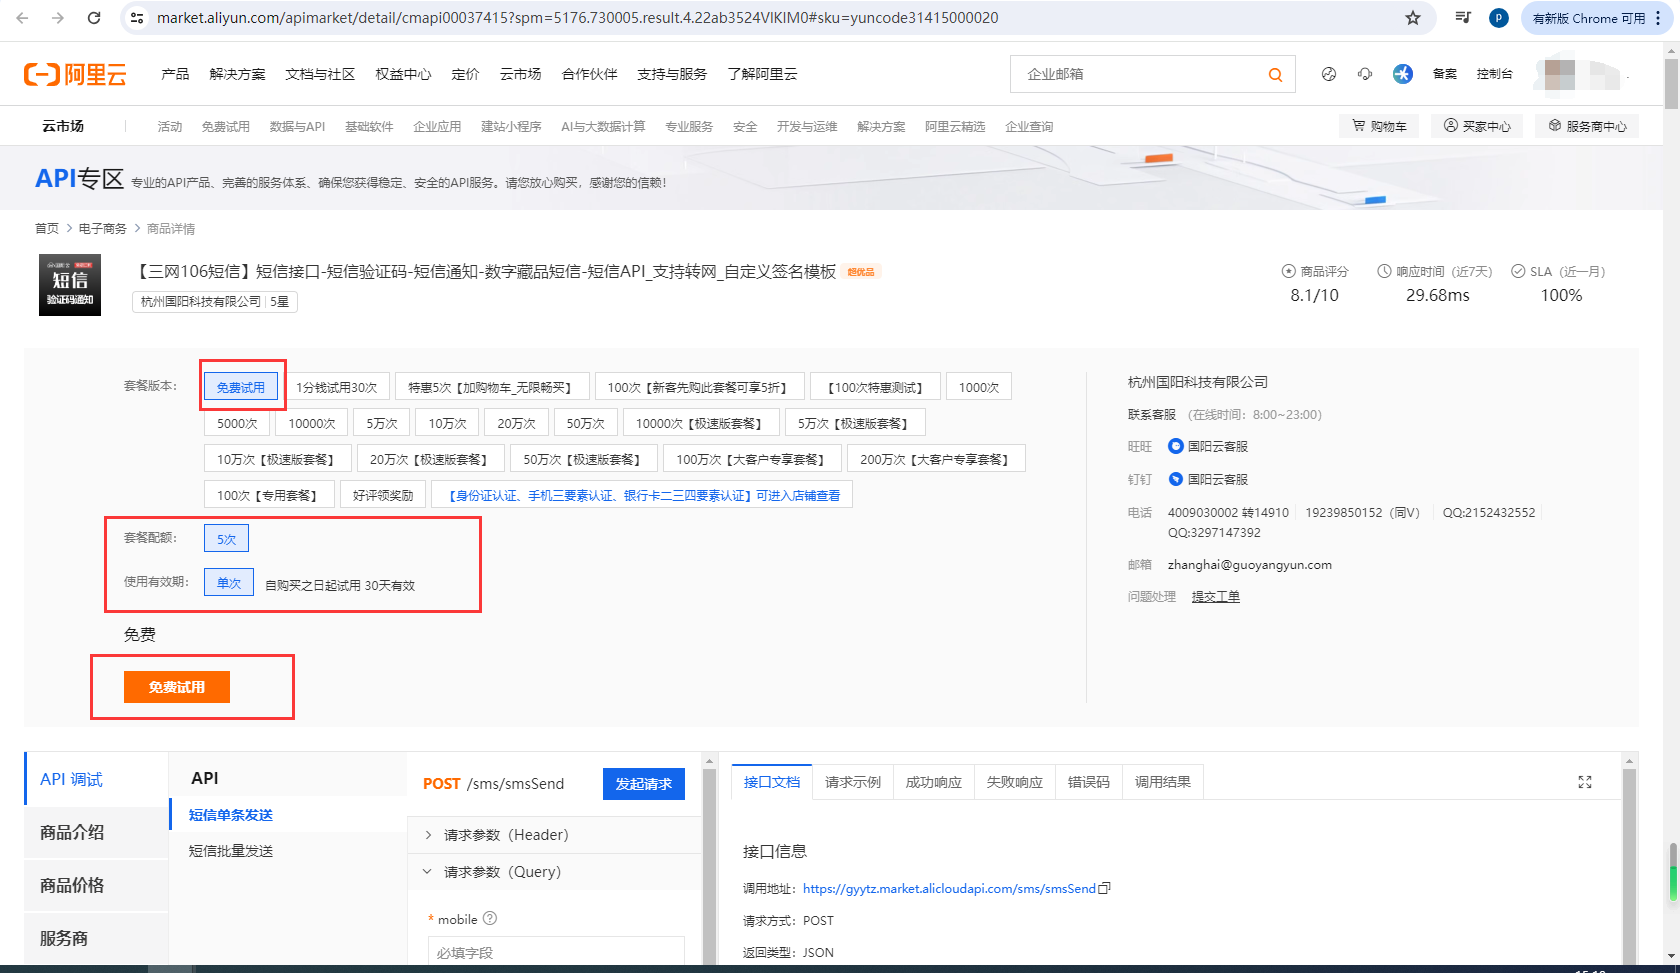
记住自己的AppCode,然后进入调试服务
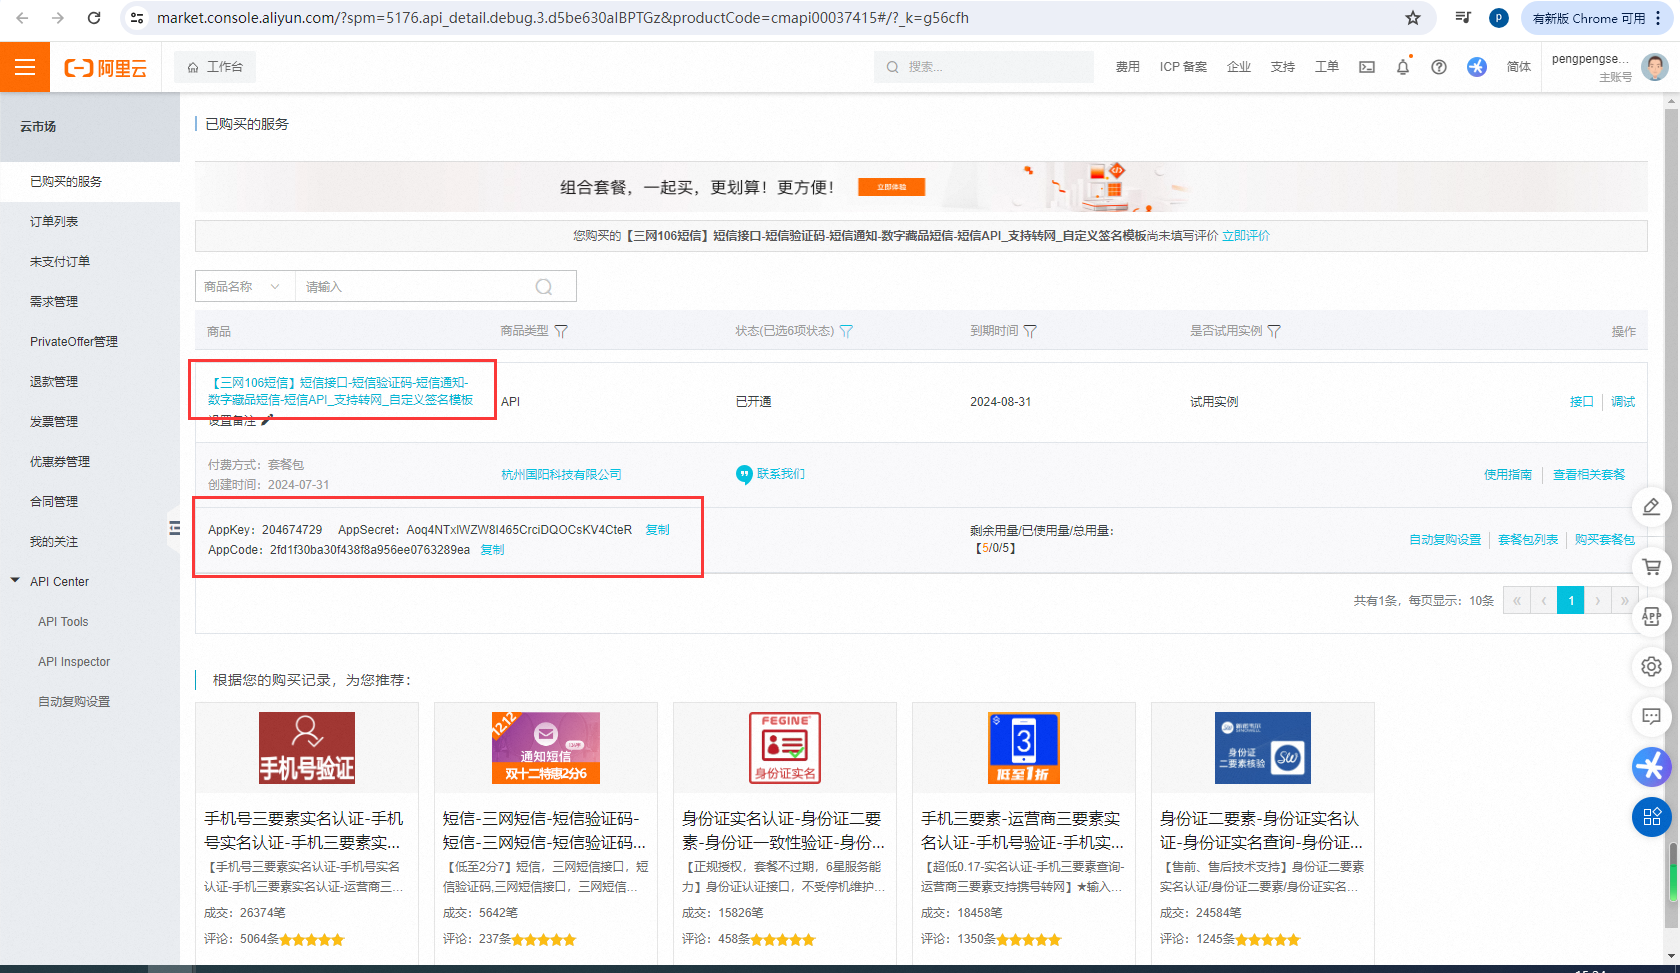
这里有事例
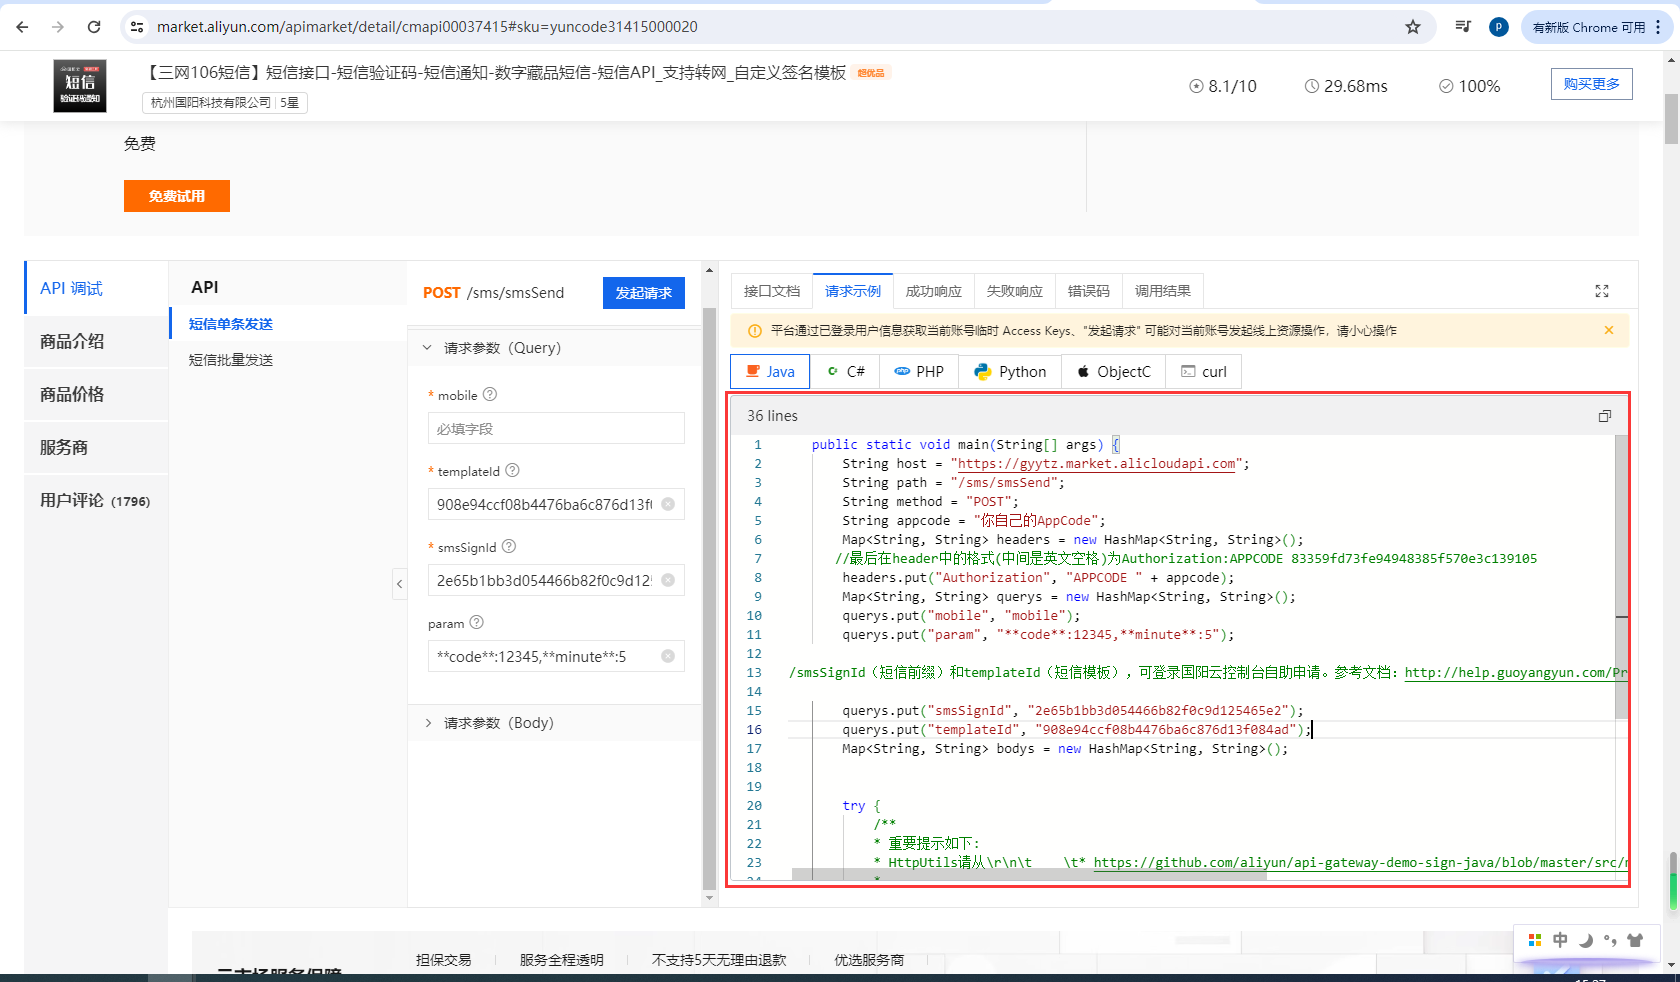
整合并测试短信验证码服务
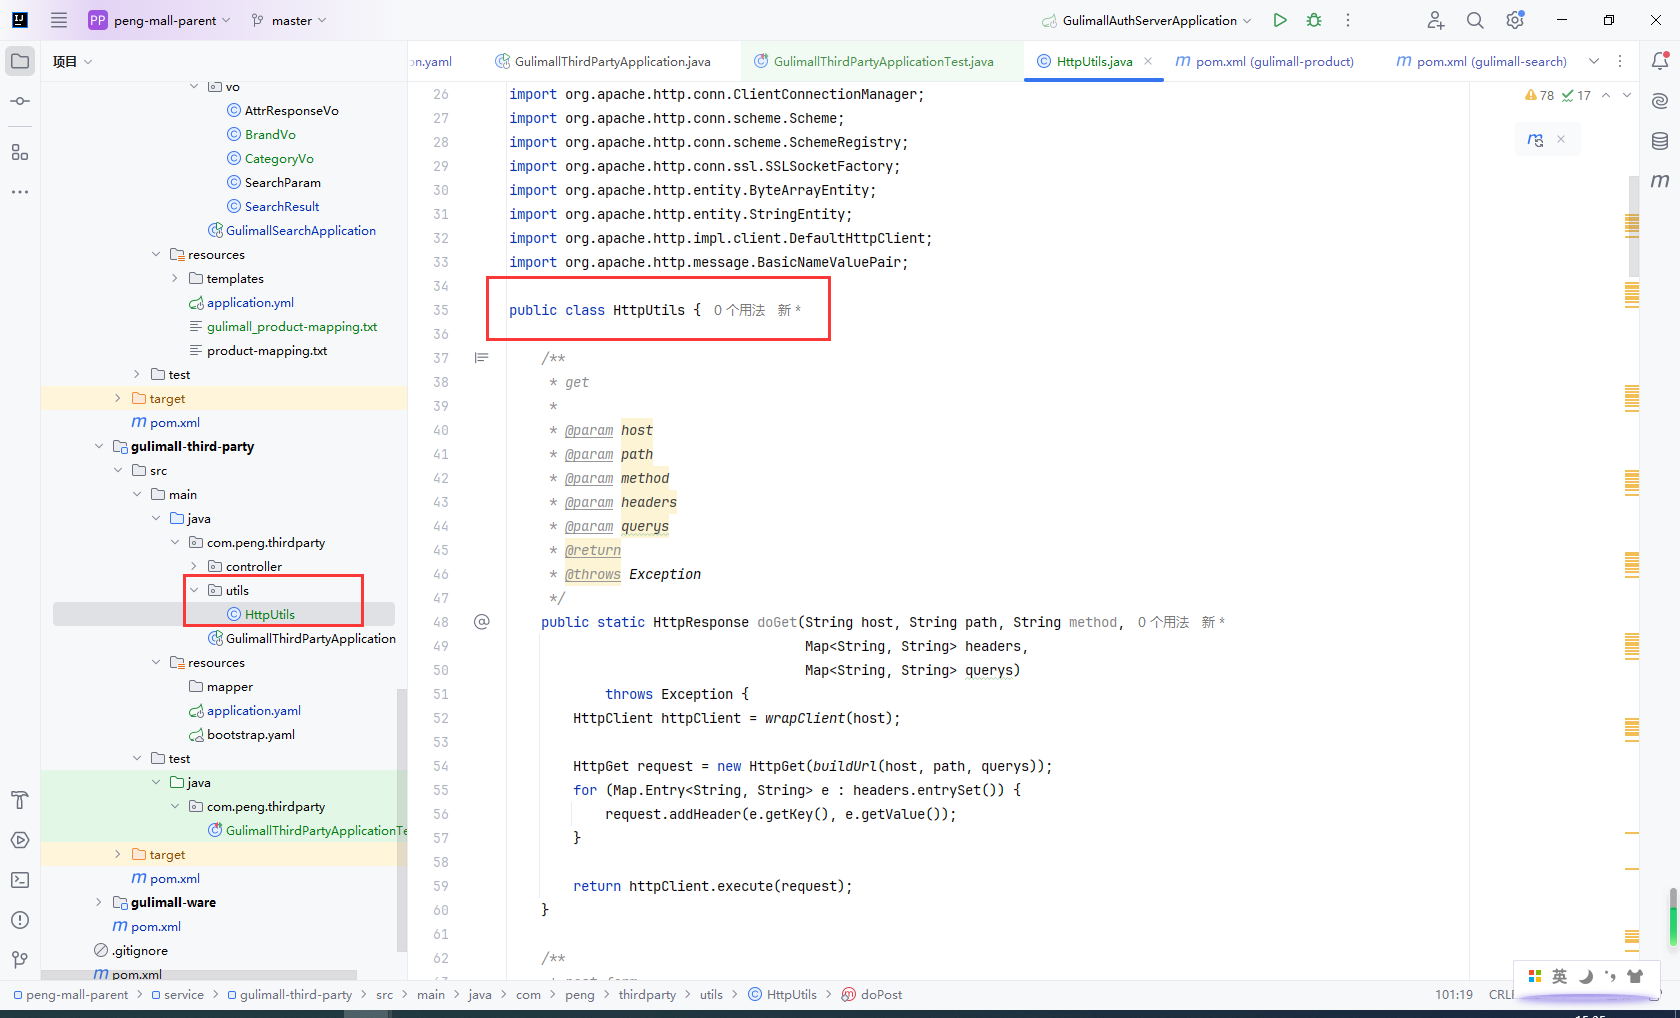
将事例中的链接代码拷贝到项目
找到HttpUtils

拷贝到项目
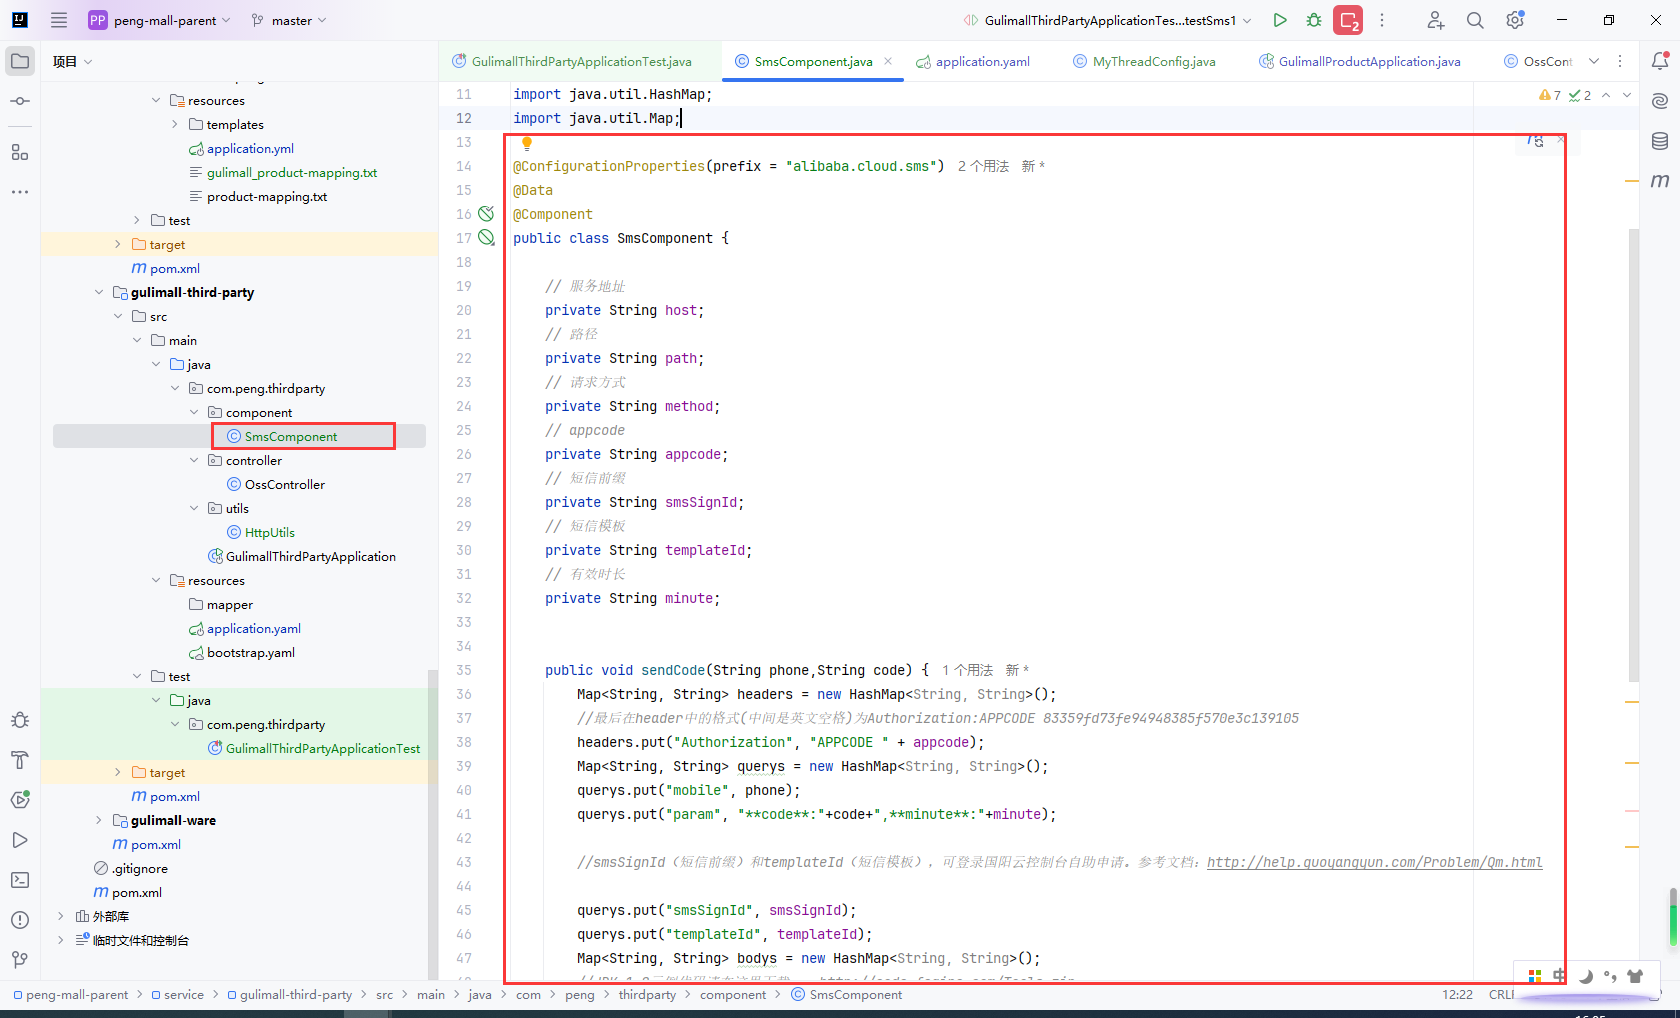
封装SmsComponent
@ConfigurationProperties(prefix = "alibaba.cloud.sms")
@Data
@Component
public class SmsComponent {
// 服务地址
private String host;
// 路径
private String path;
// 请求方式
private String method;
// appcode
private String appcode;
// 短信前缀
private String smsSignId;
// 短信模板
private String templateId;
// 有效时长
private String minute;
public void sendCode(String phone,String code) {
Map<String, String> headers = new HashMap<String, String>();
//最后在header中的格式(中间是英文空格)为Authorization:APPCODE 83359fd73fe94948385f570e3c139105
headers.put("Authorization", "APPCODE " + appcode);
Map<String, String> querys = new HashMap<String, String>();
querys.put("mobile", phone);
querys.put("param", "**code**:"+code+",**minute**:"+minute);
//smsSignId(短信前缀)和templateId(短信模板),可登录国阳云控制台自助申请。参考文档:http://help.guoyangyun.com/Problem/Qm.html
querys.put("smsSignId", smsSignId);
querys.put("templateId", templateId);
Map<String, String> bodys = new HashMap<String, String>();
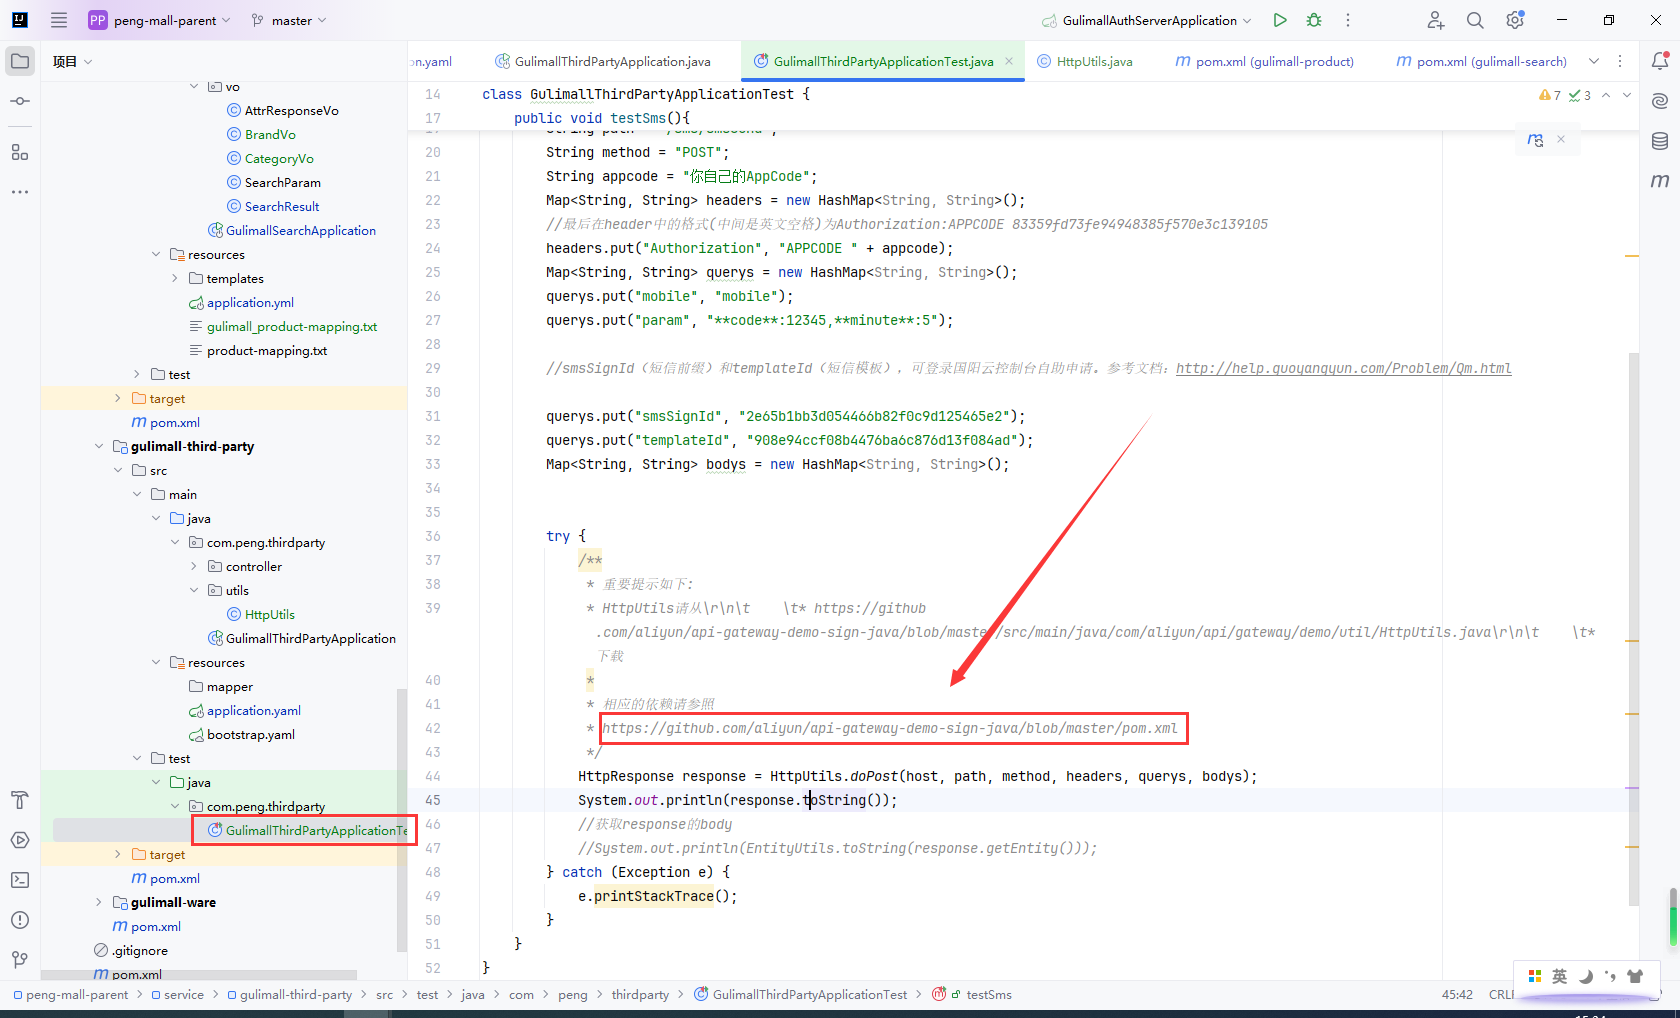
//JDK 1.8示例代码请在这里下载: http://code.fegine.com/Tools.zip
try {
/**
* 重要提示如下:
* HttpUtils请从\r\n\t \t* https://github.com/aliyun/api-gateway-demo-sign-java/blob/master/src/main/java/com/aliyun/api/gateway/demo/util/HttpUtils.java\r\n\t \t* 下载
*
* 相应的依赖请参照
* https://github.com/aliyun/api-gateway-demo-sign-java/blob/master/pom.xml
*/
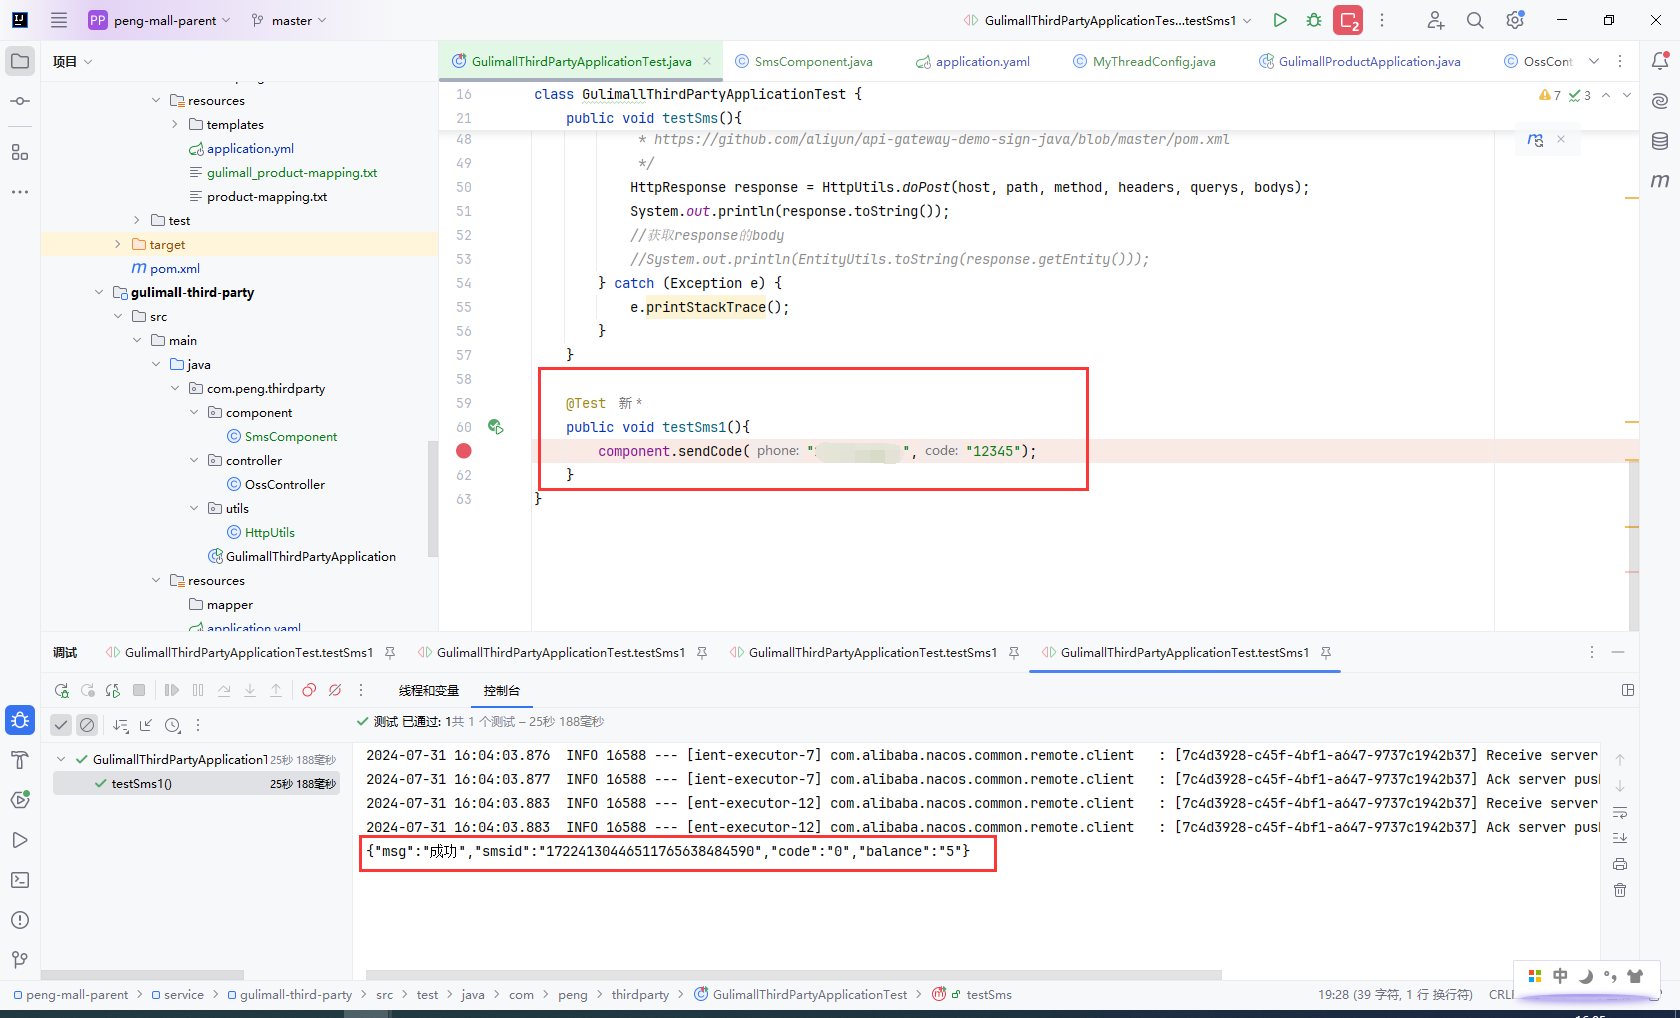
HttpResponse response = HttpUtils.doPost(host, path, method, headers, querys, bodys);
System.out.println(EntityUtils.toString(response.getEntity()));
} catch (Exception e) {
e.printStackTrace();
}
}
}
测试SmsComponent
@Autowired
SmsComponent component;

@Test
public void testSms1(){
    component.sendCode("15727328076","12345");
}
9.4验证码防刷校验
主要步骤:
gulimall-third-party封装发送短信验证码接口gulimall-auth-service封装远程接口调用gulimall-third-party发送短信验证码gulimall-auth-service发送验证码接口- 接口防刷,60s内不能重复调用,获取验证后将验证码和当前时间都存入
redis,前端调用时根据key当前手机号获取存入的验证码和时间,如果当前时间-存入的时间小于60s直接返回
- 接口防刷,60s内不能重复调用,获取验证后将验证码和当前时间都存入
- 前端调用
gulimall-auth-service
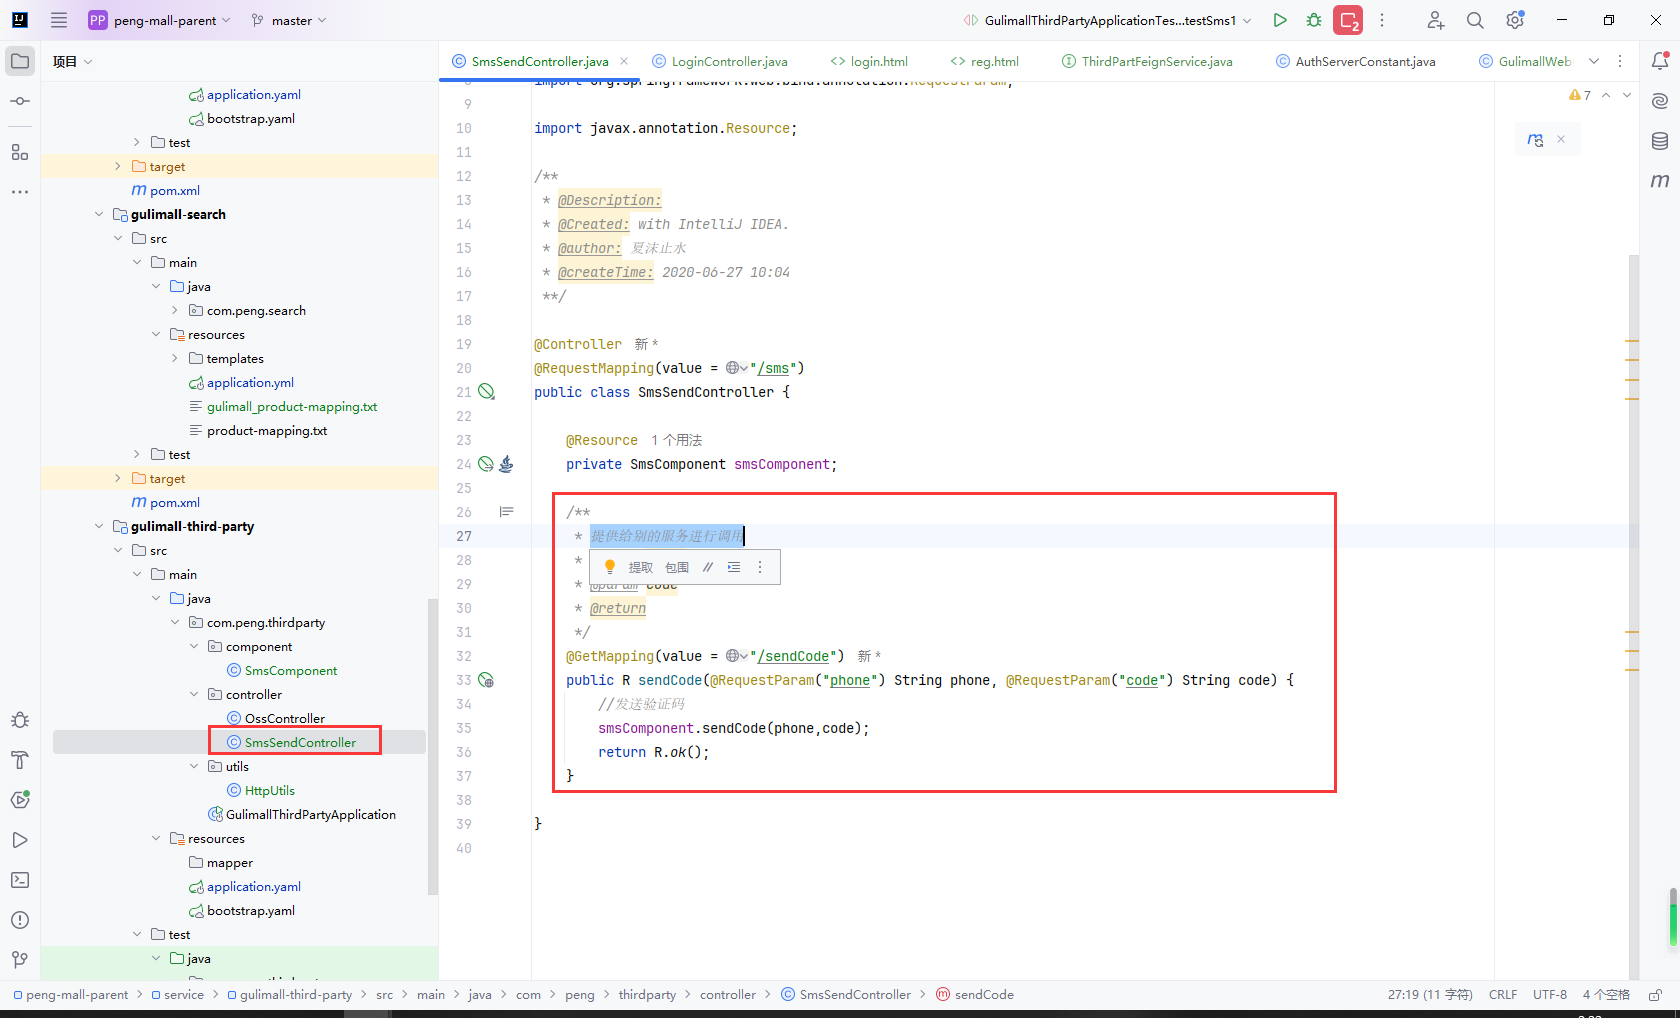
gulimall-third-party封装发送短信验证码接口
/**
 * 提供给别的服务进行调用
 * @param phone
 * @param code
 * @return
 */
@GetMapping(value = "/sendCode")
public R sendCode(@RequestParam("phone") String phone, @RequestParam("code") String code) {
    //发送验证码
    smsComponent.sendCode(phone,code);
    return R.ok();
}
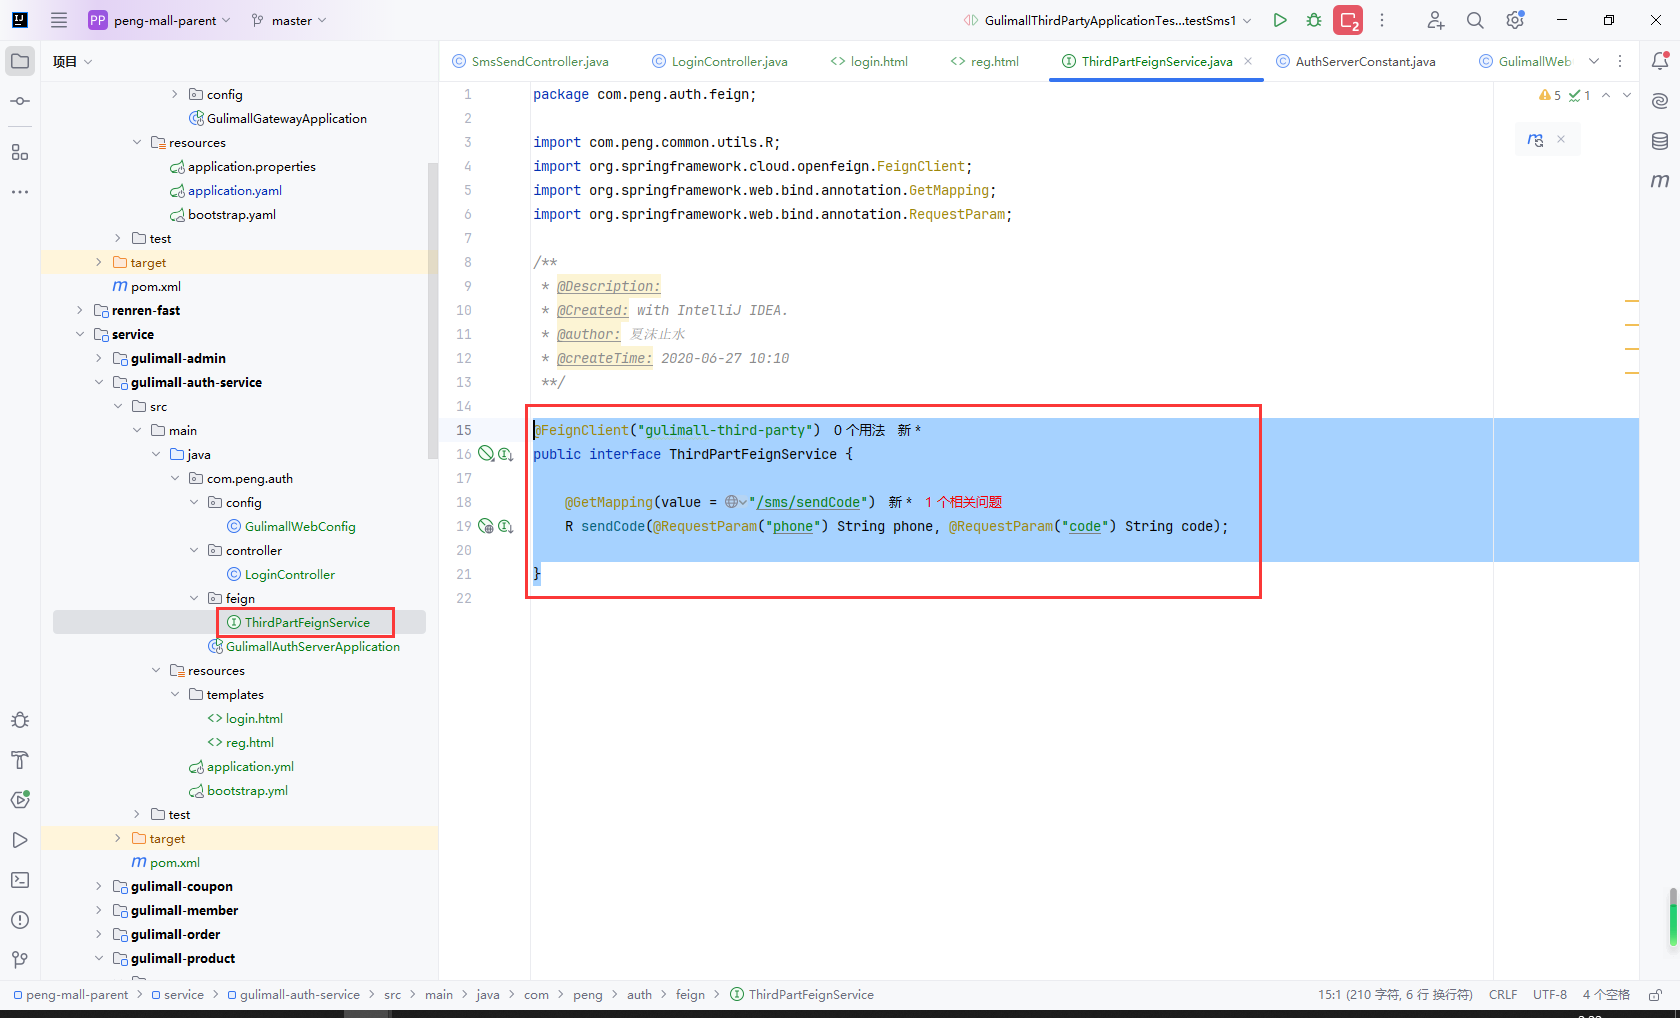
gulimall-auth-service封装远程接口调用gulimall-third-party发送短信验证码
@FeignClient("gulimall-third-party")
public interface ThirdPartFeignService {

    @GetMapping(value = "/sms/sendCode")
    R sendCode(@RequestParam("phone") String phone, @RequestParam("code") String code);

}
接口防刷,60s内不能重复调用,获取验证后将验证码和当前时间都存入redis,前端调用时根据key当前手机号获取存入的验证码和时间,如果当前时间-存入的时间小于60s直接返回
@Autowired
private ThirdPartFeignService thirdPartFeignService;

@Autowired
private StringRedisTemplate stringRedisTemplate;

@ResponseBody
@GetMapping(value = "/sms/sendCode")
public R sendCode(@RequestParam("phone") String phone) {

    //1、接口防刷
    String redisCode = stringRedisTemplate.opsForValue().get(AuthServerConstant.SMS_CODE_CACHE_PREFIX + phone);
    if (!StringUtils.isEmpty(redisCode)) {
        //活动存入redis的时间,用当前时间减去存入redis的时间,判断用户手机号是否在60s内发送验证码
        long currentTime = Long.parseLong(redisCode.split("_")[1]);
        if (System.currentTimeMillis() - currentTime < 60000) {
            //60s内不能再发
            return R.error(BizCodeEnum.SMS_CODE_EXCEPTION.getCode(),BizCodeEnum.SMS_CODE_EXCEPTION.getMsg());
        }
    }

    //2、验证码的再次效验 redis.存key-phone,value-code
    String code = UUID.randomUUID().toString().substring(0,5)+"_"+System.currentTimeMillis();
    stringRedisTemplate.opsForValue().set(AuthServerConstant.SMS_CODE_CACHE_PREFIX+phone, code,10, TimeUnit.MINUTES);
    thirdPartFeignService.sendCode(phone, codeNum);

    return R.ok();
}

9.5注册页环境
主要步骤:
- 封装注册功能
Vo实体UserRegisterVo,使用hibernate-validator特性校验 - 封装注册接口
- 修改前端页面注册提交
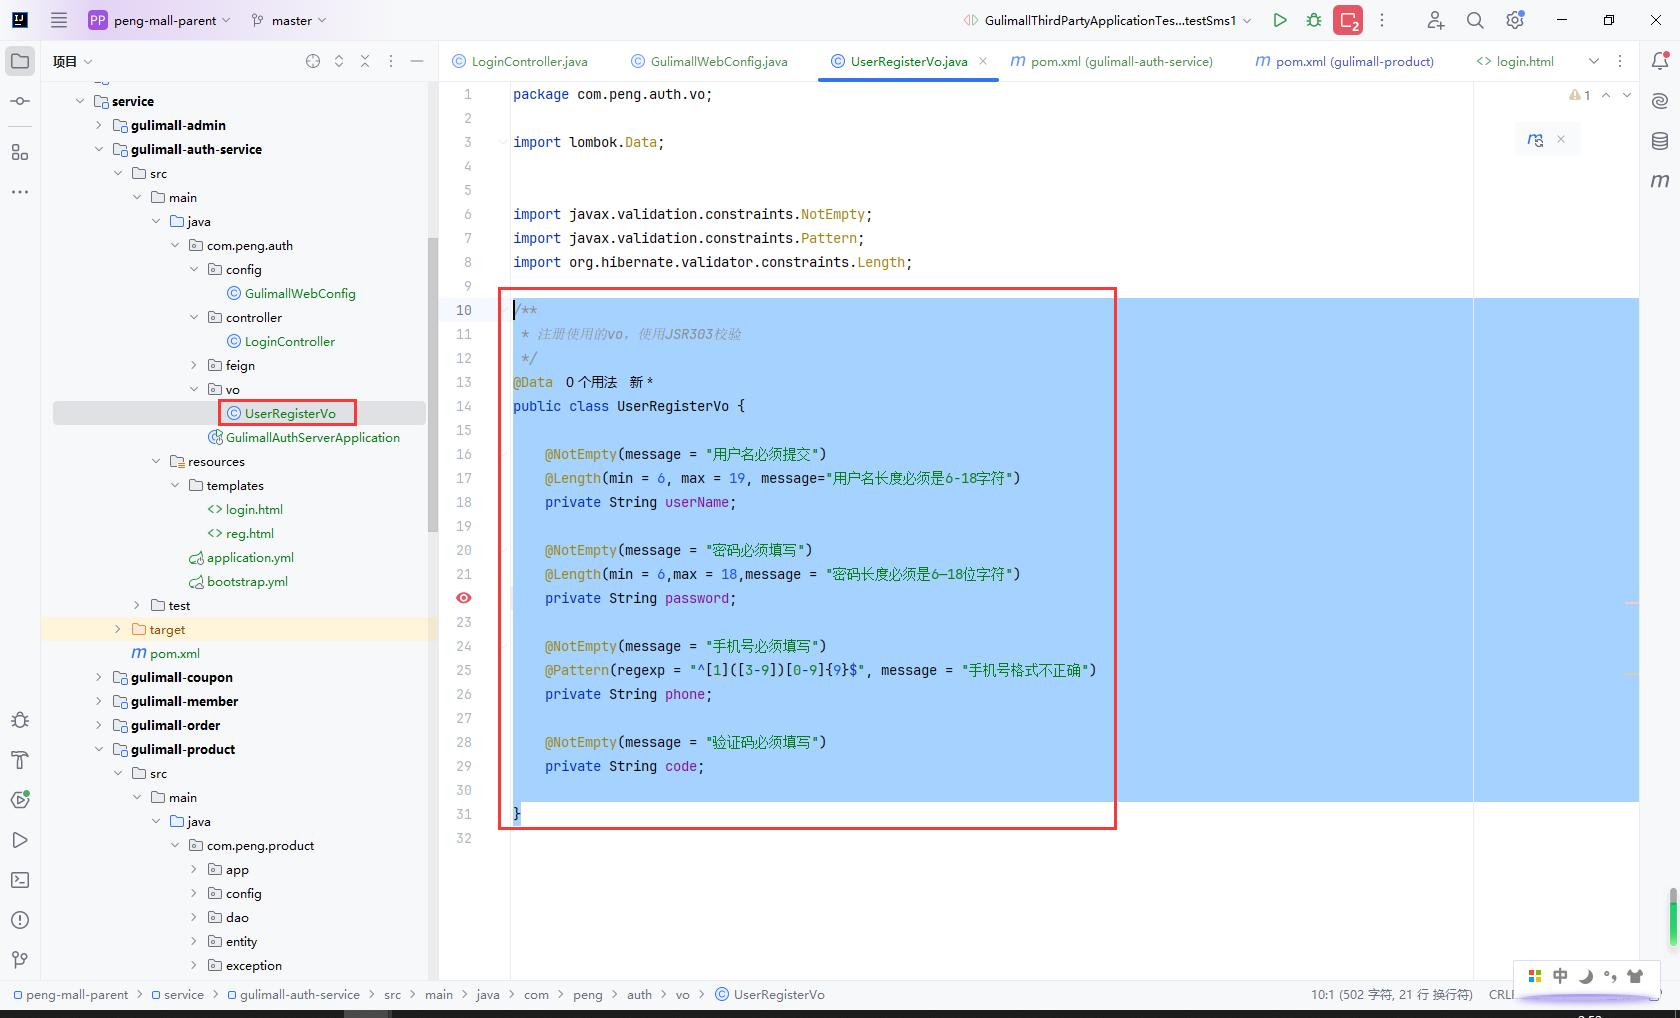
封装注册功能Vo实体 UserRegisterVo,使用hibernate-validator特性校验
/**
 * 注册使用的vo,使用JSR303校验
 */
@Data
public class UserRegisterVo {

    @NotEmpty(message = "用户名必须提交")
    @Length(min = 6, max = 19, message="用户名长度必须是6-18字符")
    private String userName;

    @NotEmpty(message = "密码必须填写")
    @Length(min = 6,max = 18,message = "密码长度必须是6—18位字符")
    private String password;

    @NotEmpty(message = "手机号必须填写")
    @Pattern(regexp = "^[1]([3-9])[0-9]{9}$", message = "手机号格式不正确")
    private String phone;

    @NotEmpty(message = "验证码必须填写")
    private String code;

}
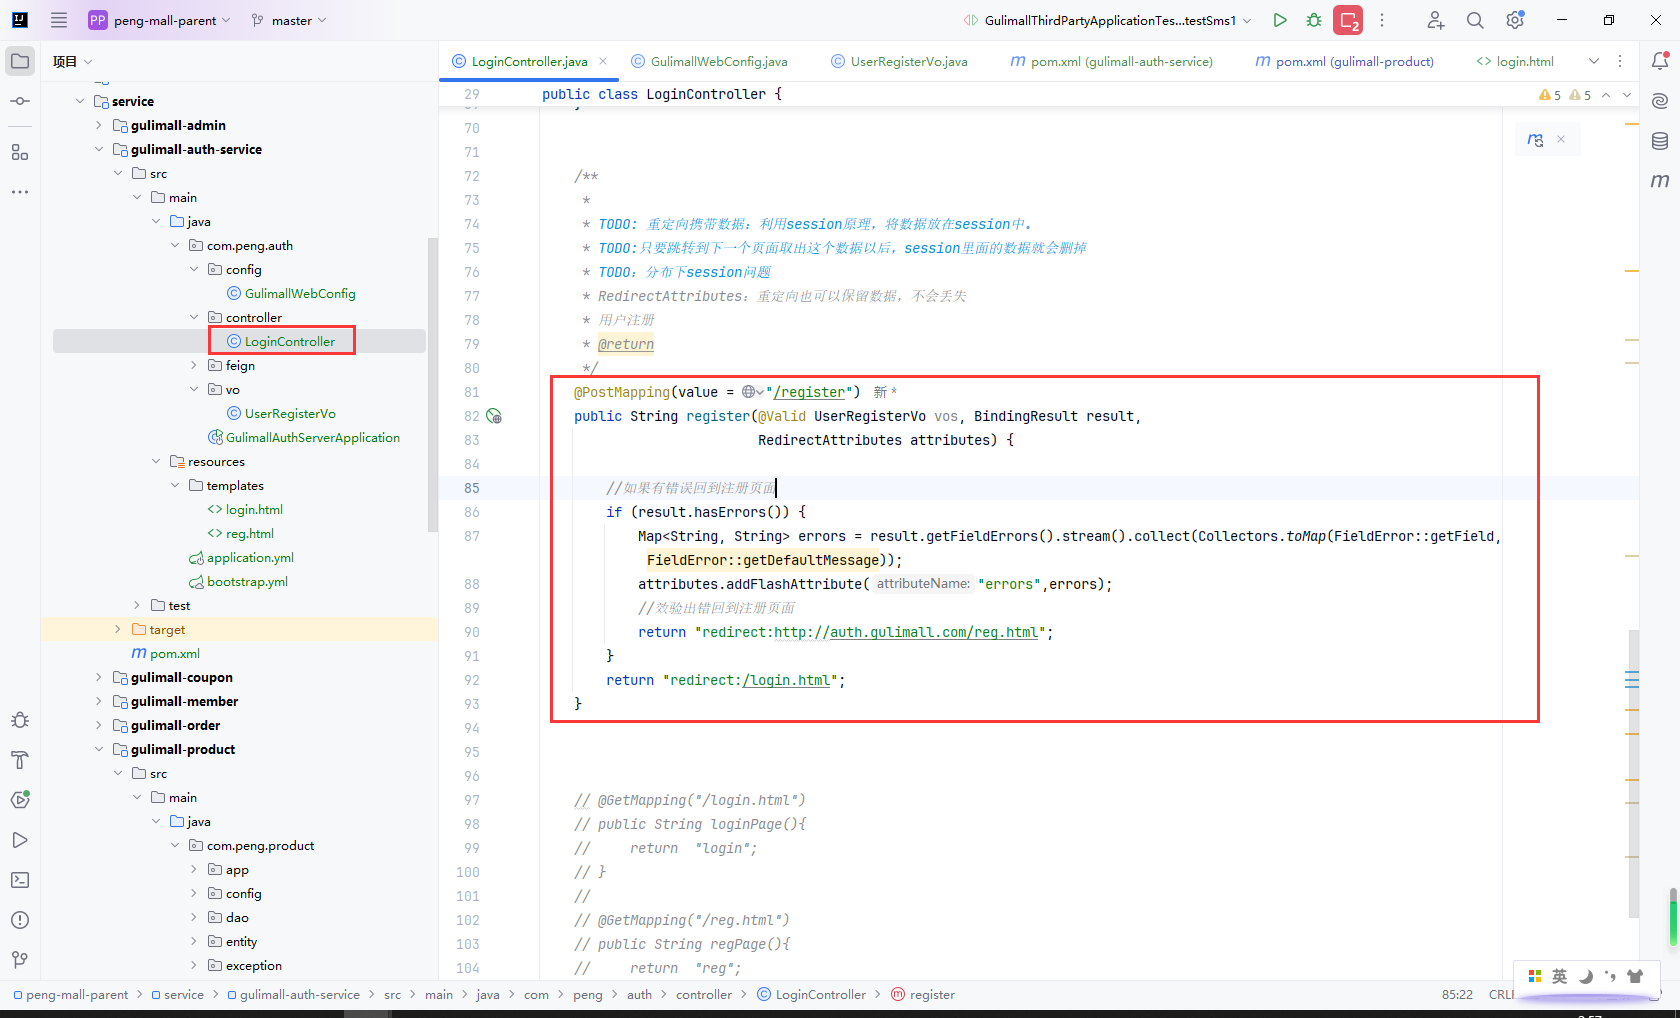
封装注册接口
@PostMapping(value = "/register")
public String register(@Valid UserRegisterVo vos, BindingResult result,
                       RedirectAttributes attributes) {

    //如果有错误回到注册页面
    if (result.hasErrors()) {
        Map<String, String> errors = result.getFieldErrors().stream().collect(Collectors.toMap(FieldError::getField, FieldError::getDefaultMessage));
        attributes.addFlashAttribute("errors",errors);
        //效验出错回到注册页面
        return "redirect:http://auth.gulimall.com/reg.html";
    }
    return "redirect:/login.html";
}
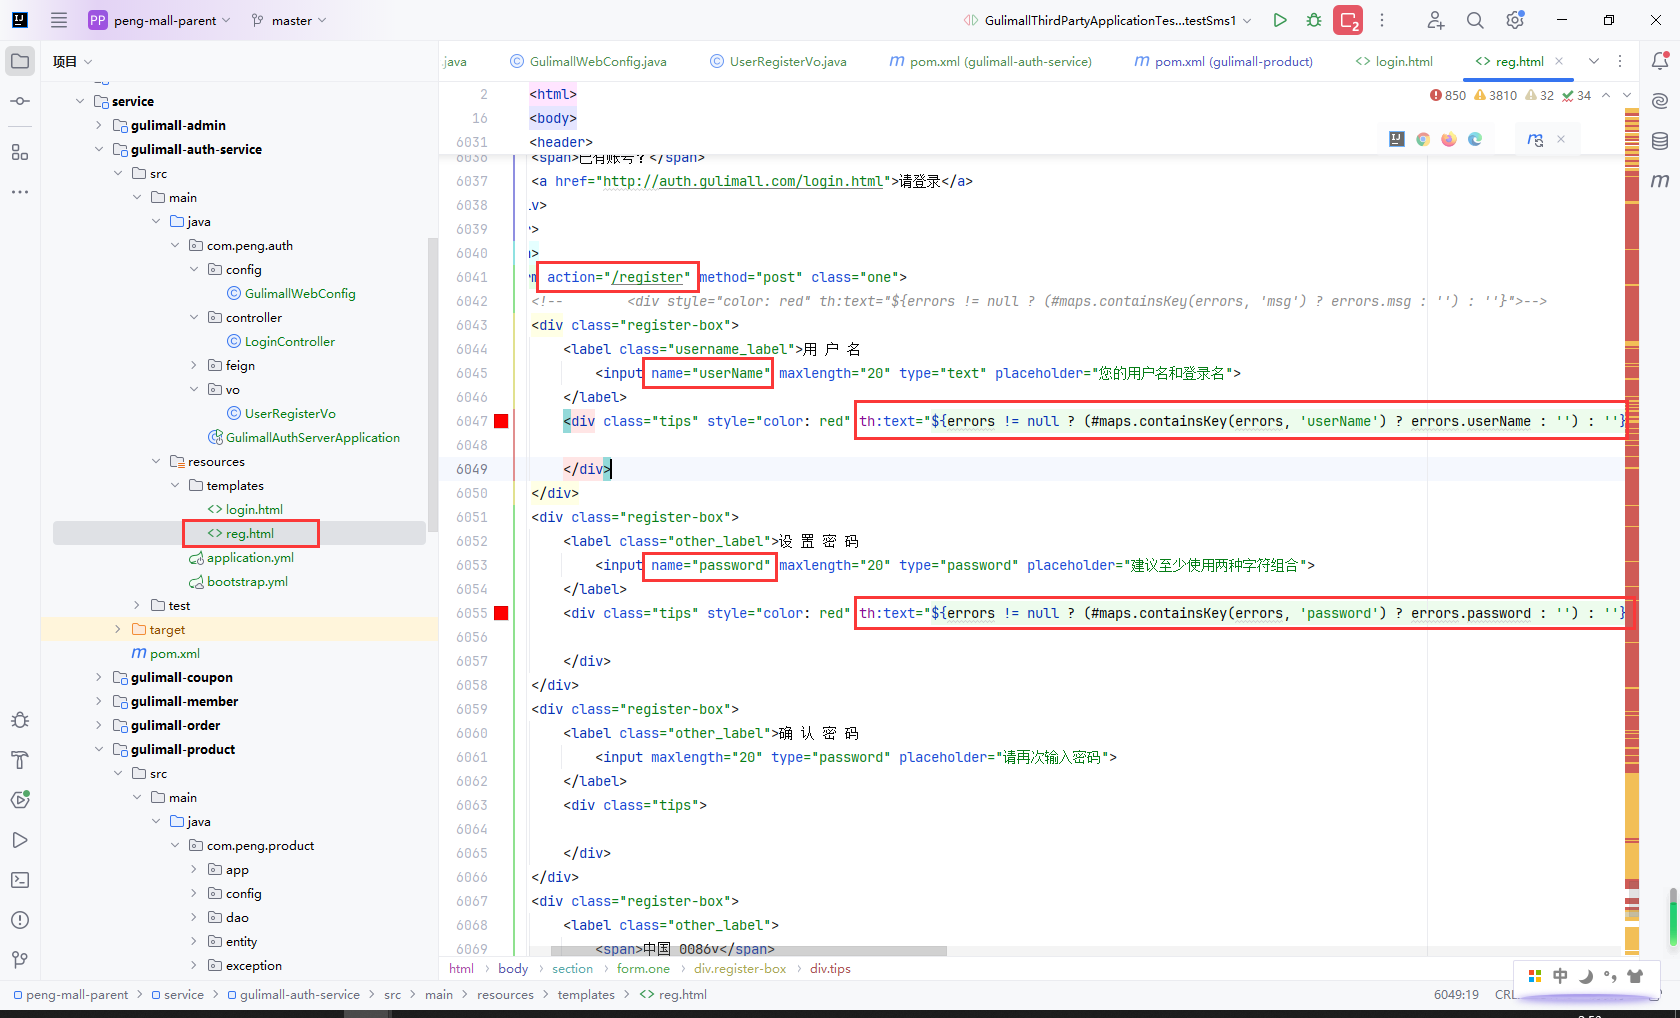
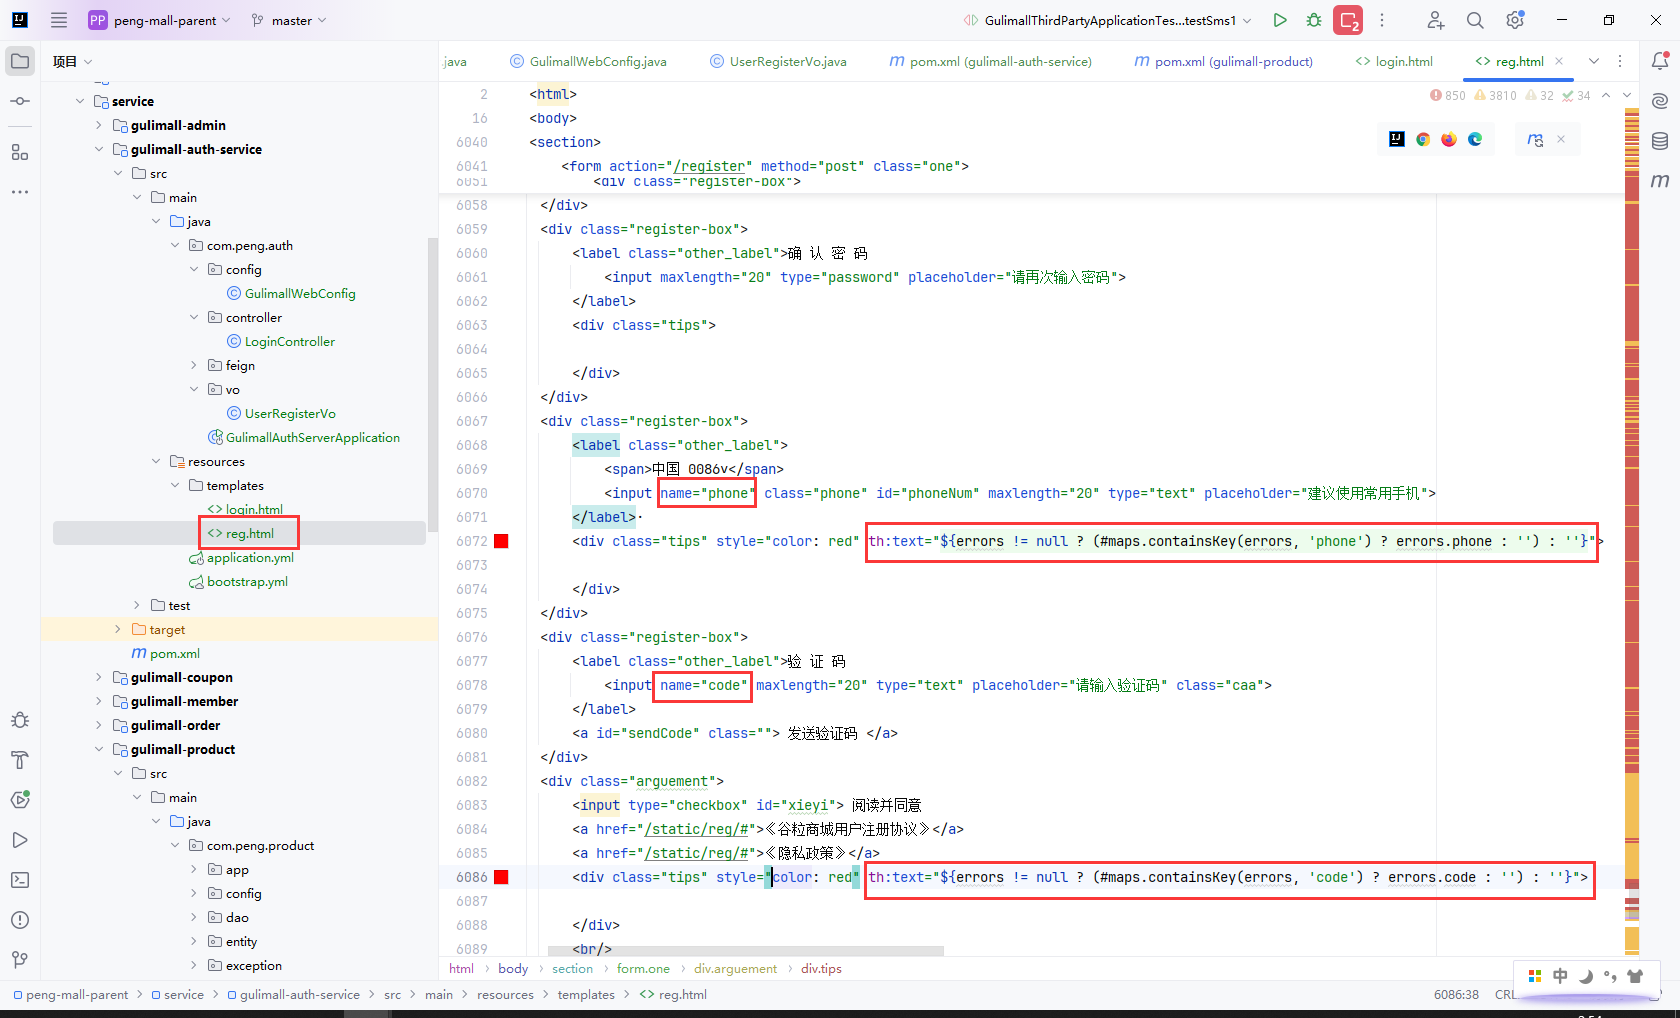
修改前端页面注册提交
9.6异常机制
主要步骤:
- 如果界面参数验证通过,获取
Redis的验证码code- 如果
Redis存在code,和传入的code一样调用注册接口保存用户信息 - 如果
Redis存在code,和传入的code不一样,跳转到注册 - 如果
Redis不存在code,跳转到注册页面
- 如果
gulimall-member添加注册接口- 设置默认等级
- 验证手机号唯一
- 验证用户名唯一
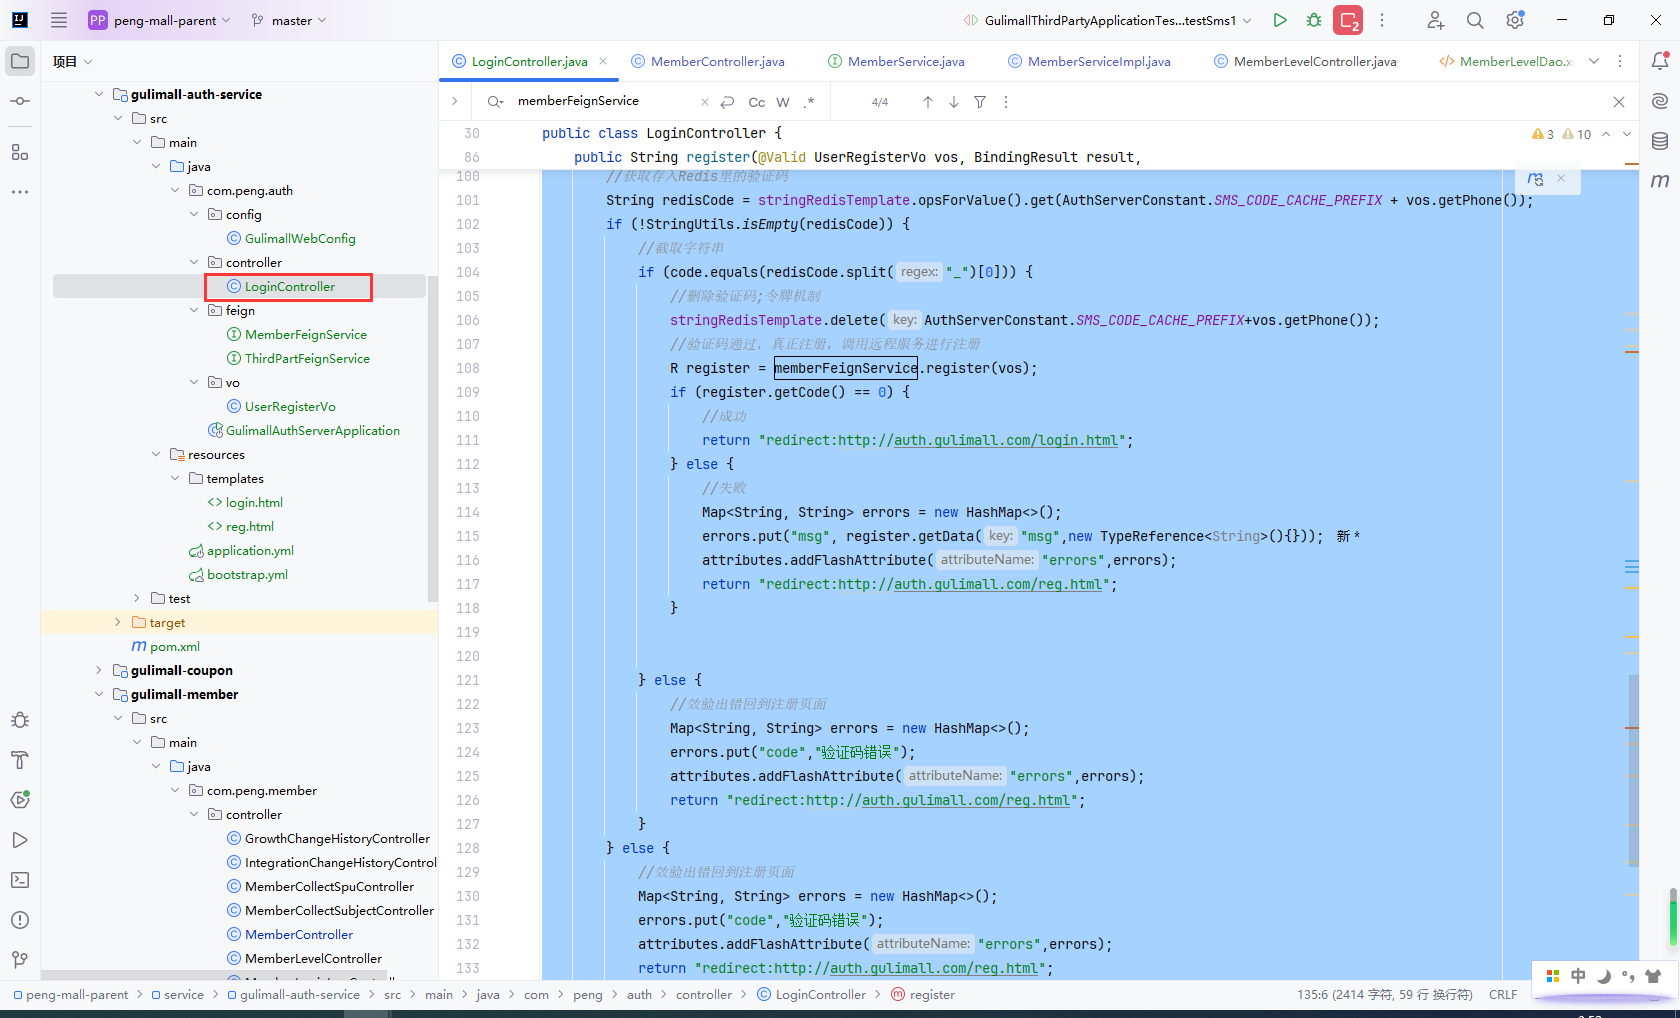
如果界面参数验证通过,获取Redis的验证码code
/**
 *
 * TODO: 重定向携带数据:利用session原理,将数据放在session中。
 * TODO:只要跳转到下一个页面取出这个数据以后,session里面的数据就会删掉
 * TODO:分布下session问题
 * RedirectAttributes:重定向也可以保留数据,不会丢失
 * 用户注册
 * @return
 */
@PostMapping(value = "/register")
public String register(@Valid UserRegisterVo vos, BindingResult result,
                       RedirectAttributes attributes) {

    //如果有错误回到注册页面
    if (result.hasErrors()) {
        Map<String, String> errors = result.getFieldErrors().stream().collect(Collectors.toMap(FieldError::getField, FieldError::getDefaultMessage));
        attributes.addFlashAttribute("errors",errors);
        //效验出错回到注册页面
        return "redirect:http://auth.gulimall.com/reg.html";
    }

    //1、效验验证码
    String code = vos.getCode();

    //获取存入Redis里的验证码
    String redisCode = stringRedisTemplate.opsForValue().get(AuthServerConstant.SMS_CODE_CACHE_PREFIX + vos.getPhone());
    if (!StringUtils.isEmpty(redisCode)) {
        //截取字符串
        if (code.equals(redisCode.split("_")[0])) {
            //删除验证码;令牌机制
            stringRedisTemplate.delete(AuthServerConstant.SMS_CODE_CACHE_PREFIX+vos.getPhone());
            //验证码通过,真正注册,调用远程服务进行注册
            R register = memberFeignService.register(vos);
            if (register.getCode() == 0) {
                //成功
                return "redirect:http://auth.gulimall.com/login.html";
            } else {
                //失败
                Map<String, String> errors = new HashMap<>();
                errors.put("msg", register.getData("msg",new TypeReference<String>(){}));
                attributes.addFlashAttribute("errors",errors);
                return "redirect:http://auth.gulimall.com/reg.html";
            }


        } else {
            //效验出错回到注册页面
            Map<String, String> errors = new HashMap<>();
            errors.put("code","验证码错误");
            attributes.addFlashAttribute("errors",errors);
            return "redirect:http://auth.gulimall.com/reg.html";
        }
    } else {
        //效验出错回到注册页面
        Map<String, String> errors = new HashMap<>();
        errors.put("code","验证码错误");
        attributes.addFlashAttribute("errors",errors);
        return "redirect:http://auth.gulimall.com/reg.html";
    }
}
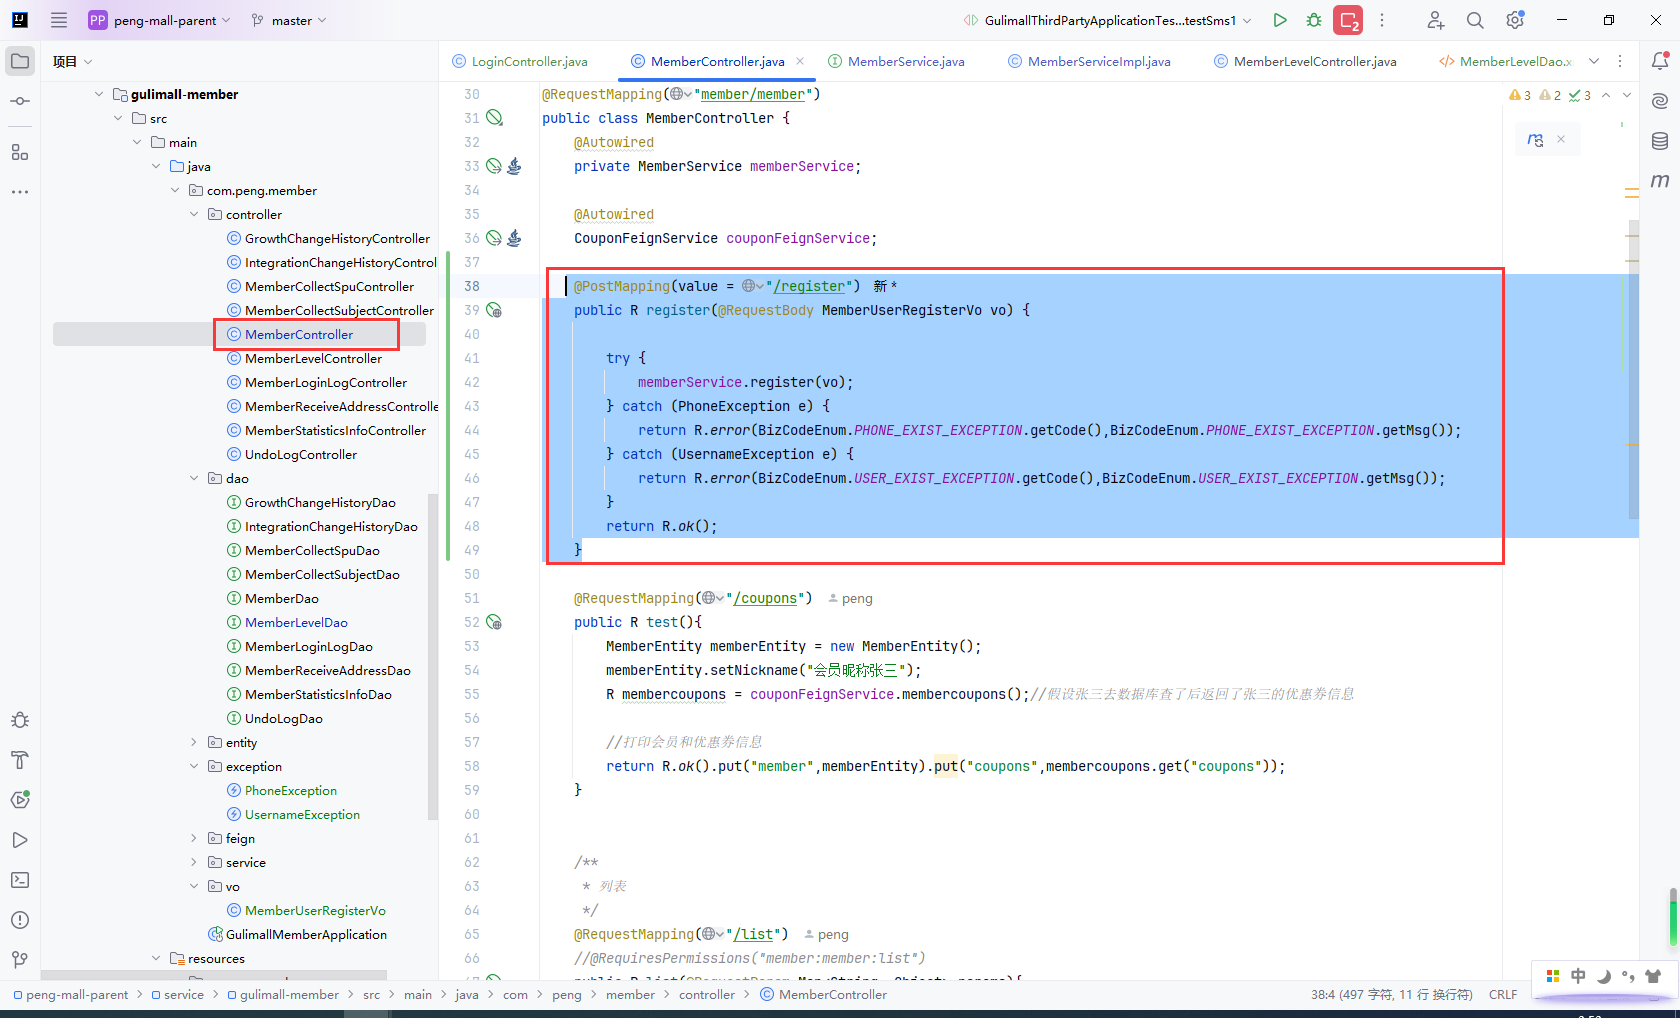
gulimall-member添加注册接口
@PostMapping(value = "/register")
public R register(@RequestBody MemberUserRegisterVo vo) {

    try {
        memberService.register(vo);
    } catch (PhoneException e) {
        return R.error(BizCodeEnum.PHONE_EXIST_EXCEPTION.getCode(),BizCodeEnum.PHONE_EXIST_EXCEPTION.getMsg());
    } catch (UsernameException e) {
        return R.error(BizCodeEnum.USER_EXIST_EXCEPTION.getCode(),BizCodeEnum.USER_EXIST_EXCEPTION.getMsg());
    }
    return R.ok();
}
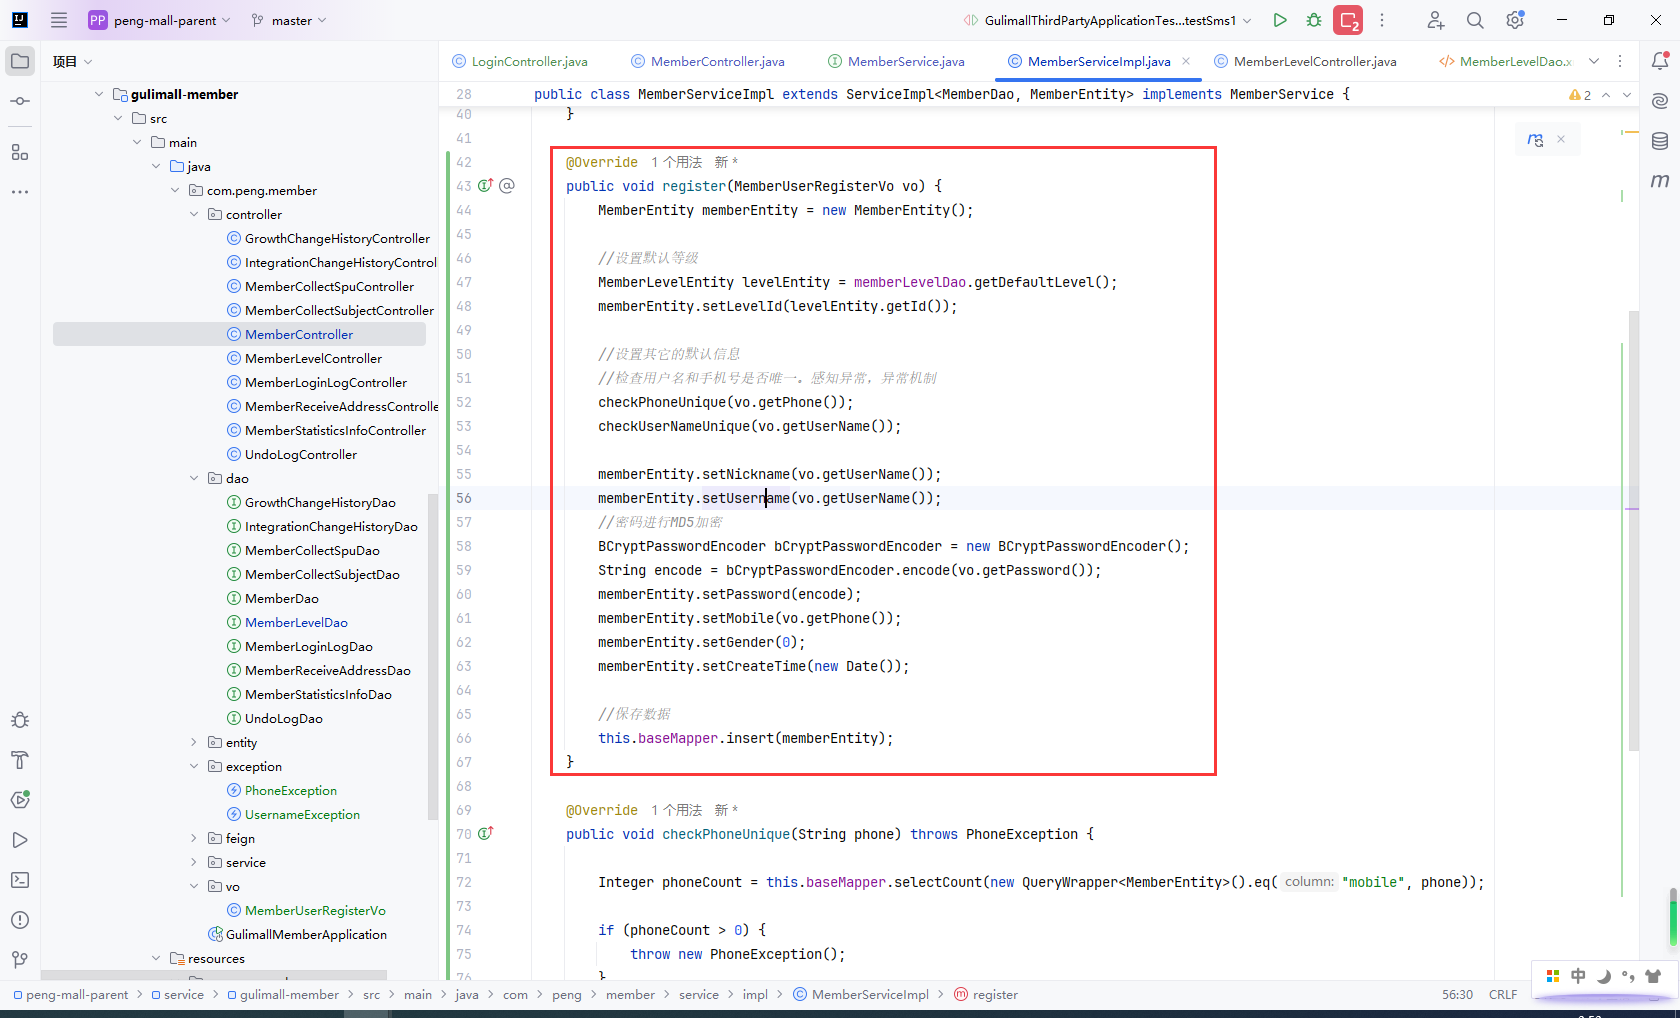
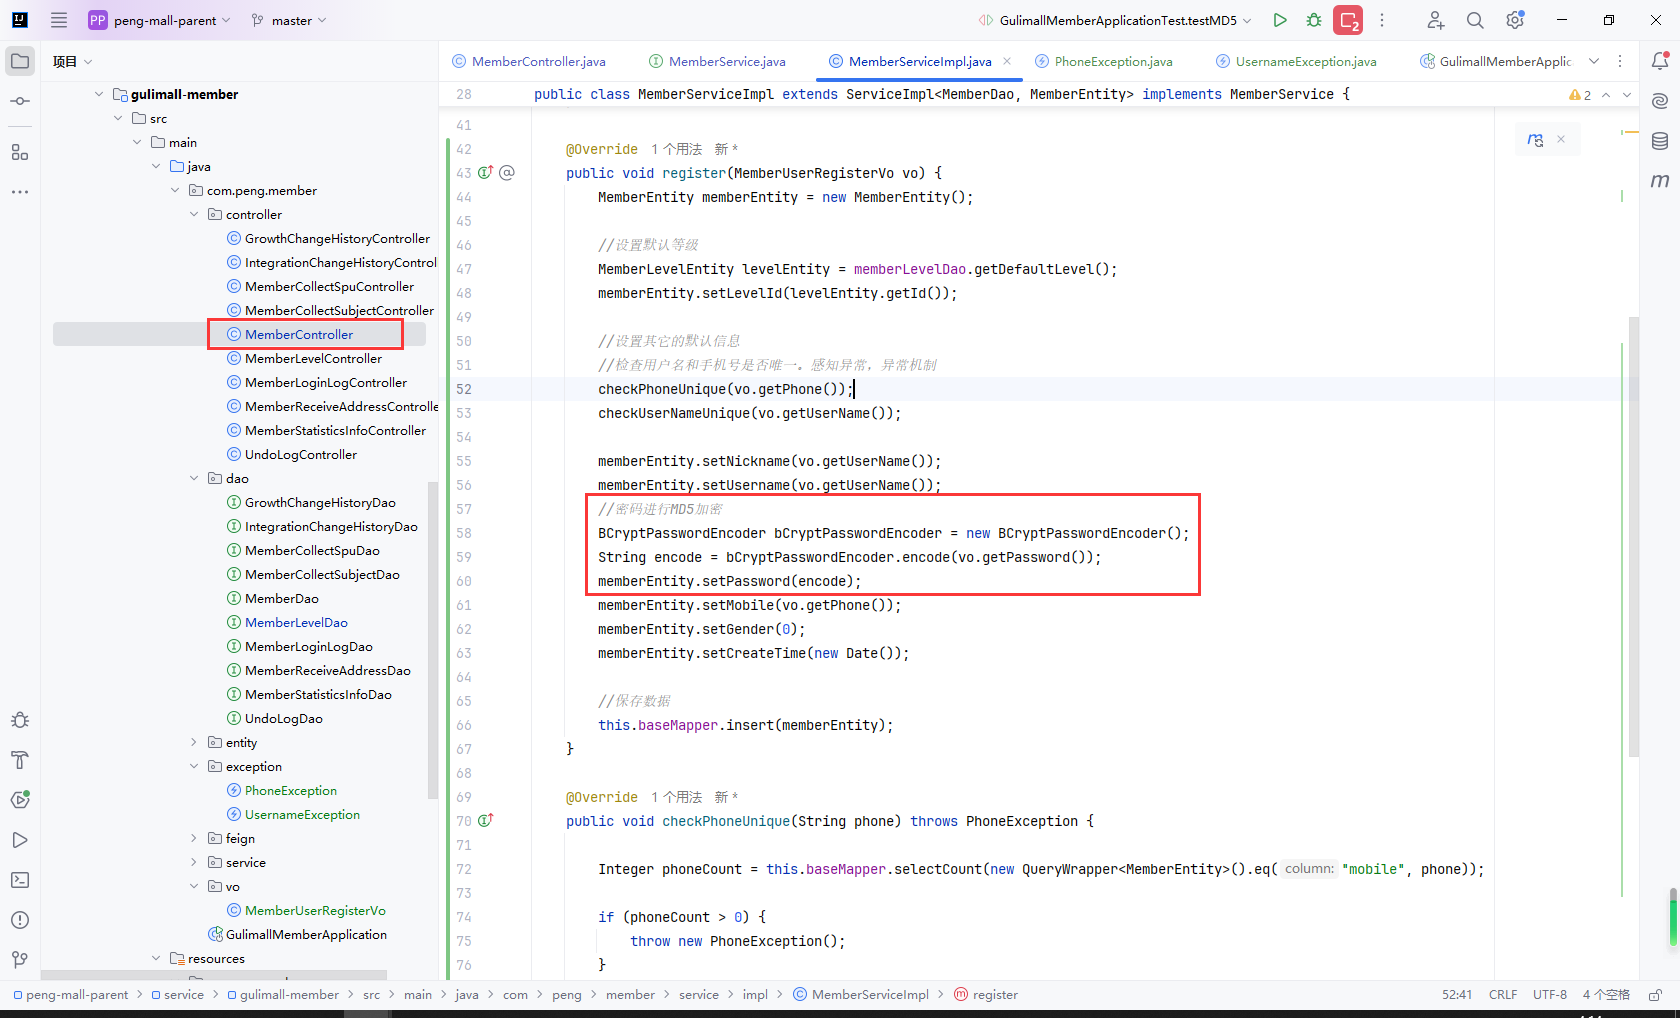
注册接口实现
@Override
public void register(MemberUserRegisterVo vo) {
    MemberEntity memberEntity = new MemberEntity();

    //设置默认等级
    MemberLevelEntity levelEntity = memberLevelDao.getDefaultLevel();
    memberEntity.setLevelId(levelEntity.getId());

    //设置其它的默认信息
    //检查用户名和手机号是否唯一。感知异常,异常机制
    checkPhoneUnique(vo.getPhone());
    checkUserNameUnique(vo.getUserName());

    memberEntity.setNickname(vo.getUserName());
    memberEntity.setUsername(vo.getUserName());
    //密码进行MD5加密
    BCryptPasswordEncoder bCryptPasswordEncoder = new BCryptPasswordEncoder();
    String encode = bCryptPasswordEncoder.encode(vo.getPassword());
    memberEntity.setPassword(encode);
    memberEntity.setMobile(vo.getPhone());
    memberEntity.setGender(0);
    memberEntity.setCreateTime(new Date());

    //保存数据
    this.baseMapper.insert(memberEntity);
}
手机号异常
public class PhoneException extends RuntimeException {

    public PhoneException() {
        super("存在相同的手机号");
    }
}
用户名异常
public class UsernameException extends RuntimeException {

    public UsernameException() {
        super("存在相同的用户名");
    }
}
9.7MD5&盐值&BCrypt
主要步骤:
- MD5介绍
- MD5测试
- 使用
BCryptPasswordEncoder完成密码MD5加密
MD5
-
Message Digest algorithm 5,信息摘要算法
-
压缩性:任意长度的数据,算出的MD5值长度都是固定的。
-
容易计算:从原数据计算出MD5值很容易。
-
抗修改性:对原数据进行任何改动,哪怕只修改1个字节,所得到的MD5值都有很大区别。
-
强抗碰撞:想找到两个不同的数据,使它们具有相同的MD5值,是非常困难的。
-
-
加盐:
- 通过生成随机数与MD5生成字符串进行组合
- 数据库同时存储MD5值与salt值。验证正确性时使用salt进行MD5即可
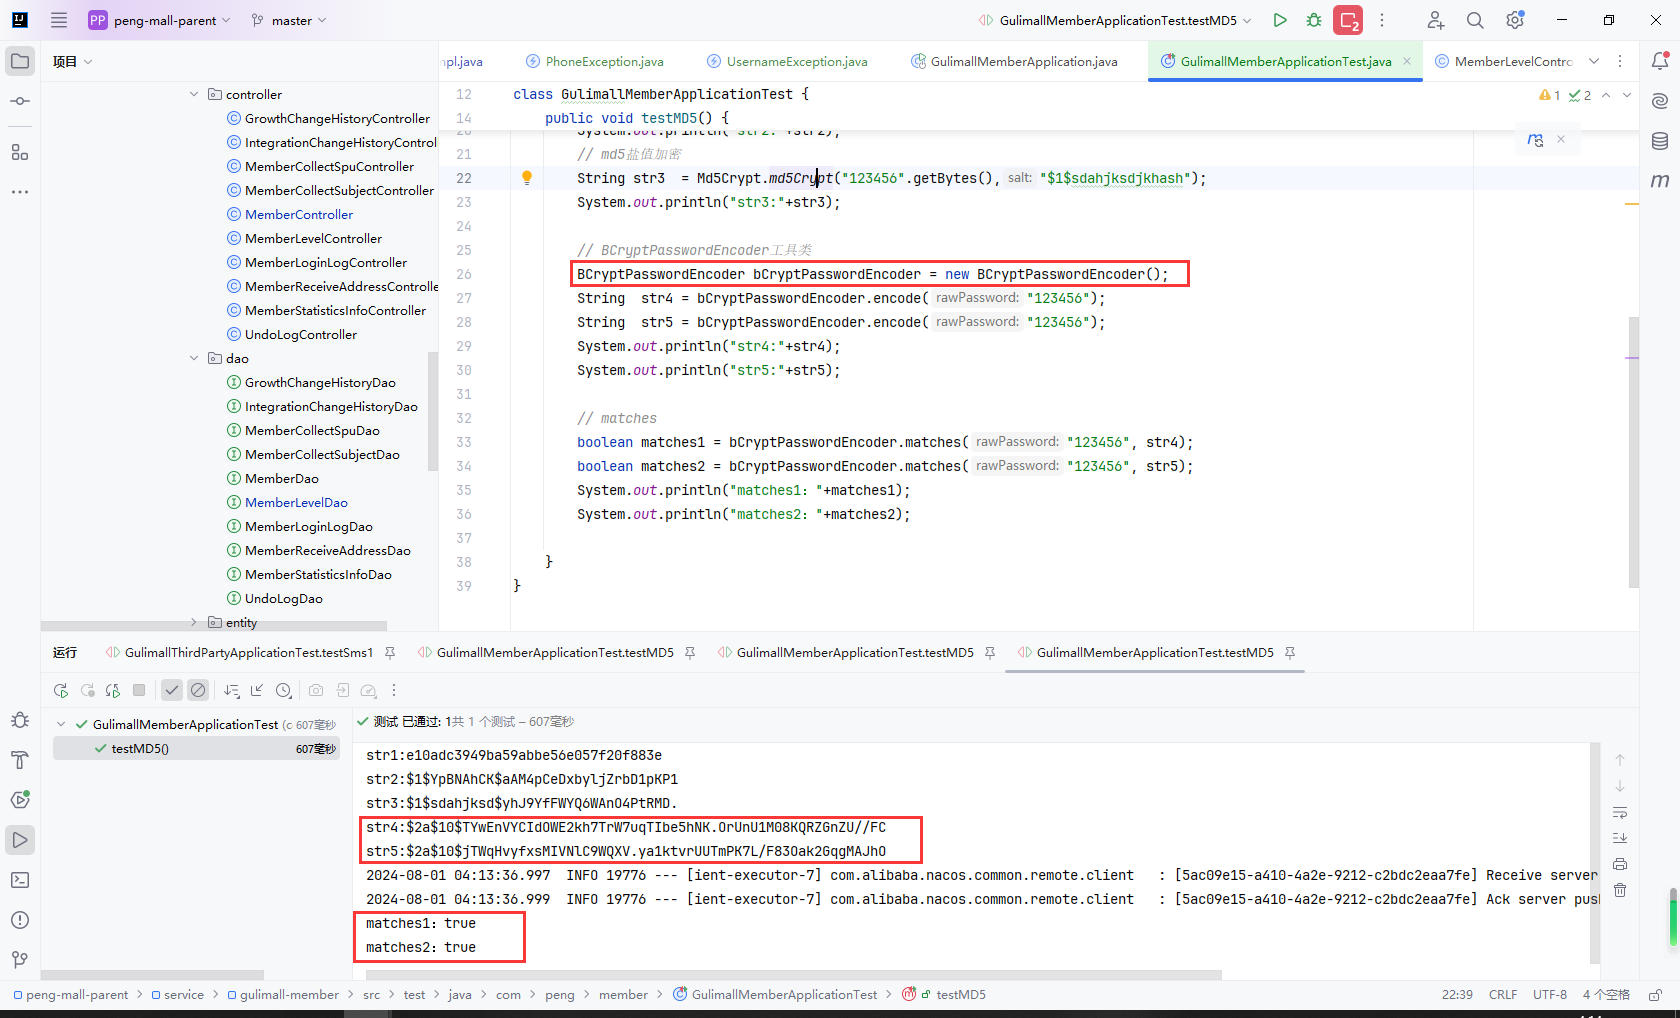
MD5测试
@Test
public void testMD5() {
    // md5加密
    String str1 = DigestUtils.md5Hex("123456");
    System.out.println("str1:"+str1);
    // md5加密
    String str2 = Md5Crypt.md5Crypt("123456".getBytes());
    System.out.println("str2:"+str2);
    // md5盐值加密
    String str3  = Md5Crypt.md5Crypt("123456".getBytes(),"$1$sdahjksdjkhash");
    System.out.println("str3:"+str3);

    // BCryptPasswordEncoder工具类
    BCryptPasswordEncoder bCryptPasswordEncoder = new BCryptPasswordEncoder();
    String  str4 = bCryptPasswordEncoder.encode("123456");
    String  str5 = bCryptPasswordEncoder.encode("123456");
    System.out.println("str4:"+str4);
    System.out.println("str5:"+str5);

    // matches
    boolean matches1 = bCryptPasswordEncoder.matches("123456", str4);
    boolean matches2 = bCryptPasswordEncoder.matches("123456", str5);
    System.out.println("matches1:"+matches1);
    System.out.println("matches2:"+matches2);

}
使用BCryptPasswordEncoder完成密码MD5加密
9.8注册完成
主要步骤:
gulimall-auth-service添加会员服务的注册接口gulimall-auth-service添加Redis的json序列化配置- 完成注册功能,调试通过
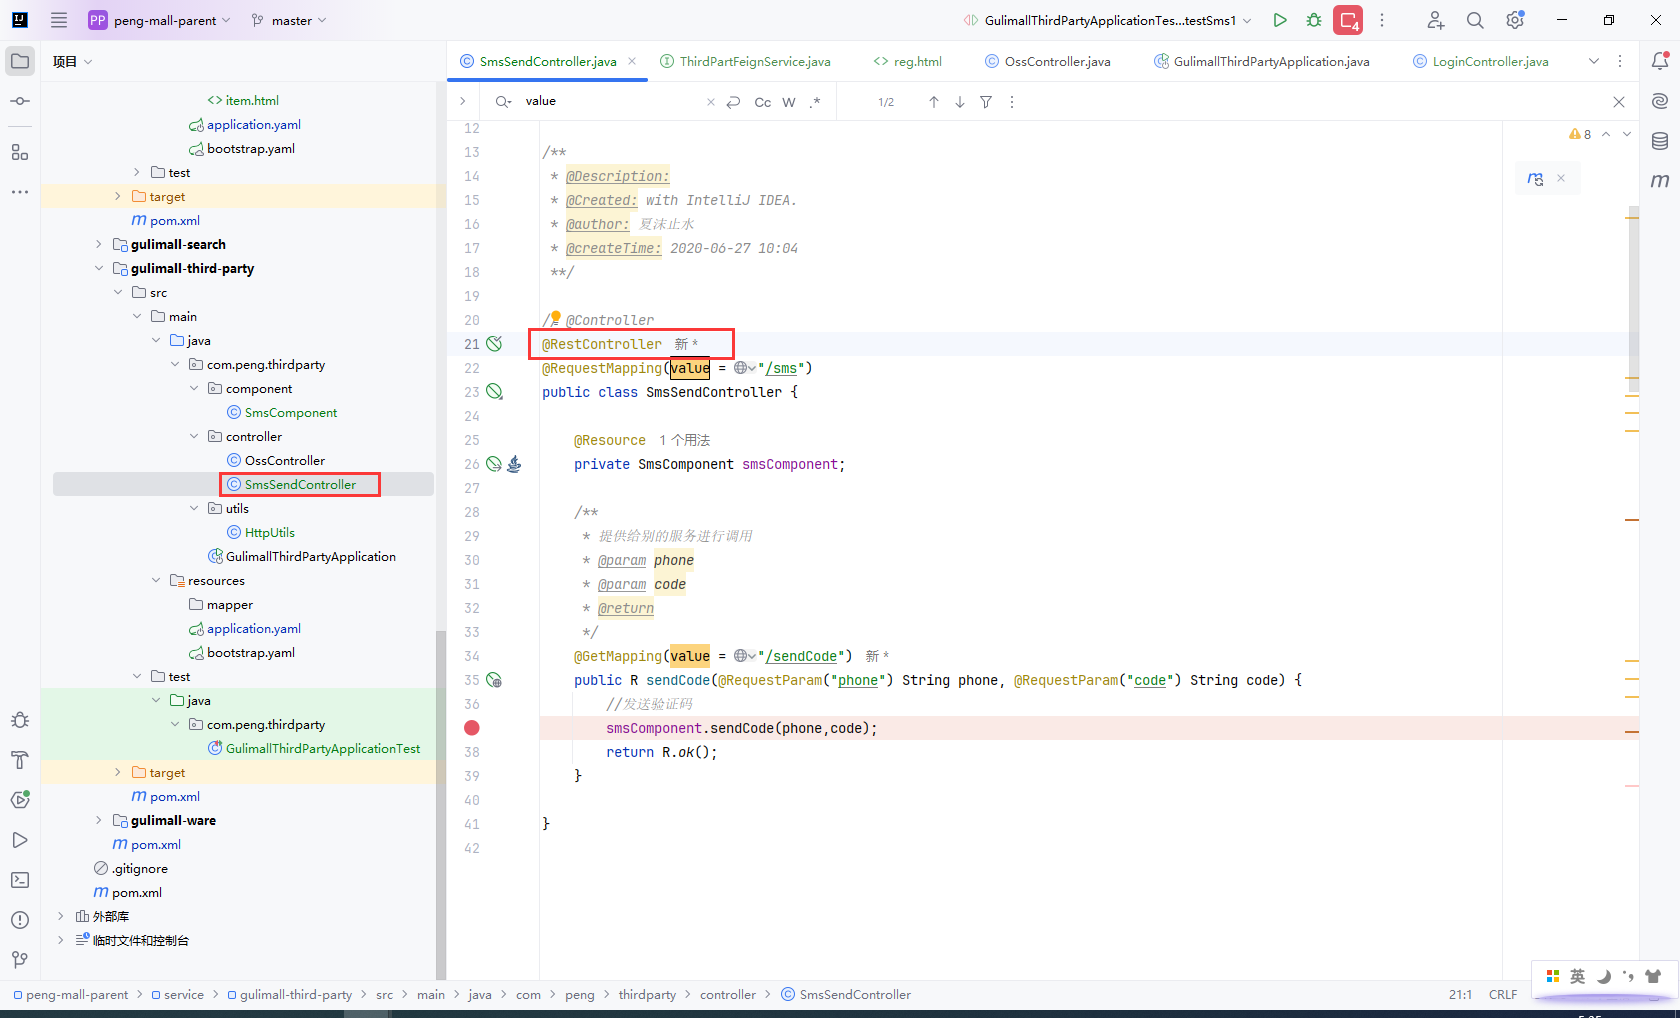
SmsSendController需要@RestController而不是@Controller
gulimall-auth-service添加会员服务的注册接口
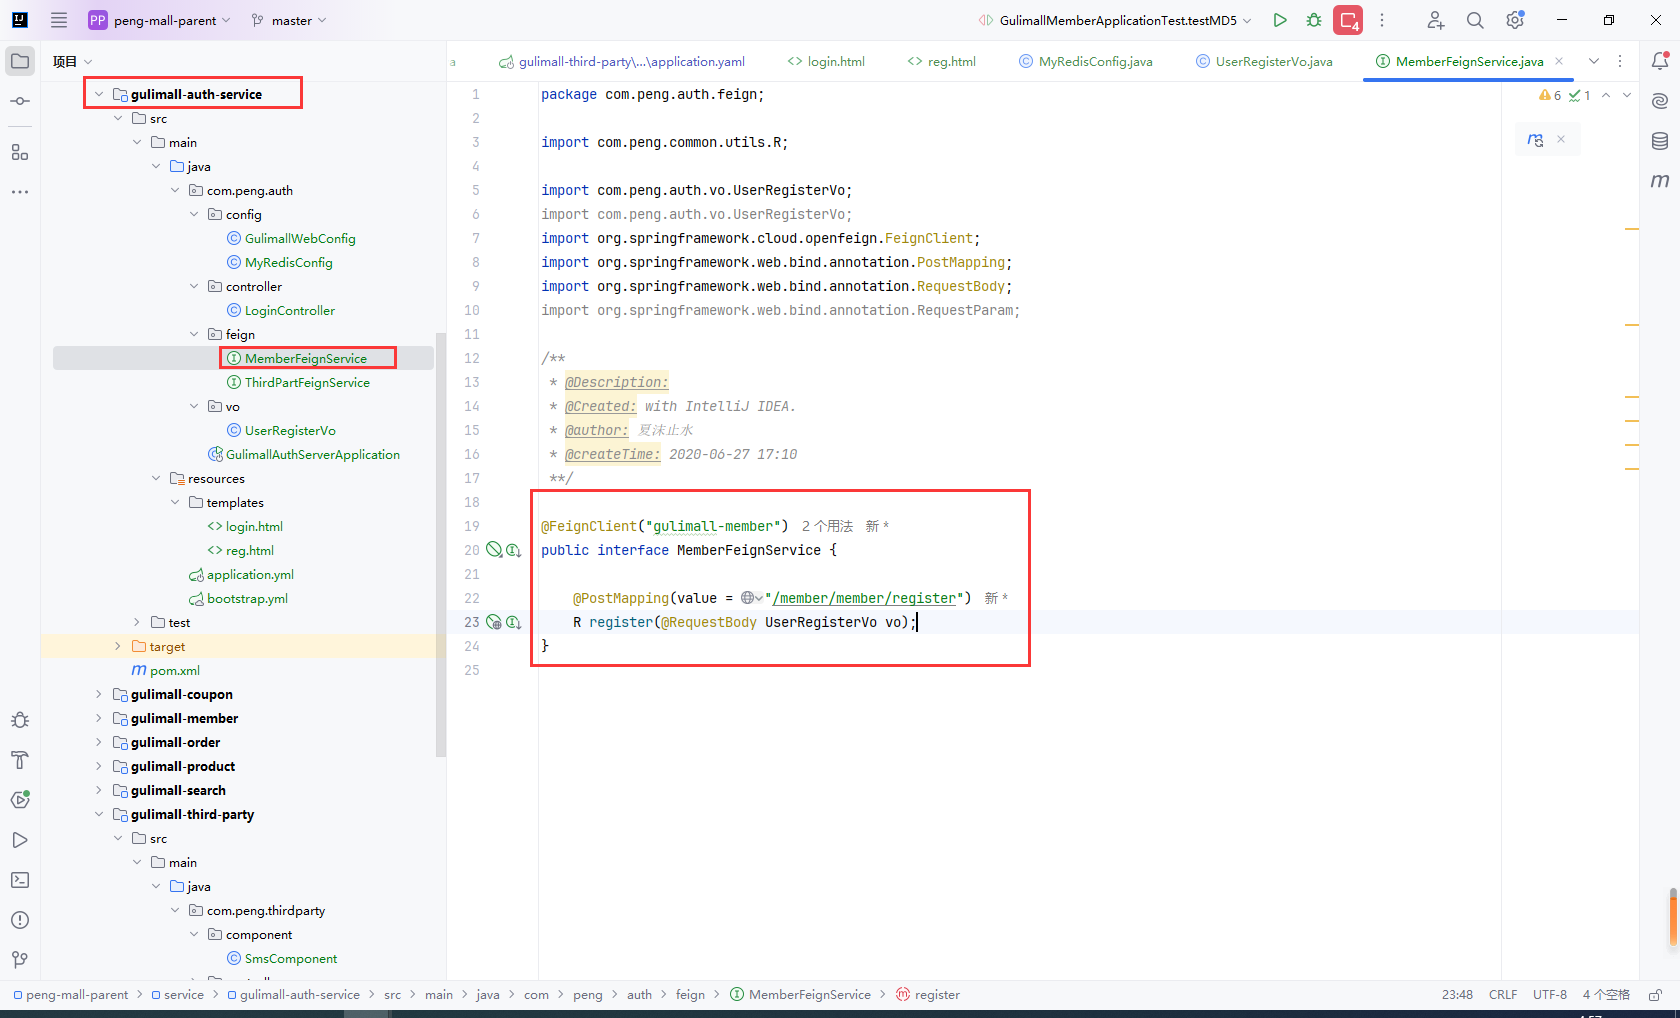
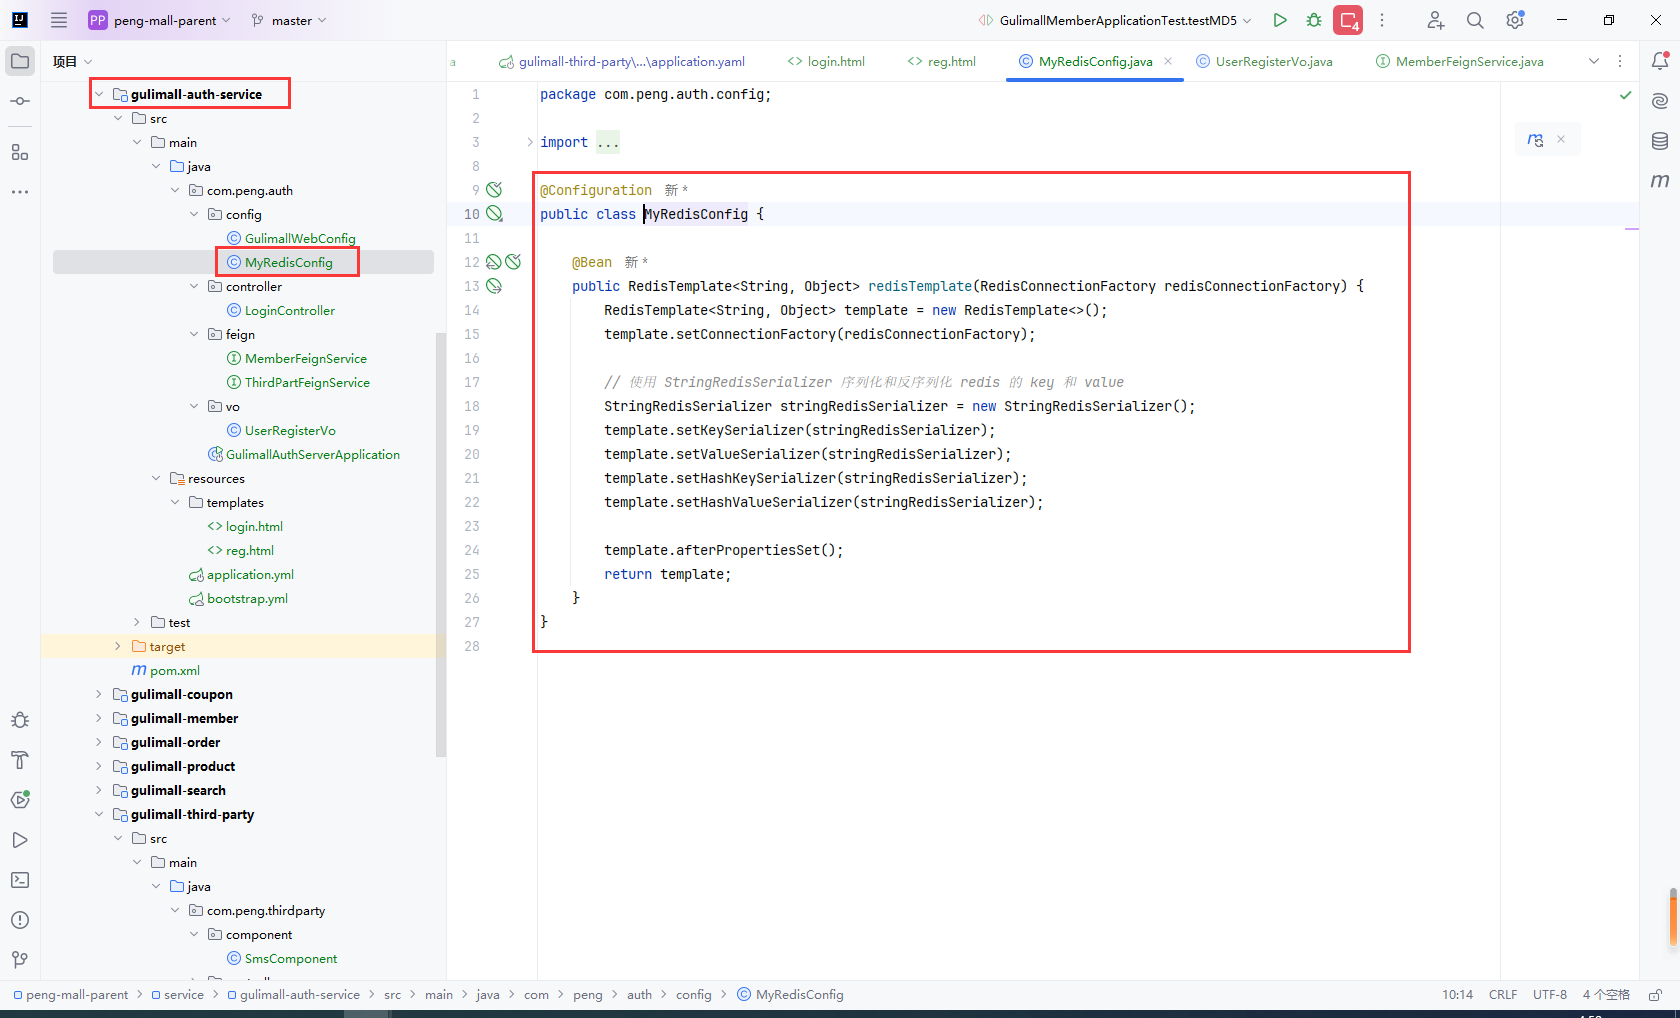
gulimall-auth-service添加Redis的json序列化配置
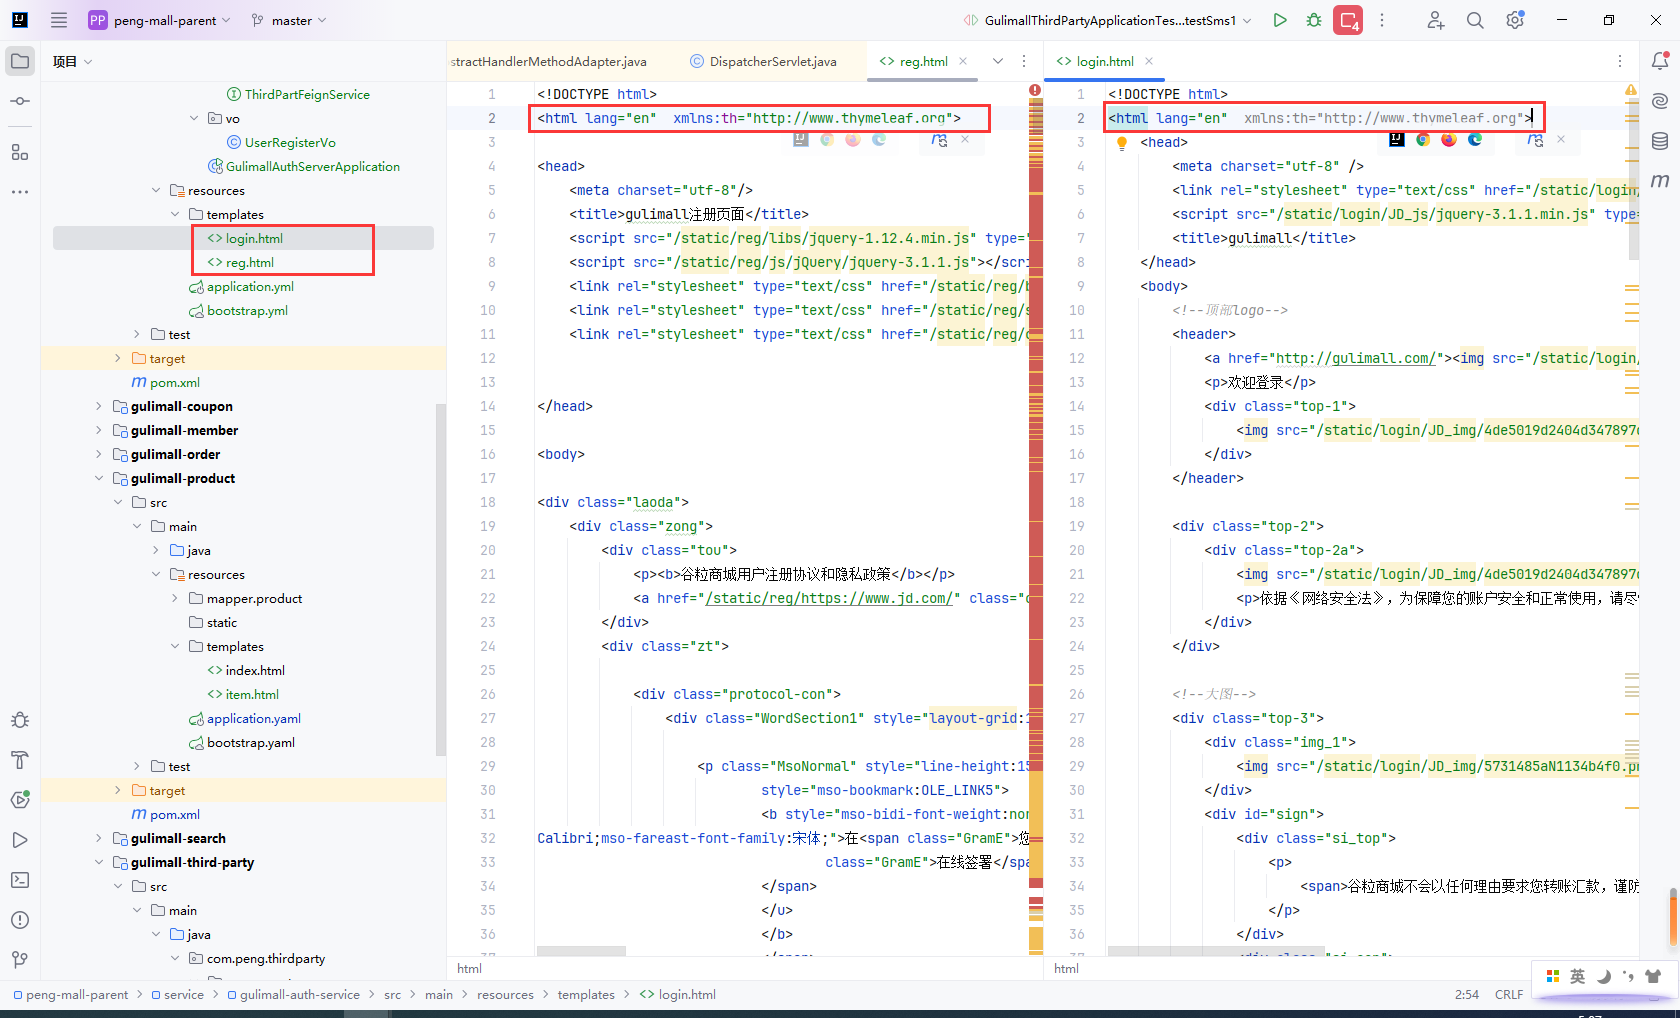
gulimall-auth-service/login.html和gulimall-auth-service/reg.html添加thymeleaf命名空间
<html lang="en" xmlns:th="http://www.thymeleaf.org">
SmsSendController需要@RestController而不是@Controller
否则会报Error resolving template [sms/sendCode], template might not exist or might not be accessible by any of the configured Template Resolvers
9.9账号密码登录完成
主要步骤:
- 1.登录页面添加
form表单提交登录信息 - 2.
gulimall-member添加登录接口 - 3.
gulimall-auth-service远程调用登录接口,并完善登录功能
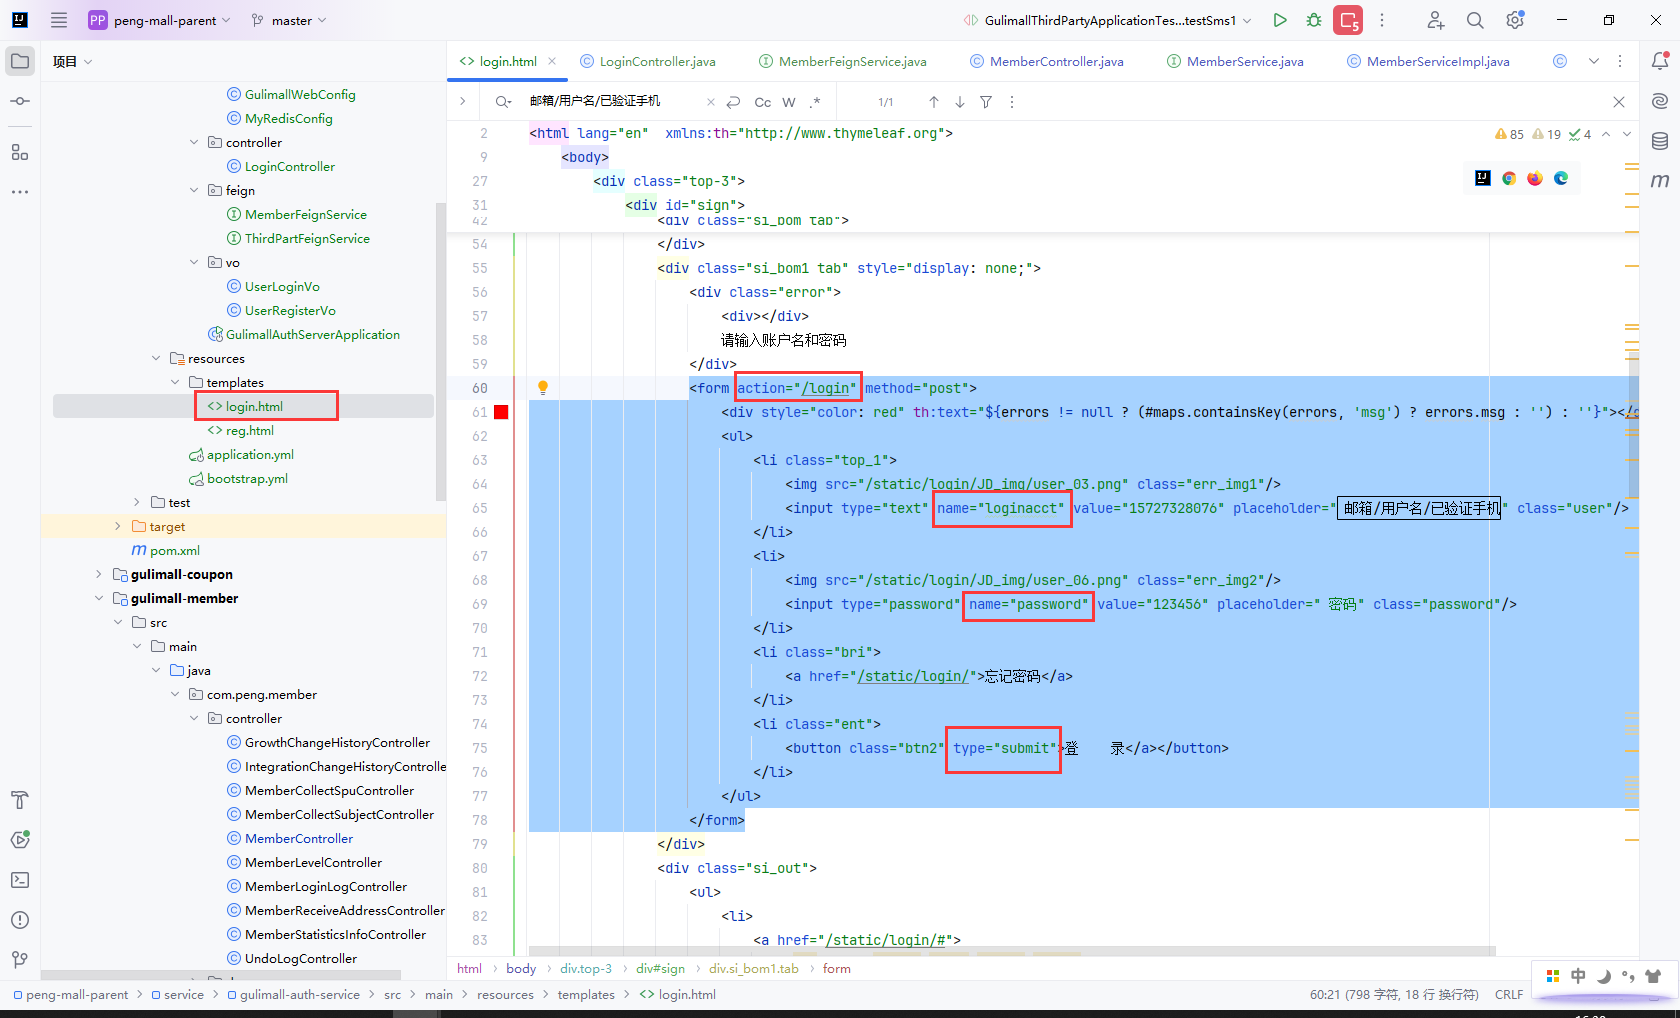
登录页面添加form表单提交登录信息
<form action="/login" method="post">
<div style="color: red" th:text="${errors != null ? (#maps.containsKey(errors, 'msg') ? errors.msg : '') : ''}"></div>
<ul>
<li class="top_1">
<img src="/static/login/JD_img/user_03.png" class="err_img1"/>
<input type="text" name="loginacct" value="15727328076" placeholder=" 邮箱/用户名/已验证手机" class="user"/>
</li>
<li>
<img src="/static/login/JD_img/user_06.png" class="err_img2"/>
<input type="password" name="password" value="123456" placeholder=" 密码" class="password"/>
</li>
<li class="bri">
<a href="/static/login/">忘记密码</a>
</li>
<li class="ent">
<button class="btn2" type="submit">登 录</a></button>
</li>
</ul>
</form>
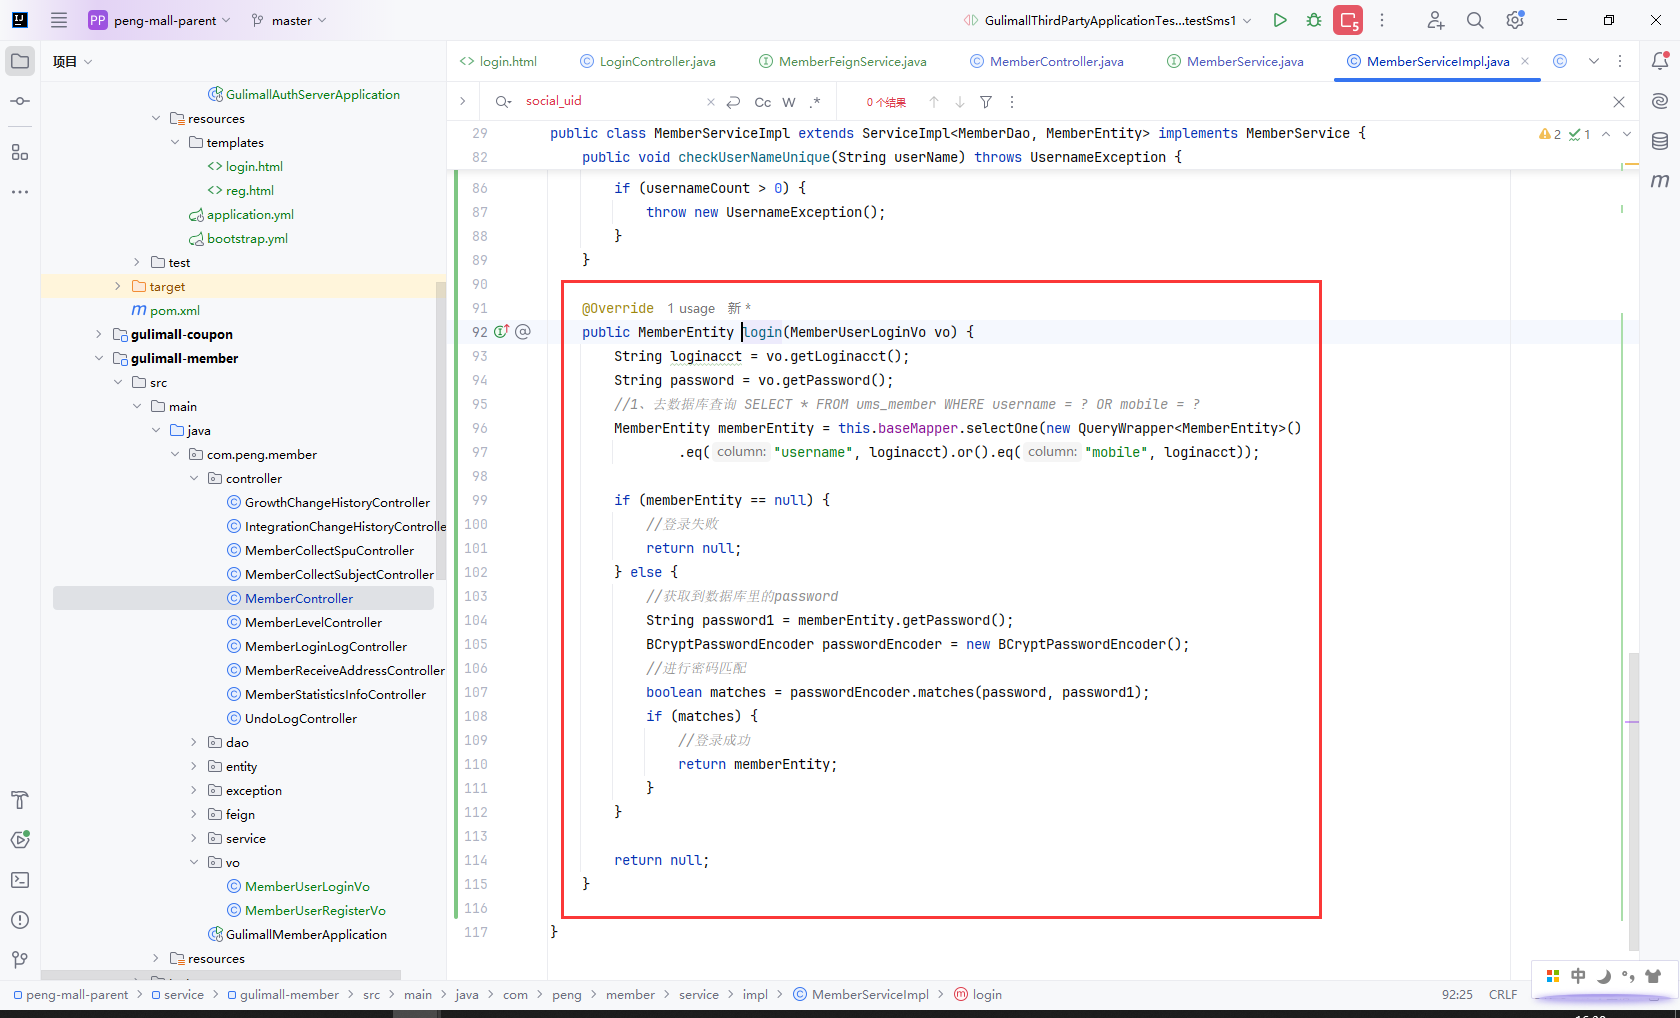
gulimall-member添加登录接口
@Override
public MemberEntity login(MemberUserLoginVo vo) {
    String loginacct = vo.getLoginacct();
    String password = vo.getPassword();
    //1、去数据库查询 SELECT * FROM ums_member WHERE username = ? OR mobile = ?
    MemberEntity memberEntity = this.baseMapper.selectOne(new QueryWrapper<MemberEntity>()
            .eq("username", loginacct).or().eq("mobile", loginacct));

    if (memberEntity == null) {
        //登录失败
        return null;
    } else {
        //获取到数据库里的password
        String password1 = memberEntity.getPassword();
        BCryptPasswordEncoder passwordEncoder = new BCryptPasswordEncoder();
        //进行密码匹配
        boolean matches = passwordEncoder.matches(password, password1);
        if (matches) {
            //登录成功
            return memberEntity;
        }
    }

    return null;
}
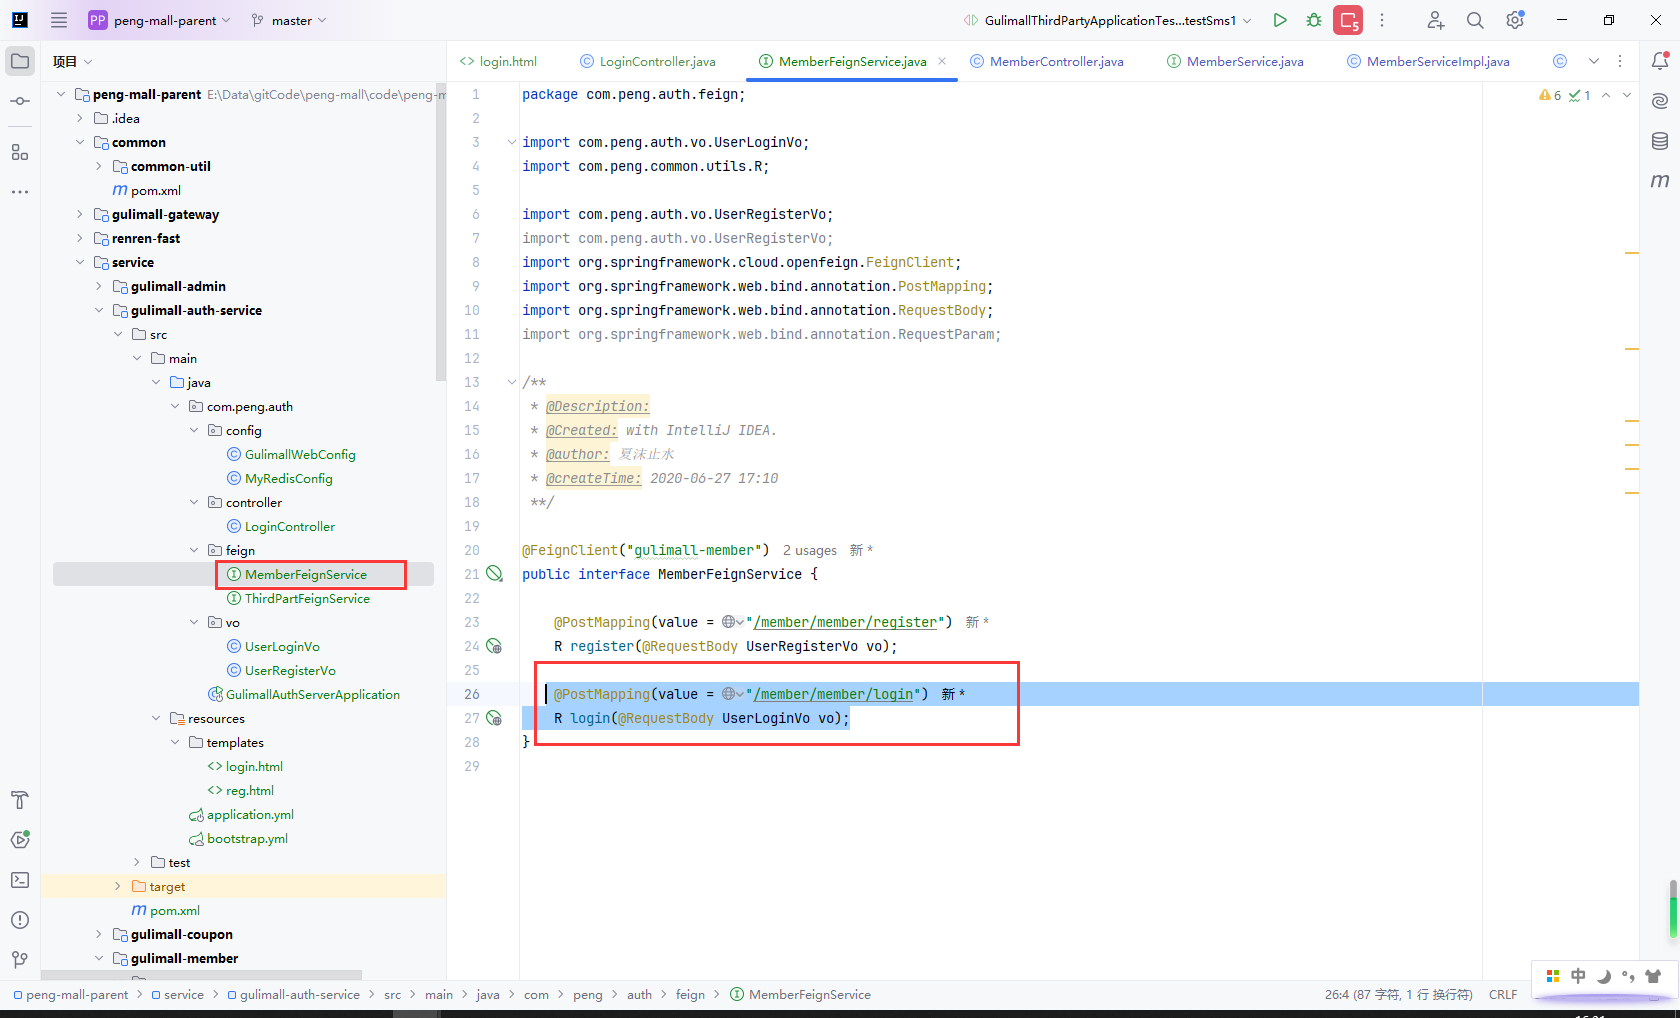
gulimall-auth-service远程调用登录接口
@PostMapping(value = "/member/member/login")
R login(@RequestBody UserLoginVo vo);
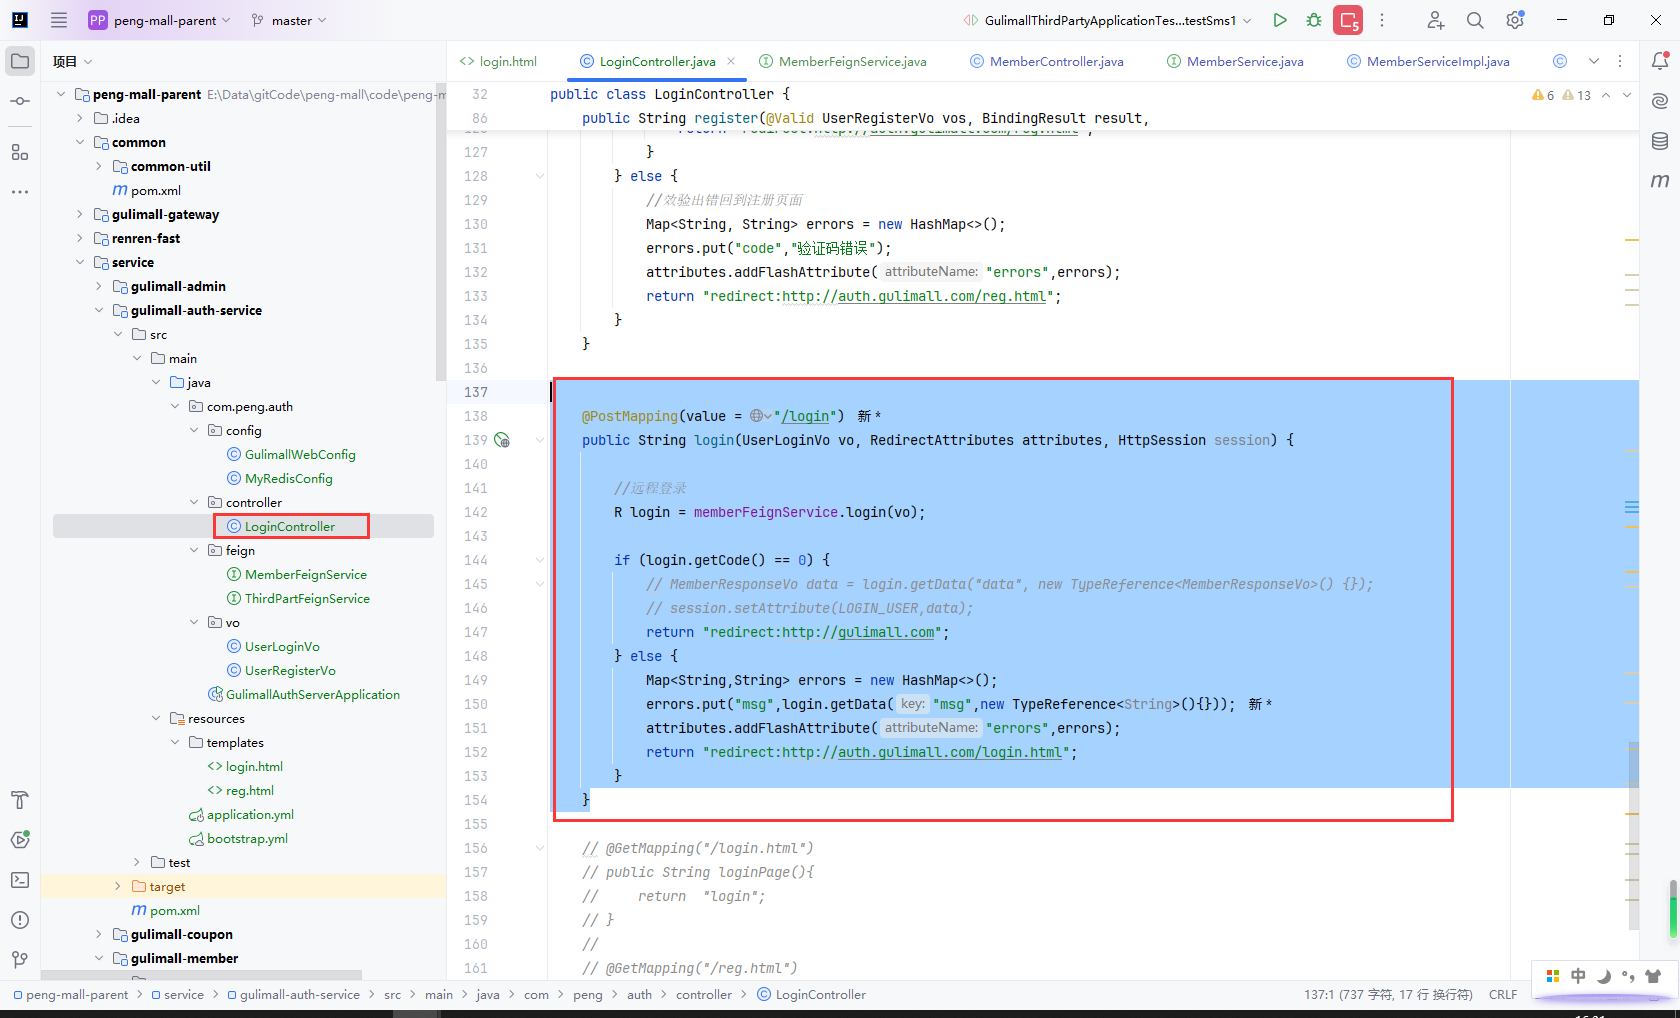
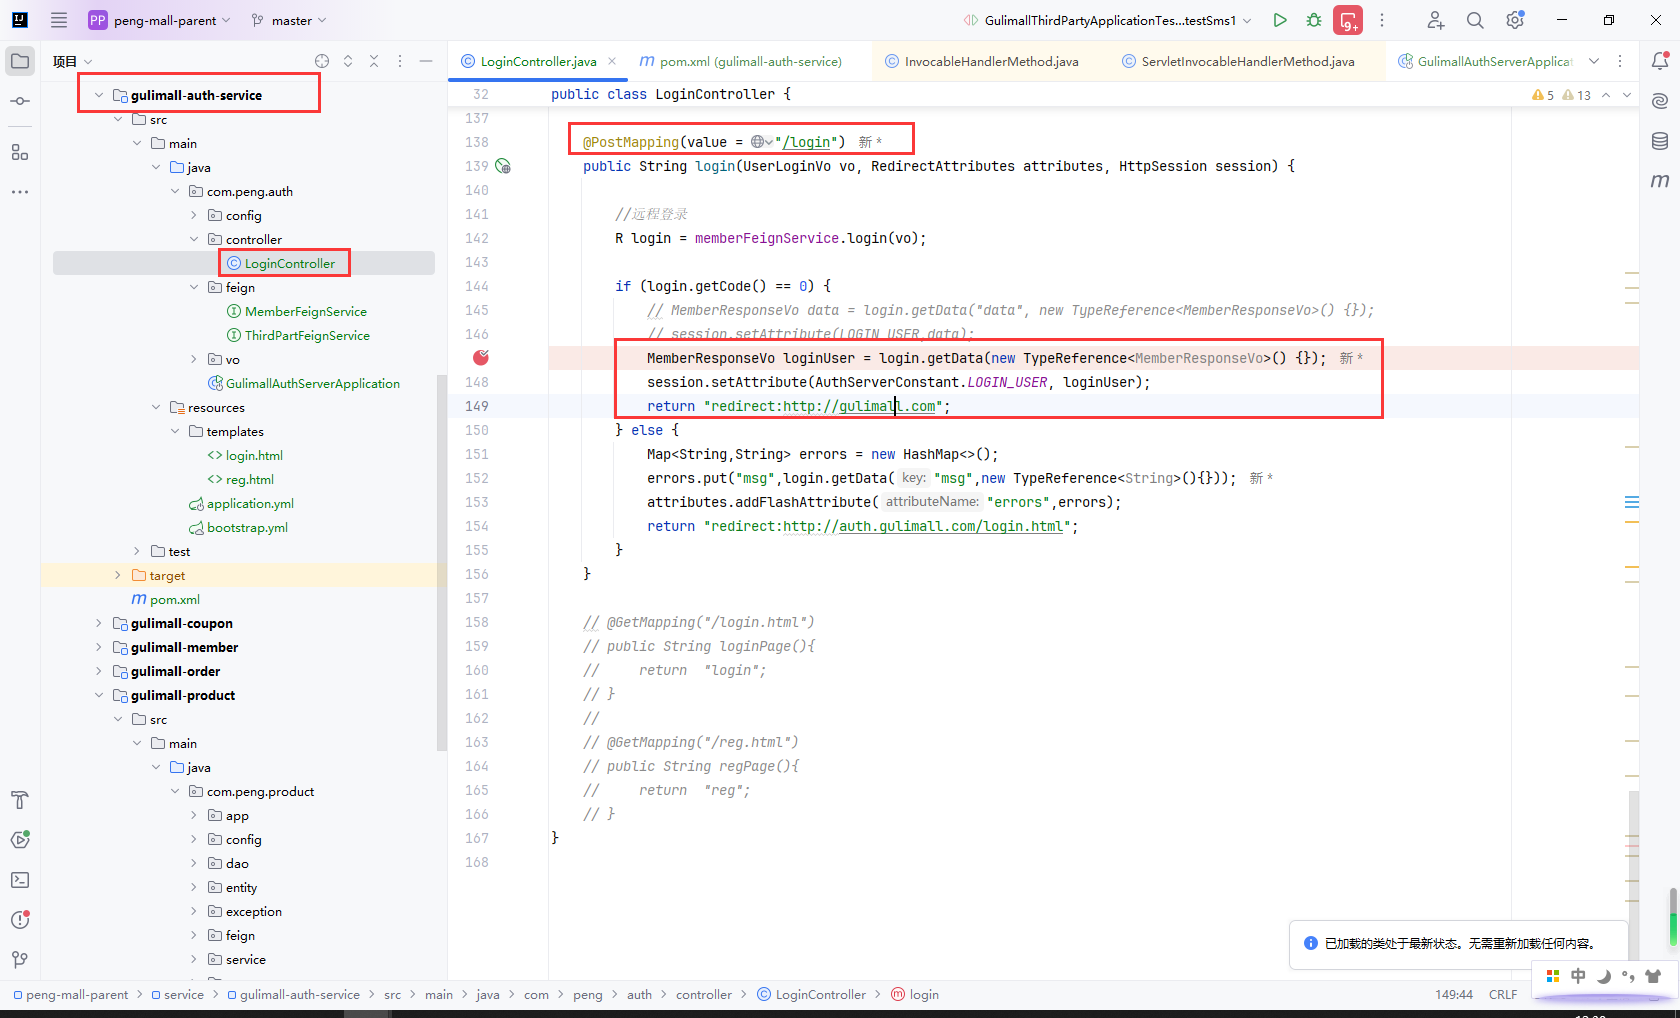
gulimall-auth-service完善登录功能
@PostMapping(value = "/login")
public String login(UserLoginVo vo, RedirectAttributes attributes, HttpSession session) {

    //远程登录
    R login = memberFeignService.login(vo);

    if (login.getCode() == 0) {
        return "redirect:http://gulimall.com";
    } else {
        Map<String,String> errors = new HashMap<>();
        errors.put("msg",login.getData("msg",new TypeReference<String>(){}));
        attributes.addFlashAttribute("errors",errors);
        return "redirect:http://auth.gulimall.com/login.html";
    }
}
注释MemberEntity以下字段

9.10OAuth2.0

9.11weibo登录测试
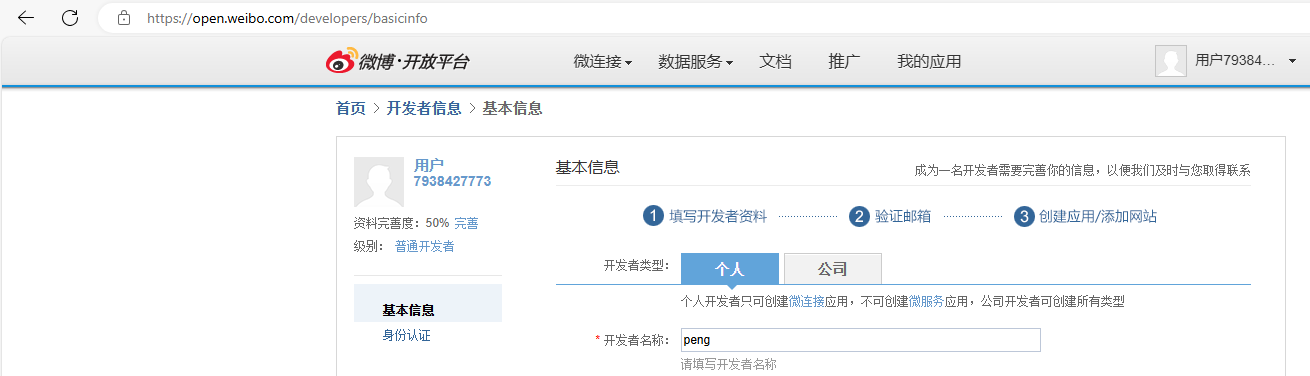
- 登录weibo,打开微博开发平台
- 开发者信息,需要输入基本信息和身份验证
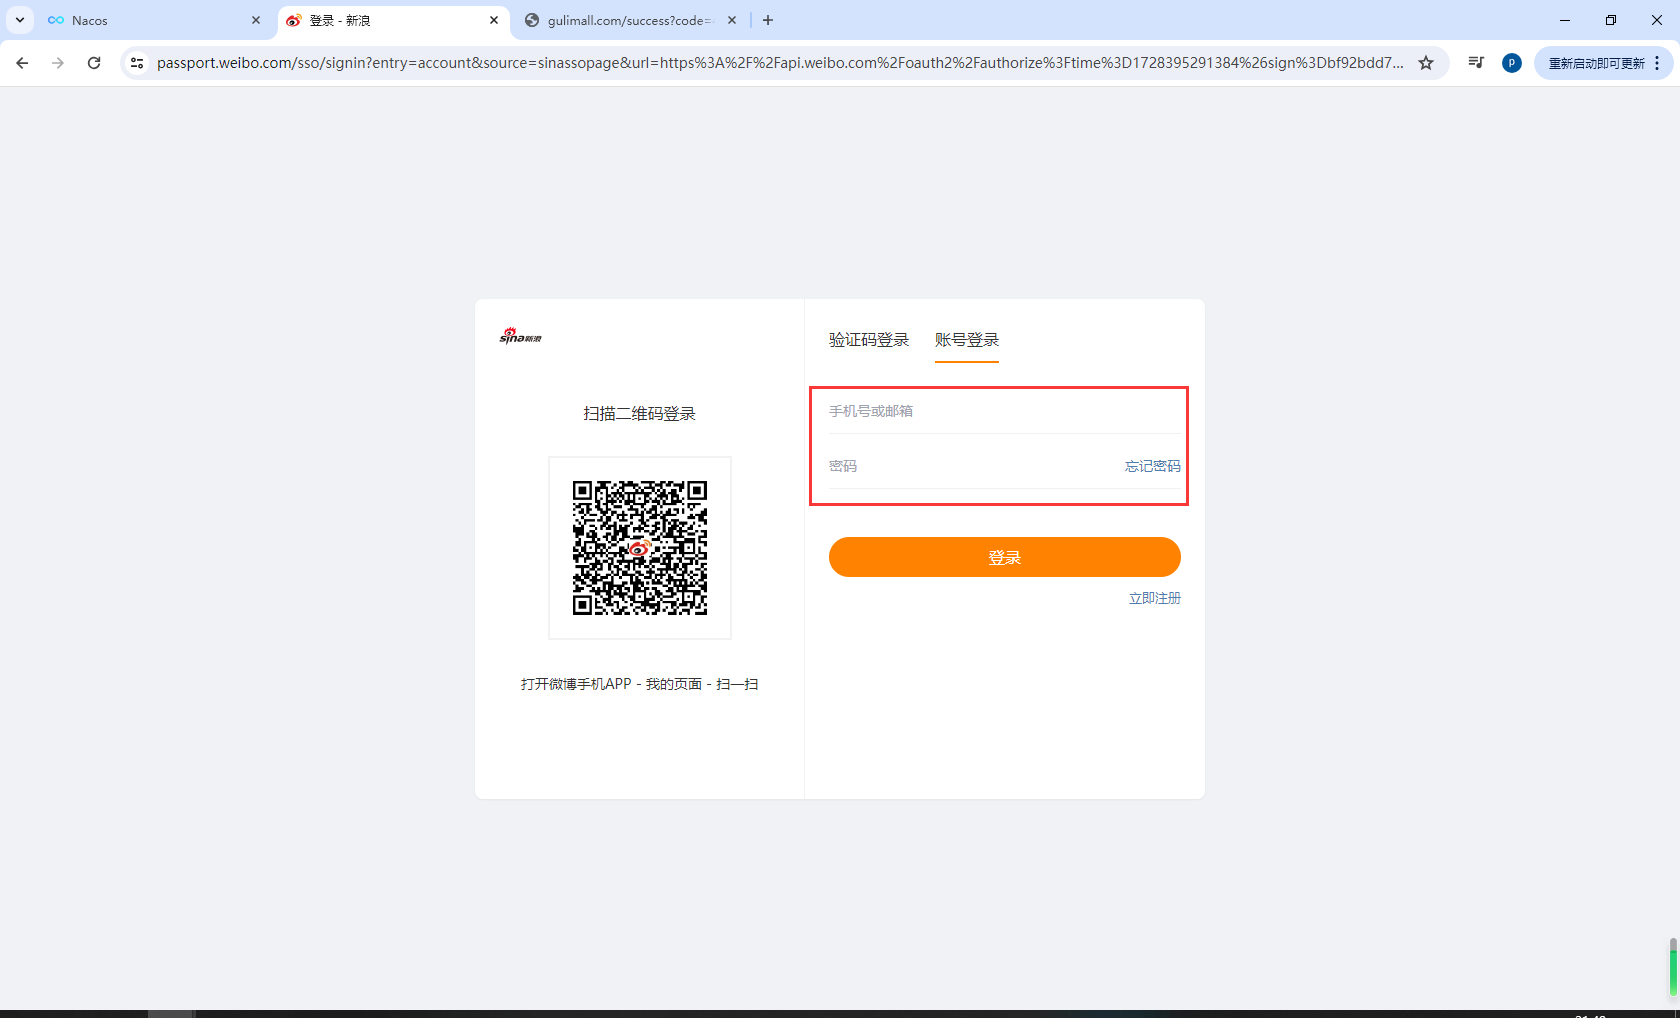
- 进入weibo授权页面
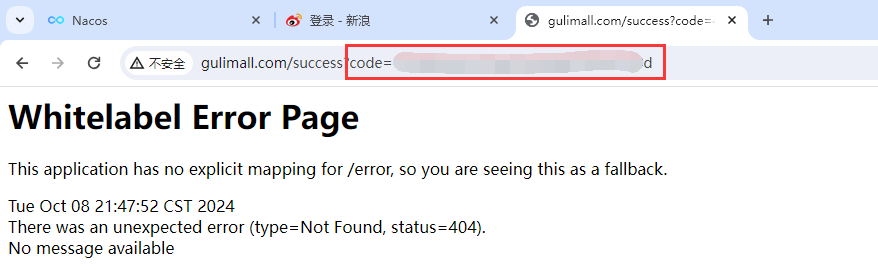
- 用户登录weibo成功获取code
- 使用code获取access_token,
- 使用code获取access_token只能用一次
- 同一个用户的access_token一段时间是不会变化的,即使获取多次
首先注册微博账号,申请开发者权限
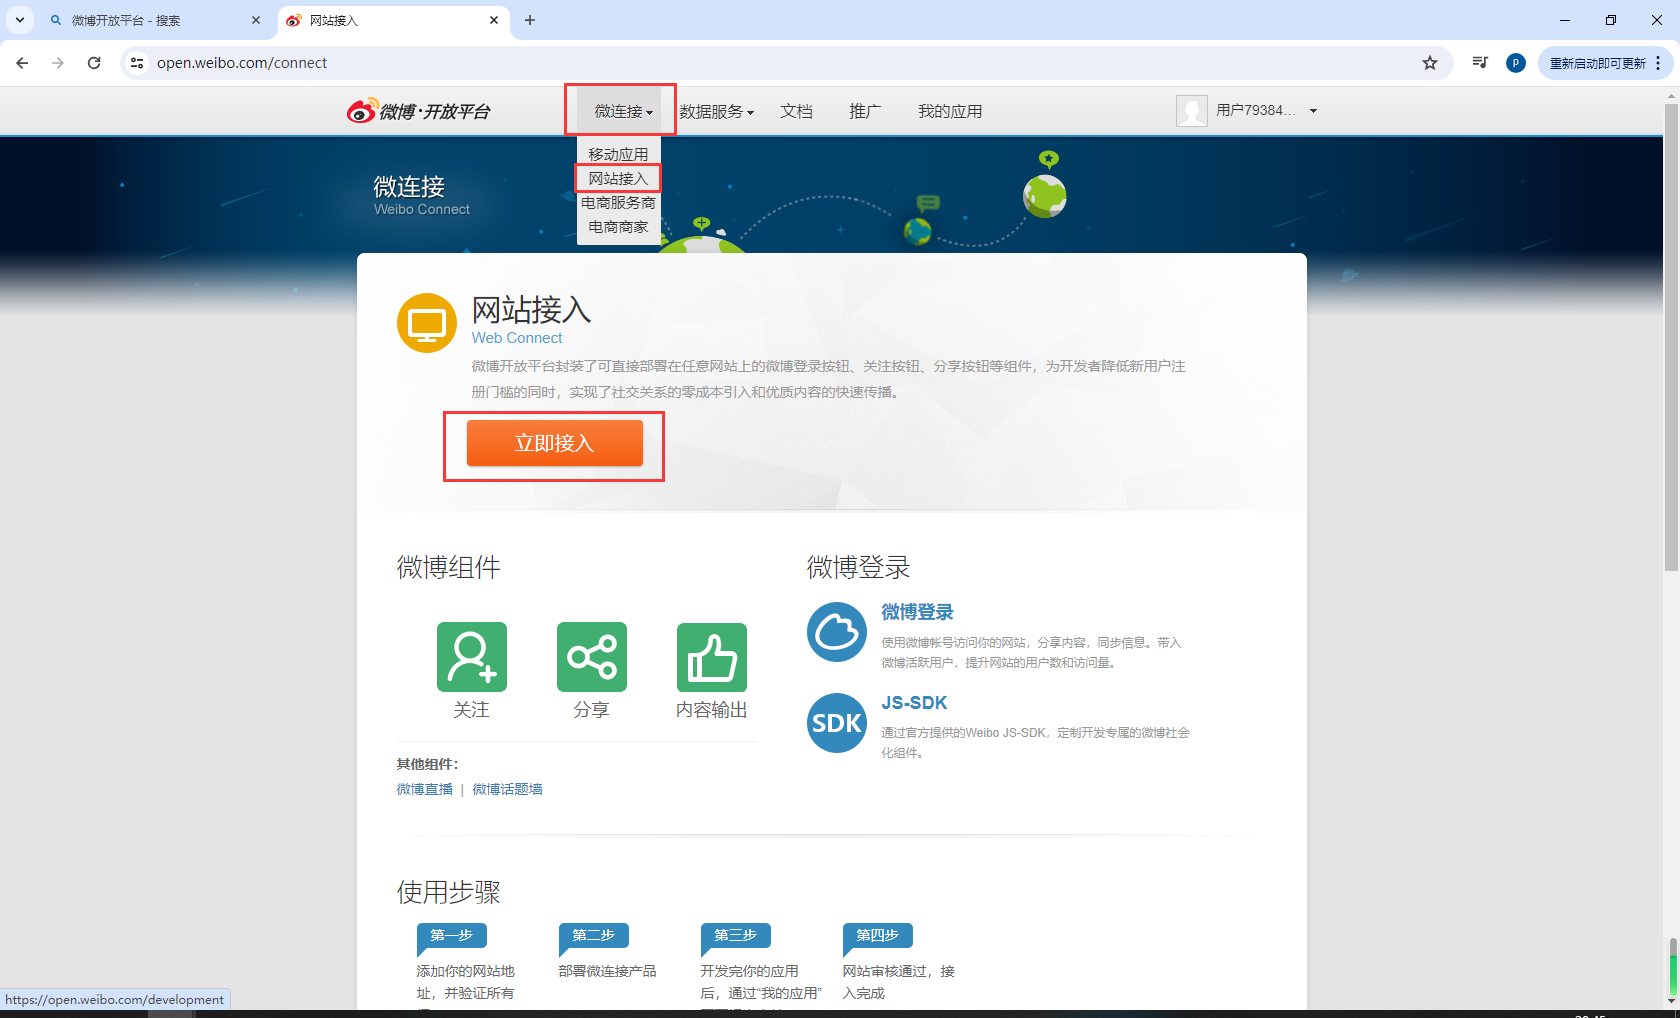
9.11.1网站接入
登录微博开发平台:https://open.weibo.com/,选择微连接,选择网站接入,选择立即接入
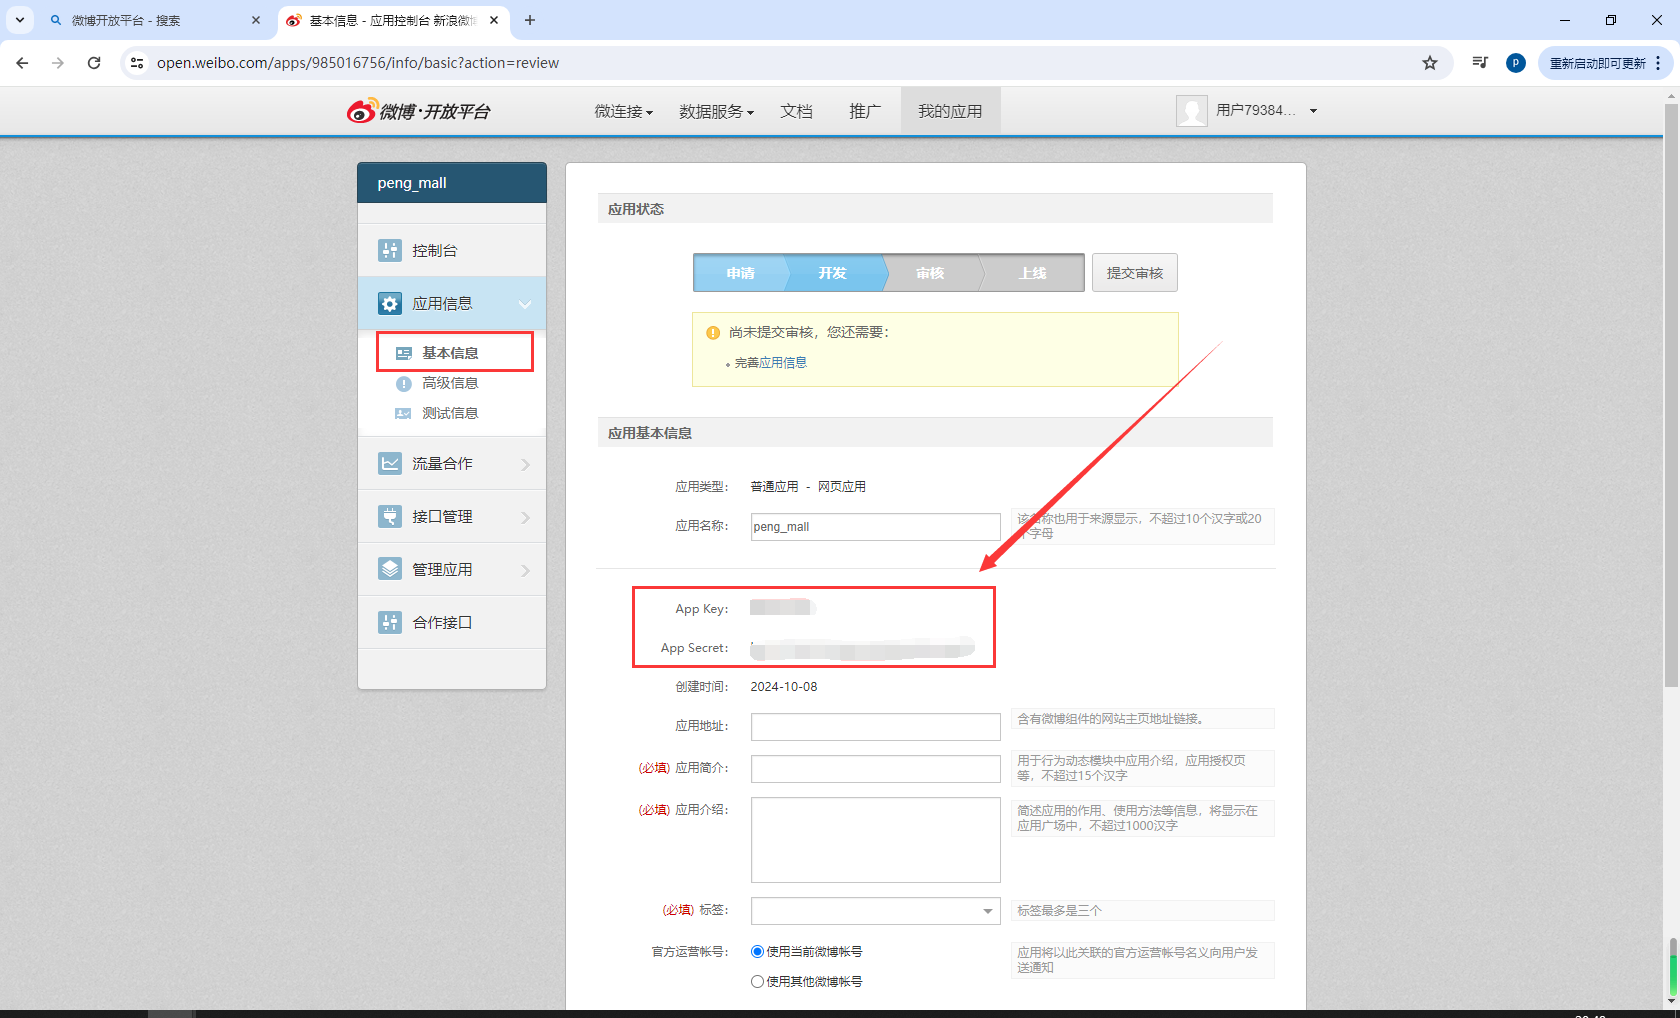
创建网页应用
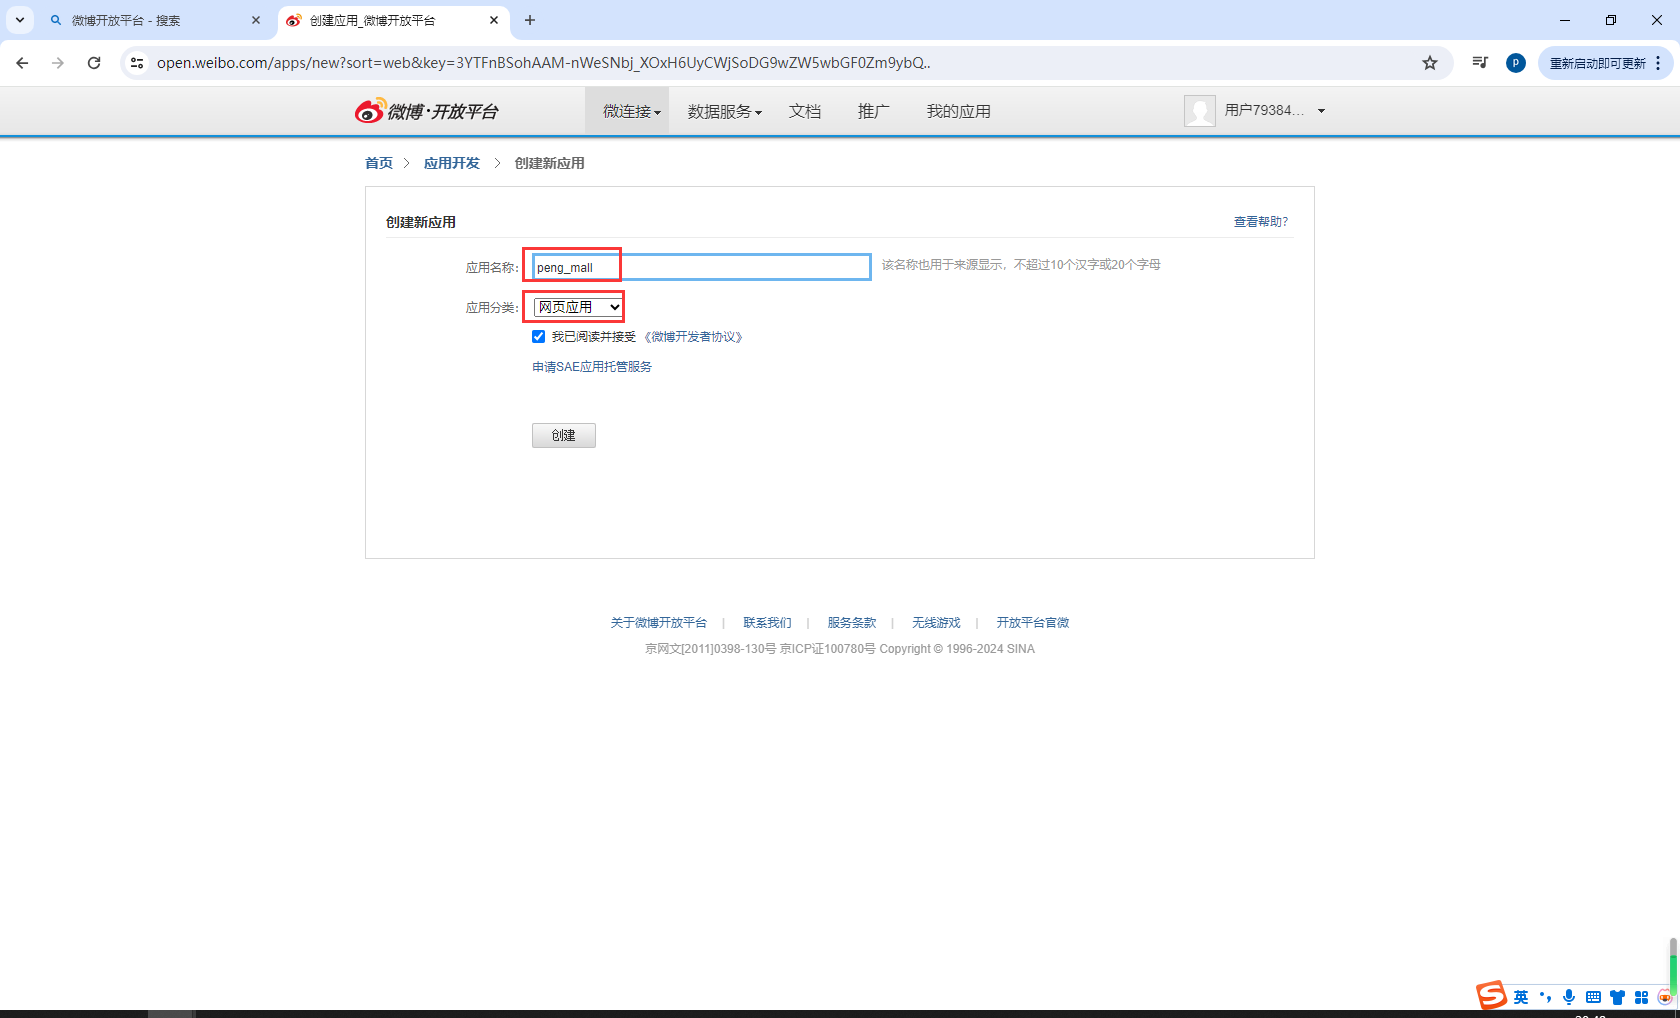
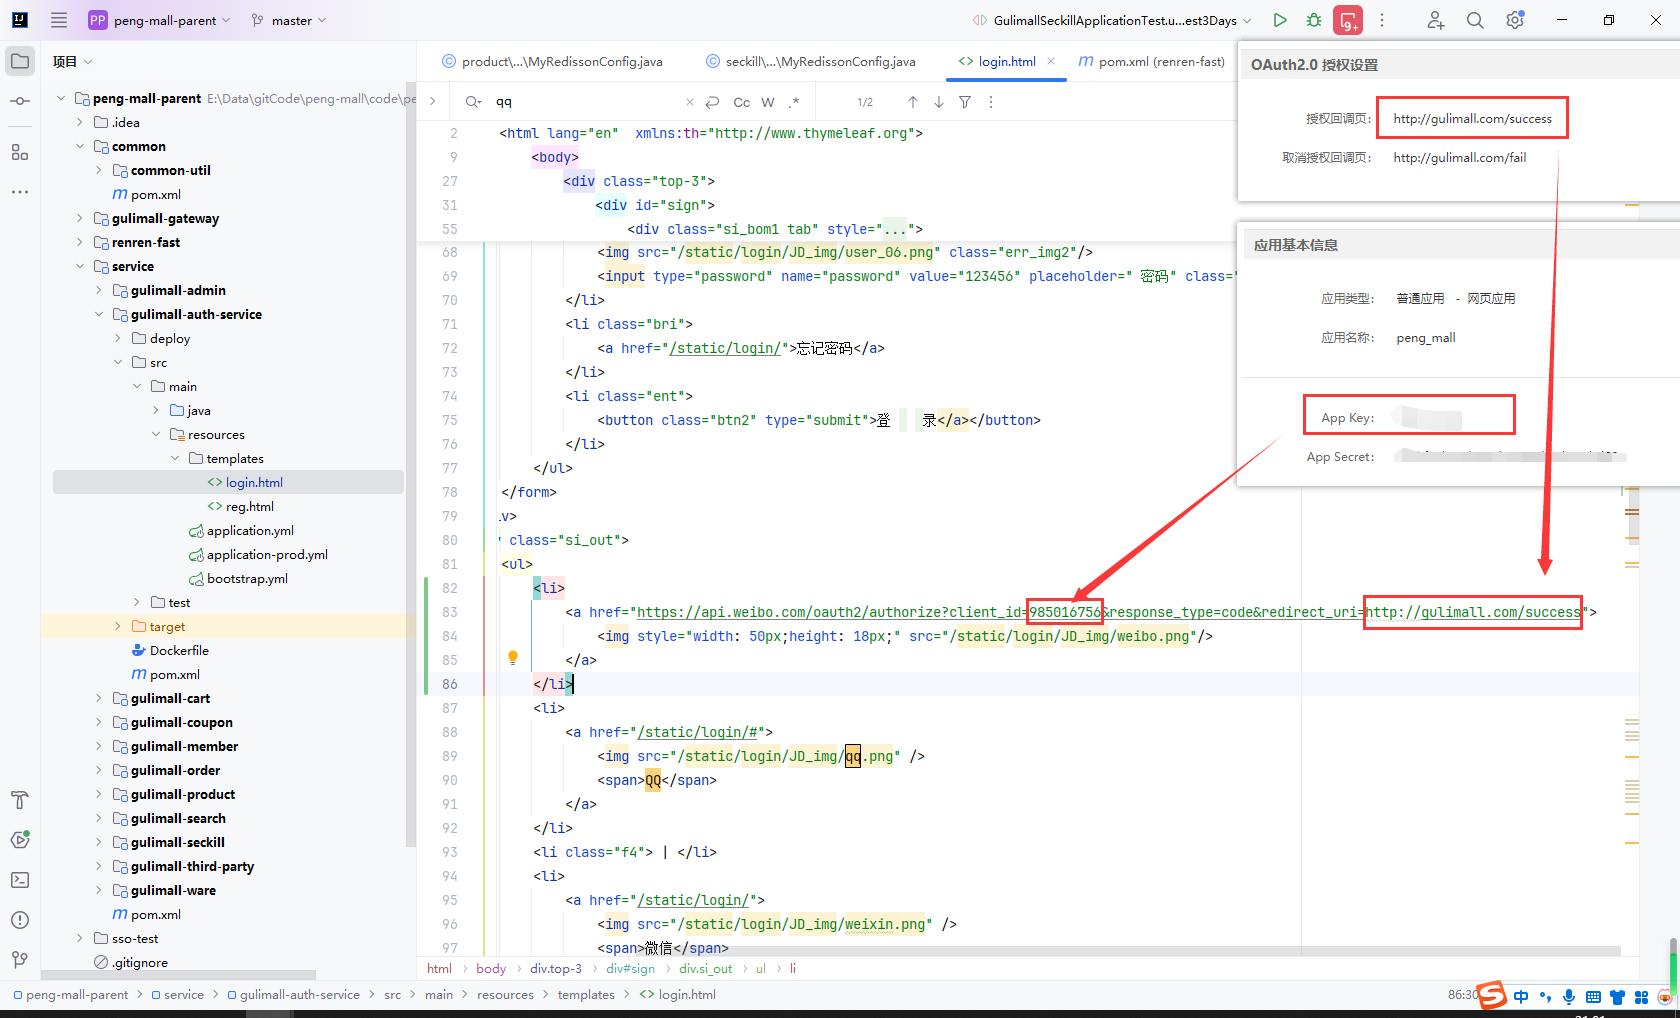
这里的App Key,App Secret
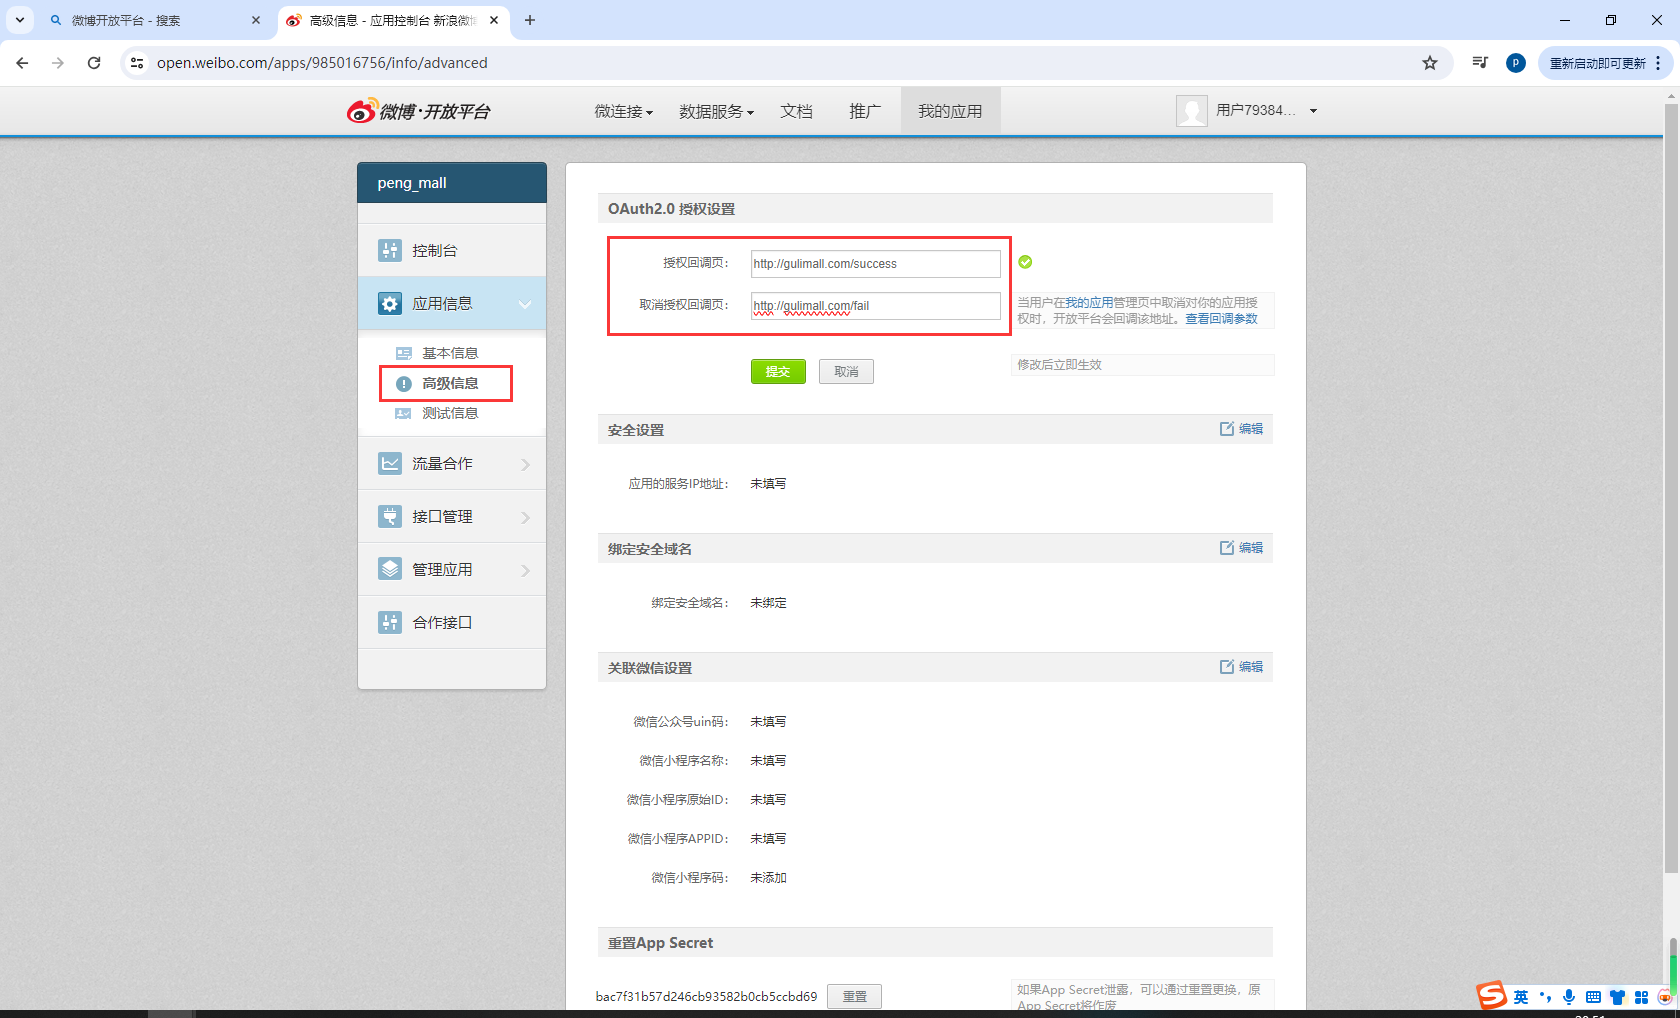
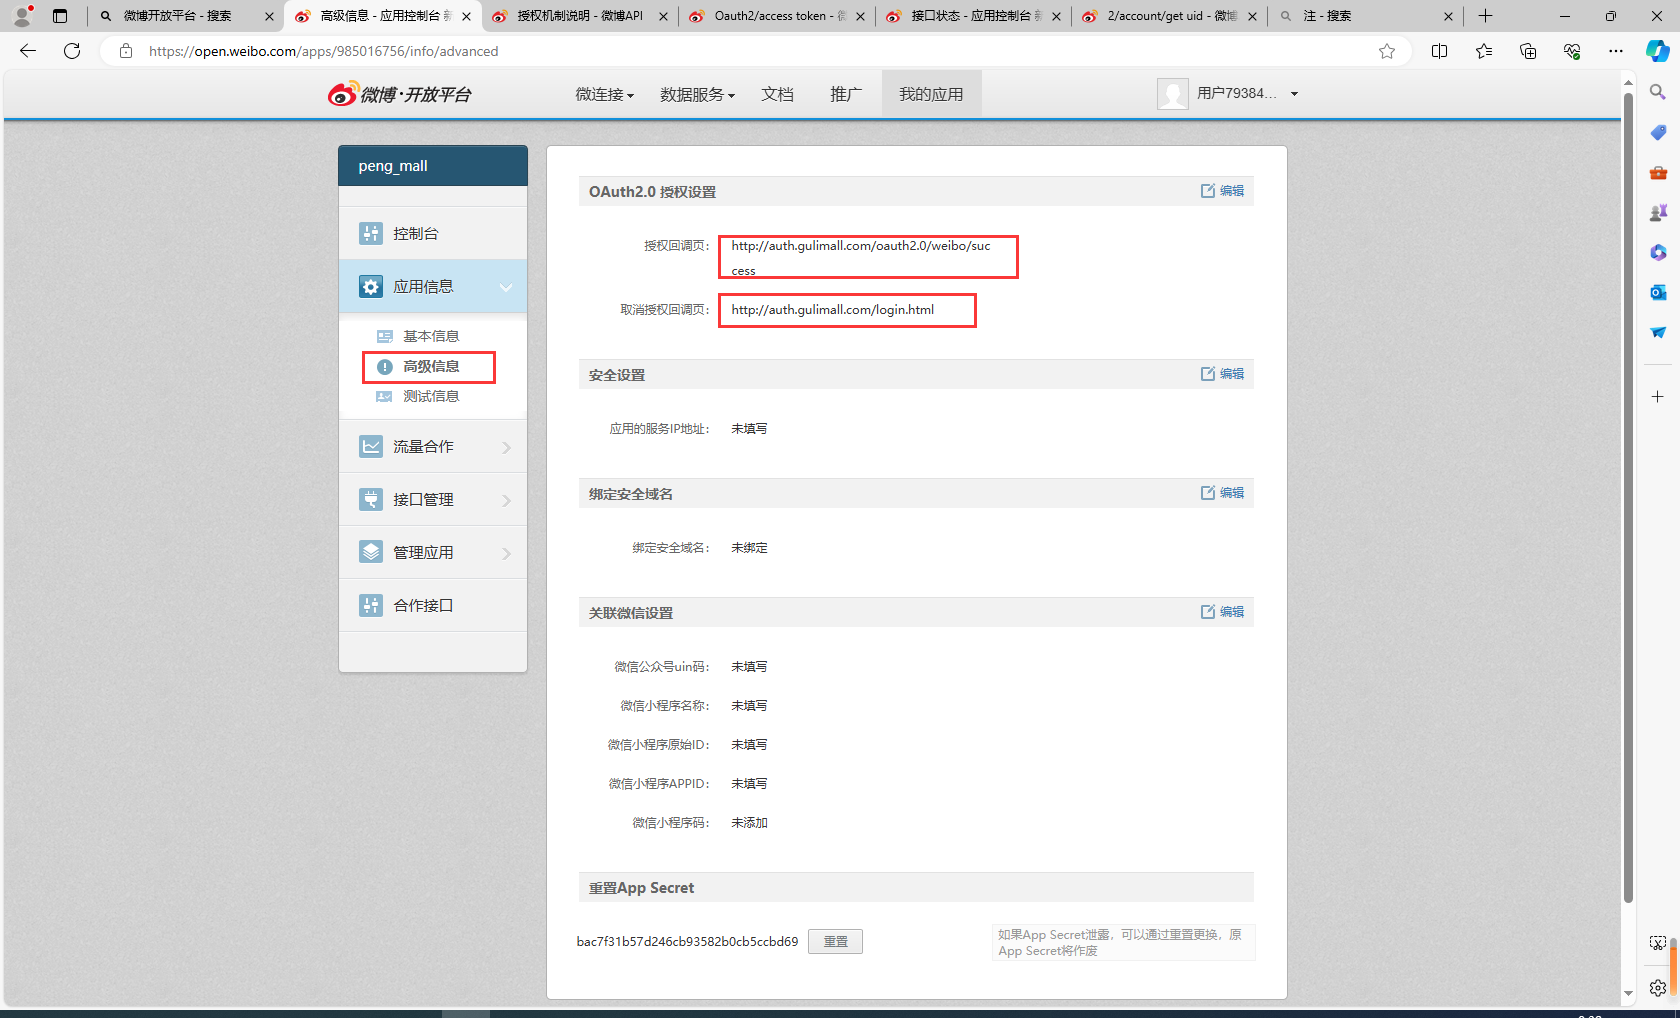
在高级信息里配置登录成功回调和登录失败回调
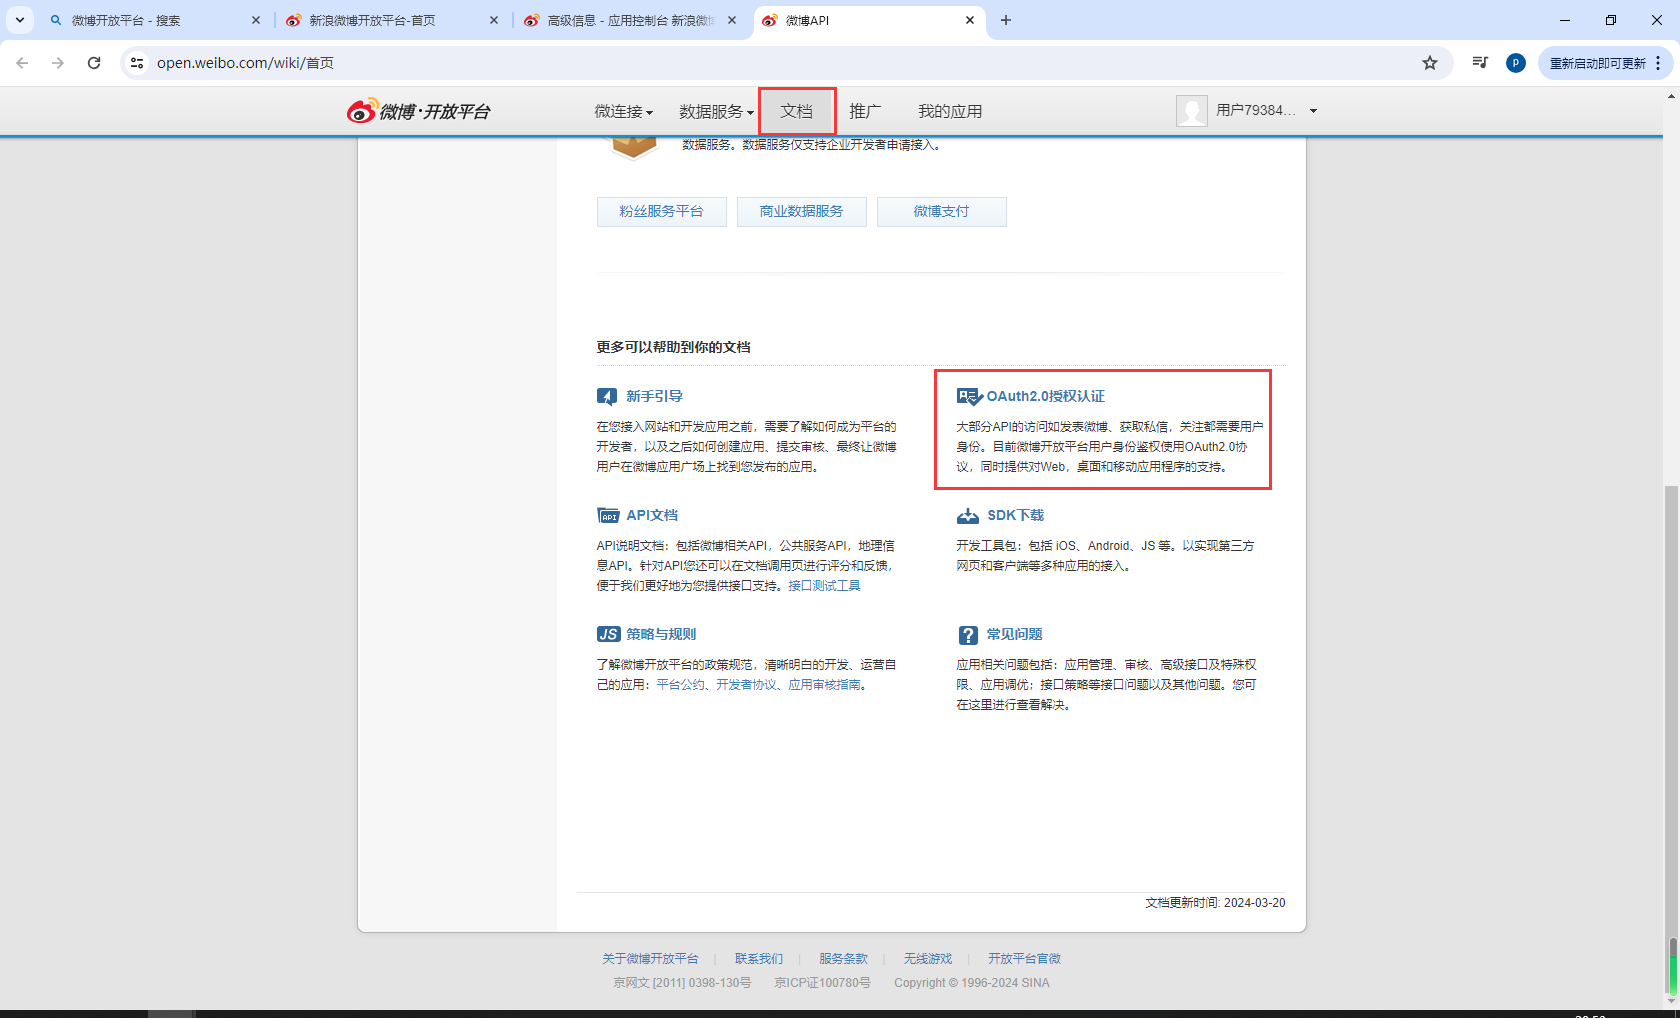
选择文档,滑动到网页最下面,查看OAuth2.0授权认证
Web网站的授权
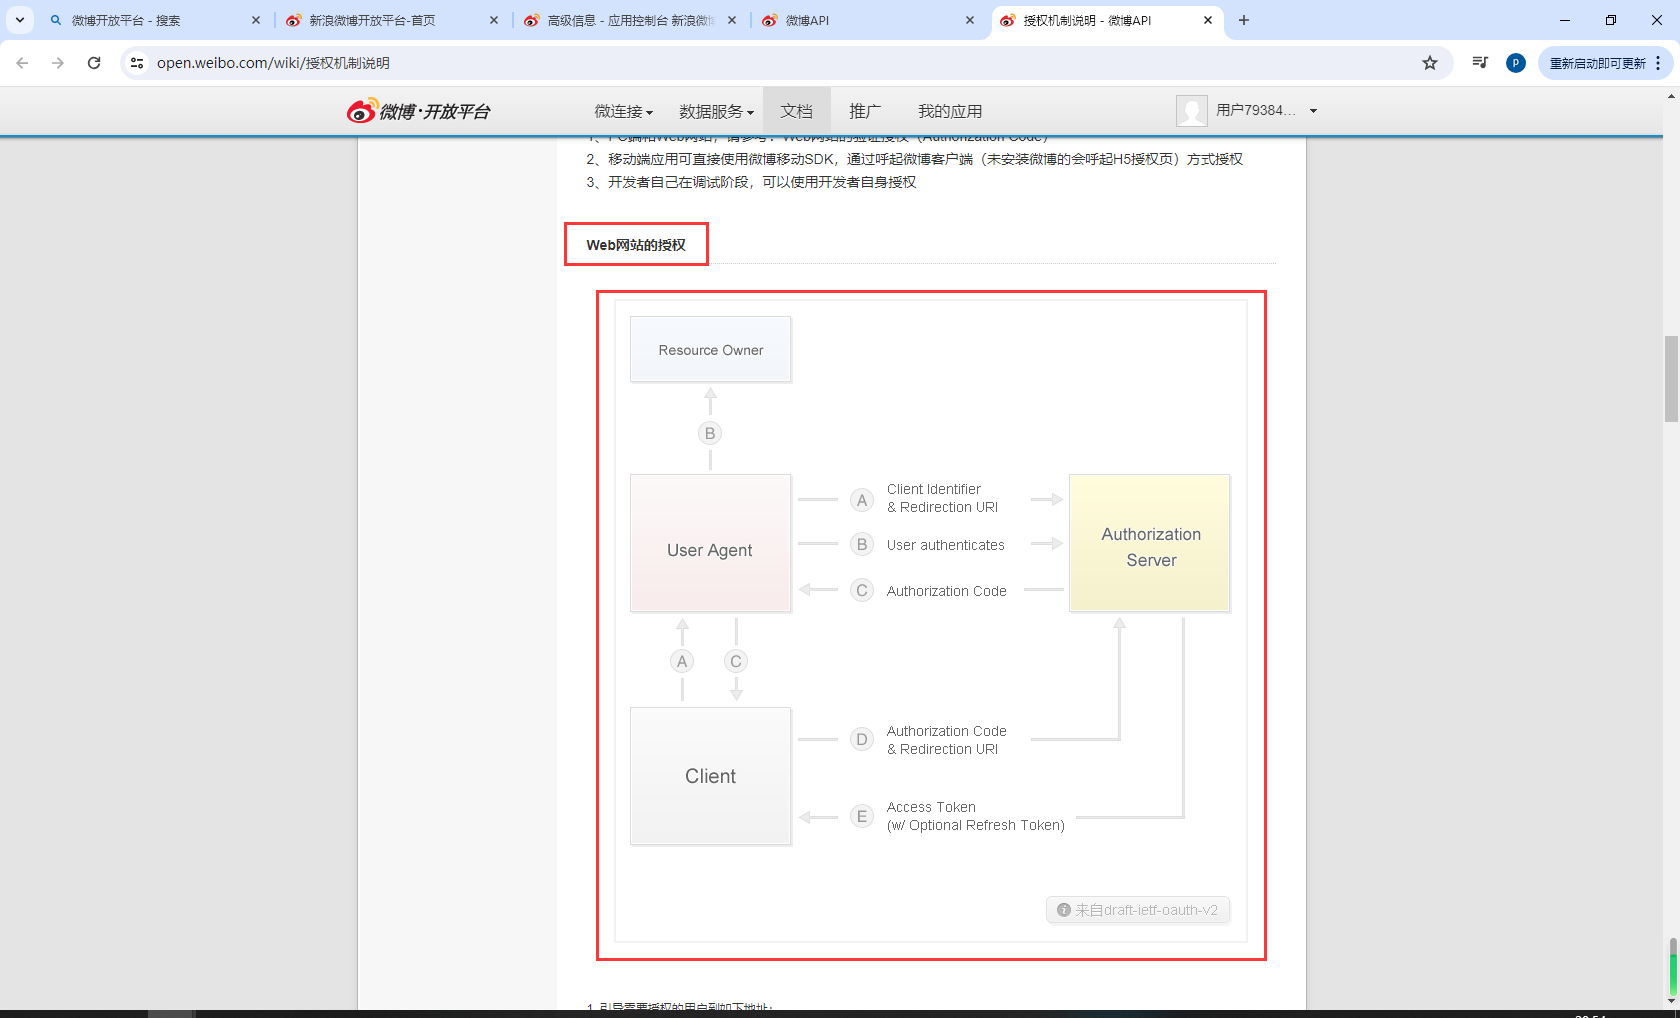
总共4步
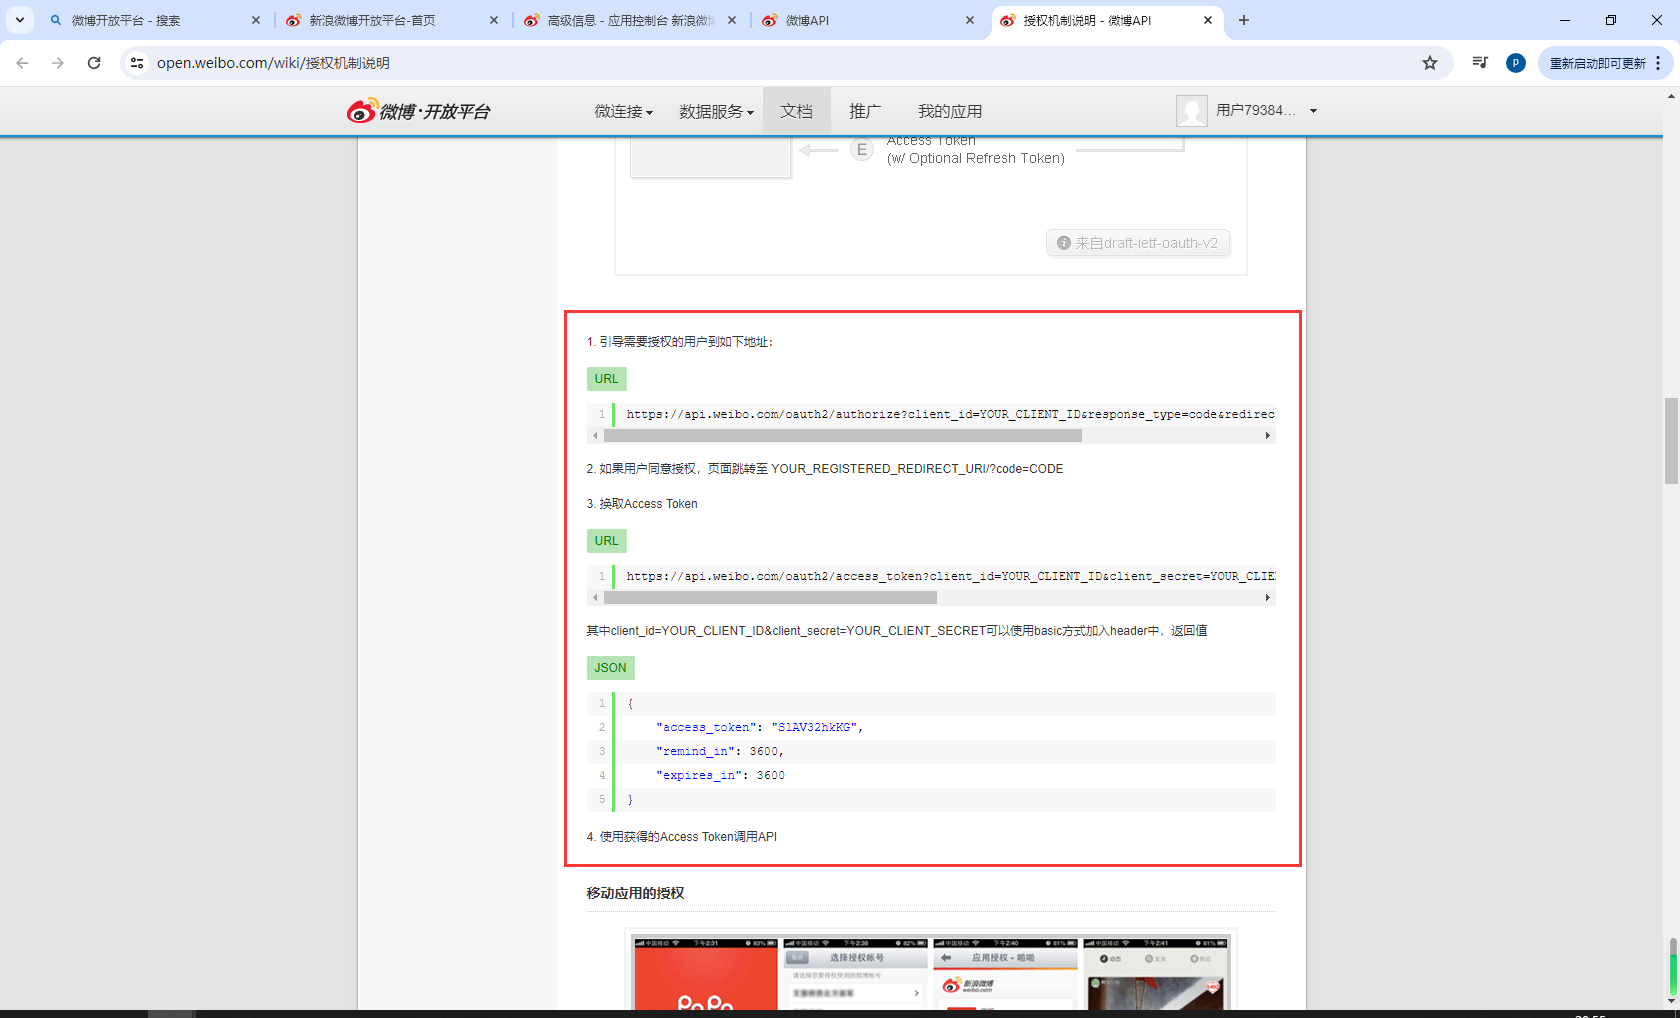
9.11.1登录测试
引导需要授权的用户到如下地址:
https://api.weibo.com/oauth2/authorize?client_id=YOUR_CLIENT_ID&response_type=code&redirect_uri=YOUR_REGISTERED_REDIRECT_URI
client_id就是你的App Key,redirect_uri就是你的授权回调页
<a href="https://api.weibo.com/oauth2/authorize?client_id=YOUR_CLIENT_ID&response_type=code&redirect_uri=http://gulimall.com/success">
								<img style="width: 50px;height: 18px;" src="/static/login/JD_img/weibo.png"/>
							</a>
用户进行登录授权
如果用户同意授权,页面跳转至 YOUR_REGISTERED_REDIRECT_URI/?code=CODE
登录成功后微博跳转到了http://gulimall.com/success,并带上了code
http://gulimall.com/success?code=598bb71e0ec19cba2369c78d16199eca
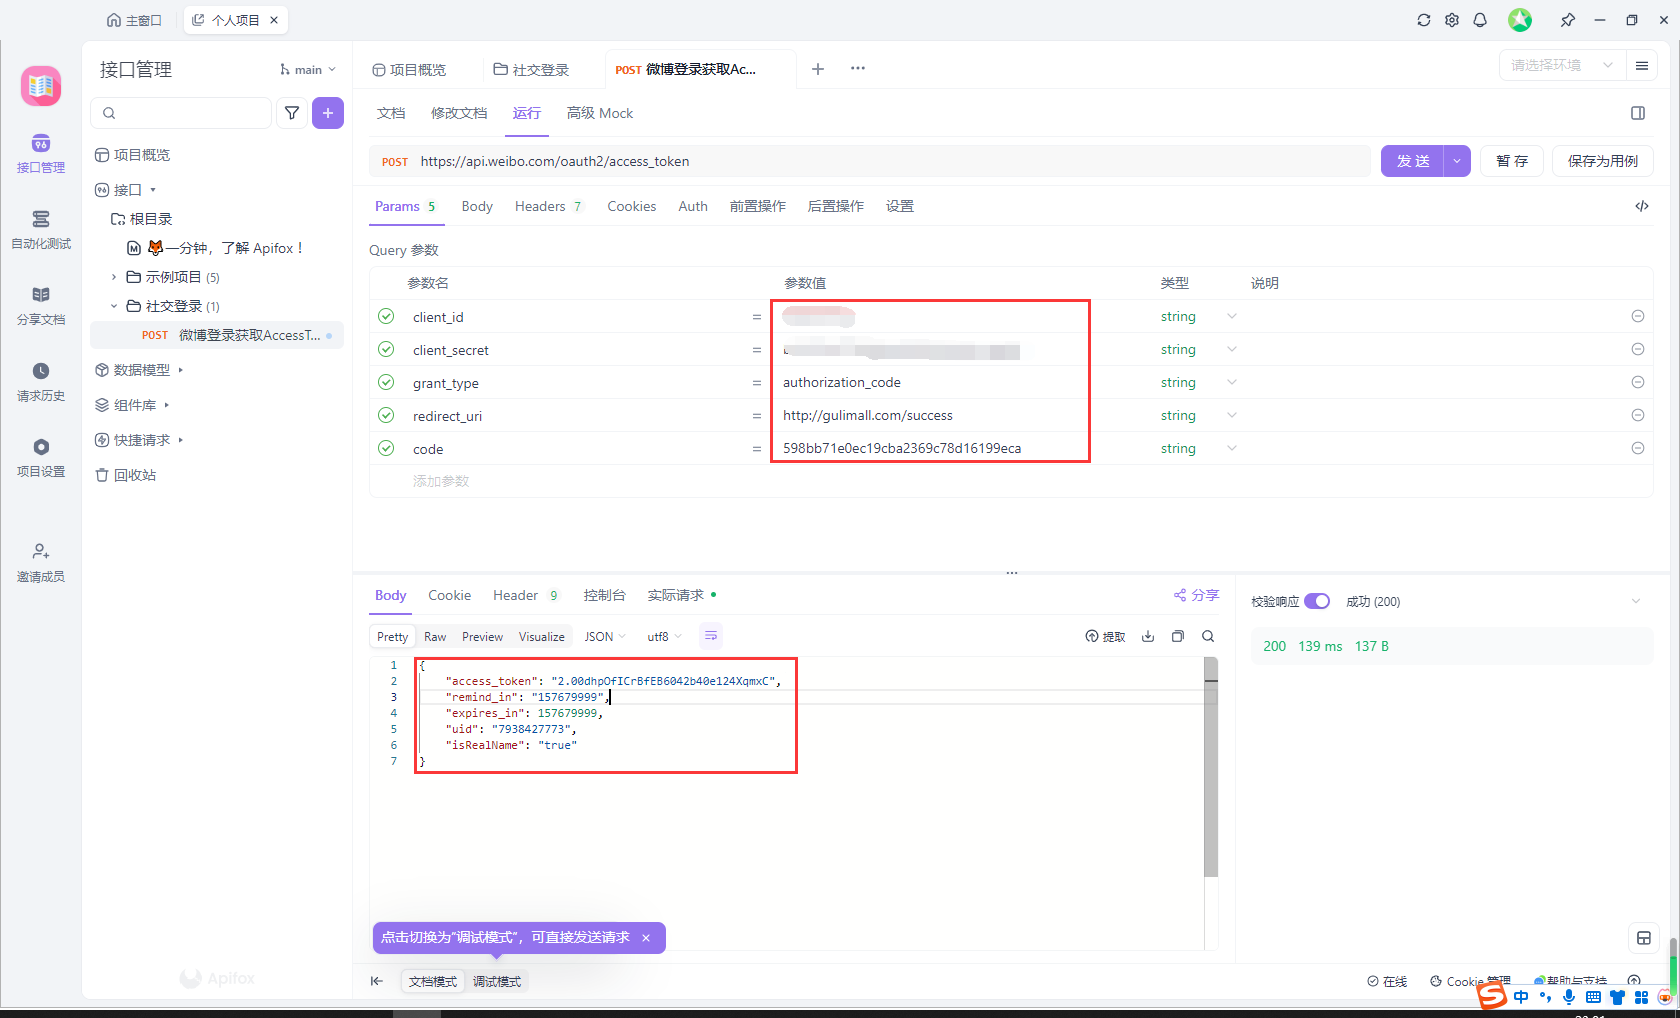
然后换取Access Token
https://api.weibo.com/oauth2/access_token?client_id=YOUR_CLIENT_ID&client_secret=YOUR_CLIENT_SECRET&grant_type=authorization_code&redirect_uri=YOUR_REGISTERED_REDIRECT_URI&code=CODE
文档地址:https://open.weibo.com/wiki/Oauth2/access_token
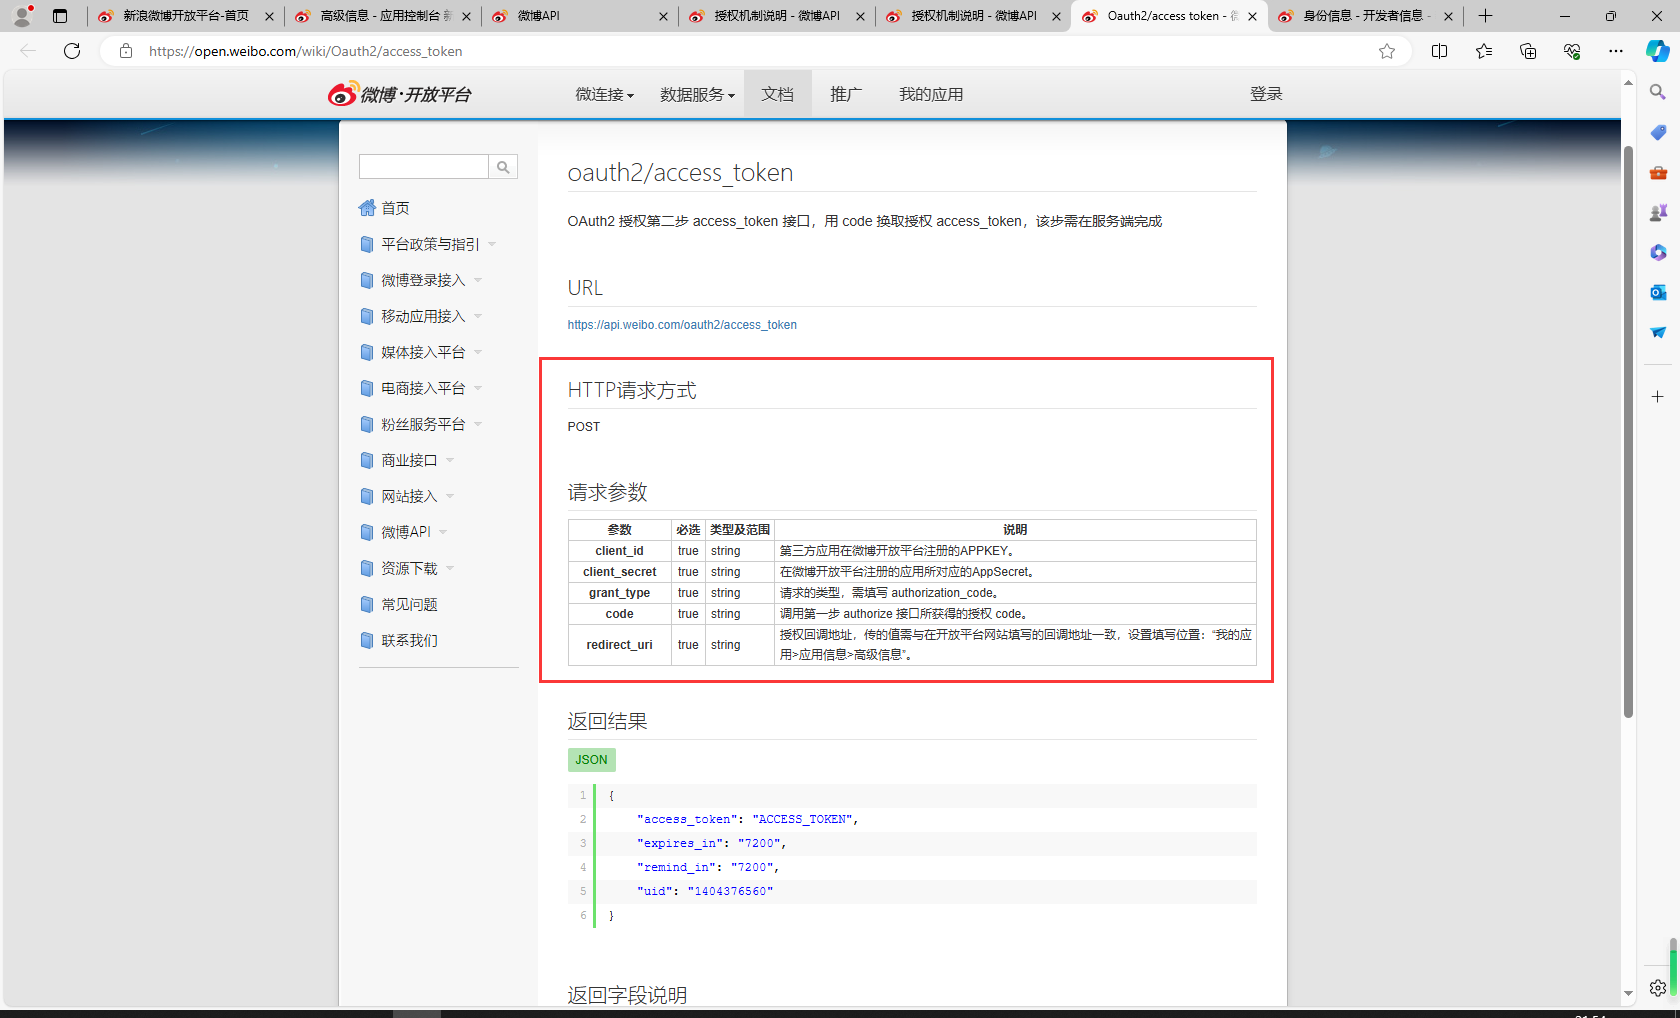
请求oauth2/access_token,获取access_token
https://api.weibo.com/oauth2/access_token
根据用户ID获取用户信息
文档地址:https://open.weibo.com/wiki/2/users/show
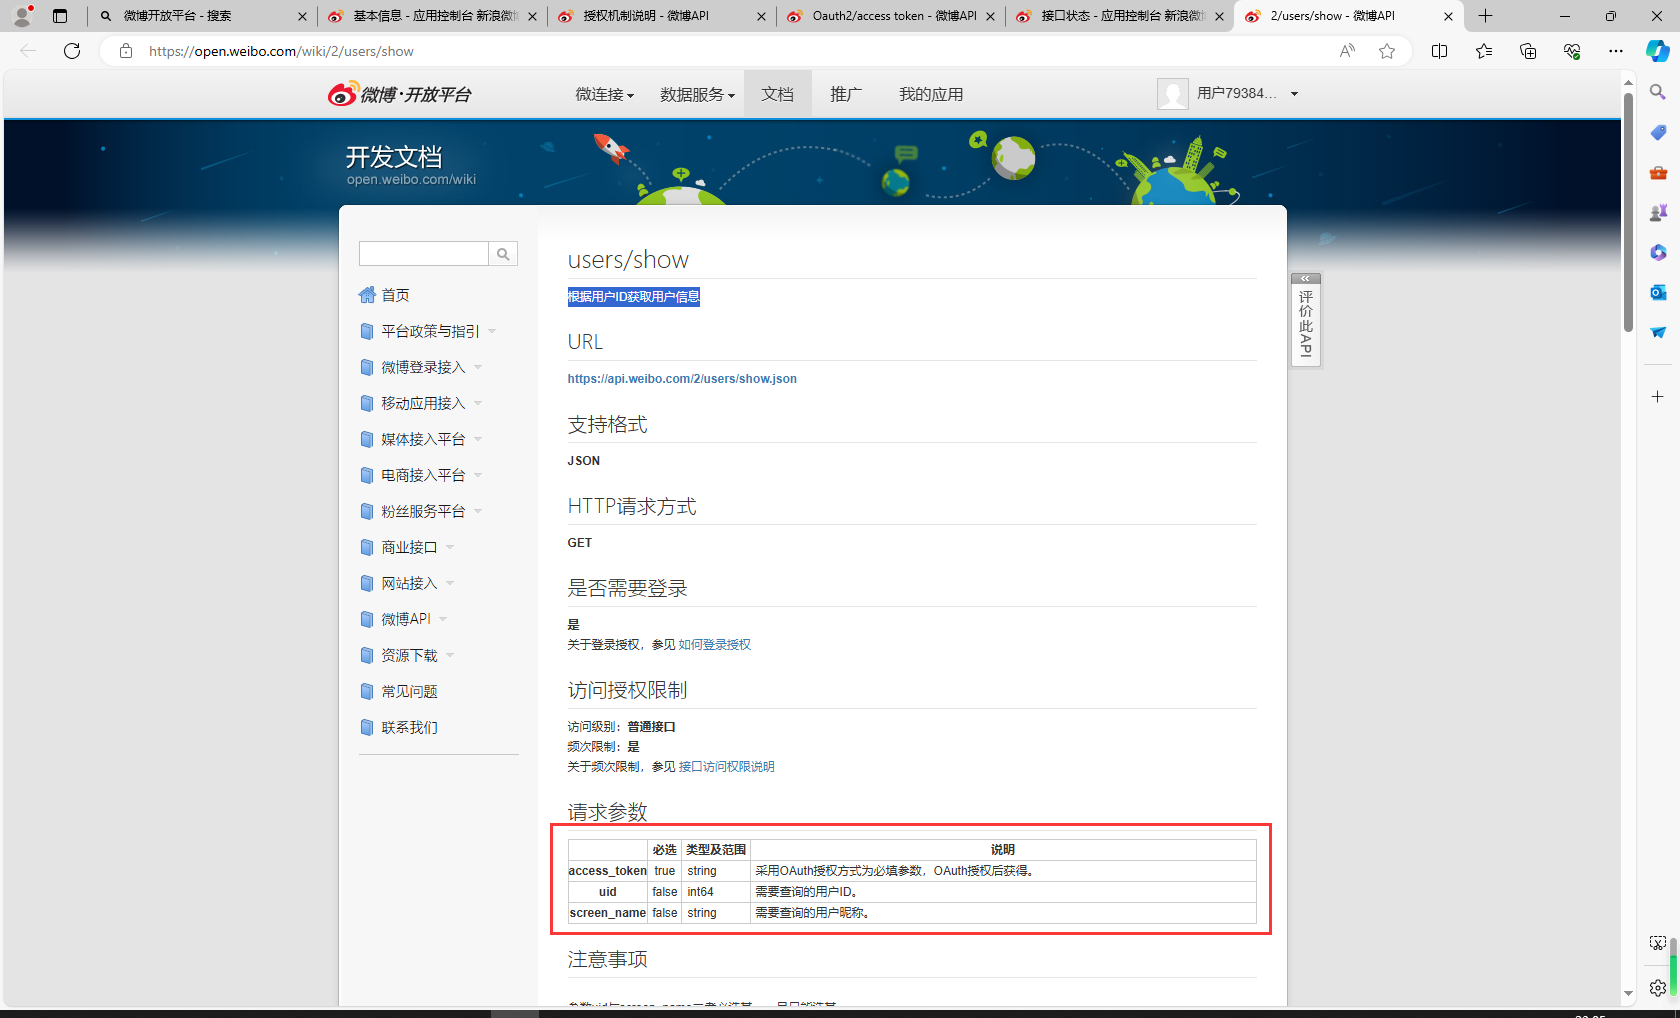
请求users/show,获取用户信息
https://api.weibo.com/2/users/show.json

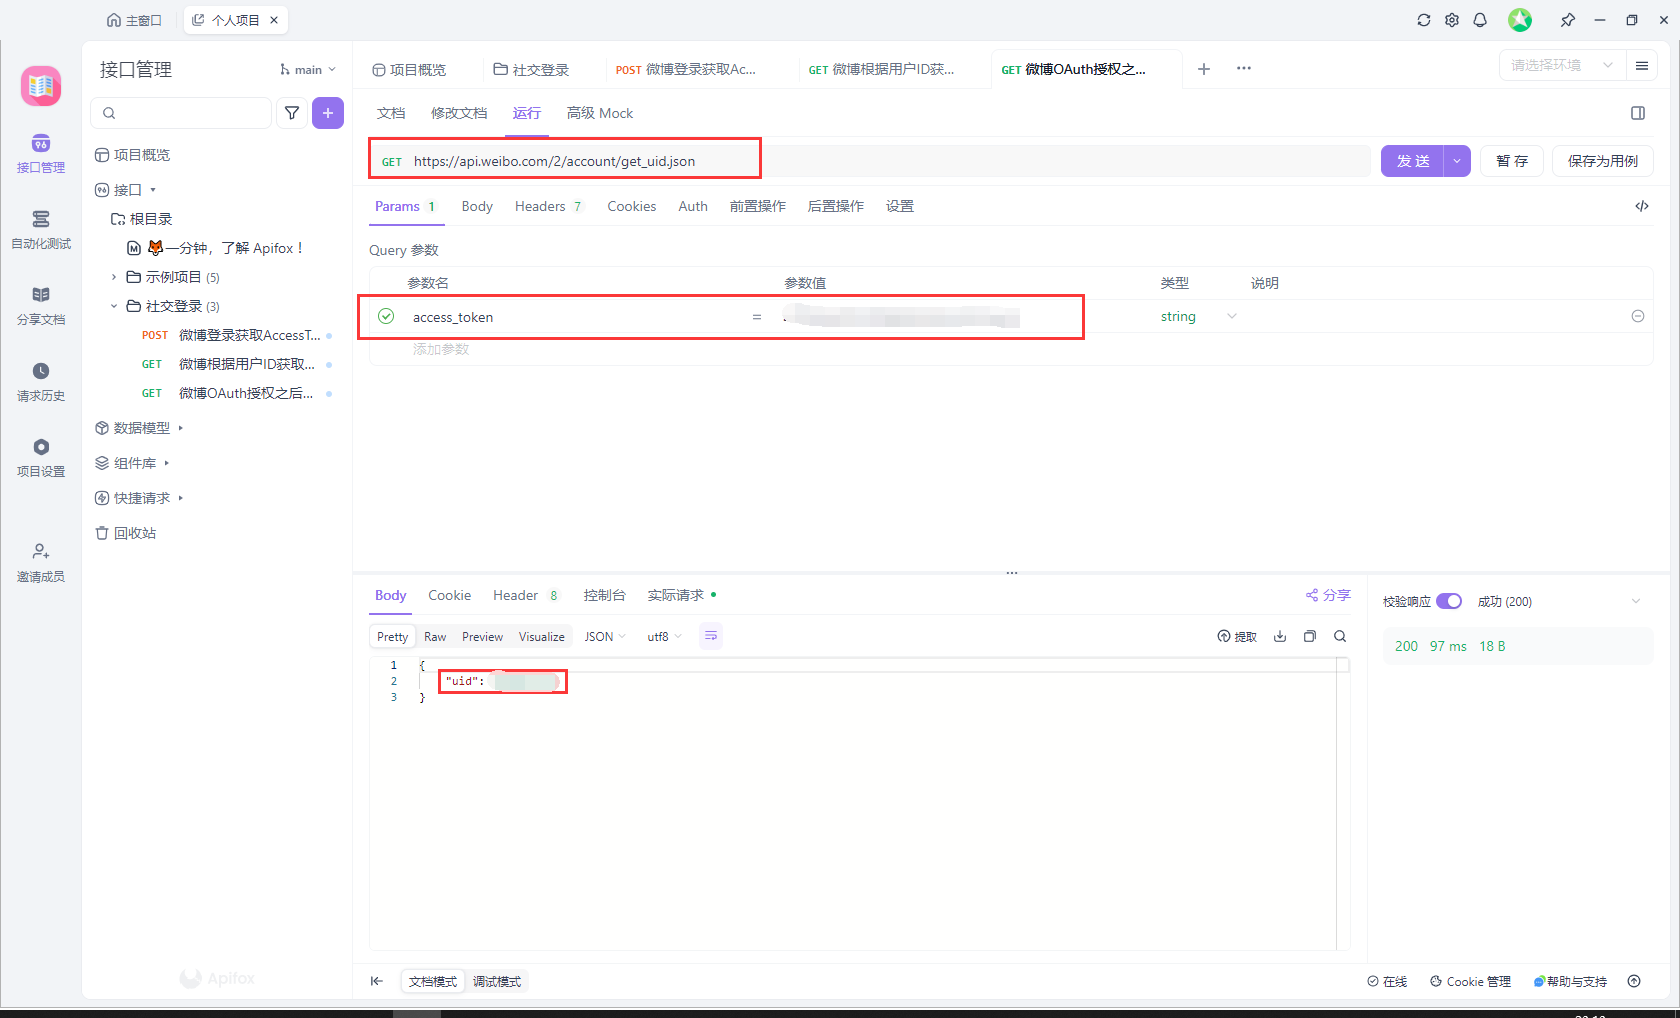
OAuth授权之后,获取授权用户的UID
文档地址:https://open.weibo.com/wiki/2/account/get_uid
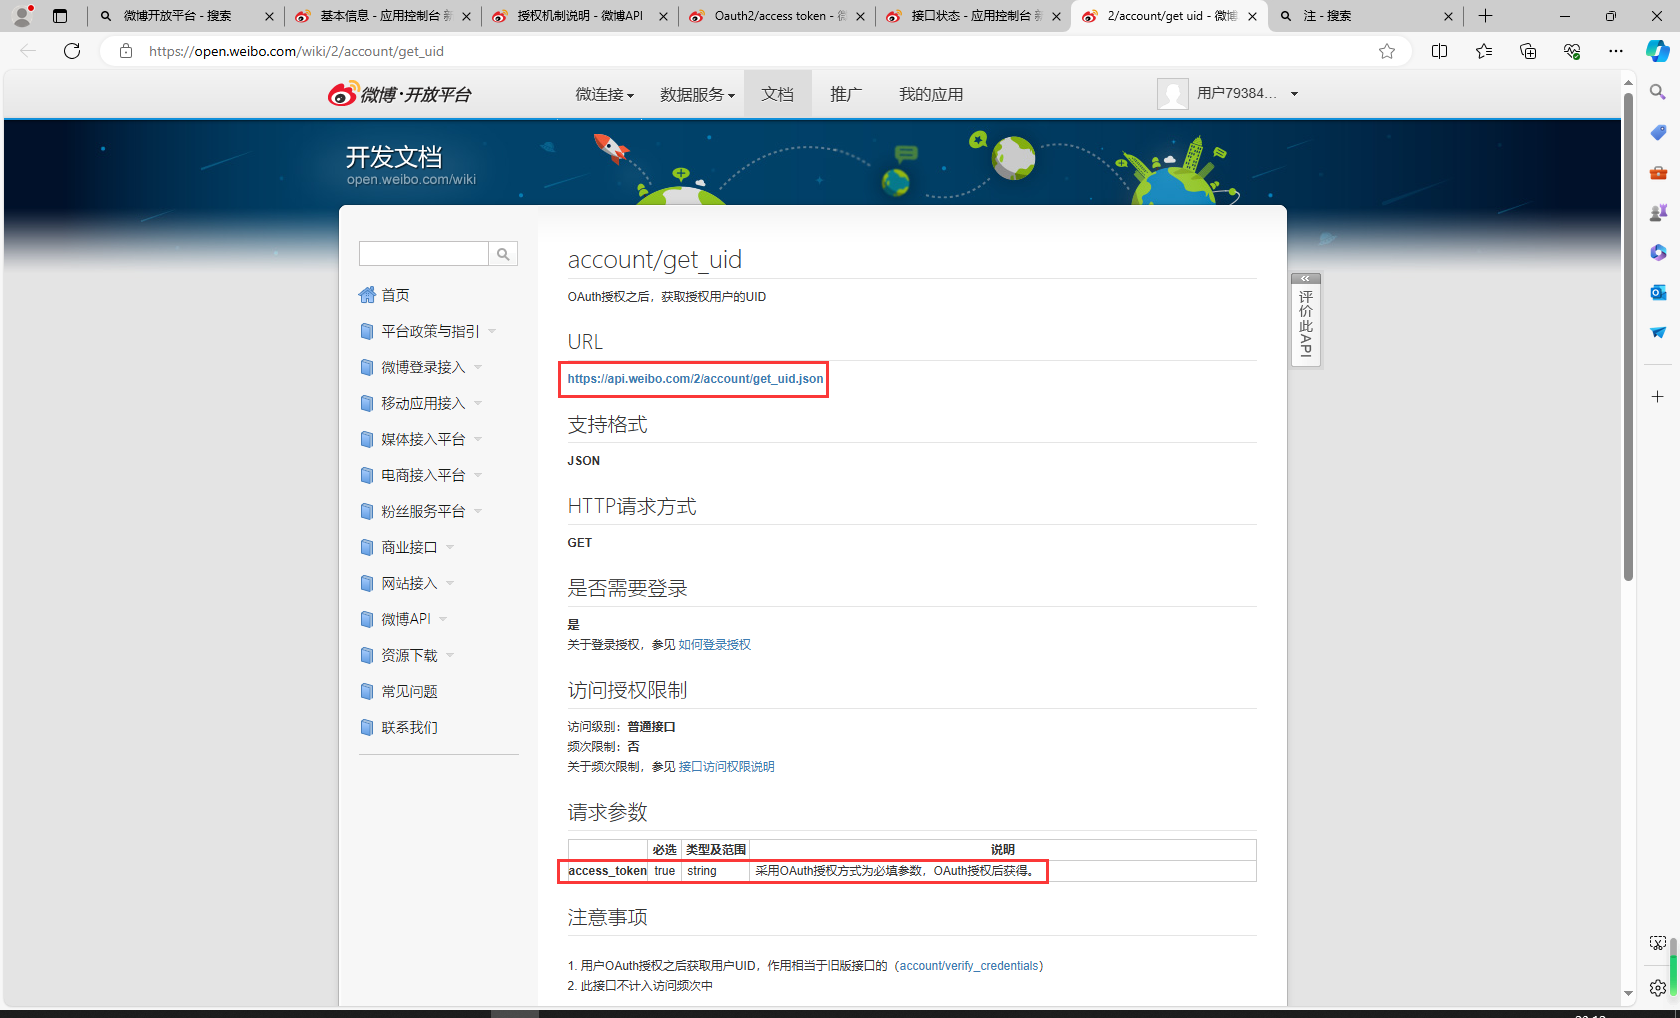
请求account/get_uid,获取授权用户的UID
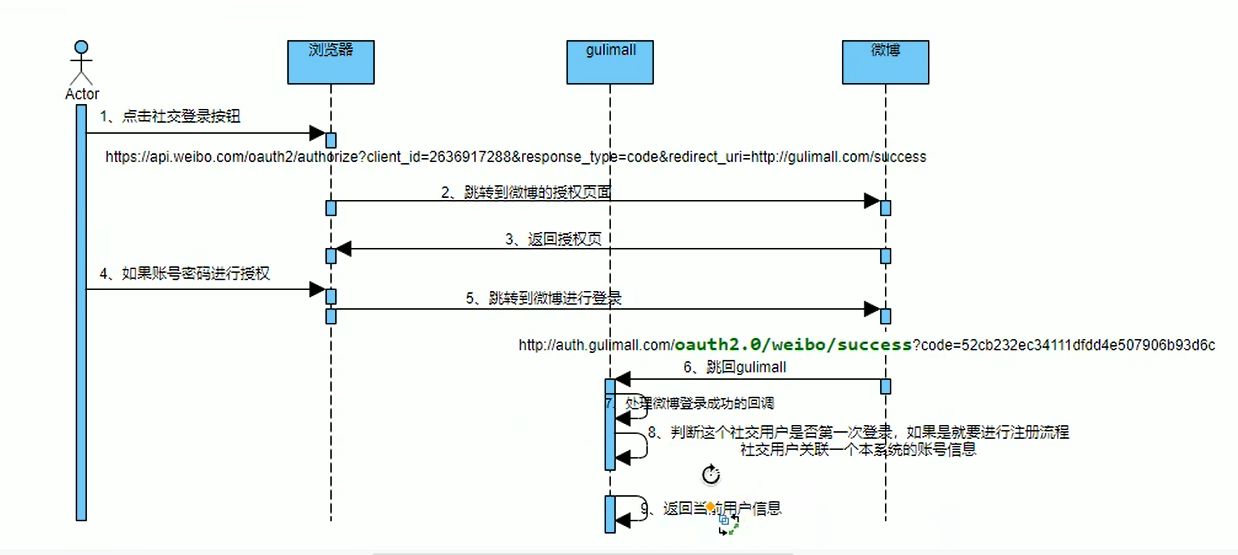
9.12社交登录回调
流程图
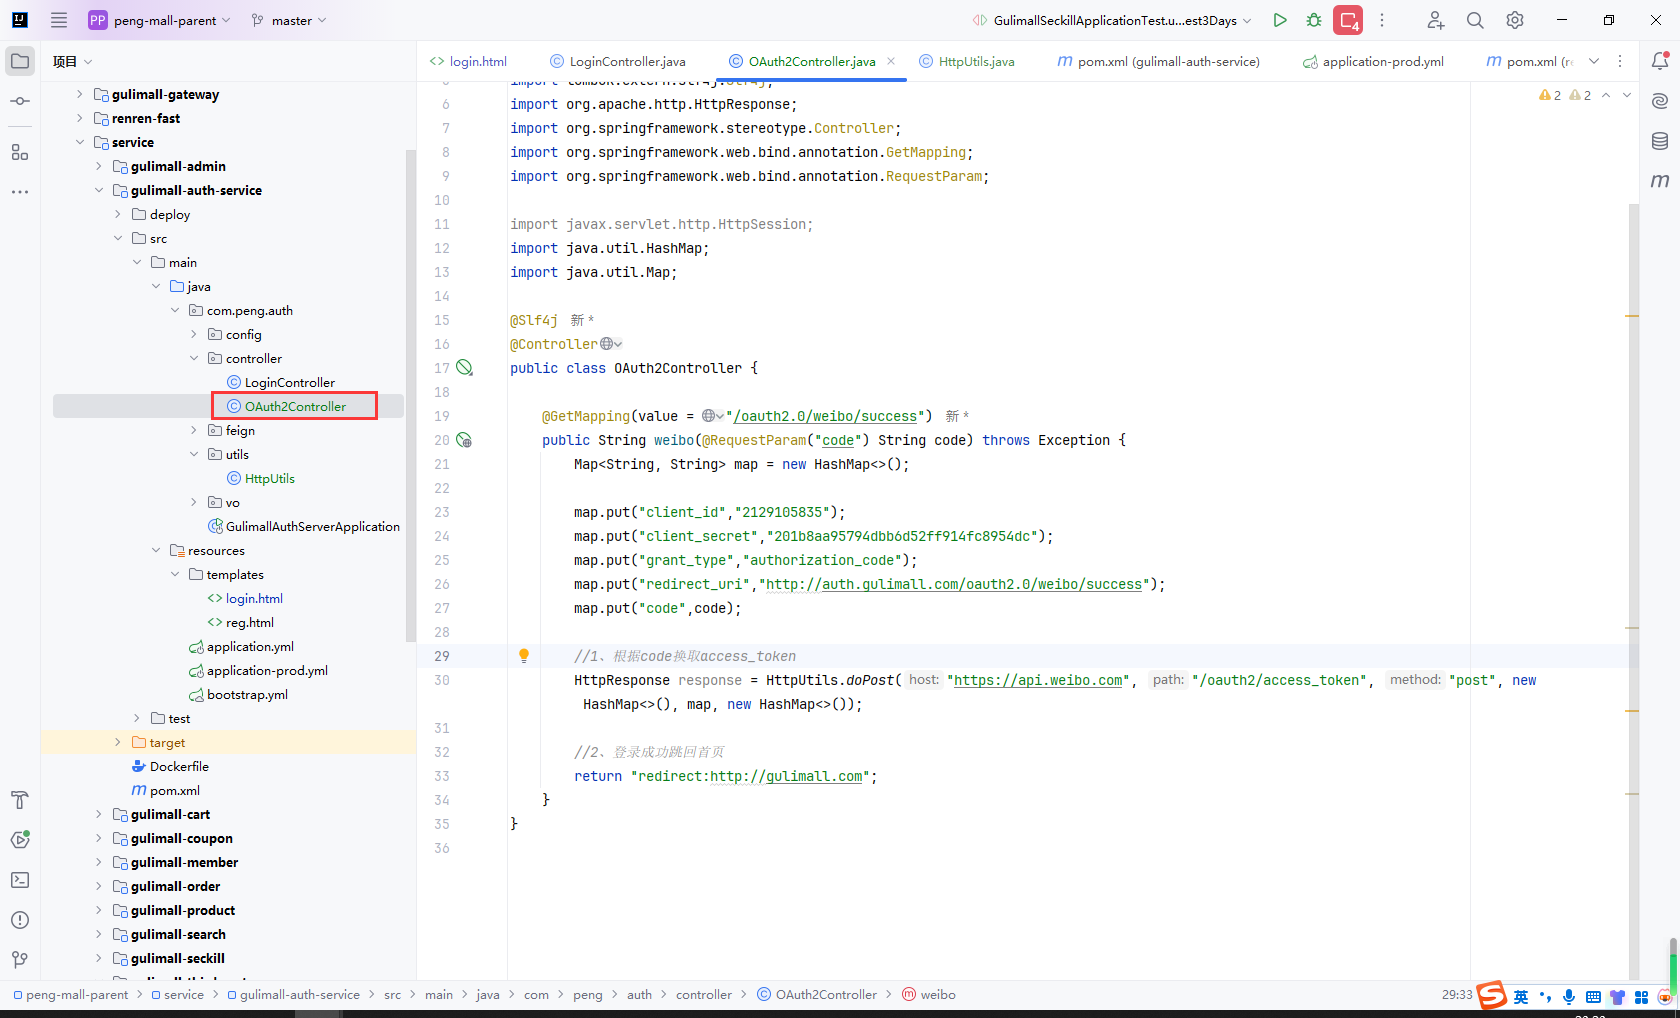
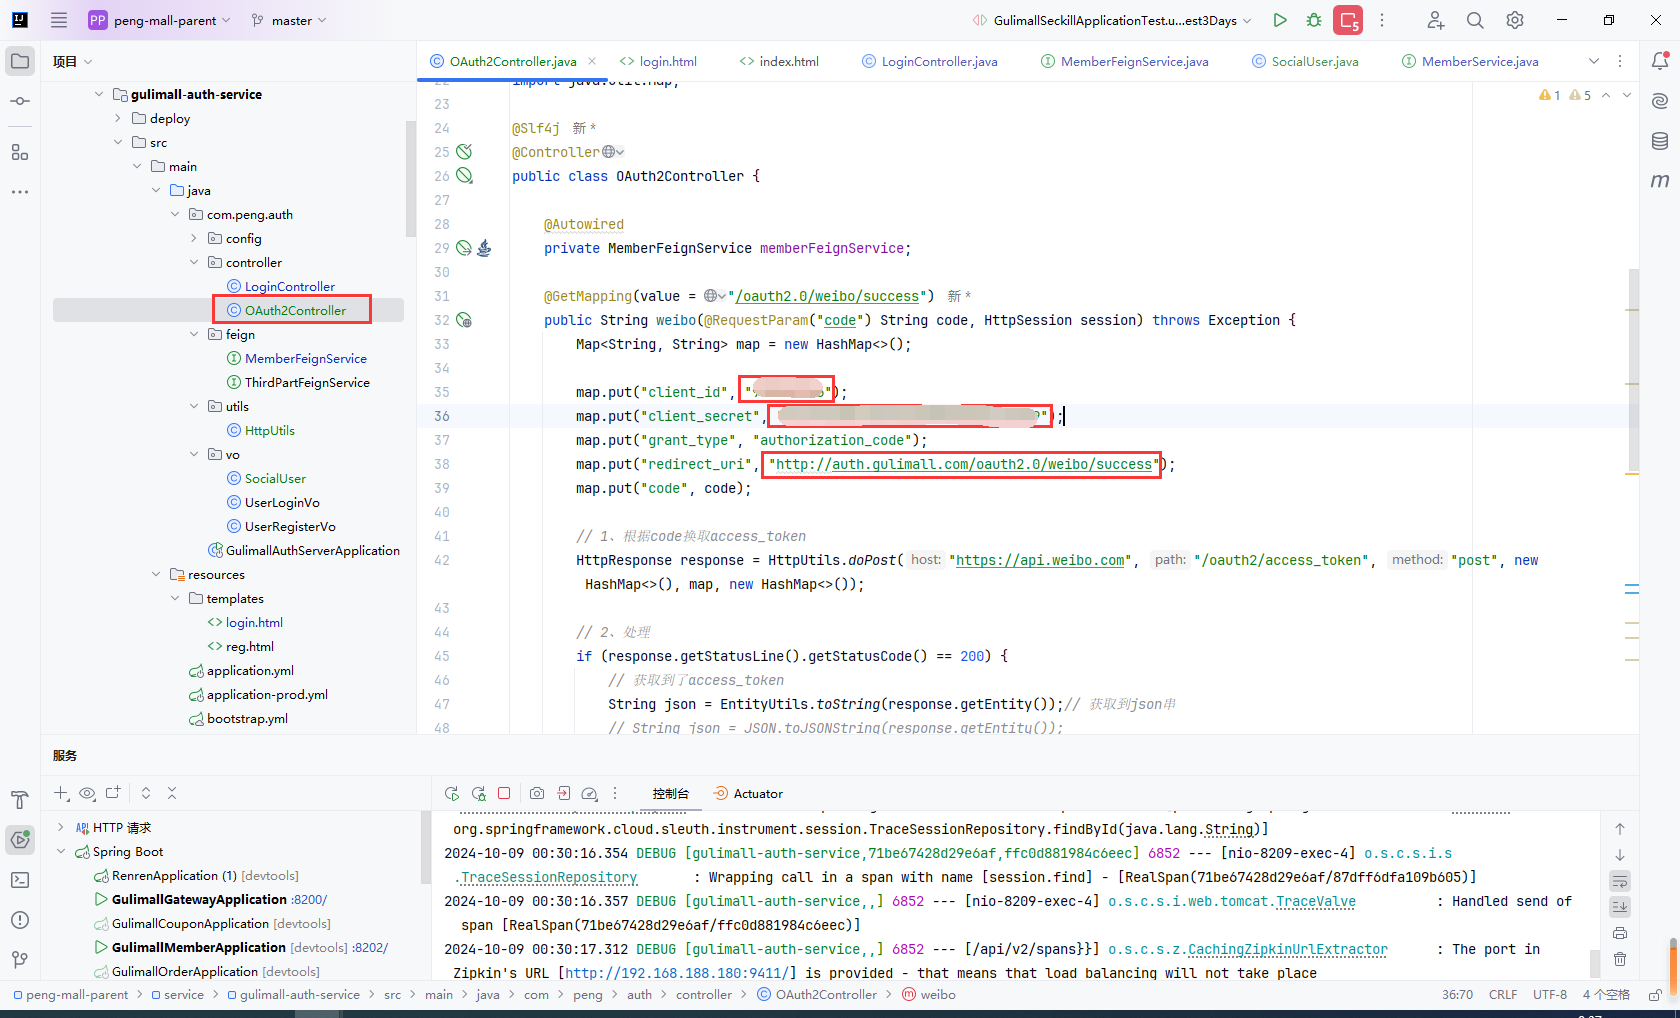
创建OAuth2Controller实现微博登录
@Slf4j
@Controller
public class OAuth2Controller {

    @GetMapping(value = "/oauth2.0/weibo/success")
    public String weibo(@RequestParam("code") String code) throws Exception {
        Map<String, String> map = new HashMap<>();

        map.put("client_id","你的App Key");
        map.put("client_secret","你的App Secret");
        map.put("grant_type","authorization_code");
        map.put("redirect_uri","http://auth.gulimall.com/oauth2.0/weibo/success");
        map.put("code",code);

        //1、根据code换取access_token
        HttpResponse response = HttpUtils.doPost("https://api.weibo.com", "/oauth2/access_token", "post", new HashMap<>(), map, new HashMap<>());

        //2、处理

        //2、登录成功跳回首页
        return "redirect:http://gulimall.com";
    }
}
9.13社交登录完成
主要步骤:
-
ums_member添加三个字段,保存社交登录信息socialUid:社交登录UIDaccessToken:社交登录TOKENexpiresIn:社交登录过期时间
-
根据
social_uid判断当前用户有没有注册 -
这个用户已经注册过,更新用户的访问令牌的时间和
access_token -
没有查到当前社交用户对应的记录我们就需要注册一个
- 根据官方
api查询当前社交用户的社交账号信息(昵称、性别等)
- 根据官方
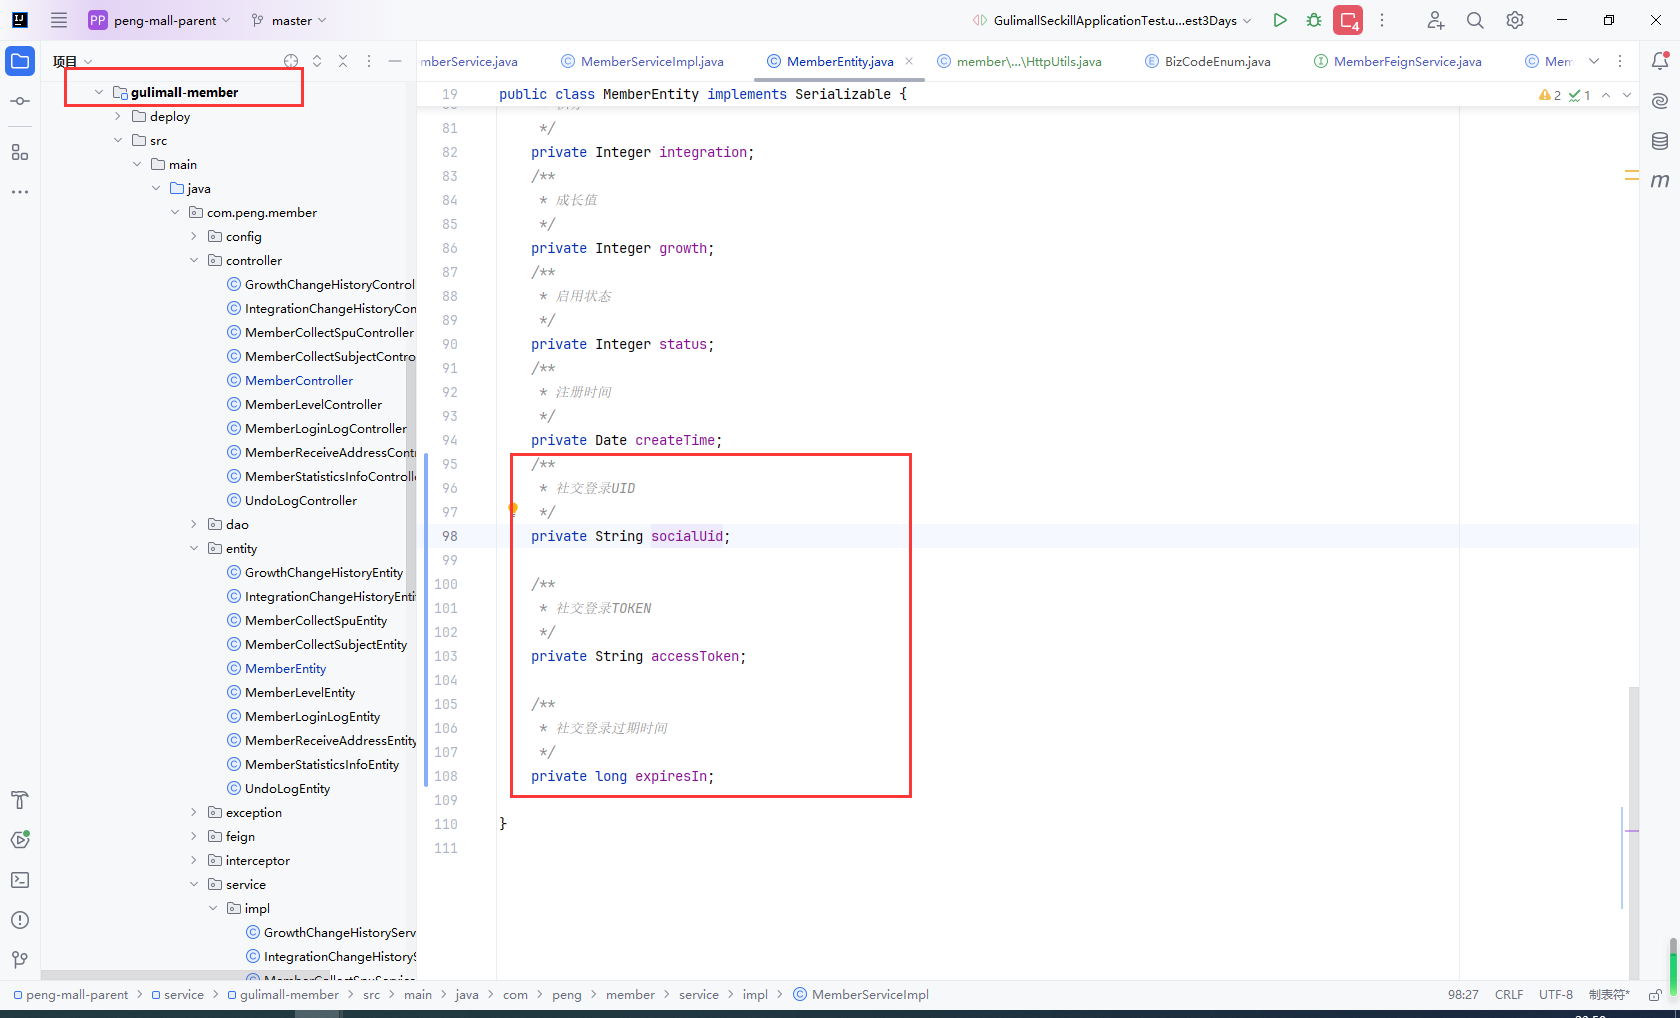
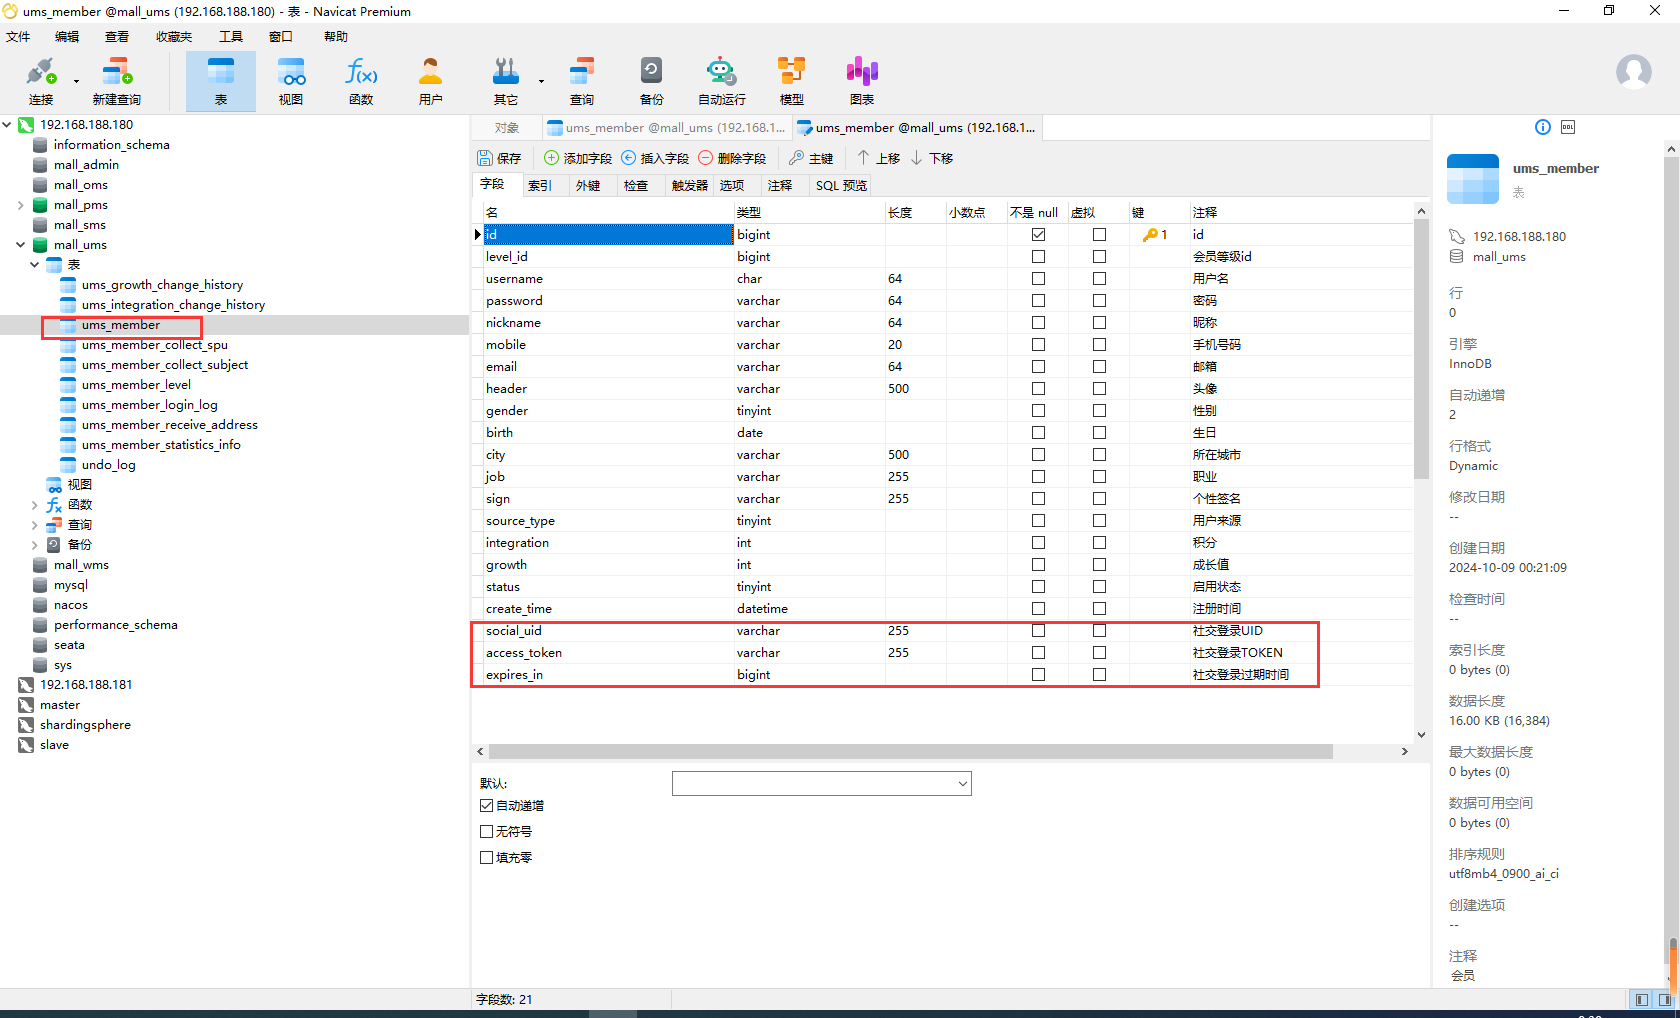
ums_member添加三个字段,保存社交登录信息
socialUid:社交登录UIDaccessToken:社交登录TOKENexpiresIn:社交登录过期时间
根据social_uid判断当前用户有没有注册
这个用户已经注册过,更新用户的访问令牌的时间和access_token
没有查到当前社交用户对应的记录我们就需要注册一个
根据官方api查询当前社交用户的社交账号信息(昵称、性别等)
 @Override
    public MemberEntity login(SocialUser socialUser) throws Exception {

        //具有登录和注册逻辑
        String uid = socialUser.getUid();

        //1、判断当前社交用户是否已经登录过系统
        MemberEntity memberEntity = baseMapper.selectOne(new QueryWrapper<MemberEntity>().eq("social_uid", uid));

        if (memberEntity != null) {
            //这个用户已经注册过
            //更新用户的访问令牌的时间和access_token
            MemberEntity update = new MemberEntity();
            update.setId(memberEntity.getId());
            update.setAccessToken(socialUser.getAccess_token());
            update.setExpiresIn(socialUser.getExpires_in());
            baseMapper.updateById(update);

            memberEntity.setAccessToken(socialUser.getAccess_token());
            memberEntity.setExpiresIn(socialUser.getExpires_in());
            return memberEntity;
        } else {
            //2、没有查到当前社交用户对应的记录我们就需要注册一个
            MemberEntity register = new MemberEntity();
            //3、查询当前社交用户的社交账号信息(昵称、性别等)
            // 远程调用,不影响结果
            try {
                Map<String, String> query = new HashMap<>();
                query.put("access_token", socialUser.getAccess_token());
                query.put("uid", socialUser.getUid());
                HttpResponse response = HttpUtils.doGet("https://api.weibo.com", "/2/users/show.json", "get", new HashMap<String, String>(), query);

                if (response.getStatusLine().getStatusCode() == 200) {
                    //查询成功
                    String json = EntityUtils.toString(response.getEntity());
                    JSONObject jsonObject = JSON.parseObject(json);
                    String name = jsonObject.getString("name");
                    String gender = jsonObject.getString("gender");
                    String profileImageUrl = jsonObject.getString("profile_image_url");

                    register.setNickname(name);
                    register.setGender("m".equals(gender) ? 1 : 0);
                    register.setHeader(profileImageUrl);
                }
            }catch (Exception e){}
            register.setCreateTime(new Date());
            register.setSocialUid(socialUser.getUid());
            register.setAccessToken(socialUser.getAccess_token());
            register.setExpiresIn(socialUser.getExpires_in());

            //把用户信息插入到数据库中
            baseMapper.insert(register);
            return register;
        }
    }
9.14社交登录测试
数据库添加social_uid、access_token、expires_in
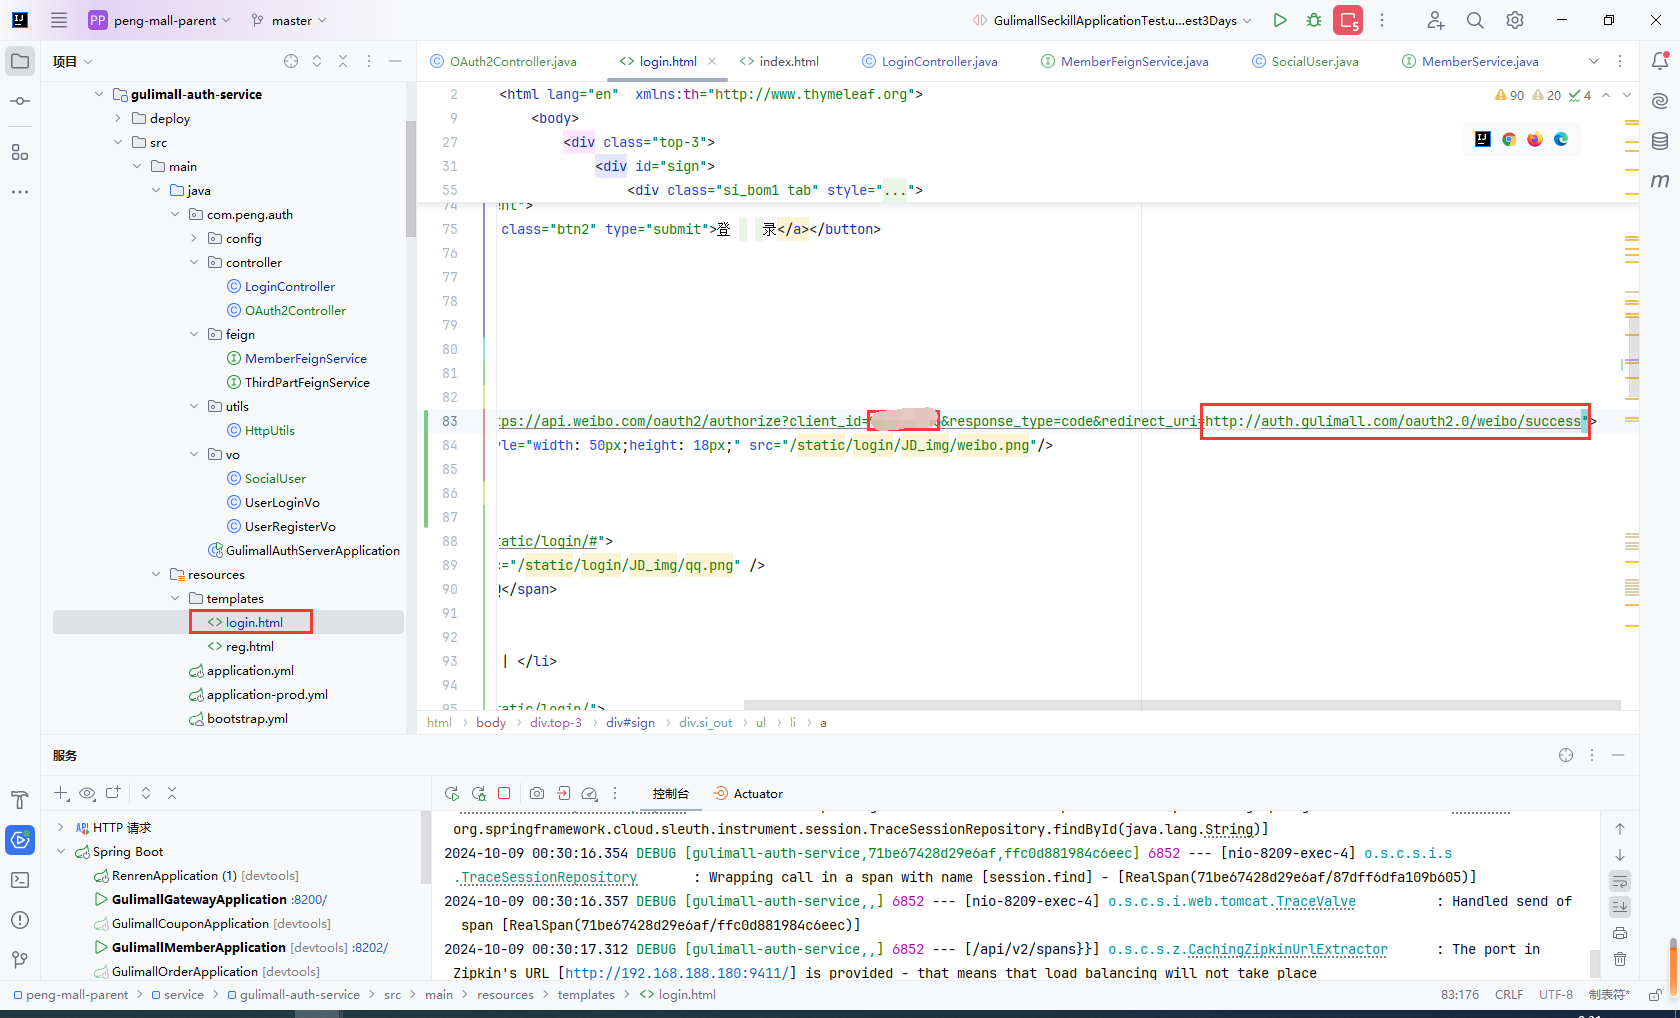
login.html修改自己的App Key和redirect_uri
http://auth.gulimall.com/oauth2.0/weibo/success
OAuth2Controller修改自己的App Key、App Secret
开放平台里高级信息配置自己的授权回调页面
9.15分布式session不共享不同步
主要步骤:
session原理session共享问题
session原理
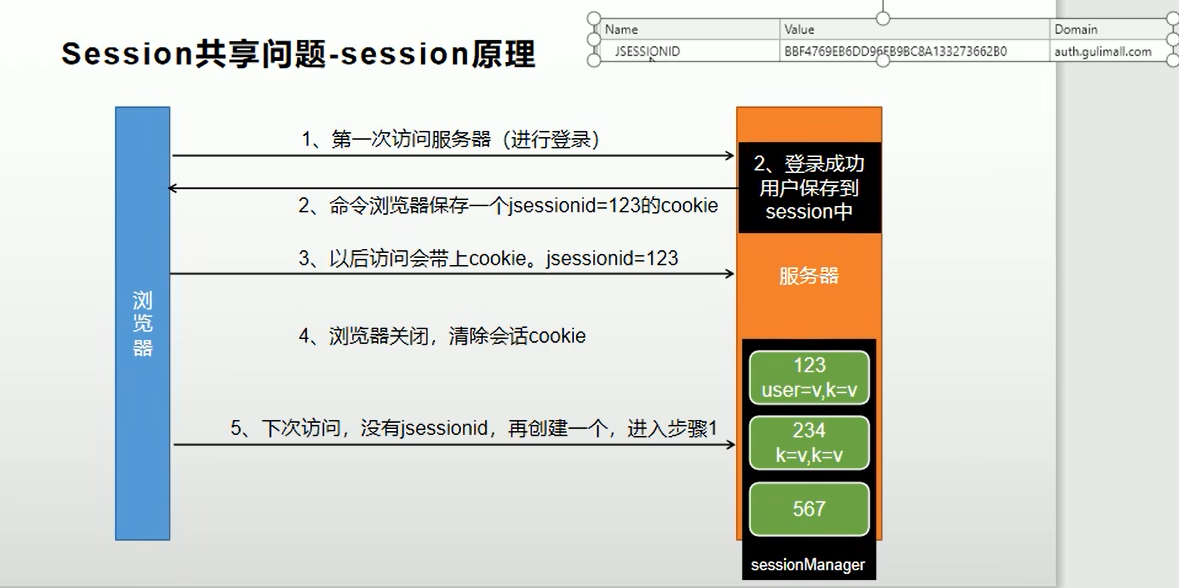
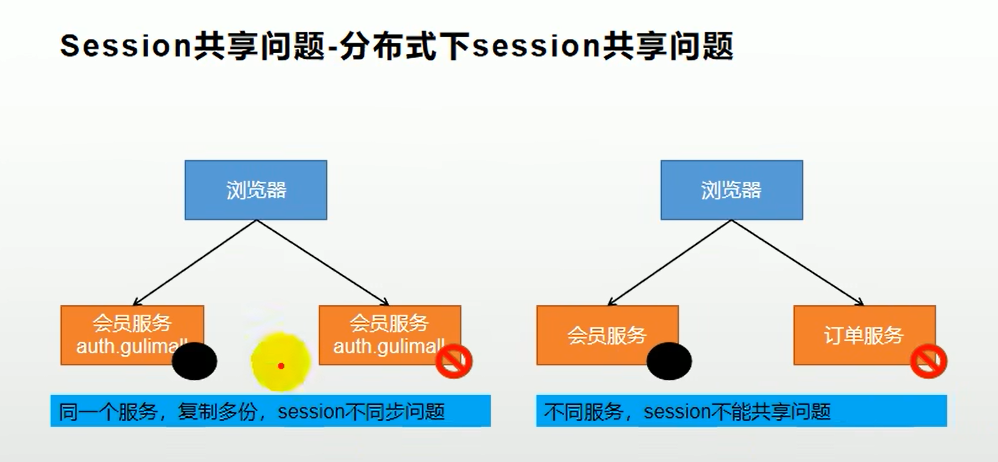
session共享问题
- 同一个服务,多个实例
- 不同服务
9.16分布式session解决方案原理
主要步骤:
session复制- 客户端存储
hash一致性- 统一存储
- 不能跨域名共享
cookie:子域session共享,放大作用域
session复制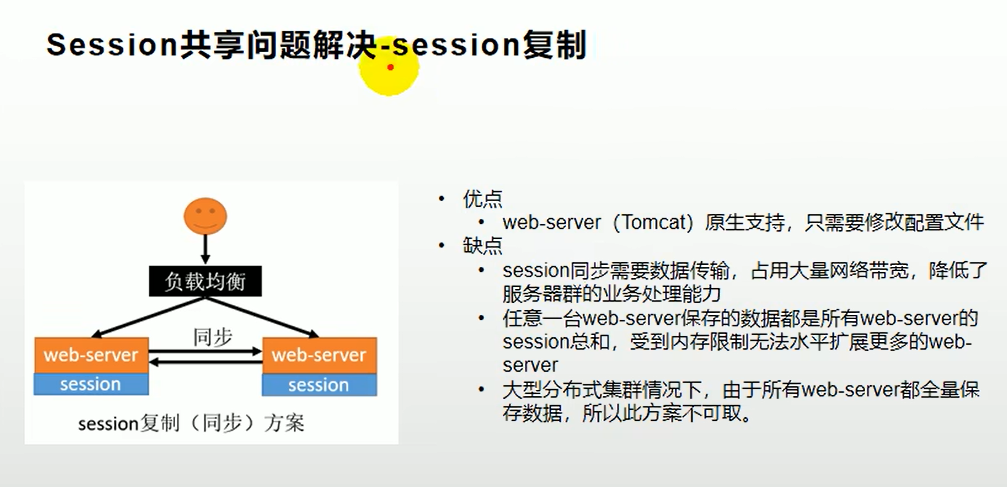
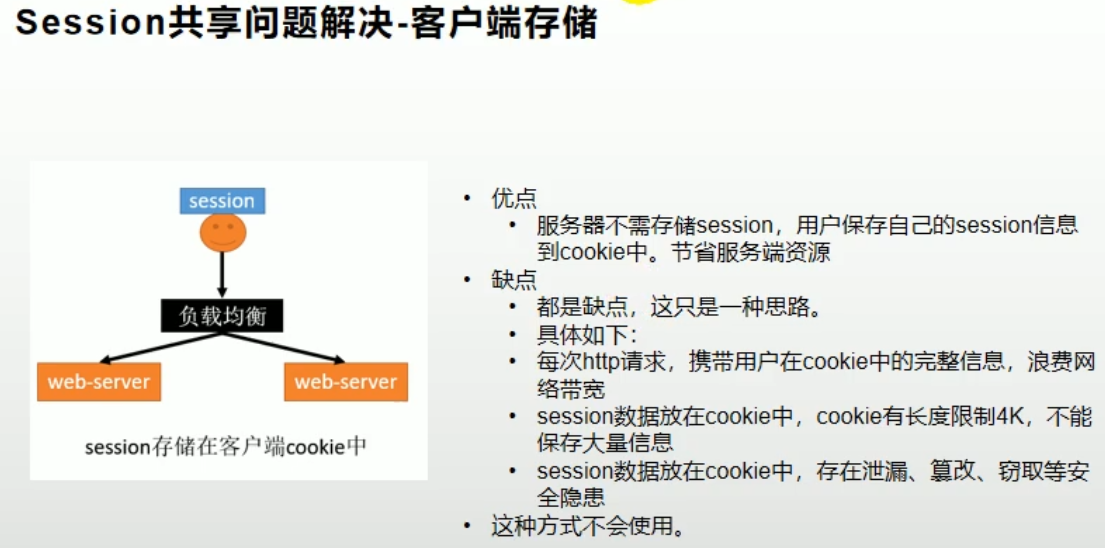
客户端存储
hash一致性
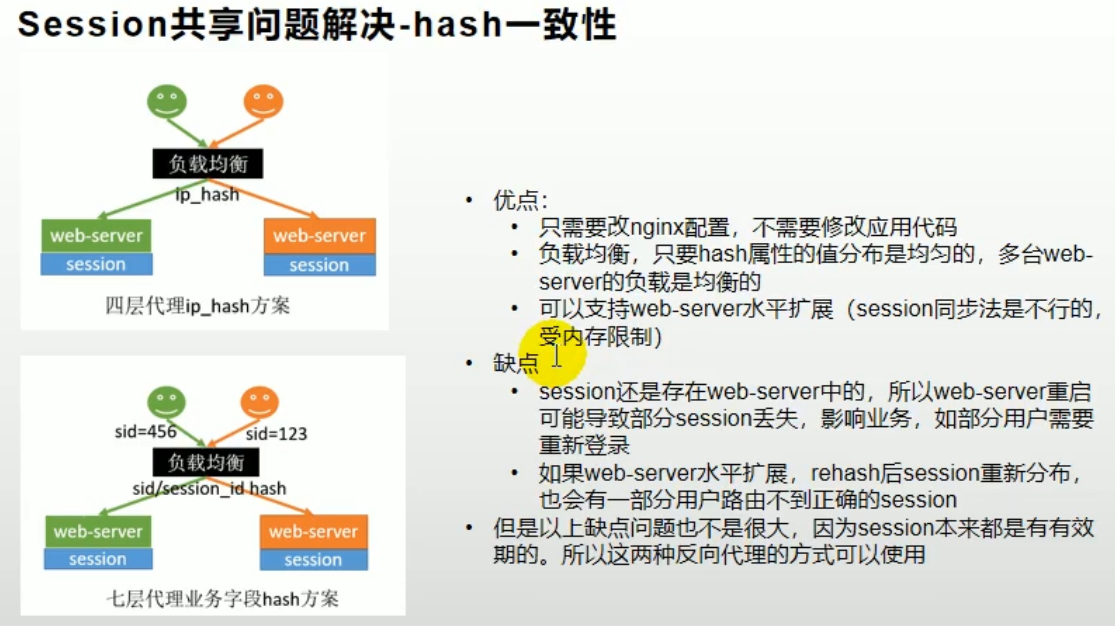
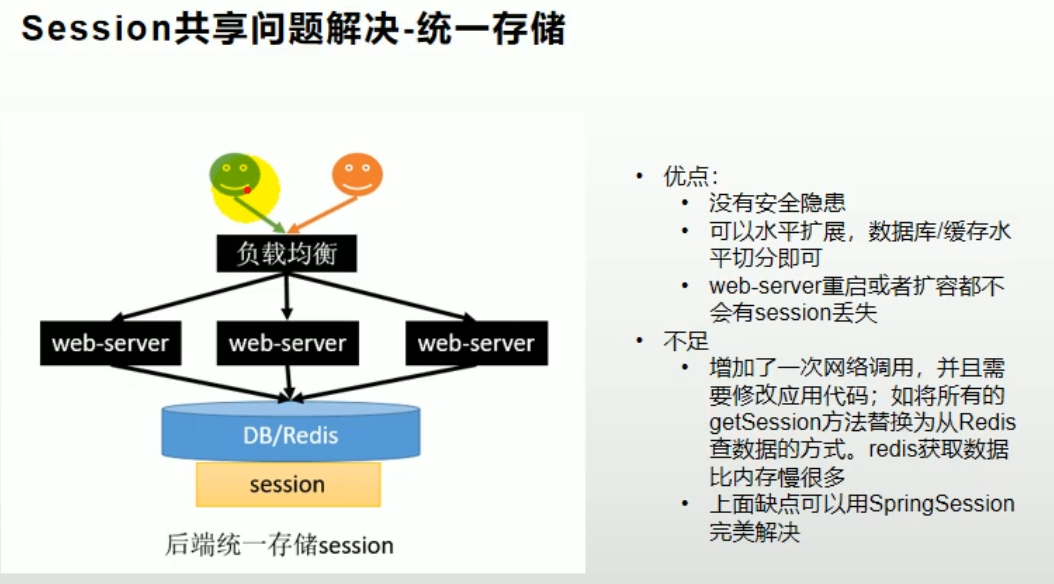
统一存储
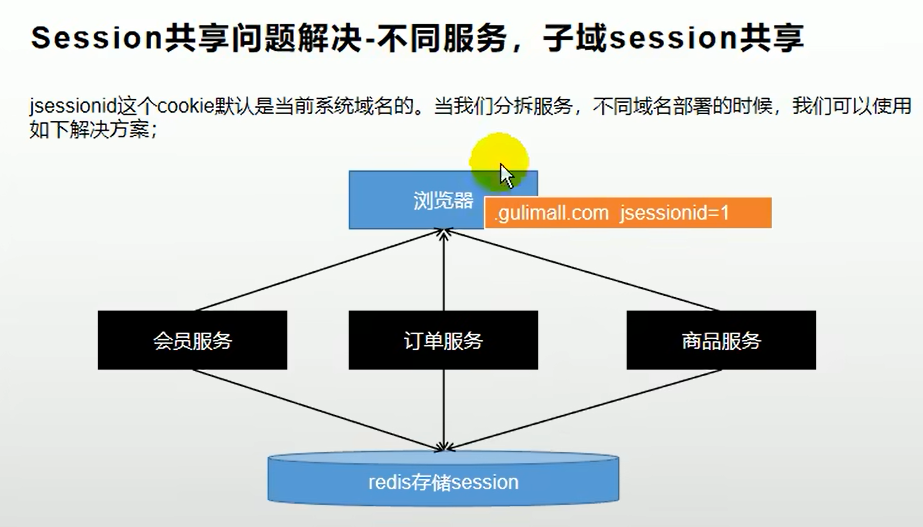
子域session共享,放大作用域
9.17SpringSession整合
主要步骤:
- 地址:https://spring.io/projects/spring-session
- 导入依赖
spring-session,配置session - 开启
Redis作为session存储 - 登录成功后,保存用户信息到
session gulimall-product登录成功后获取session信息- 修改
session域名 - 问题:Could not transfer artifact不知道这样的主机。
打开SpringSession官方文档

认证服务gulimall-auth-service和商品服务gulimall-product
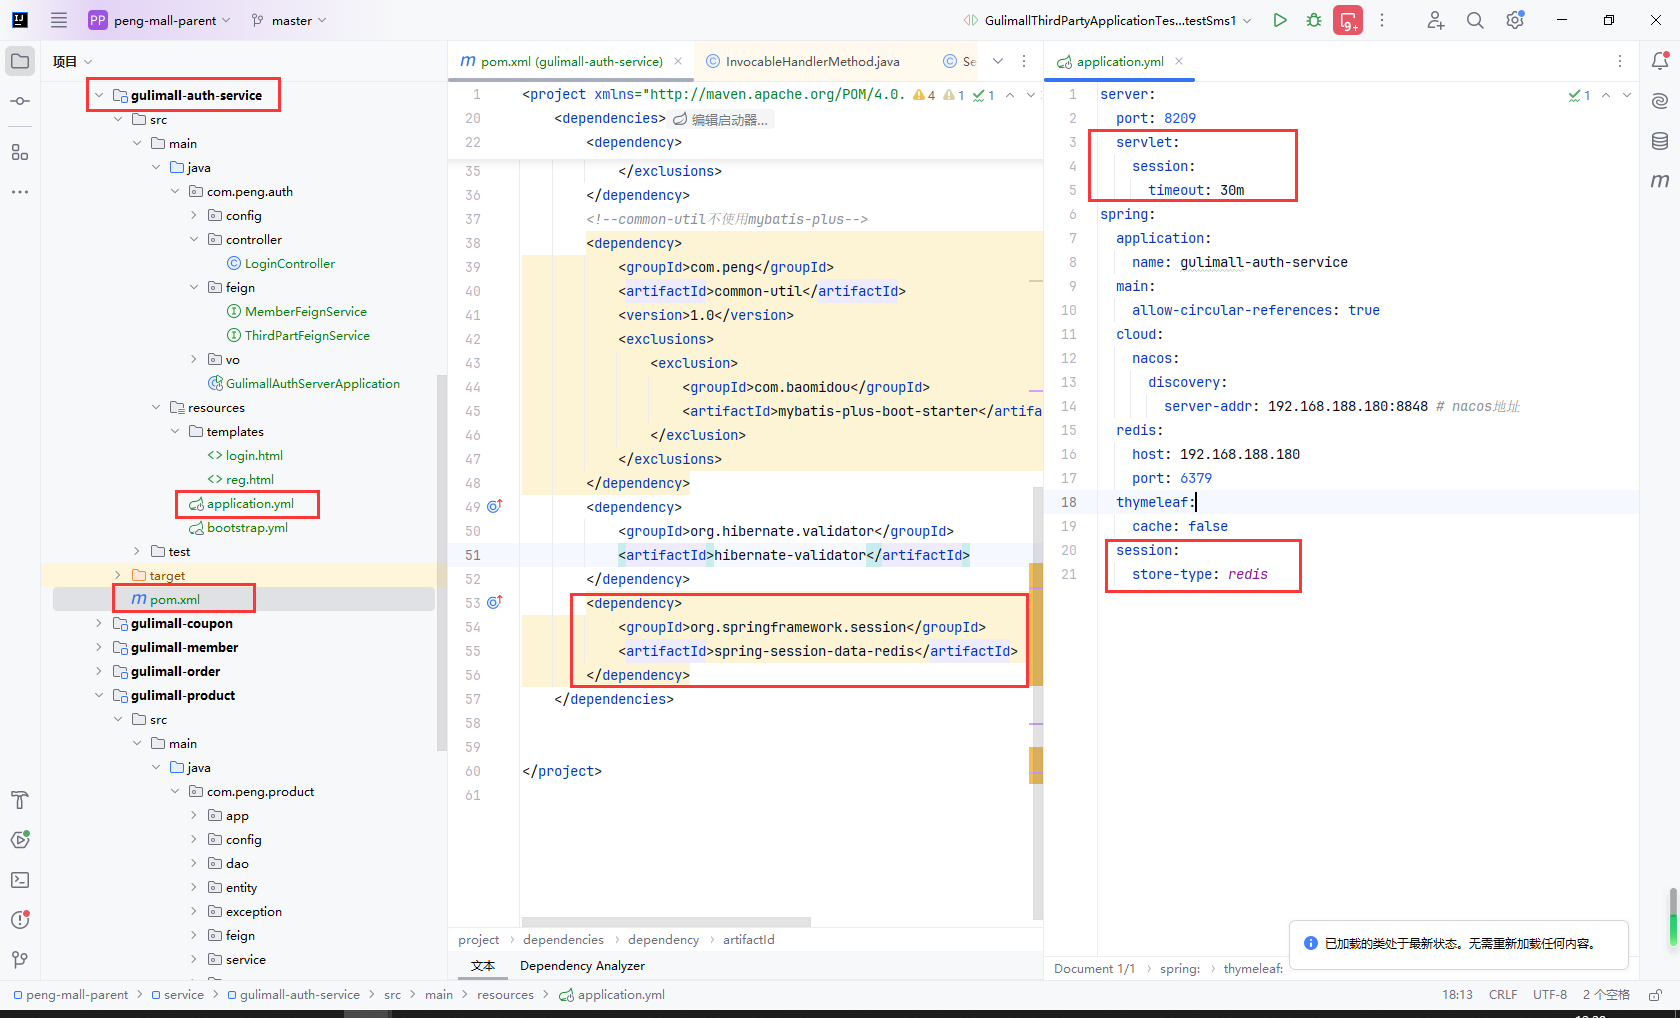
导入依赖spring-session,配置session
<dependency>
    <groupId>org.springframework.session</groupId>
    <artifactId>spring-session-data-redis</artifactId>
</dependency>
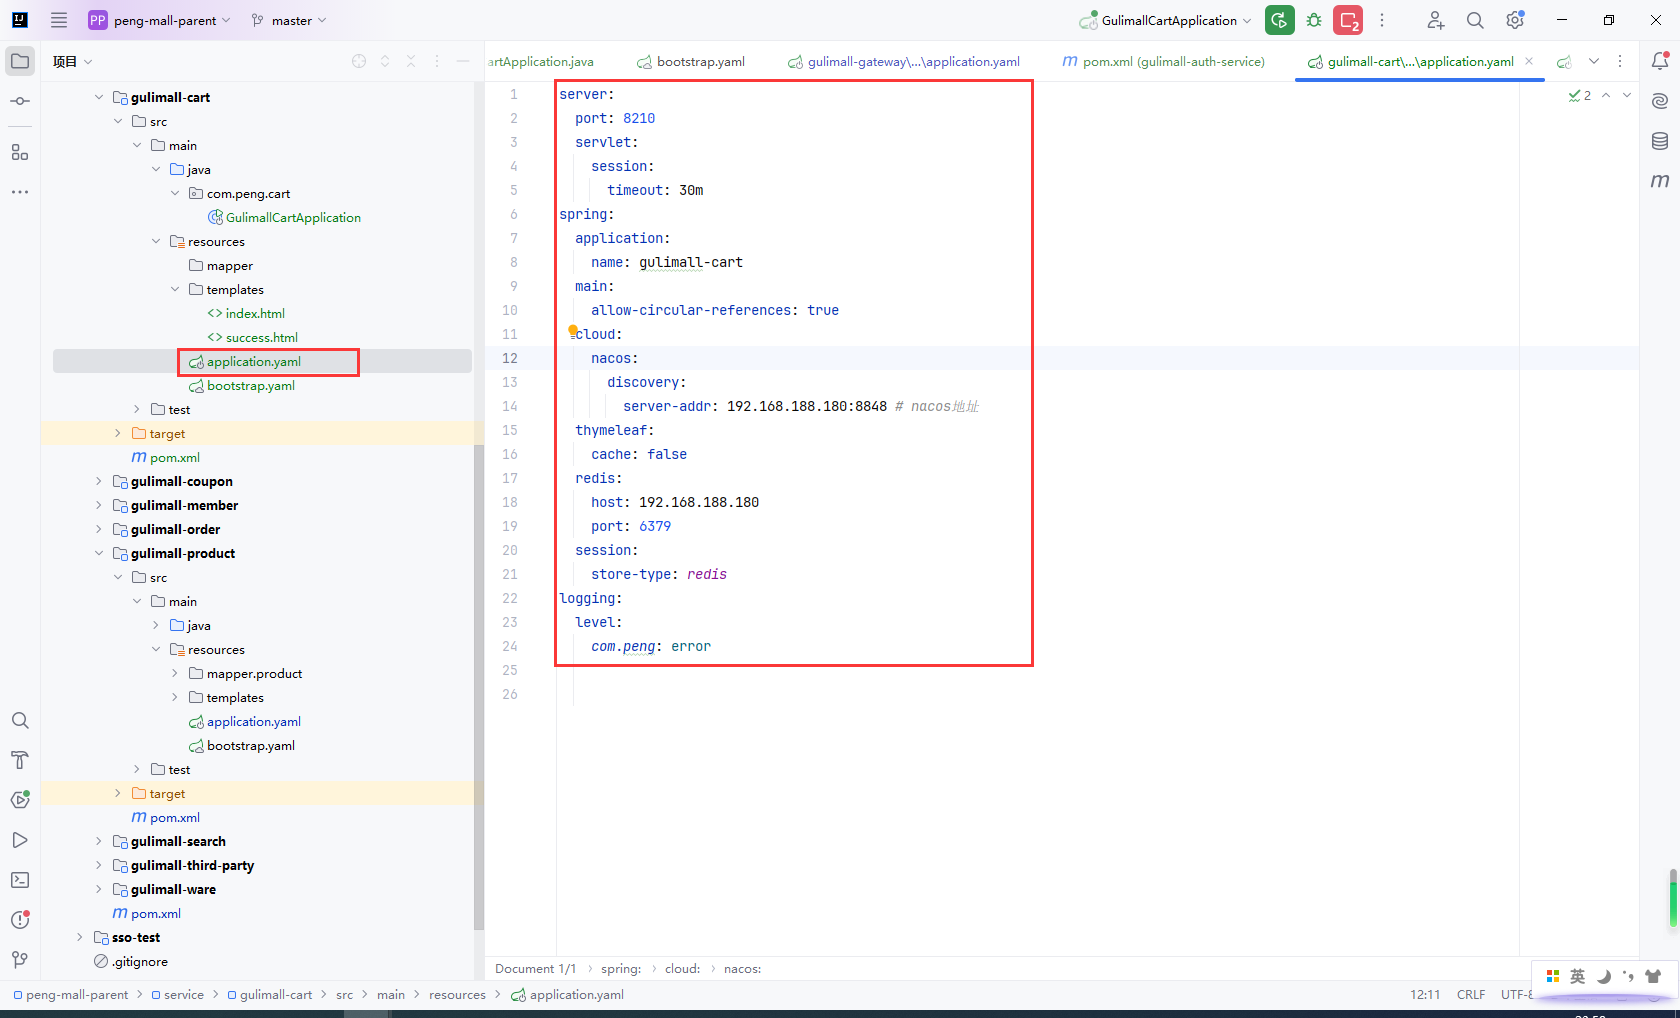
application.yml配置
server:
  servlet:
    session:
      timeout: 30m
spring:
  session:
    store-type: redis
开启@EnableRedisHttpSession
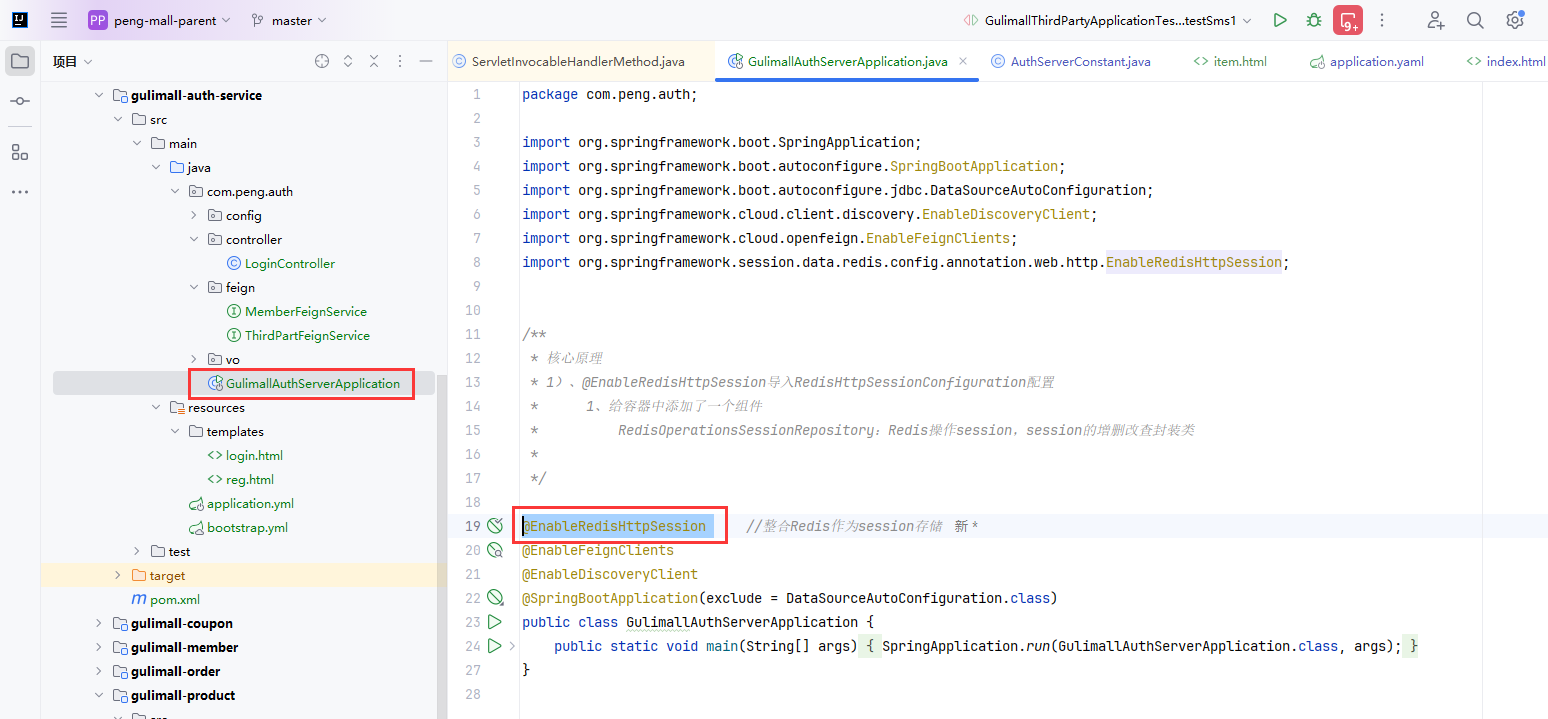
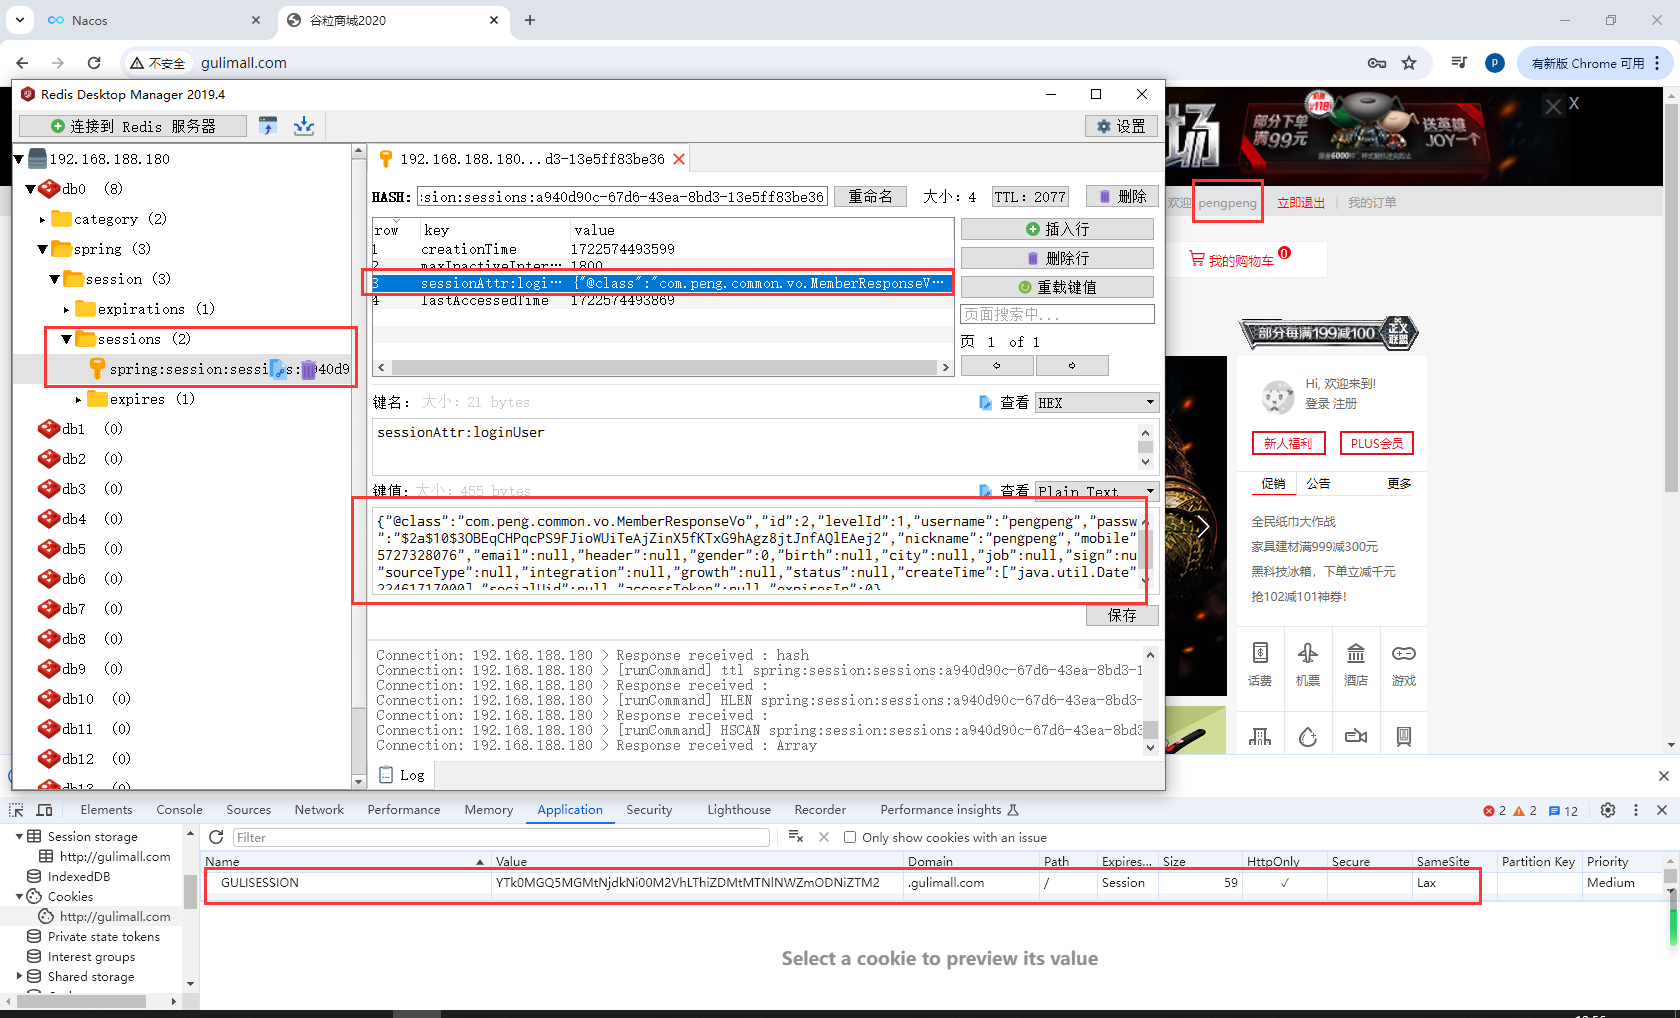
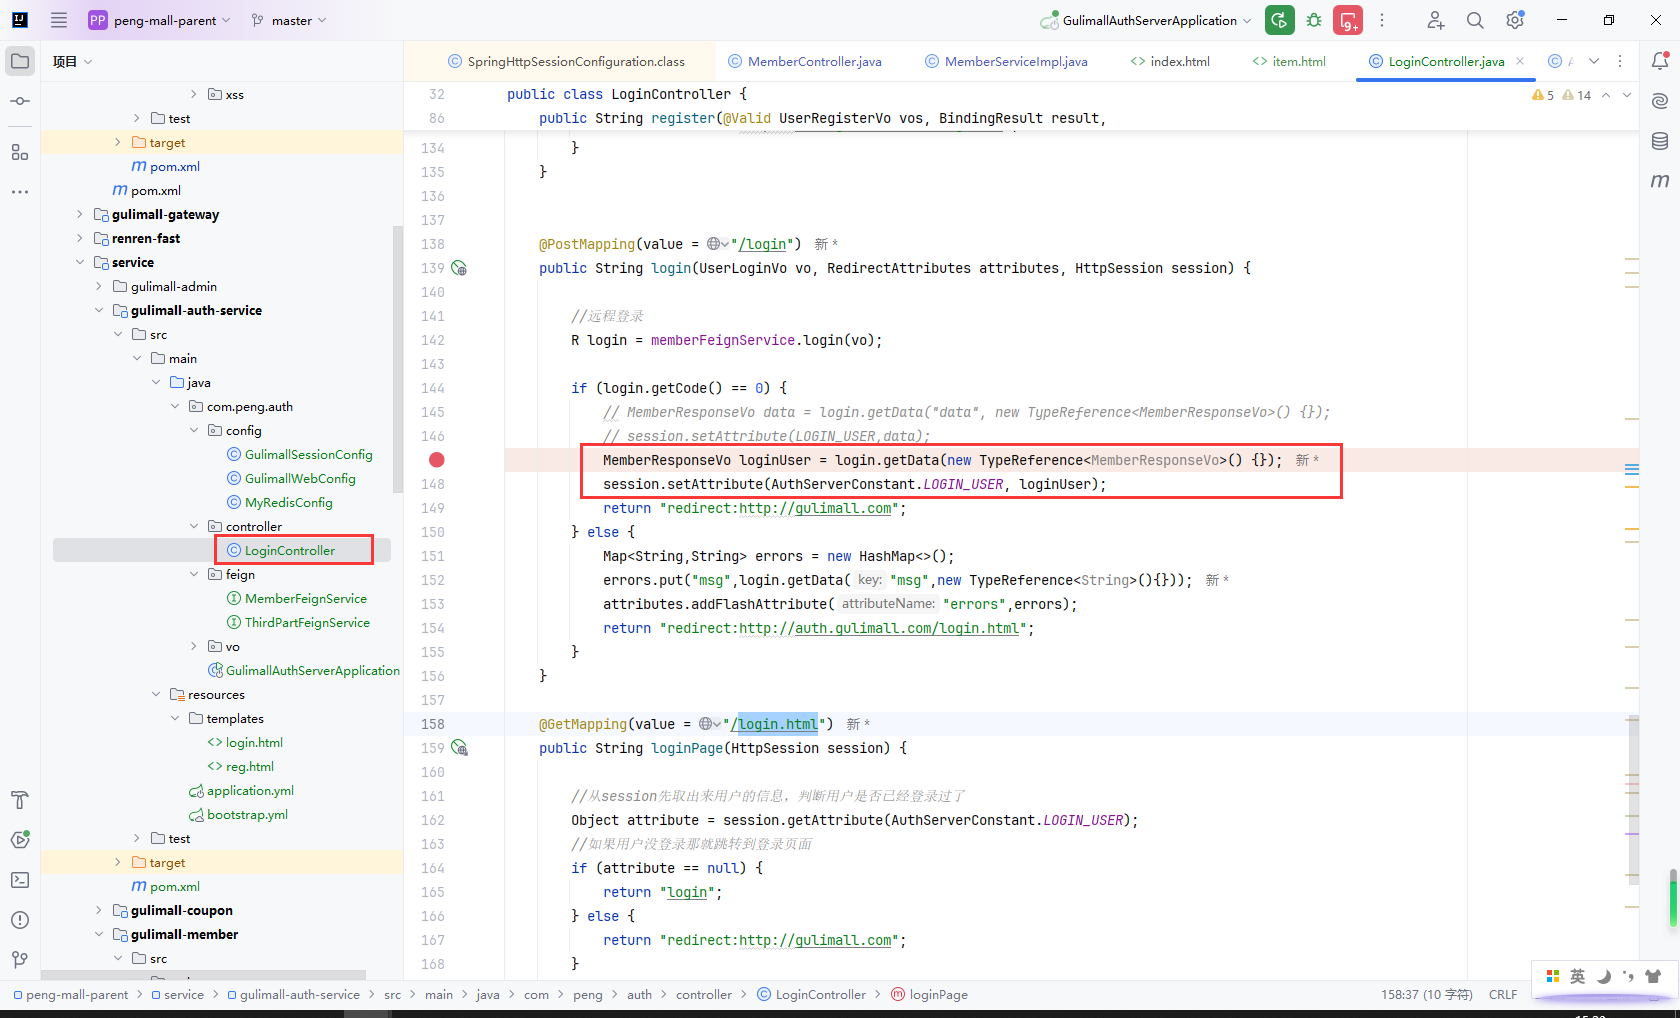
登录成功后,保存用户信息到session
因为微博登录需要申请开发者权限,这里暂时没有申请成功,使用登录功能一样可以测试session
MemberResponseVo loginUser = login.getData(new TypeReference<MemberResponseVo>() {});
session.setAttribute(AuthServerConstant.LOGIN_USER, loginUser);
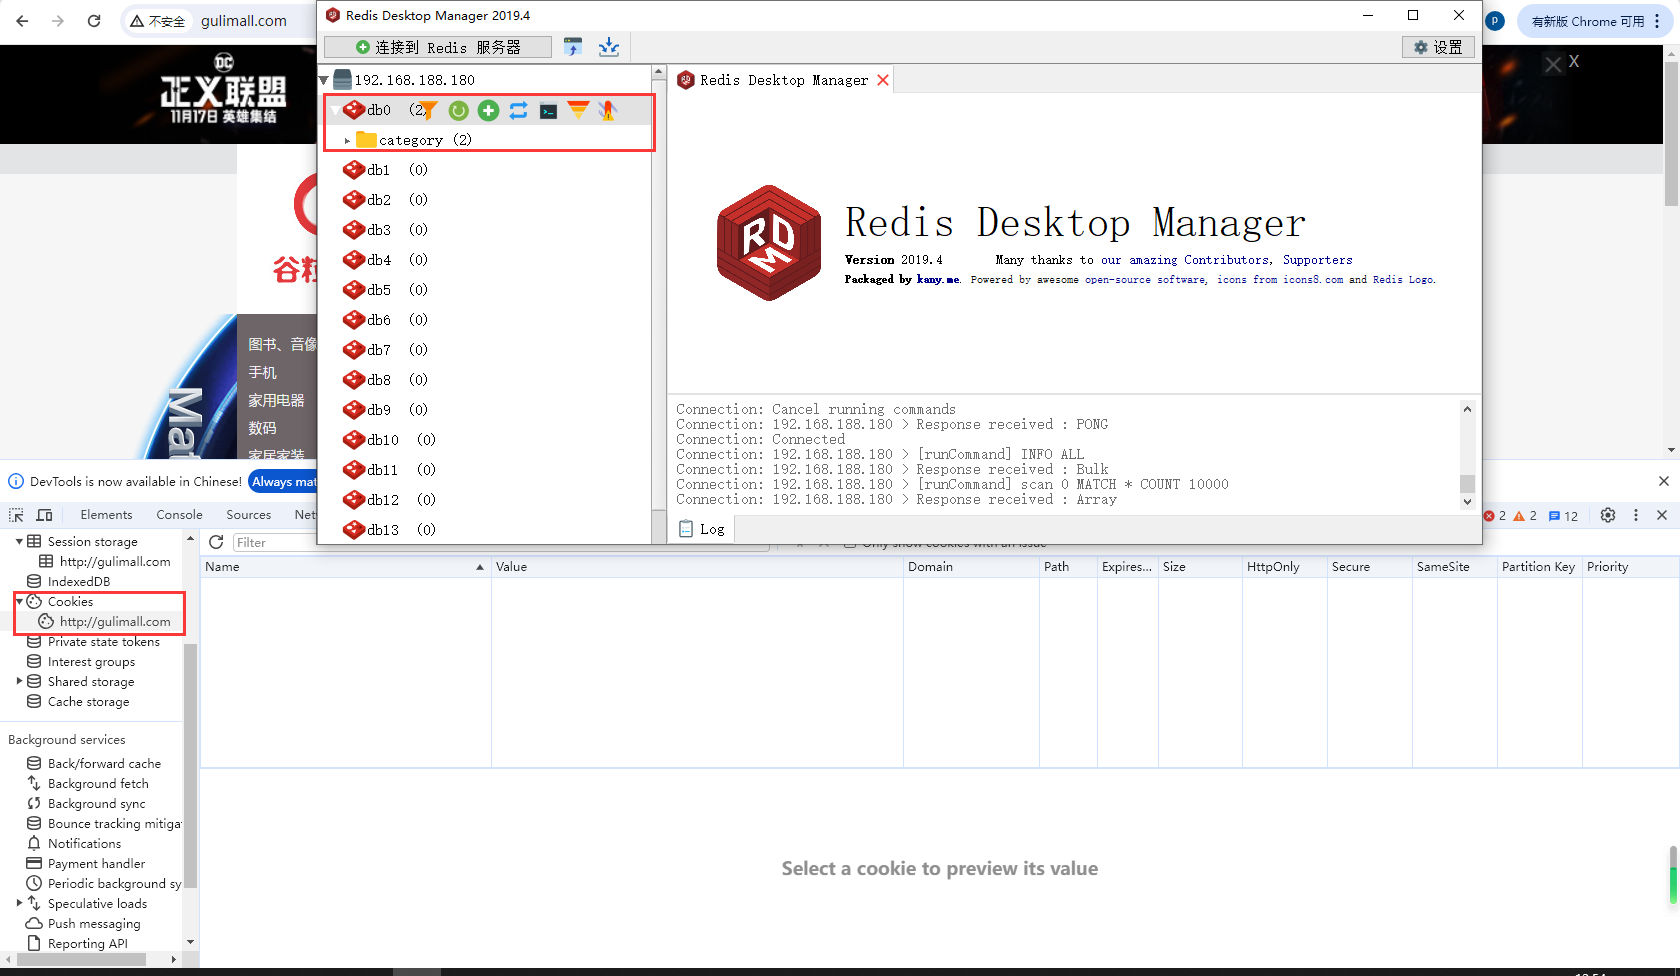
Redis里也保存成功session数据

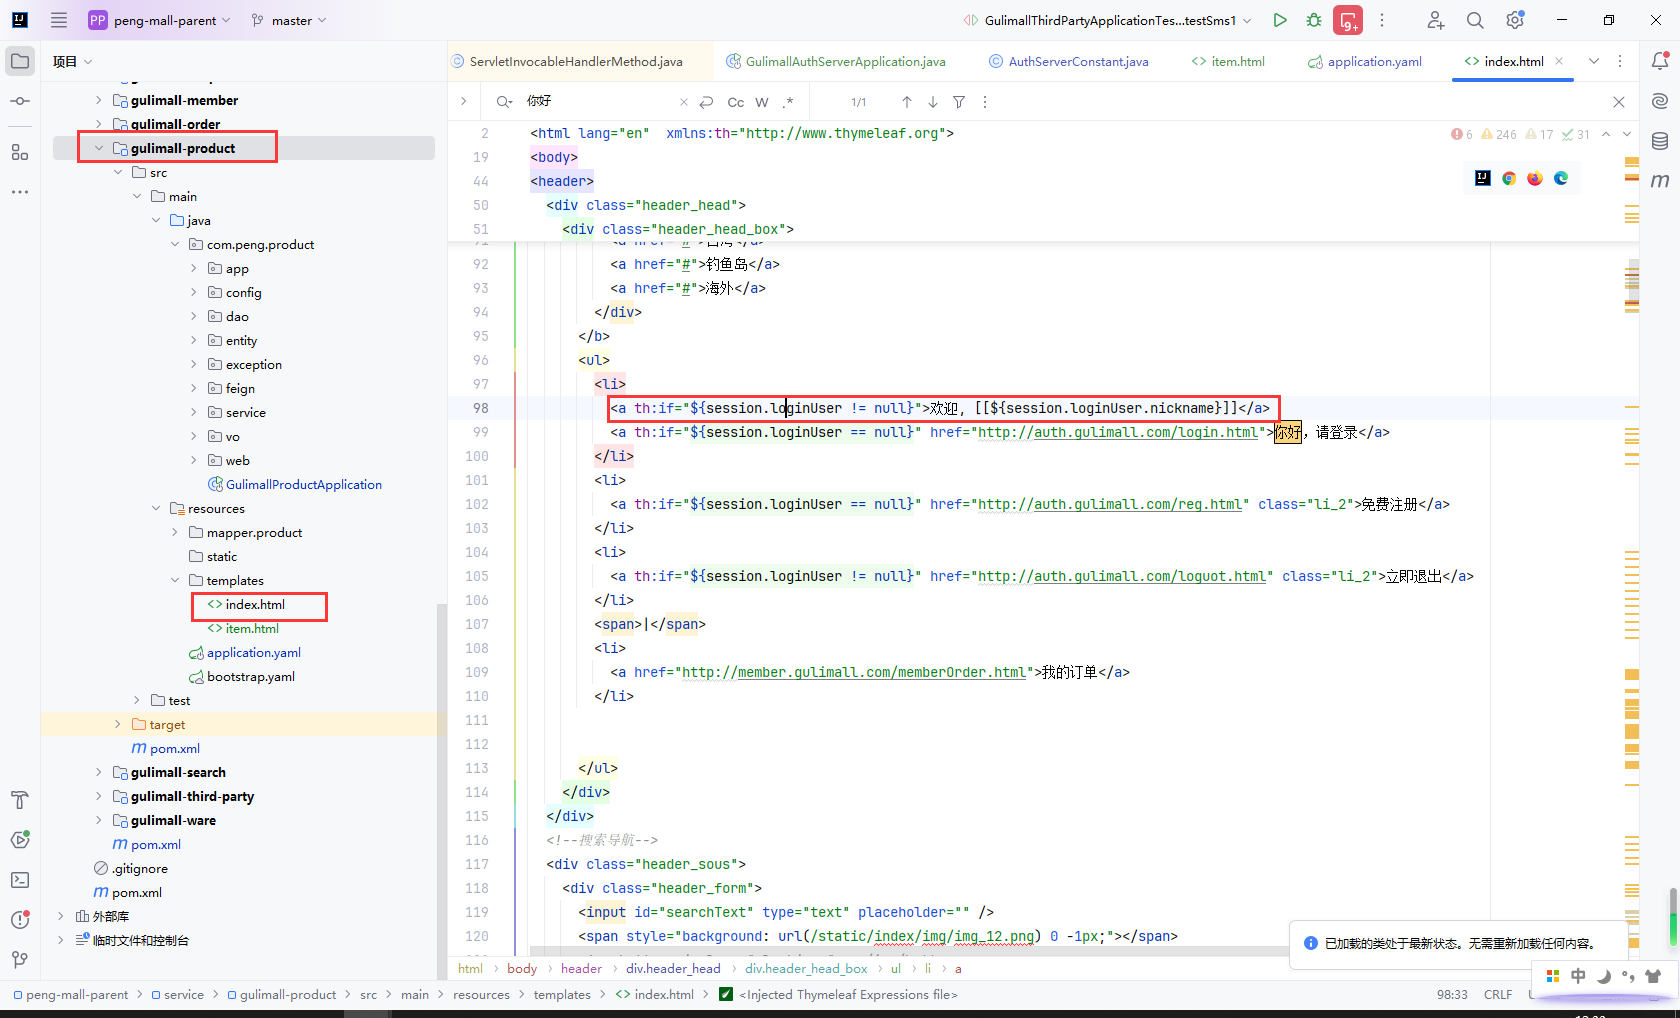
gulimall-product登录成功后获取session信息
<li>
  <a th:if="${session.loginUser != null}">欢迎, [[${session.loginUser.nickname}]]</a>
  <a th:if="${session.loginUser == null}" href="http://auth.gulimall.com/login.html">你好,请登录</a>
</li>
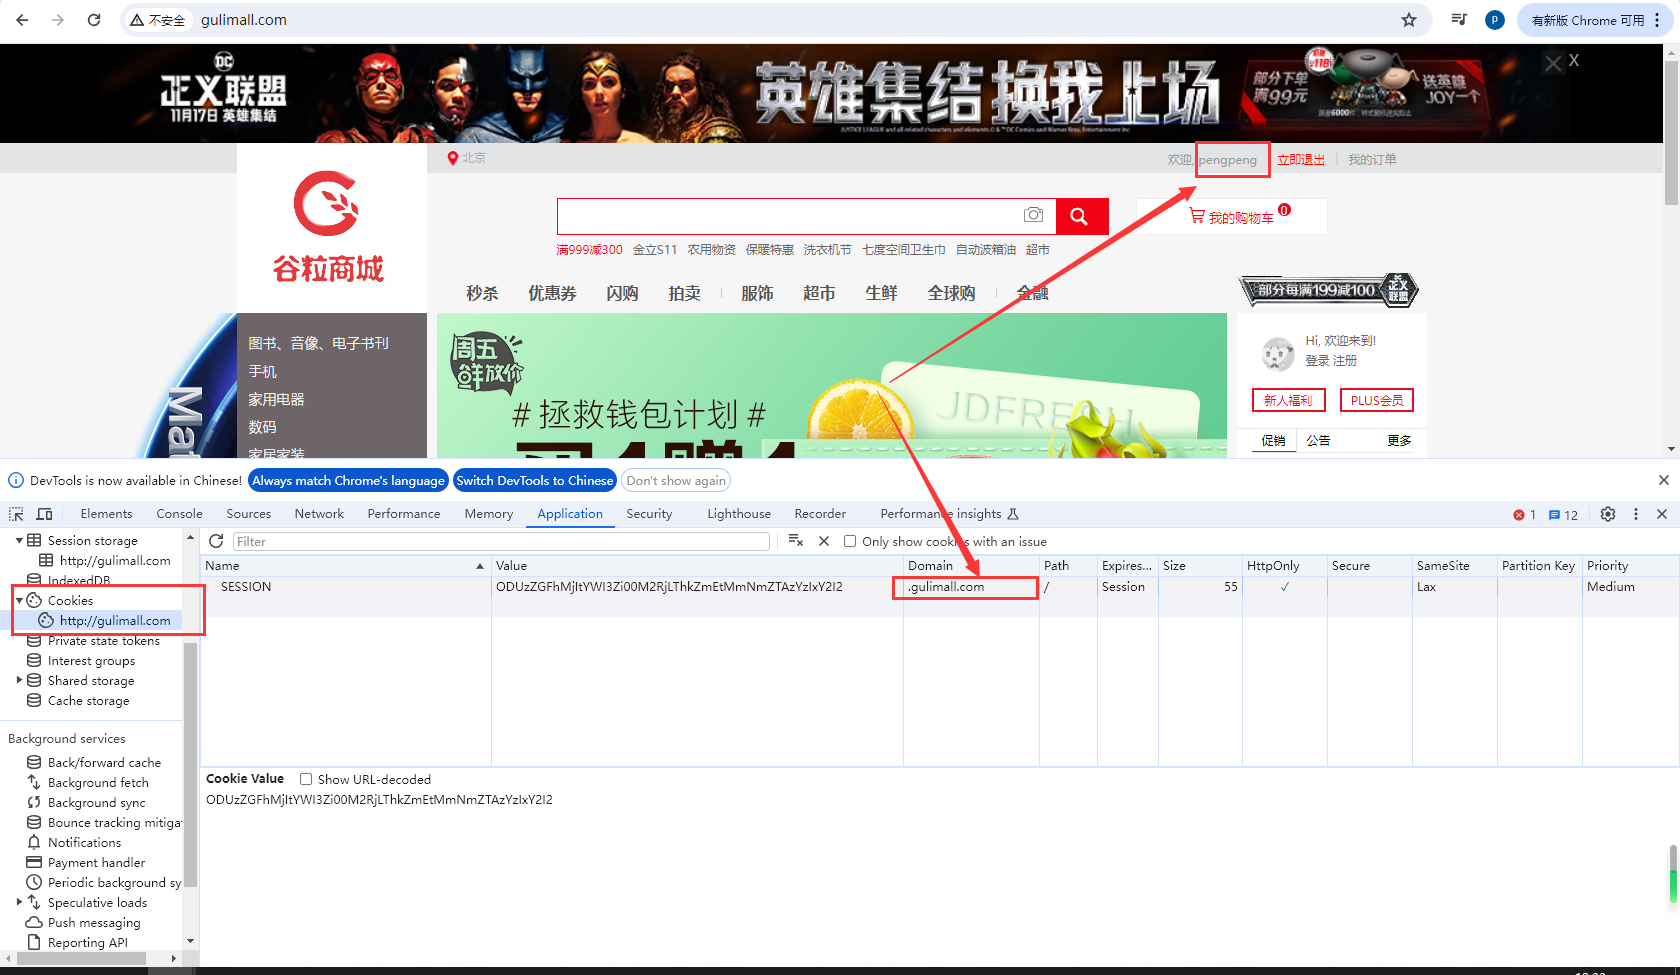
登录成功后,跳转到http://gulimall.com/,此时session的域名是auth.gulimall.com,因为子域名之间无法共享session,需要修改成父域名.gulimall.com,然后就可以正常获取session里的登录信息了
问题:Could not transfer artifact不知道这样的主机。
Could not transfer artifact org.springframework.session:spring-session-bom:pom:2.5.7 from/to alimaven (http://maven.aliyun.com/nexus/content/repositories/central/): 不知道这样的主机。 (maven.aliyun.com)
导入spring-session一只导入失败,后来注释掉relativePath正常了
9.18自定义SpringSession完成子域Session共享
主要步骤:
- 解决子域共享问题
JSON序列化保存session数据到Redis- 清空
Redis和浏览器中的session数据
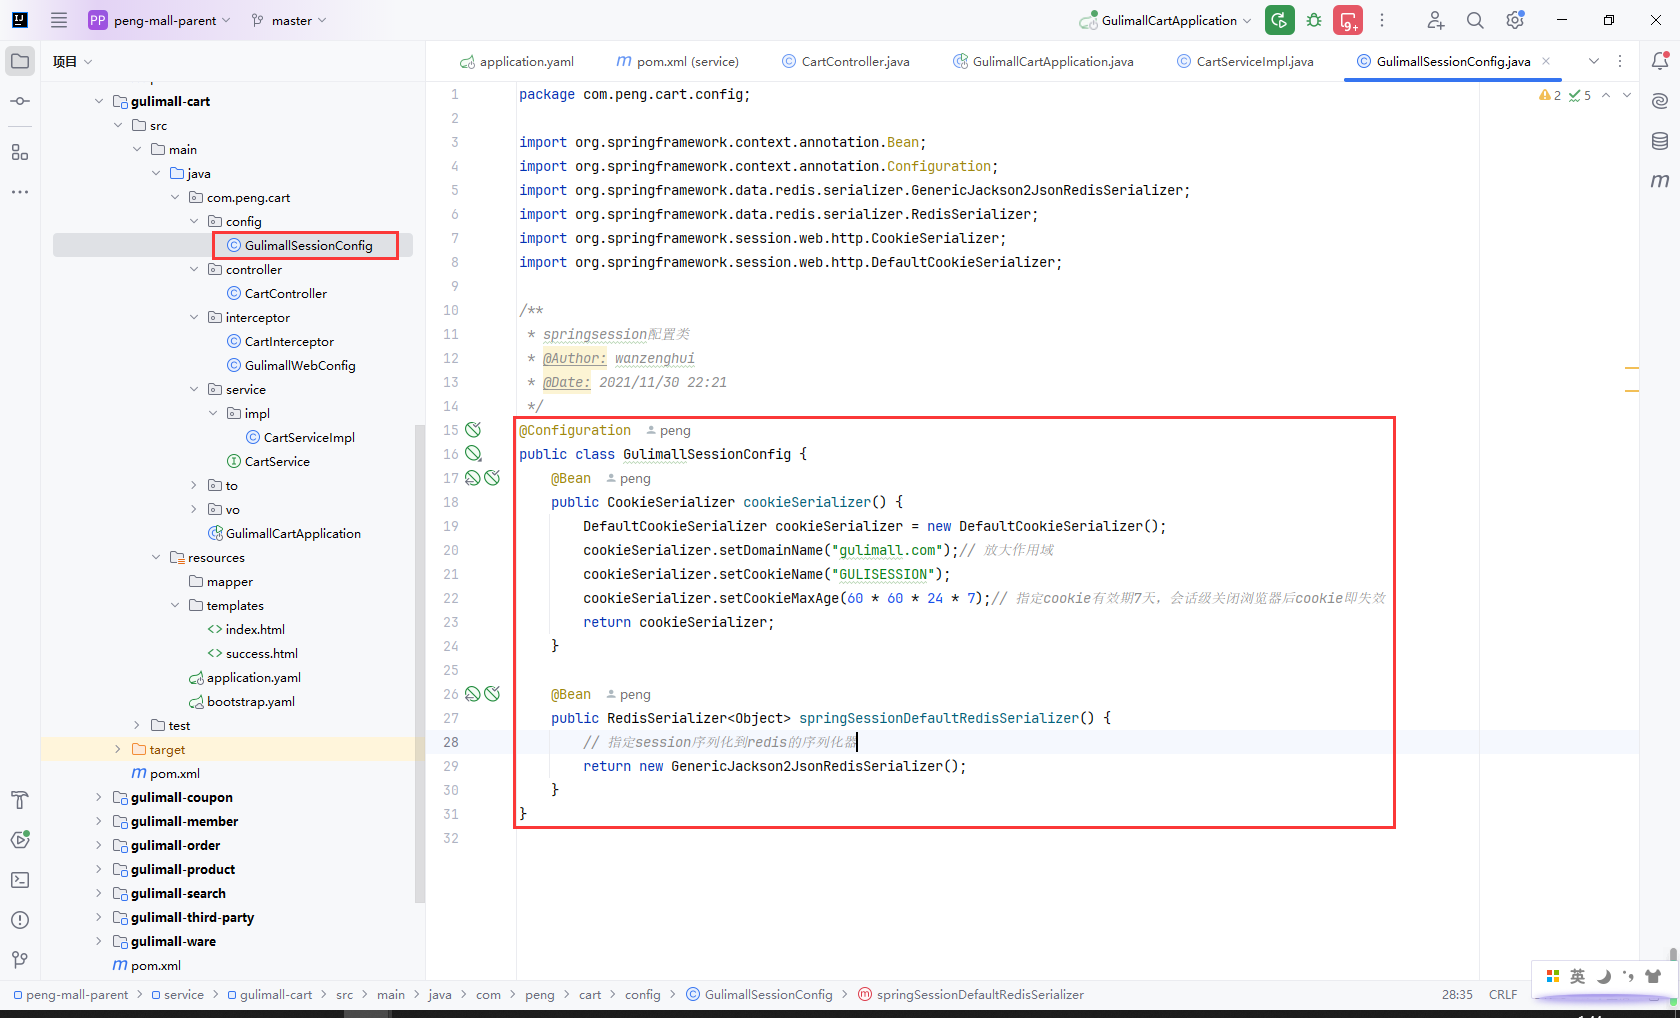
在gulimall-auth-service和gulimall-product中添加配置GulimallSessionConfig
- 设置父域名解决子域共享问题
- 使用
Jackson解决Redis数据序列化问题
@Configuration
public class GulimallSessionConfig {

    @Bean
    public CookieSerializer cookieSerializer() {

        DefaultCookieSerializer cookieSerializer = new DefaultCookieSerializer();
        //放大作用域
        cookieSerializer.setDomainName("gulimall.com");
        cookieSerializer.setCookieName("GULISESSION");
        return cookieSerializer;
    }

    @Bean
    public RedisSerializer<Object> springSessionDefaultRedisSerializer() {
        return new GenericJackson2JsonRedisSerializer();
    }
}
重启gulimall-auth-service和gulimall-product,然后清空Redis和浏览器中的session数据
重新登录
9.19SpringSession原理
主要步骤:
- 1.
EnableRedisHttpSession导入RedisHttpSessionConfiguration - 2.
RedisHttpSessionConfiguration添加了一个组件RedisIndexedSessionRepository封装Redis操作session的增删改查 - 3.
RedisHttpSessionConfiguration继承了SpringHttpSessionConfiguration,SpringHttpSessionConfiguration注入了SessionRepositoryFilter,每个请求都必须经过filter SessionRepositoryFilter创建的时候构造器注入了SessionRepositorySessionRepositoryFilter的方法doFilterInternal包装了request、responseSessionRepositoryRequestWrapperSessionRepositoryResponseWrapper
SessionRepositoryFilter的方法getSession是从sessionRepository获取的
EnableRedisHttpSession导入RedisHttpSessionConfiguration
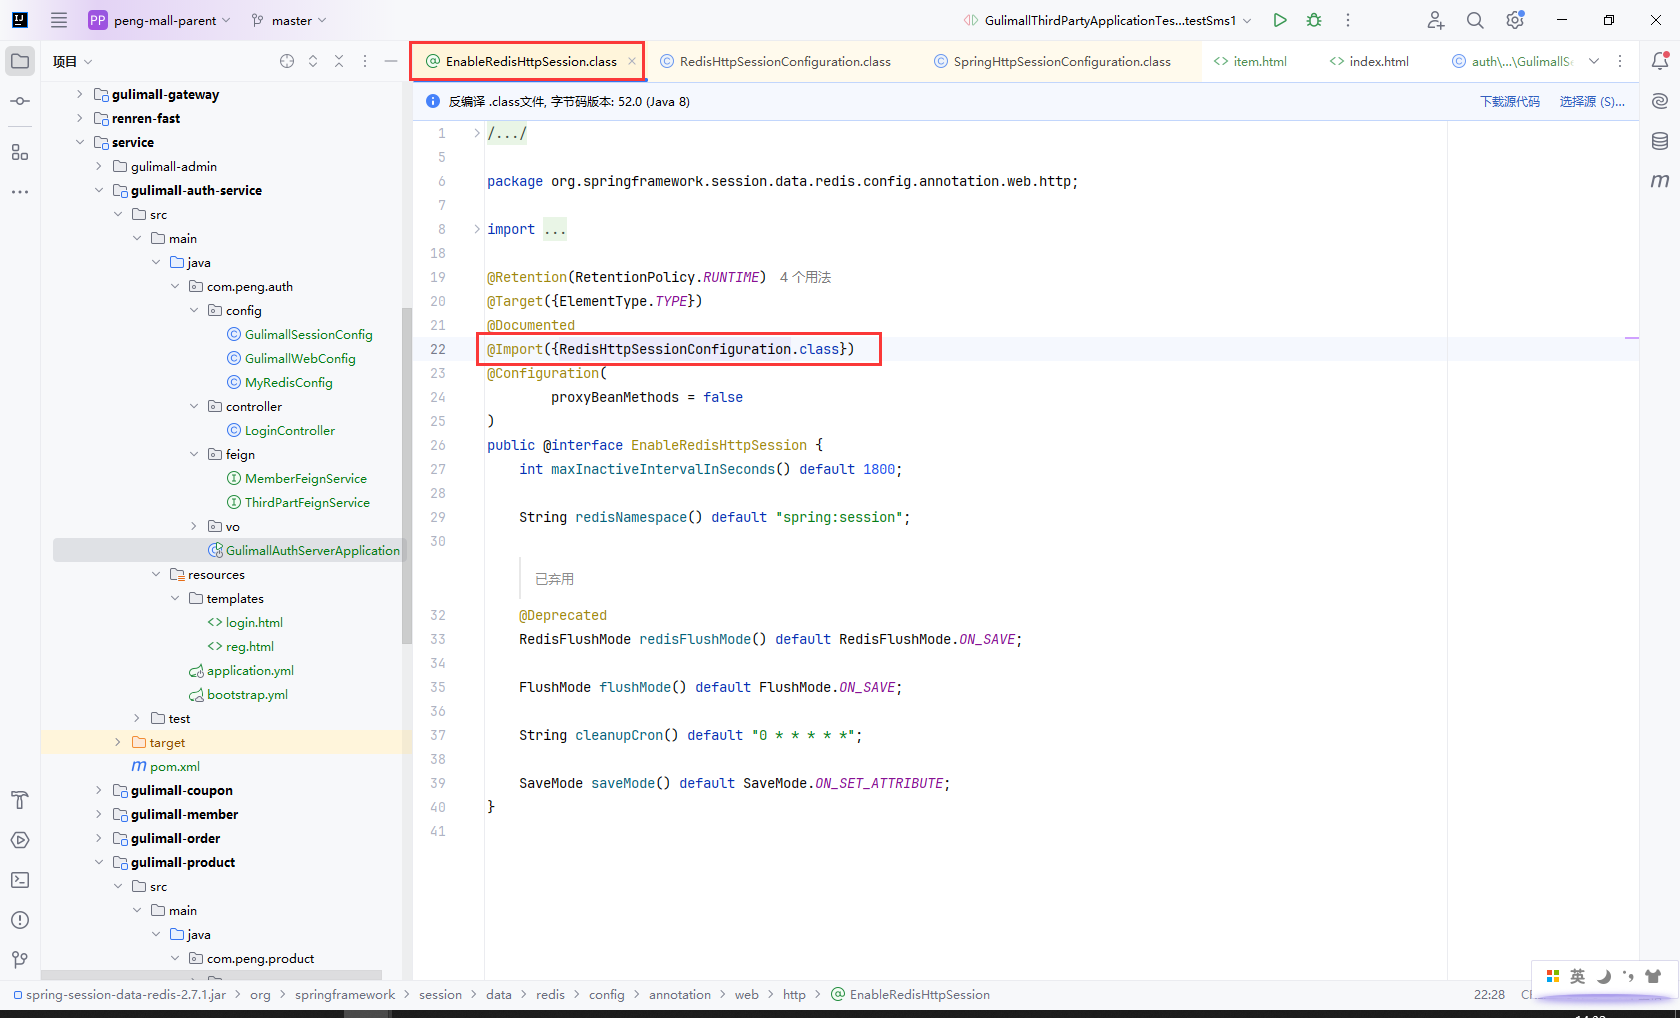
RedisHttpSessionConfiguration添加了一个组件RedisIndexedSessionRepository封装Redis操作session的增删改查
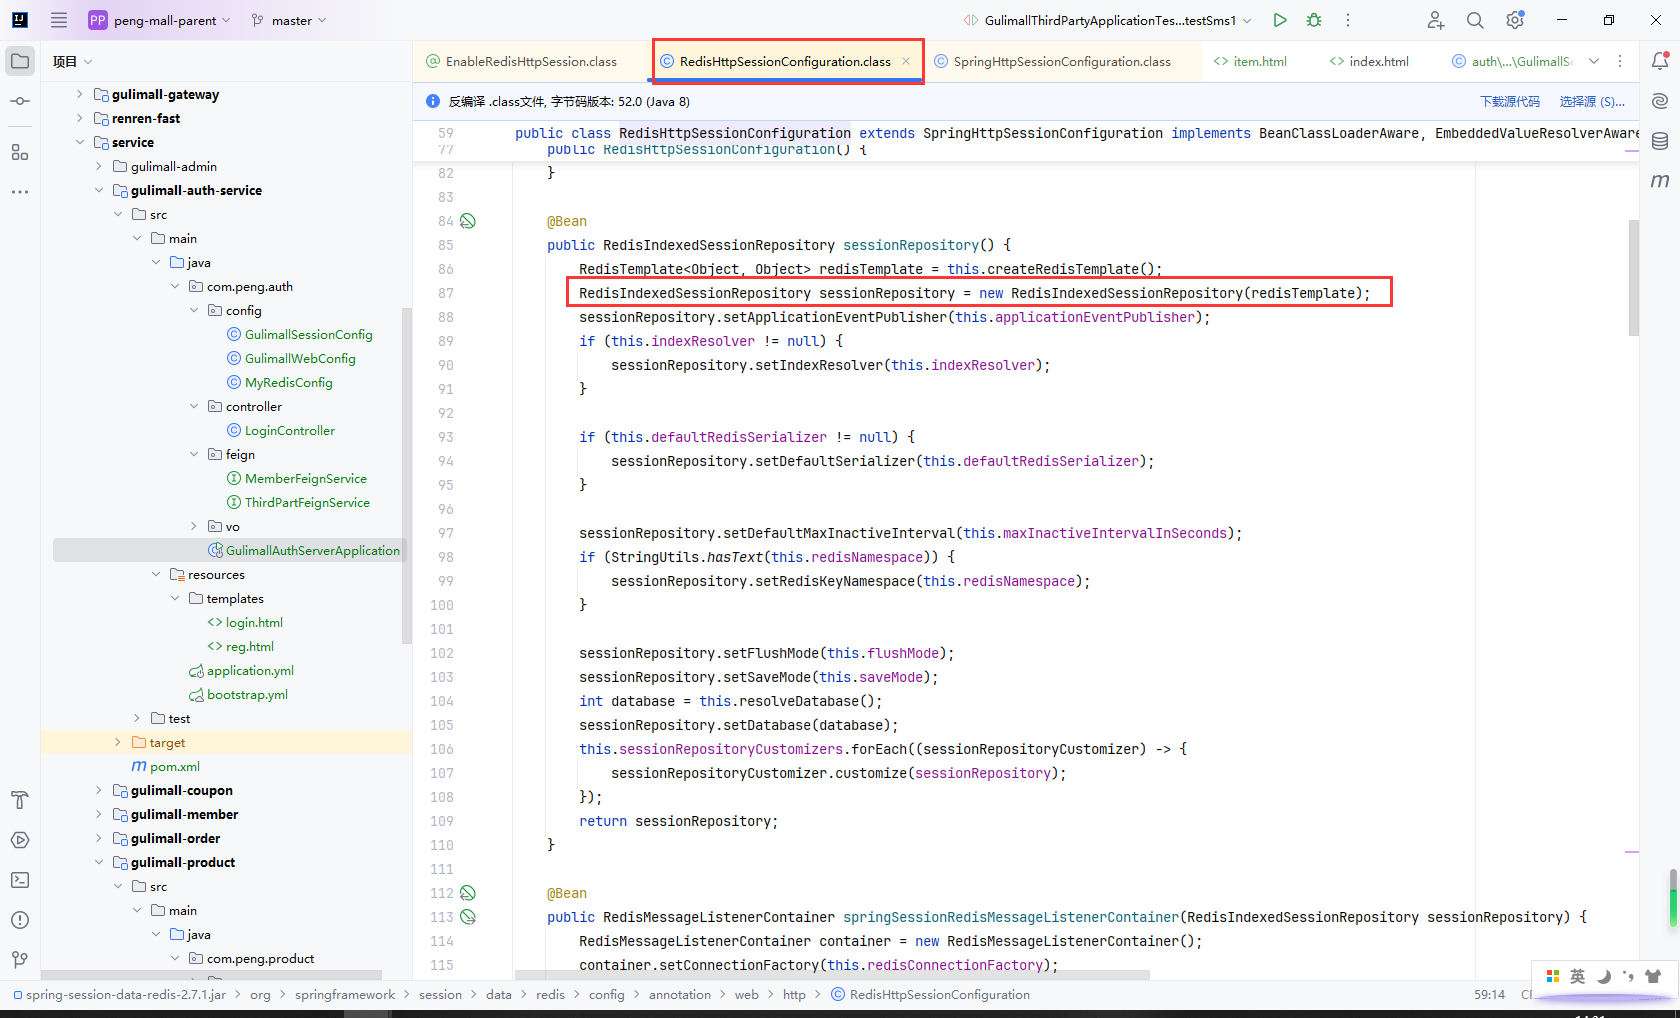
RedisIndexedSessionRepository的主要方法

RedisHttpSessionConfiguration继承了SpringHttpSessionConfiguration,

SpringHttpSessionConfiguration注入了SessionRepositoryFilter,每个请求都必须经过filter
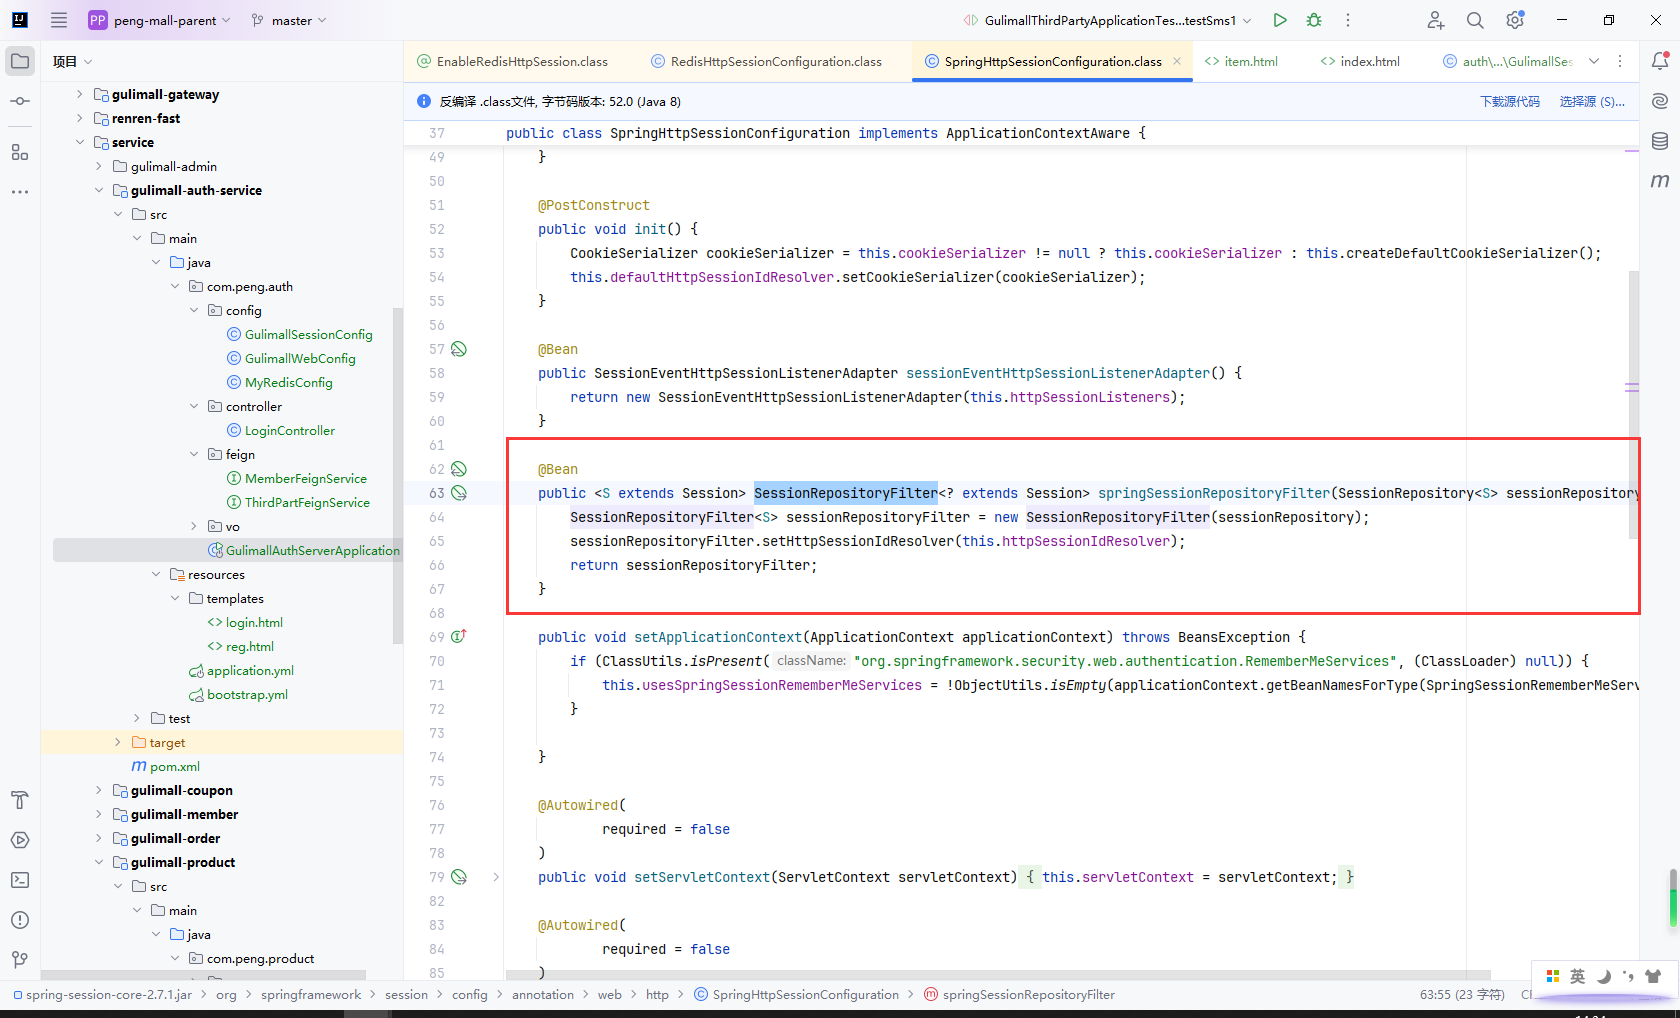
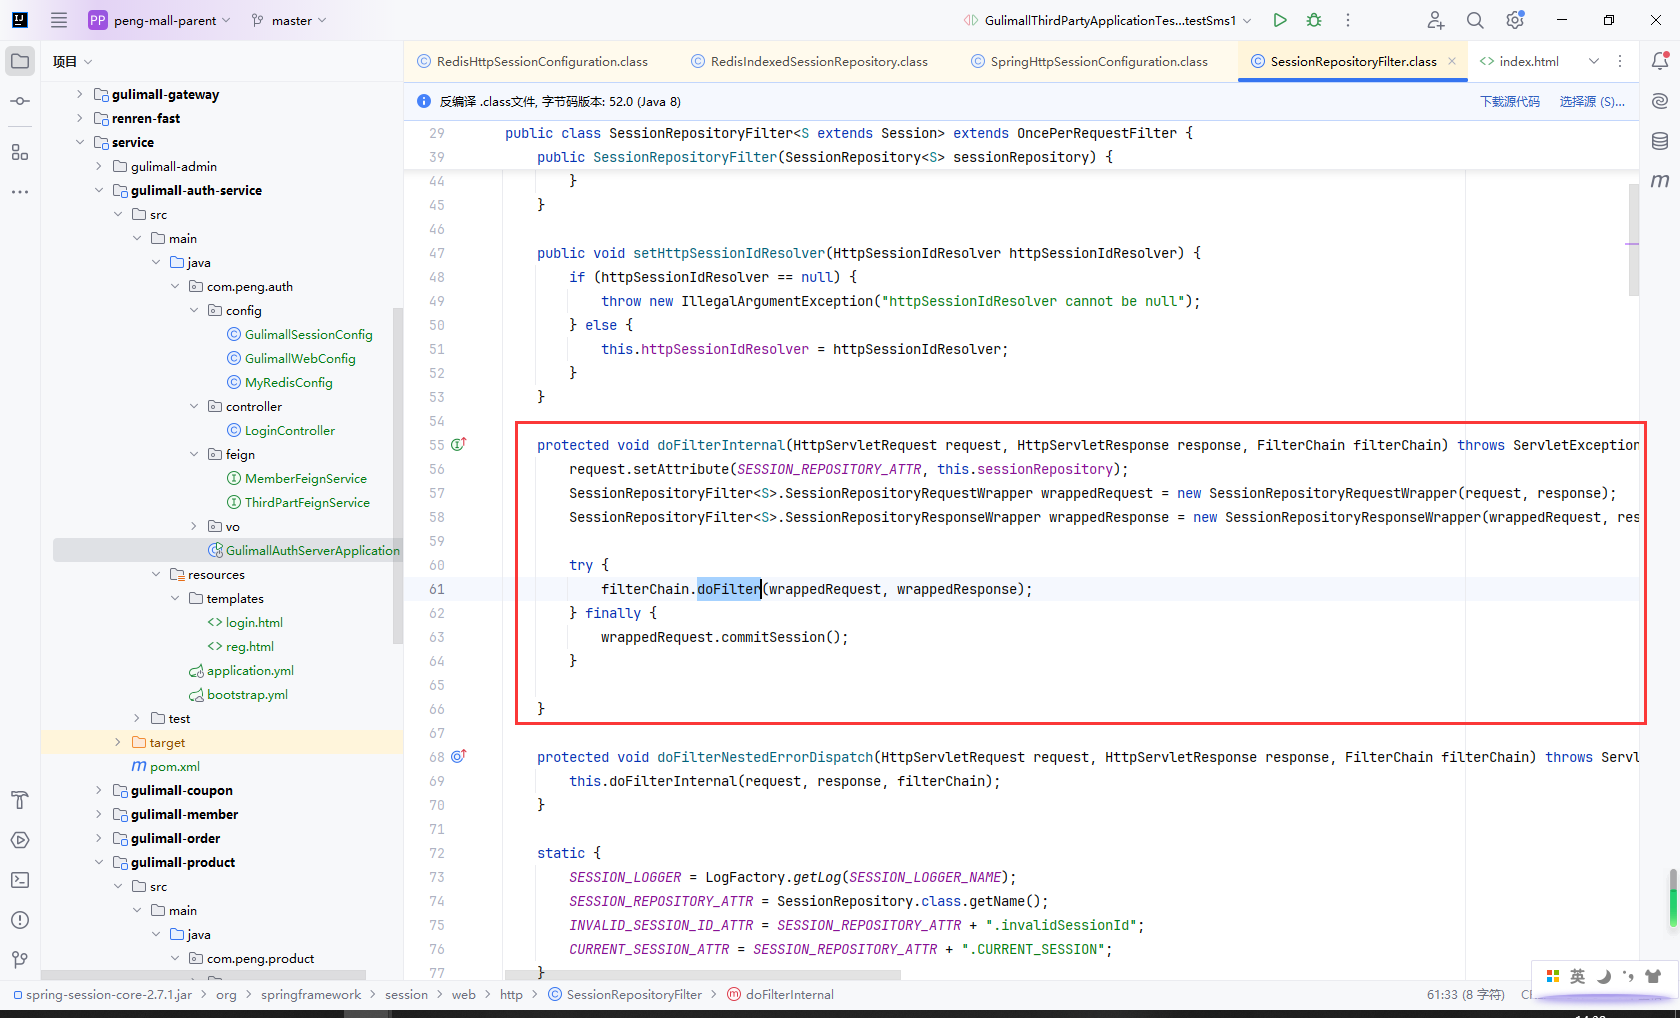
SessionRepositoryFilter的方法doFilterInternal包装了request、response
SessionRepositoryRequestWrapperSessionRepositoryResponseWrapper
SessionRepositoryFilter 的getSession方法
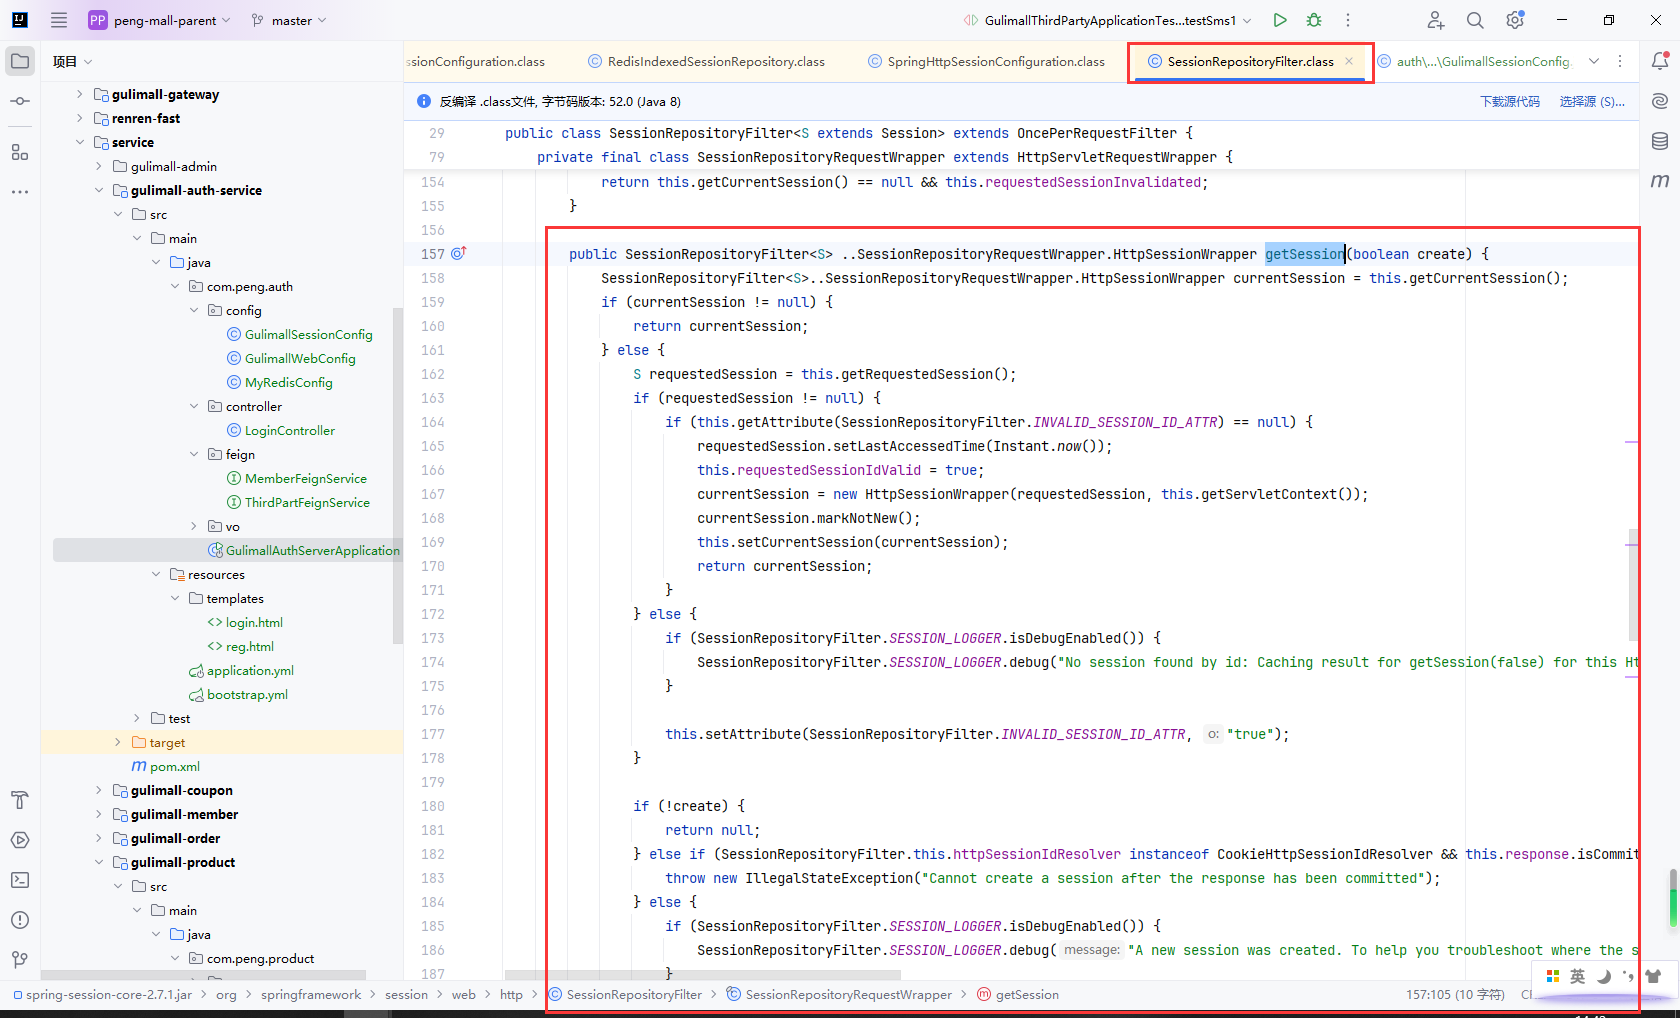
SessionRepositoryFilter的方法getSession是从sessionRepository获取的

9.20页面效果完成
主要步骤:
- 1.登录成功设置
session信息 - 2.登录成功不能跳转
login.html登录页 - 3.
gulimall-search搜索服务添加SpringSession配置 - 4.商品搜索页和商品详情页都需要更新登录信息
gulimall-search的list.htmlgulimall-product的item.html
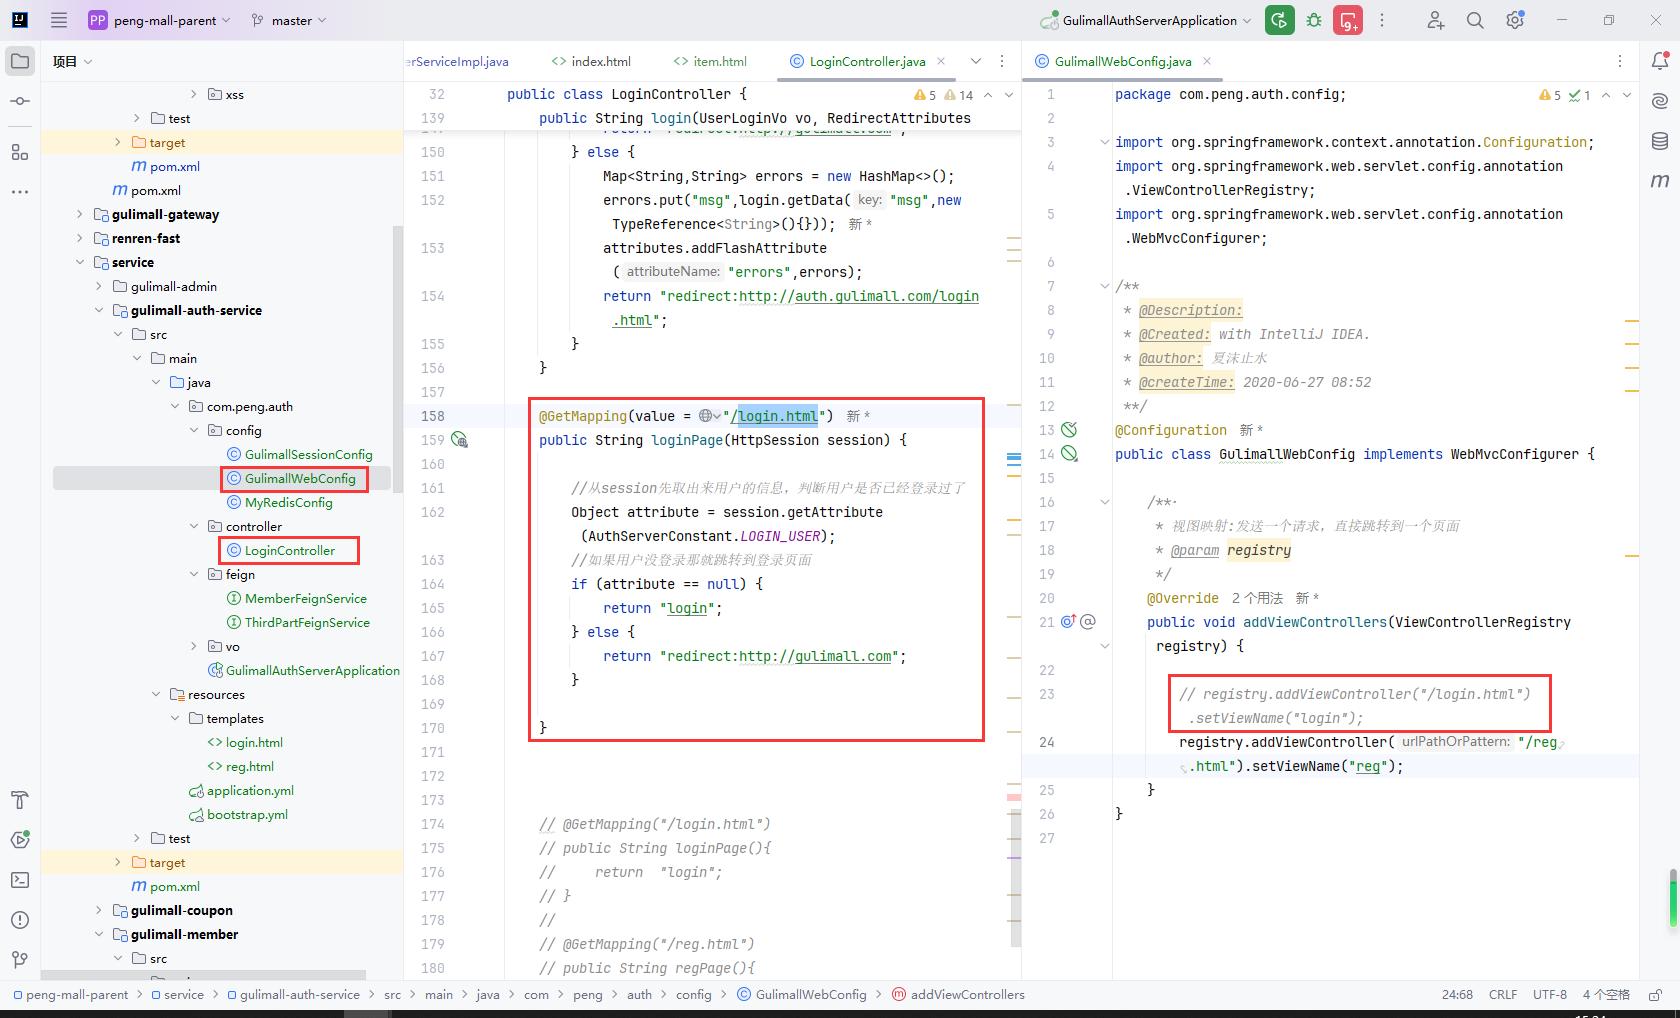
登录成功设置session信息
登录成功不能跳转login.html登录页
-
注释
GulimallWebConfig跳转login.html自定义导航 -
loginPage方法用于判断跳转login.html时如果登录直接跳转首页
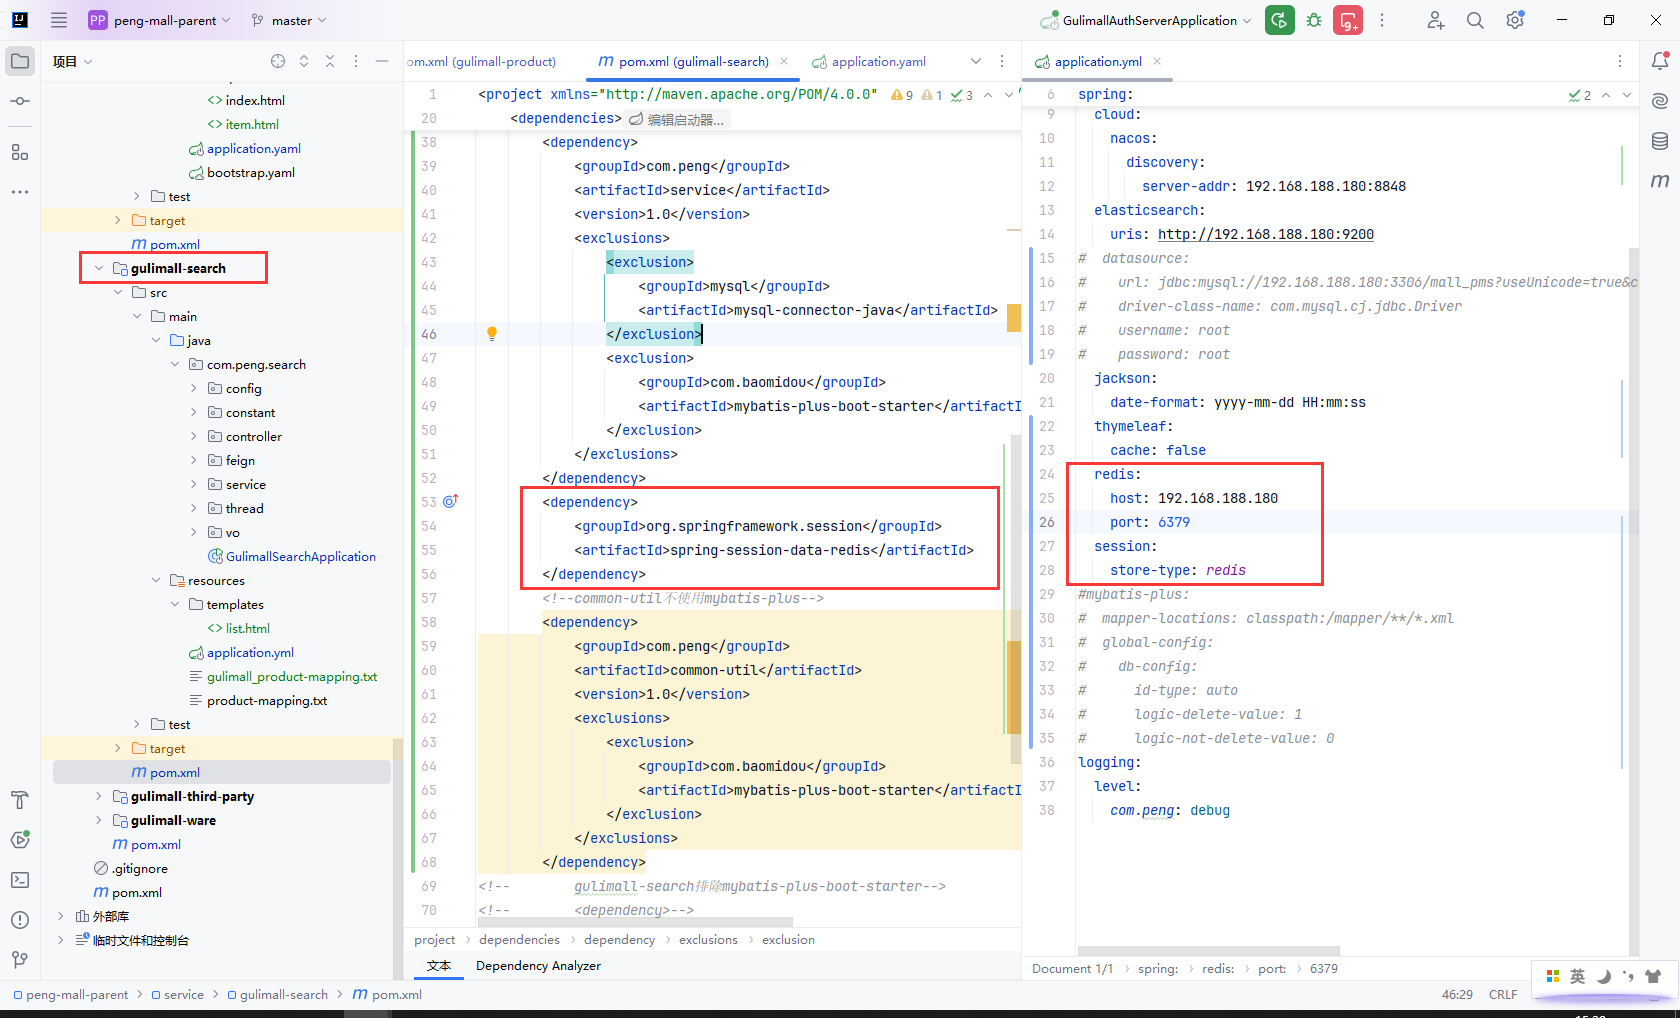
gulimall-search导入SpringSession依赖
<dependency>
    <groupId>org.springframework.session</groupId>
    <artifactId>spring-session-data-redis</artifactId>
</dependency>
并添加Redis和SpringSession配置
server:
  port: 8208
  servlet:
    session:
      timeout: 30m
spring:
  redis:
    host: 192.168.188.180
    port: 6379
  session:
    store-type: redis
商品搜索页和商品详情页都需要更新登录信息
gulimall-search的list.html
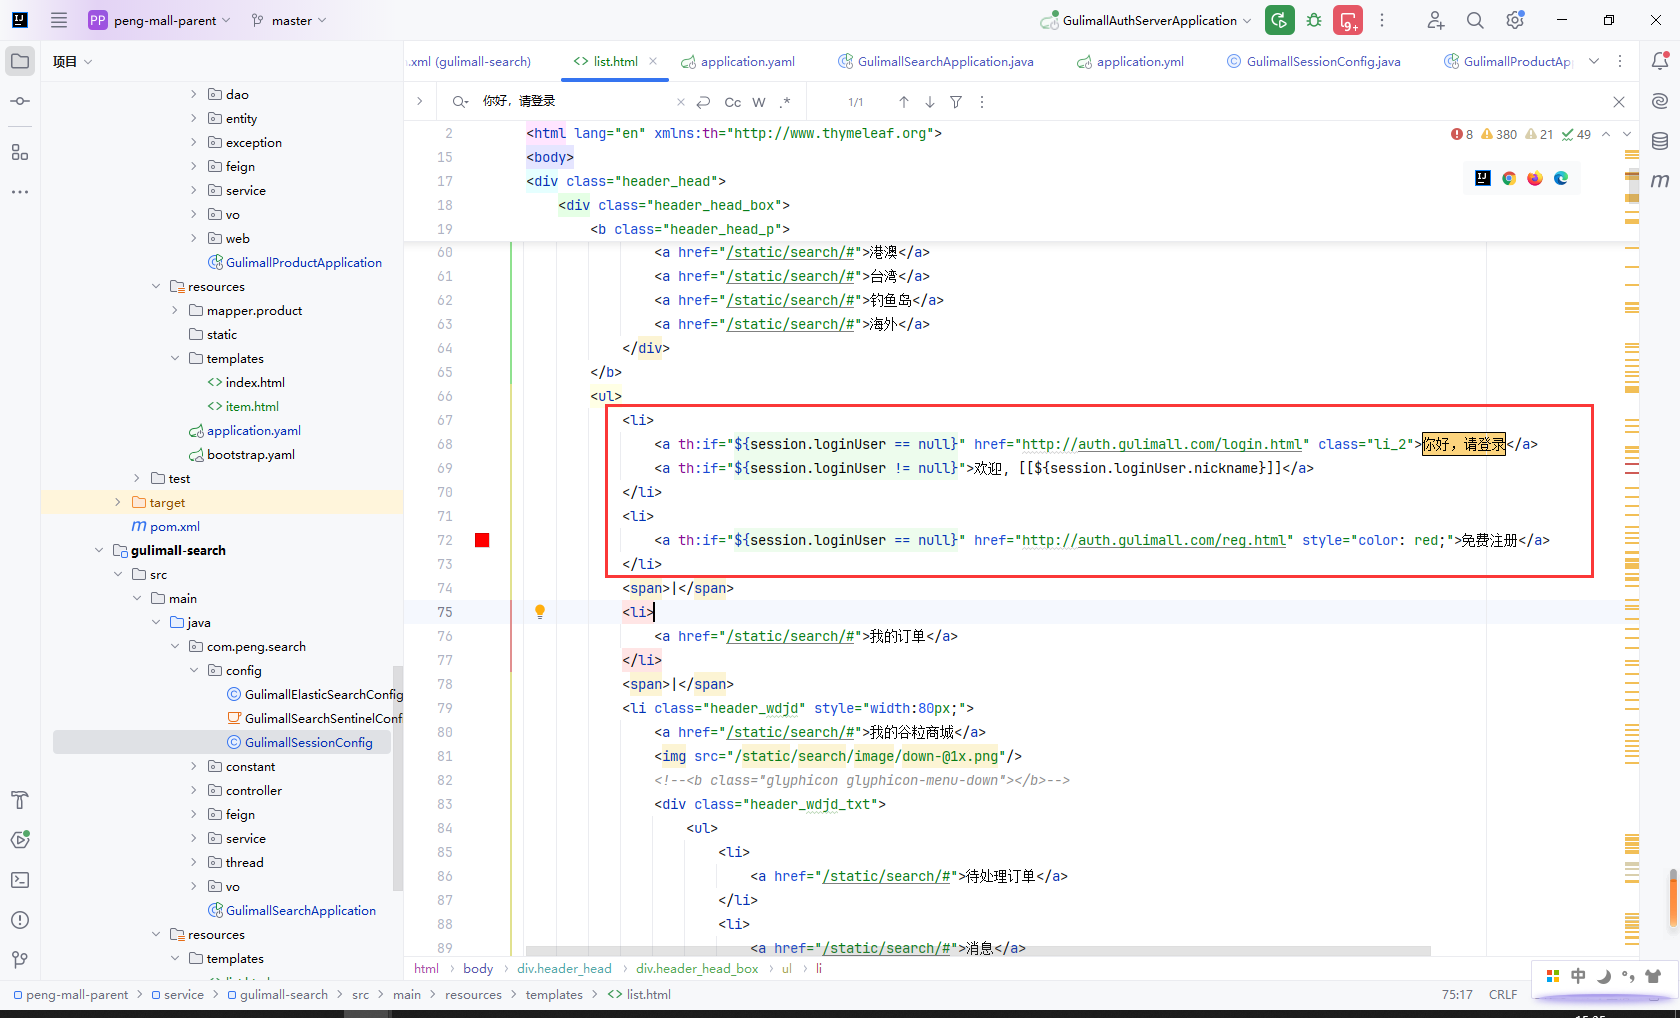
gulimall-product的item.html
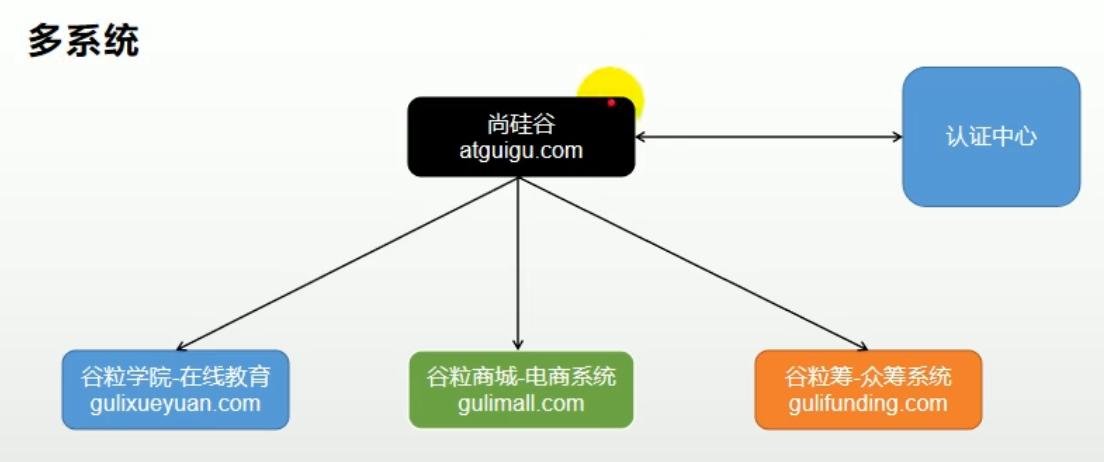
9.21单点登录简介
多个不同域名下,springsession无法共享
单点登录特性:非父子域名下共享登录状态
- 一处退出,处处退出
- 一处登录,处处登录
原理:
- 1.客户端访问认证中心并带上回调url,进行登录
- 2.登录成功认证中心域名下设置cookie,并跳转url?token=xxx,携带token参数
- 3.客户端根据tokne请求认证中心获取用户信息【微博是用code获取AcsessToken,然后根据AcsessToken获取信息】
- 4.客户端2再访问认证中心时,会带上浏览器存储的cookie,从而直接登录通过
9.22框架效果演示
主要步骤:
- 在
gitee搜索xxl-sso,然后下载 - 配置
hosts文件 - 配置单点登录服务
xxl-sso-server - 配置测试客户端
xxl-sso-server\xxl-sso-samples\xxl-sso-web-sample-springboot xxl-sso项目打包- 运行单点服务和客户端服务
在gitee搜索xxl-sso,然后下载
地址:https://gitee.com/xuxueli0323/xxl-sso

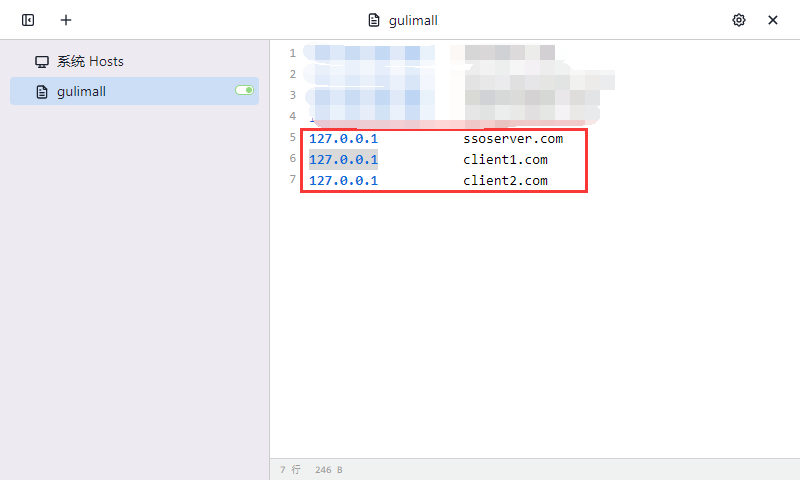
配置hosts文件
127.0.0.1           ssoserver.com
127.0.0.1           client1.com
127.0.0.1           client2.com
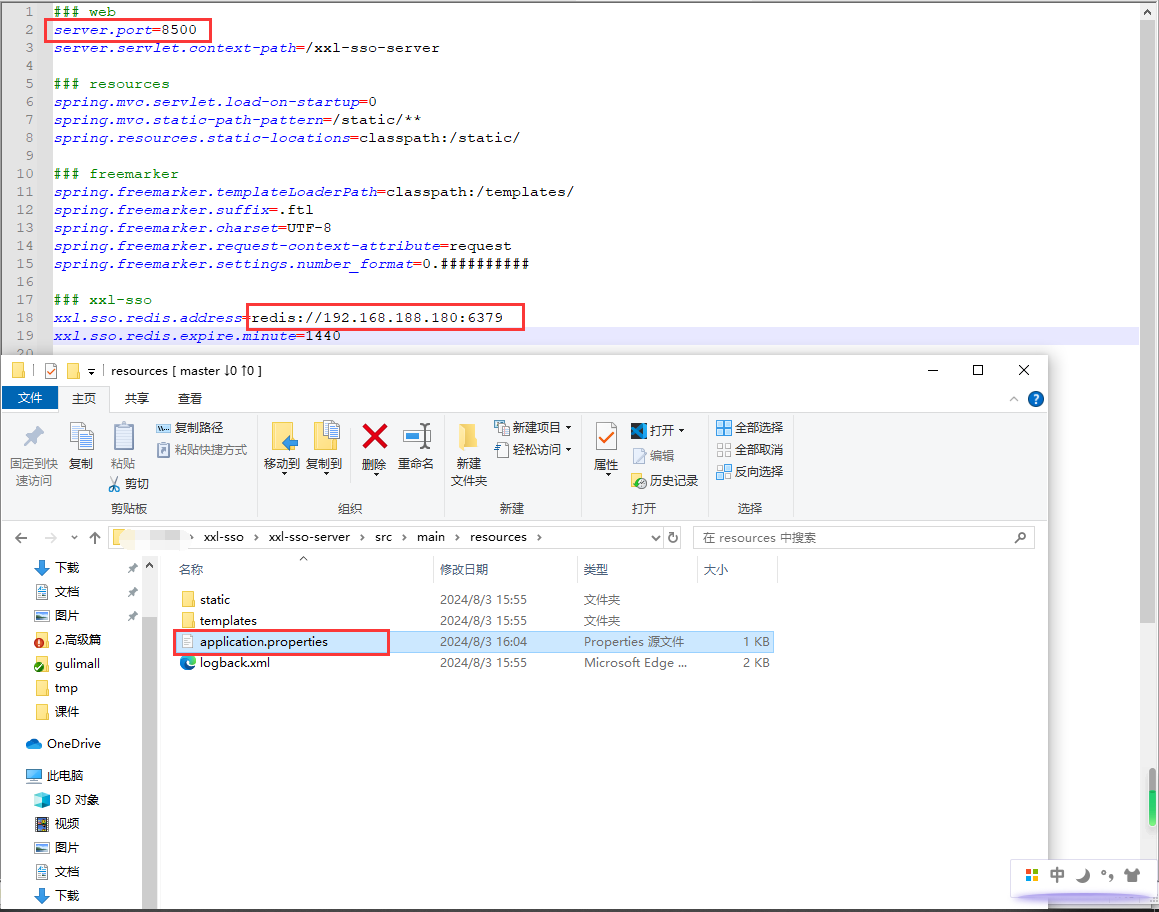
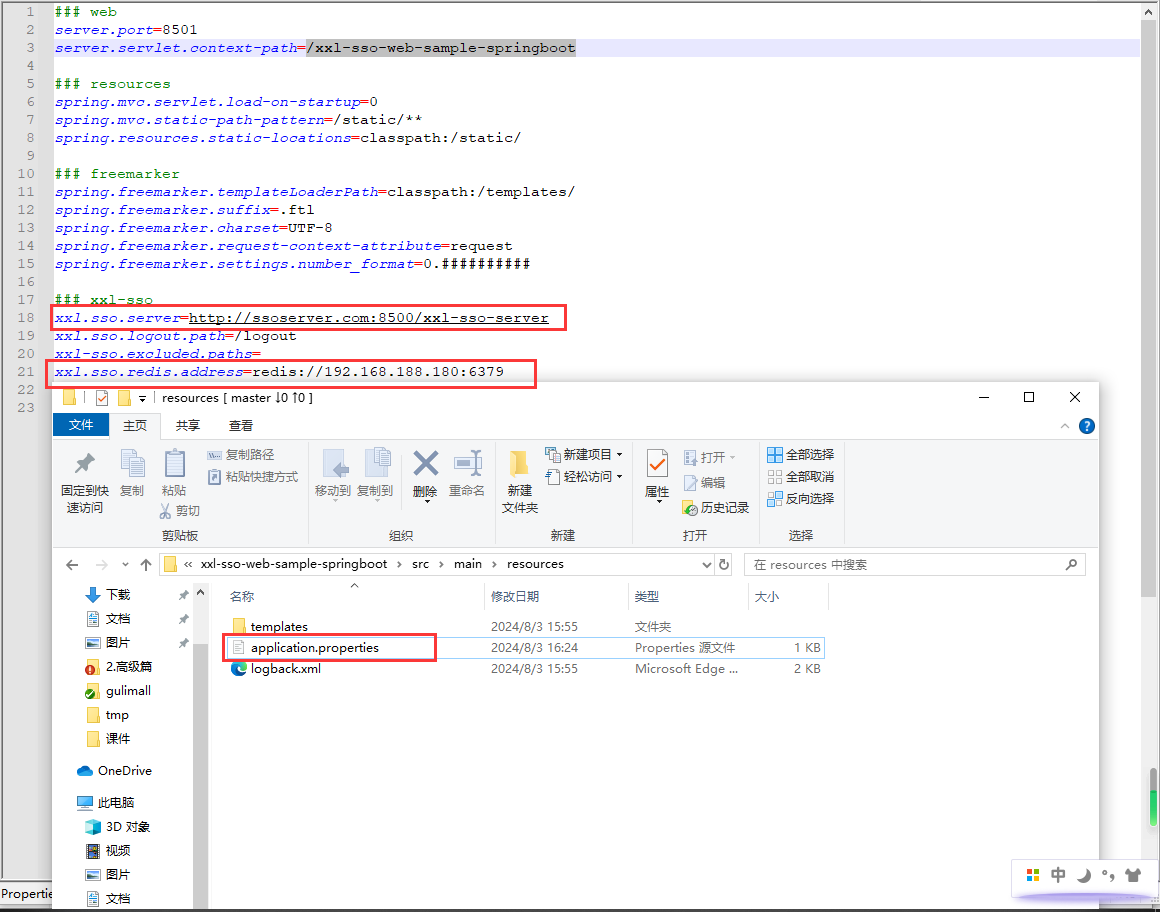
配置单点登录服务xxl-sso-server
在目录下.\xxl-sso\xxl-sso-server\src\main\resources\application.properties
主要配置运行端口(这里为了防止端口冲突)和redis地址
配置测试客户端xxl-sso-server\xxl-sso-samples\xxl-sso-web-sample-springboot
在目录下.\xxl-sso\xxl-sso-samples\xxl-sso-web-sample-springboot\src\main\resources\application.properties
主要配置单点登录服务和redis地址
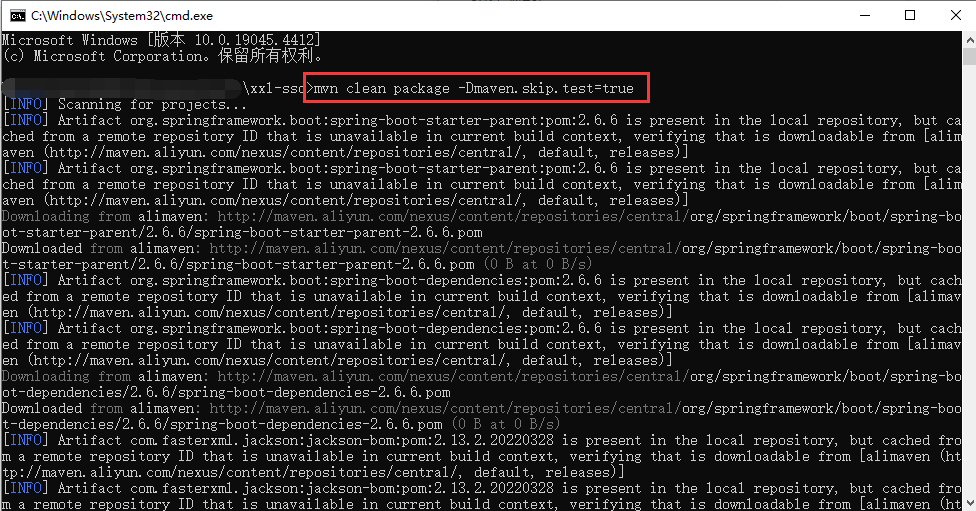
xxl-sso项目打包
mvn clean package -Dmaven.skip.test=true
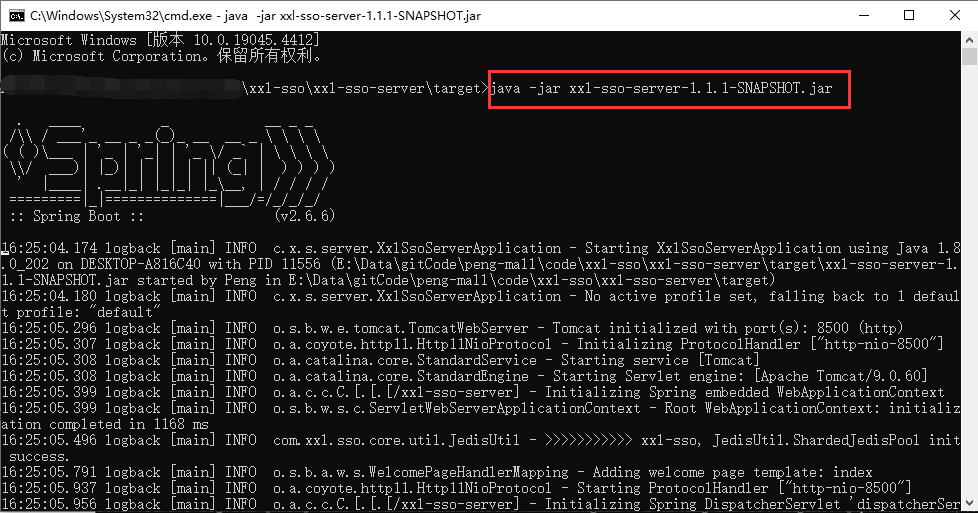
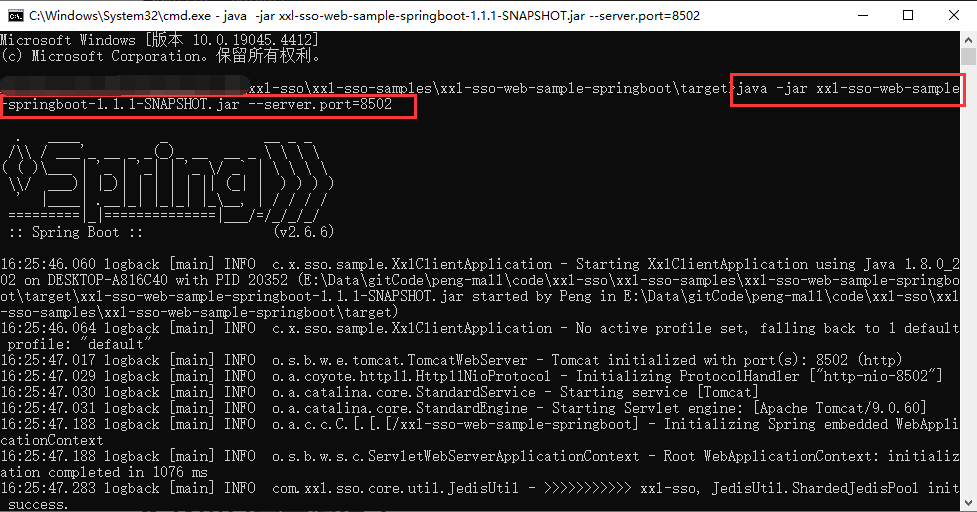
运行单点服务
java -jar xxl-sso-server-1.1.1-SNAPSHOT.jar
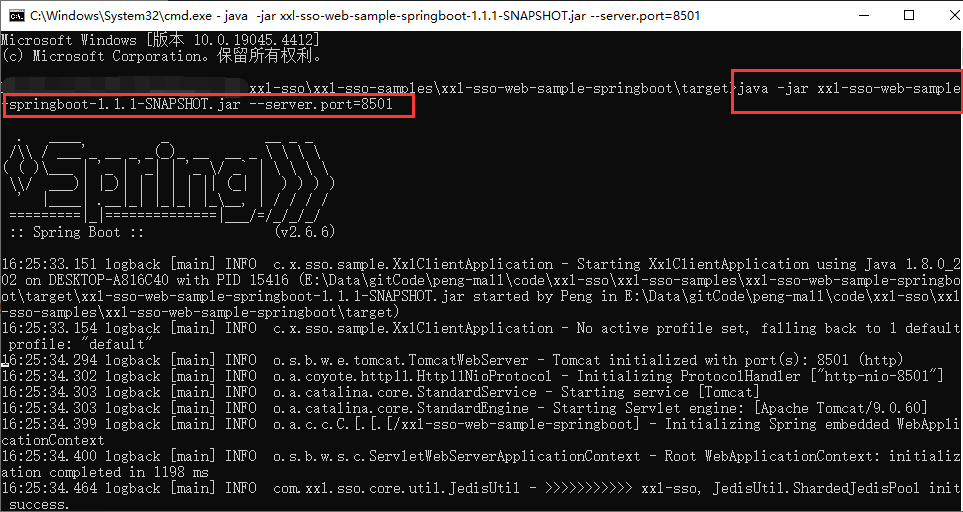
运行客户端服务1
java -jar xxl-sso-web-sample-springboot-1.1.1-SNAPSHOT.jar --server.port=8501
运行客户端服务2
java -jar xxl-sso-web-sample-springboot-1.1.1-SNAPSHOT.jar --server.port=8502
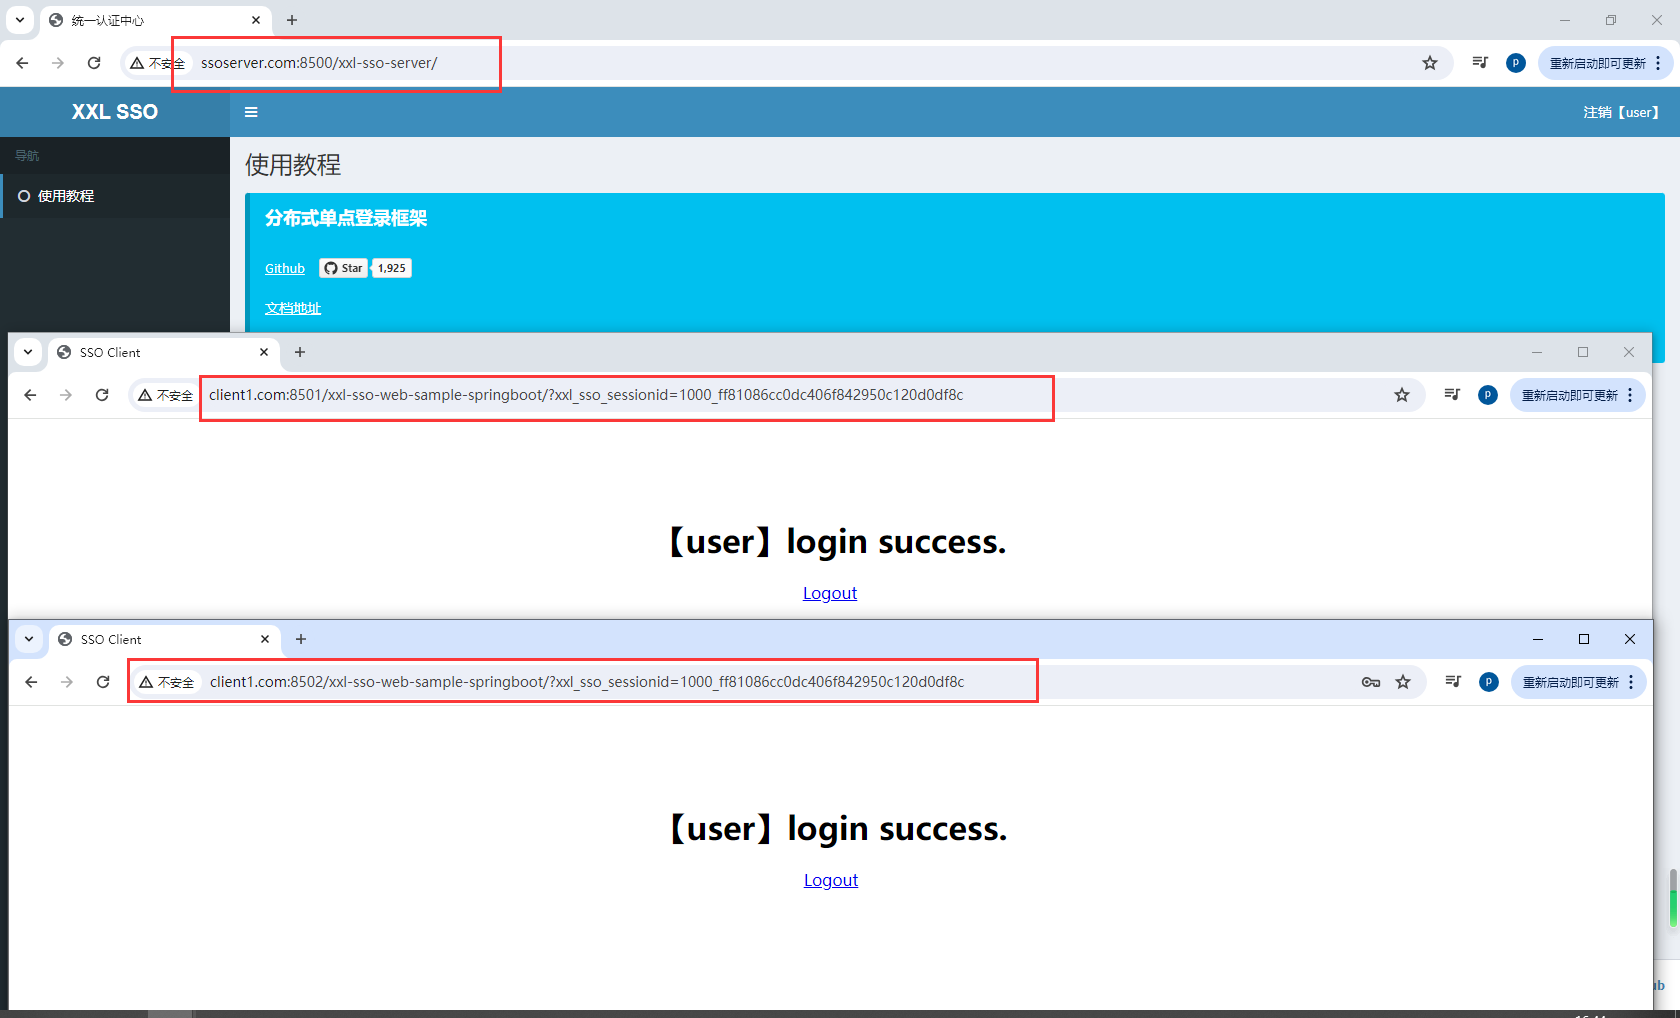
访问三个服务,发现登录一个其他服务都是登录状态,退出状态也同步
ssoserver.com:8500/xxl-sso-server/login
ssoserver.com:8500/xxl-sso-server/login?redirect_url=http://client1.com:8501/xxl-sso-web-sample-springboot/
ssoserver.com:8500/xxl-sso-server/login?redirect_url=http://client2.com:8502/xxl-sso-web-sample-springboot/
9.23单点登录流程-1
SSO核心:
- 1.中央认证服务器:
ssoserver.com - 2.其他系统想要登录去
ssoserver.com,登录成功跳转回来 - 3.只要有一个系统登录,其他都不用登录
- 全系统唯一一个
sso-sessionid,所有系统域名可能都不相同
主要步骤:
- 1.创建
sso测试客户端peng-sso-clientemployees接口需要登录成功才能调用,否则跳转到登录页面login.ghtml- 跳转到登录页面
login.ghtml需要带上当前页面的地址的参数redirect_url
- 2.创建
sso测试服务端peng-sso-serve- 访问登录页面
login.ghtml的时候直接返回login.ghtml
- 访问登录页面
- 3.测试
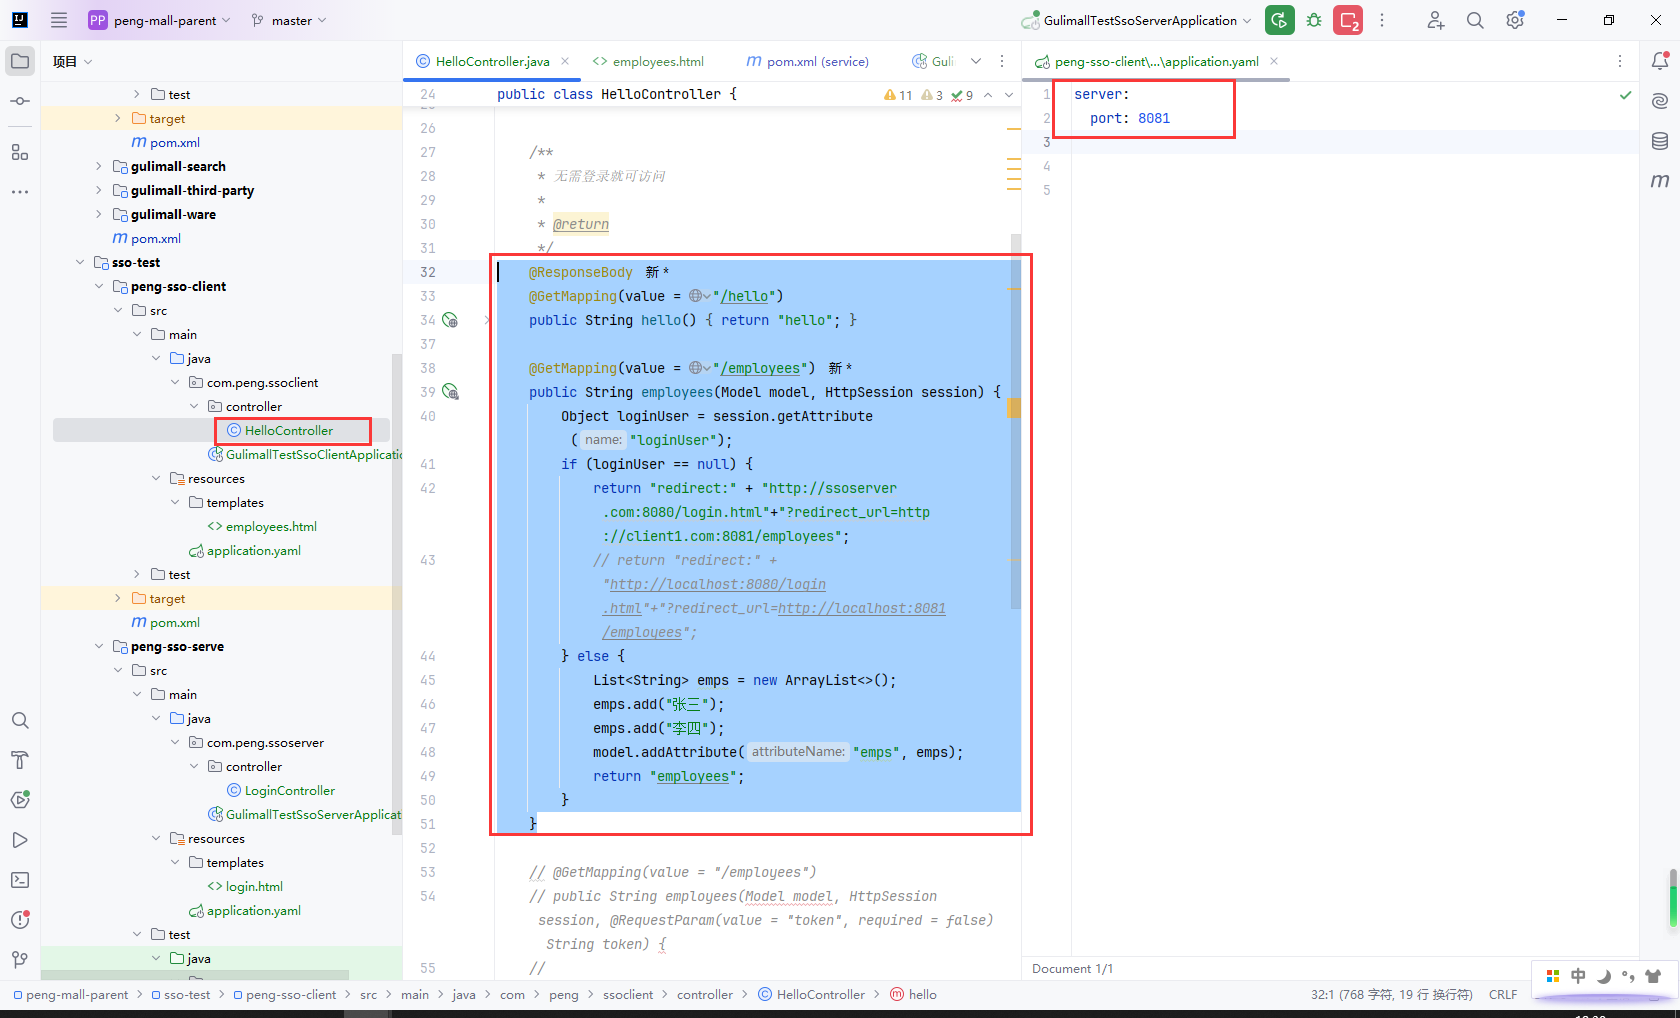
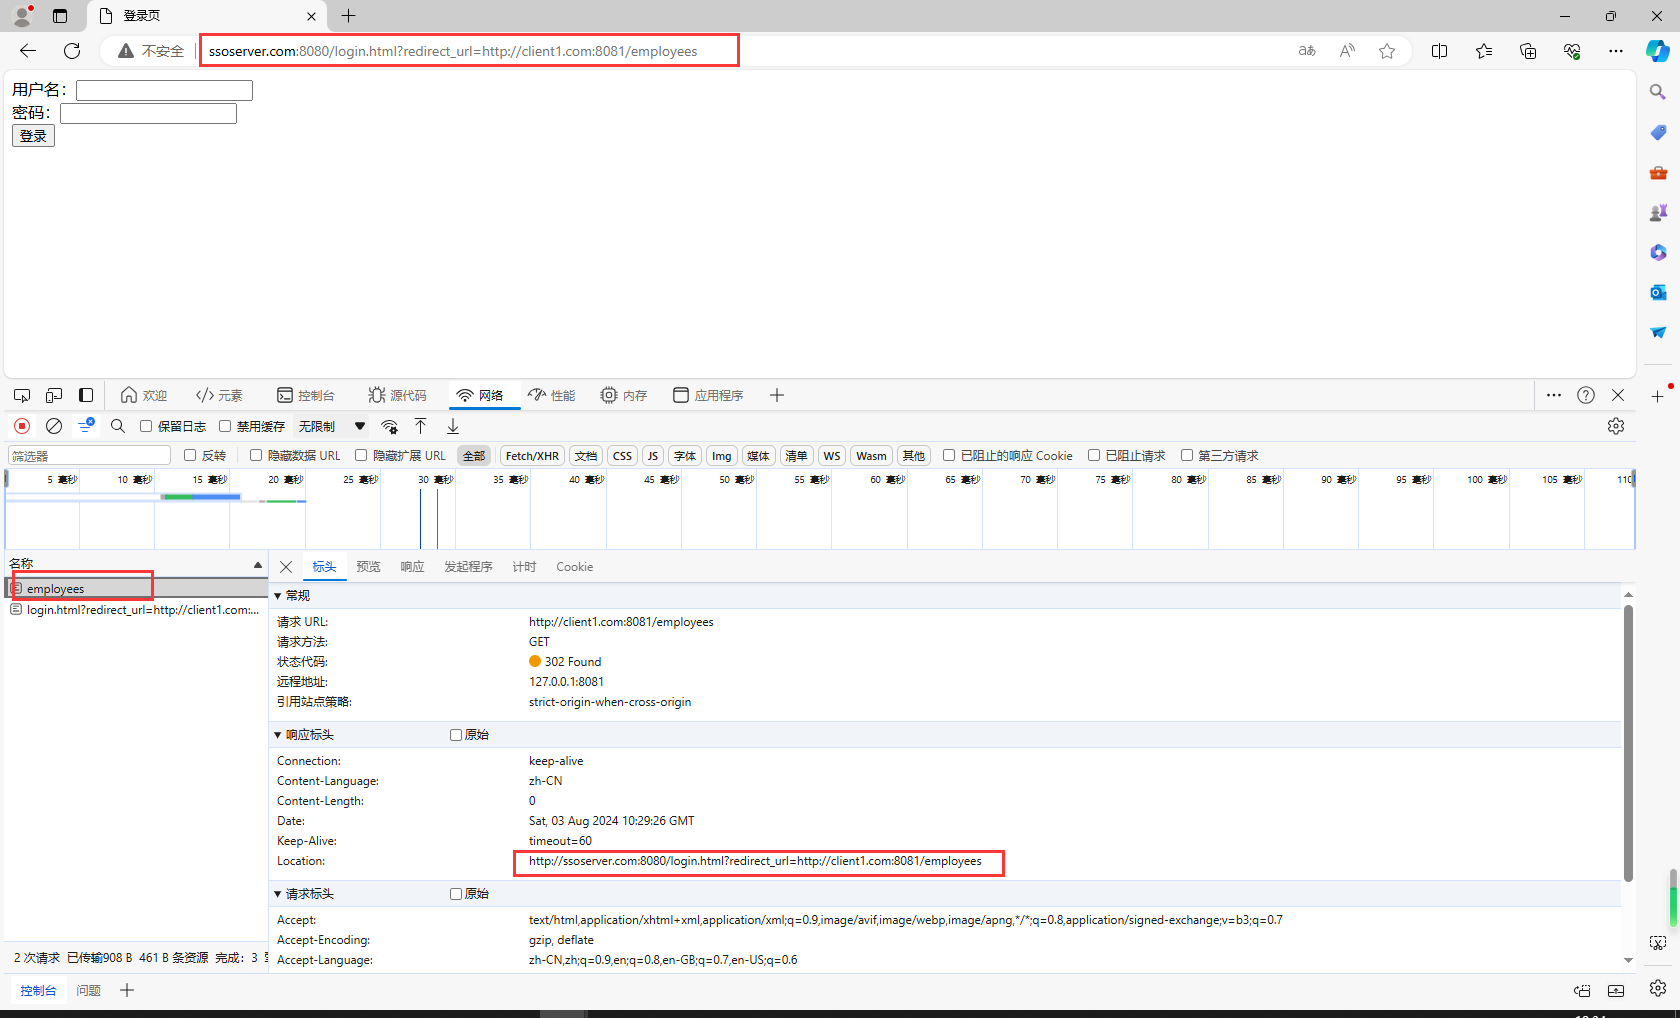
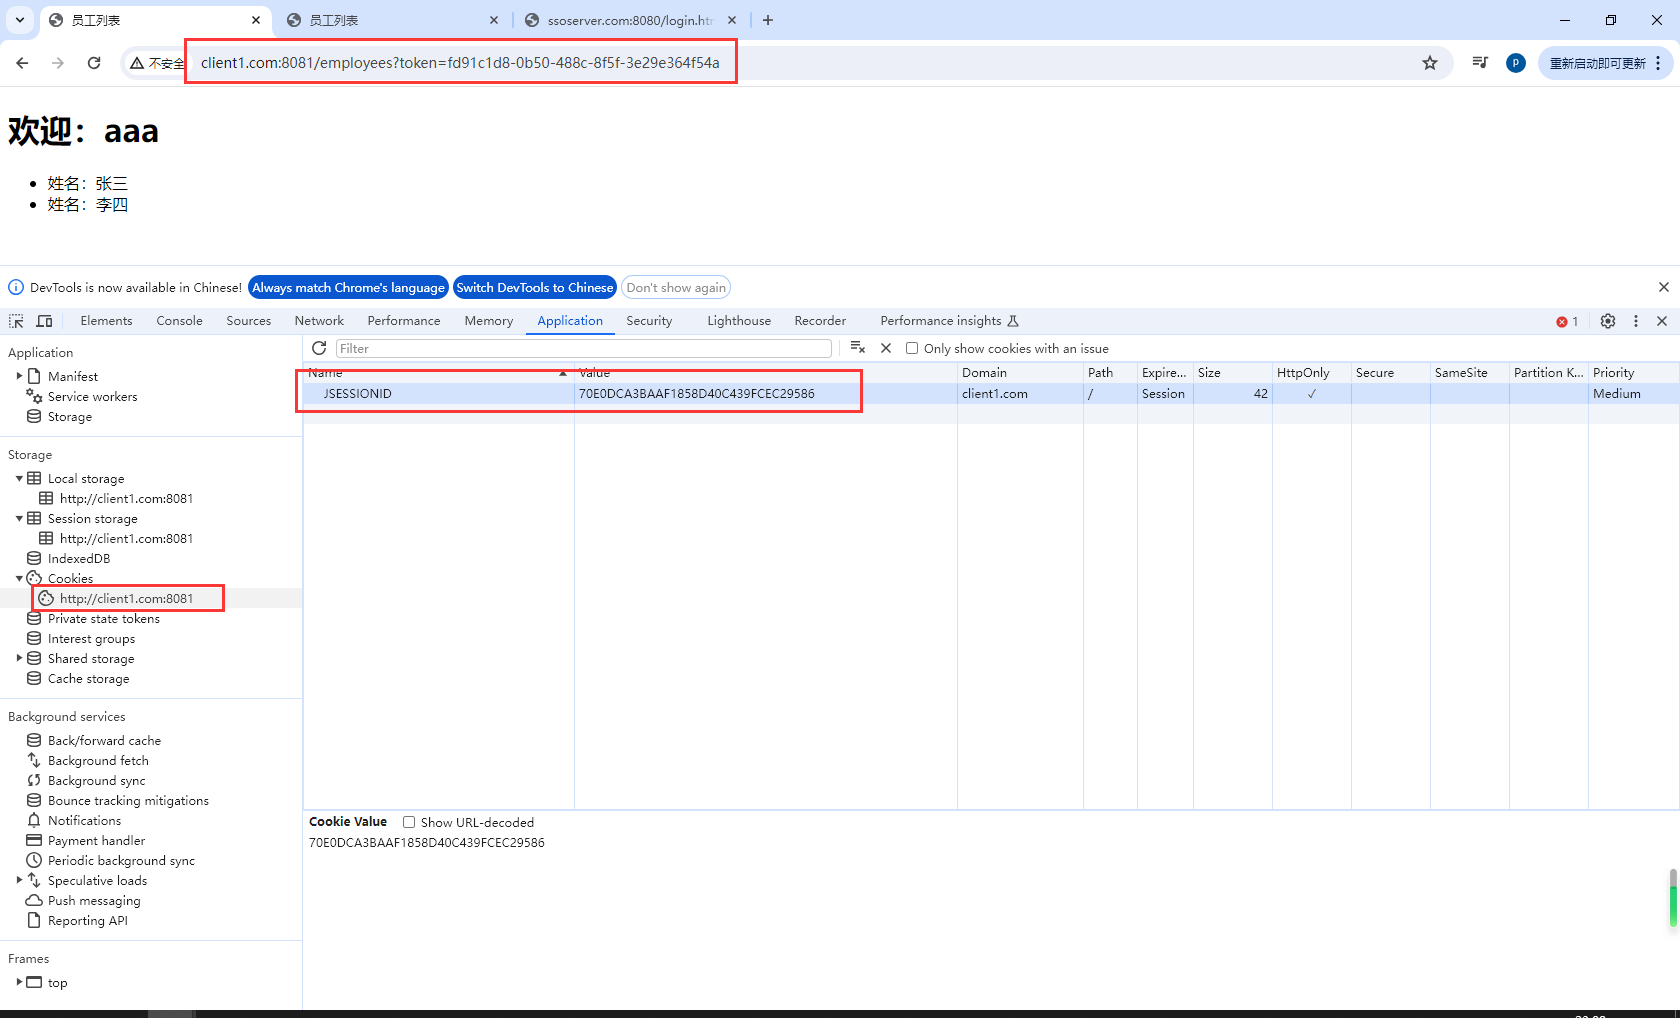
创建sso测试客户端peng-sso-client,配置运行端口为8081
访问/employees如果没有获取到session就跳转到login.html,但是带上当前地址redirect_url=http://client1.com:8081/employees
@ResponseBody
@GetMapping(value = "/hello")
public String hello() {
return "hello";
}
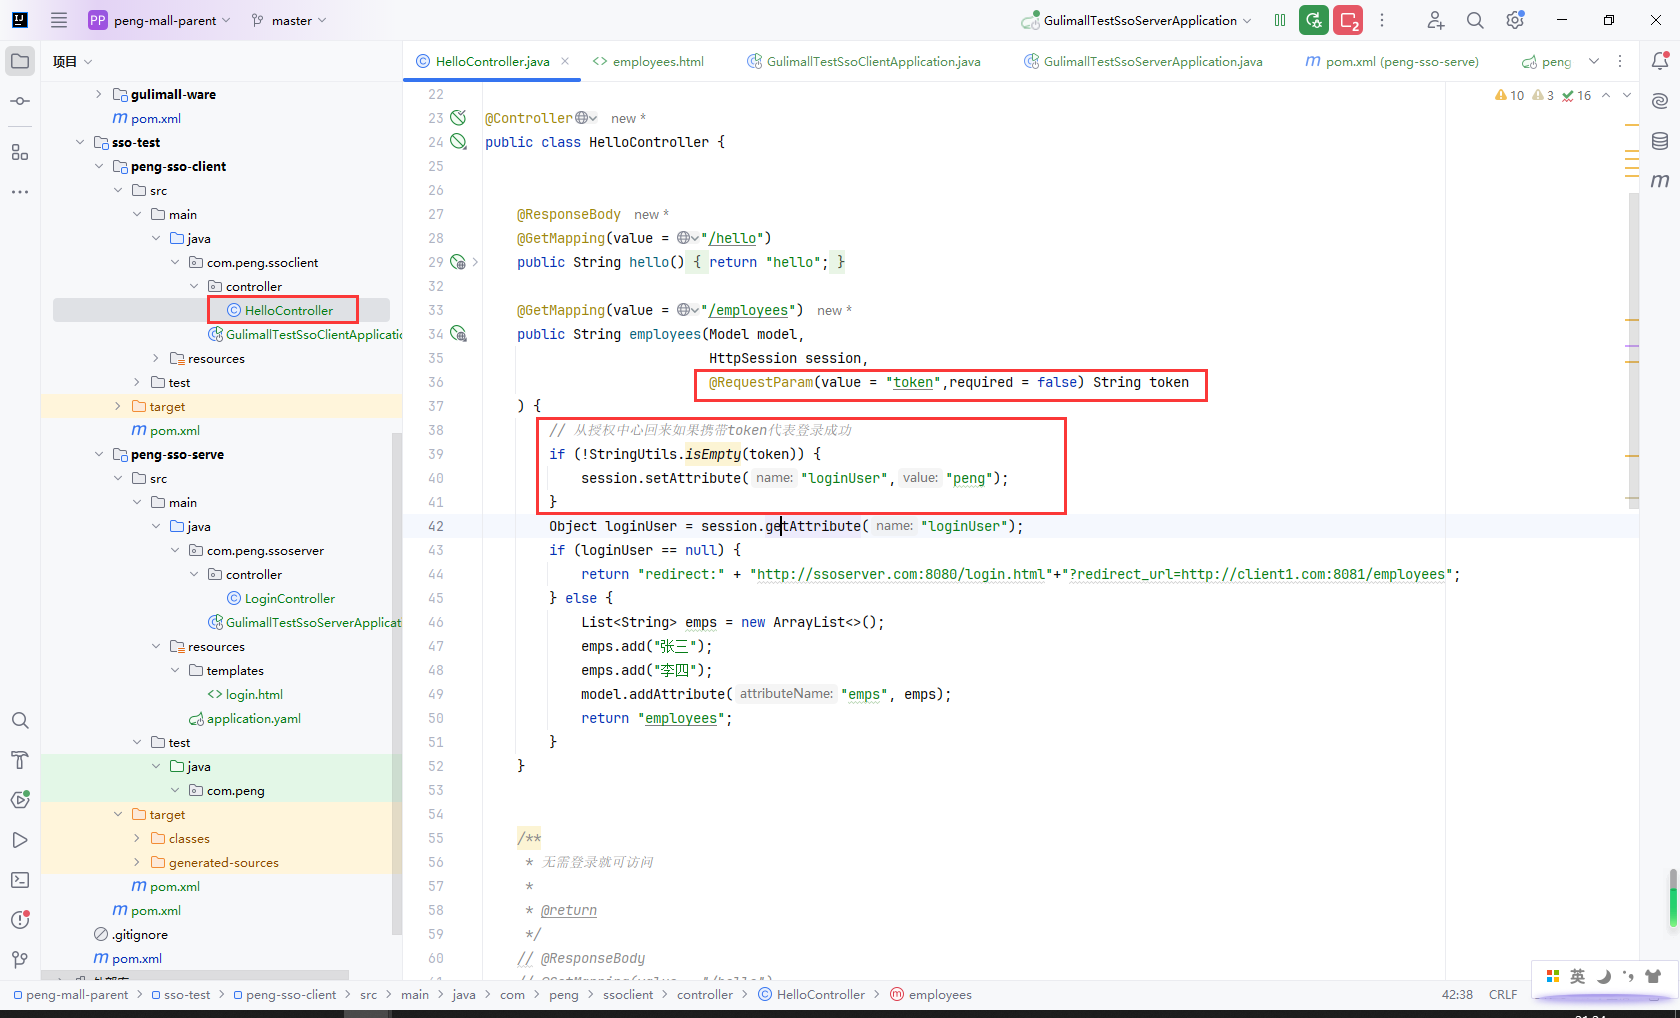
@GetMapping(value = "/employees")
public String employees(Model model, HttpSession session) {
Object loginUser = session.getAttribute("loginUser");
if (loginUser == null) {
return "redirect:" + "http://ssoserver.com:8080/login.html"+"?redirect_url=http://client1.com:8081/employees";
// return "redirect:" + "http://localhost:8080/login.html"+"?redirect_url=http://localhost:8081/employees";
} else {
List<String> emps = new ArrayList<>();
emps.add("张三");
emps.add("李四");
model.addAttribute("emps", emps);
return "employees";
}
}
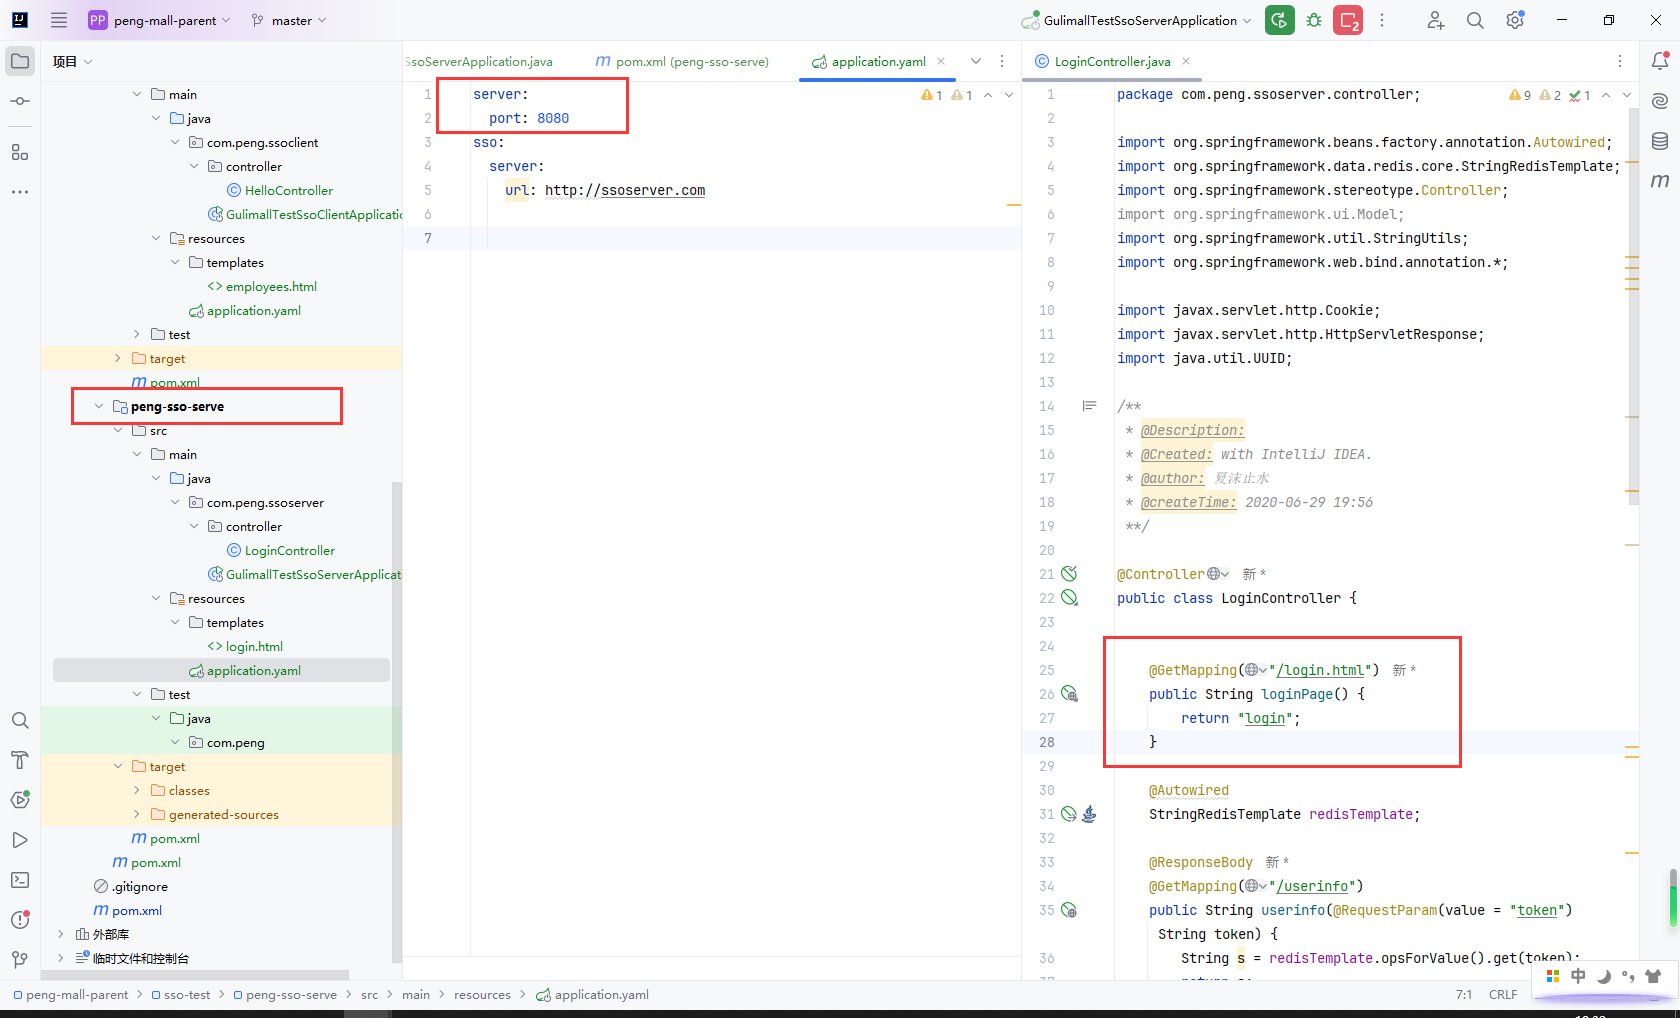
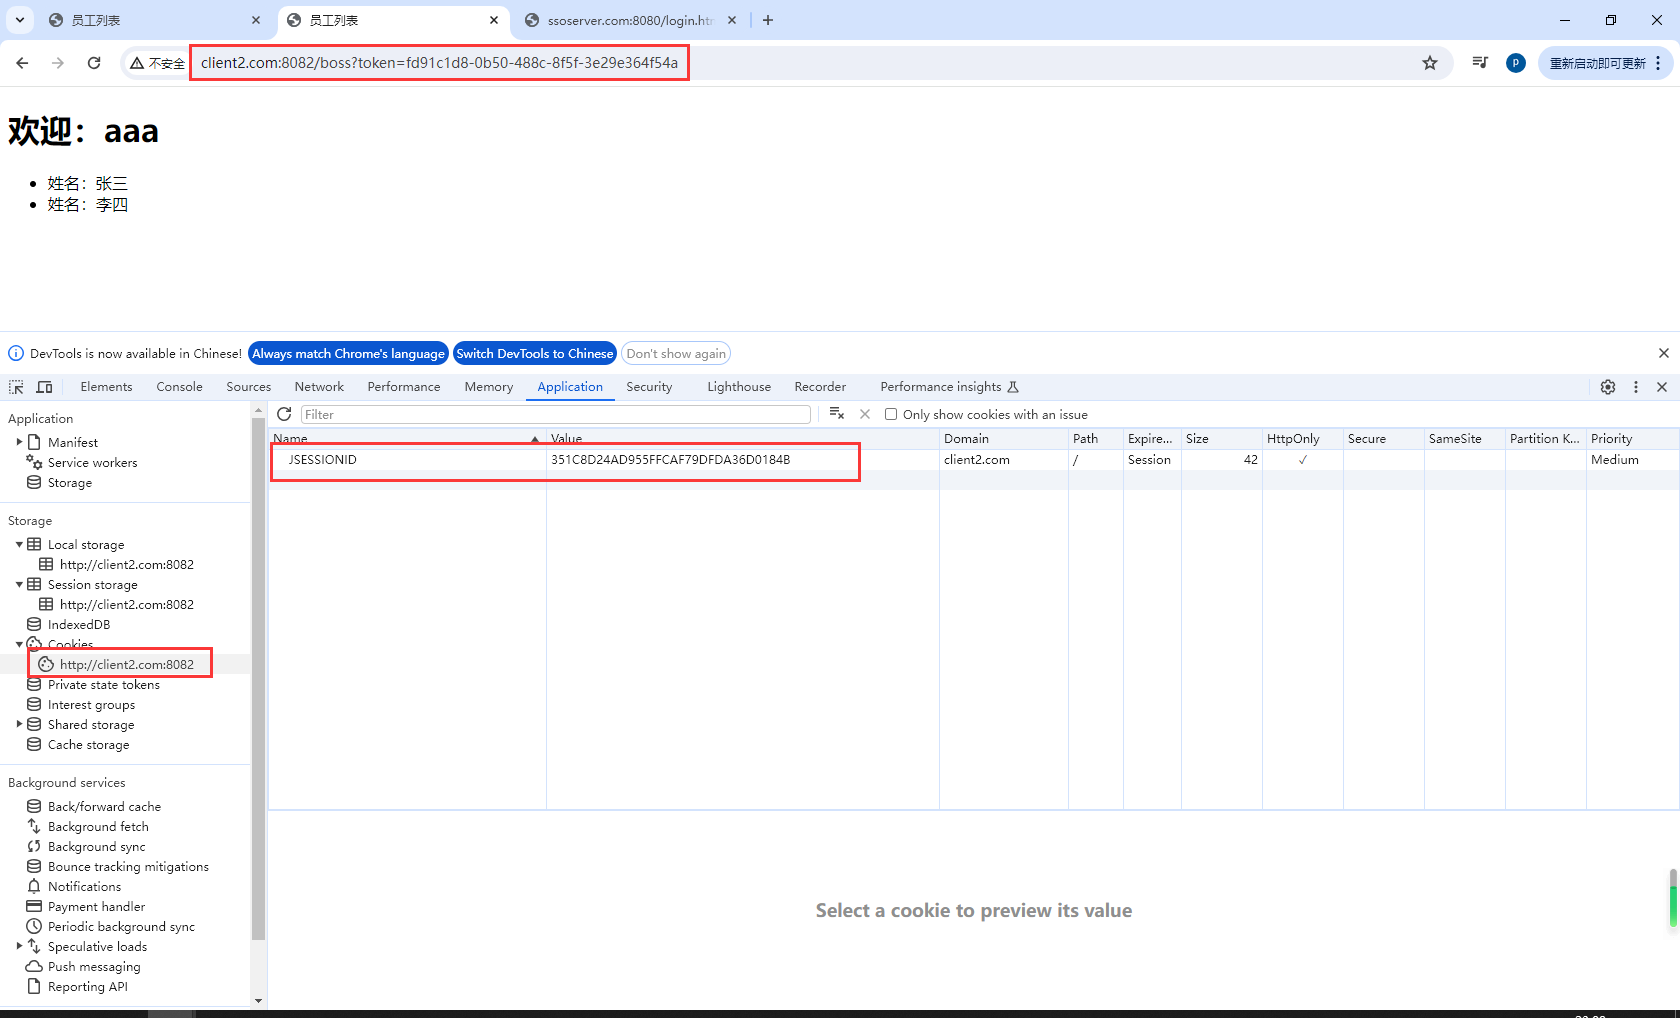
创建sso测试服务端peng-sso-serve,配置运行端口为8082
@GetMapping("/login.html")
public String loginPage() {
    return "login";
}
启动项目,访问client1.com:8081/employees,发现直接重定向到登录页了
ssoserver.com:8080/login.html
client1.com:8081/employees
client1:8081/hello

http://localhost:8081/hello
http://localhost:8081/employees
http://localhost:8080/login.html
9.24单点登录流程-2
主要步骤:
- 1.
loginPage跳转到login.html时需要获取跳转过来页面的地址redirect_url,因为登录成功需要再跳转回去 - 2.
doLogin登录的时候需要带上redirect_url,然后带上token跳转回去 - 3.成功跳转到
employees时判断token,这里只是简单判断获取到token就算登录成功,把用户信息写到session
loginPage跳转到login.html时需要获取跳转过来页面的地址redirect_url,把redirect_url复制给隐藏域
doLogin登录的时候需要带上redirect_url,然后生成UUID模拟token,存入redis后跳转回原来页面

成功跳转到employees时判断token,这里只是简单判断获取到token就算登录成功,把用户信息写到session
9.25单点登录流程-3
主要步骤:
-
在创建一个客户端服务
peng-sso-client2 -
首先访问
peng-sso-client,因为没有登录会重定向到peng-sso-serve -
peng-sso-serve的doLogin登录成功后peng-sso-serve会使用session保存当前token- 带上
token重定向peng-sso-client - 把
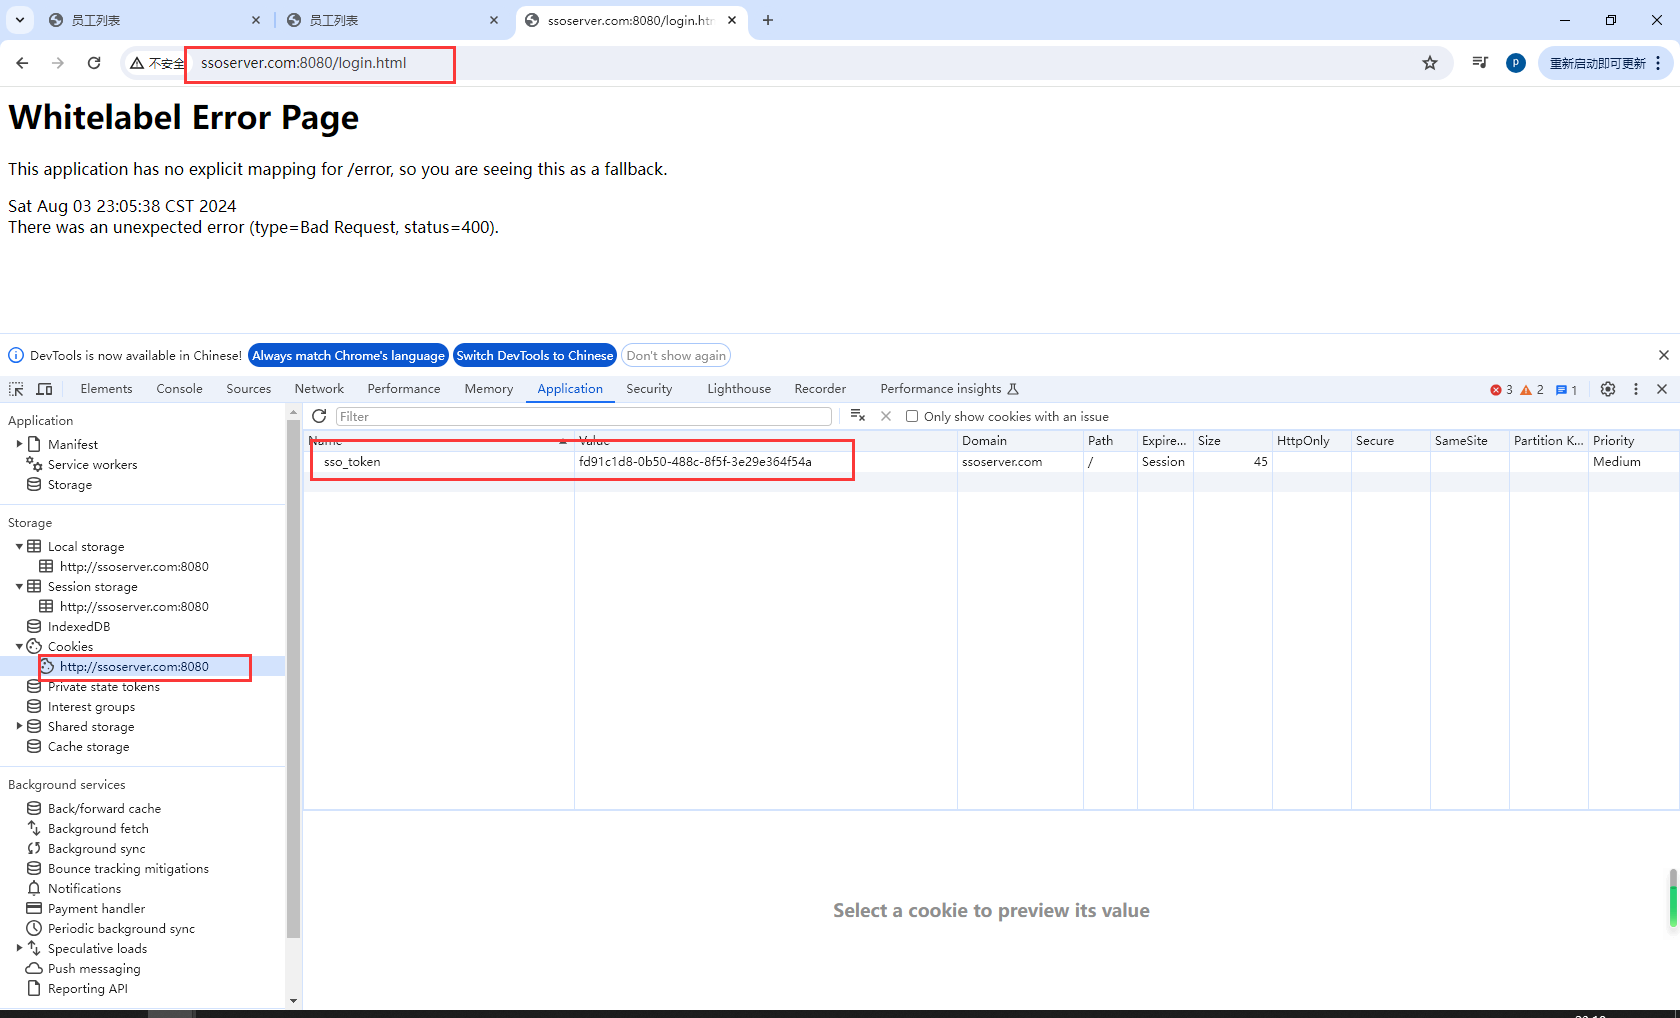
sso_token添加到cookie中
-
peng-sso-client登陆成功后重定向/employees(当前服务)时,根据传入的token使用HttpClient发起http请求调用peng-sso-serve获取登录信息设置到session中 -
peng-sso-client2访问/boss时,此时peng-sso-serve已存在sso_token,peng-sso-serve会带上sso_token转发回来,peng-sso-client2根据传入的token使用HttpClient发起http请求调用peng-sso-serve获取登录信息设置到session中
首先访问peng-sso-client,因为没有登录会重定向到peng-sso-serve
peng-sso-serve的doLogin登录成功后
- 带上
token重定向peng-sso-client - 把
sso_token添加到cookie中
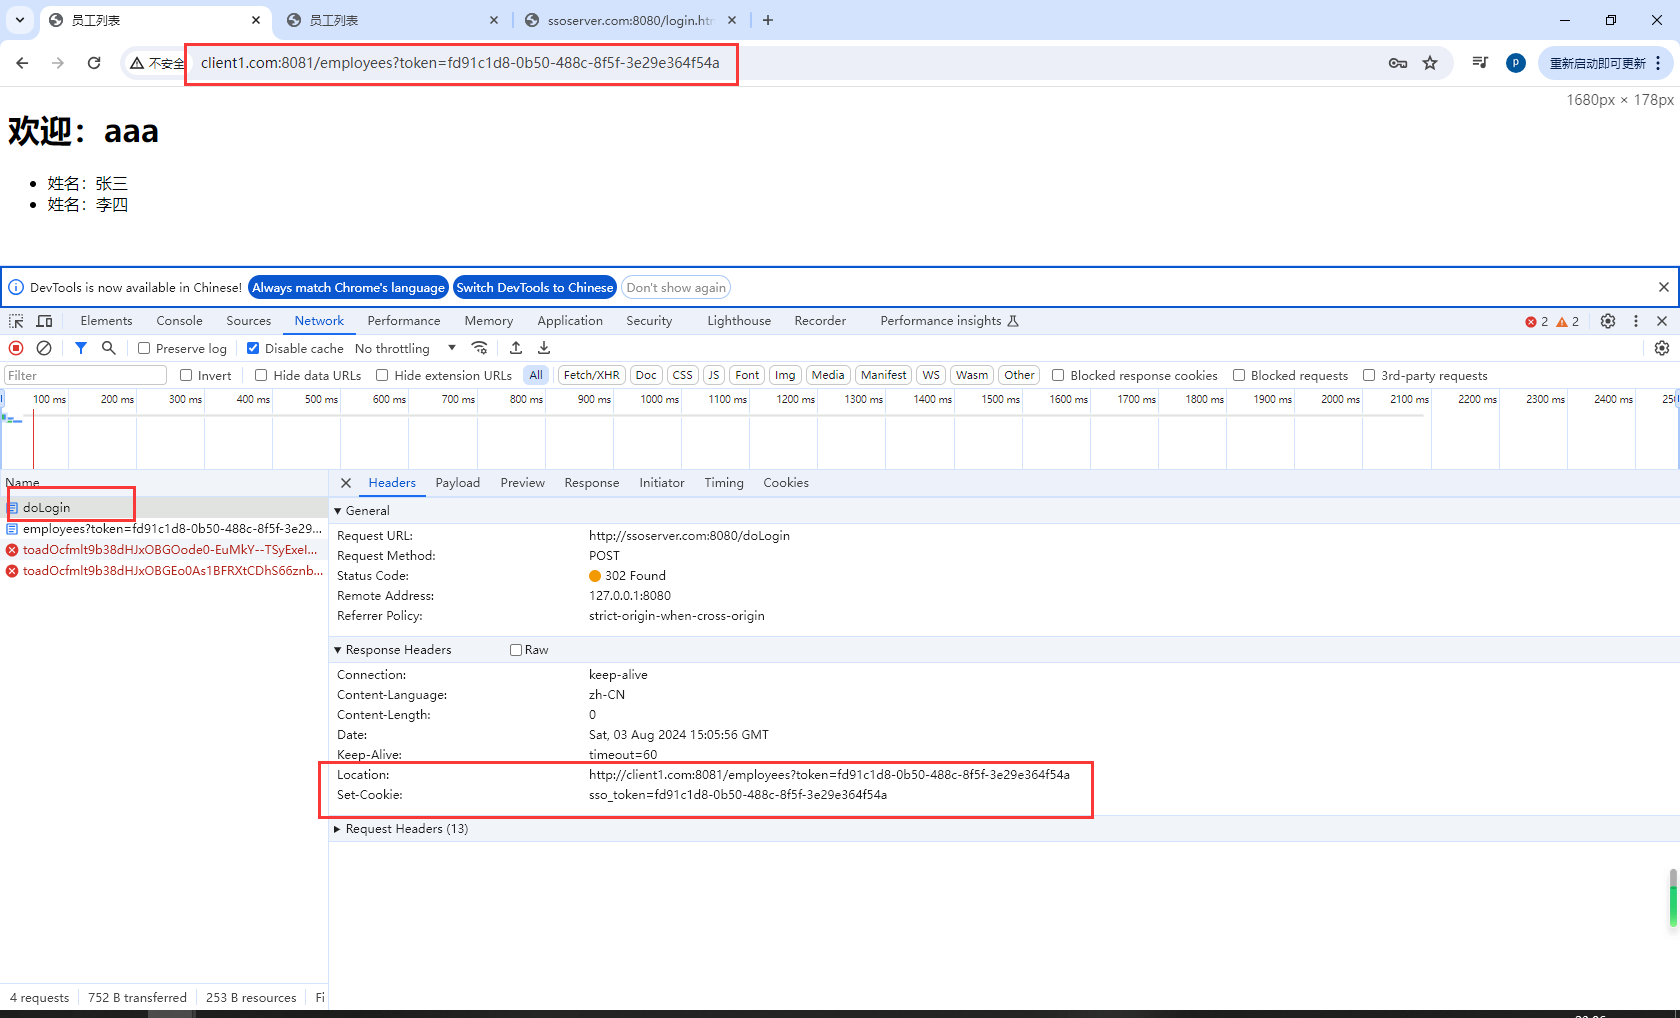
peng-sso-serve的doLogin登录成功后peng-sso-serve会使用session保存当前token
peng-sso-client登陆成功后重定向/employees(当前服务)时,根据传入的token使用HttpClient发起http请求调用peng-sso-serve获取登录信息设置到session中
peng-sso-client2访问/boss时,此时peng-sso-serve已存在sso_token,peng-sso-serve会带上sso_token转发回来,peng-sso-client2根据传入的token使用HttpClient发起http请求调用peng-sso-serve获取登录信息设置到session中
测试地址
http://client1.com:8081/employees
http://client2.com:8082/boss
http://ssoserver.com:8080/login.html
10.商城业务-购物车
10.1环境搭建
主要步骤:
-
创建
gulimall-cart,application.yml配置服务注册 -
配置
gulimall-cart的pom.xml,此服务暂不需要mybatis-plus -
配置
hosts文件 -
上传购物车的静态资源到
nginx -
配置
nginx -
配置
gulimall-gateway网关服务 -
gulimall-cart添加cartList.html和success.html,cartList.html改为index.html方便测试 -
修改
cartList.html和success.html的静态资源访问地址 -
测试访问http://cart.gulimall.com/
创建gulimall-cart ,application.yml配置服务注册
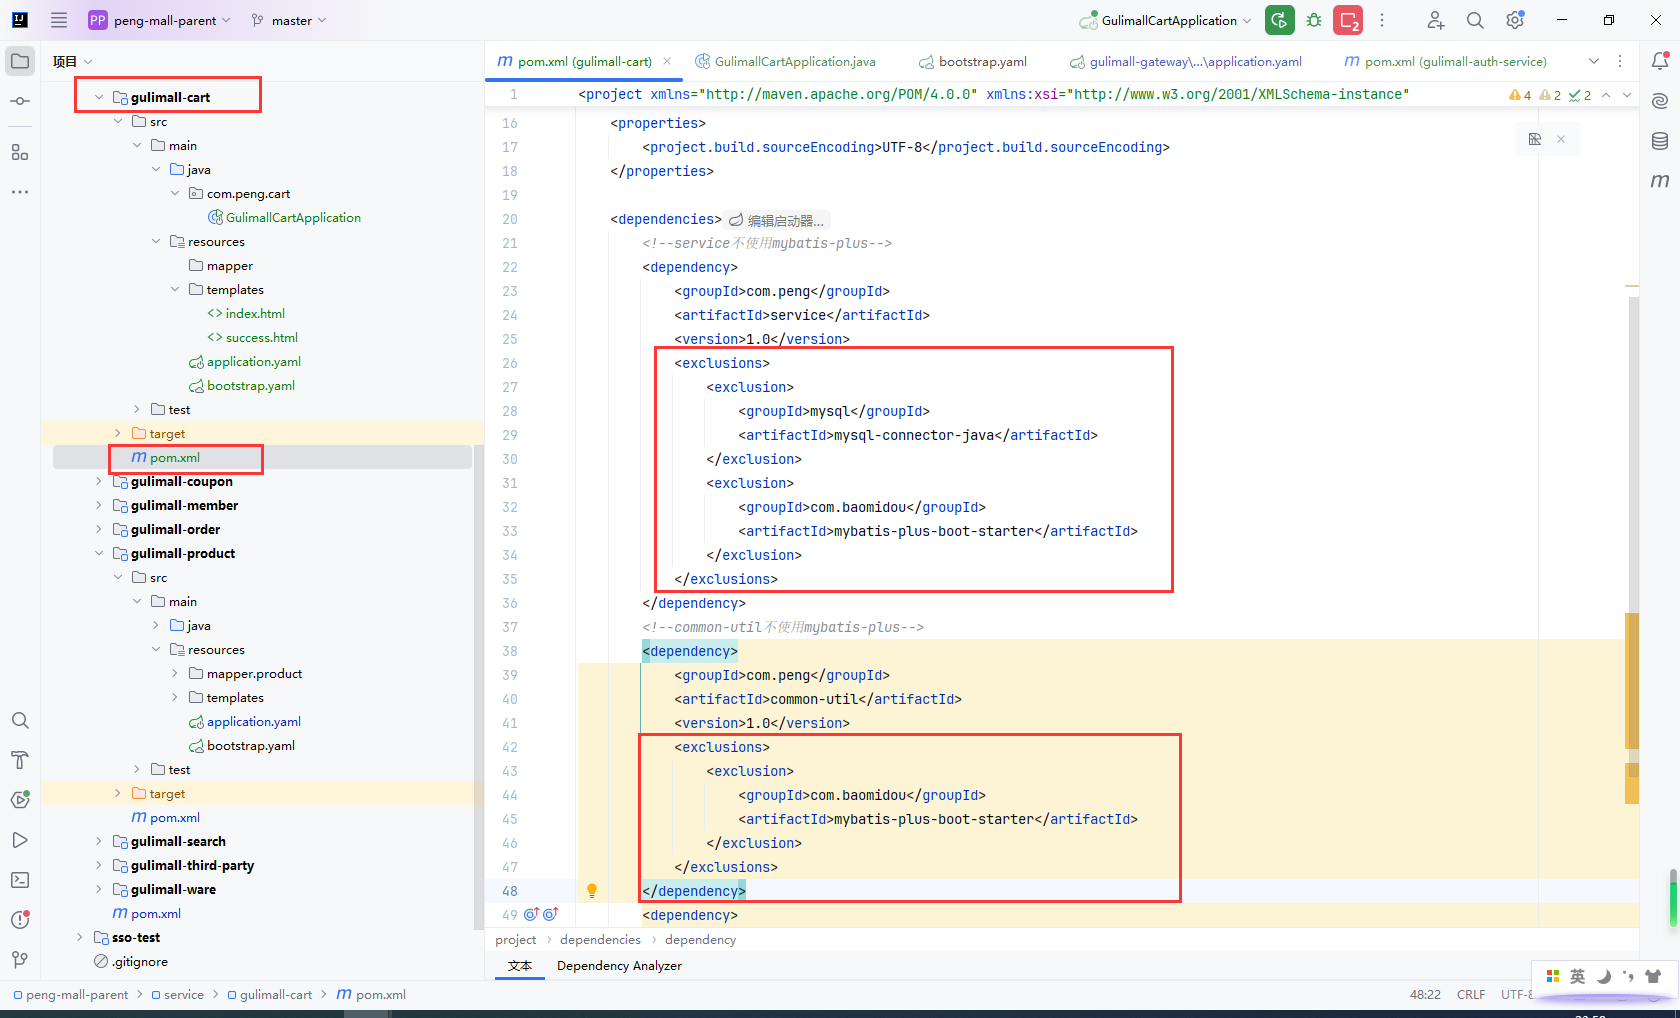
配置gulimall-cart 的pom.xml,此服务暂不需要mybatis-plus
<exclusions>
    <exclusion>
        <groupId>mysql</groupId>
        <artifactId>mysql-connector-java</artifactId>
    </exclusion>
    <exclusion>
        <groupId>com.baomidou</groupId>
        <artifactId>mybatis-plus-boot-starter</artifactId>
    </exclusion>
</exclusions>
管理员运行SwicthHosts配置hosts文件
192.168.188.180 cart.gulimall.com

上传购物车的静态资源到nginx的/root/mall/nginx/html/static/cart/目录下
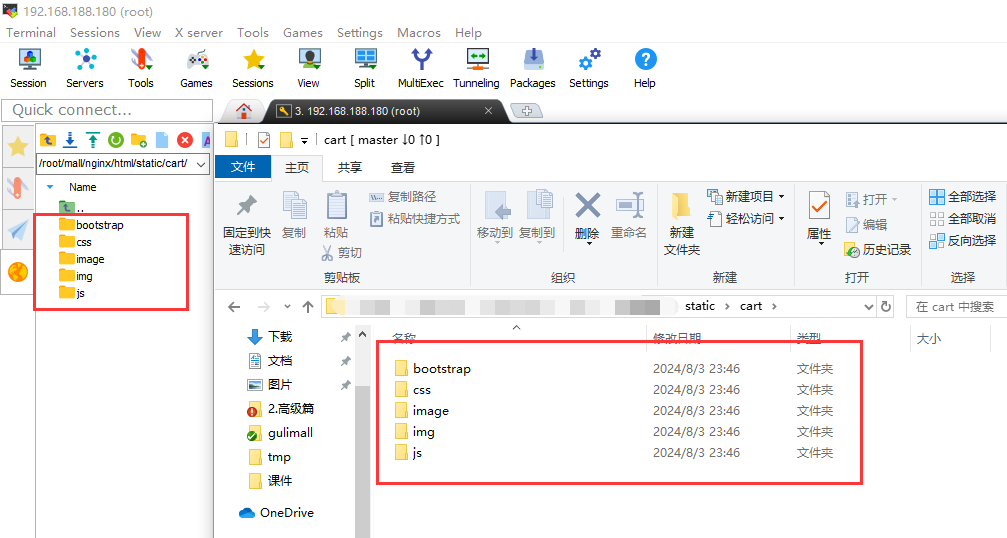
配置nginx,因为*.gulimall.com匹配 cart.gulimall.com,这里不需要多加配置,留意一下即可
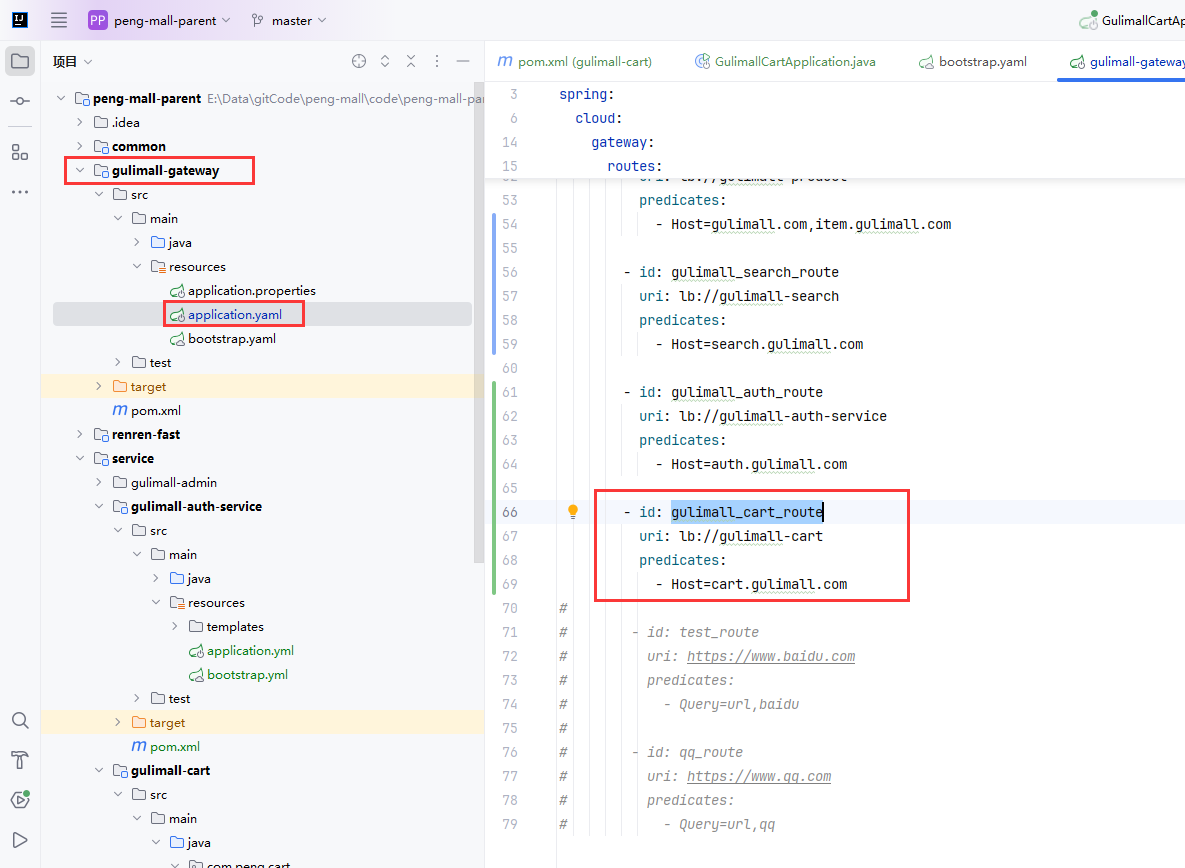
配置gulimall-gateway网关服务
        - id: gulimall_cart_route
          uri: lb://gulimall-cart
          predicates:
            - Host=cart.gulimall.com
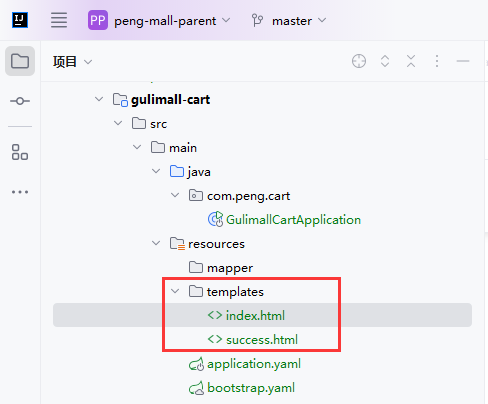
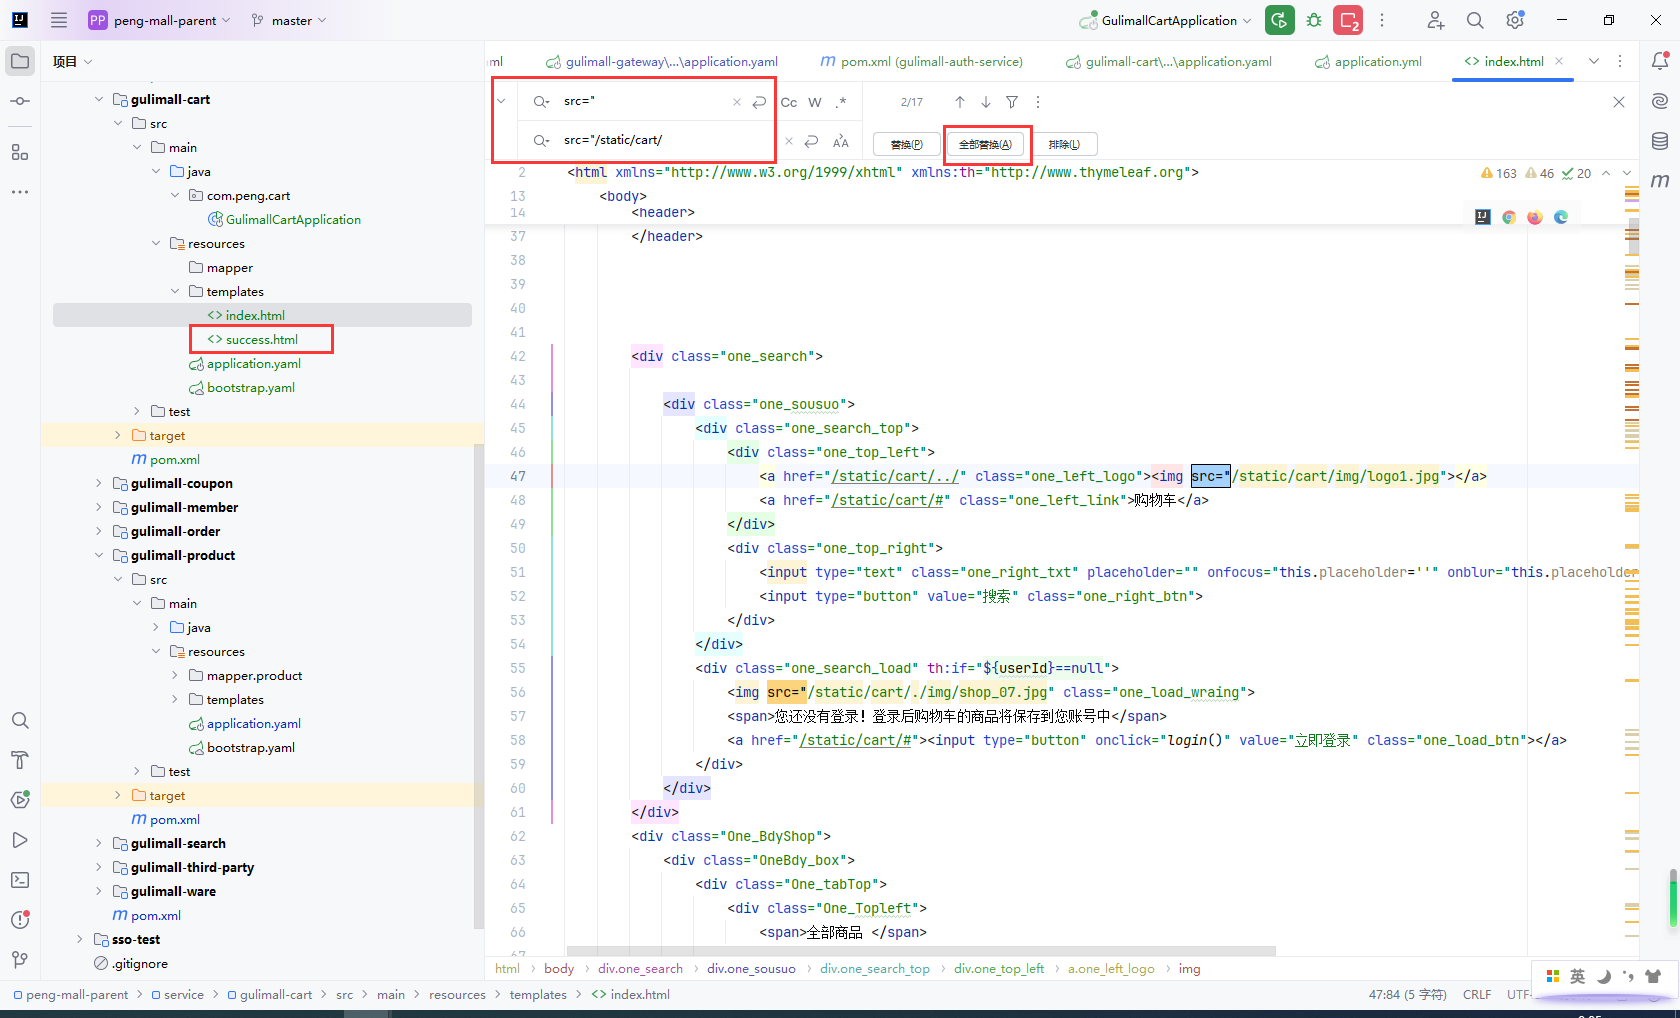
gulimall-cart添加cartList.html和success.html,cartList.html改为index.html方便测试
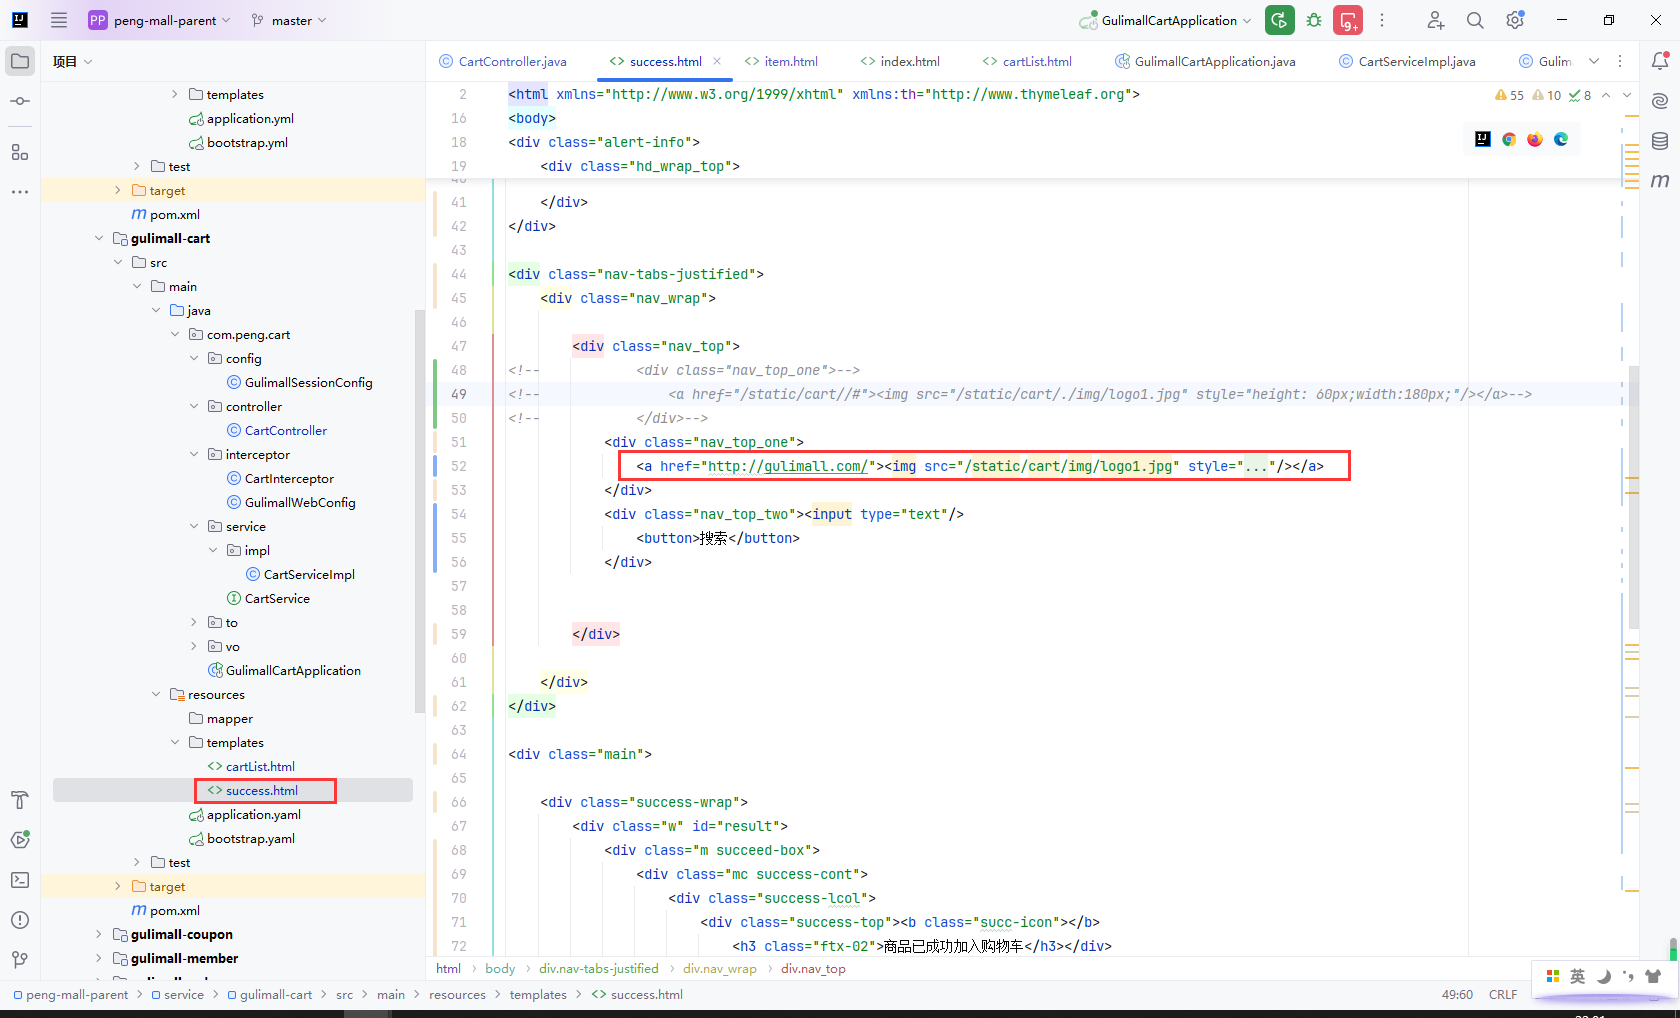
修改cartList.html和success.html的静态资源访问地址
修改href
href="
href="/static/cart/
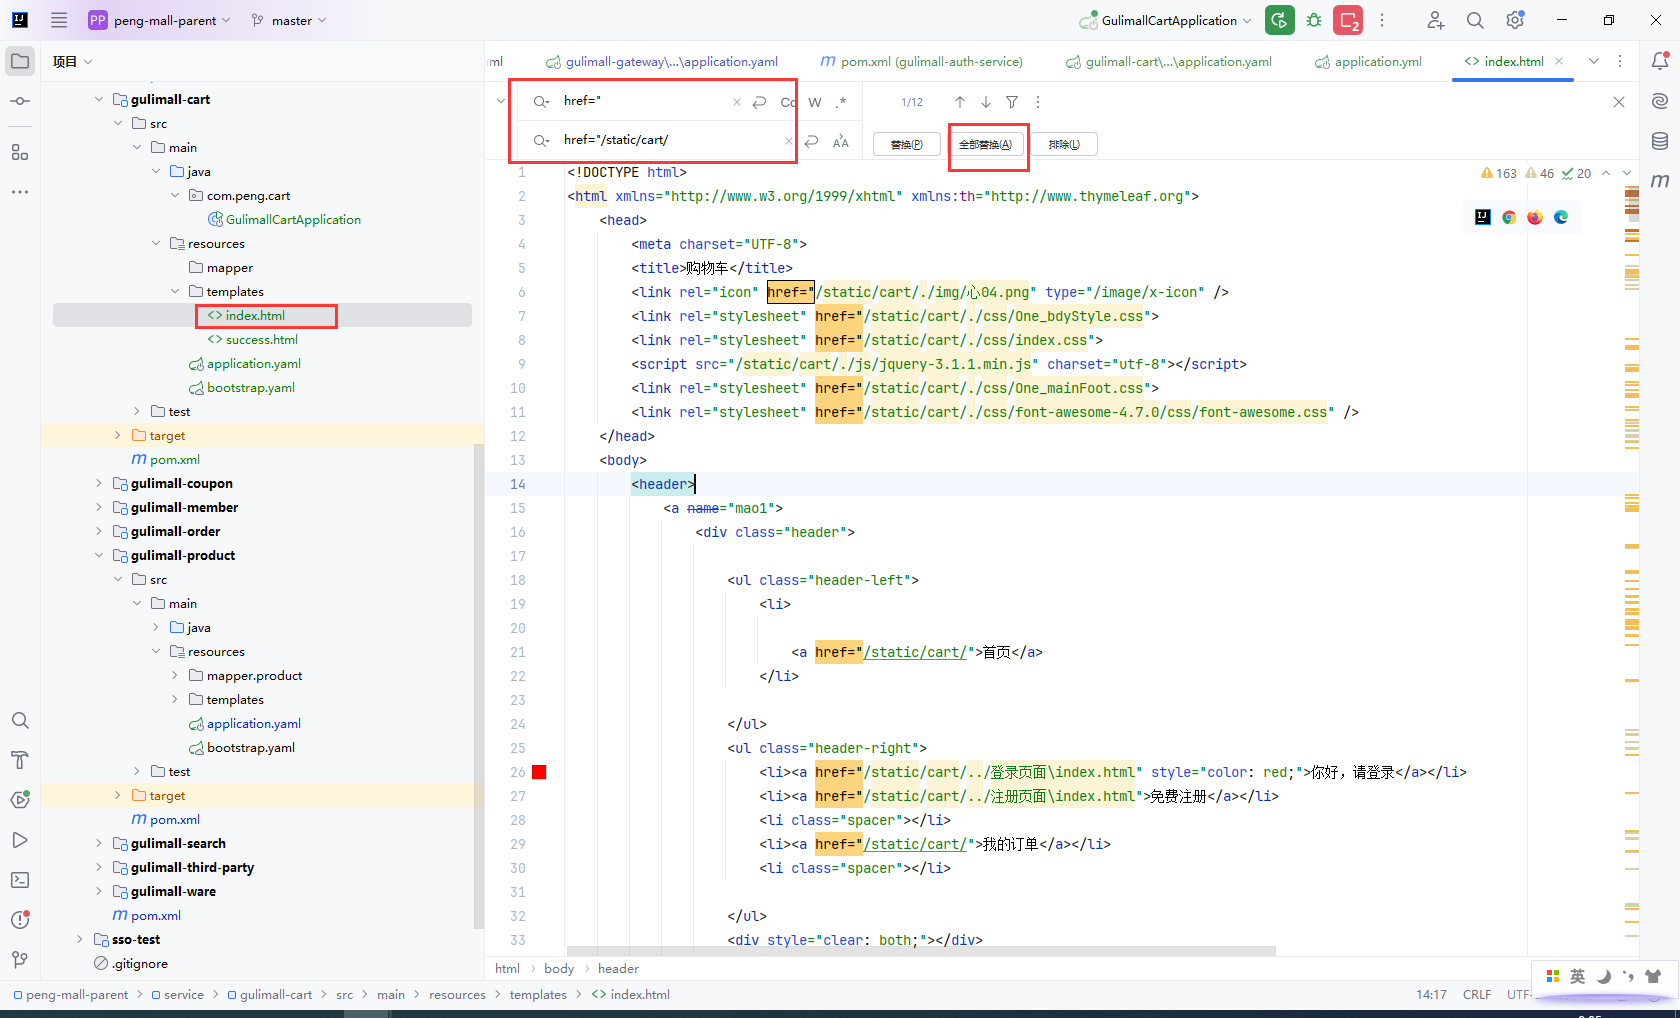
修改src
src="
src="/static/cart/
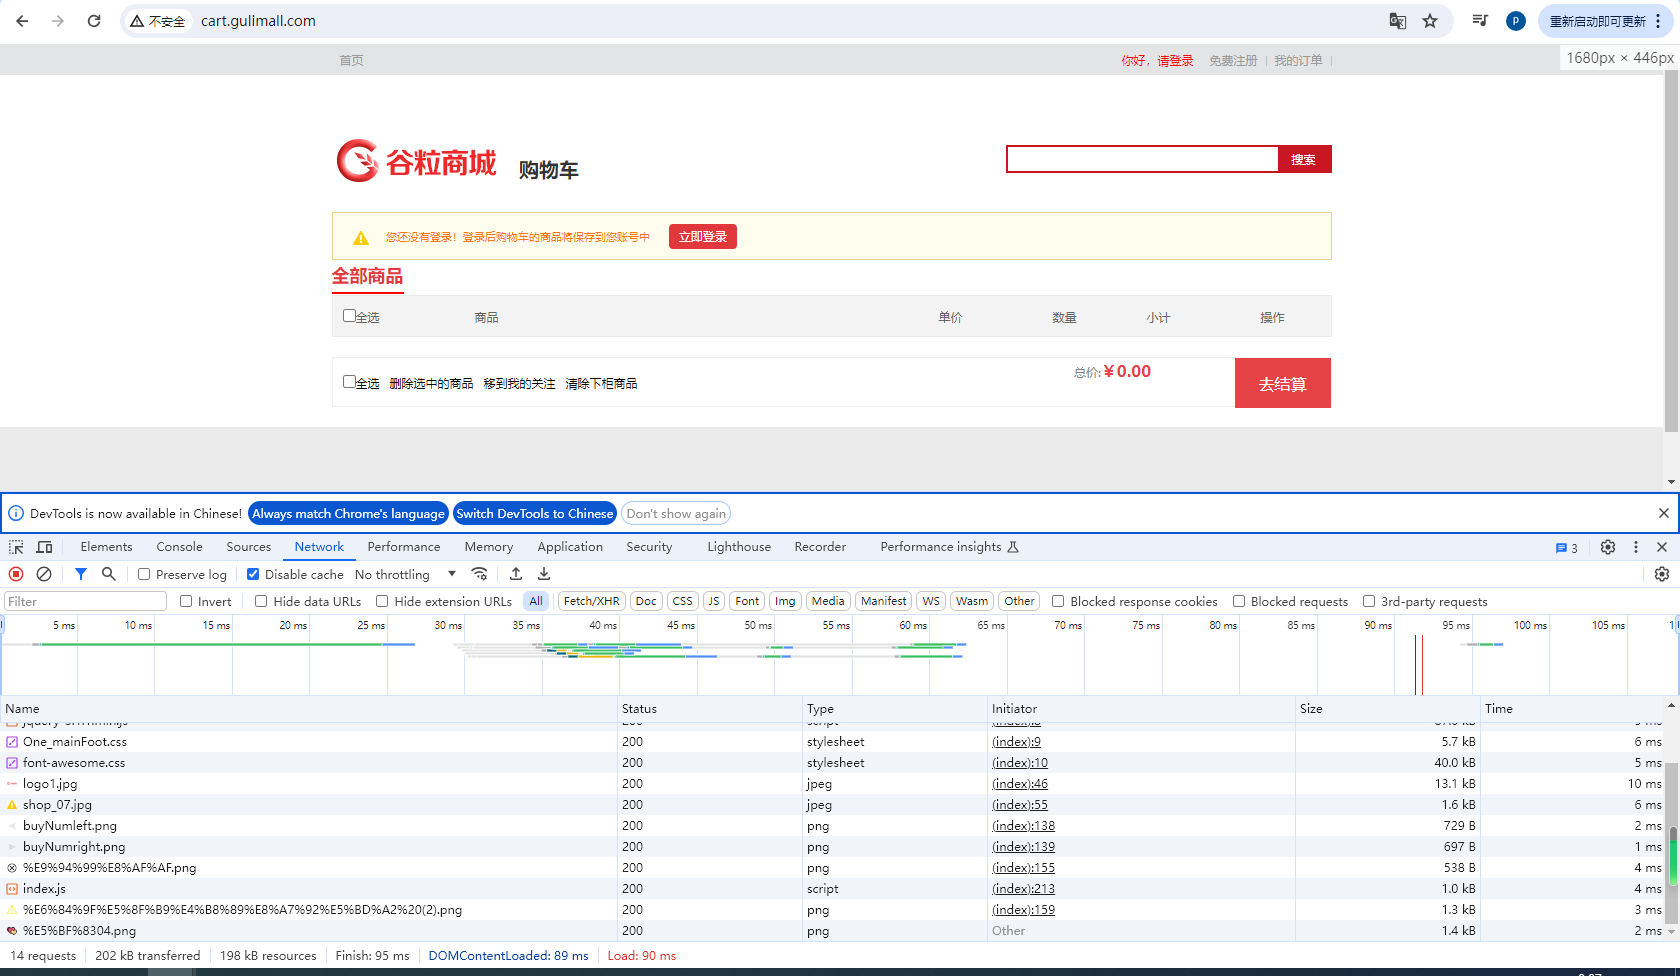
测试访问http://cart.gulimall.com/
10.2数据模型分析
游客购物车/离线购物车:
- 1.未登录状态下加入购物车的商品
- 2.关闭浏览器后再打开,商品仍然存在
- 3.采用
redis【很好的高并发性能,强于MongoDB】 - 4.使用
user-key【相当于UUID,存在于cookie中】成为临时用户【如果没有user-key,第一次访问购物车时,会自动分配一个user-key(临时用户身份)】
逻辑:
- 1)第一次使用购物车功能,创建user-key(分配临时用户身份)
- 2)访问购物车时,判断当前是否登录状态(session是否存在用户信息)登录状态则获取用户购物车信息
- 3)未登录状态,则获取临时用户身份,获取游客购物车
用户购物车/在线购物车:
- 1.会将游客状态下的购物车,整合到登录用户名下的购物车
- 2.游客购物车被清空(此时退出登录游客购物车已被清空)
- 3.采用
redis - 4.因为要获取用户登录状态,所以需要整合
springsession
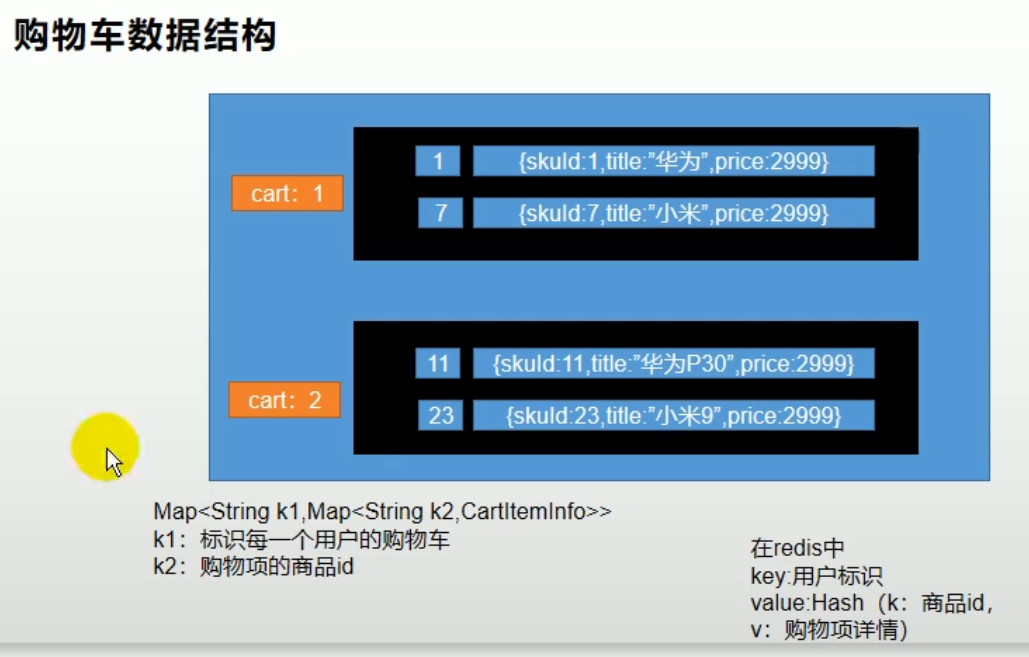
购物车数据结构:
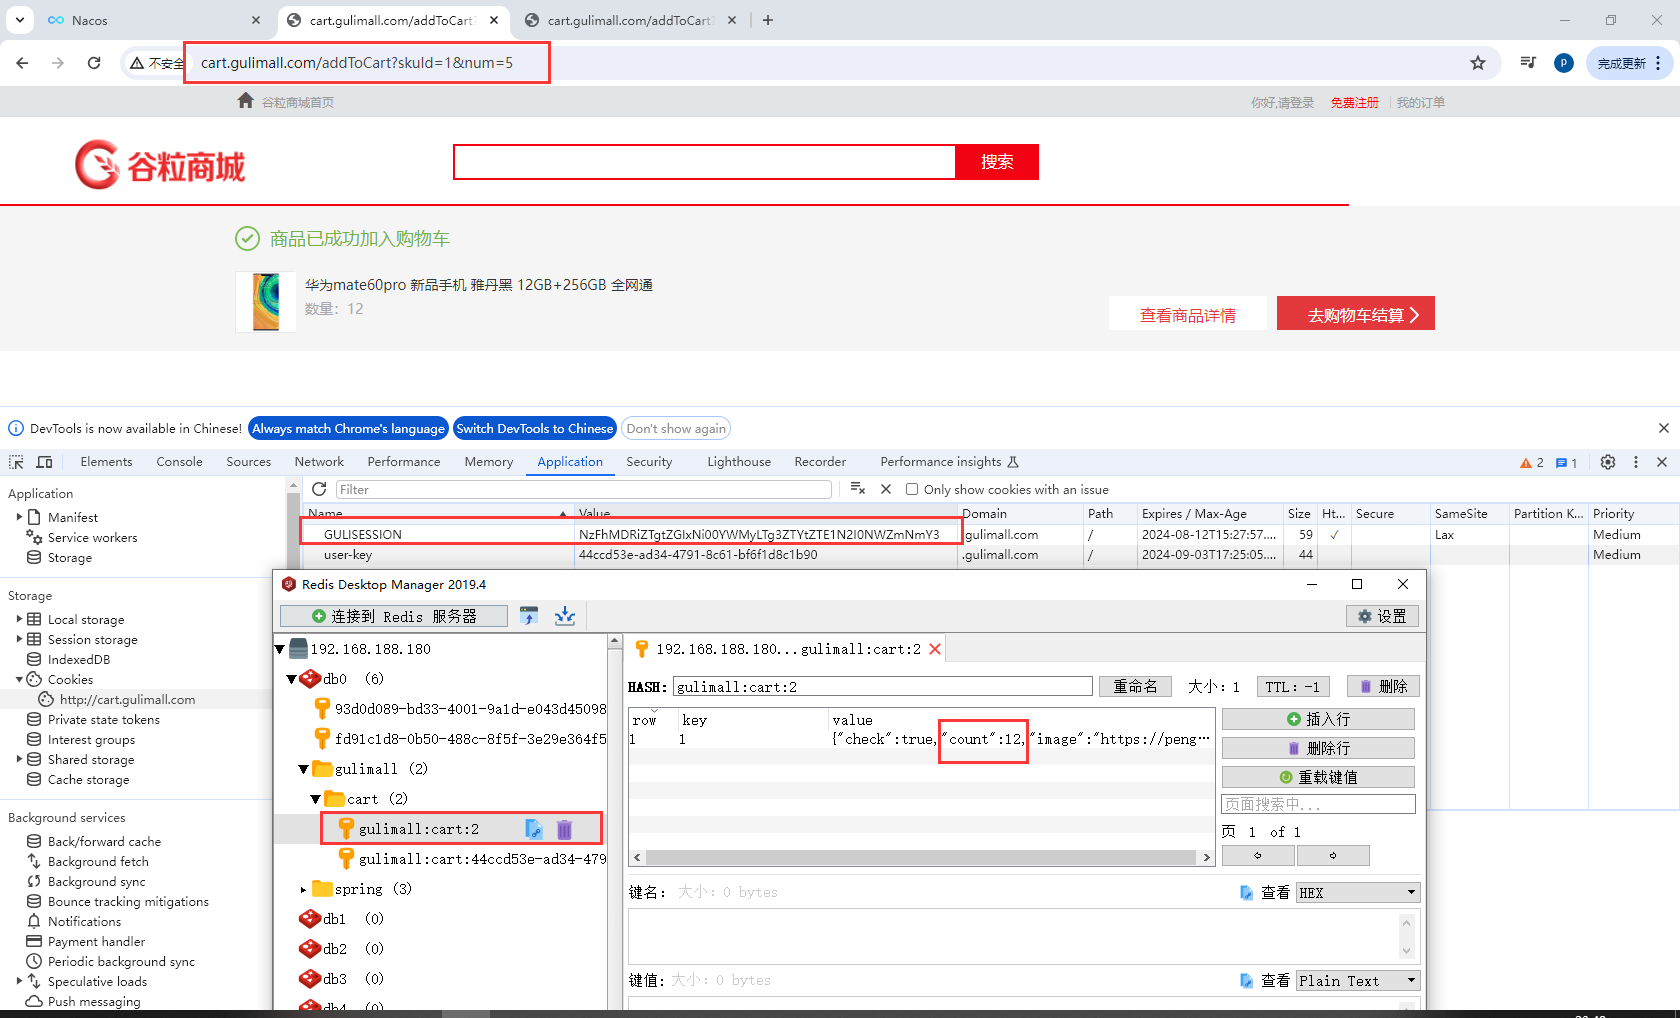
Map<String k1, Map<String k2, CartItemInfo>>

key:用户标示
	登录态:gulimall:cart:userId
	非登录态:gulimall:cart:userKey

value:
	存储一个Hash结构的值,其中该hash结构的key是SkuId,hash结构的value是商品信息,以json字符串格式存储
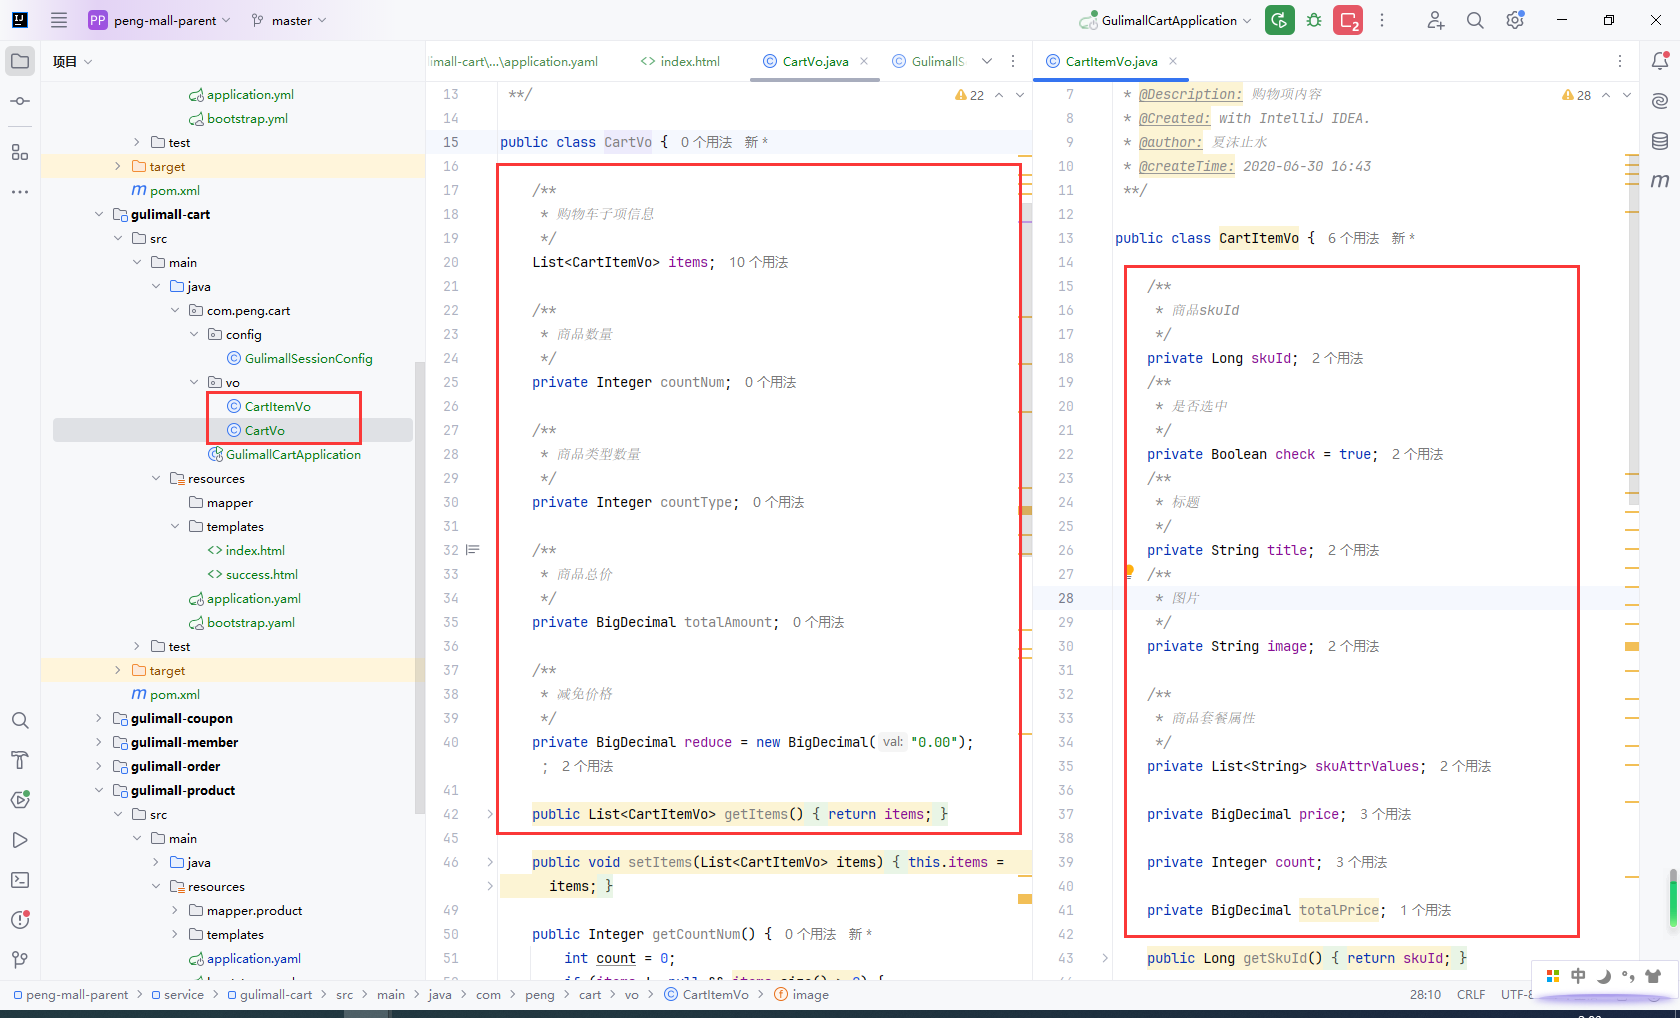
10.3VO编写
/**
 * 购物车VO
 * 需要计算的属性需要重写get方法,保证每次获取属性都会进行计算
 */
public class CartVO {

    private List<CartItemVO> items; // 购物项集合
    private Integer countNum;       // 商品件数(汇总购物车内商品总件数)
    private Integer countType;      // 商品数量(汇总购物车内商品总个数)
    private BigDecimal totalAmount; // 商品总价
    private BigDecimal reduce = new BigDecimal("0.00");// 减免价格

    public List<CartItemVO> getItems() {
        return items;
    }

    public void setItems(List<CartItemVO> items) {
        this.items = items;
    }

    public Integer getCountNum() {
        int count = 0;
        if (items != null && items.size() > 0) {
            for (CartItemVO item : items) {
                count += item.getCount();
            }
        }
        return count;
    }

    public Integer getCountType() {
        return CollectionUtils.isEmpty(items) ? 0 : items.size();
    }


    public BigDecimal getTotalAmount() {
        BigDecimal amount = new BigDecimal("0");
        // 1、计算购物项总价
        if (!CollectionUtils.isEmpty(items)) {
            for (CartItemVO cartItem : items) {
                if (cartItem.getCheck()) {
                    amount = amount.add(cartItem.getTotalPrice());
                }
            }
        }
        // 2、计算优惠后的价格
        return amount.subtract(getReduce());
    }

    public BigDecimal getReduce() {
        return reduce;
    }

    public void setReduce(BigDecimal reduce) {
        this.reduce = reduce;
    }
}

/**
 * 购物项VO(购物车内每一项商品内容)
 */
public class CartItemVO {
    private Long skuId;                     // skuId
    private Boolean check = true;           // 是否选中
    private String title;                   // 标题
    private String image;                   // 图片
    private List<String> skuAttrValues;     // 销售属性
    private BigDecimal price;               // 单价
    private Integer count;                  // 商品件数
    private BigDecimal totalPrice;          // 总价

    public Long getSkuId() {
        return skuId;
    }

    public void setSkuId(Long skuId) {
        this.skuId = skuId;
    }

    public Boolean getCheck() {
        return check;
    }

    public void setCheck(Boolean check) {
        this.check = check;
    }

    public String getTitle() {
        return title;
    }

    public void setTitle(String title) {
        this.title = title;
    }

    public String getImage() {
        return image;
    }

    public void setImage(String image) {
        this.image = image;
    }

    public List<String> getSkuAttrValues() {
        return skuAttrValues;
    }

    public void setSkuAttrValues(List<String> skuAttrValues) {
        this.skuAttrValues = skuAttrValues;
    }

    public BigDecimal getPrice() {
        return price;
    }

    public void setPrice(BigDecimal price) {
        this.price = price;
    }

    public Integer getCount() {
        return count;
    }

    public void setCount(Integer count) {
        this.count = count;
    }

    /**
     * 计算当前购物项总价
     */
    public BigDecimal getTotalPrice() {
        return this.price.multiply(new BigDecimal("" + this.count));
    }

    public void setTotalPrice(BigDecimal totalPrice) {
        this.totalPrice = totalPrice;
    }
}
10.4ThreadLocal用户身份鉴别
游客购物车/离线购物车:
- 第一次使用购物车功能,没有登录,创建
user-key(分配临时用户身份) - 访问购物车时,判断当前是否登录状态(session是否存在用户信息)
- 登录状态则获取用户购物车信息
- 未登录状态,则获取临时用户身份,获取游客购物车
项目搭建步骤:
- 集成
Redis - 集成
SpringSession,配置SpringSession域名和过期时间 - 创建拦截器获取用户身份信息
- 创建
CartInterceptor拦截器 - 创建
GulimallWebConfig使用CartInterceptor拦截器
- 创建
- 创建测试
controller
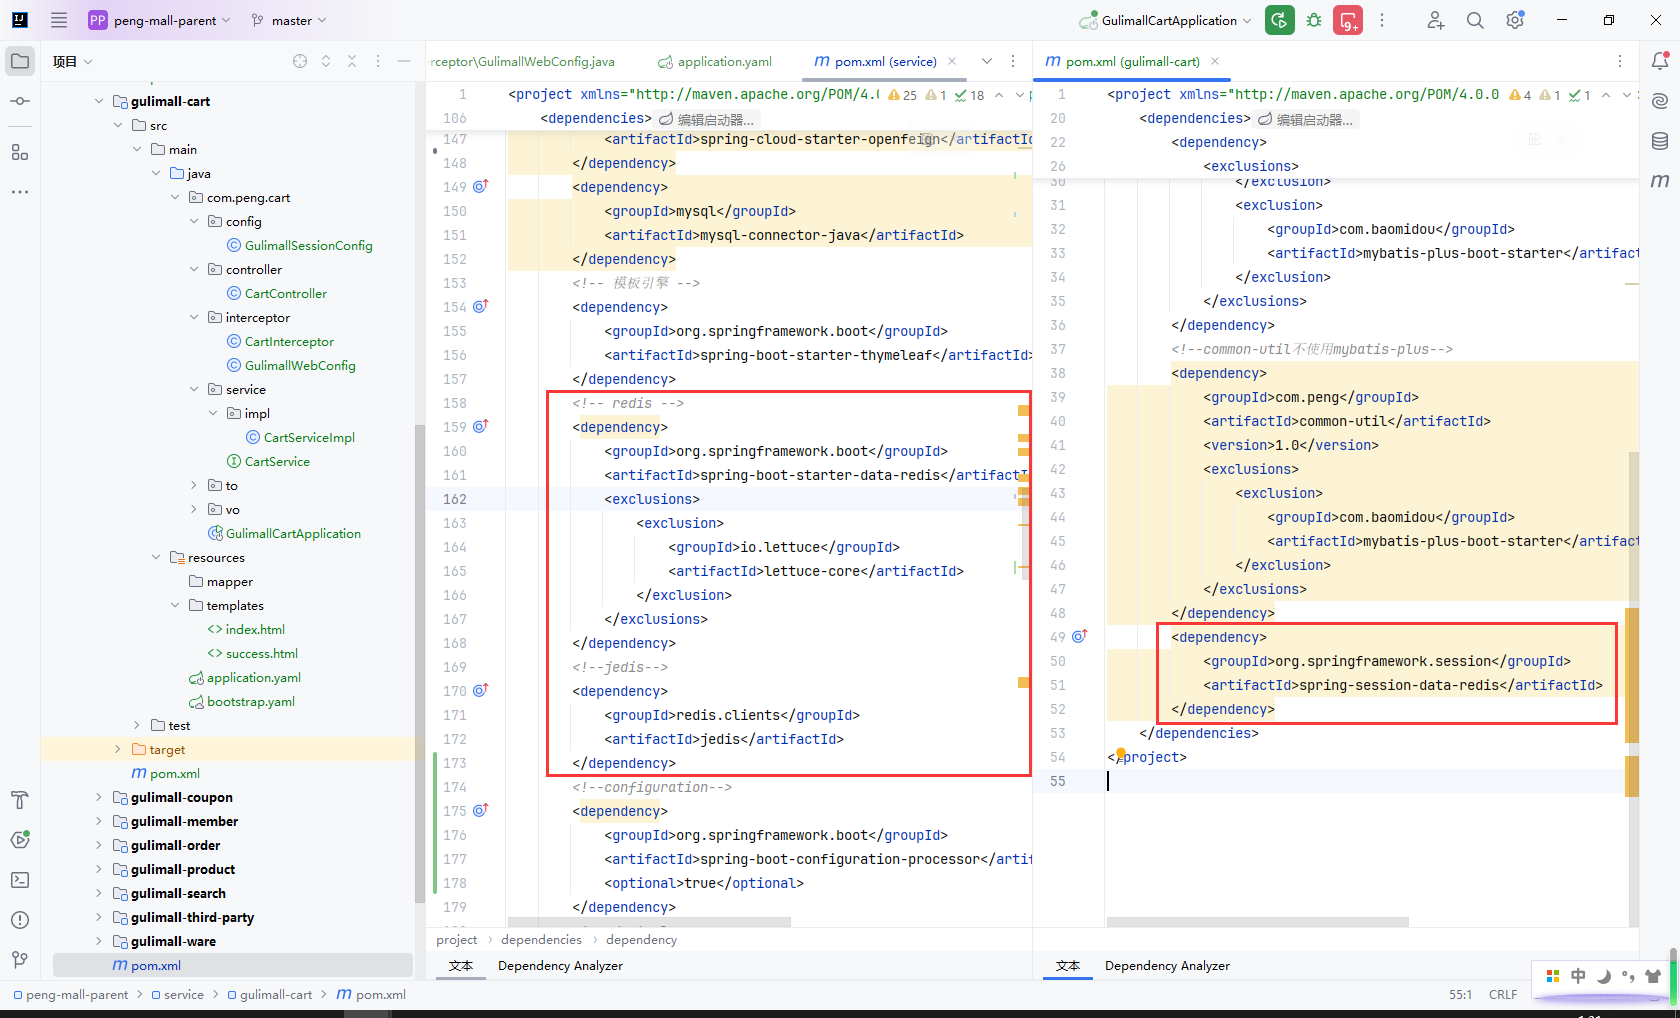
导入Redis和SpringSession依赖
<!-- redis -->
<dependency>
    <groupId>org.springframework.boot</groupId>
    <artifactId>spring-boot-starter-data-redis</artifactId>
    <exclusions>
        <exclusion>
            <groupId>io.lettuce</groupId>
            <artifactId>lettuce-core</artifactId>
        </exclusion>
    </exclusions>
</dependency>
<!--jedis-->
<dependency>
    <groupId>redis.clients</groupId>
    <artifactId>jedis</artifactId>
</dependency>
<!--SpringSession-->
 <dependency>
     <groupId>org.springframework.session</groupId>
     <artifactId>spring-session-data-redis</artifactId>
  </dependency>
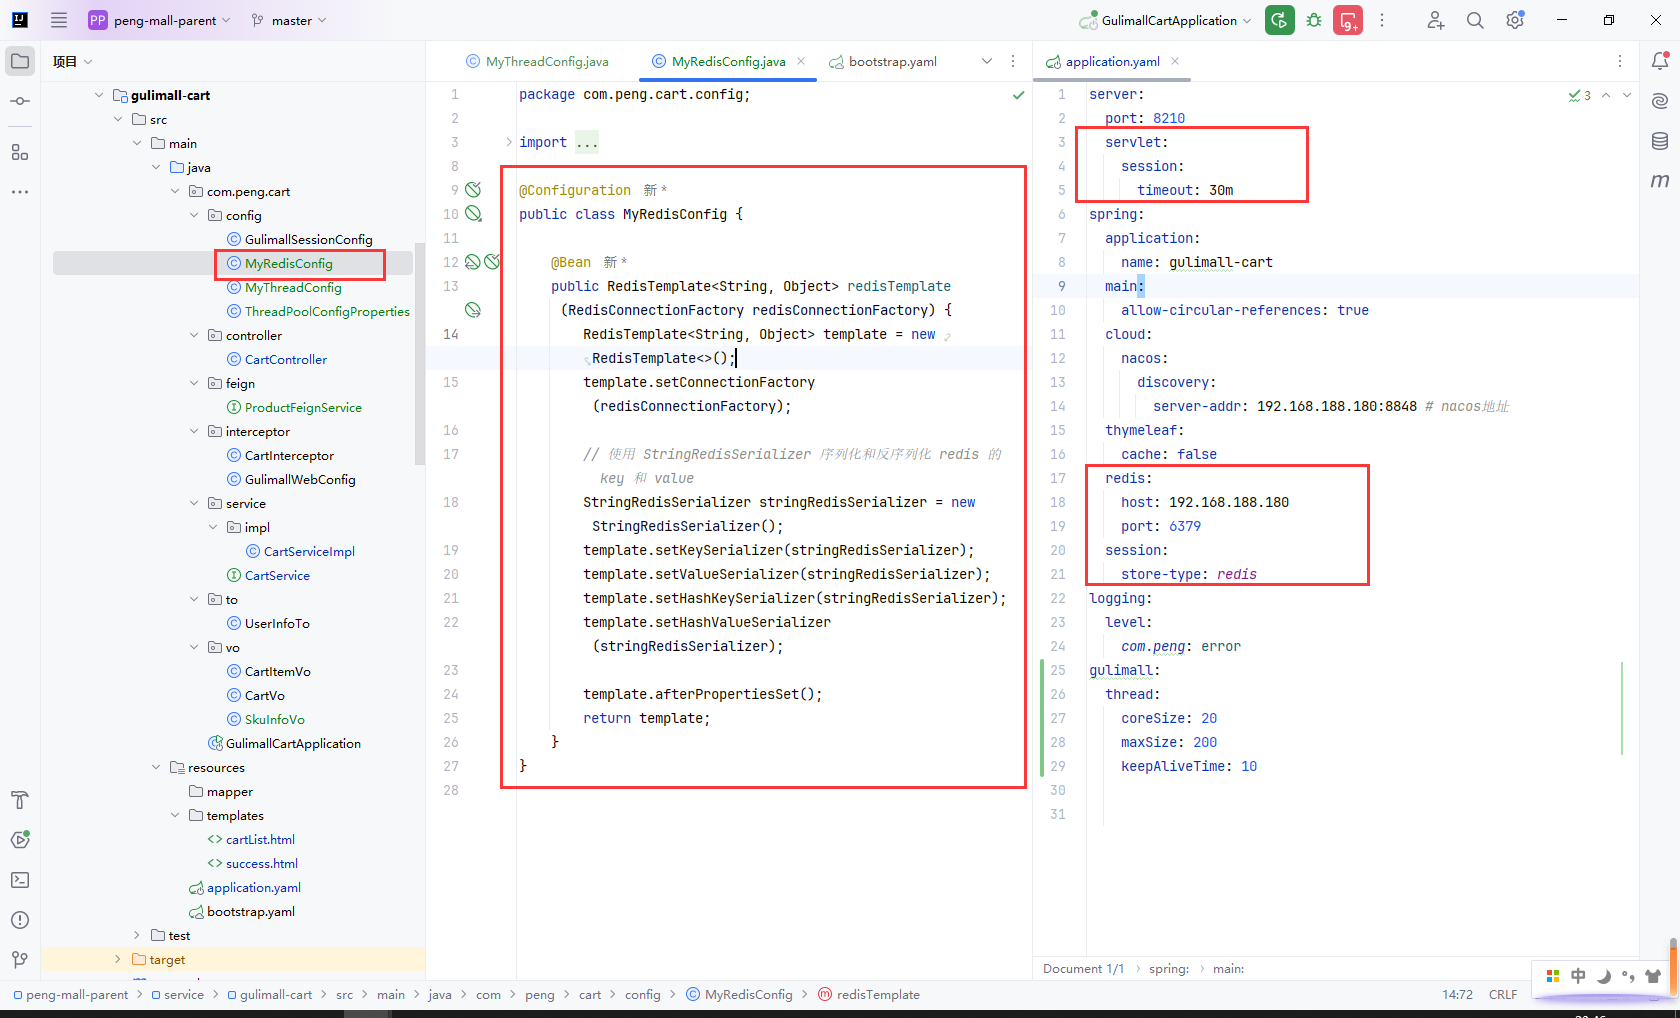
配置Redis和SpringSession
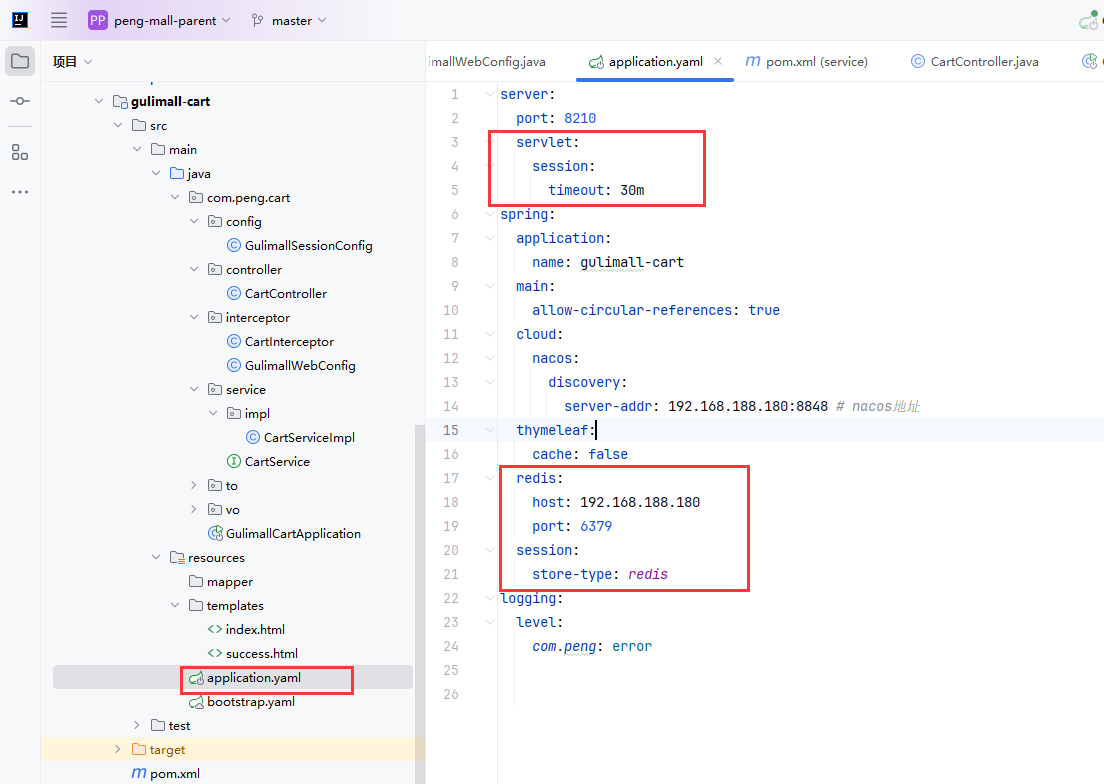
配置SpringSession域名和过期时间
创建拦截器获取用户身份信息
- 创建
CartInterceptor拦截器 - 创建
GulimallWebConfig使用CartInterceptor拦截器
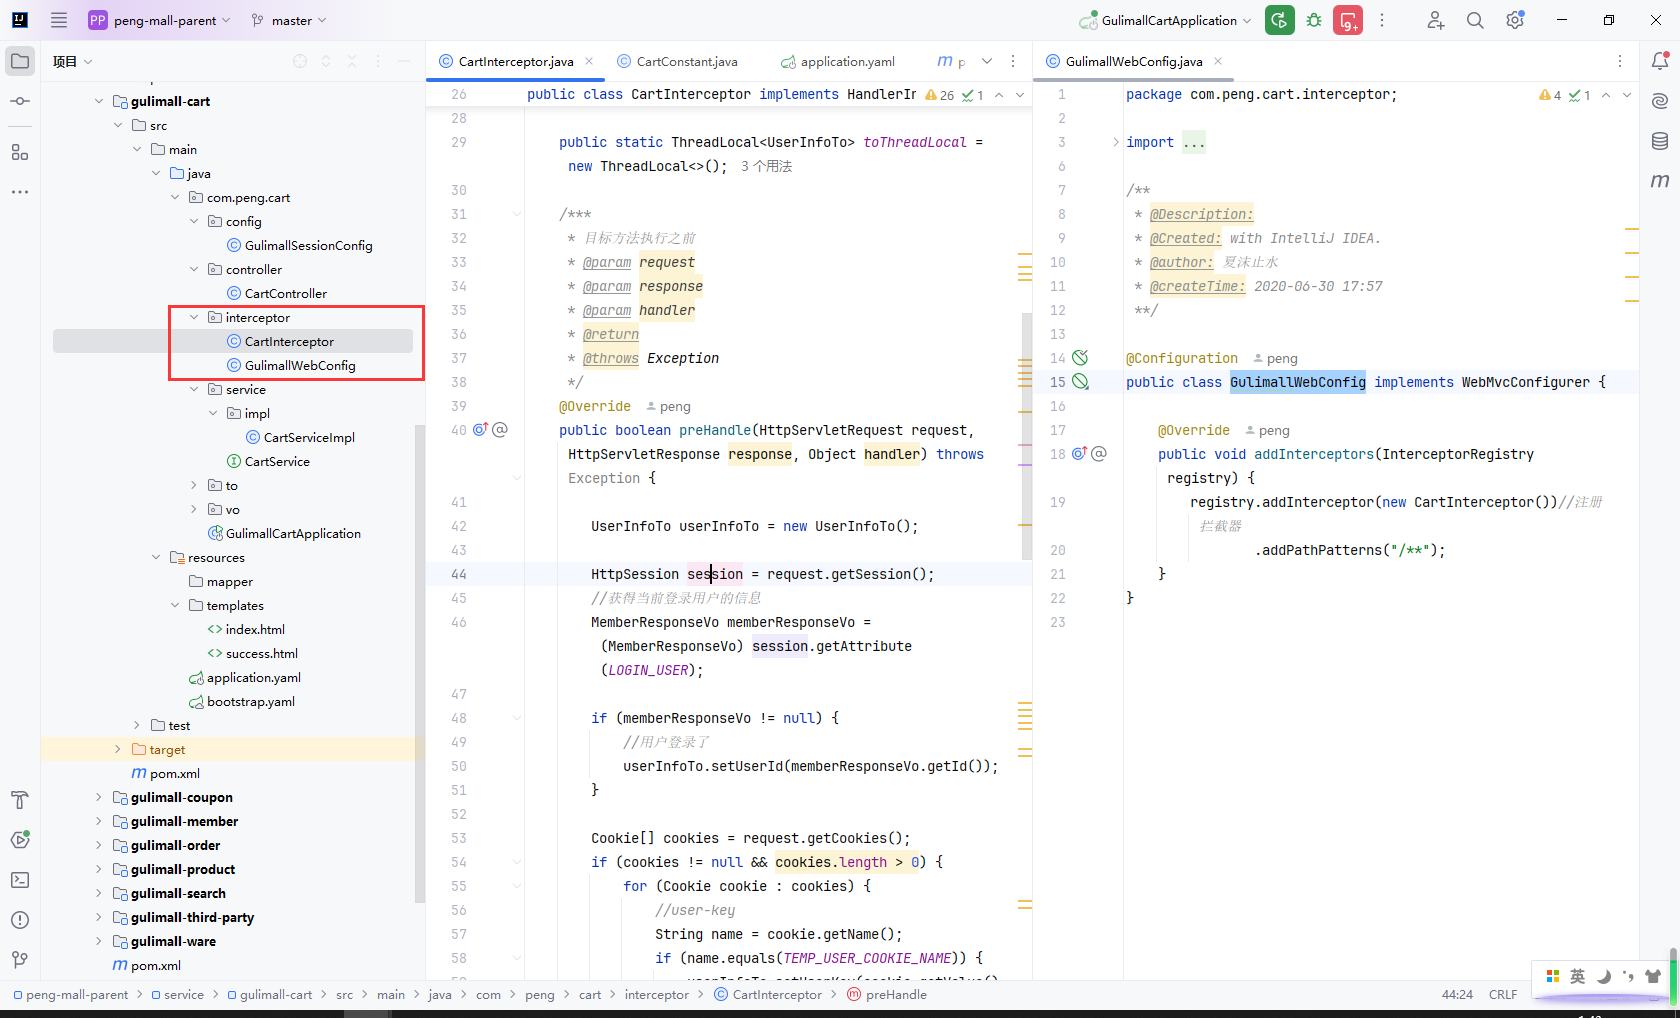
测试,访问http://cart.gulimall.com/
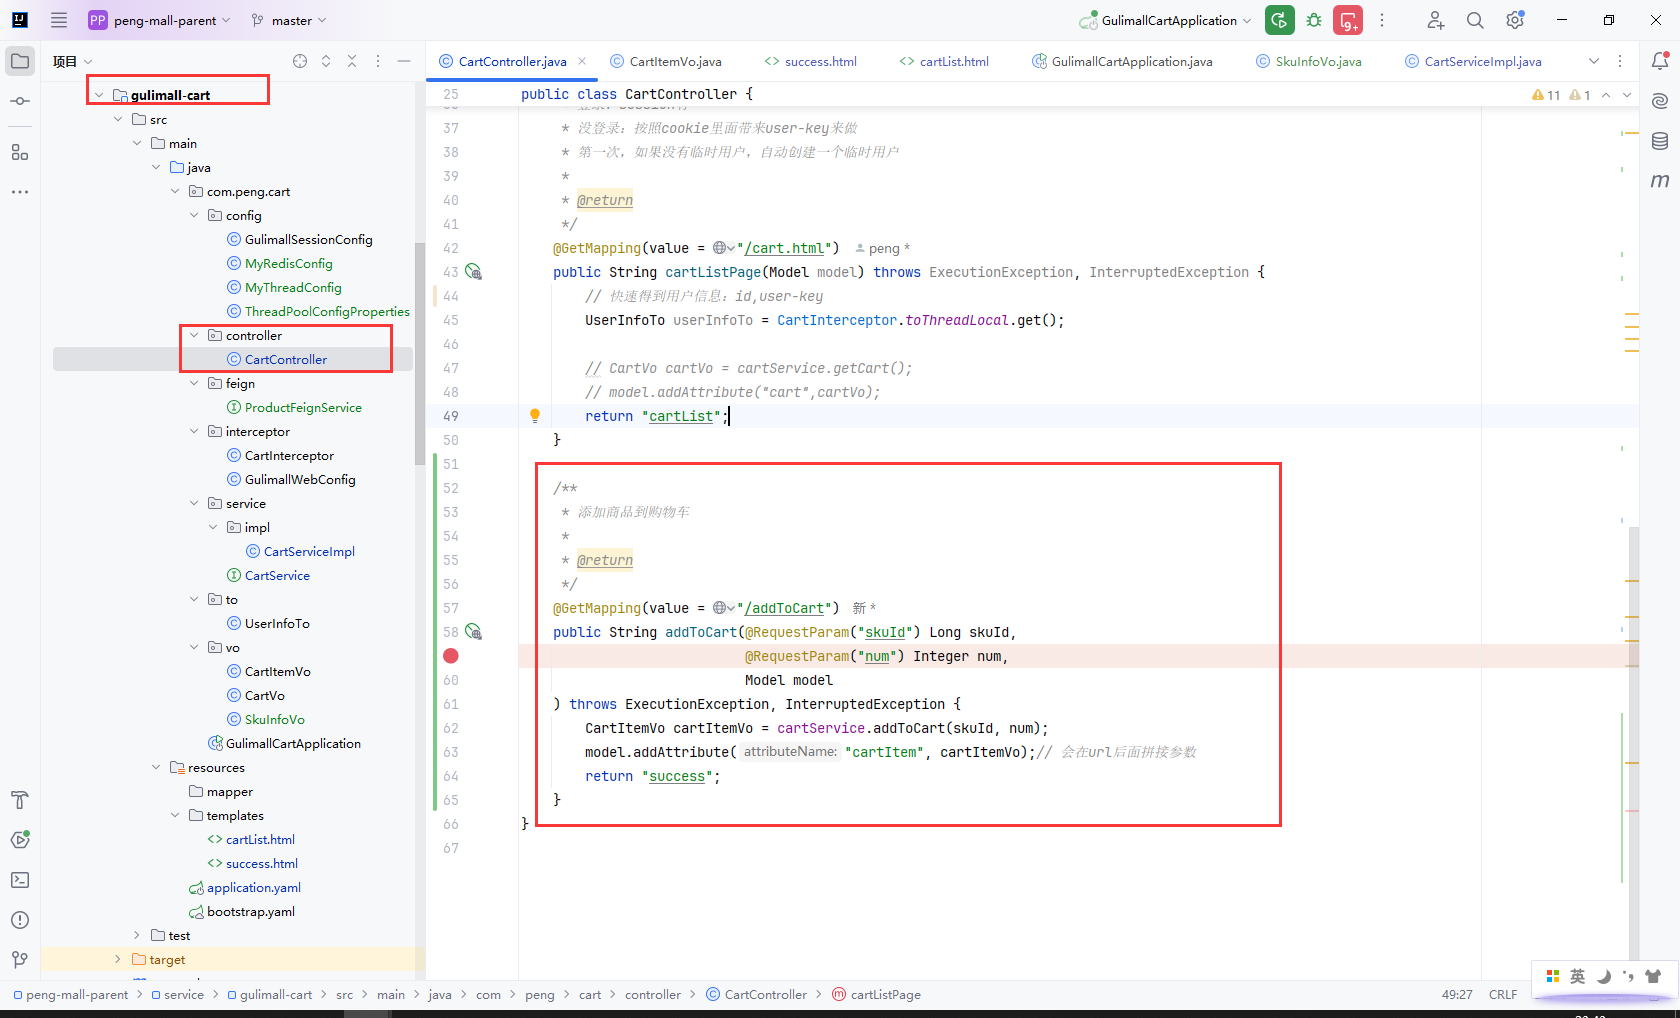
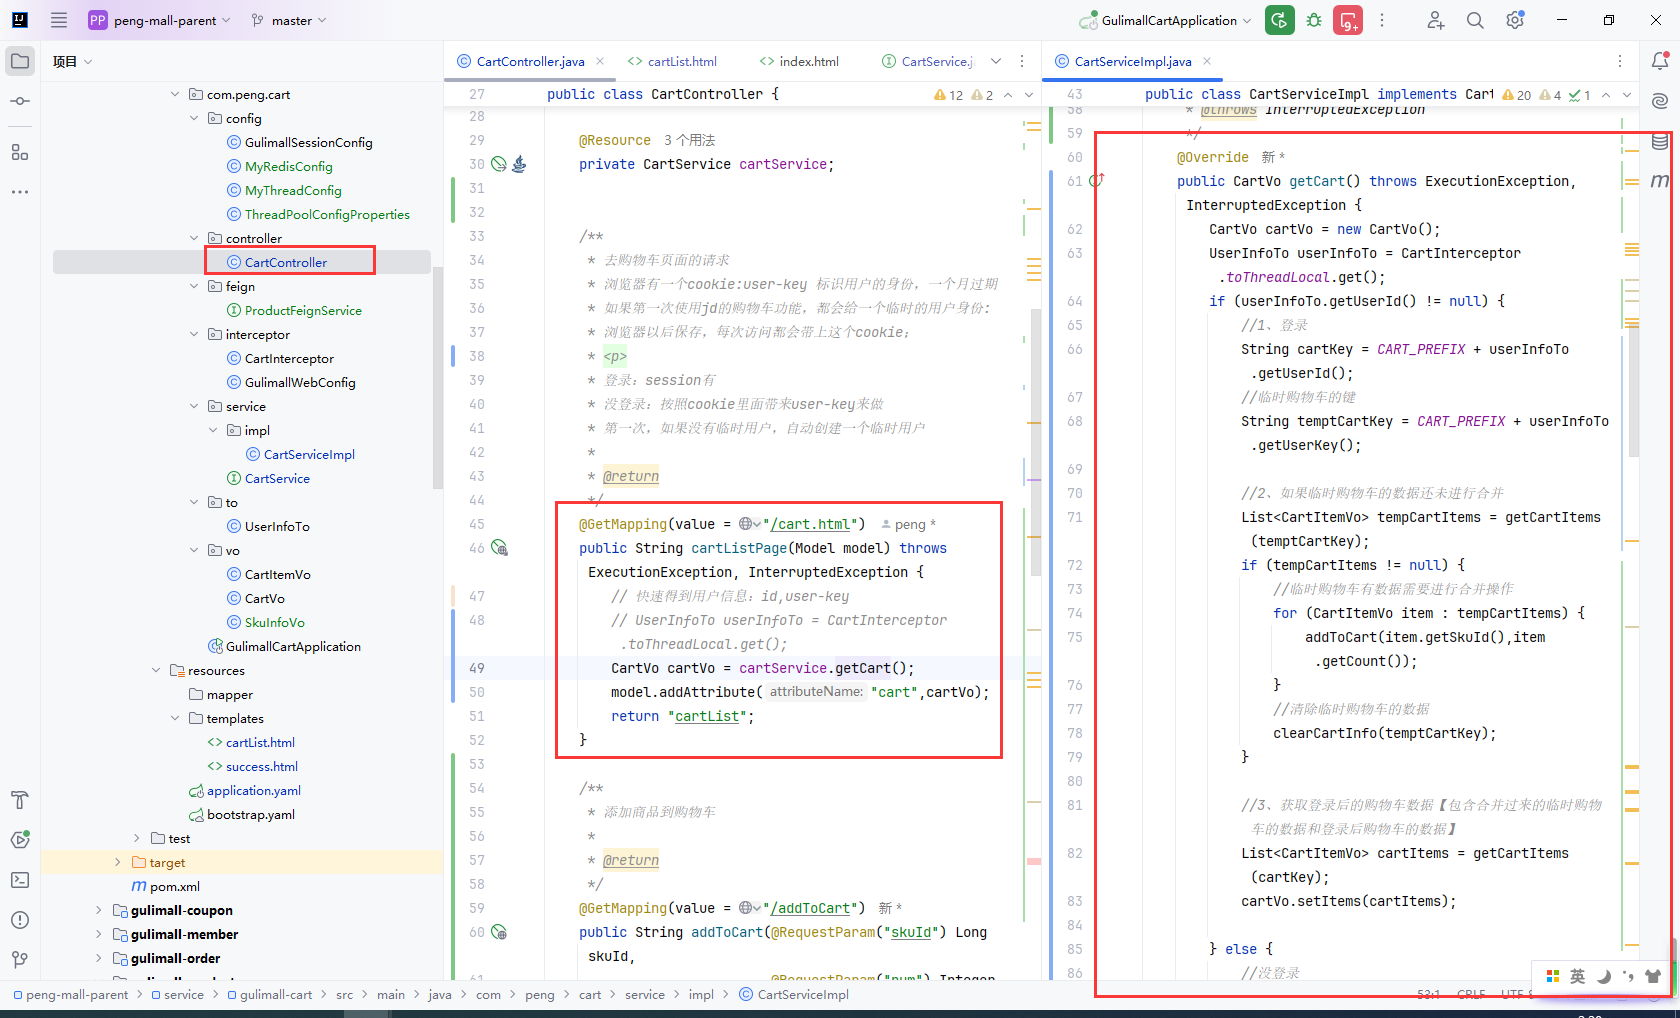
@GetMapping(value = "/cart.html")
public String cartListPage(Model model) throws ExecutionException, InterruptedException {
    //快速得到用户信息:id,user-key
    UserInfoTo userInfoTo = CartInterceptor.toThreadLocal.get();

    // CartVo cartVo = cartService.getCart();
    // model.addAttribute("cart",cartVo);
    return "cartList";
}

10.5页面环境搭建
主要步骤:
gulimall-product/item.html立即预约box-btns-twogulimall-product/index.html我的购物车gulimall-cart/success.html首页- 首页
- 去购物车结算
- 查看商品详情
gulimall-cart/cartList.html首页- 测试地址:
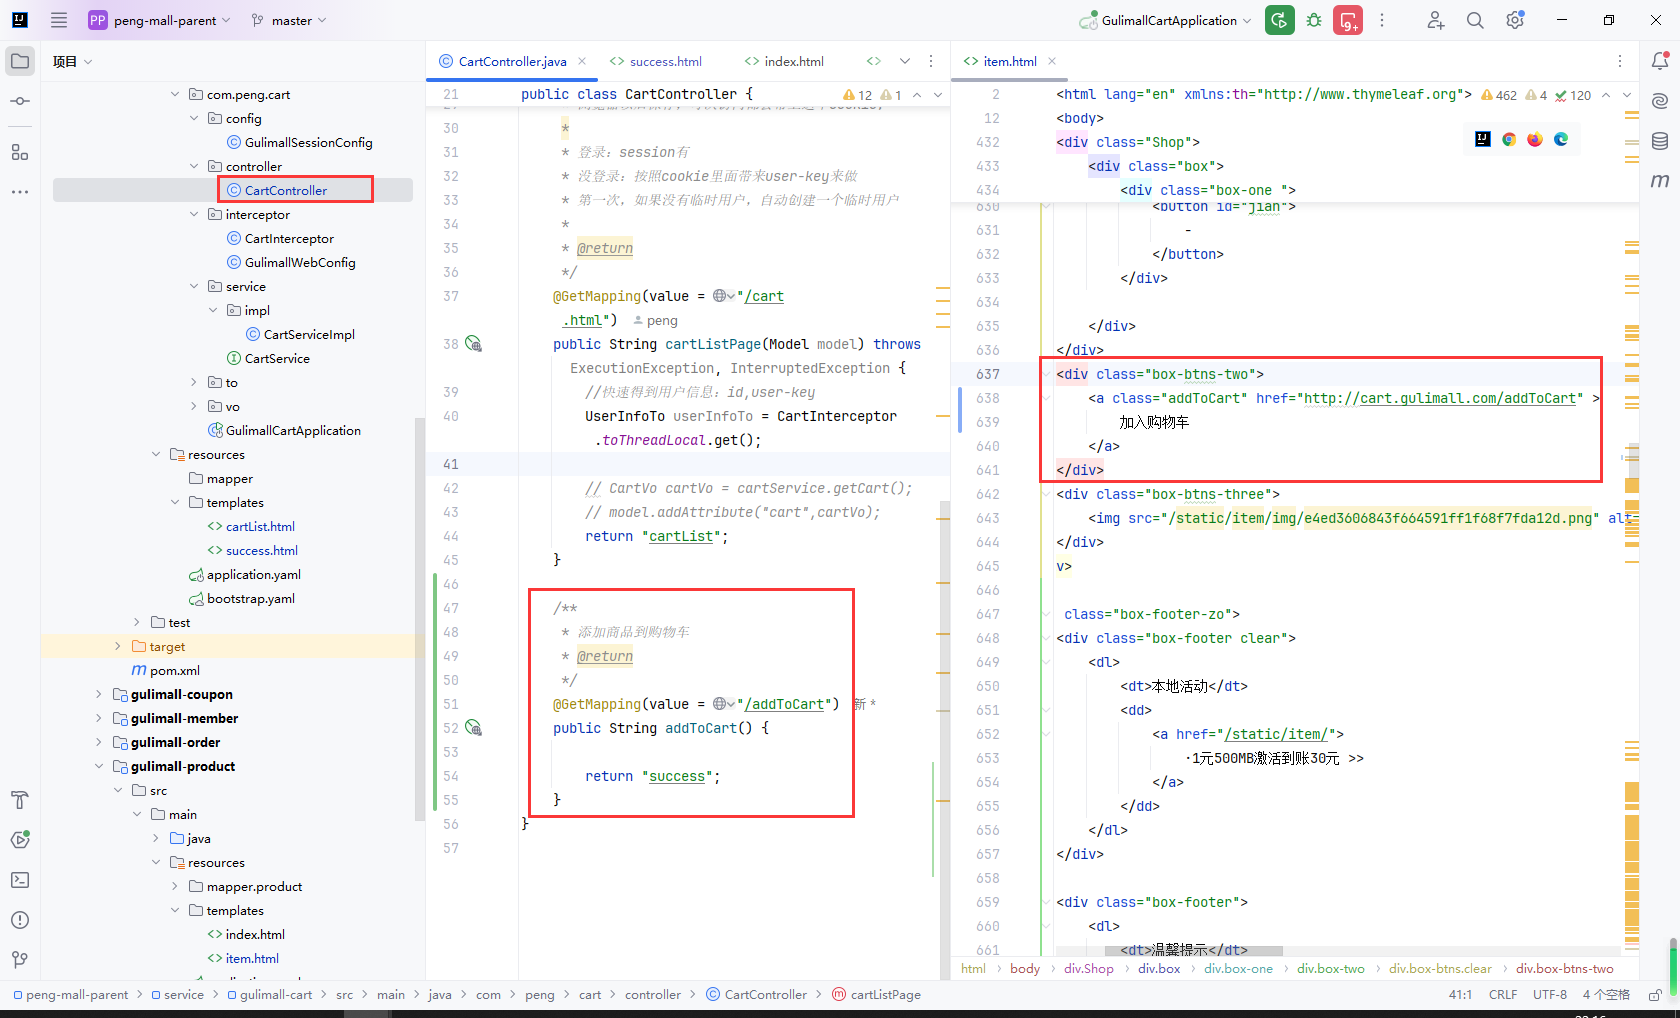
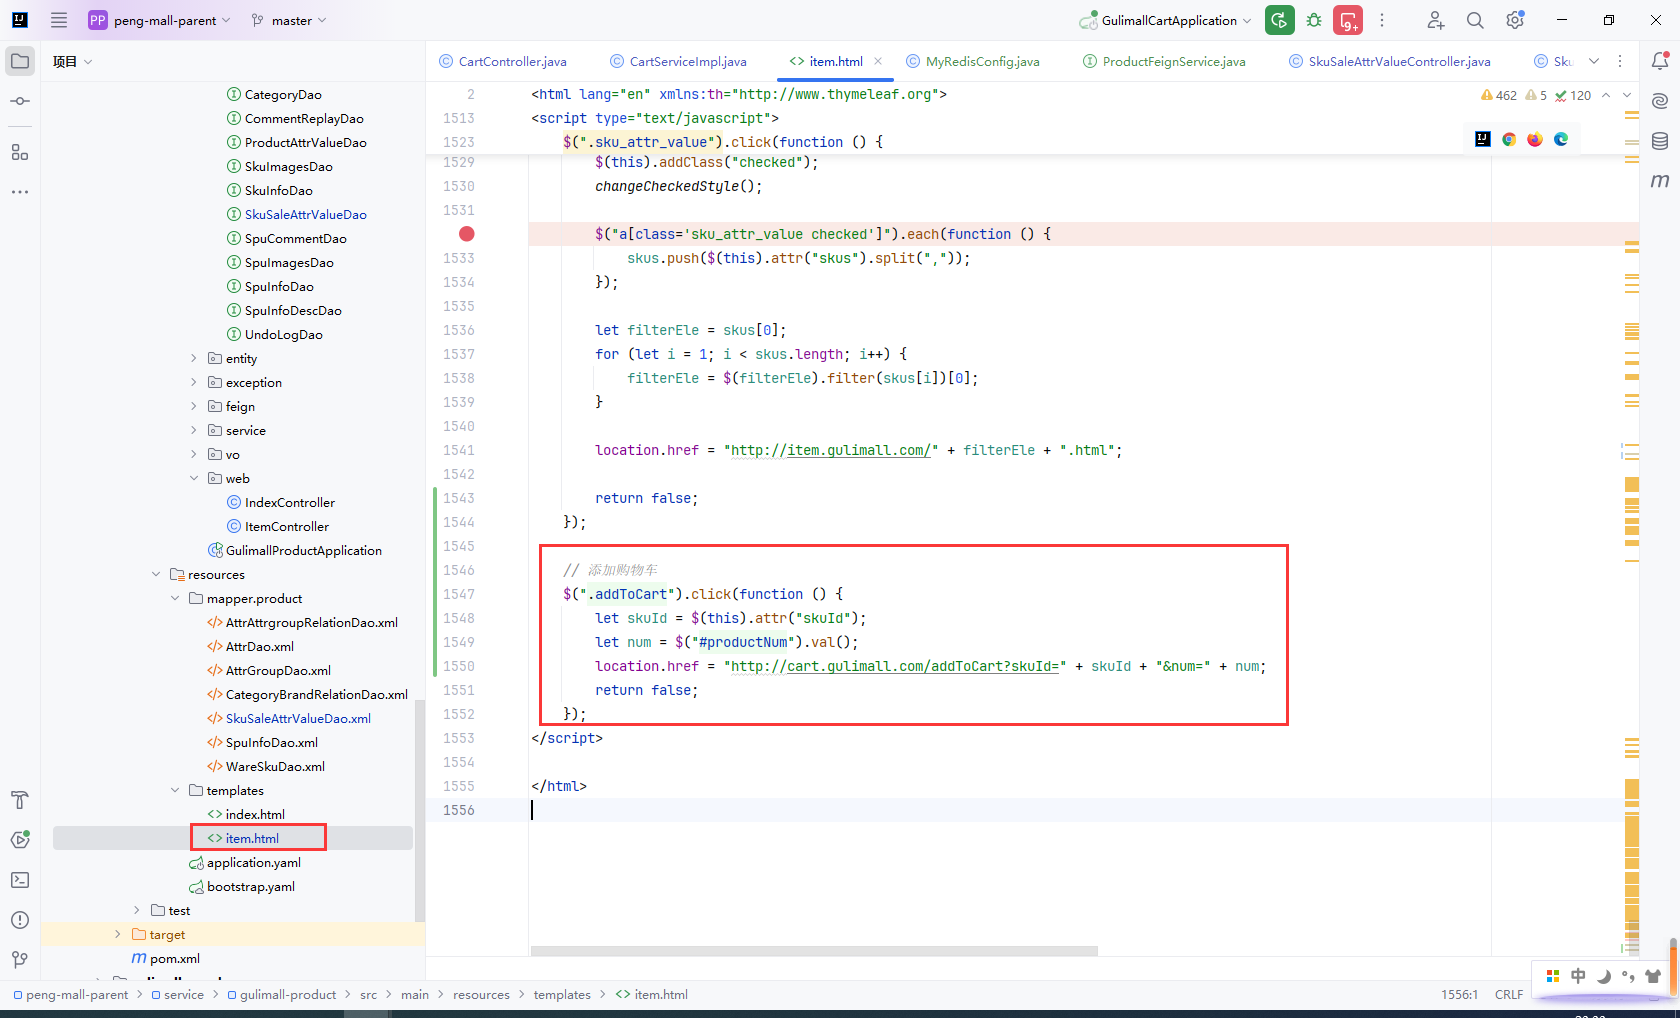
gulimall-product/item.html立即预约,改为加入购物车
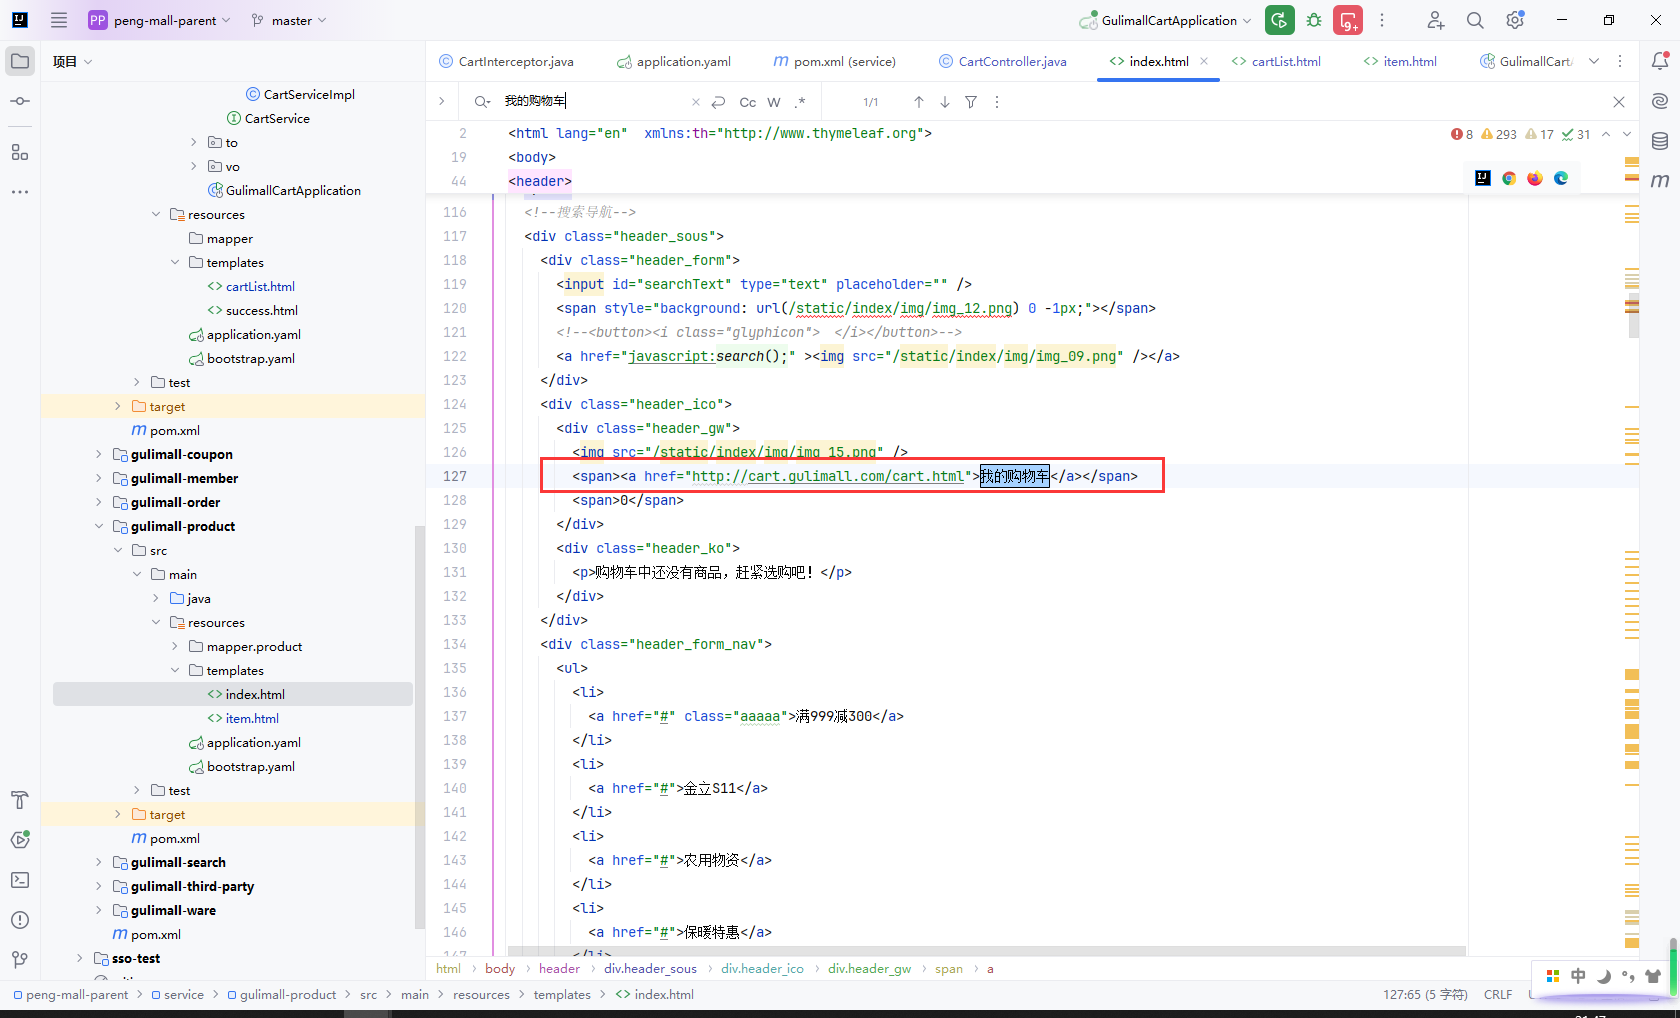
gulimall-product/index.html我的购物车
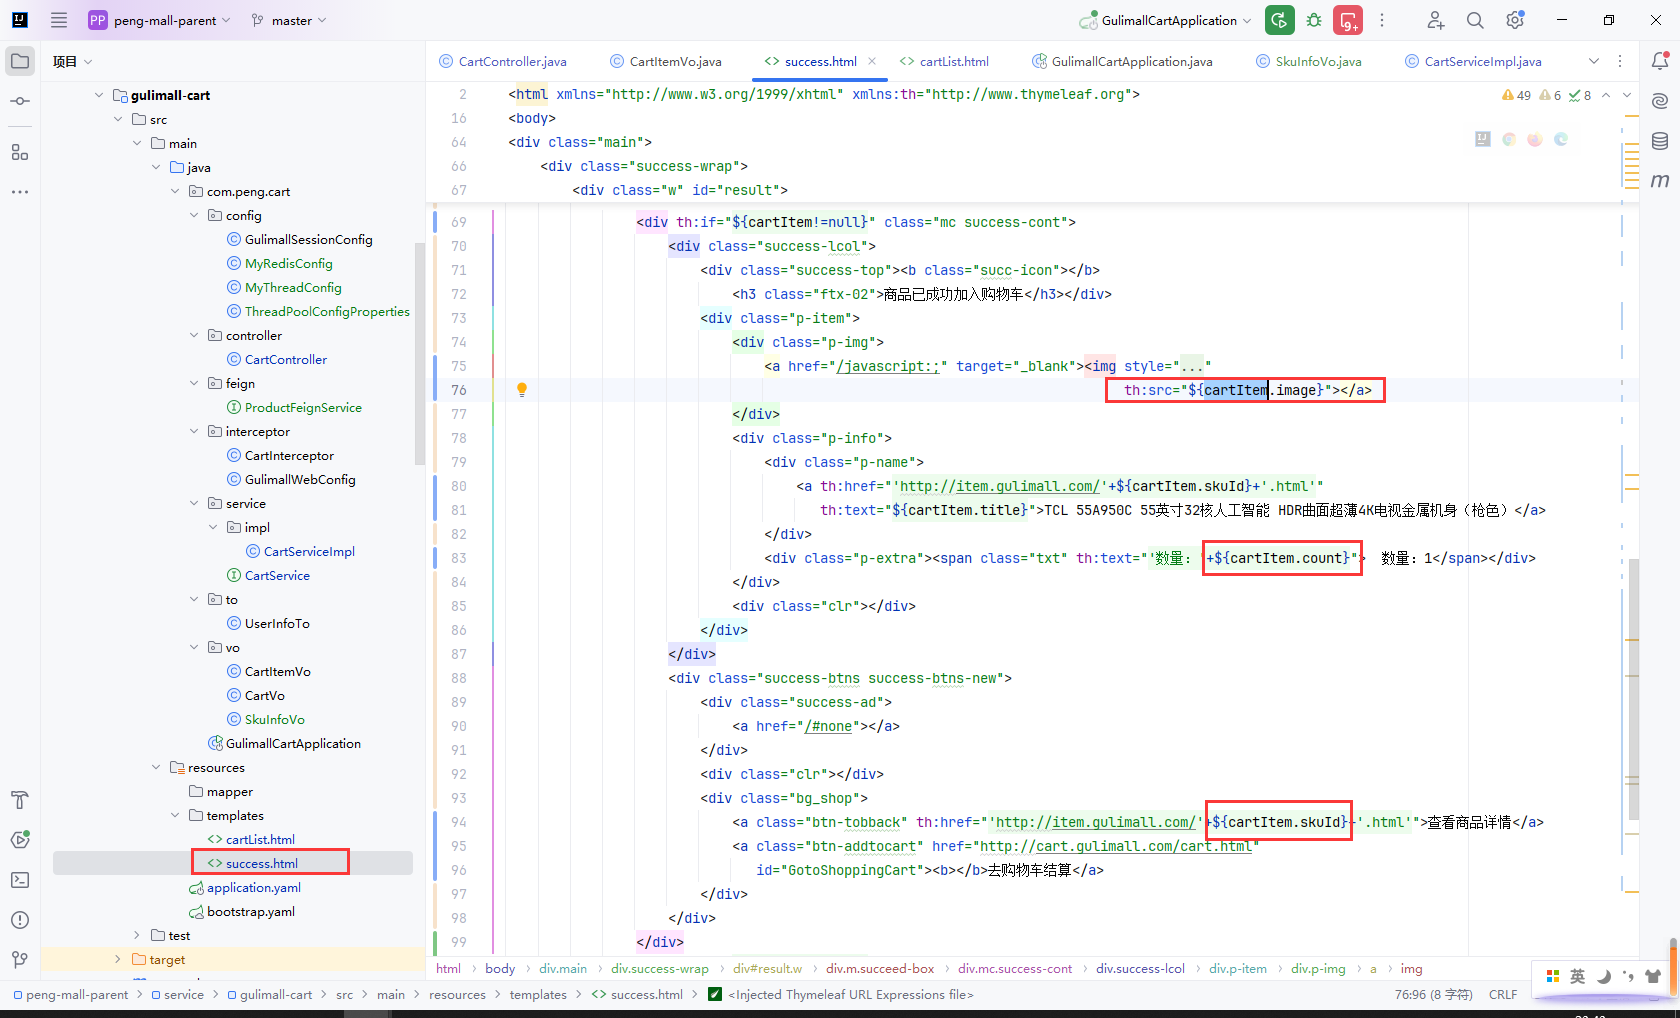
gulimall-cart/success.html首页
gulimall-cart/success.html去购物车结算
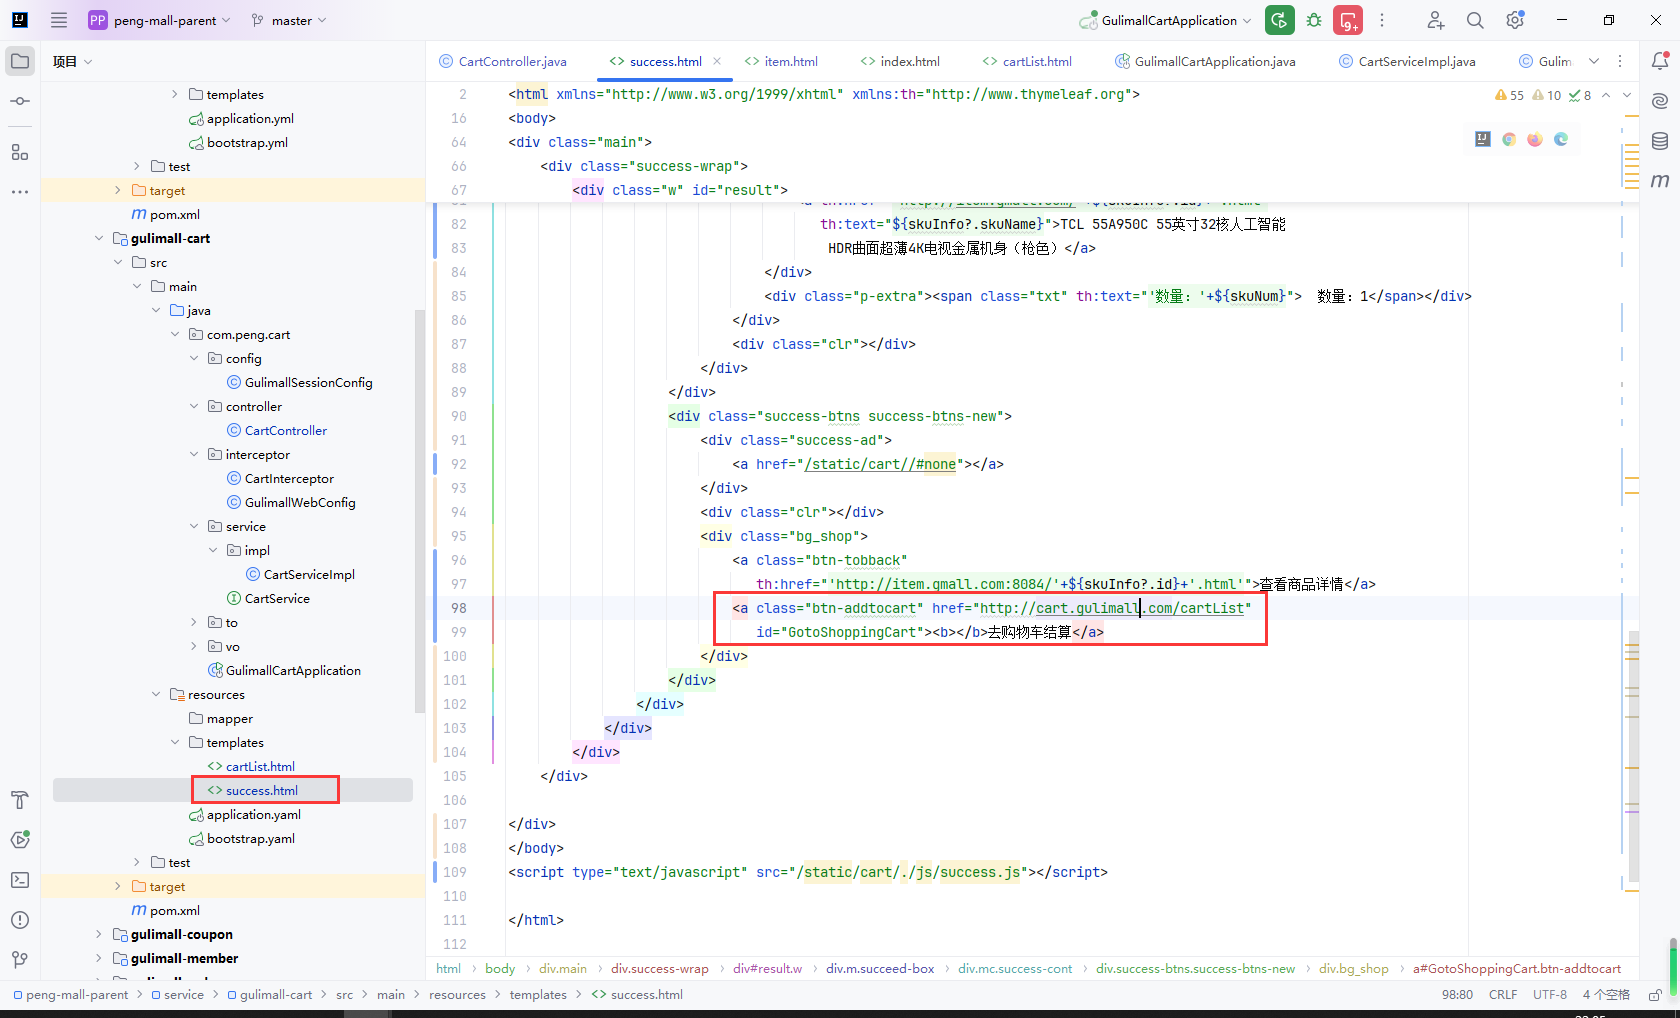
gulimall-cart/success.html查看商品详情

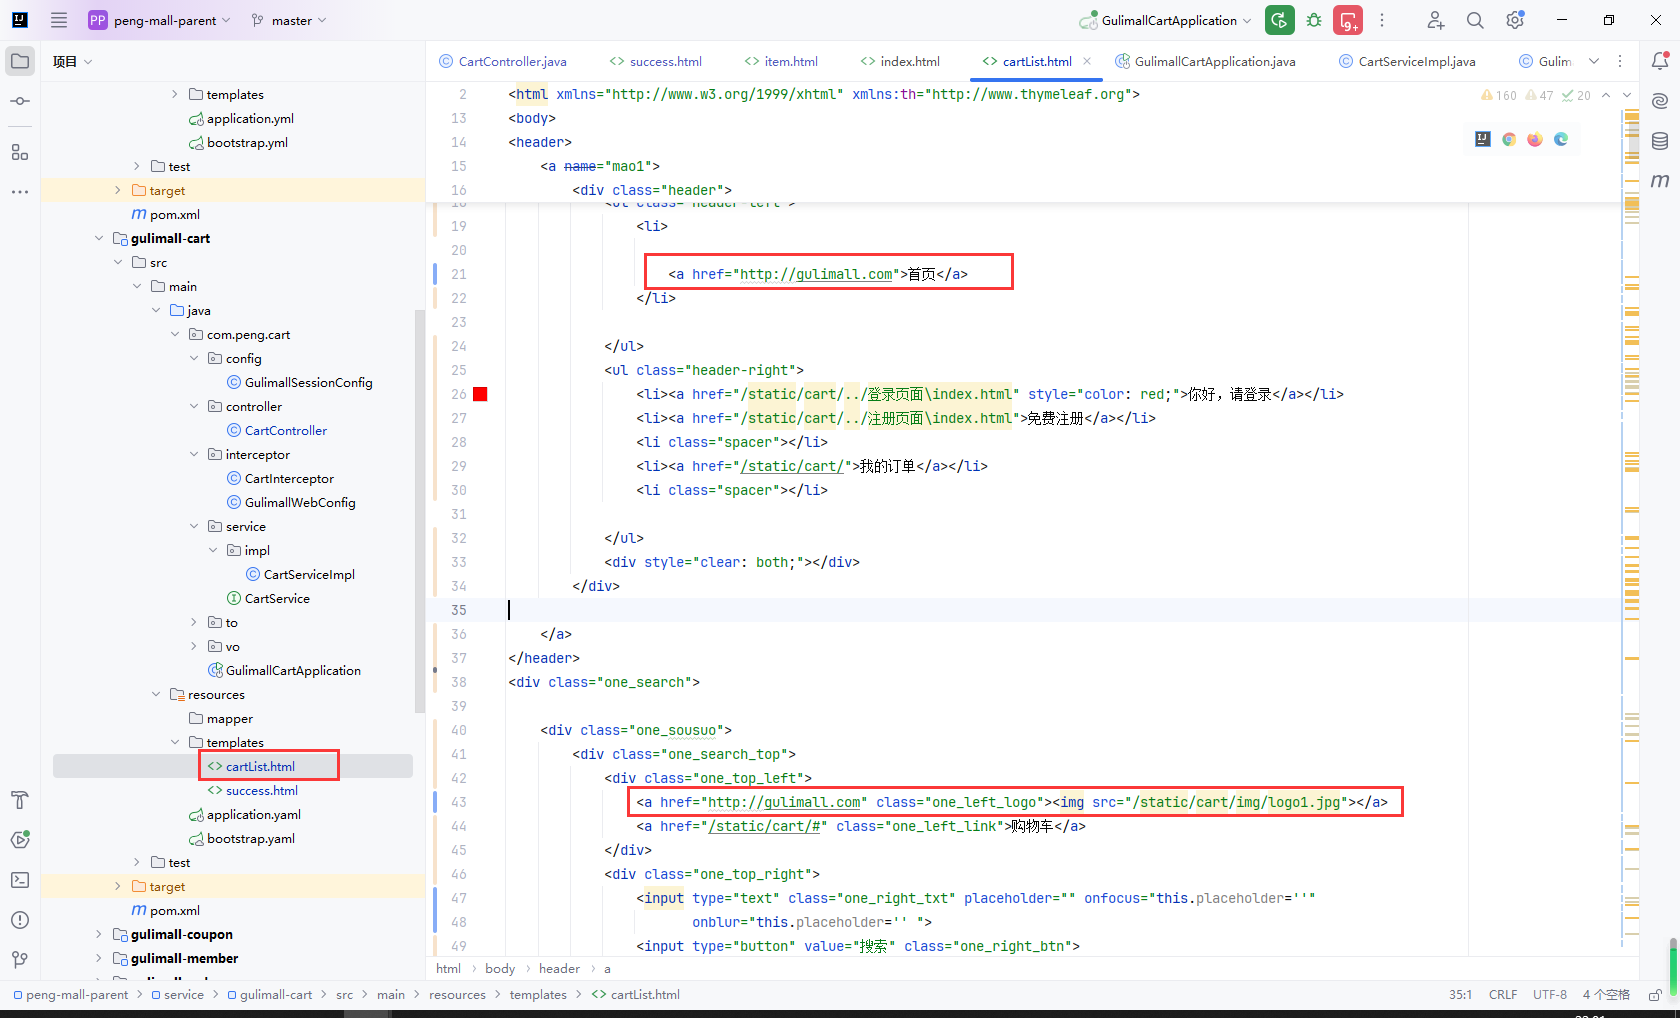
gulimall-cart/cartList.html首页
10.6添加购物车
主要步骤:
- 商品服务
gulimall-product/item.html请求购物车服务gulimall-cart添加购物车接口 gulimall-cart创建添加购物车接口gulimall-cart/success.html界面显示购物车列表gulimall-cart实现添加购物车接口- 使用
BoundHashOperations获取购物车redis操作对象,登录使用UserId,未登录使用UserKey - 如果
redis不存在key就使用redis创建购物车信息 - 远程调用
gulimall-product获取sku基本信息pms_sku_info - 远程调用
gulimall-product获取sku销售属性pms_sku_sale_attr_value - 导入异步编排
CompletableFuture,使用CompletableFuture优化gulimall-product接口调用 - 如果
redis存在key就根据key获取此商品修改数量即可
- 使用
- 未登录测试
- 登录测试
商品服务gulimall-product/item.html请求购物车服务gulimall-cart添加购物车接口
gulimall-cart创建添加购物车接口
gulimall-cart/success.html界面显示购物车列表
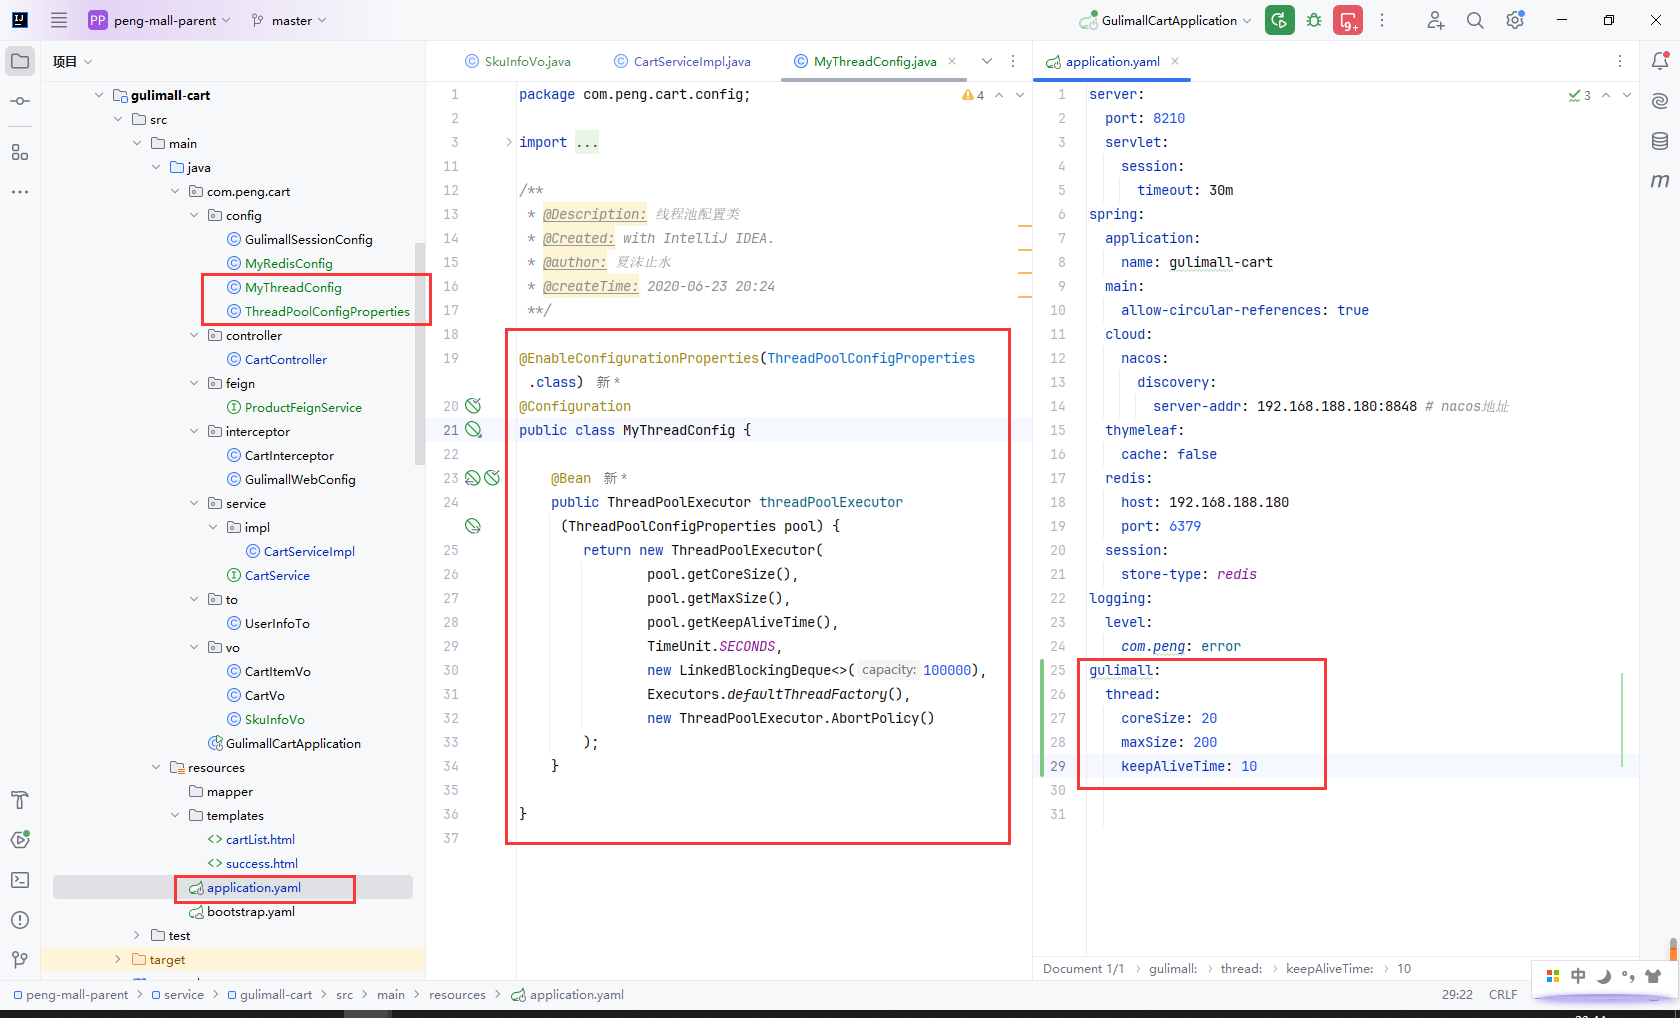
配置异步线程编排
顺便检查一下Redis和SpringSession的配置
gulimall-cart实现添加购物车接口
- 使用
BoundHashOperations获取购物车redis操作对象,登录使用UserId,未登录使用UserKey - 如果
redis不存在key就使用redis创建购物车信息 - 远程调用
gulimall-product获取sku基本信息pms_sku_info - 远程调用
gulimall-product获取sku销售属性pms_sku_sale_attr_value - 导入异步编排
CompletableFuture,使用CompletableFuture优化gulimall-product接口调用 - 如果
redis存在key就根据key获取此商品修改数量即可
@Autowired
StringRedisTemplate redisTemplate;
@Autowired
private ProductFeignService productFeignService;
@Autowired
private ThreadPoolExecutor executor;
@Override
public CartItemVo addToCart(Long skuId, Integer num) throws ExecutionException, InterruptedException {
// 获取购物车redis操作对象
BoundHashOperations<String, Object, Object> cartOps = getCartOps();
// 获取商品
String productRedisValue = (String) cartOps.get(skuId.toString());
//如果没有就添加数据
if (StringUtils.isEmpty(productRedisValue)) {
//2、添加新的商品到购物车(redis)
CartItemVo cartItemVo = new CartItemVo();
//开启第一个异步任务
CompletableFuture<Void> getSkuInfoFuture = CompletableFuture.runAsync(() -> {
//1、远程查询当前要添加商品的信息
R productSkuInfo = productFeignService.getInfo(skuId);
SkuInfoVo skuInfo = productSkuInfo.getData("skuInfo", new TypeReference<SkuInfoVo>() {});
//数据赋值操作
cartItemVo.setSkuId(skuInfo.getSkuId());
cartItemVo.setTitle(skuInfo.getSkuTitle());
cartItemVo.setImage(skuInfo.getSkuDefaultImg());
cartItemVo.setPrice(skuInfo.getPrice());
cartItemVo.setCount(num);
}, executor);
//开启第二个异步任务
CompletableFuture<Void> getSkuAttrValuesFuture = CompletableFuture.runAsync(() -> {
//2、远程查询skuAttrValues组合信息
R skuSaleAttrValues = productFeignService.getSkuSaleAttrValues(skuId);
List<String> skustrs = skuSaleAttrValues.getData("skuSaleAttrValues", new TypeReference<List<String>>() {});
cartItemVo.setSkuAttrValues(skustrs);
}, executor);
//等待所有的异步任务全部完成
CompletableFuture.allOf(getSkuInfoFuture, getSkuAttrValuesFuture).get();
String cartItemJson = JSON.toJSONString(cartItemVo);
cartOps.put(skuId.toString(), cartItemJson);
return cartItemVo;
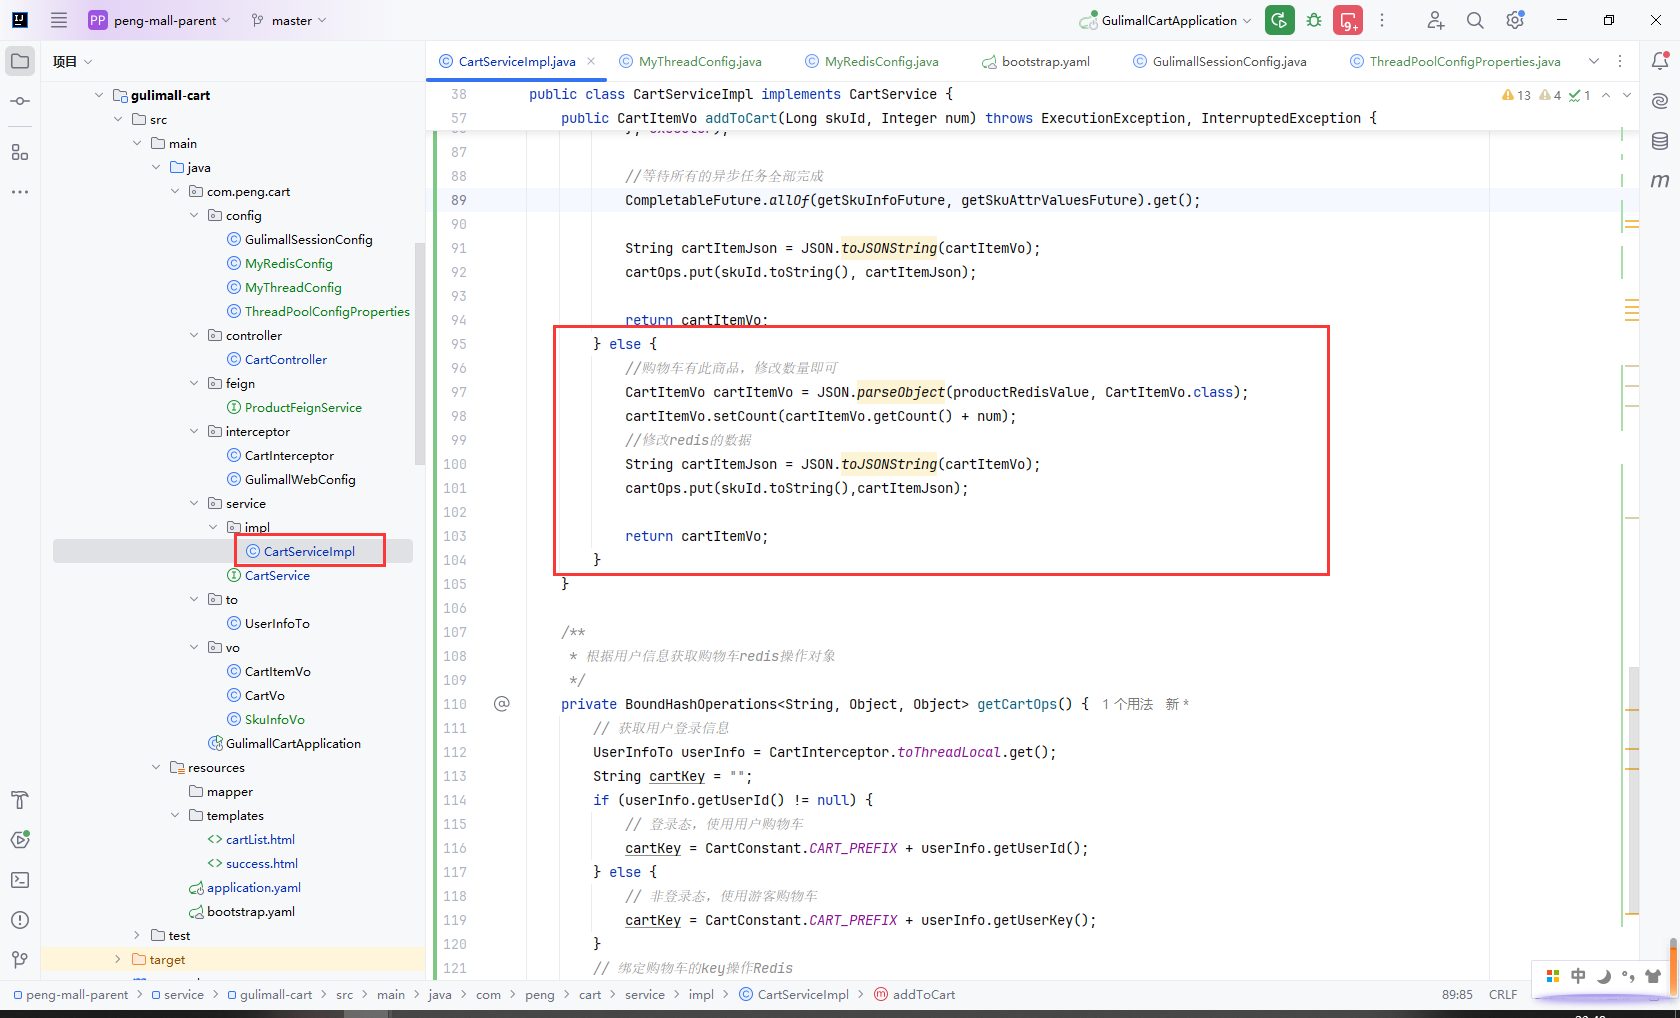
} else {
//购物车有此商品,修改数量即可
CartItemVo cartItemVo = JSON.parseObject(productRedisValue, CartItemVo.class);
cartItemVo.setCount(cartItemVo.getCount() + num);
//修改redis的数据
String cartItemJson = JSON.toJSONString(cartItemVo);
cartOps.put(skuId.toString(),cartItemJson);
return cartItemVo;
}
}
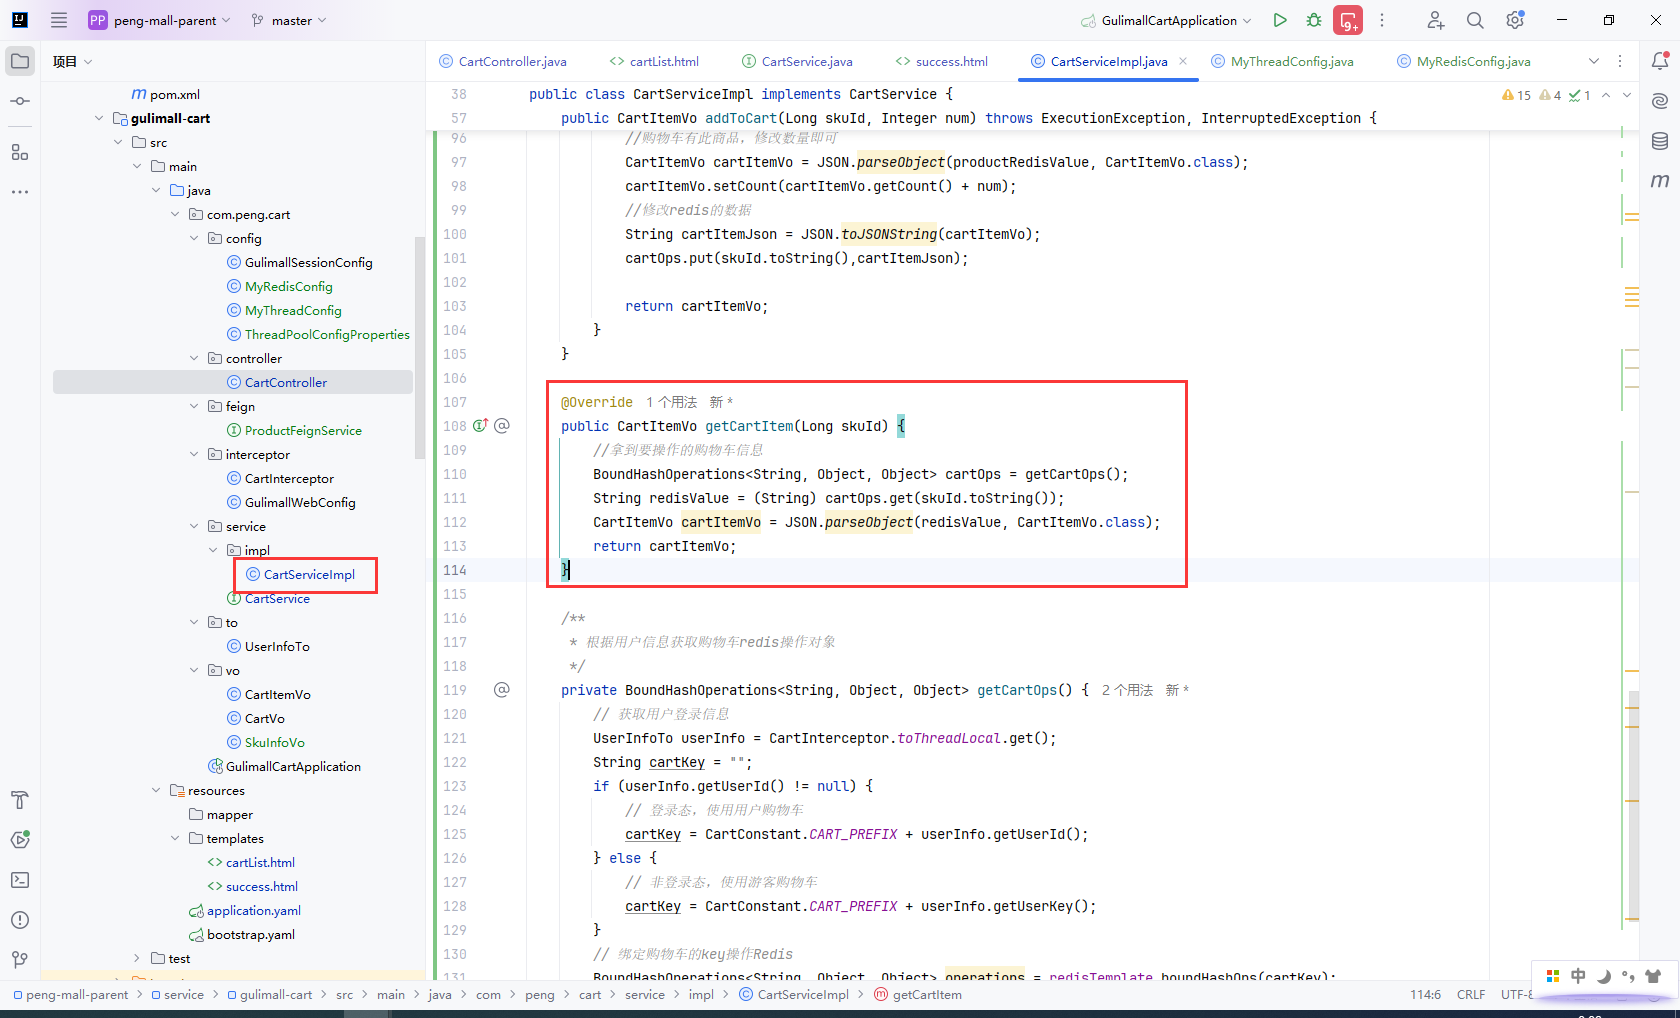
/**
* 根据用户信息获取购物车redis操作对象
*/
private BoundHashOperations<String, Object, Object> getCartOps() {
// 获取用户登录信息
UserInfoTo userInfo = CartInterceptor.toThreadLocal.get();
String cartKey = "";
if (userInfo.getUserId() != null) {
// 登录态,使用用户购物车
cartKey = CartConstant.CART_PREFIX + userInfo.getUserId();
} else {
// 非登录态,使用游客购物车
cartKey = CartConstant.CART_PREFIX + userInfo.getUserKey();
}
// 绑定购物车的key操作Redis
BoundHashOperations<String, Object, Object> operations = redisTemplate.boundHashOps(cartKey);
return operations;
}
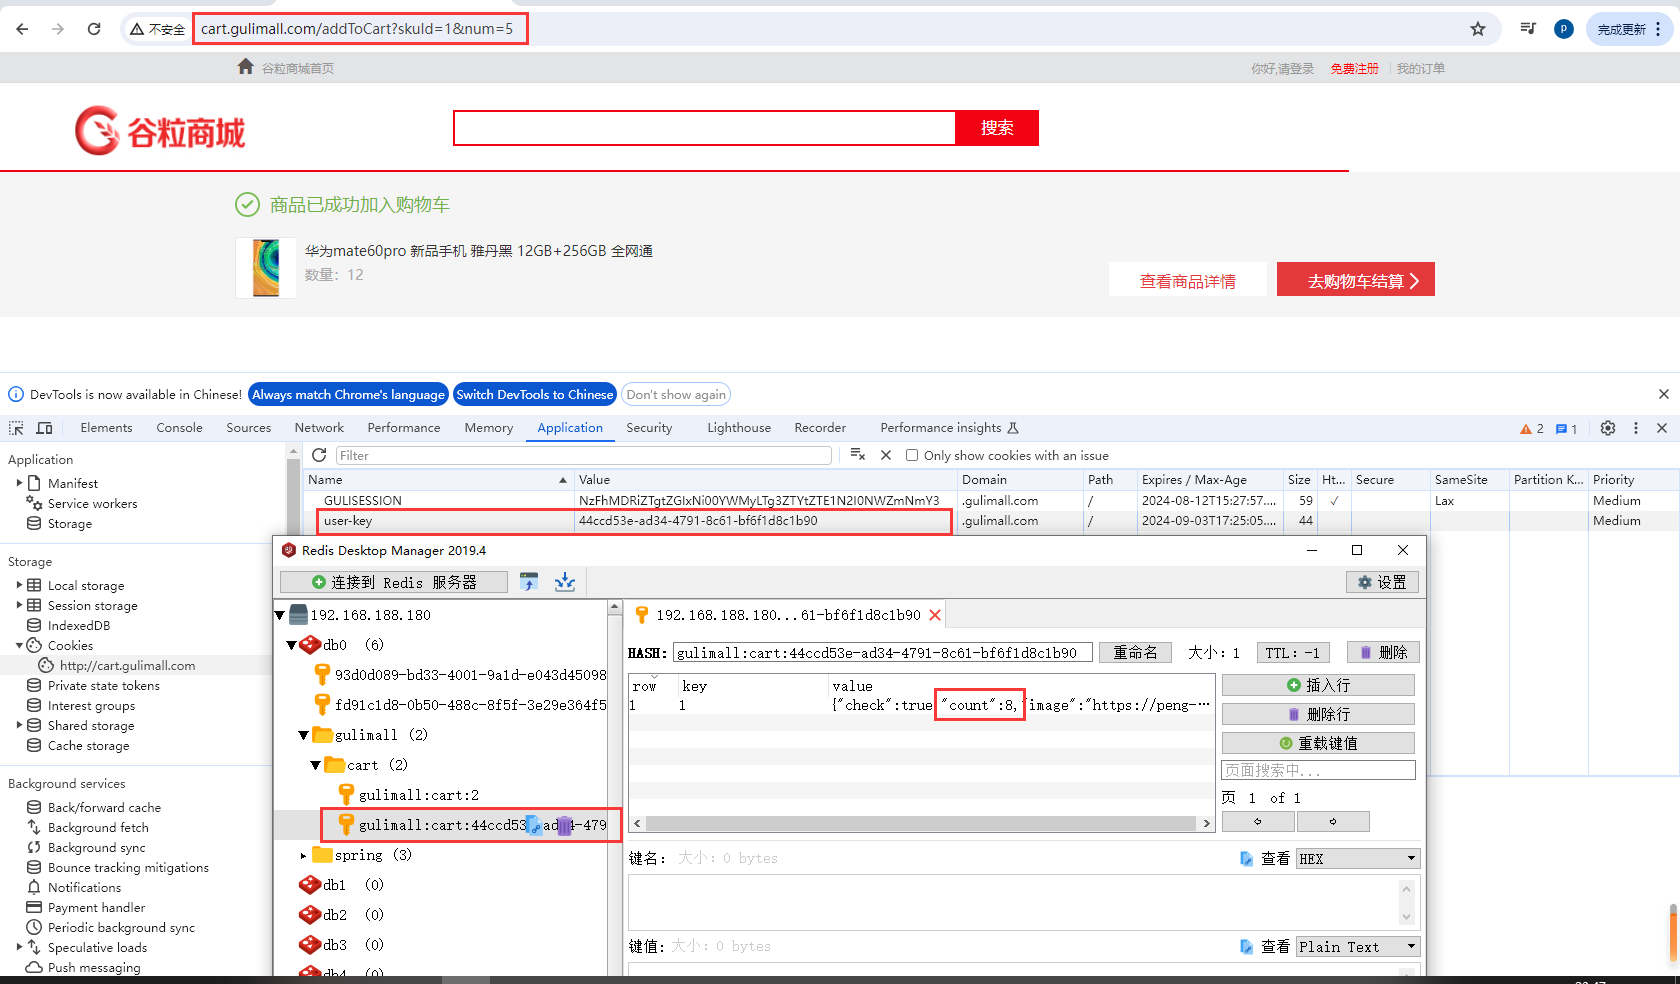
未登录测试
登录测试
10.7添加购物车细节
主要步骤:
- 购物车有此商品,修改数量即可
10.8RedirectAttribute
接口防刷:
如果刷新
cart.gulimall.com/addToCart?skuId=7&num=1该页面,会导致购物车中此商品的数量无限新增
解决方案:
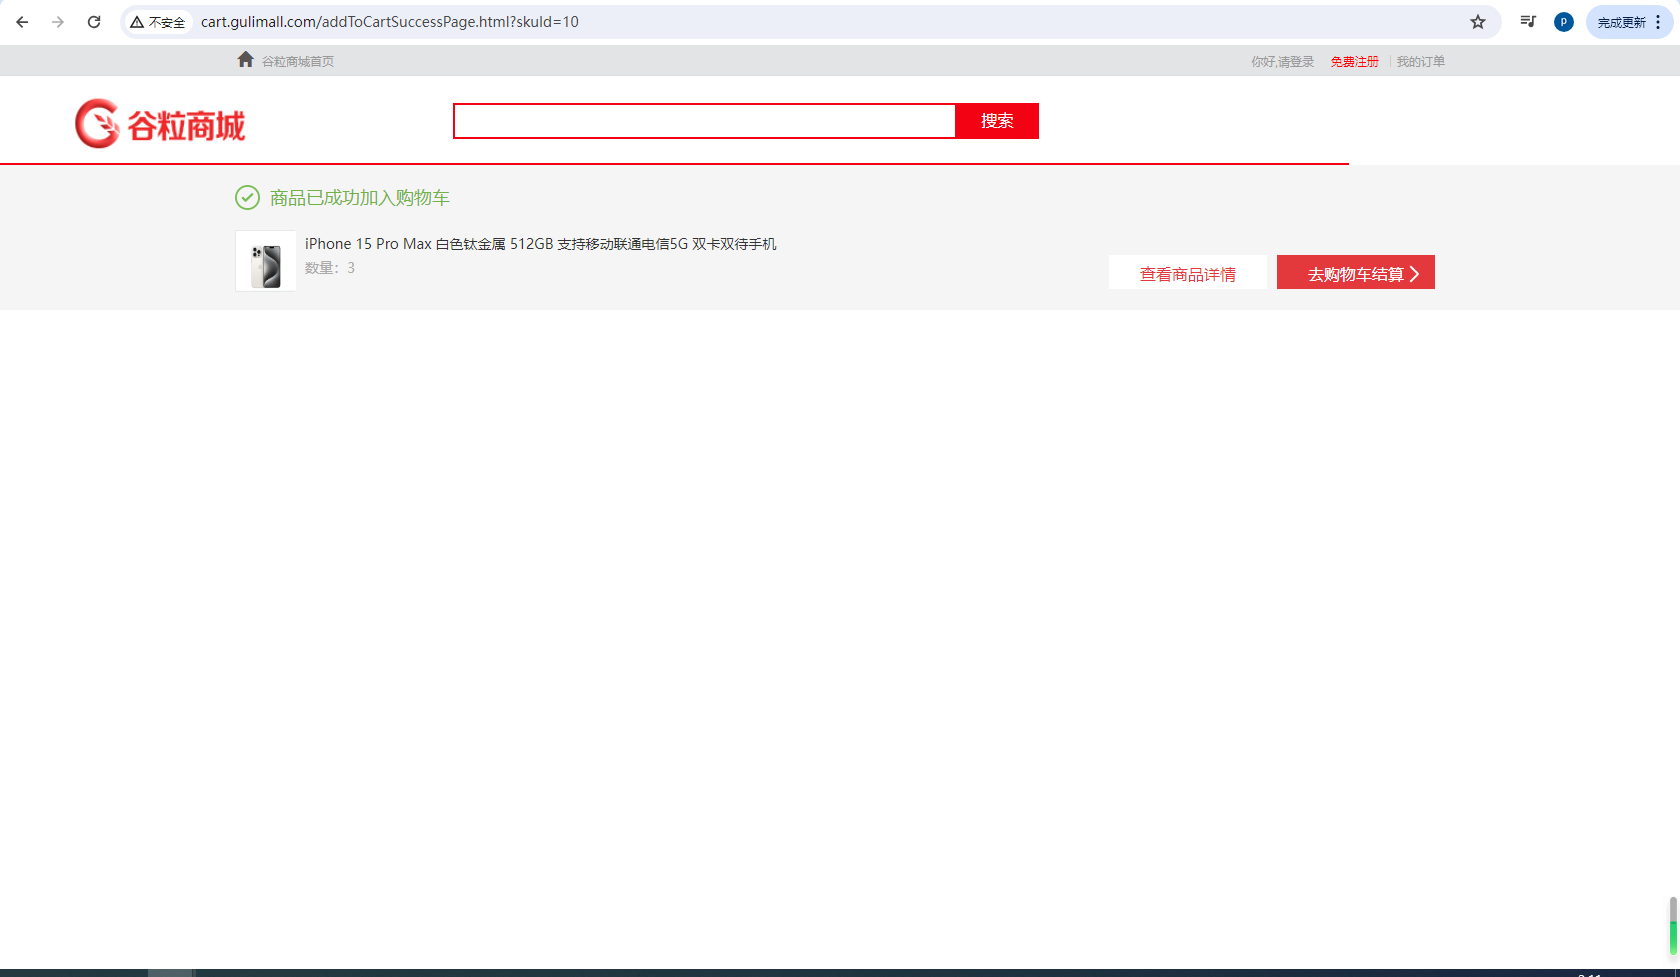
/addToCart请求使用重定向给/addToCartSuccessPage.html- 由
/addToCartSuccessPage.html这个请求跳转"商品已成功加入购物车页面"(浏览器url请求已更改),达到防刷的目的
主要步骤:
/addToCart使用RedirectAttributes带上skuId,并且执行完成重定向到addToCartSuccessPage.htmladdToCartSuccessPage查询Redis获取购物车信息
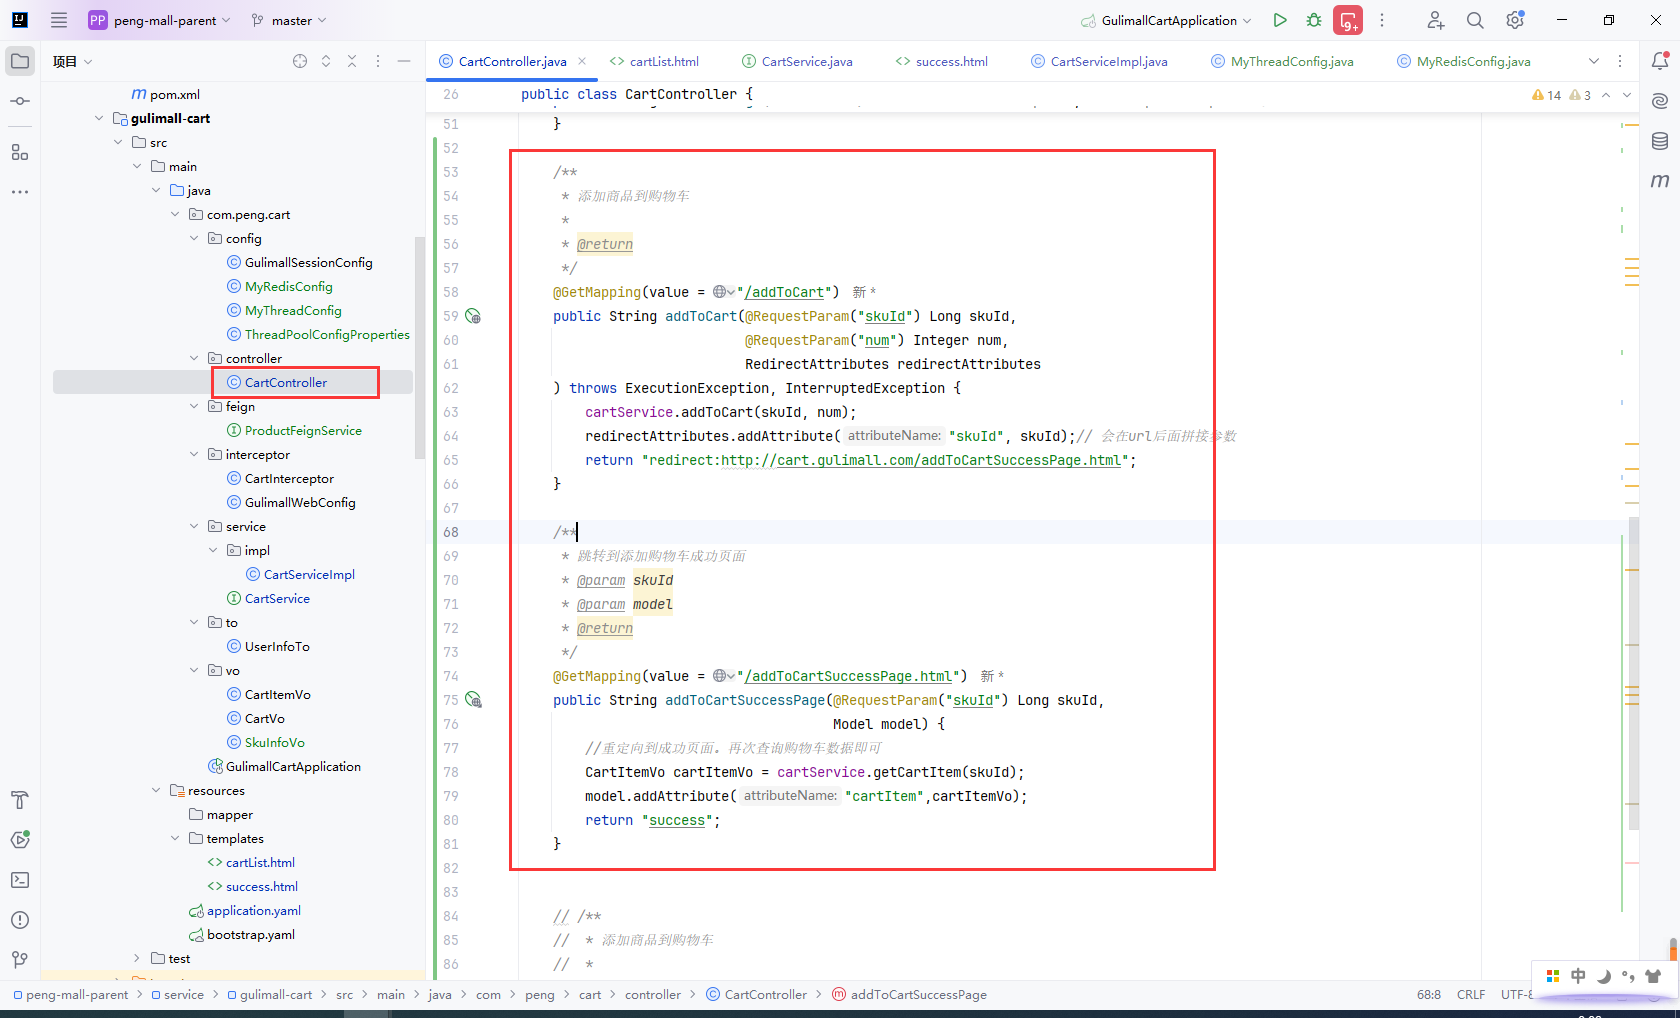
/addToCart使用RedirectAttributes带上skuId,并且执行完成重定向到addToCartSuccessPage.html
  /**
     * 添加商品到购物车
     *
     * @return
     */
    @GetMapping(value = "/addToCart")
    public String addToCart(@RequestParam("skuId") Long skuId,
                            @RequestParam("num") Integer num,
                            RedirectAttributes redirectAttributes
    ) throws ExecutionException, InterruptedException {
        cartService.addToCart(skuId, num);
        redirectAttributes.addAttribute("skuId", skuId);// 会在url后面拼接参数
        return "redirect:http://cart.gulimall.com/addToCartSuccessPage.html";
    }

    /**
     * 跳转到添加购物车成功页面
     * @param skuId
     * @param model
     * @return
     */
    @GetMapping(value = "/addToCartSuccessPage.html")
    public String addToCartSuccessPage(@RequestParam("skuId") Long skuId,
                                       Model model) {
        //重定向到成功页面。再次查询购物车数据即可
        CartItemVo cartItemVo = cartService.getCartItem(skuId);
        model.addAttribute("cartItem",cartItemVo);
        return "success";
    }
addToCartSuccessPage查询Redis获取购物车信息
@Override
public CartItemVo getCartItem(Long skuId) {
    //拿到要操作的购物车信息
    BoundHashOperations<String, Object, Object> cartOps = getCartOps();
    String redisValue = (String) cartOps.get(skuId.toString());
    CartItemVo cartItemVo = JSON.parseObject(redisValue, CartItemVo.class);
    return cartItemVo;
}
此时我们刷新购物车界面,商品数量不会增加
10.9获取&合并购物车
主要步骤:
-
实现获取购物车接口
getCart-
如果登录,合并在线、临时购物车,
addToCart方法支持合并购物车,之后清除临时购物车 -
封装清空购物车
-
如果未登录,获取临时购物车数据
-
-
渲染购物车界面,展示购物车数据
-
登录渲染
-
测试
实现获取购物车接口getCart
-
如果登录,合并在线、临时购物车,
addToCart方法支持合并购物车,之后清除临时购物车 -
封装清空购物车
-
如果未登录,获取临时购物车数据
/**
 * 获取用户登录或者未登录购物车里所有的数据
 * @return
 * @throws ExecutionException
 * @throws InterruptedException
 */
@Override
public CartVo getCart() throws ExecutionException, InterruptedException {
    CartVo cartVo = new CartVo();
    UserInfoTo userInfoTo = CartInterceptor.toThreadLocal.get();
    if (userInfoTo.getUserId() != null) {
        //1、登录
        String cartKey = CART_PREFIX + userInfoTo.getUserId();
        //临时购物车的键
        String temptCartKey = CART_PREFIX + userInfoTo.getUserKey();

        //2、如果临时购物车的数据还未进行合并
        List<CartItemVo> tempCartItems = getCartItems(temptCartKey);
        if (tempCartItems != null) {
            //临时购物车有数据需要进行合并操作
            for (CartItemVo item : tempCartItems) {
                addToCart(item.getSkuId(),item.getCount());
            }
            //清除临时购物车的数据
            clearCartInfo(temptCartKey);
        }

        //3、获取登录后的购物车数据【包含合并过来的临时购物车的数据和登录后购物车的数据】
        List<CartItemVo> cartItems = getCartItems(cartKey);
        cartVo.setItems(cartItems);

    } else {
        //没登录
        String cartKey = CART_PREFIX + userInfoTo.getUserKey();
        //获取临时购物车里面的所有购物项
        List<CartItemVo> cartItems = getCartItems(cartKey);
        cartVo.setItems(cartItems);
    }

    return cartVo;
}

/**
 * 根据购物车的key获取
 */
private List<CartItemVo> getCartItems(String cartKey) {
    BoundHashOperations<String, Object, Object> operations = redisTemplate.boundHashOps(cartKey);
    List<Object> values = operations.values();
    if (!CollectionUtils.isEmpty(values)) {
        // 购物车非空,反序列化成商品并封装成集合返回
        return values.stream()
                .map(jsonString -> JSONObject.parseObject((String) jsonString, CartItemVo.class))
                .collect(Collectors.toList());
    }
    return null;
}

/**
 * 清空购物车
 */
@Override
public void clearCartInfo(String cartKey) {
    redisTemplate.delete(cartKey);
}
渲染购物车界面,展示购物车数据

登录渲染
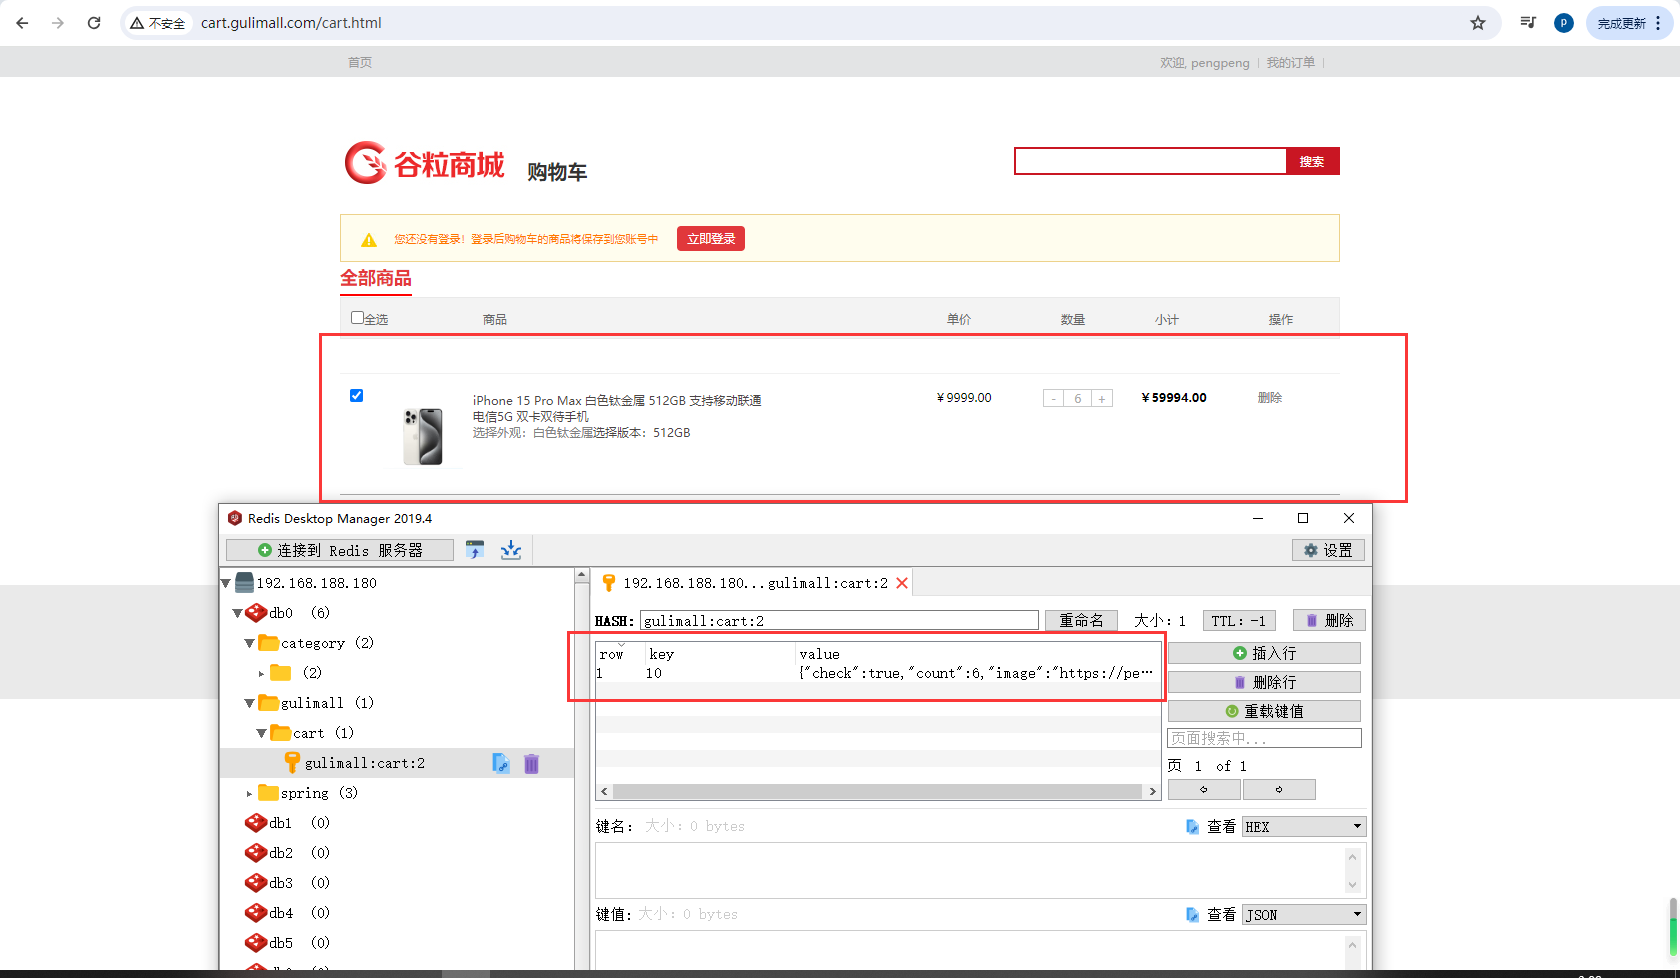
测试
未登录购买商品
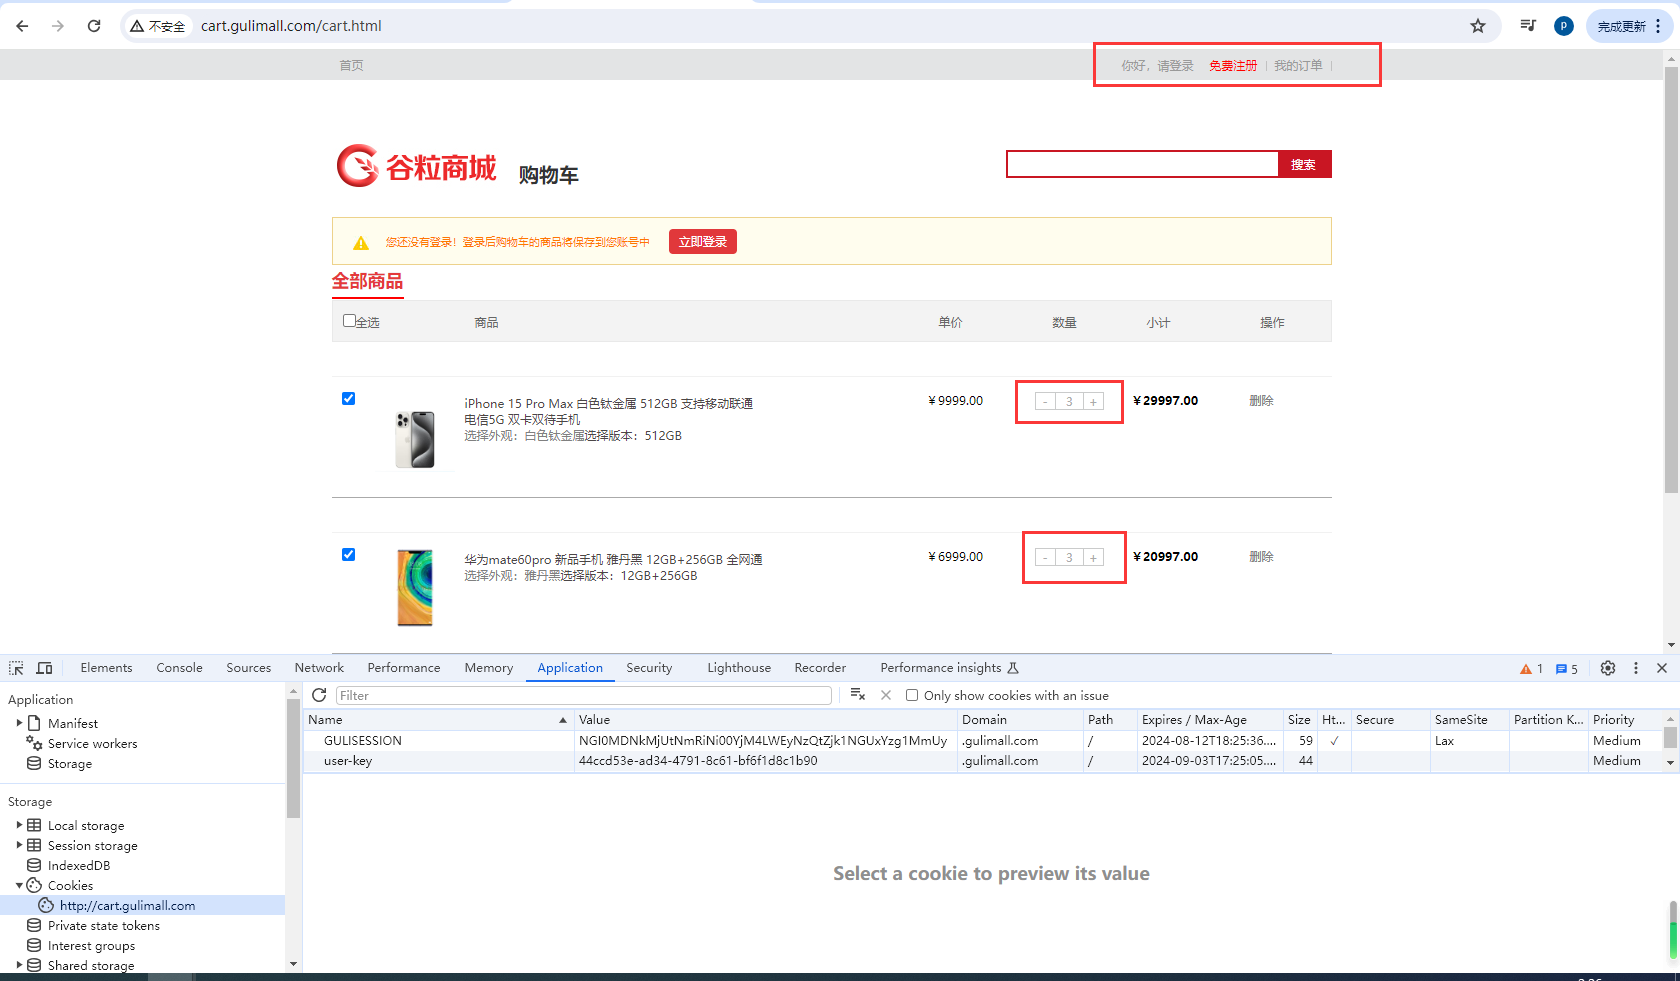 商品
商品skuId=1和skuId=10各购买3个
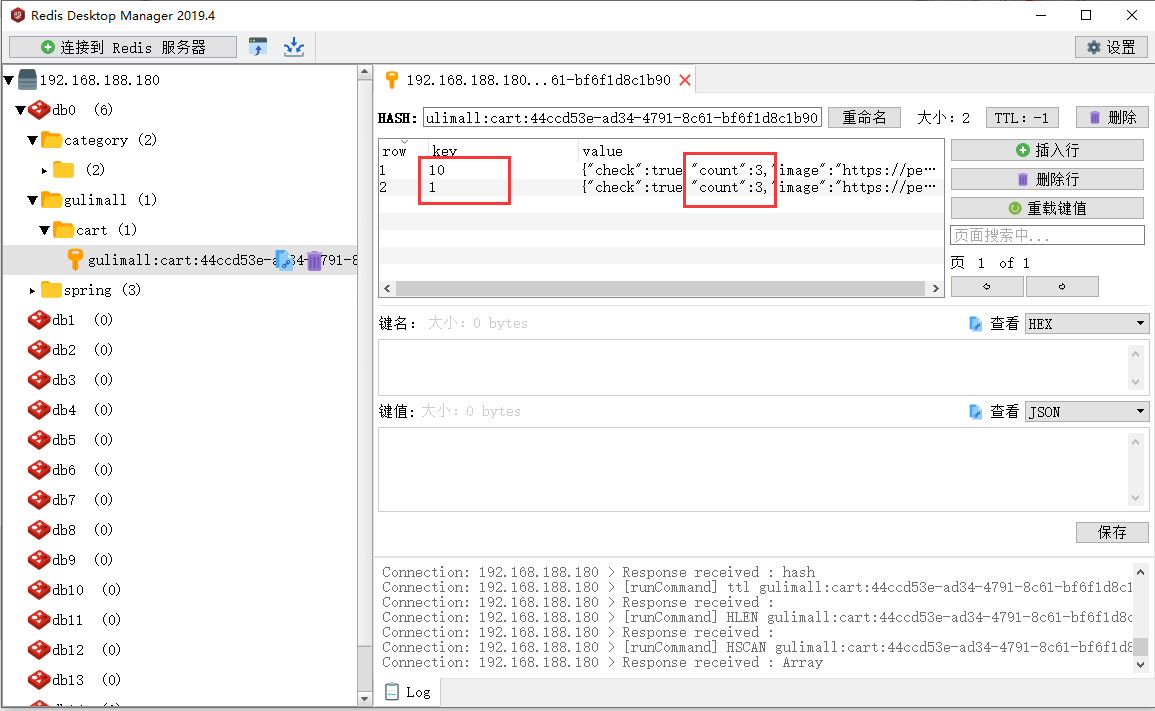
登录后访问购物车,临时购物车已经合并到在线购物车
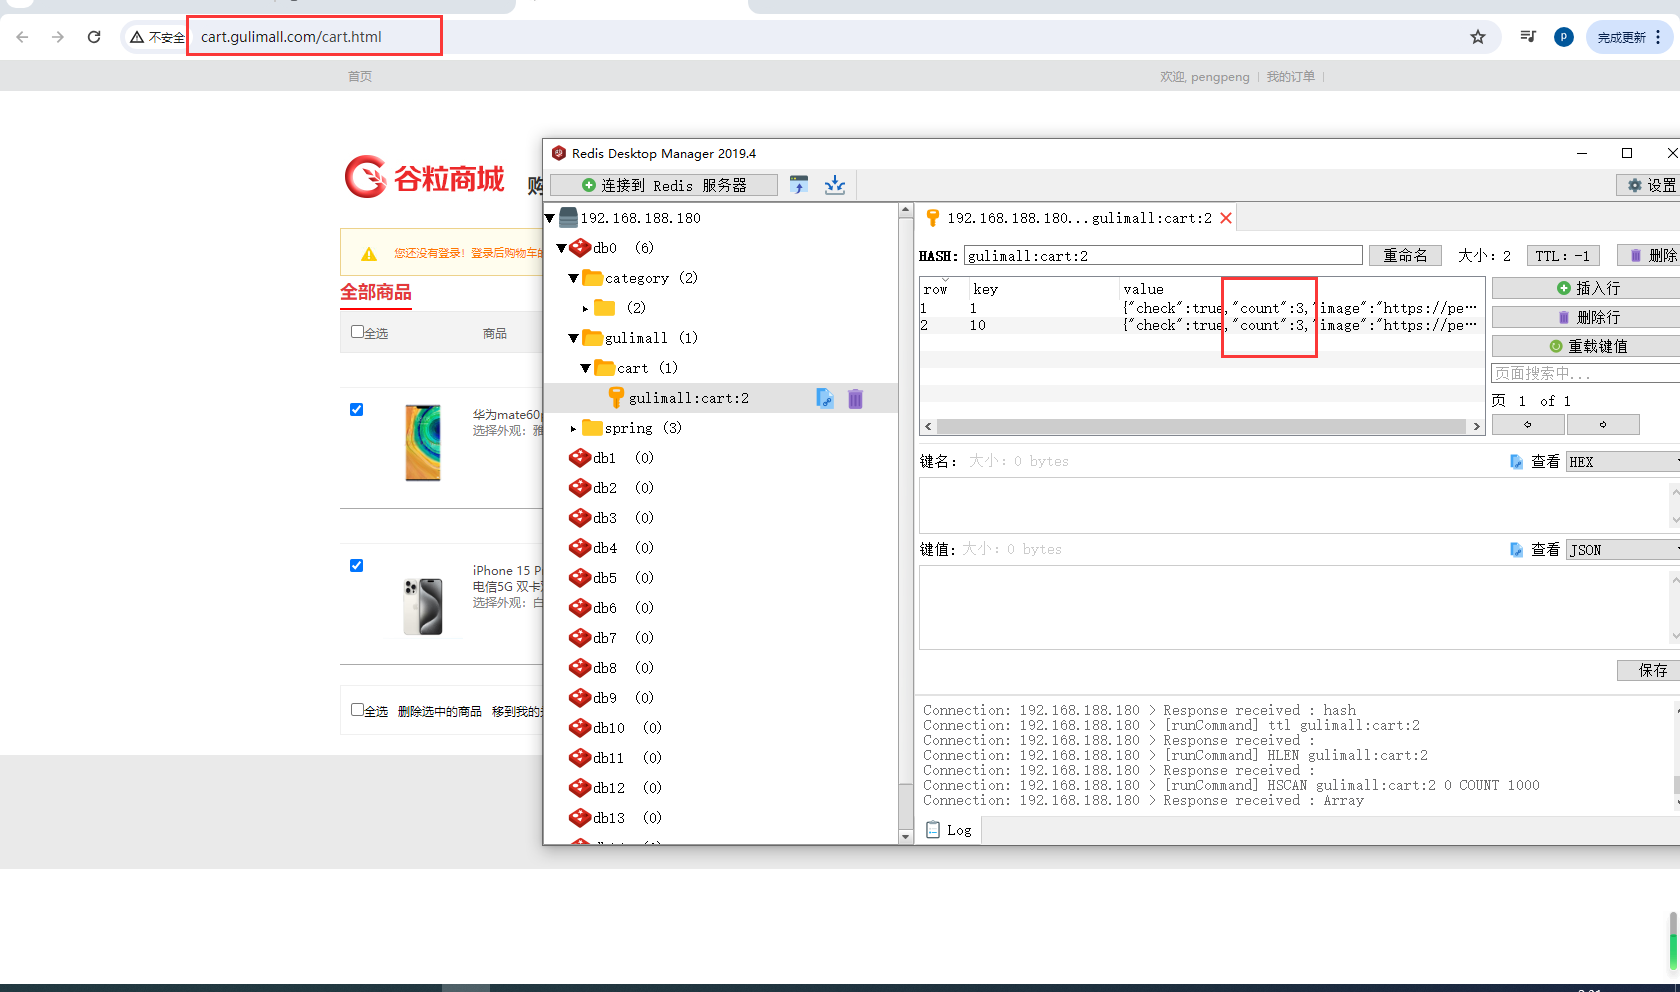
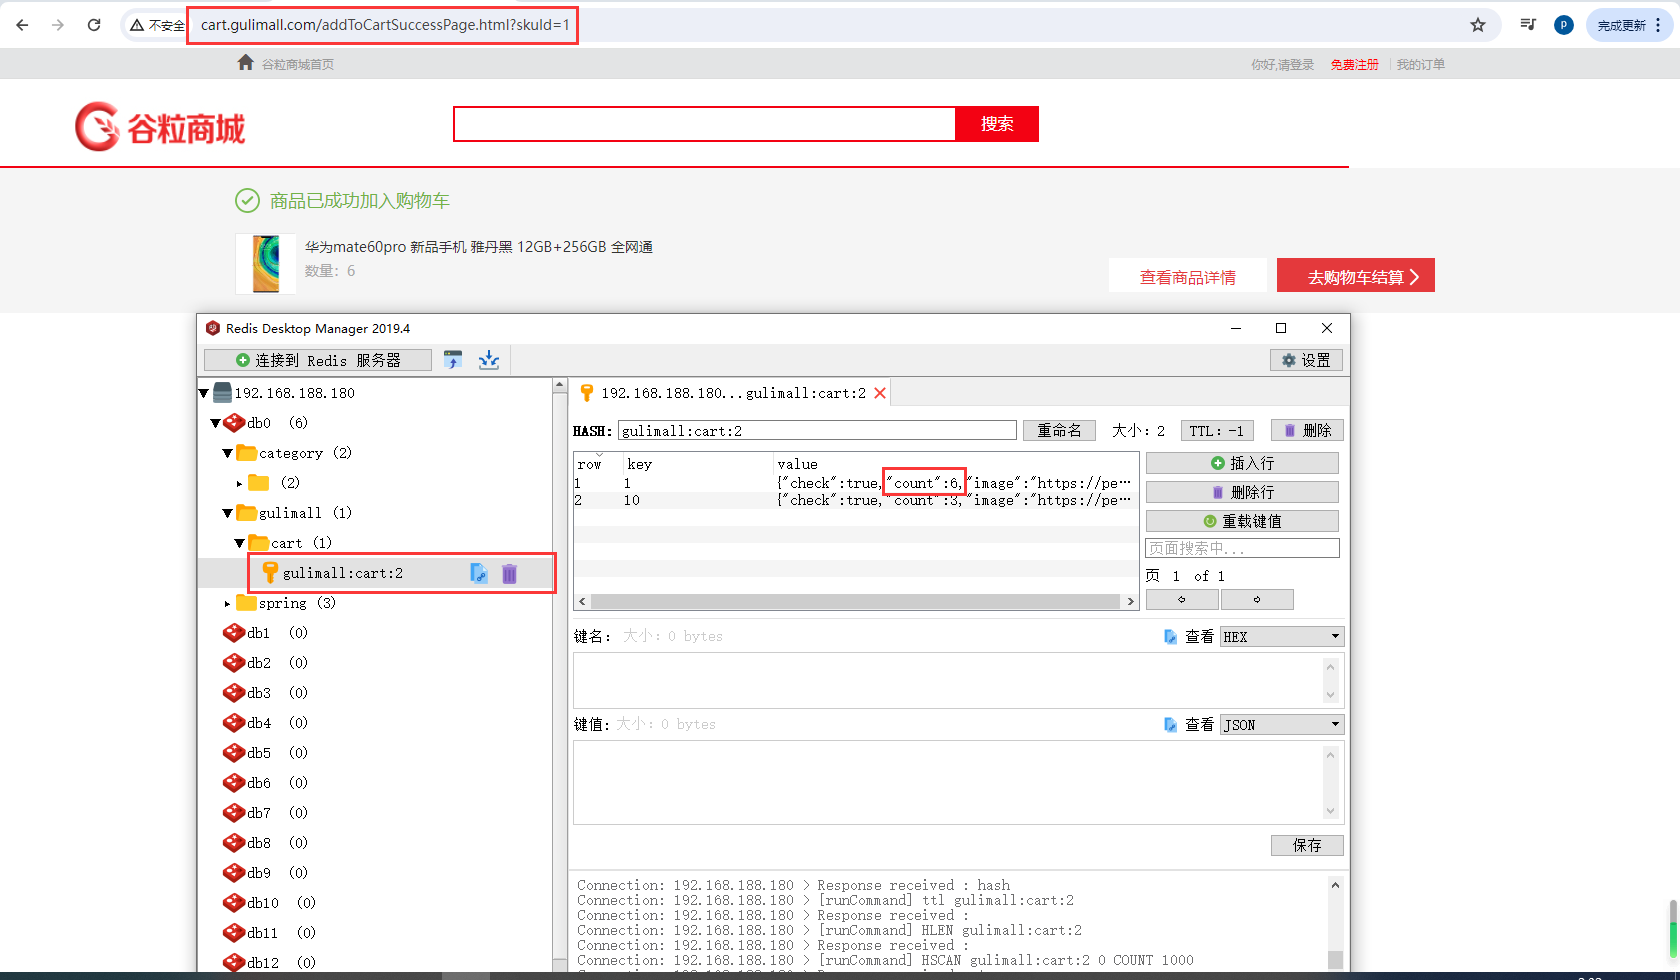
再次购物skuId=1号商品3个,发现数量成功合并
10.10选中购物车
主要步骤:
- 页面选中时/取消选中时页面带上
skuId和checked请求checkItem接口 - 实现
checkItem,根据传来的skuId获取数据,然后更新选中状态 - 测试
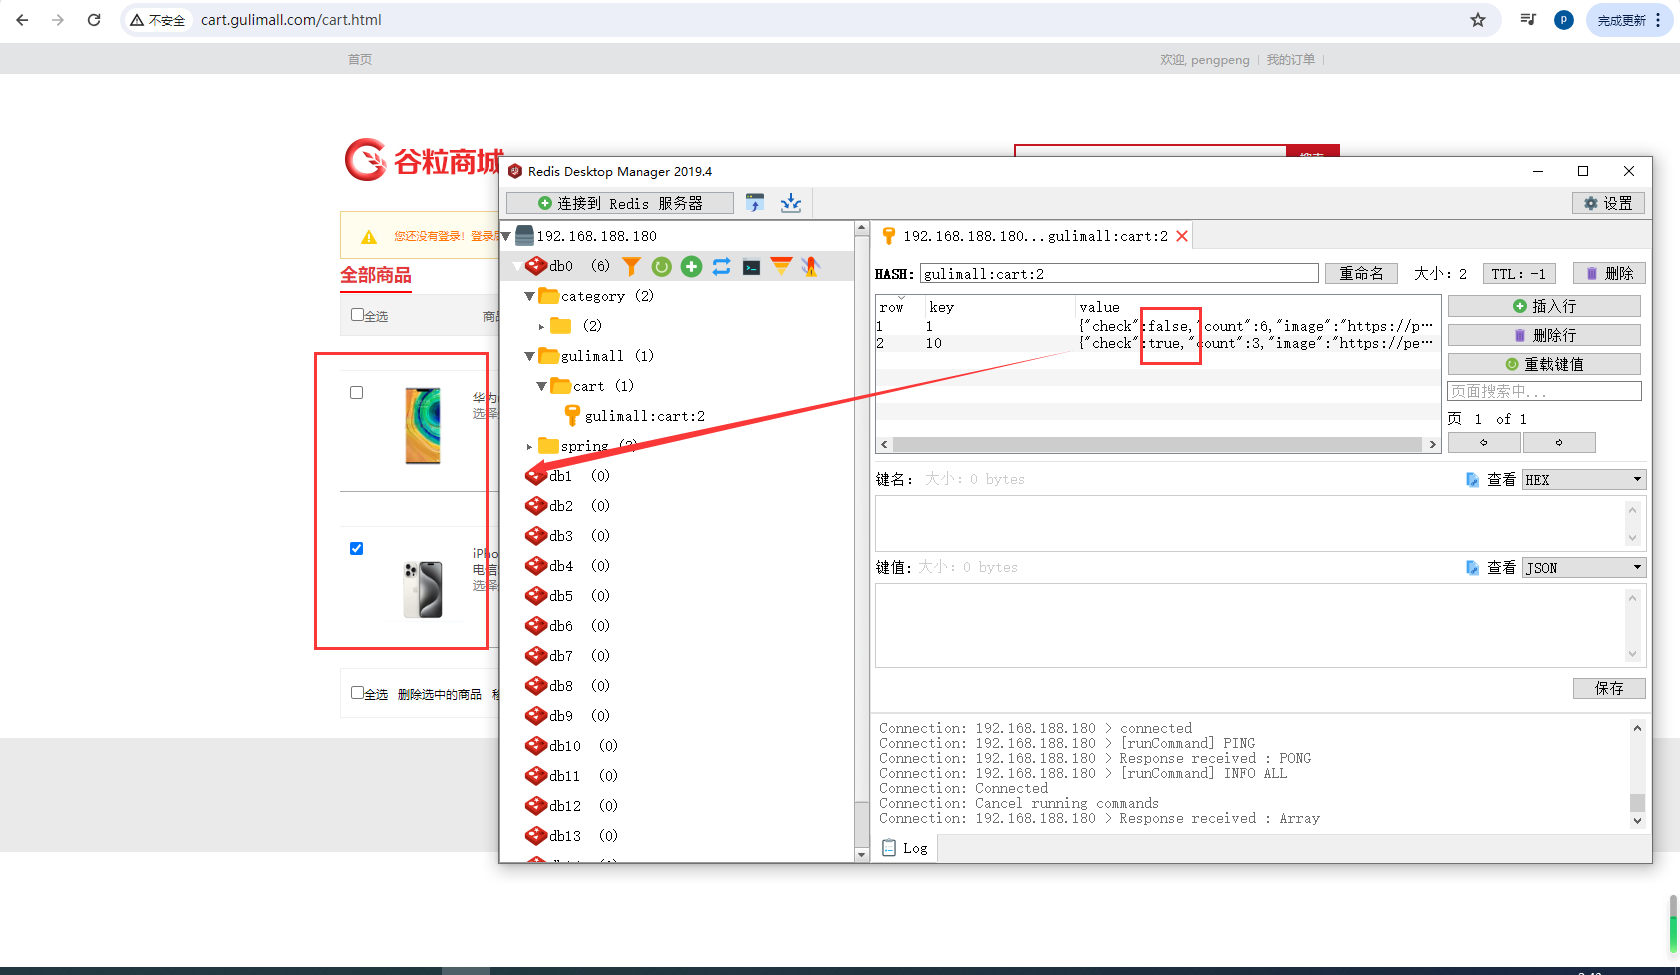
页面选中时/取消选中时页面带上skuId和checked请求checkItem接口
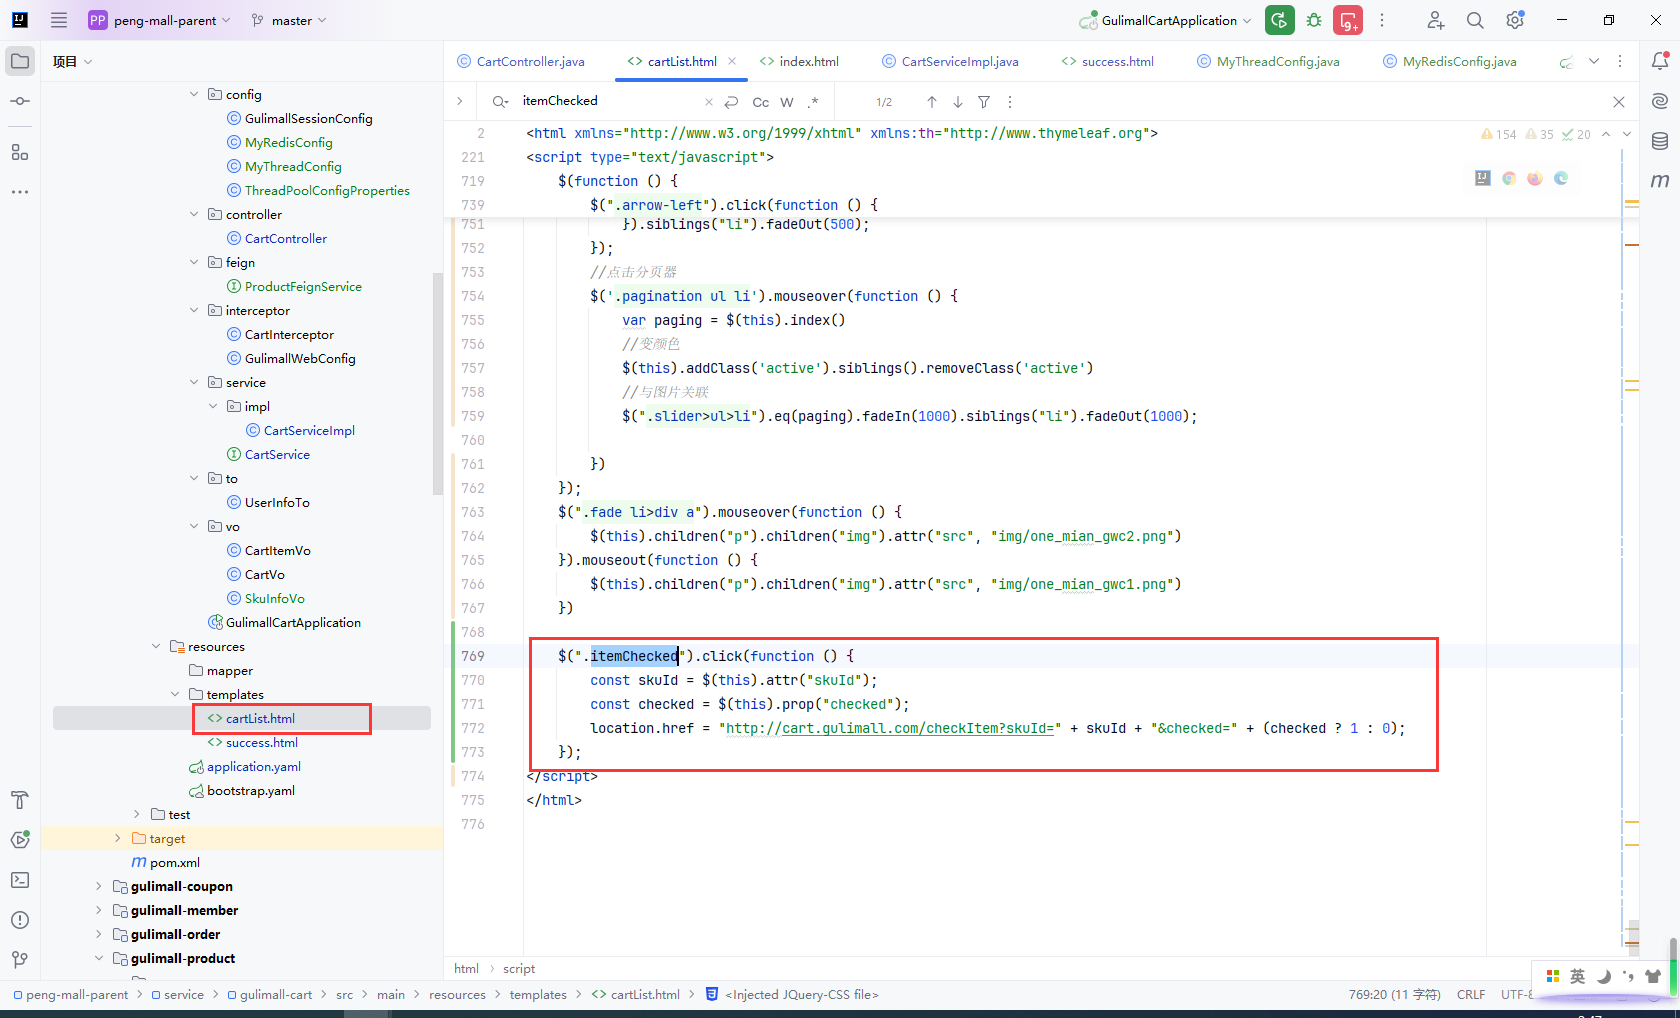
实现checkItem,根据传来的skuId获取数据,然后更新选中状态

测试,点击选中,redis数据正常更新
10.11改变购物项数量
主要步骤:
- 页面+/-选中时页面带上
skuId和num请求countItem接口 - 实现
countItem,根据传来的skuId获取数据,然后更新数量 - 测试
页面+/-选中时页面带上skuId和num请求countItem接口

实现countItem,根据传来的skuId获取数据,然后更新数量
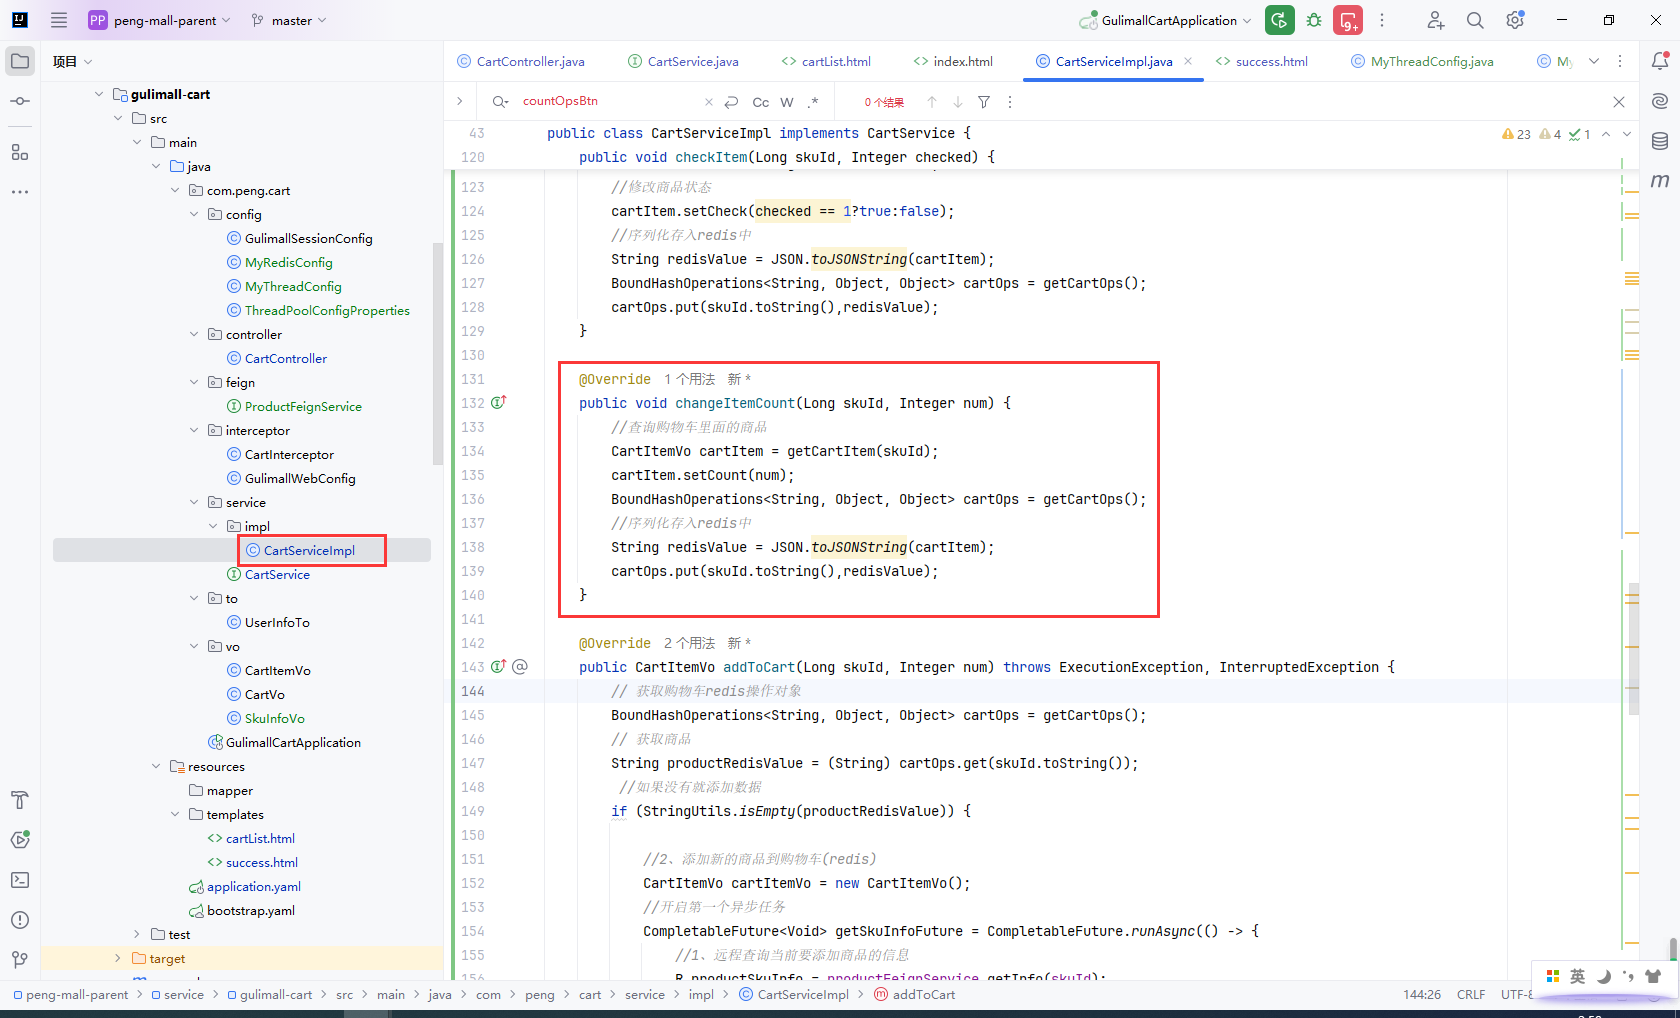
测试,点击+/-,redis数据正常更新
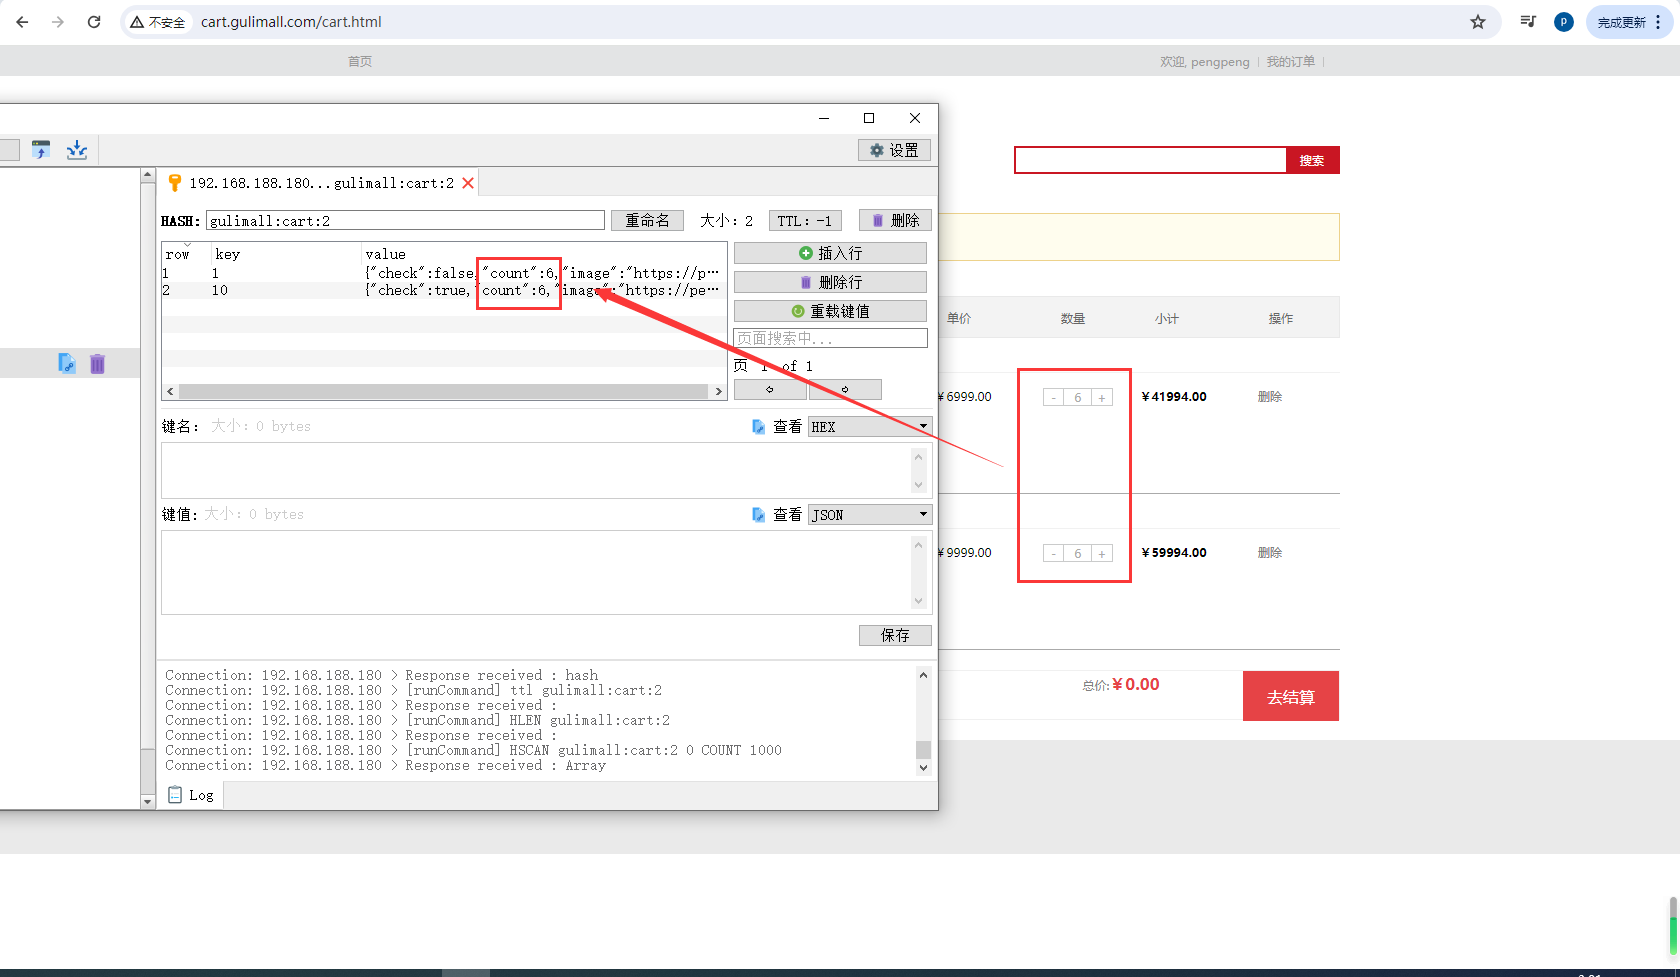
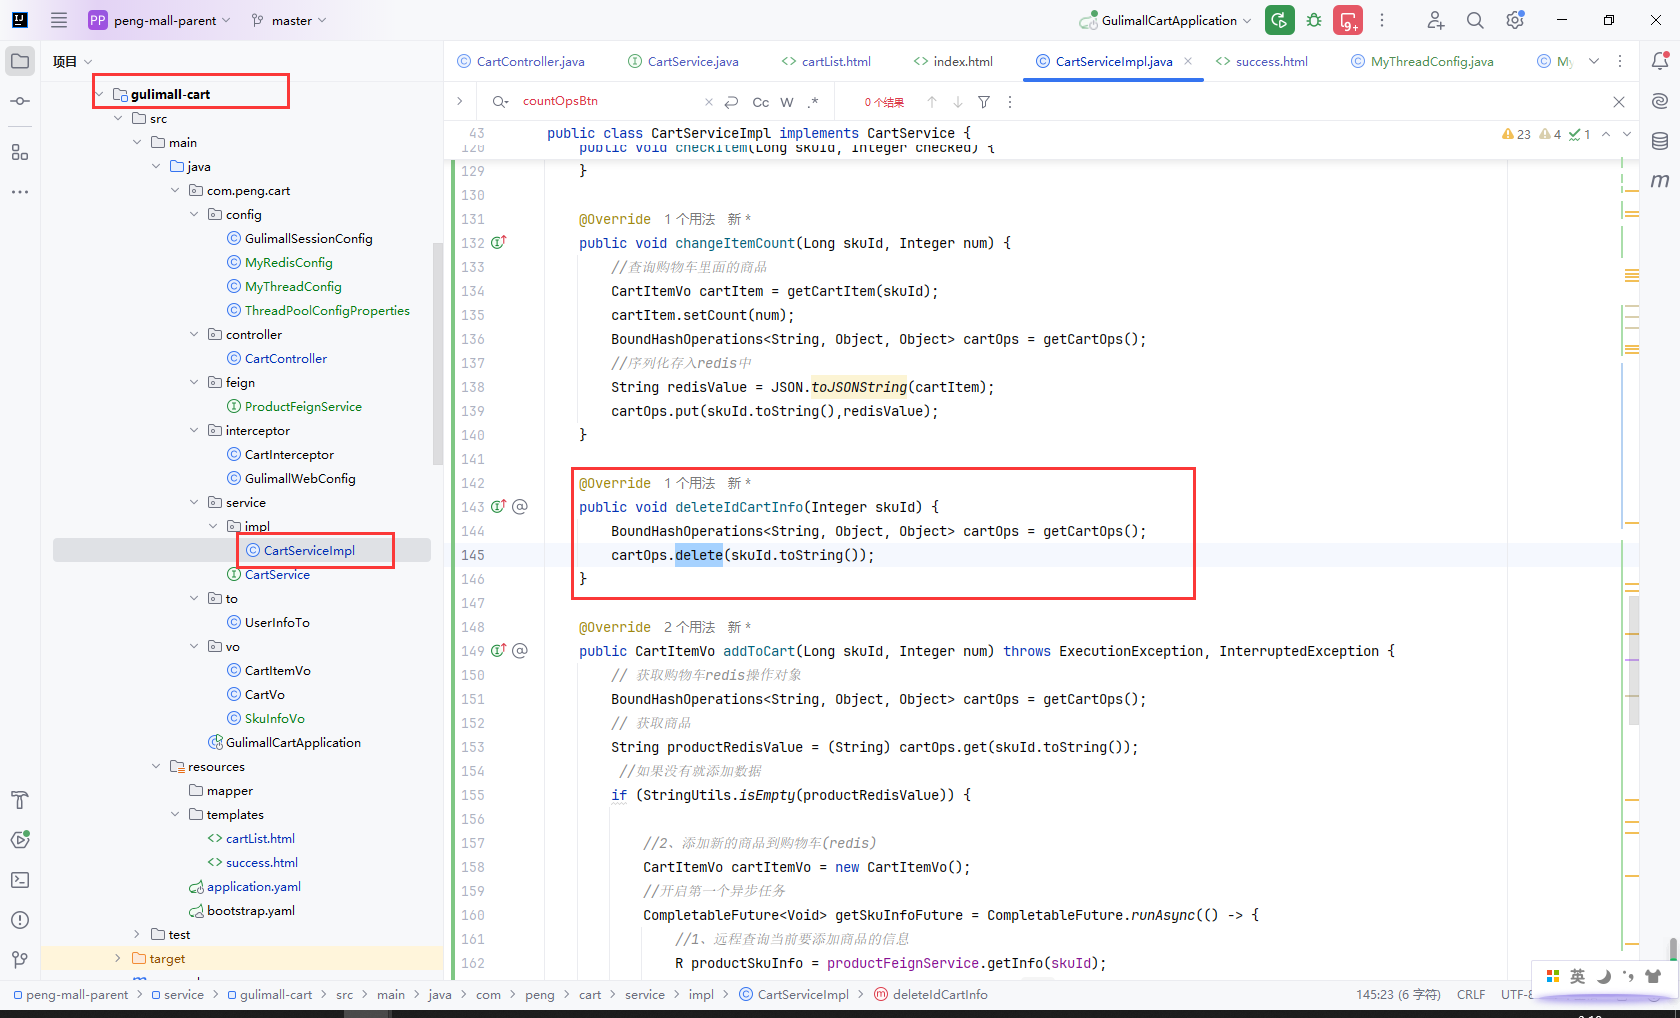
10.12删除购物项
主要步骤:
- 点击页面删除按钮时页面带上
skuId请求deleteItem接口 - 实现
deleteItem,根据传来的skuId获取数据,然后删除数据 - 测试
点击页面删除按钮时页面带上skuId请求deleteItem接口
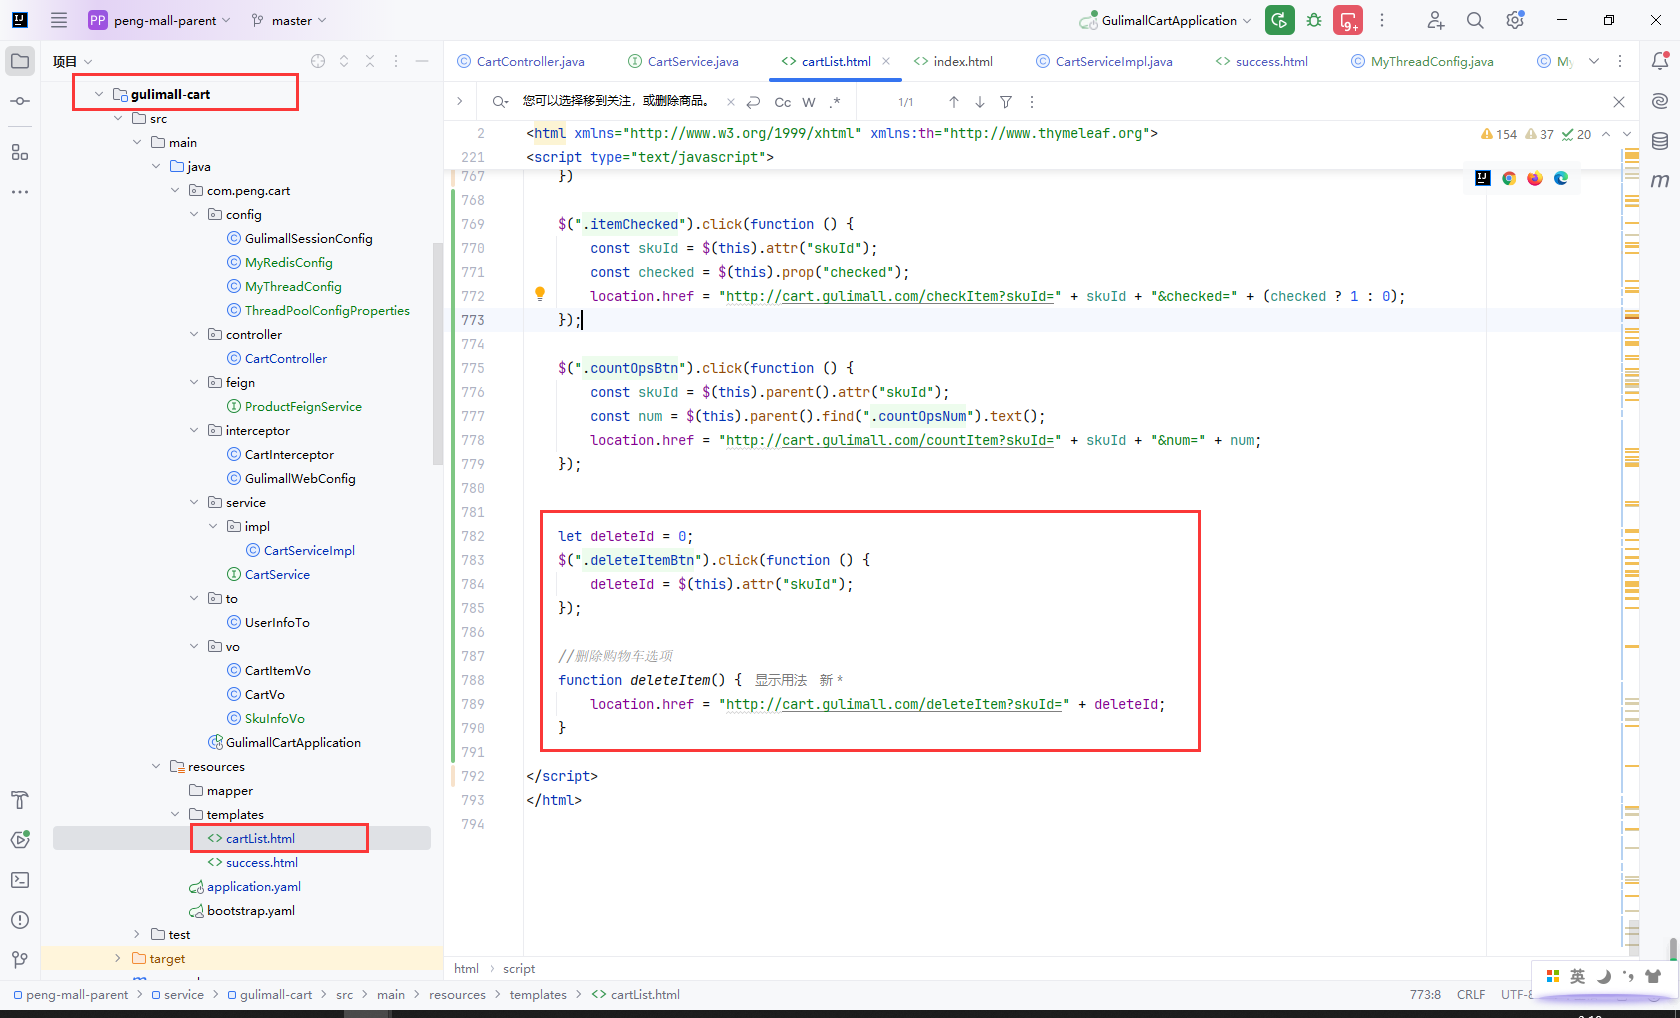
实现deleteItem,根据传来的skuId获取数据,然后删除数据
测试

 浙公网安备 33010602011771号