


Creating and Configuring a Table View
Your app must present a table view to users before it can manage it in response to taps on rows and other actions. This chapter shows what you must do to create a table view, configure it, and populate it with data.
在应用程序能管理响应行上的点击以及其它操作之前,必须给用户呈现一个表格视图。本章显示了创建一个表格视图你必须做的事情,配置它,并用数据填充表格视图。
Most of the code examples shown in this chapter come from the sample projects TableViewSuite and TheElements.
本章中的大多数例程代码都从例程TableViewSuite 和 TheElements 中获得.
Basics of Table View Creation
一、创建表格视图的基础知识
To create a table view, several entities in an app must interact: the view controller, the table view itself, and the table view’s data source and delegate. The view controller, data source, and delegate are usually the same object. The view controller starts the calling sequence, diagrammed in Figure 4-1.
要想创建一个表格视图,应用程序必须具备几个实体:视图控制器,表格视图,以及表格视图的数据源和委托。视图控制器,数据源,和委托常常是同一对象。视图控制器开始调用序列,如图4-1。
-
The view controller creates a
UITableViewinstance in a certain frame and style. It can do this either programmatically or in a storyboard. The frame is usually set to the screen frame, minus the height of the status bar or, in a navigation-based app, to the screen frame minus the heights of the status bar and the navigation bar. The view controller may also set global properties of the table view at this point, such as its autoresizing behavior or a global row height.视图控制器以一定的边框(frame)和风格创建了一个UITableView 实例。它可以通过程序或故事板实现。边框常常被设为屏幕的边框,减去状态栏的高度,或在一个基于导航的应用程序中,减去状态栏的高度以及导航栏的高度。视图控制器还可能在这时设置表格视图的全局属性,比如它的自动调整尺寸行为或一个全局行高度。
To learn how to create table views in a storyboard and programmatically, see “Creating a Table View Using a Storyboard” and “Creating a Table View Programmatically.”
要想学习如何通过故事板或程序创建表格视图,请看“Creating a Table View Using a Storyboard” 和 “Creating a Table View Programmatically.”
-
The view controller sets the data source and delegate of the table view and sends a
reloadDatamessage to it. The data source must adopt theUITableViewDataSourceprotocol, and the delegate must adopt theUITableViewDelegateprotocol.视图控制器设置表格视图的数据源和委托,并给表格视图发送一个
reloadData 消息。数据源必须遵守UITableViewDataSource 协议,委托必须遵守UITableViewDelegate 协议。 -
The data source receives a
numberOfSectionsInTableView:message from theUITableViewobject and returns the number of sections in the table view. Although this is an optional protocol method, the data source must implement it if the table view has more than one section.数据源从UITableView对象接收一个
numberOfSectionsInTableView:消息并在表格视图中返回区(sections)的数目。尽管这是个可选协议方法,但是如果表格视图不止一个区的话必须实现该方法。 -
For each section, the data source receives a
tableView:numberOfRowsInSection:message and responds by returning the number of rows for the section.对于每个区,数据源接收一个tableView:numberOfRowsInSection: 消息,并返回每个区的行数。
-
The data source receives a
tableView:cellForRowAtIndexPath:message for each visible row in the table view. It responds by configuring and returning aUITableViewCellobject for each row. TheUITableViewobject uses this cell to draw the row.数据源为表格视图的每个可见行接收一个tableView:cellForRowAtIndexPath:消息。该方法配置并为每行返回一个
UITableViewCell对象。UITableView 对象使用该cell来绘制行。
Figure 4-1 Calling sequence for creating and configuring a table view
图 4-1 调用序列来创建和配置一个表格视图
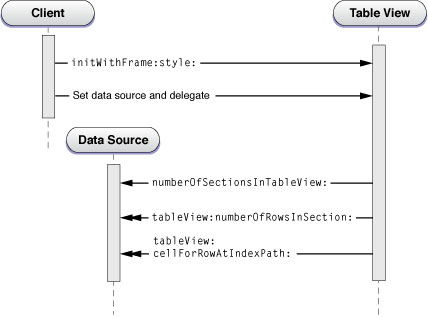
The diagram in Figure 4-1 shows the required protocol methods as well as the numberOfSectionsInTableView:method. Populating the table view with data occurs in steps 3 through 5. To learn how to implement the methods in these steps, see “Populating a Dynamic Table View with Data.”
图4-1 显示了必需的协议方法以及numberOfSectionsInTableView: 方法。用数据填充表格视图发生在步骤3到5. 要想学习如何实现这些步骤中的方法,请看“Populating a Dynamic Table View with Data.”
The data source and the delegate may implement other optional methods of their protocols to further configure the table view. For example, the data source might want to provide titles for each of the sections in the table view by implementing the tableView:titleForHeaderInSection: method. For more on some of these optional table view customizations, see “Optional Table View Configurations.”
数据源和委托可能实现协议的其它可选方法来进一步配置表格视图。 比如,数据源可能想为表格视图中的每个区提供标题,通过实现tableView:titleForHeaderInSection: 方法。更多关于这些可选的表视图自定义的信息,请看“Optional Table View Configurations.”
You create a table view in either the plain style (UITableViewStylePlain) or the grouped style (UITableViewStyleGrouped). (You specify the style in a storyboard.) Although the procedure for creating a table view in either styles is identical, you may want to perform different kinds of configurations. For example, because a grouped table view generally presents item detail, you may also want to add custom accessory views (for example, switches and sliders) or custom content (for example, text fields). For an example, see “A Closer Look at Table View Cells.”
你可以以朴素风格(UITableViewStylePlain)或分组风格(UITableViewStyleGrouped)创建一个表格视图。(你可以在故事板里指定风格。) 尽管两种风格创建表格视图的过程是一样的,但是你可能对它们执行不同的配置。比如,因为分组表格视图通常要呈现数据详情,所以你可能还想添加自定义辅助视图(比如,开关或滑动条) 或 自定义内容(比如,文本框)。例子请参考,“A Closer Look at Table View Cells.”
Recommendations for Creating and Configuring Table Views
二、创建和配置表格视图的建议
There are many ways to put together a table view app. For example, you can use an instance of a custom NSObjectsubclass to create, configure, and manage a table view. However, you will find the task much easier if you adopt the classes, techniques, and design patterns that the UIKit framework offers for this purpose. The following approaches are recommended:
有好几种方法可以实现一个表格视图应用程序。比如,你可以使用一个自定义NSObject类的实例来创建,配置并管理一个表格视图。然而,如果你采用UIKit框架为该目的而提供的类,技术和设计模式,你将发现实现表格视图变得更加容易。以下方法值得推荐:
-
Use an instance of a subclass of
UITableViewControllerto create and manage a table view.使用一个UITableViewController 子类的实例来创建和管理表格视图。
Most apps use a custom
UITableViewControllerobject to manage a table view. As described in “Navigating a Data Hierarchy with Table Views,”UITableViewControllerautomatically creates a table view, assigns itself as bothdelegate and data source (and adopts the corresponding protocols), and initiates the procedure for populating the table view with data. It also takes care of several other “housekeeping” details of behavior. The behavior ofUITableViewController(a subclass ofUIViewController) within the navigation controller architecture is described in “Table View Controllers.”大多数应用程序使用一个自定义UITableViewController 对象来管理表格视图。正如 “Navigating a Data Hierarchy with Table Views,”中所描述,UITableViewController 自动创建一个表格视图,分配它自己成为委托和数据源(并采用相关协议),然后启动用数据填充表格视图的程序。它还带有很多其它清理细节的行为。UITableViewController在导航控制器架构里的行为在“Table View Controllers.”中有描述。
-
If your app is largely based on table views, select the Master-Detail Application template provided by Xcode when you create your project.
如果你的应用程序是基于大量的表格视图中,当你创建工程时请选择Xcode提供的Master-Detail应用程序模板。
As described in “Creating a Table View Using a Storyboard,” the template includes stub code and a storyboarddefining an app delegate, the navigation controller, and the master view controller (which is an instance of a custom subclass of
UITableViewController).正如“Creating a Table View Using a Storyboard,” 中所述,模板包含存根代码(stub code),定义一个应用程序委托的故事板,导航控制器,以及主视图控制器(它是UITableViewController对象自定义子类的一个实例)。
-
For successive table views, you should implement custom
UITableViewControllerobjects. You can either load them from a storyboard or create the associated table views programmatically.对于连续的表格视图,你应该实现自定义UITableViewController 对象。 你可以从故事板加载它们,或通过程序创建相关的表格视图。
Although either option is possible, the storyboard route is generally easier.
尽管哪个选择都可行,但是故事板例程基本上比较简单。
If the view to be managed is a composite view in which a table view is one of multiple subviews, you must use a custom subclass of UIViewController to manage the table view (and other views). Do not use UITableViewController, because this controller class sizes the table view to fill the screen between the navigation bar and the tab bar (if either is present).
如果管理的视图是一个组合视图,里面的表格视图是多个子视图中的一个,你必须使用 UIViewController对象的一个自定义子类来管理表格视图(或其它视图)。不要使用 UITableViewController,因为该控制器类使得表格视图充满导航栏跟标签栏(如果存在)之间的屏幕。
Creating a Table View Using a Storyboard
三、使用故事板创建一个表格视图
Create an app with a table view using Xcode. When you create your project, select a template that contains stub code and a storyboard that, by default, supply the structure for setting up and managing table views.
使用Xcode创建一个带有表格视图的应用程序。 当你创建你的工程,选择一个默认带有存根代码和故事板的模板,它提供了建立和管理表格视图的结构。
-
In Xcode, choose File > New > Project.
在Xcode,选择File > New > Project.
-
In the iOS section at the left side of the dialog, select Application.
在对话框左边的iOS区,选择Application.
-
In the main area of the dialog, select Master-Detail Application and then click Next.
在对话框的主区域,选择Master-Detail Application,然后点击Next。
-
Choose your project options (make sure Use Storyboard is selected), and then click Next.
选择你的工程选项(确保已经勾选了Use Storyboard), 然后点击Next。
-
Choose a save location for your project and then click Create.
为你的工程选择一个保存位置,然后点击Create。
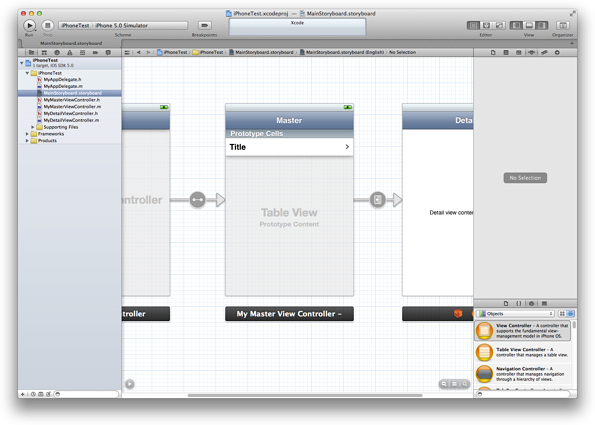
Depending on which device family you chose in step 4, the project has one or two storyboards. To display the storyboard canvas, double-click a storyboard file in the project navigator. If the device family is iPhone, for example, your storyboard should contain a table view controller that looks similar to the one in Figure 4-2.
根据你在步骤4选择哪个设备,工程带有一个或两个故事板。要想显示故事板画布,双击工程导航中的故事板文件。举个例子,如果设备是iPhone, 故事板应该包含一个表格视图控制器,如图4-2.
Figure 4-2 The master view controller in the Master-Detail Application storyboard
图4-2 Master-Detail 应用程序故事板中的主视图控制器
-
On the canvas, click the scene’s title bar to select the table view controller.
在画布中,点击场景的标题栏选择表格视图控制器。
-
Click the Identity button at the top of the utility area to open the Identity inspector.
点击实用区顶部的身份按钮来打开Identity inspector(身份检查器).
-
Verify that the Class field contains the project’s custom subclass of
UITableViewController.确认Class字段包含了工程的UITableViewController对象的自定义子类。
Choose the Table View’s Display Style
<一> 选择表格视图的显示风格
As described in “Table View Styles,” every table view has a display style: plain or grouped.
如“Table View Styles,” 中所描述,每个表格视图都有一个显示风格:简朴(plain)或分组(grouped).
-
Click the center of the scene to select the table view.
点击场景的中央,选择表格视图。
-
In the utility area, display the Attributes inspector.
在实用区,显示Attributes inspector(属性检查器).
-
In the Table View section of the Attributes inspector, use the Style pop-up menu to choose Plain or Grouped.
在属性检查器的表格视图(table view)区, 使用Style弹出菜单选择Plain 或 Grouped。
Choose the Table View’s Content Type
<二>选择表格视图的内容类型
Storyboards introduce two convenient ways to design a table view’s content:
故事板介绍了两种便利方法来设计表格视图的内容:
-
Dynamic prototypes. Design a prototype cell and then use it as the template for other cells in the table. Use a dynamic prototype when multiple cells in a table should use the same layout to display information. Dynamic content is managed by the table view data source (the table view controller) at runtime, with an arbitrary number of cells.Figure 4-3 shows a plain table view with a one prototype cell.
动态原型。设计一个原型单元格,然后在表格中把它作为其它单元格的模板。当在表格中的多个单元格使用相同的布局来显示信息时,使用动态原型。动态内容在运行时由表格视图数据源(表格视图控制器)控制,它用任意数量的单元格实现。图4-3 显示了一个带有一个原型单元格的plain表格视图。
Figure 4-3 A dynamic table view ![]()
Note: If a table view in a storyboard is dynamic, the custom subclass of
UITableViewControllerthat contains the table view needs to implement the data source protocol. For more information, see “Populating a Dynamic Table View with Data.”注意:如果故事板中的表格视图是动态的,包含有表格视图的UITableViewController 对象的自定义子类需要实现数据源协议。更多信息,请看“Populating a Dynamic Table View with Data.”
-
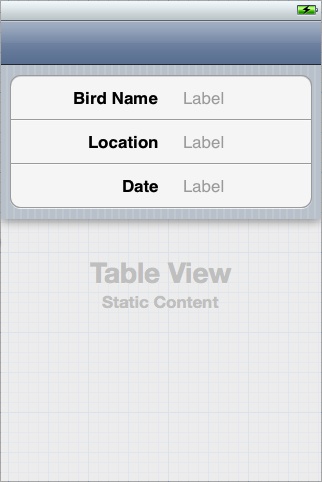
Static cells. Use static content to design the overall layout of the table, including the total number of cells. A table view with static content has a fixed set of cells that you can configure at design time. You can also configure other static data elements such as section headers. Use static cells when a table does not change its layout, regardless of the specific information it displays. Figure 4-4 shows a grouped table view with three static cells.
静态单元格。使用静态内容来设计表格的整体布局,包括单元格的总数量。静态内容的表格视图有一定数量的单元格集,这些集是你在设计时配置的。 你还可以配置其它静态数据元素,比如区头。当表格不改变它的布局时,不管它显示的具体信息,可以使用静态单元格。图4-4显示了一个带有三个静态单元格的分组表格视图。
Figure 4-4 A static table view ![]()
Note: If a table view in a storyboard is static, the custom subclass of
UITableViewControllerthat contains the table view should not implement the data source protocol. Instead, the table view controller should use itsviewDidLoadmethod to populate the table view’s data. For more information, see “Populating a Static Table View With Data.”注意:如果故事板中的表格视图是静态的,包含表格视图的UITableViewController对象的自定义子类不应该实现数据源协议。相反,表格视图控制器应该使用它的viewDidLoad 方法来初始化表格视图的数据。更多信息,请看“Populating a Static Table View With Data.”

By default, when you add a table view controller to a storyboard, the controller contains a table view that uses prototype-based cells. If you want to use static cells:
默认情况下,当你添加一个表格视图控制到故事板时,控制器包含了一个表格视图,该视图使用基于原型的单元格。 如果你想使用静态单元格:
-
Select the table view.
选中表格视图。
-
Display the Attributes inspector.
显示属性检查器.
-
In the the Content pop-up menu, choose Static Cells.
在Content弹出菜单中,选中 Static Cells。
If you’re designing a prototype cell, the table view needs a way to identify the prototype when the data source dequeues reusable cells for the table at runtime. Therefore you must assign a reuse identifier to the cell. In the Table View Cell section of the Attributes inspector, enter an ID in the Identifier text field. By convention, a cell’s reuse identifier should describe what the cell contains, such as BirdSightingCell.
如果你正在设计一个原型cell,当数据源在运行时为表格从队列中取出可重用单元格时,表格视图需要一种方法来标识原型。因此,你必须分配一个可重用标识符给单元格。在属性检查器(Attributes inspector)的table view cell区的Identifier文本字段,输入一个ID。按照惯例,cell的reuse identifier(重用标示符)应该描述cell包含了什么,比如BirdSightingCell。
Design the Table View’s Rows
<三> 设计表格视图的行
As described in “Standard Styles for Table View Cells,” UIKit defines four styles for the cells that a table view uses to draw its rows. You can use one of the four standard styles, design a custom style, or subclass UITableViewCell to define additional behavior or properties for the cell. This topic is covered in detail in “A Closer Look at Table View Cells.”
正如“Standard Styles for Table View Cells,”中所描述,UIKit为单元格定义了四种风格,用来让表格视图绘制它的行。你可以使用其中一种风格,设计一个自定义风格,或子类化 UITableViewCell 来为单元格定义额外的行为或属性。该主题在 “A Closer Look at Table View Cells.” 中有详细讲述。
A table view cell can also have an accessory, as described in “Accessory Views.” An accessory is a standard user interface element that UIKit draws at the right end of a table cell. For example, the disclosure indicator, which looks similar to a right angle bracket (>), tells users that tapping an item reveals related information in a new screen. In the Attributes inspector, use the Accessory pop‐up menu to select a cell’s accessory.
表格视图单元格还可以有一个附件,正如“Accessory Views.” 中所述。附件是一个标准用户界面元素,它被UIKit绘制在表格单元格的最右边。比如,扩展指示器,它看起来像一个又尖括号(>),它告诉用户点击一个数据项将在一个新屏幕上揭示相关信息。在属性检查器中,使用Accessory 弹出菜单来选择一个单元格的附件。
Create Additional Table Views
<四> 创建额外的表格视图
If your app displays and manages more than one table view, add those table views to your storyboard. You add a table view by adding a custom UITableViewController object, which contains the table view it manages.
如果你的应用程序显示并管理着不止一个表格视图,把那些表格视图添加到故事板。 你可以通过添加一个自定义UITableViewController对象来添加一个表格视图,该控制器对象包含了它管理的表格视图。
-
In Xcode, choose File > New > File.
Xcode中,选择File > New > File.
-
In the iOS section at the left side of the dialog, select Cocoa Touch.
在iOS区的对话框左边,选择Cocoa Touch.
-
In the main area of the dialog, select Objective-C class, and then click Next.
在对话框的主区域,选择Objective-C class, 然后点击Next。
-
Enter a name for your new class, choose subclass of
UITableViewController, and then click Next.输入新的类名,选择成为UITableViewController的子类,然后点击Next。
-
Choose a save location for your class files, and then click Create.
为你的类文件选择一个保存位置,然后点击Create.
-
Display the storyboard to which you want to add the table view controller.
显示你想向其添加表格视图控制器的故事板。
-
Drag a table view controller out of the object library and drop it on the storyboard.
从对象库中拖动一个表格视图控制器到故事板。
-
With the new scene still selected on the canvas, click the Identity button in the utility area to open the Identity inspector.
选中该新场景,点击实用区的Identity button(身份按钮)来打开身份检查器。
-
In the Custom Class section, choose the new custom class in the Class pop-up menu.
在自定义类区(Custon Class), 选择Class弹出菜单中选中新的自定义类。
-
Set the new table view’s style and cell content (dynamic or static).
设置新表格视图的风格以及单元格内容(dynamic 或 static).
-
Create a segue to the new scene.
创建一个到新场景的segue(推送)。
The details of step 7 vary depending on the project. To learn more about adding segues, see Xcode User Guide.
步骤7的具体内容根据项目的不同有所不同。学习更多关于添加跳转的信息,请看Xcode User Guide.
Note: Populating a table view with data and configuring a table view are discussed in “Populating a Dynamic Table View with Data” and “Optional Table View Configurations.”
注意:用数据填充表格视图以及配置表格视图的内容在以下地方讨论:“Populating a Dynamic Table View with Data” 和 “Optional Table View Configurations.”
Learn More by Creating a Sample App
<五>通过创建一个教程应用程序学习更多
The tutorial Your Second iOS App: Storyboards shows how to create a sample app that is structured around table views. After you complete the steps in this tutorial, you’ll have a working knowledge of how to create both dynamic and static table views using a storyboard. The tutorial creates a basic navigation-based app called BirdWatching that uses table view controllers connected by both push and modal segues.
教程Your Second iOS App: Storyboards 讲述了如何创建一个围绕表格视图的应用程序。当你完成本教程的步骤之后,你将有关于用故事板如何穿件动态和静态表格视图的工作知识。教程创建了一个基本基于导航的应用程序,应用程序名称为BirdWatching, 它被表格视图控制器用推送和模型跳转(model segues)。
Creating a Table View Programmatically
四、通过程序创建一个表格视图
If you choose not to use UITableViewController for table view management, you must replicate what this class gives you “for free.”
如果你选择不使用UITableViewController 来管理表格视图,你必须复写(replicate)该类免费给你提供的东西。
Adopt the Data Source and Delegate Protocols
<一>采用数据源和委托协议
The class creating the table view typically makes itself the data source and delegate by adopting theUITableViewDataSource and UITableViewDelegate protocols. The adoption syntax appears just after the superclass in the @interface directive, as shown in Listing 4-1.
创建表格视图的类通常让它自己成为数据源和委托,它采用UITableViewDataSource 和 UITableViewDelegate 协议。采用协议的语法是把协议放在尖括号里添加到@interface指令中父类的后面,参见列表 4-1.
Listing 4-1 Adopting the data source and delegate protocols
列表 4-1 采用数据源和委托协议
@interface RootViewController : UIViewController <UITableViewDelegate, UITableViewDataSource> |
@property (nonatomic, strong) NSArray *timeZoneNames; |
@end |
Create and Configure a Table View
<二>创建和配置一个表格视图
The next step is for the client to allocate and initialize an instance of the UITableView class. Listing 4-2 gives an example of a client that creates a UITableView object in the plain style, specifies its autoresizing characteristics, and then sets itself to be both data source and delegate. Again, keep in mind that the UITableViewController does all of this for you automatically.
接下来是客户端分配并初始化一个UITableView类的实例。列表 4-2 给出了一个创建一个简朴风格的UITableView 对象的例子,该例子指定了它的自动调整尺寸特性,然后把自己设置为数据源和委托。 请记住UITableViewController会自动替你完成这些工作。
Listing 4-2 Creating a table view
- (void)loadView |
{
|
UITableView *tableView = [[UITableView alloc] initWithFrame:[[UIScreen mainScreen] applicationFrame] style:UITableViewStylePlain]; |
tableView.autoresizingMask = UIViewAutoresizingFlexibleHeight|UIViewAutoresizingFlexibleWidth; |
tableView.delegate = self; |
tableView.dataSource = self; |
[tableView reloadData]; |
self.view = tableView; |
} |
Because in this example the class creating the table view is a subclass of UIViewController, it assigns the created table view to its view property, which it inherits from that class. It also sends a reloadData message to the table view, causing the table view to initiate the procedure for populating its sections and rows with data.
因为该例子中创建表格视图的类是UIViewController的一个子类,它给创建的表格视图一个view属性,该属性从其父类继承。 它还给表格视图发送了一个reloadData消息, 致使表格视图用数据填充它的区和行,完成对程序的初始化。
Populating a Dynamic Table View with Data
五、用数据填充一个动态表格视图
Just after a table view object is created, it receives a reloadData message, which tells it to start querying thedata source and delegate for the information it needs for the sections and rows it displays. The table view immediately asks the data source for its logical dimensions—that is, the number of sections and the number of rows in each section. It then repeatedly invokes the tableView:cellForRowAtIndexPath: method to get a cell object for each visible row; it uses this UITableViewCell object to draw the content of the row. (Scrolling a table view also causes an invocation oftableView:cellForRowAtIndexPath: for each newly visible row.)
当一个表格视图对象被创建,它接收到一个reloadData 消息,该消息让它开始从数据源和委托请求它需要用来显示区和行的信息。 表格视图立即向数据源请求它的逻辑尺寸--就是,区的数量以及每个区中行的数量。然后它重复调用tableView:cellForRowAtIndexPath: 方法来为每个可见行获取一个cell 对象;它使用该UITableViewCell 对象来绘制行的内容。(滚动表格视图还会导致表格视图为新的可见行调用 tableView:cellForRowAtIndexPath:。)
As noted in “Choose the Table View’s Content Type,” if the table view is dynamic then you need to implement the required data source methods. Listing 4-3 shows an example of how the data source and the delegate could configure a dynamic table view.
正如 “Choose the Table View’s Content Type,” 中所说,如果表格视图是动态的,那么你需要实现必需的数据源方法。 列表4-3显示了一个数据源和委托如何配置一个动态表格视图的例子。
Listing 4-3 Populating a dynamic table view with data
- (NSInteger)numberOfSectionsInTableView:(UITableView *)tableView {
|
return [regions count]; |
} |
- (NSInteger)tableView:(UITableView *)tableView numberOfRowsInSection:(NSInteger)section {
|
// Number of rows is the number of time zones in the region for the specified section. |
Region *region = [regions objectAtIndex:section]; |
return [region.timeZoneWrappers count]; |
} |
- (NSString *)tableView:(UITableView *)tableView titleForHeaderInSection:(NSInteger)section {
|
// The header for the section is the region name -- get this from the region at the section index. |
Region *region = [regions objectAtIndex:section]; |
return [region name]; |
} |
- (UITableViewCell *)tableView:(UITableView *)tableView cellForRowAtIndexPath:(NSIndexPath *)indexPath {
|
static NSString *MyIdentifier = @"MyReuseIdentifier"; |
UITableViewCell *cell = [tableView dequeueReusableCellWithIdentifier:MyIdentifier]; |
if (cell == nil) {
|
cell = [[UITableViewCell alloc] initWithStyle:UITableViewCellStyleDefault reuseIdentifier:MyIdentifier]; |
} |
Region *region = [regions objectAtIndex:indexPath.section]; |
TimeZoneWrapper *timeZoneWrapper = [region.timeZoneWrappers objectAtIndex:indexPath.row]; |
cell.textLabel.text = timeZoneWrapper.localeName; |
return cell; |
} |
The data source, in its implementation of the tableView:cellForRowAtIndexPath: method, returns a configured cell object that the table view can use to draw a row. For performance reasons, the data source tries to reuse cells as much as possible. It first asks the table view for a specific reusable cell object by sending it adequeueReusableCellWithIdentifier: message. If no such object exists, the data source creates it, assigning it a reuse identifier. The data source sets the cell’s content (in this example, its text) and returns it. “A Closer Look at Table View Cells” discusses this data source method and UITableViewCell objects in more detail.
该实现中的tableView:cellForRowAtIndexPath: 方法中的数据源返回一个已经配置好的cell对象,表格视图可以使用它来绘制一行。由于性能原因,数据源尝试着尽可能多的重用单元格。 它首先通过发送一个dequeueReusableCellWithIdentifier:消息向表格视图请求一个特定的可重用cell对象。 如果不存在这样的对象,数据源创建它,并给它分配一个重用标示图(reuse identifier)。 数据源设置单元格(cell)的内容(在本例是它的文本),并返回它。“A Closer Look at Table View Cells” 中更详细的讨论了该数据源以及UITableViewCell 对象。
If the dequeueReusableCellWithIdentifier: method asks for a cell that’s defined in a storyboard, the method always returns a valid cell. If there is not a recycled cell waiting to be reused, the method creates a new one using the information in the storyboard itself. This eliminates the need to check the return value for nil and create a cell manually.
如果dequeueReusableCellWithIdentifier: 方法请求一个在故事板中定义的单元格(cell),该方法总是返回一个可用单元格。如果没有一个可循环的单元格能被重用,方法根据故事板中的信息创建一个新cell。这样就消除了检查返回值是否为nil以及手动创建一个单元格的必要。
The implementation of the tableView:cellForRowAtIndexPath: method in Listing 4-3 includes an NSIndexPathargument that identifies the table view section and row. UIKit declares a category of the NSIndexPath class, which is defined in the Foundation framework. This category extends the class to enable the identification of table view rows by section and row number. For more information on this category, see NSIndexPath UIKit Additions.
在列表4-3中的tableView:cellForRowAtIndexPath: 方法实现包含了一个标识表格视图区和行的NSIndexPath 参数。UIKit 声明了一个NSIndexPath类的类别,它被定义在Foundation框架中。 该类别扩展了类,让其能根据区号和行号来识别表格视图的行。 关于该类别的更多信息,请看 NSIndexPath UIKit Additions.
Populating a Static Table View With Data
六、用数据填充一个静态表格视图
As noted in “Choose the Table View’s Content Type,” if a table view is static then you should not implement any data source methods. The configuration of the table view is known at compile time, so UIKit can get this information from the storyboard at runtime. However, you still need to populate a static table view with data from your data model.“Populating a Static Table View With Data” shows an example of how a table view controller could load user data in a static table view. This example is adapted from Your Second iOS App: Storyboards.
正如“Choose the Table View’s Content Type,”中所述,如果一个表格视图是静态的,那么你不应该实现任何数据源方法。表格视图的配置时在编译时被知道,所以UIKit能在运行时(runtime)从故事板获取该信息。然而,你还是需要从数据模型用数据填充一个静态表格视图。“Populating a Static Table View With Data” 显示了一个表格视图控制器如何在一个静态表格视图里加载用户数据。该例子改编自Your Second iOS App: Storyboards。
Listing 4-4 Populating a static table view with data
- (void)viewDidLoad |
{
|
[super viewDidLoad]; |
BirdSighting *theSighting = self.sighting; |
static NSDateFormatter *formatter = nil; |
if (formatter == nil) {
|
formatter = [[NSDateFormatter alloc] init]; |
[formatter setDateStyle:NSDateFormatterMediumStyle]; |
} |
if (theSighting) {
|
self.birdNameLabel.text = theSighting.name; |
self.locationLabel.text = theSighting.location; |
self.dateLabel.text = [formatter stringFromDate:(NSDate*)theSighting.date]; |
} |
} |
The table view is populated with data in the UIViewController method viewDidLoad, which is called after the view is loaded into memory. The data is passed to the table view controller in the sighting object, which is set in the previous view controller’s prepareForSegue:sender: method. The properties birdNameLabel, locationLabel, anddateLabel are outlets connected to labels in the static table view (see Figure 4-4).
在UIViewController 对象的viewDidLoad 方法中用数据填充表格视图。viewDidLoad方法在视图被加载到内存之后才被调用。数据在sighting对象中被传递给表格视图控制器,该对象在前一个视图控制器的prepareForSegue:sender: 方法中被设置。属性birdNameLabel, locationLabel, 以及dateLabel 是静态表格视图中链接到标签(label)的输出口(outlet)。
Populating an Indexed List
七、填充一个索引列表
An indexed list (see Figure 1-2) is ideally suited for navigating large amounts of data organized by a conventional ordering scheme such as an alphabet. An indexed list is a table view in the plain style that is specially configured through three UITableViewDataSource methods:
索引列表(参见图1-2)很适合用来导航庞大数量的数据,这些数据由一个常规的有序方案组织,比如一个字母表。索引列表是一个简朴风格的表格视图,特别是它由三个UITableViewDataSource方法配置而成。
-
sectionIndexTitlesForTableView:Returns an array of the strings to use as the index entries (in order).
返回一个被用作索引入口(entries)的字符串数组(按顺序)。
-
tableView:titleForHeaderInSection:Maps these index strings to the titles of the table view’s sections (they don’t have to be the same).
映射这些索引字符串到表格视图区的标题(它们不必是相同的)。
-
tableView:sectionForSectionIndexTitle:atIndex:Returns the section index related to the entry the user tapped in the index.
返回跟用户在索引中轻击的入口相关的区索引。
The data you use to populate an indexed list should be organized to reflect this indexing model. Specifically, you need to build an array of arrays. Each inner array corresponds to a section in the table. Section arrays are sorted (or collated) within the outer array according to the prevailing ordering scheme, which is often an alphabetical scheme (for example, A through Z). Additionally, the items in each section array are sorted. You can build and sort this array of arrays yourself, but fortunately the UILocalizedIndexedCollation class greatly simplifies the tasks of building and sorting these data structures and providing data to the table view. The class also collates items in the arrays according to the current localization.
你用来填充一个索引列表的数据应该能反映该索引模型。特别是,你需要建立一个包含数组的数组。每个内部数组都跟表格的一个区相关联。外部数组根据通用的排序方案(常常是一个字母表---A 到 Z)排序(或整理)区数组。另外,每个区数组中的数据线都被排序。你可以自己建立并排序该数组的数组,但是幸运地是UILocalizedIndexedCollation类极大的简化了建立和排序这些数据结构的任务,并给表格视图提供了数据。类还根据当前的本地化信息来整理数组中的数据项。
However you internally manage this array-of-arrays structure is up to you. The objects to be collated should have aproperty or method that returns a string value that the UILocalizedIndexedCollation class uses in collation; if it is a method, it should have no parameters. You might find it convenient to define a custom model class whose instances represent the rows in the table view. These model objects not only return a string value but also define a property that holds the index of the section array to which the object is assigned. Listing 4-5 illustrates the definition of a class that declares a name property and a sectionNumber property.
然而由你决定内部管理该数组的数组。 被整理的对象应该有一个属性或方法来返回一个字符串数据,以提供给UILocalizedIndexedCollation 类在整理时使用;如果它是一个方法,则它应该没有参数。 你可能会发现定义一个自定义模型类的实例来代表表格视图中的行很方便。 这些模型对象不仅给分配的对象返回一个字符串值,还定义了一个存储着区数组索引的属性。列表4-5演示了一个类的定义,该类声明了一个name属性,以及一个 sectionNumber 属性。
Listing 4-5 Defining the model-object interface
列表 4-5 定义模型对象接口
@interface State : NSObject |
@property(nonatomic,copy) NSString *name; |
@property(nonatomic,copy) NSString *capitol; |
@property(nonatomic,copy) NSString *population; |
@property NSInteger sectionNumber; |
@end |
Before your table view controller is asked to populate the table view, you load the data to be used (from whatever source) and create instances of your model class from this data. The example in Listing 4-6 loads data defined in a property list and creates the model objects from that. It also obtains the shared instance ofUILocalizedIndexedCollation and initializes the mutable array (states) that will contain the section arrays.
在表格视图控制器填充表格视图之前,你加载要用的数据(从任何源)并用该数据创建模型类的实例。列表4-6加载了定义在一个属性列表中的数据并用它创建模型对象。它还获得 UILocalizedIndexedCollation的共享实例,并初始化将容纳区数组的可变数组(states)。
Listing 4-6 Loading the table-view data and initializing the model objects
列表 4-6 加载表格视图数据并初始化模型对象
- (void)viewDidLoad {
|
[super viewDidLoad]; |
UILocalizedIndexedCollation *theCollation = [UILocalizedIndexedCollation currentCollation]; |
self.states = [NSMutableArray arrayWithCapacity:1]; |
NSString *thePath = [[NSBundle mainBundle] pathForResource:@"States" ofType:@"plist"]; |
NSArray *tempArray; |
NSMutableArray *statesTemp; |
if (thePath && (tempArray = [NSArray arrayWithContentsOfFile:thePath]) ) {
|
statesTemp = [NSMutableArray arrayWithCapacity:1]; |
for (NSDictionary *stateDict in tempArray) {
|
State *aState = [[State alloc] init]; |
aState.name = [stateDict objectForKey:@"Name"]; |
aState.population = [stateDict objectForKey:@"Population"]; |
aState.capitol = [stateDict objectForKey:@"Capitol"]; |
[statesTemp addObject:aState]; |
} |
} else {
|
return; |
} |
After the data source has this “raw” array of model objects, it can process it with the facilities of theUILocalizedIndexedCollation class. In Listing 4-7, the code is annotated with numbers.
当数据源有模型对象的这种“原始”数组之后,它就可以用UILocalizedIndexedCollation类的功能来处理它。列表4-7中,代码用数字进行了标记。
Listing 4-7 Preparing the data for the indexed list
// viewDidLoad continued... |
// (1) |
for (State *theState in statesTemp) {
|
NSInteger sect = [theCollation sectionForObject:theState collationStringSelector:@selector(name)]; |
theState.sectionNumber = sect; |
} |
// (2) |
NSInteger highSection = [[theCollation sectionTitles] count]; |
NSMutableArray *sectionArrays = [NSMutableArray arrayWithCapacity:highSection]; |
for (int i = 0; i < highSection; i++) {
|
NSMutableArray *sectionArray = [NSMutableArray arrayWithCapacity:1]; |
[sectionArrays addObject:sectionArray]; |
} |
// (3) |
for (State *theState in statesTemp) {
|
[(NSMutableArray *)[sectionArrays objectAtIndex:theState.sectionNumber] addObject:theState]; |
} |
// (4) |
for (NSMutableArray *sectionArray in sectionArrays) {
|
NSArray *sortedSection = [theCollation sortedArrayFromArray:sectionArray |
collationStringSelector:@selector(name)]; |
[self.states addObject:sortedSection]; |
} |
} // end of viewDidLoad |
Here's what the code in Listing 4-7 does:
以下是列表4-7中代码解析:
-
The data source enumerates the array of model objects and sends
sectionForObject:collationStringSelector:to the collation manager on each iteration. This method takes as arguments a model object and a property or method of the object that it uses in collation. Each call returns the index of the section array to which the model object belongs, and that value is assigned to thesectionNumberproperty.数据源遍历了模型对象中的数组并给每个循环的(collation manager)发送 sectionForObject:collationStringSelector:方法。 该方法包含两个参数:一个模型对象,以及一个对象属性或方法以在整理(collation)中使用. 每次调用都给模型对象所述对象返回区数组的索引,该索引值被分配给sectionNumber属性。
-
The data source source then creates a (temporary) outer mutable array and mutable arrays for each section; it adds each created section array to the outer array.
数据源然后为每个区创建一个(临时)外部可变数组和多个可变数组;它把每个创建的区数组添加到外部数组。
-
It then enumerates the array of model objects and adds each object to its assigned section array.
然后它遍历模型对象中的数组并把每个对象添加到它分配的区数组中。
-
The data source enumerates the array of section arrays and calls
sortedArrayFromArray:collationStringSelector:on the collation manager to sort the items in each array. It passes in a section array and a property or method that is to be used in sorting the items in the array. Each sorted section array is added to the final outer array.数据源遍历区数组的数组并调用collation manager的
sortedArrayFromArray:collationStringSelector:方法排序每个数组中的数据项。它需要传入一个区数组以及一个用来排序数组中数据项的属性或方法。每个排序好的区数组被添加到最终的外部数组中。
Now the data source is ready to populate its table view with data. It implements the methods specific to indexed lists as shown in Listing 4-8. In doing this it calls two UILocalizedIndexedCollation methods: sectionIndexTitles andsectionForSectionIndexTitleAtIndex:. Also note that in tableView:titleForHeaderInSection: it suppresses any headers from appearing in the table view when the associated section does not have any items.
现在数据源已经准备好用数据填充它的表格视图。 它实现指定给有序列表的方法,参见列表4-8. 实现时,它调用两个UILocalizedIndexedCollation 方法: sectionIndexTitles 方法以及 sectionForSectionIndexTitleAtIndex:方法。还要注意在tableView:titleForHeaderInSection: 方法中,当相关区没有任何数据项时,该方法还阻止区头显示在表格视图中。
Listing 4-8 Providing section-index data to the table view
列表 4-8 给表格视图提供区索引数据
- (NSArray *)sectionIndexTitlesForTableView:(UITableView *)tableView {
|
return [[UILocalizedIndexedCollation currentCollation] sectionIndexTitles]; |
} |
- (NSString *)tableView:(UITableView *)tableView titleForHeaderInSection:(NSInteger)section {
|
if ([[self.states objectAtIndex:section] count] > 0) {
|
return [[[UILocalizedIndexedCollation currentCollation] sectionTitles] objectAtIndex:section]; |
} |
return nil; |
} |
- (NSInteger)tableView:(UITableView *)tableView sectionForSectionIndexTitle:(NSString *)title atIndex:(NSInteger)index |
{
|
return [[UILocalizedIndexedCollation currentCollation] sectionForSectionIndexTitleAtIndex:index]; |
} |
Accessibility Note: To change what VoiceOver reads aloud when the indexed list is selected, assign a localized string to the accessibilityLabel property of each item in the array that sectionIndexTitlesForTableView:returns.
无障碍注意事项:当索引列表被选中时,要想改变VoiceOver朗读,给 sectionIndexTitlesForTableView:返回的数组中的每个数据项的 accessibilityLabel 属性分配一个本地化字符串(localized string).
Finally, the data source should implement the UITableViewDataSource methods that are common to all table views.Listing 4-9 gives examples of these implementations, and illustrates how to use the section and row properties of the table view–specific category of the NSIndexPath class described in NSIndexPath UIKit Additions.
最后,数据源应该实现UITableViewDataSource方法,该方法对所有表格视图通用。列表4-9 给出了这些实现,并显示了如何使用表格视图的section 和 row 属性。NSIndexPath 类的特定类别的描述,请看NSIndexPath UIKit Additions.
Listing 4-9 Populating the rows of an indexed list
- (NSInteger)numberOfSectionsInTableView:(UITableView *)tableView {
|
return [self.states count]; |
} |
- (NSInteger)tableView:(UITableView *)tableView numberOfRowsInSection:(NSInteger)section {
|
return [[self.states objectAtIndex:section] count]; |
} |
- (UITableViewCell *)tableView:(UITableView *)tableView cellForRowAtIndexPath:(NSIndexPath *)indexPath {
|
static NSString *CellIdentifier = @"StateCell"; |
UITableViewCell *cell; |
cell = [tableView dequeueReusableCellWithIdentifier:CellIdentifier]; |
if (cell == nil) {
|
cell = [[UITableViewCell alloc] initWithStyle:UITableViewCellStyleDefault reuseIdentifier:CellIdentifier]; |
} |
State *stateObj = [[self.states objectAtIndex:indexPath.section] objectAtIndex:indexPath.row]; |
cell.textLabel.text = stateObj.name; |
return cell; |
} |
For table views that are indexed lists, when the data source assigns cells for rows intableView:cellForRowAtIndexPath:, it should ensure that the accessoryType property of the cell is set toUITableViewCellAccessoryNone.
对于索引序列表格视图,当数据源tableView:cellForRowAtIndexPath: 方法里为行分配单元格时,它应该确保单元格的accessoryType 属性被设置为UITableViewCellAccessoryNone.
After initially populating the table view following the procedure outlined above, you can reload the contents of the index by calling the reloadSectionIndexTitles method.
按照上面所述过程完成最初表格视图填充之后,你可以调用 reloadSectionIndexTitles 方法来重载索引的内容。
Optional Table View Configurations
八、可选的表格视图配置
The table view API allows you to configure various visual and behavioral aspects of a table view, including specific rows and sections. The following examples serve to give you some idea of the options available to you.
表格视图API允许你配置表格视图不同的视觉效果以及行为方面,包括特殊的行和区。以下例子为你提供一些可能有用的选项。
Add a Custom Title
<一>添加一个自定义标题
In the same block of code that creates the table view, you can apply global configurations using certain methods of theUITableView class. The code example in Listing 4-10 adds a custom title for the table view (using a UILabel object).
在创建表格视图的同一个块代码中,你可以使用UITableView 类的特定方法实现一些全局配置。列表4-10中的代码给表格视图添加一个自定义标题(使用一个UILabel 对象)。
Listing 4-10 Adding a title to the table view
- (void)loadView |
{
|
CGRect titleRect = CGRectMake(0, 0, 300, 40); |
UILabel *tableTitle = [[UILabel alloc] initWithFrame:titleRect]; |
tableTitle.textColor = [UIColor blueColor]; |
tableTitle.backgroundColor = [self.tableView backgroundColor]; |
tableTitle.opaque = YES; |
tableTitle.font = [UIFont boldSystemFontOfSize:18]; |
tableTitle.text = [curTrail objectForKey:@"Name"]; |
self.tableView.tableHeaderView = tableTitle; |
[self.tableView reloadData]; |
} |
Provide a Section Title
<二> 提供一个区标题
The example in Listing 4-11 returns a title string for a section.
列表4-11中的例子为区返回一个标题字符串。
Listing 4-11 Returning a title for a section
- (NSString *)tableView:(UITableView *)tableView titleForHeaderInSection:(NSInteger)section {
|
// Returns section title based on physical state: [solid, liquid, gas, artificial] |
return [[[PeriodicElements sharedPeriodicElements] elementPhysicalStatesArray] objectAtIndex:section]; |
} |
Indent a Row
<三> 行缩进
The code in Listing 4-12 moves a specific row to the next level of indentation.
列表4-12代码把一个特定行缩进到下一个层次。
Listing 4-12 Custom indentation of a row
- (NSInteger)tableView:(UITableView *)tableView indentationLevelForRowAtIndexPath:(NSIndexPath *)indexPath {
|
if ( indexPath.section==TRAIL_MAP_SECTION && indexPath.row==0 ) {
|
return 2; |
} |
return 1; |
} |
Vary a Row’s Height
<四> 改变行高
The example in Listing 4-13 varies the height of a specific row based on its index value.
列表4-13中的例子根据它的索引值改变一个特定行的行高。
Listing 4-13 Varying row height
- (CGFloat)tableView:(UITableView *)tableView heightForRowAtIndexPath:(NSIndexPath *)indexPath |
{
|
CGFloat result; |
switch ([indexPath row]) |
{
|
case 0: |
{
|
result = kUIRowHeight; |
break; |
} |
case 1: |
{
|
result = kUIRowLabelHeight; |
break; |
} |
} |
return result; |
} |
Customize Cells
<五> 定制单元格
You can also affect the appearance of rows by returning custom UITableViewCell objects with specially formatted subviews for content in tableView:cellForRowAtIndexPath:. Cell customization is discussed in “A Closer Look at Table View Cells.”
你还可以在tableView:cellForRowAtIndexPath: 方法中为内容返回带有特殊格式的自定义UITableViewCell 对象来影响行的外形。单元格的定制在 “A Closer Look at Table View Cells.”中讨论。


 浙公网安备 33010602011771号